25 Stunning Christmas Sideboard Decor Ideas for 2026 That Will Transform Your Home

Still scrolling through Pinterest at midnight, pinning gorgeous holiday vignettes, yet your own sideboard sits bare? You’re not alone — and the secret isn’t more stuff, it’s a sharper eye. We spent serious time browsing Wayfair, Anthropologie, and CB2 to bring you only what’s worth your attention this year, covering everything from luxurious gold-and-leopard numbers to serene modern nativities and rustic farmhouse charm. Inside, you’ll find 25 distinct ideas pulled from real homes, blending elegant, traditional, modern, and whimsical styles — each with the specific details that make it sing. In 2026, the shift is away from generic mass-produced displays toward deeply personal, layered collections that tell a story — and your sideboard is the perfect stage. And stay until the end — we break down the most common mistakes that can ruin these looks. Pin this guide for later — your future self will thank you when it’s time to actually do this.
1. Rich Gold Bar Cart Meets Leopard Print Luxe
The leopard print cloche and tumblers are doing some serious heavy lifting here, introducing an unexpected pattern that saves the gold and red palette from feeling predictable. In design terms, this is a masterclass in breaking visual repetition — the warm brown wood sideboard with gold ring pulls establishes a refined base, the deep green garland and red ornaments deliver classic Christmas saturation, and then the leopard print crashes the party in the best possible way. It’s the design equivalent of wearing a vintage fur stole over a silk gown. The illuminated clear and amber glass Christmas trees add vertical structure and a soft glow that keeps the barware from feeling too clubby. The risk with mixing this many metallic and rich tones is veering into gaudy territory, but the dark wood grounding element pulls it back to sophisticated.
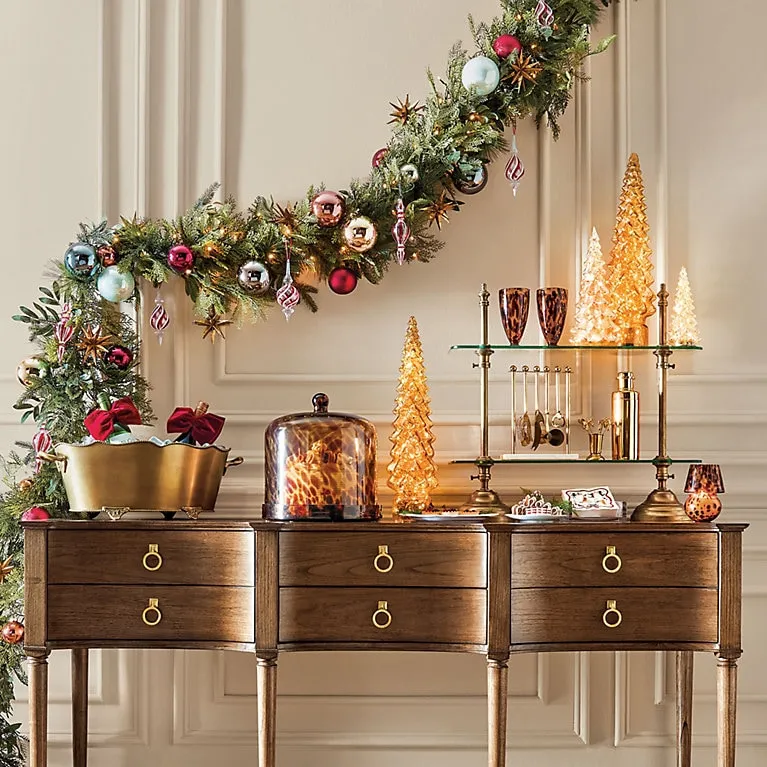
“This entire mood swings on one element: the leopard print cloche.”
Without it, you’d have a perfectly nice, slightly predictable elegant Christmas setup. With it? You have a statement. It bridges the gap between the organic warmth of the wood garland and the cool luxury of the gold barware stand and ice bucket. If you were to swap it for a plain glass cloche, the arrangement would lose about 70% of its personality. That’s the power of one unexpected texture — it rewrites the entire room’s vocabulary from “holiday party” to “fashion editor’s holiday party.”
2. Serene Wooden Nativity With a Whitewashed Village
This is the anti-bling Christmas moment that’s been quietly building on Pinterest for two years and is now everywhere in 2026. After seasons of metallic overload and neon-trimmed maximalism, the pendulum has swung toward quieter, more grounded displays. A dark grey-black sideboard anchors an arrangement of white, silver, and woven conical trees interspersed with soft faux evergreen garland — but the central wooden nativity set is the emotional core. It’s not about religiosity necessarily; it’s about the cultural craving for handmade imperfection, as a counterbalance to algorithmically perfect digital lives. The carved wooden animal and human figures tap into the same biophilic design principle that makes houseplants so comforting: natural materials calm our nervous systems. Expect this style to have serious staying power because it’s rooted in texture, not trends.
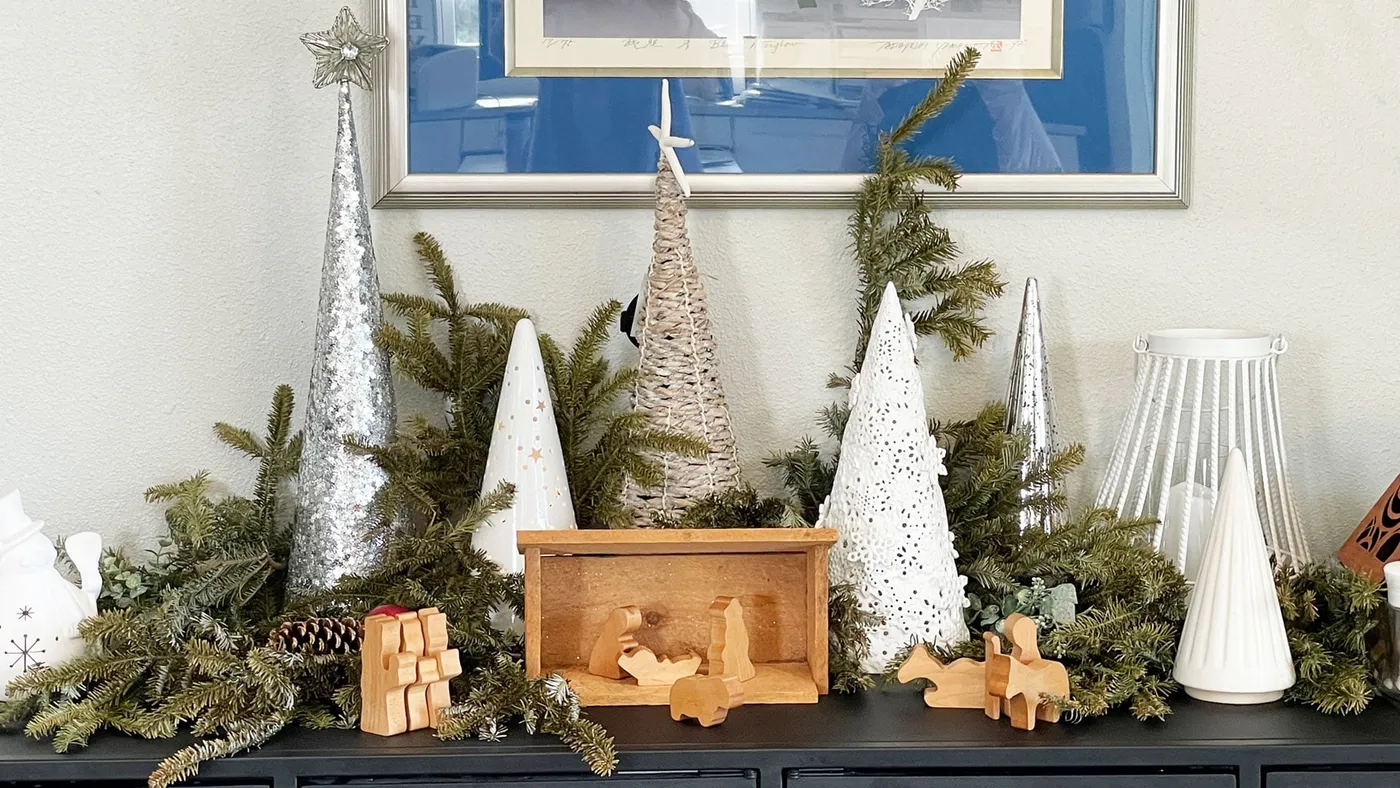
“This idea sings when the sideboard is at least 5 feet wide and sits against a wall with some breathing room — you need about 18 inches of depth for the layered trees and nativity figures to read properly.”
If your sideboard is under 4 feet, this exact arrangement will feel cramped; try paring it down to just three conical trees and the nativity centered on a single garland runner. Compare this with the winter wonderland in Idea #8 — that version uses similar conical trees but spreads them across a wider surface, while this one creates a tighter, more intimate cluster. The white open lantern with a candle works on any scale, but make sure your ceiling height is at least 8 feet, or the vertical trees will feel squashed.
3. Farmhouse Baking Station With Plaid and Pie
Let’s address the microwave on the sideboard: yes, it’s doing triple duty as decor, appliance, and prop. And honestly? It works because the red berry garland above and the small decorated Christmas tree beside it frame it as intentional, not accidental. But here’s the reality check: if your sideboard doesn’t have an outlet within 18 inches, you’re running an extension cord across your floor, which kills the magic. This setup needs a white farmhouse-style piece with a light wood countertop (the X-panel doors and brass knobs are doing foundational work), and it thrives in kitchens where the sideboard lives against a window wall — that holiday wreath reflection in the glass doubles the festive energy. If you have toddlers who treat every surface like a climbing wall, keep that hot pie inaccessible and consider swapping the microwave for a faux bread display. The red and white plaid runner and towel are doing the heavy lifting on the “cozy” factor — without plaid, this is just appliances on furniture.
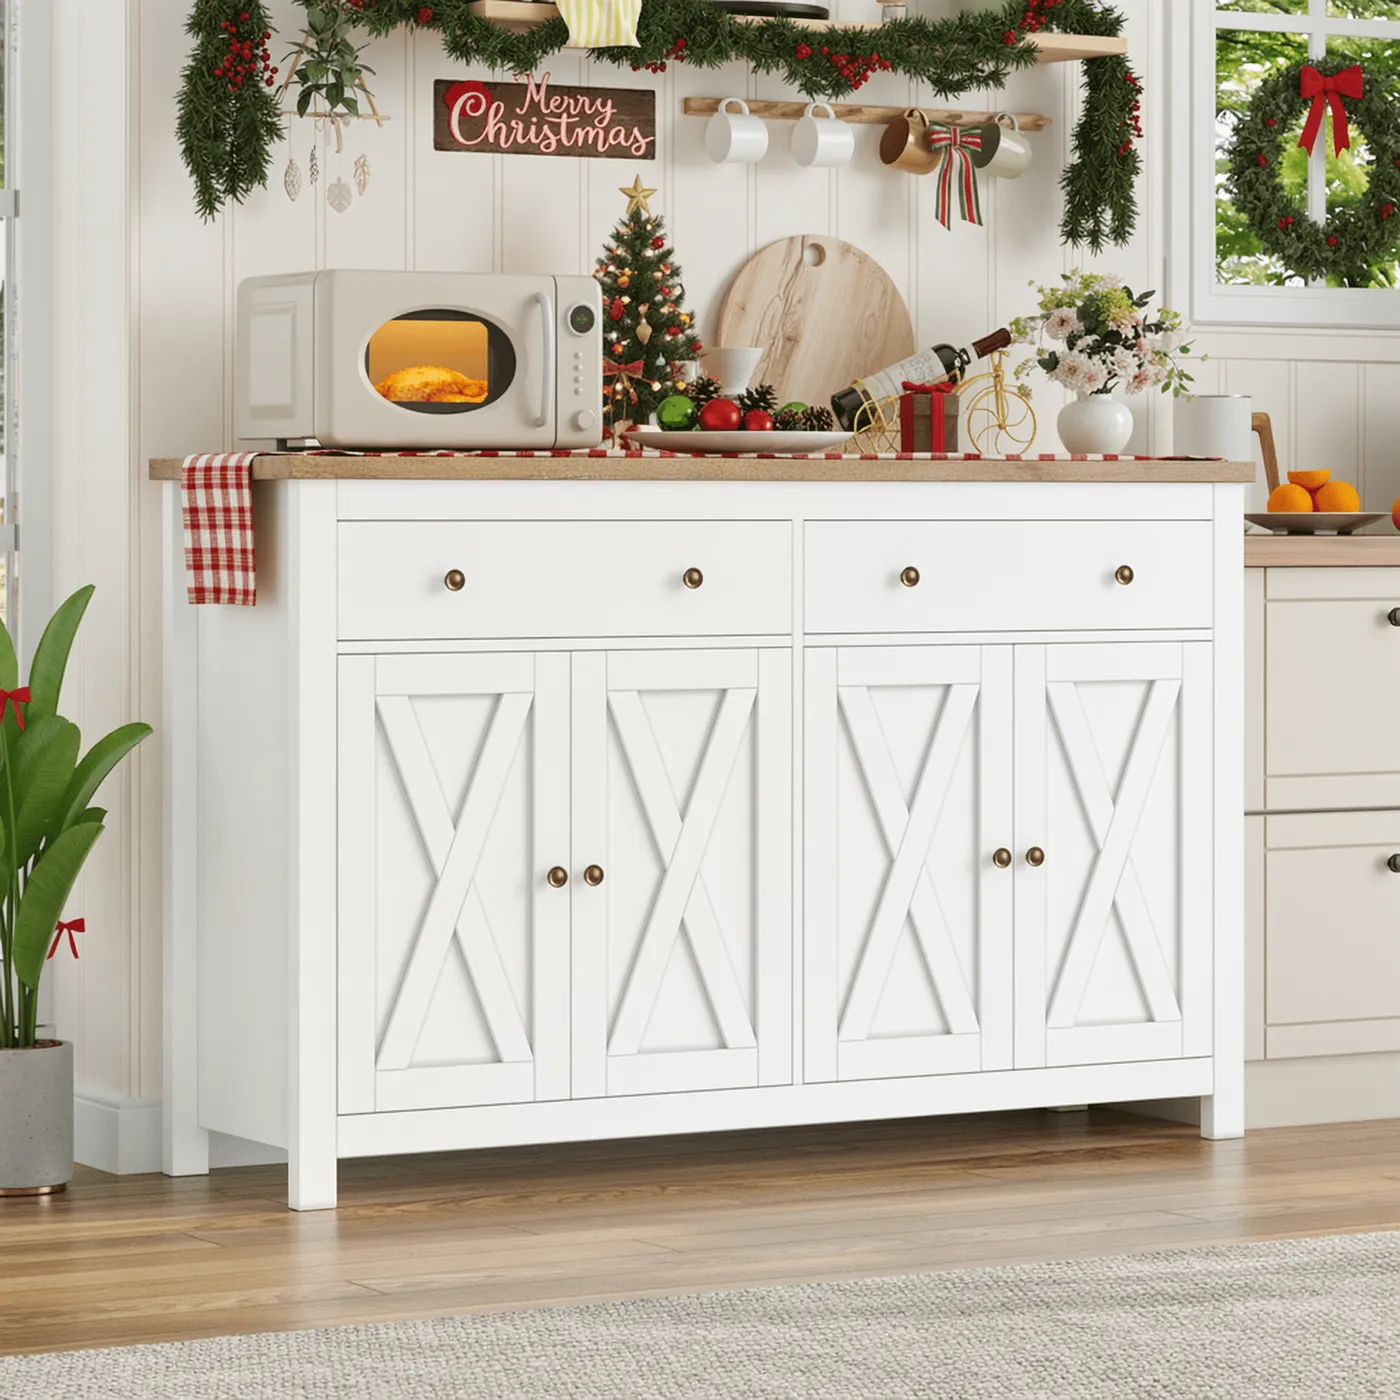
“The visual recipe here is refreshingly simple: 50% white base (sideboard, walls, window trim) + 25% natural wood and brass (countertop, knobs, window frame) + 15% deep green (tree, garland, wreath) + 10% Christmas red (berries, plaid runner, towel).”
The genius is in the red distribution — it’s not a solid block, it’s dotted around the scene so your eye bounces from berries to plaid to towel in a triangle. Want to adapt this for a less traditional palette? Swap the red for blush pink and the deep green for eucalyptus — same percentages, totally different 2026 vibe.
4. Ribbon-Wrapped Garland With a Dreamy Neutral Palette
This farmhouse Christmas sideboard leans hard into Emily Henderson’s signature ribbon hack and that covetable dream color palette. When wrapping ribbon around a garland, cut strips at 22-inch lengths and knot them loosely every 8 inches along the greenery — this creates volume without looking fussy, and you’ll use about 30% less ribbon than a tight wrap. The secret here is in the draping tension: let the garland sag naturally between attachment points (about 6 inches of droop per foot of length), which reads as effortless rather than over-styled. The creamy neutral backdrop lets the ribbon textures — likely velvets and raw linens — take center stage without any single element screaming for attention.
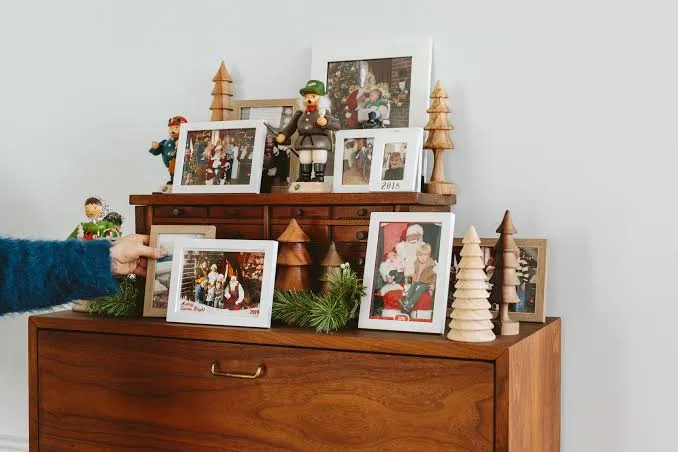
“That dreamy cream-and-wood palette is gorgeous, but let’s talk about what happens after Christmas dinner.”
Light-colored ribbon and fabric garland against a sideboard surface that sees food, drinks, and wandering hands: expect to spot-clean with a damp microfiber cloth after every gathering. Faux greenery sheds micro-dust that shows up mercilessly on white surfaces — budget 10 minutes weekly for a quick vacuum with the brush attachment. If the ribbon is silk or rayon velvet, it’ll crush where it touches the sideboard; rotate it 90 degrees when you notice flattening. For a lower-maintenance version that keeps the same feel, swap fabric ribbons for wired burlap ribbon (sheds less, holds shape better after crushing) and use preserved eucalyptus instead of faux pine — it doesn’t drop nearly as much particulate.
5. Glitter Banner Energy Above a Black Glass Console
That gold glitter “Oh What Fun” banner is the anchor of this entire modern display, but you can recreate the precise look without hunting down retail store signage. Here’s how to DIY a version that looks equally polished:
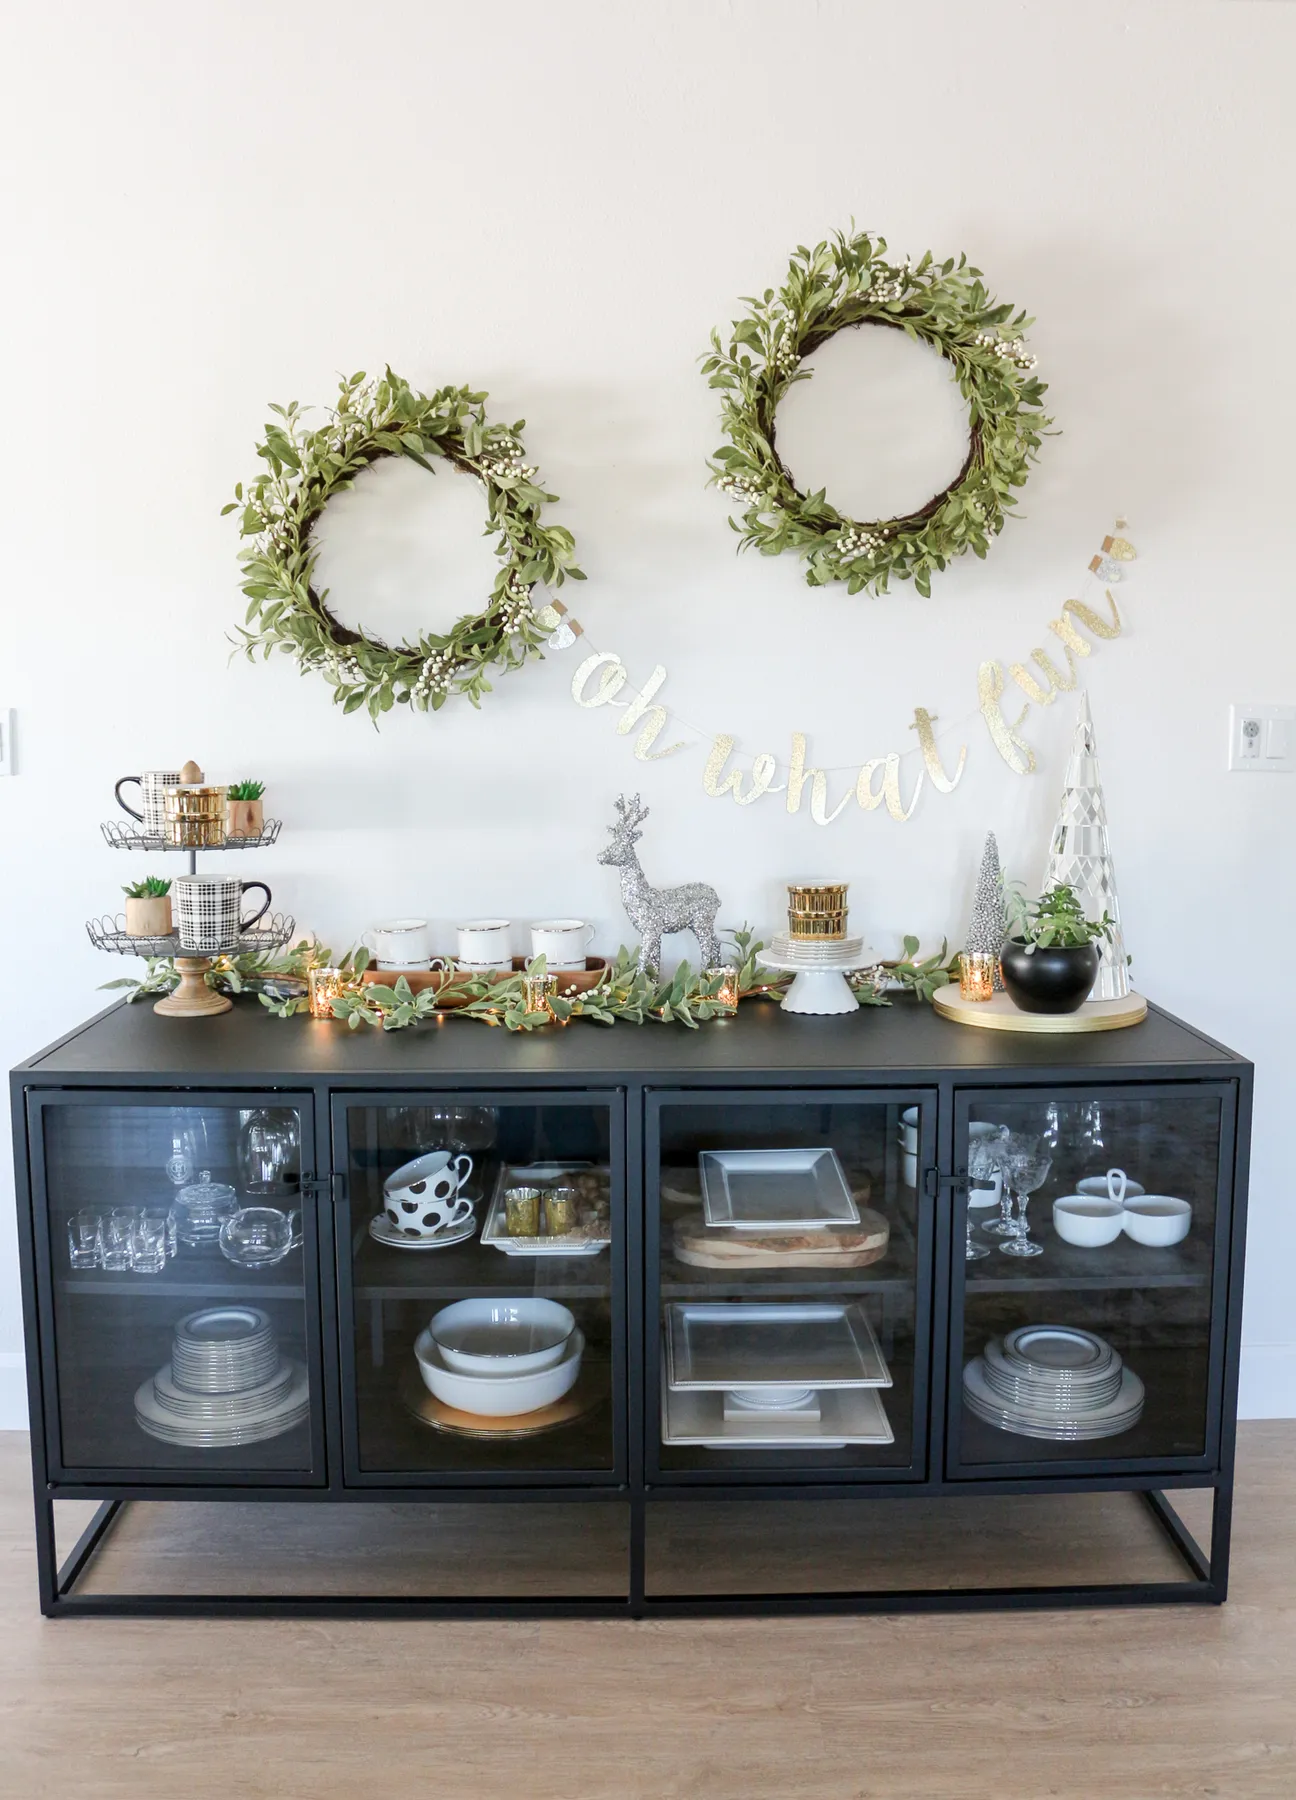
“Cut 6 rectangles of heavy chipboard at 8×10 inches — this weight holds up to gli”
- Cut 6 rectangles of heavy chipboard at 8×10 inches — this weight holds up to glitter without warping.
- Paint one side with Mod Podge in a thick, even layer using a foam brush (takes about 3 minutes per board).
- Sprinkle chunky gold glitter generously while the Mod Podge is still wet; let dry flat for 2 hours.
- Use adhesive vinyl letters in a clean sans-serif font — 4-inch height — and press firmly onto each board.
- Punch two holes in the top corners of each board and thread 1/4-inch black satin ribbon through, tying bows between letters.
- Hang with 3M Command hooks rated for 3 pounds each — the chipboard + glitter combo is heavier than it looks.
Total material cost: about $18 — far less than pre-made glitter banners of this scale. Time from start to hanging: roughly 3 hours including drying time.
High-end tiered tray styling doesn’t require high-end sourcing. The black glass-front sideboard is likely a pricier investment piece, but everything on it has thriftable alternatives. Check Facebook Marketplace for tiered metal and wood trays — they show up constantly for $12-25 because people buy them for parties and declutter afterward. Those white and gold metallic candles? Target’s Threshold line carries nearly identical pillar candles at $8 each versus the $22+ versions at specialty shops. The silver deer and tree figurines are standard thrift store fare in November-December; I’ve found whole sets for under $15. The only element worth spending on: quality fairy lights with a warm white glow (2700K) rather than cool blue-tinted LEDs. Those run about $18 per 20-foot strand and matter more than everything else combined for that elegant, bright atmosphere. You can nail this entire look for around $95, sideboard excluded.
6. Gingerbread Houses and Watercolor Softness on Dark Wood
The large framed floral watercolor painting in soft pink and navy blue is doing something subtle but essential here: it’s softening the entire display so it reads as “cozy traditional home” rather than “bakery window display.” Without it, the gingerbread houses, dessert parfaits, and ginger cookies would feel like a catering setup. The painting pulls in the pink tones from the cookies and the blue notes from the shadows, creating a visual bridge between the dark wood sideboard with ornate brass handles and the fresh green evergreen wreath and branches. It’s also solving a practical problem: that wall space above a sideboard can feel like a dead zone. The art fills it without competing with the three-dimensional elements below. If you have a sideboard against a blank wall, consider this your permission to hang something soft and unexpected above it — not just another mirror or wreath.
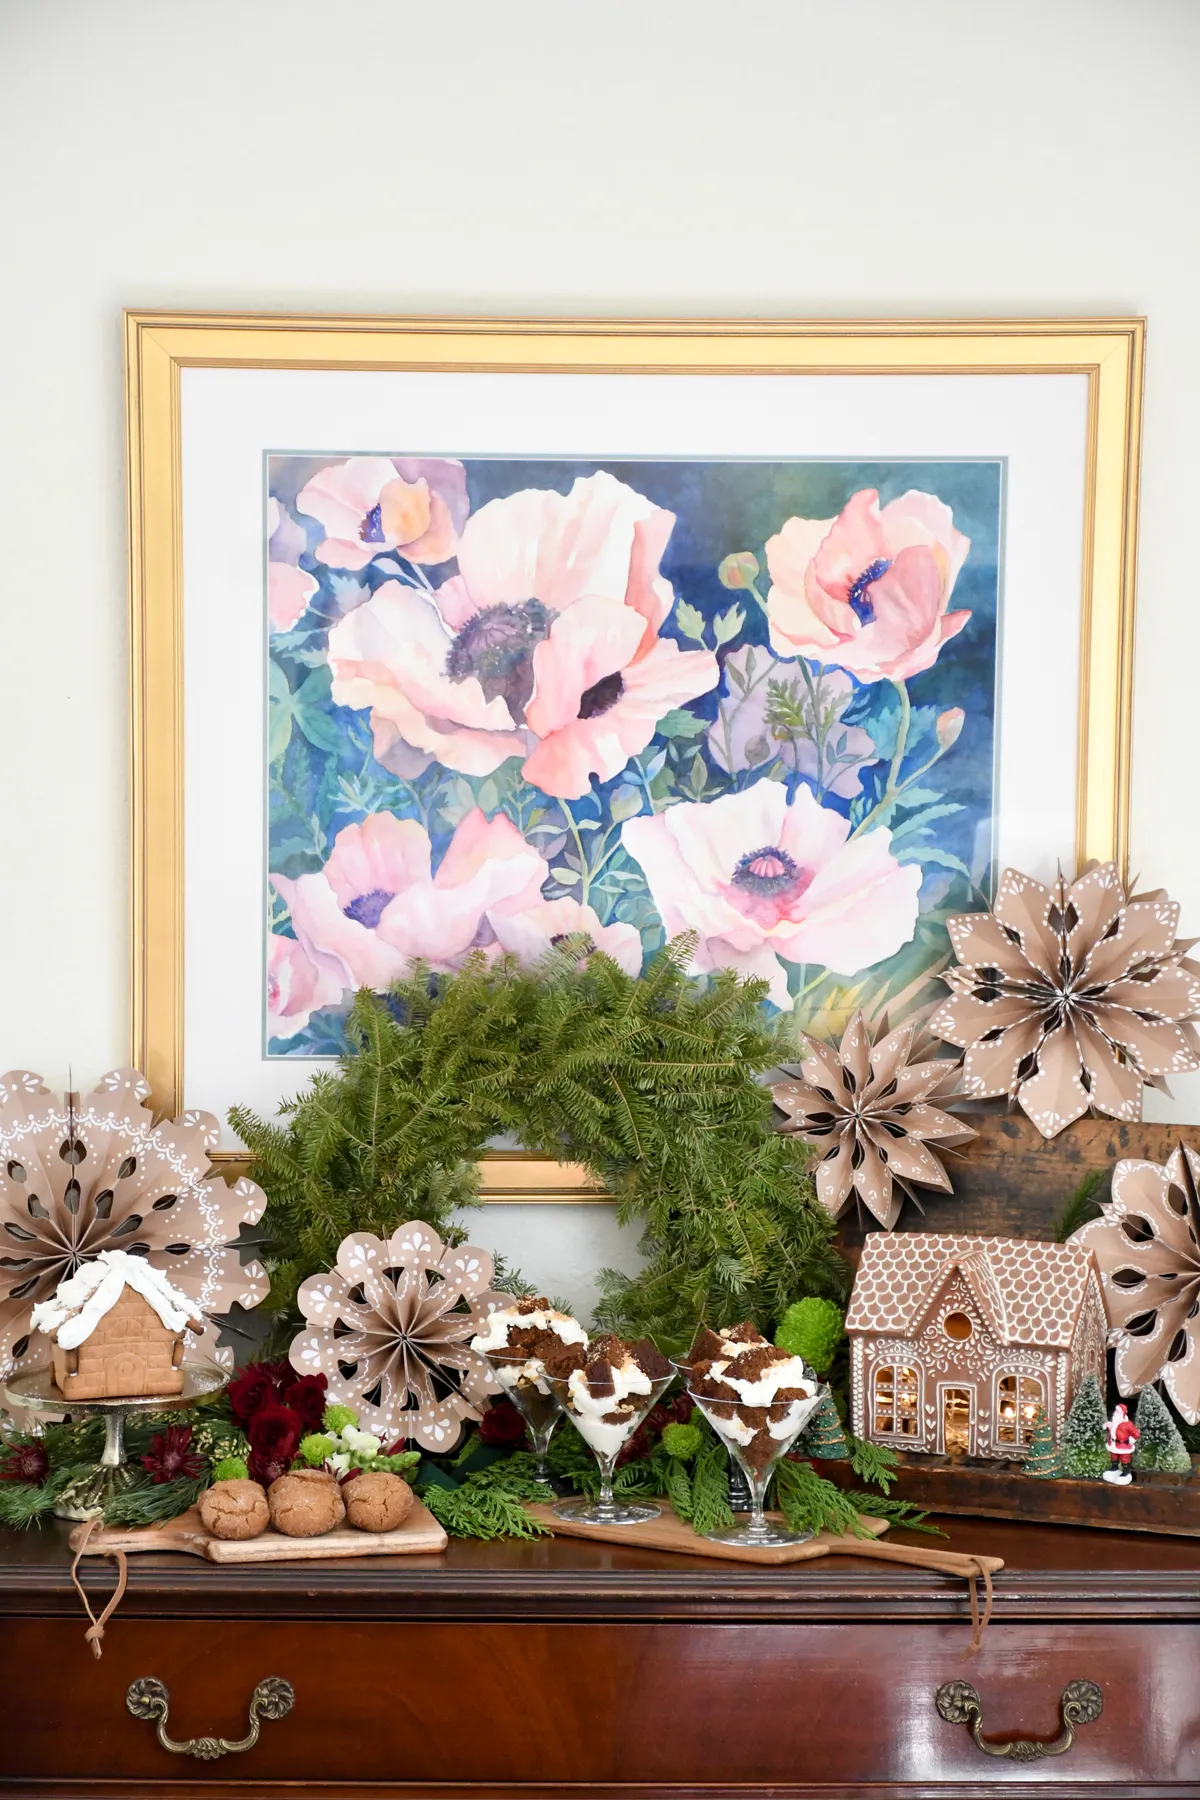
“Real gingerbread houses as decor are charming for exactly 48 hours before humidity, curious pets, or tiny curious fingers start the clock on their decline.”
If your home runs above 50% humidity (hello, kitchens and dining rooms near cooking zones), the gingerbread will soften and the icing will weep — you’ll get about 3 days before structural sagging begins. The illuminated house with a light inside generates heat that accelerates this timeline. My honest recommendation: build the display with real gingerbread for one evening if you’re hosting, then swap to ceramic or wooden gingerbread houses for the rest of the season. The brown paper snowflake decorations with white patterns are genius — they’re essentially free decor that reads as intentional Scandinavian-inspired crafting, and they’ll last the entire season if kept away from direct heat sources. The fresh greenery will need misting every other day to stay vibrant, so factor that into your sideboard access pattern.
7. Teal Textured Ceramics Against a Mid-Century Silhouette
This arrangement works because of a tightly controlled principle called color echo — that deep teal appears in the large textured lamp, the matching vase holding bare winter branches, the ceramic Christmas tree planter, and even the ornaments on the full-size tree. But it never overwhelms because each application uses a different texture (ribbed ceramic, matte finish, glossy ornament) rather than a flat solid color. The warm brown wood of the mid-century modern sideboard provides the necessary warmth to keep the teal-silver-white palette from feeling cold. The bare winter branches in the teal vase are a particularly smart choice — they introduce organic asymmetry in a room that could otherwise feel too “styled,” and their sculptural quality echoes the clean lines of the mid-century furniture. The white ceramic Christmas tree figurines on the sideboard are direct nods to vintage holiday decor, tying the past to the present.
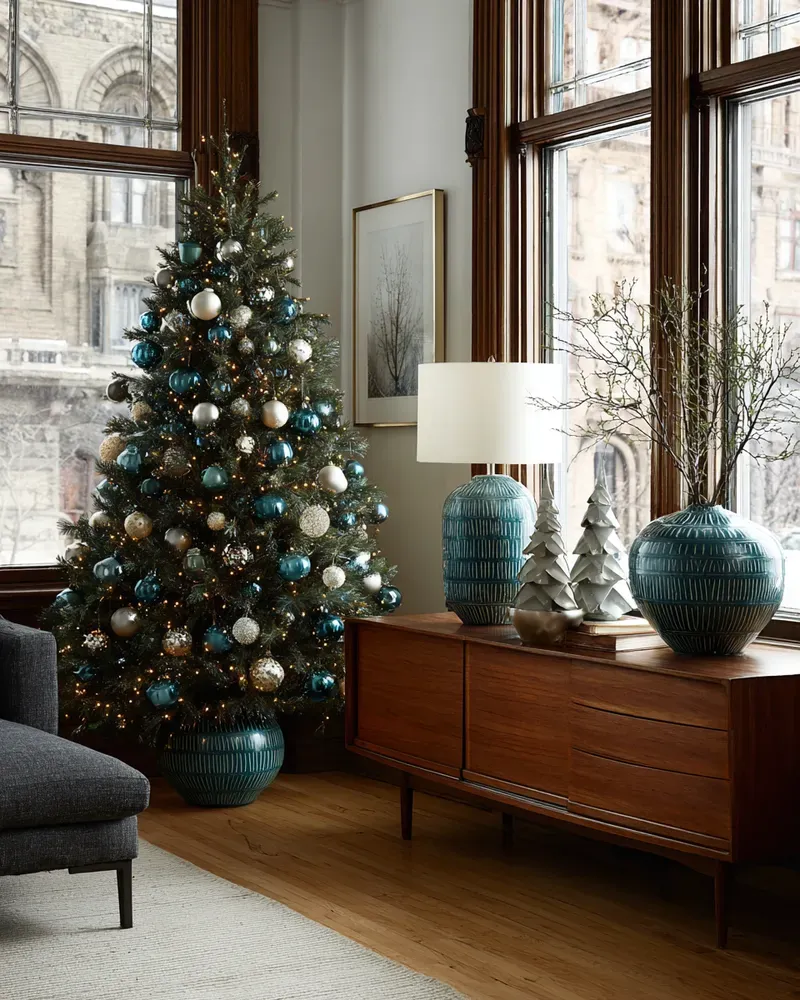
“This idea requires a sideboard at least 60 inches long to accommodate the lamp, vases, and figurines without crowding.”
More importantly, the full-size decorated tree to the right means the sideboard needs to sit in a room with at least 9-foot ceilings — that tree in a matching teal planter demands vertical clearance. If your room has standard 8-foot ceilings, scale the tree down to 5.5 feet and position it on a low table rather than the floor so the visual relationship with the sideboard still works. This is the sophisticated cousin of the winter wonderland in Idea #8 — both use cool palettes and sculptural elements, but this one trades the snowy whites for deep teal saturation, creating a more intimate, evening-friendly atmosphere.
8. Conical Silver Trees and a Framed Winter Artwork
The winter wonderland trend has evolved significantly for 2026 — it’s no longer about plastering every surface in fake snow and glitter. This display gets it right by mixing conical trees in three distinct textures (silver glitter for sparkle, white textured for softness, woven natural for grounding) against a backdrop that includes a framed blue winter tree artwork. That art is pulling double duty: it sets the cool-toned palette expectation from the start and it visually expands the room by creating depth beyond the sideboard surface. The wooden nativity figures and white ceramic snowman keep the display from feeling like a department store window — they’re imperfect, hand-touched shapes that read as collected over time rather than purchased in one trip. This is the look that’s dominating Pinterest searches for “calm Christmas decor” — people are craving serene, not stimulating.
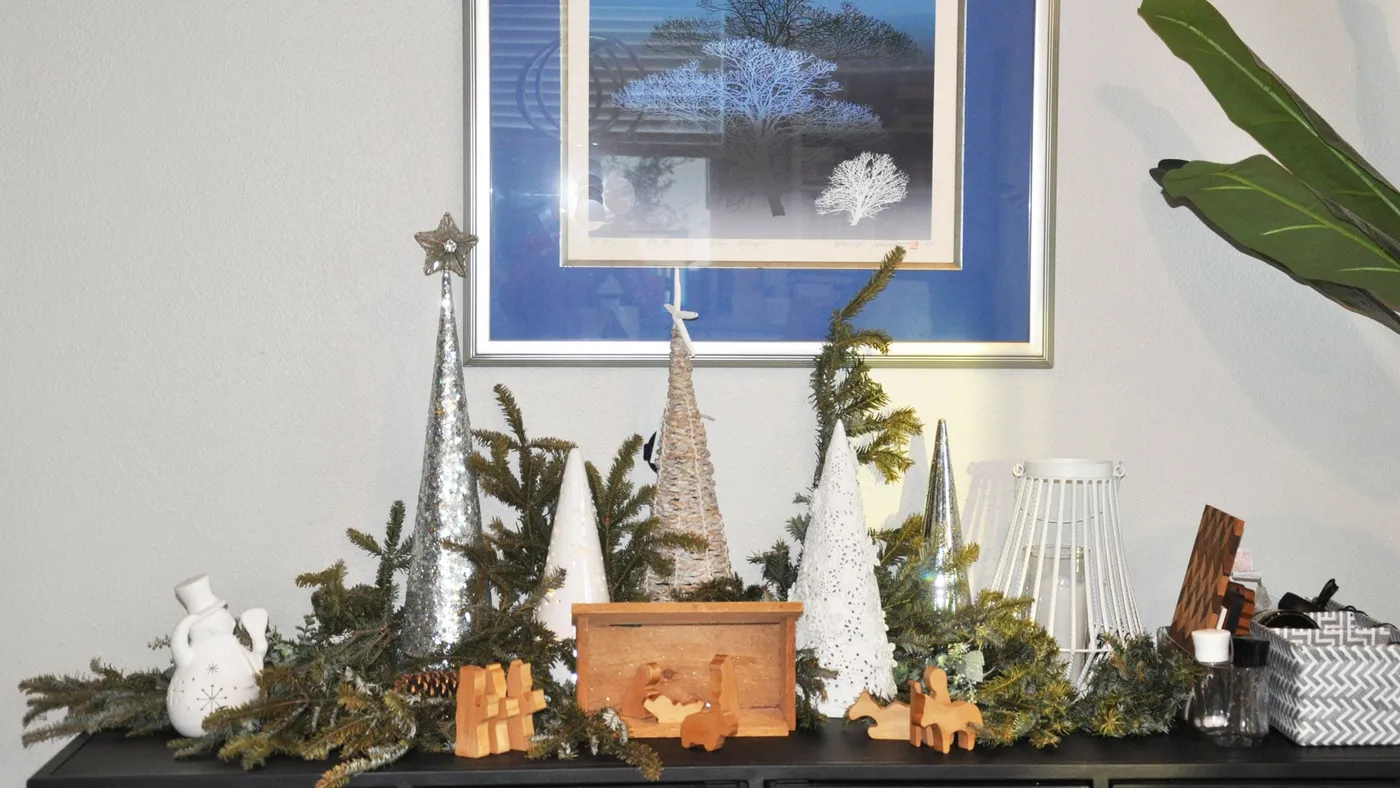
“Getting those conical trees to actually stay standing through holiday traffic — kids, pets, reaching for things behind them — requires more than just setting them on the faux evergreen garland.”
Here’s the method:
- Place small squares of museum gel (about a dime-sized amount) under the base of each tree.
- Press down firmly for 5 seconds; this creates a removable but earthquake-proof hold.
- Position the heaviest tree (likely the white ceramic one) in the center of the garland as an anchor point.
- Cluster lighter trees around it with roughly 2 inches of breathing room between each.
- Test stability by gently bumping the sideboard — adjust gel amounts on any wobblers.
Material cost is about $6 for the museum gel, and it’ll take you approximately 8 minutes to secure the full arrangement. This is the same technique museum curators use for small artifacts — you’re welcome.
9. Marbled Paper Stockings and Pastel Candy Jars
The formula for this playful, eclectic look is delightfully unconventional: 40% antique dark wood foundation + 25% white wall backdrop + 20% pastel color pops (marbled stockings, wreath, candies) + 10% forest green foliage + 5% gold accents. What makes it work so brilliantly is the marbled paper — it’s texture-forward in a way that flat printed paper could never be, and it introduces multiple colors simultaneously without reading as chaotic. The pink ribbed ceramic lamp with a white shade adds task lighting and a sculptural moment, while the assorted colorful candies in clear glass jars are essentially edible decor that doubles as a party offering. The abstraction of the artwork behind the marbled wreath is key — a representational piece would compete too hard. Swap the pastels for jewel tones (amethyst, sapphire, emerald) and you’ll get a similar effect with more formality; swap for neons and you’ll pivot to kid-birthday-party energy, so tread carefully.
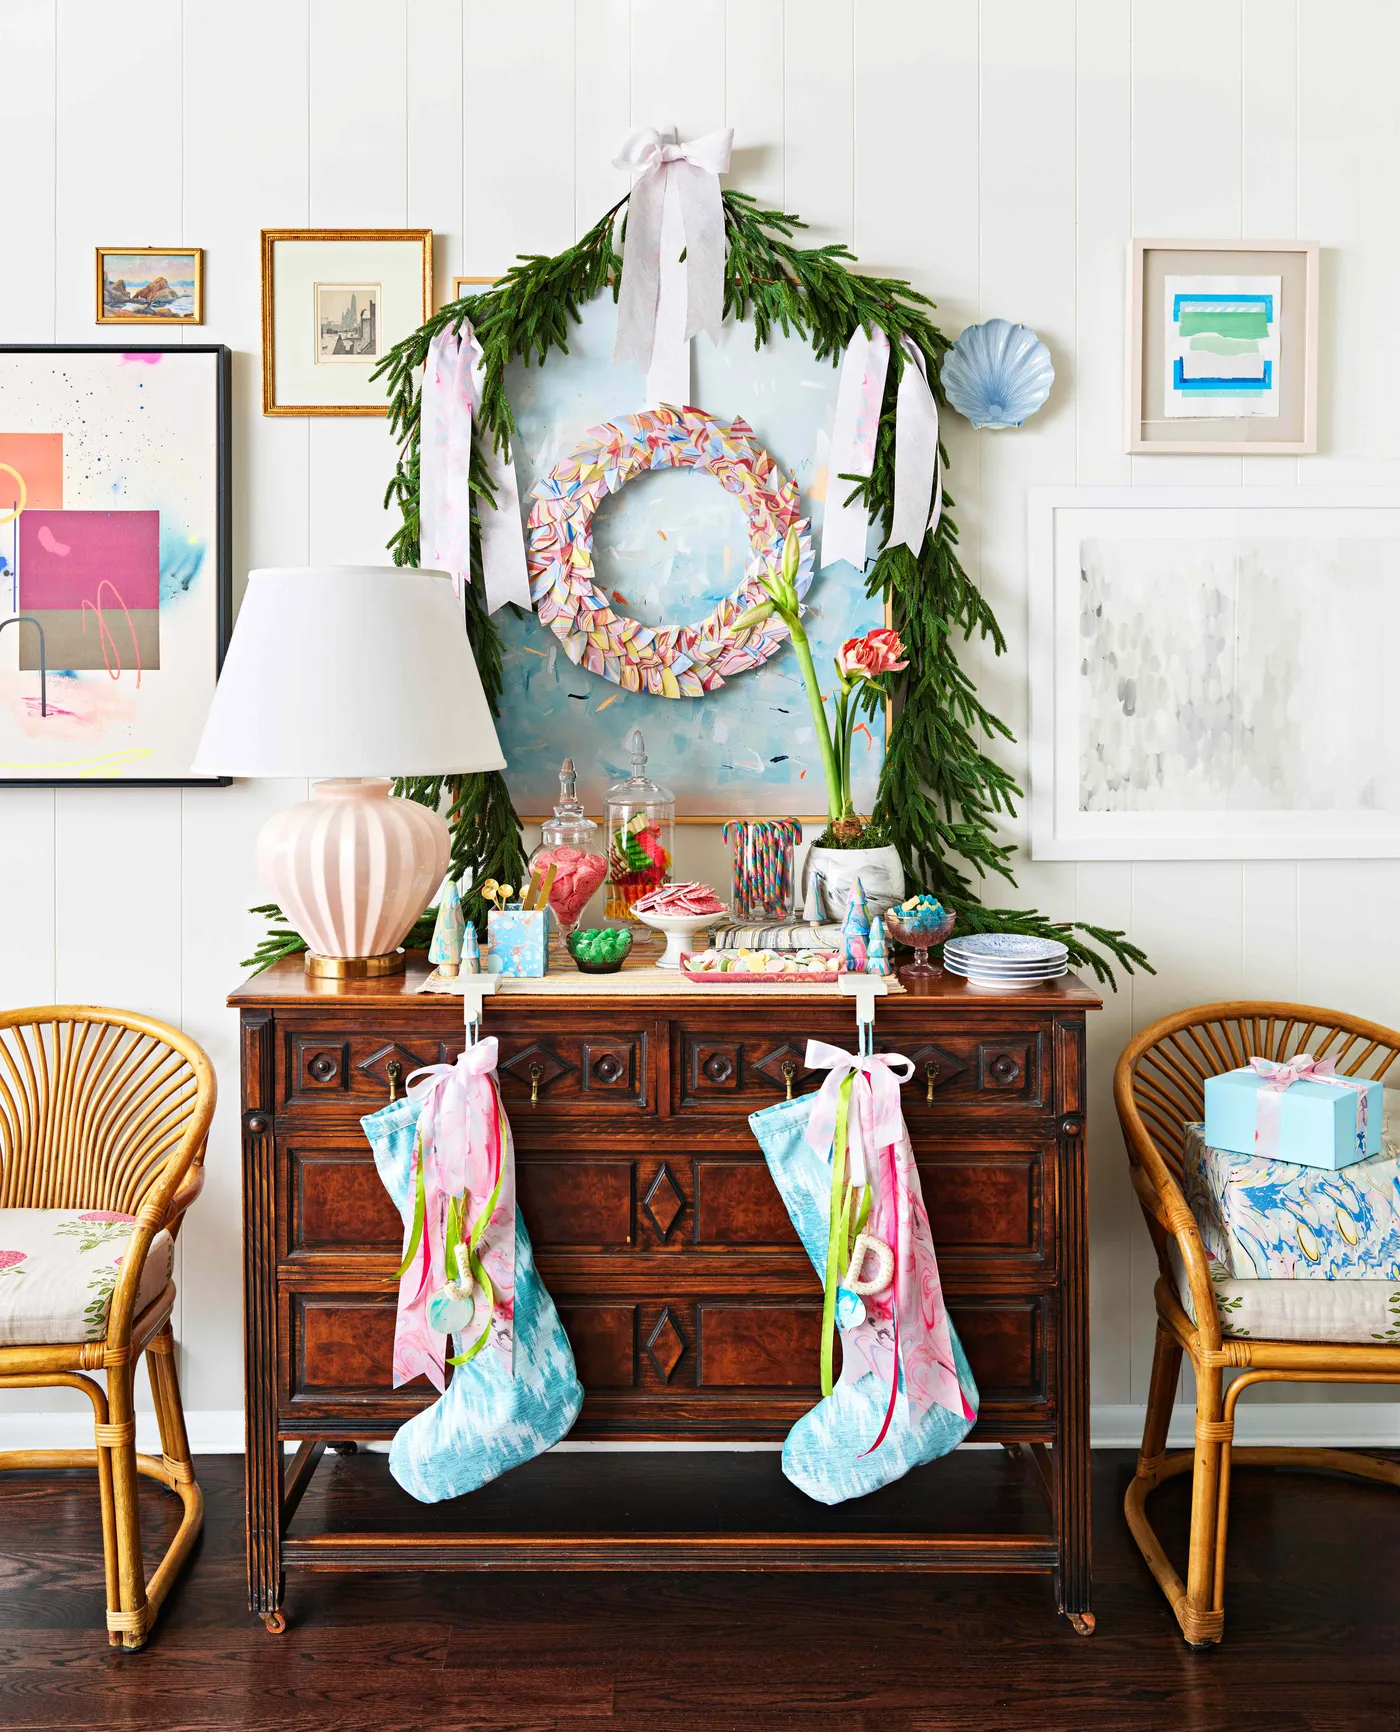
“Creating marbled paper stockings at this scale requires the right technique to get those Instagram-worthy swirls.”
This method uses shaving cream and liquid watercolor — it sounds weird, but trust the process:
- Trace and cut stocking shapes from heavy watercolor paper (140 lb weight minimum — anything lighter will buckle).
- Spread a 1-inch layer of plain white shaving cream in a shallow baking dish.
- Drop liquid watercolors in 3-4 pastel shades across the surface in dime-sized dots.
- Swirl gently with a skewer for 10-15 seconds — over-swirling turns to mud.
- Press each paper stocking face-down into the cream for 3 seconds, lift, and scrape off excess cream with a ruler.
- Let dry completely for 4 hours, then punch a hole and thread with gold cord for hanging.
Total time per stocking: about 20 minutes active work. Material cost: under $12 for enough to make 6 stockings.
10. Frosted Evergreen Arrangement in a Copper-Kissed Vessel
This wintery centerpiece built around a white geometric container on an aged dark green rusted trunk is surprisingly achievable if you know where to allocate funds:
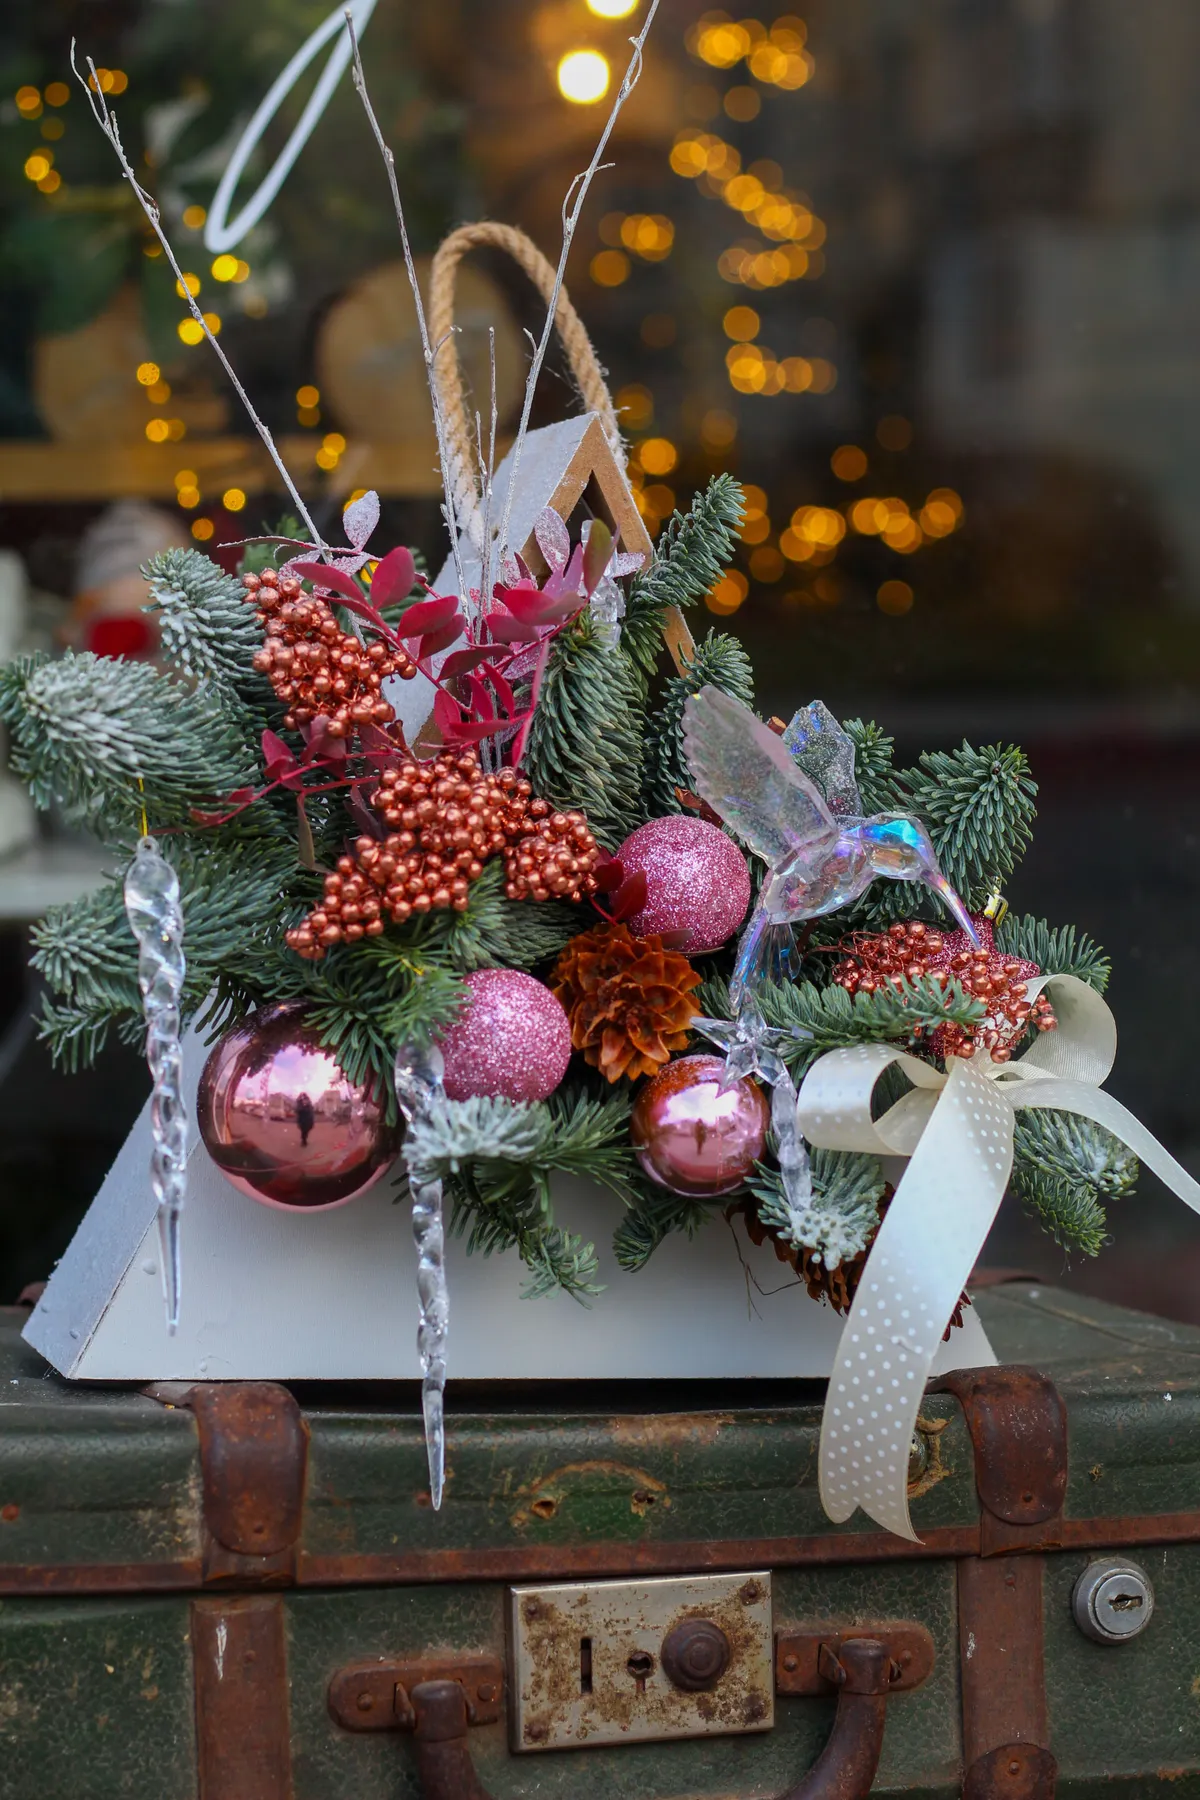
“Main container: White geometric planter — $25-45 (West Elm outlet, HomeGoods) or”
- Main container: White geometric planter — $25-45 (West Elm outlet, HomeGoods) or $55-95 (CB2, Anthropologie)
- Greenery: Frosted evergreen branches (faux, high-quality) — $18-35 per bundle; you’ll want 2-3 bundles for fullness
- Ornaments: Glittery pink spherical ornaments — $12-20 per box of 6 (Target, Michaels)
- Berry clusters: Copper-colored faux berry picks — $8-14 per bundle; 3 bundles for generous distribution
- Icicles: Clear acrylic icicles — $6-10 per pack (available at most craft stores in December)
- Ribbon: Sheer white with polka dots — $4-8 per roll
- TOTAL: $90-175
Budget alternative: Hit the thrift store for a white ceramic bowl ($6), use foraged pine branches spray-painted with frosted glass effect ($9), and swap copper berries for spray-painted eucalyptus pods ($5 total). You’ll land around $40.
The aged dark green trunk with rust details is the unsung hero of this entire composition. Without it, you’d have a pretty arrangement floating on a table. With it, you have a story — something that feels found, inherited, storied. The rust patina on the trunk picks up the copper berry clusters visually, while the dark green base anchors the frosted branches and prevents them from blending into a light surface. If you were to place this exact arrangement on a white marble countertop, it would lose about 60% of its character instantly. That’s the power of a vessel with age and texture — it does the heavy lifting that no amount of styling can replicate. If you don’t have an actual vintage trunk, look for a wooden crate with dark stain and intentionally rusted hardware at an antique mall.
11. Countdown Calendar With Cotton and Burlap Textures
That Christmas tree countdown calendar is adorable, but let’s talk logistics: if it has small compartments or moving parts, you need to position it at eye level for little kids — which means bending over a sideboard daily, potentially disturbing the cotton and dried leaf arrangements flanking it. The cotton stems are fragile; one snagged sleeve and you’ve got a bald stem. And dried leaves? They crumble. This arrangement is gorgeous for the first week of December and increasingly fragile by December 24th. If you have children under 8 who will be operating the countdown calendar daily, anchor the dried arrangements with a thicker burlap wrap and hot-glue the stems into their vases so they don’t shift with every brush-past. The rustic wooden sideboard with dark metal studs is forgiving of bumps and scratches — exactly what you want for a high-traffic holiday setup. The small gold and silver textured cups are smart additions because metallic catches light and draws the eye up, away from any accumulating cotton dust.
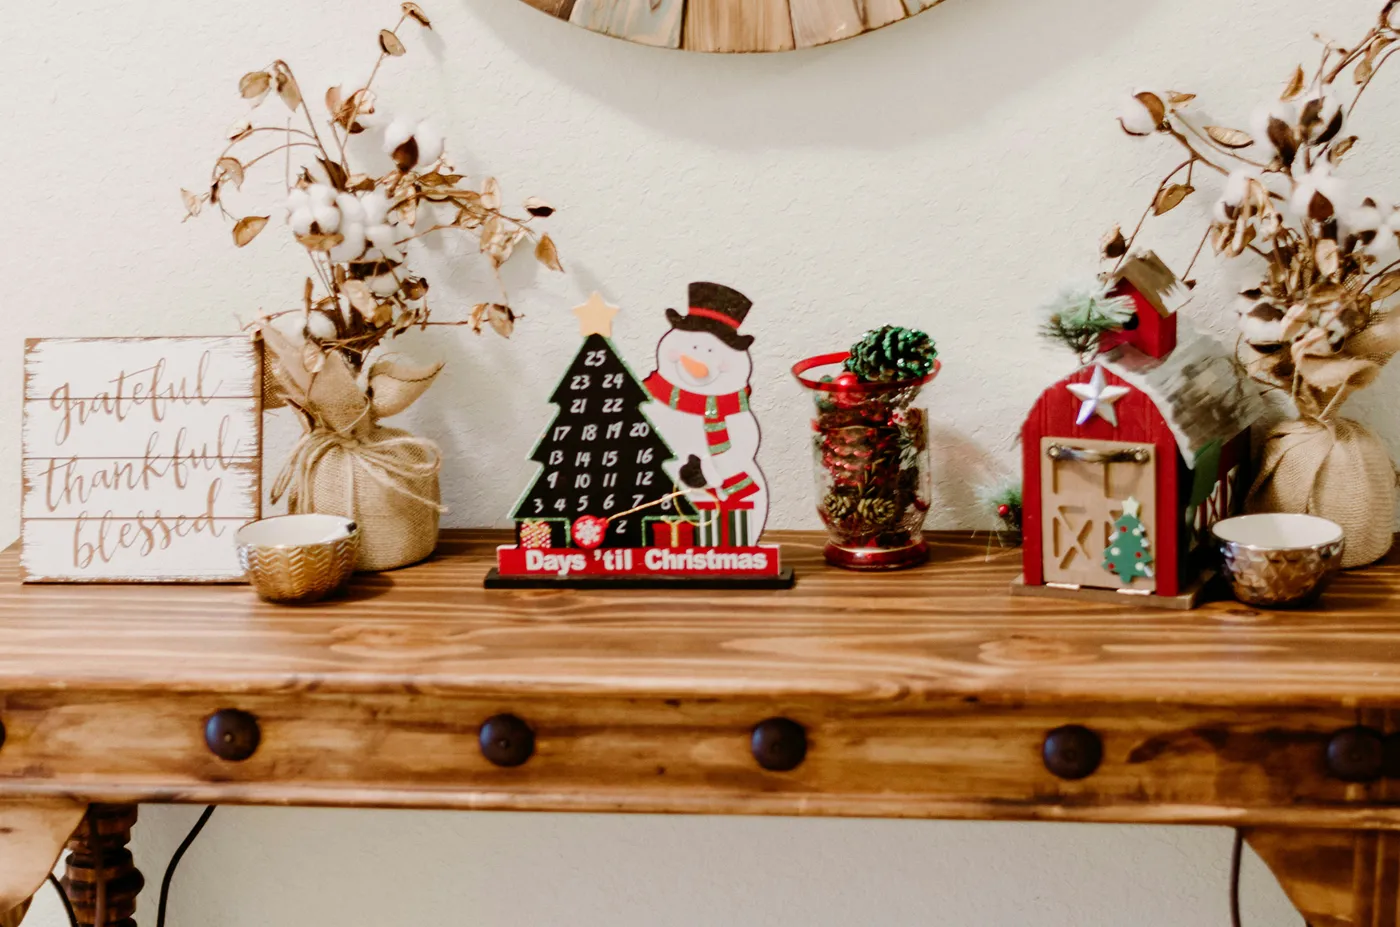
“You don’t need artisan-level crafting skills to get this rustic feel for a fraction of the expected cost.”
A wooden crate from Michaels ($12) with peel-and-stick metal stud accents from Amazon ($8 for 100) can approximate that sideboard look. The countdown calendar? A DIY version using a cork board ($10), small muslin bags numbered with a Sharpie ($5 for 12), and mini clothespins ($3) takes about 45 minutes to assemble. The burlap-wrapped vases are literally just tomato sauce jars (free) wrapped in burlap ribbon ($6 per roll) and secured with hot glue. Cotton stems run $4-7 per bundle at Hobby Lobby, and dried eucalyptus or baby’s breath at the grocery store floral section is $6-8 per bunch. You can recreate this entire display for under $65, sideboard excluded.
12. Gold, Silver, and Teal Ornament Overload With Candle Glow
The density of the ornament arrangement is what makes this close-up work, but achieving that look without it reading as a jumbled mess requires a specific strategy: layer your ornaments in three distinct planes — the back row should be all matte silver (non-reflective, creates depth), the middle row all teal (your color anchor), and the front row all gold glitter and wrapped candies (maximum sparkle where the eye lands first). This creates visual recession and prevents your eye from being unable to find a resting point. The warm LED pillar candles should be positioned at 3 different heights using clear glass risers (shot glasses work in a pinch), so the glow hits the ornaments at different angles. The scattered confetti and candy wrappers should be distributed in an S-curve pattern — our brains read S-curves as more intentional than random scatter. If you just dump them, it reads as mess, not design.
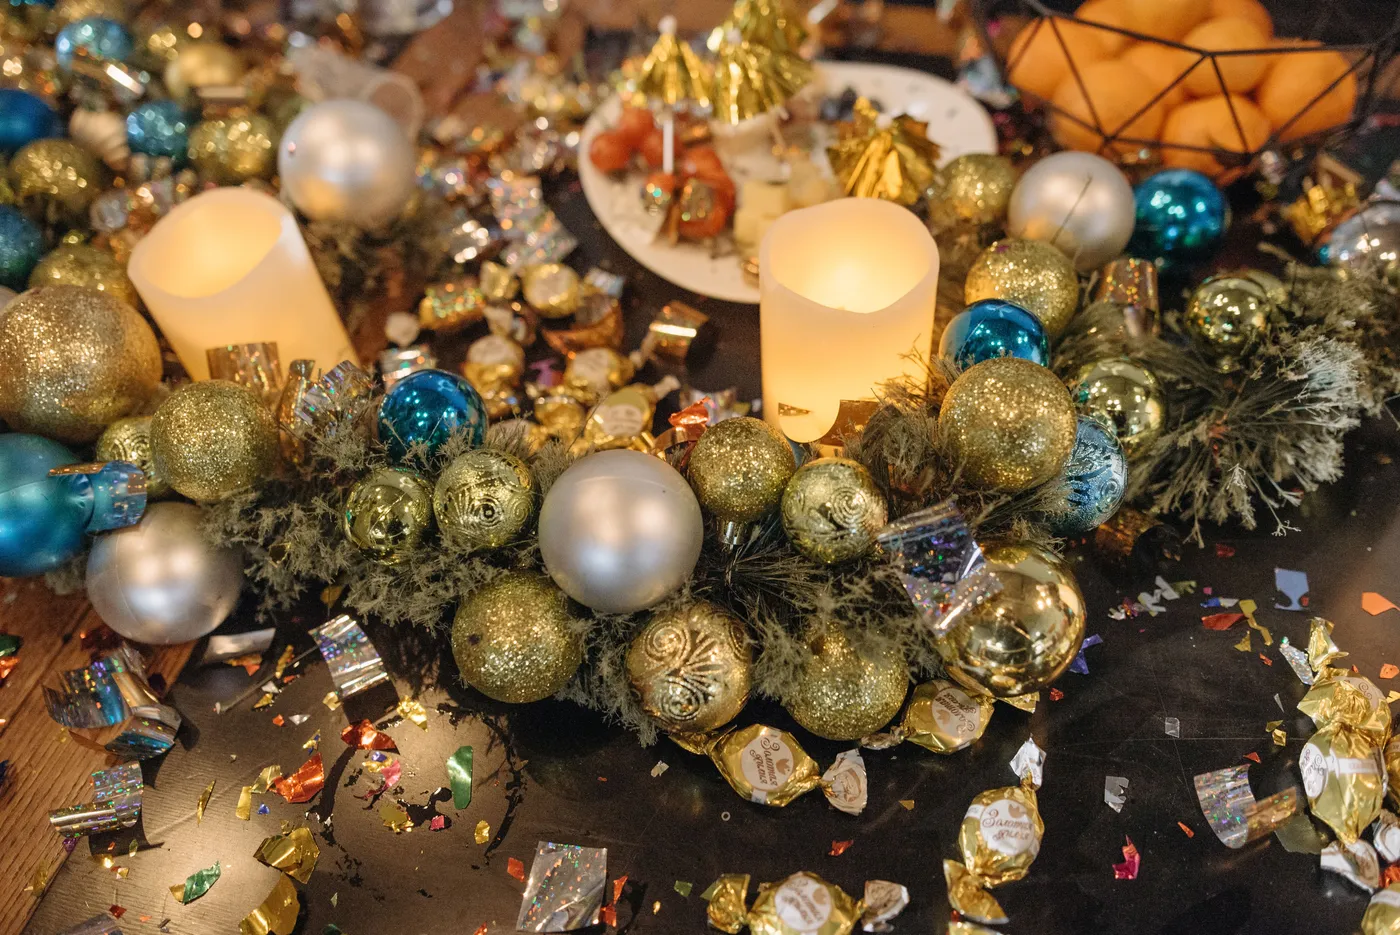
“The visual formula for this level of holiday maximalism: 35% gold (warm sparkle, the dominant metallic) + 25% teal blue (your cool-tone anchor that prevents the whole thing from feeling like a jewelry store) + 20% silver matte (the quiet supporter that adds depth without competing) + 15% warm white candlelight (the element that makes everything look expensive) + 5% dark brown-black surface (the necessary void that makes the sparkle pop).”
If you’re adapting this for a lighter surface — say a white sideboard — you’ll need to increase the teal to 35% and drop the gold to 25%, because without the dark contrast, gold can wash out against white. And avoid warm LED candles altogether? The whole thing falls flat. The warm white light is the glue holding the palette together.
13. Plaid Napkin and Santa Ring on a Scarlet Tablescape
This festive place setting is a lesson in controlled pattern mixing. The bright red tablecloth is bold and saturated, and on its own, it would overwhelm the dark green dinner plate. But the plaid napkin — white, green, and red — acts as a mediator. It shares the red of the tablecloth and the green of the plate, creating instant harmony through color repetition. The ceramic Santa Claus napkin ring is the cleverest move here: it breaks the napkin’s strict geometry with an irregular, handcrafted shape, and its peach-toned elements introduce just enough warmth to prevent the red-green-white palette from feeling like a crayon drawing. The faceted dark green glass catches light from multiple angles, adding dimension to a setting that could otherwise feel flat. The silverware is present but quiet — it doesn’t compete for attention, it just does its job.
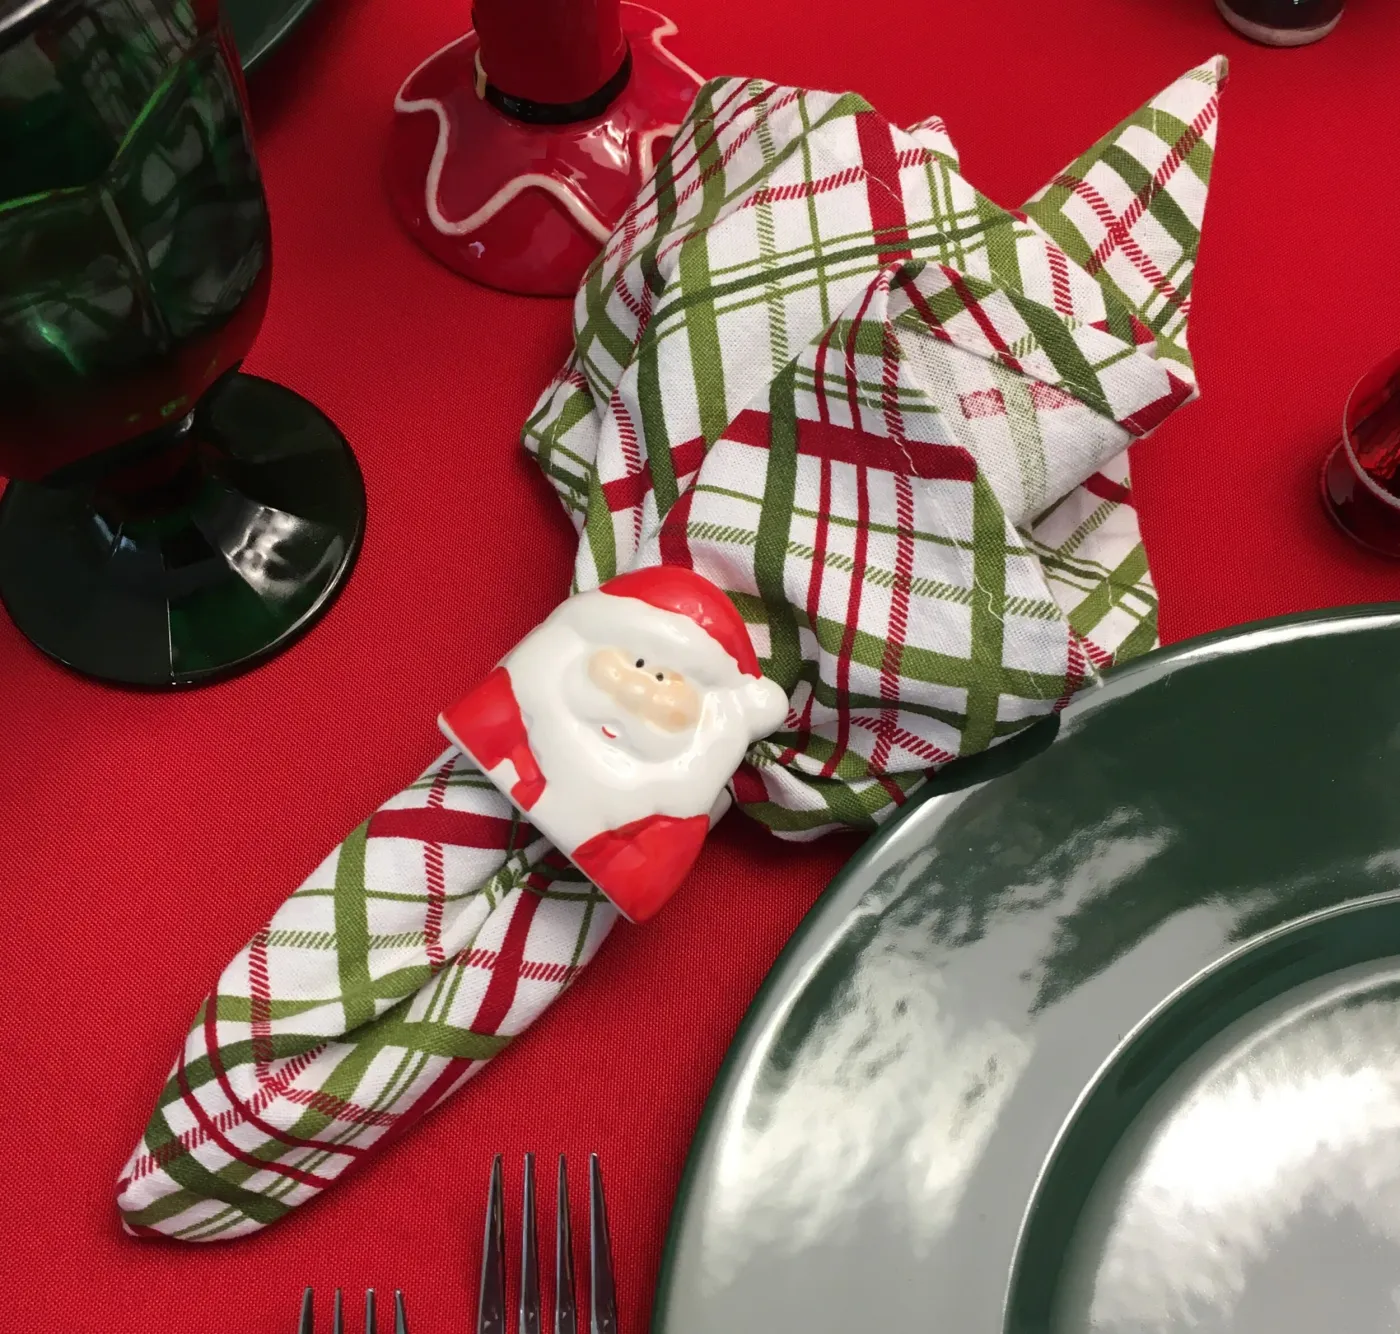
“Remove the ceramic Santa napkin ring, and you lose the entire mood.”
This is not hyperbole. The plaid napkin on the red tablecloth with the green plate is a color story; it’s pretty but generic. The Santa ring introduces specificity — it says “this is Christmas dinner, not a winter wedding.” It’s also doing a critical design job: it creates a focal point that’s at the height of the place setting, drawing the eye upward from the flat table surface. If you were to swap it for a plain wooden ring, the setting would still coordinate, but it would feel about 40% less festive. The Santa ring is doing emotional labor — it’s the nostalgia trigger, the whimsy injection, the detail that makes this a moment rather than just a table setting.
14. Frosted Pine Wreath and Ribbon Spools on Shiplap
Those decorative ribbon spools — red, plaid, and burlap — are a styling move that’s trending hard for 2026 because they add craft-room charm without requiring you to actually craft anything. Here’s how to create identical-looking spools in under 20 minutes:
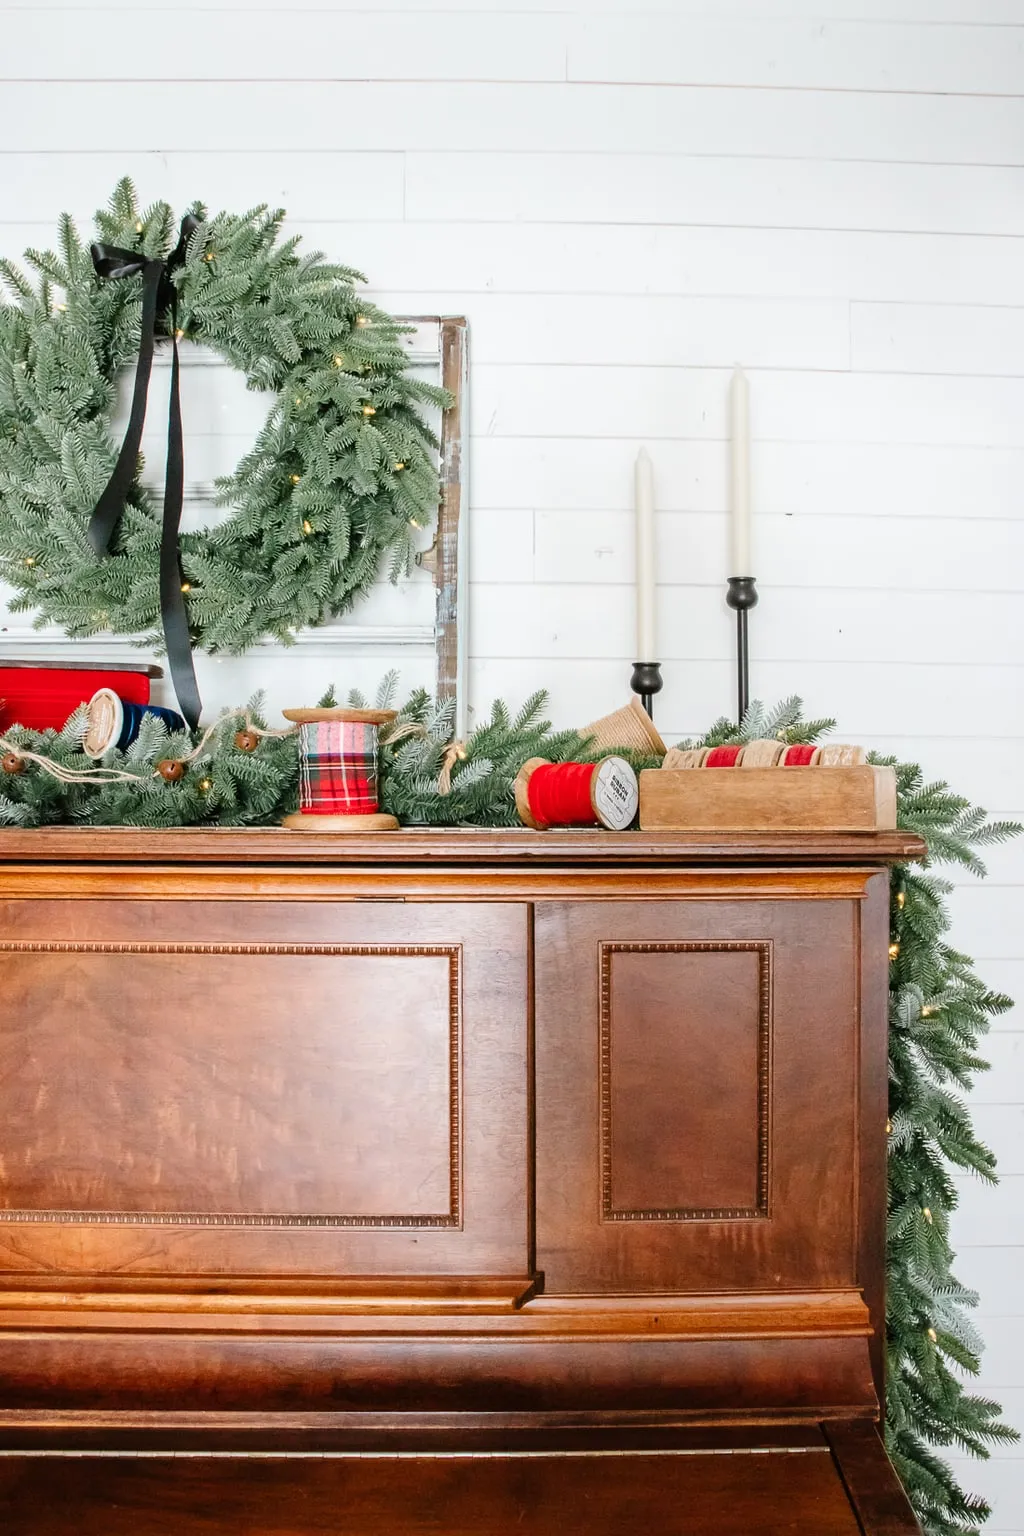
“Find three wooden spools — check the woodcraft section of any craft store ($3 ea”
- Find three wooden spools — check the woodcraft section of any craft store ($3 each) or Amazon ($9 for a set of 6).
- Wrap each spool tightly with your chosen ribbon, securing the starting edge with a tiny dot of hot glue (not tape, which will yellow over time).
- Leave a 6-inch tail of ribbon hanging loose from the top of each spool — this is what makes it look “in progress” rather than “sealed product.”
- Stack the spools off-center — the largest on the bottom, smallest on top, with the plaid spool always in the middle position for maximum visibility.
- Tuck a pair of scissors with wooden handles ($4 at any craft store) next to the spools to complete the illusion.
The total cost runs about $18-22, and you’ll spend about 15 minutes assembling. The key is using ribbons with different textures — the burlap adds matte roughness, the plaid adds pattern, and the solid red adds saturation.
This rustic arrangement works beautifully on sideboards that are at least 48 inches wide and 16 inches deep — you need that depth buffer so the cream taper candles in dark holders don’t feel precarious at the front edge. The distressed wooden window frame hanging above requires a wall height of at least 7 feet from the sideboard surface to the ceiling; shorter walls will make the wreath feel cramped. If your space is smaller, check out the gold bar cart idea in Idea #1 — it uses vertical elements in a tighter footprint. The white shiplap wall here is doing foundational work; if you have smooth drywall, the rustic effect will be about 30% less impactful because the texture contrast between rough wood and smooth wall is part of the charm.
15. Bottle Brush Forest Beneath a Gold-Framed Mirror
Winter village scenes have graduated from “grandma’s ceramic collection” to “considered design statement” in 2026, driven by a broader nostalgia trend that values miniatures not as kitsch but as tiny stage sets for the imagination. The pale golden bottle brush trees in various sizes — resting on white faux snow and scattered with small silver baubles — are specifically on-trend because that muted gold reads as vintage rather than brassy. The gold-framed round mirror behind the rustic wooden sideboard does something clever: it reflects the scene back at the viewer, doubling the visual impact without requiring you to buy double the decor. It also bounces whatever ambient light exists in the room, making the pale gold trees glow even in daylight. The assorted white and grey miniature houses provide the architectural contrast — their clean lines balance the soft, fuzzy texture of the bottle brush trees.
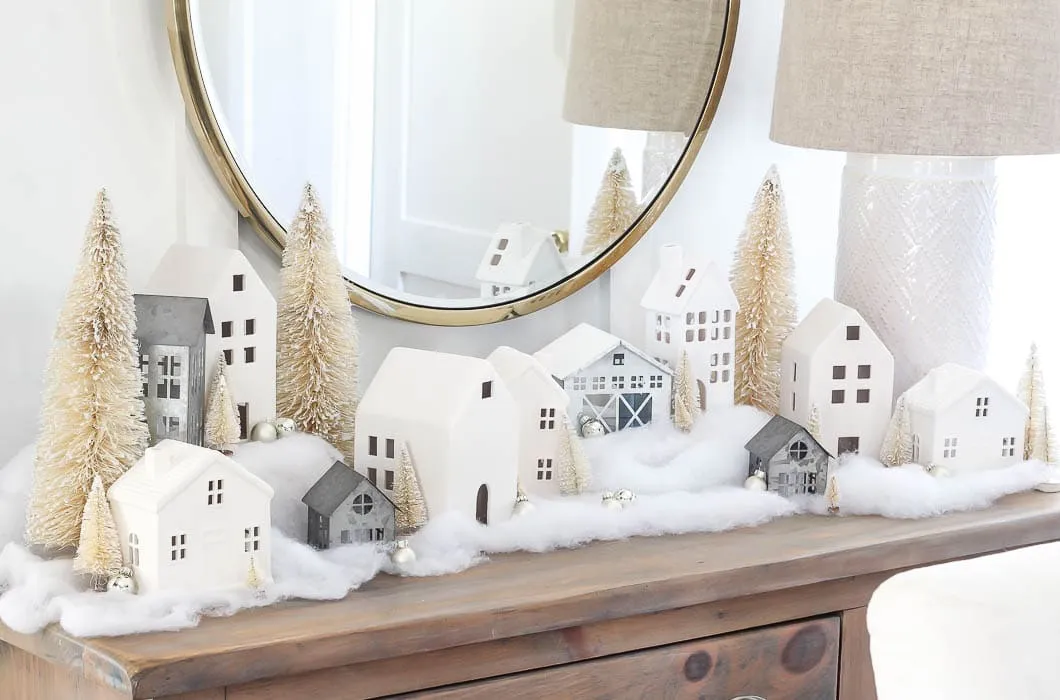
“Faux snow is, frankly, a magnet for every dust particle in your home.”
After two weeks, that pristine white blanket will look dingy around the edges unless you’re proactive. Here’s the maintenance reality: you’ll need to gently lift the decorative elements (carefully — those pale golden trees are often wired to small bases that can snag the faux snow fibers) and use a lint roller on the snow surface every 5-7 days. The silver baubles will show fingerprints instantly, so handle them with microfiber cloths. The good news: bottle brush trees are nearly indestructible — they can be vacuumed with a brush attachment if they get dusty, which takes about 30 seconds per tree. If you want a lower-maintenance version that gives the same snowy village effect, swap the loose faux snow for a textured white felt mat cut to fit the sideboard surface — it won’t shift when you dust, and it’ll last multiple seasons without the dingy degradation.
16. Lit Garland and Framed Art Over a Gray Paned Sideboard
The evergreen garland with warm white lights draped across the white vertical paneled wall above this gray wooden sideboard is deceptively simple — until you try to hang it yourself. When securing garland to a paneled wall, attach Command hooks rated for 5 pounds at the top of every third groove (roughly every 18 inches) — never try to secure directly to the panel ridges, as they have less surface area for adhesive bonding. Drape the garland so it dips 8-10 inches between each attachment point — this creates a gentle scallop that reads as intentional rather than a straight line that reads as store display. The two framed prints on the sideboard are placed asymmetrically for a reason: one sits directly under a garland dip, the other under a peak, creating a subtle rhythm your eye reads as “interesting” without knowing why. The ceramic decorative vases flanking the artwork should be no more than 2/3 the height of the frames — any taller and they’d compete with the garland above.
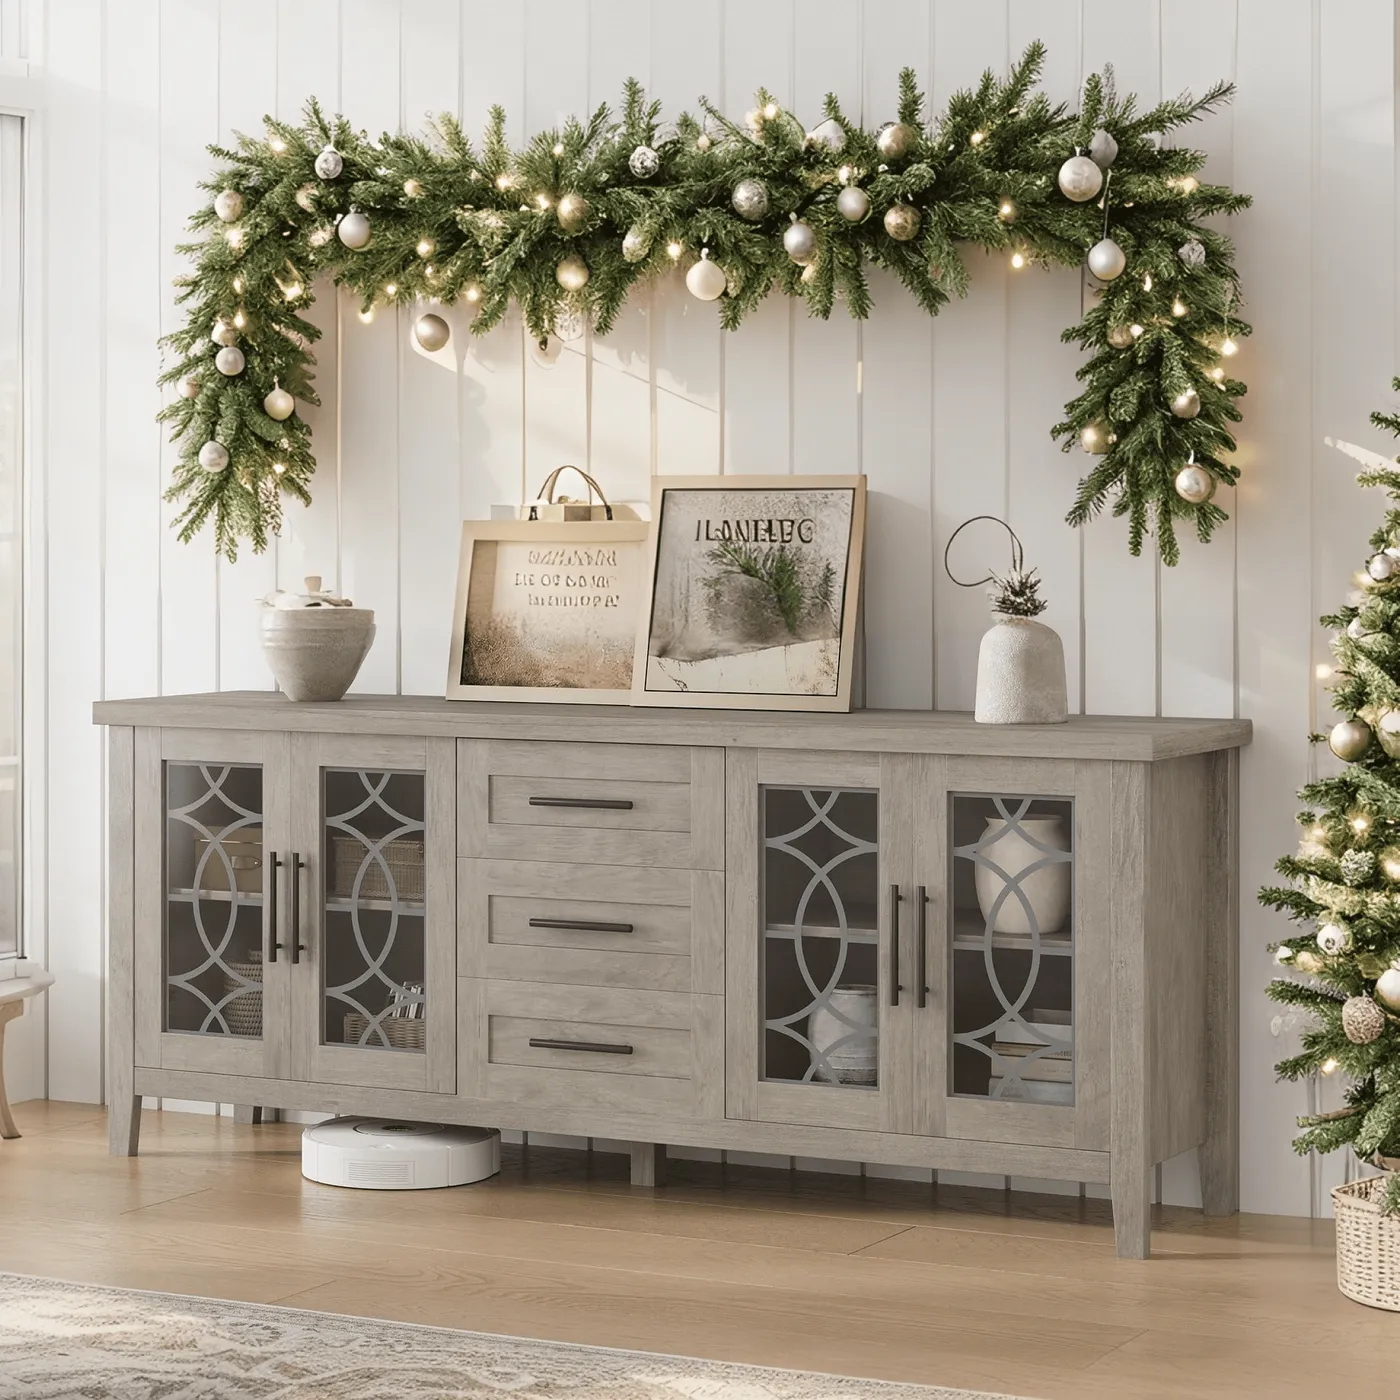
“Before you commit to this look, verify the following:”
Before you commit to this look, verify the following:
- Measure the width of your sideboard — this arrangement needs at least 54 inches for the garland to have meaningful draping; shorter sideboards should use a single continuous wreath instead.
- Check that your wall above the sideboard has at least 30 inches of vertical clearance for the garland drape plus the framed artwork height.
- Confirm the light direction: if the small Christmas tree in the woven basket to the right will sit in a corner that gets no natural light, it’ll look sad by week two — reposition or supplement with a tiny grow light on a timer.
- Test the weight of your framed artwork against the gray sideboard’s glass-paned doors — framed pieces can vibrate when doors open/close; use museum gel under frames to prevent sliding.
- Verify outlet access: the lit garland needs a power source within 6 feet, and a dangling extension cord will destroy the minimal, cohesive aesthetic instantly.
17. White Built-Ins With Mini Village and Brass Sconce Ribbon
The white built-in shelving unit works brilliantly here because it employs what designers call “the gallery effect” — the white shelving and cabinets create a neutral frame that makes every object on them read as intentional and curated. The green Christmas garland with lights strung across the top defines the uppermost boundary and pulls the eye across the full width, while the small bottle brush Christmas trees and miniature village house create a sense of discovery at each shelf level. The brass wall sconce with a vibrant red ribbon is the punctuation mark — it breaks the symmetry and introduces warm metal and bold color in a single compact moment. The framed photos mixed in with the holiday decor keep this from feeling like a store display; they signal that this is a real home where Christmas happens alongside everyday life. This is a high-impact, low-footprint approach — perfect when you don’t have a dedicated sideboard surface.
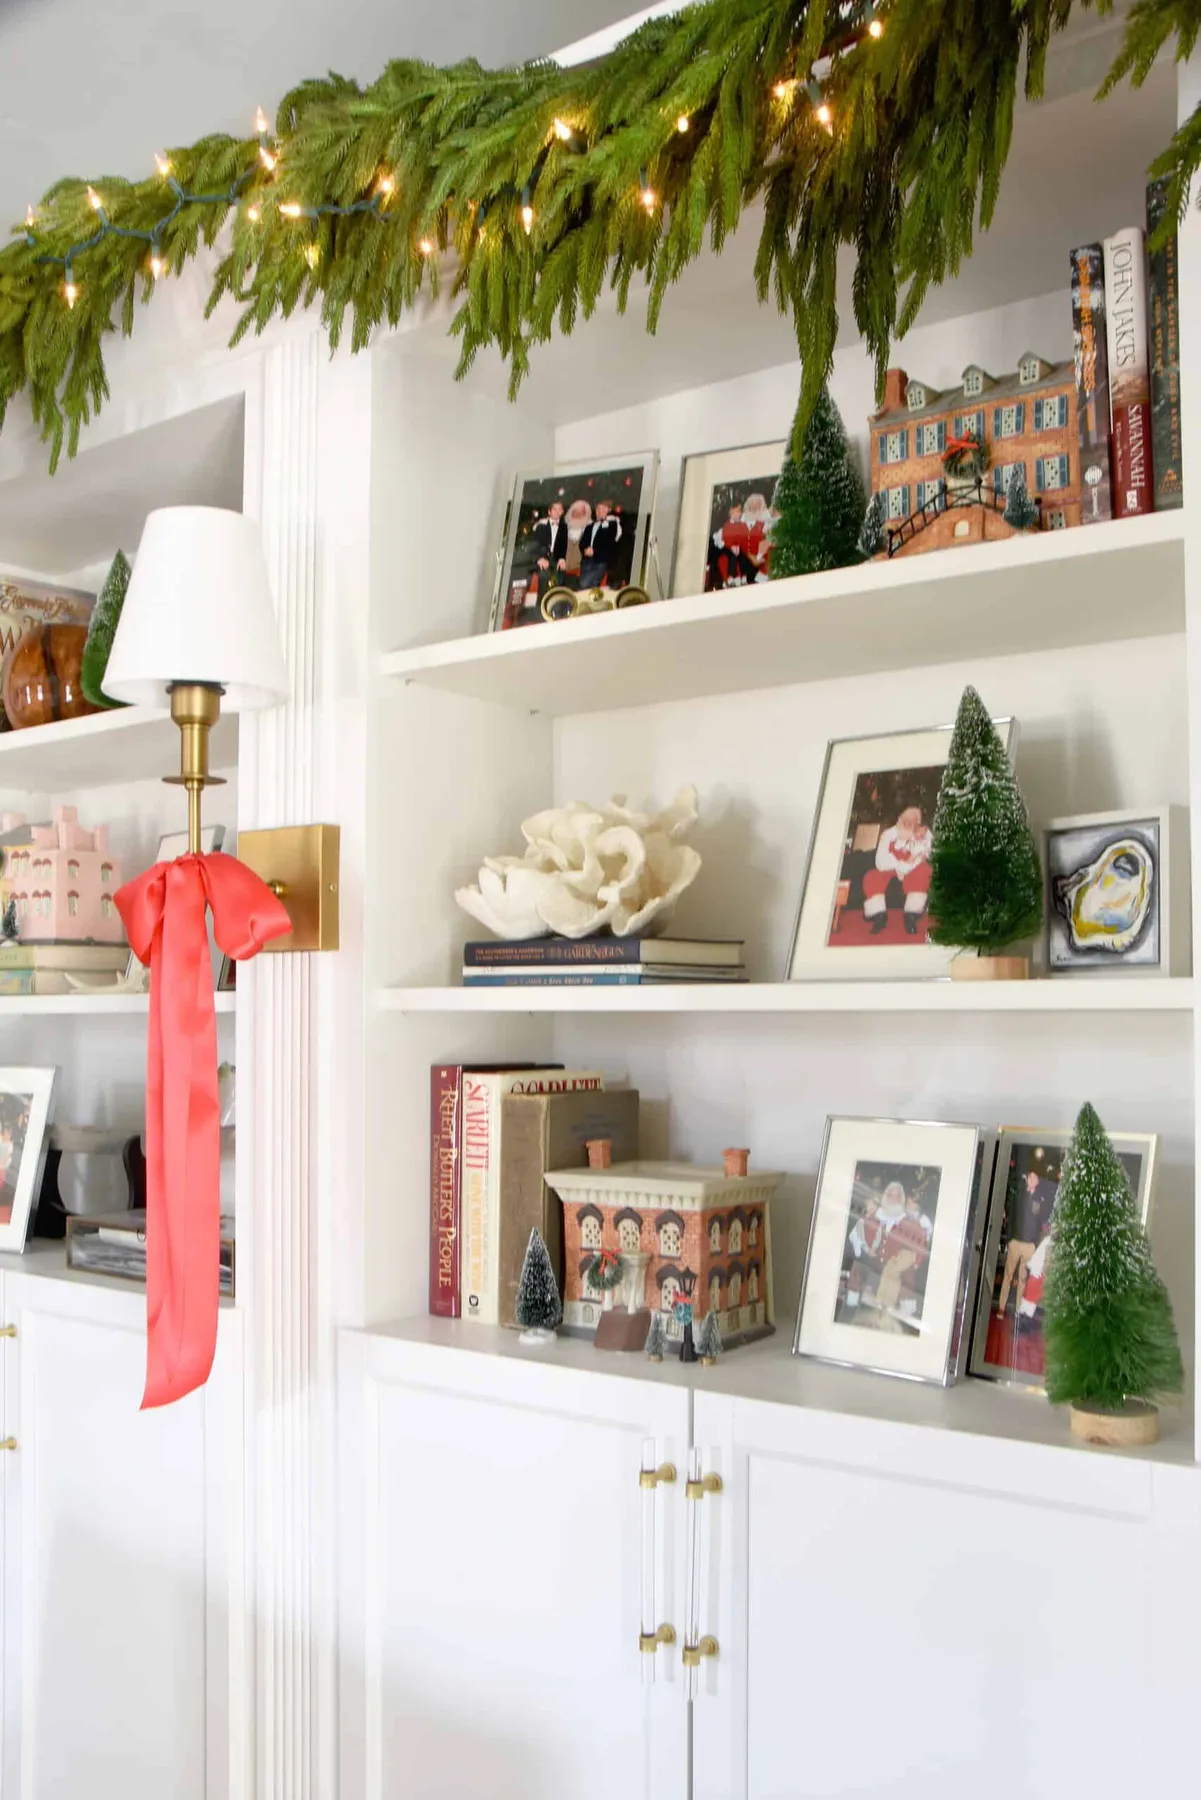
“The downside of open shelving during the holidays: every surface you decorate is a surface you must dust.”
And garland draped across shelves sheds needles (real or faux) that drift down onto the shelves below, meaning you’re essentially creating a self-dusting system that distributes debris across your entire display. Budget an extra 15 minutes of dusting per week during December if you run this setup. Additionally, if those small bottle brush trees or the miniature village house are within reach of children under 5, expect them to be relocated frequently. The brass sconce ribbon is another vulnerability — if the sconce gets warm (check the bulb type; LED stays cool, but incandescent gets hot enough to potentially singe ribbon over time), you’re running a tiny fire risk. Use LED bulbs exclusively in any sconce that will have ribbon attached, and check the ribbon’s position weekly to make sure it hasn’t migrated closer to the bulb.
18. Gold Birds and Stacked Books on a Glass-Door Console
Those gold bird figurines are doing all the work here. Without them, you’d have a nicely styled console with a ribbed white lamp, some stacked antique-style books, and a patterned rug — pleasant, balanced, refined, and entirely forgettable. The birds inject life. They introduce a sense of motion — even though they’re stationary, their forms suggest flight, arrival, departure. They catch light differently than the matte book covers or the ribbed ceramic lamp base, creating tiny glints of warmth that draw your eye across the dark brown sideboard. The glass-paneled doors on the sideboard reflect ambient light, and the gold birds seem to hover in that reflection. The light neutral textured rug on warm hardwood flooring adds softness underfoot, but it’s the birds that make this composition worth photographing. If you were to remove them, the entire arrangement would still be balanced and calm, but it would lose its soul.
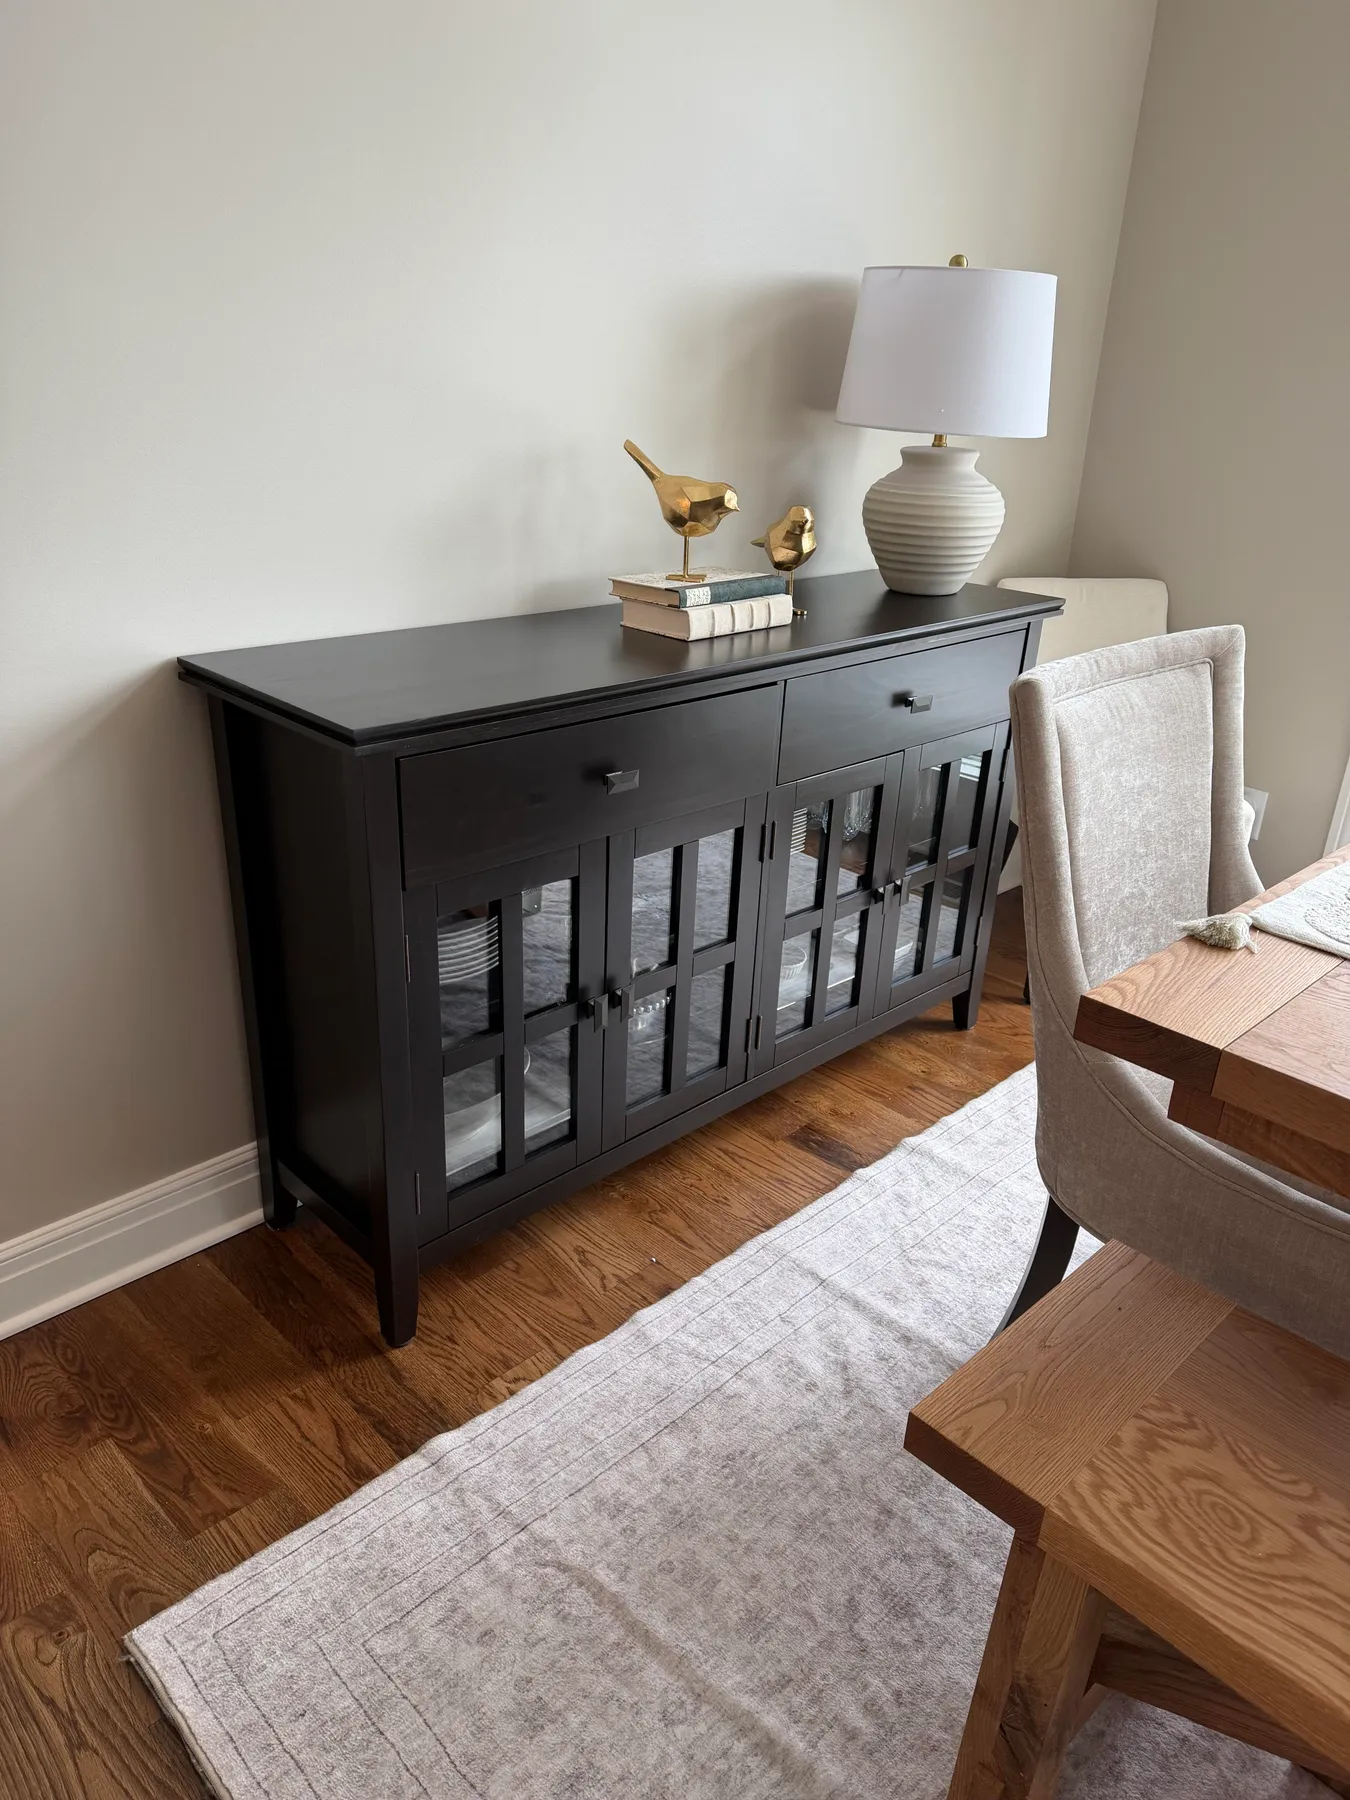
“You don’t need to source identical gold bird figurines to capture this refined look.”
Target’s home decor section currently carries brass animal figurines in their Project 62 line for $12-18 each — eagles, sparrows, and abstract bird forms rotate through seasonally. Thrift stores are gold mines for this specific item; brass bird figurines were wildly popular in the 1960s-70s and show up constantly for $3-8. The ribbed white lamp is essentially any ceramic table lamp with a drum shade — Walmart’s Mainstays line has versions under $25. Stacked antique-style books can be faked by covering hardcovers from the dollar store with kraft paper ($3 for a roll) and leaving them unlabeled — the texture reads as “vintage” without the antiquarian price tag. The dark brown sideboard itself is the hardest element to thrift, but you can approximate the look with a dark-stained IKEA Havsta cabinet ($299) and swap the door fronts to glass-paneled using aftermarket inserts ($45-60 per door). Check out the dark glossy console in Idea #24 for another take on a moody, gold-accented display.
19. Vintage Santa Collection on a Distressed White Console
The style math for this nostalgic, cheerful display: 35% distressed white (sideboard, wall planks to the right) + 25% warm wood tones (light wood top, wooden plank wall behind, staircase handrail) + 20% Christmas red (Santa figures, “GOOD CHEER” banner lettering, ribbon accents) + 15% forest green (garland on staircase, miniature trees) + 5% cream/beige (banner background, neutral transition pieces). The collection of vintage-inspired Santa figures is the focal point, but the wooden plank wall background does critical work — it provides the rustic framework that makes the distressed white sideboard with decorative panels feel intentional rather than just worn. The Christmas garland with ribbons on the staircase to the right extends the composition beyond the sideboard itself, pulling the eye through the full room. The miniature Christmas trees and reindeer figures fill in the scale gaps between the larger Santa figures.
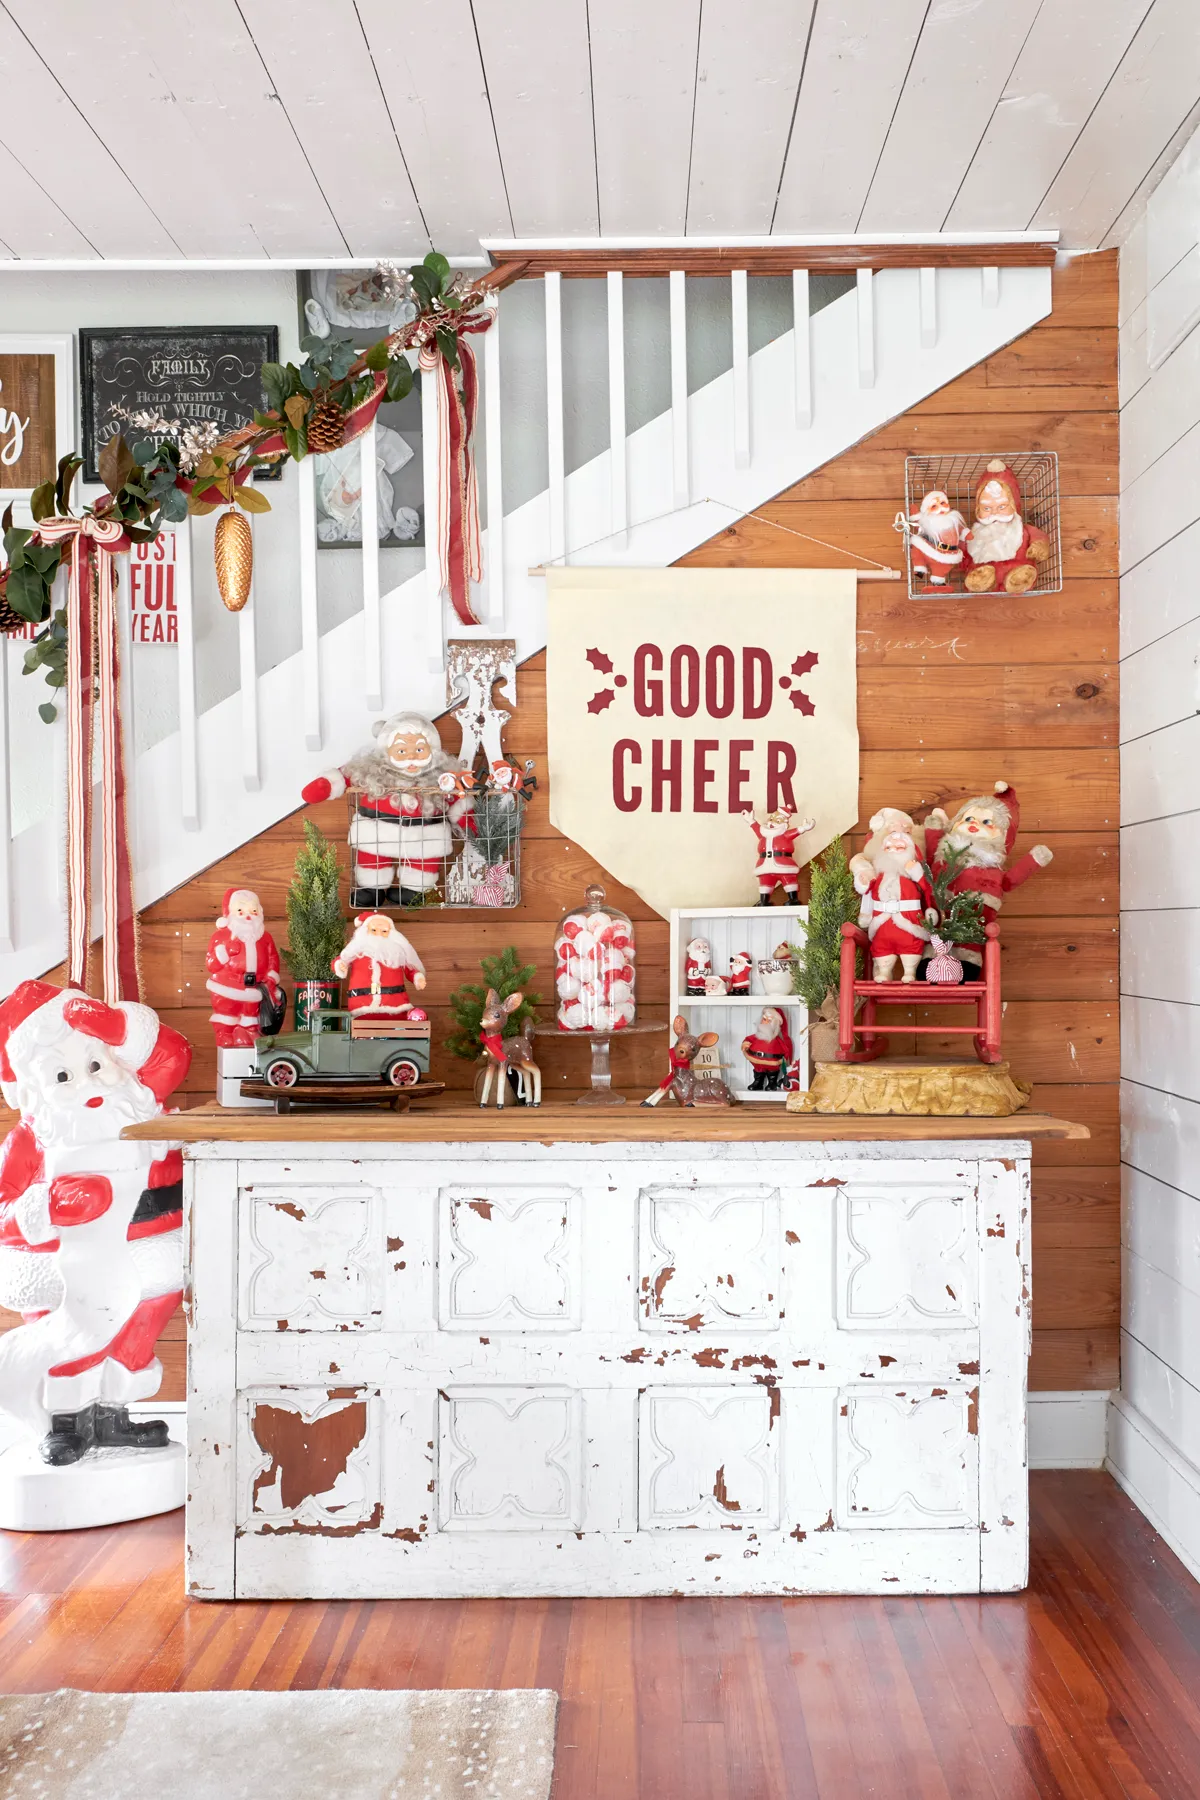
“Grouping a collection of vintage-inspired figurines so they read as a curated collection rather than a cluttered shelf is harder than it looks.”
Arrange your Santa figures using the “triangle rule” — place the tallest one off-center (never dead center), flank it with two medium-sized Santas at roughly 2/3 its height, and position the smallest figurines along the front edge where their details are most visible. The space between figures should vary: 3 inches between some pairs, 5 inches between others. Consistent spacing reads as retail display; varied spacing reads as collected. Rotate the figures slightly — some facing forward, some angled 15-20 degrees toward the center — so each one has its own “viewpoint.” This arrangement style takes about 20 minutes to get right, and you’ll know it’s working when your eye moves naturally from figure to figure without getting stuck on any one spot.
20. Illuminated Village Tray With Pearl Bracelet Charm
This creamy white round tray vignette is adorable and clearly styled for the photo — but here’s what the photo doesn’t show: those personal accessories (perfume bottle, gold-framed sunglasses, pearl bracelet) arranged so casually in the foreground? They’re going to move constantly. This is a functional surface being styled as a still life, and unless you live alone and never reach for your perfume, the arrangement will need daily resetting. The illuminated miniature village with ceramic Christmas trees and a streetlamp is the stable element; place the village toward the back of the tray and accept that the accessories will migrate. The pearl bracelet is particularly vulnerable — if it rolls off the tray edge (which happens whenever someone reaches past it), it’s going under furniture. Consider swapping live accessories for a single decorative jewelry dish ($12, Target) that holds costume pearls permanently — same visual effect, zero daily frustration. The warm yellow light from the village creates a gorgeous glow at dinner parties but will be invisible in daytime unless you remember to turn it on.
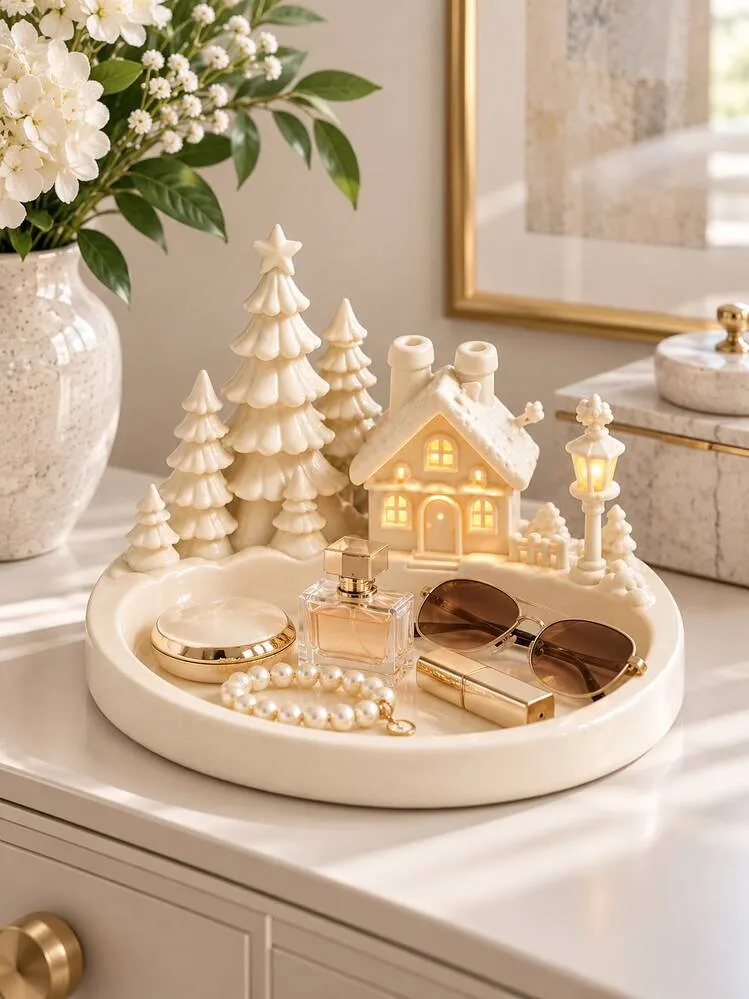
“Breaking down the cost to assemble this elegant, serene vignette:”
Breaking down the cost to assemble this elegant, serene vignette:
- Round tray: Creamy white wood or enamel tray — $22-38 (H&M Home, Threshold at Target)
- Miniature village pieces: Ceramic house and trees — $18-45 (check Michaels holiday section or Etsy for handmade versions)
- String lights for village: Warm LED micro lights — $7-12 per strand
- Perfume bottle: Decorative glass atomizer — $14-28 (vintage stores often have beautiful options for $8-15)
- Gold-framed sunglasses: $5-15 (thrifted or Amazon)
- Pearl bracelet: Faux pearl strand — $8-18
- TOTAL: $75-155
Budget alternative: A whitewashed wooden tray from Dollar Tree ($5), cardboard miniature houses hand-painted white ($6 for supplies), tea lights in frosted glass holders ($8 for 6-pack), and existing accessories from your dresser. Total: under $25.
21. Frosted Pinecone Cloche With Mercury Glass Sparkle
Under a clear glass cloche, a snow-dusted pinecone on a bed of artificial snow becomes a tiny frozen diorama — and the design principle at work is called compression. By enclosing a single natural element in glass, you’re forcing the viewer to focus on its texture in a way they never would if it were sitting freely on a surface. The ribbed mercury glass ornament and matte white ornament nearby extend the frosty, elegant palette outward, creating a gradient from the ultra-detailed cloche interior to the more diffuse sparkle of the frosted evergreen garlands. The distressed mirror with weathered gold frame in the background reflects parts of the arrangement, adding depth and doubling the visual impact. The cool silver-white-brown-green palette is winter personified — there’s no red or gold to anchor it in Christmas specifically, which means this arrangement can live on your sideboard from late November through February without feeling seasonally out of place.
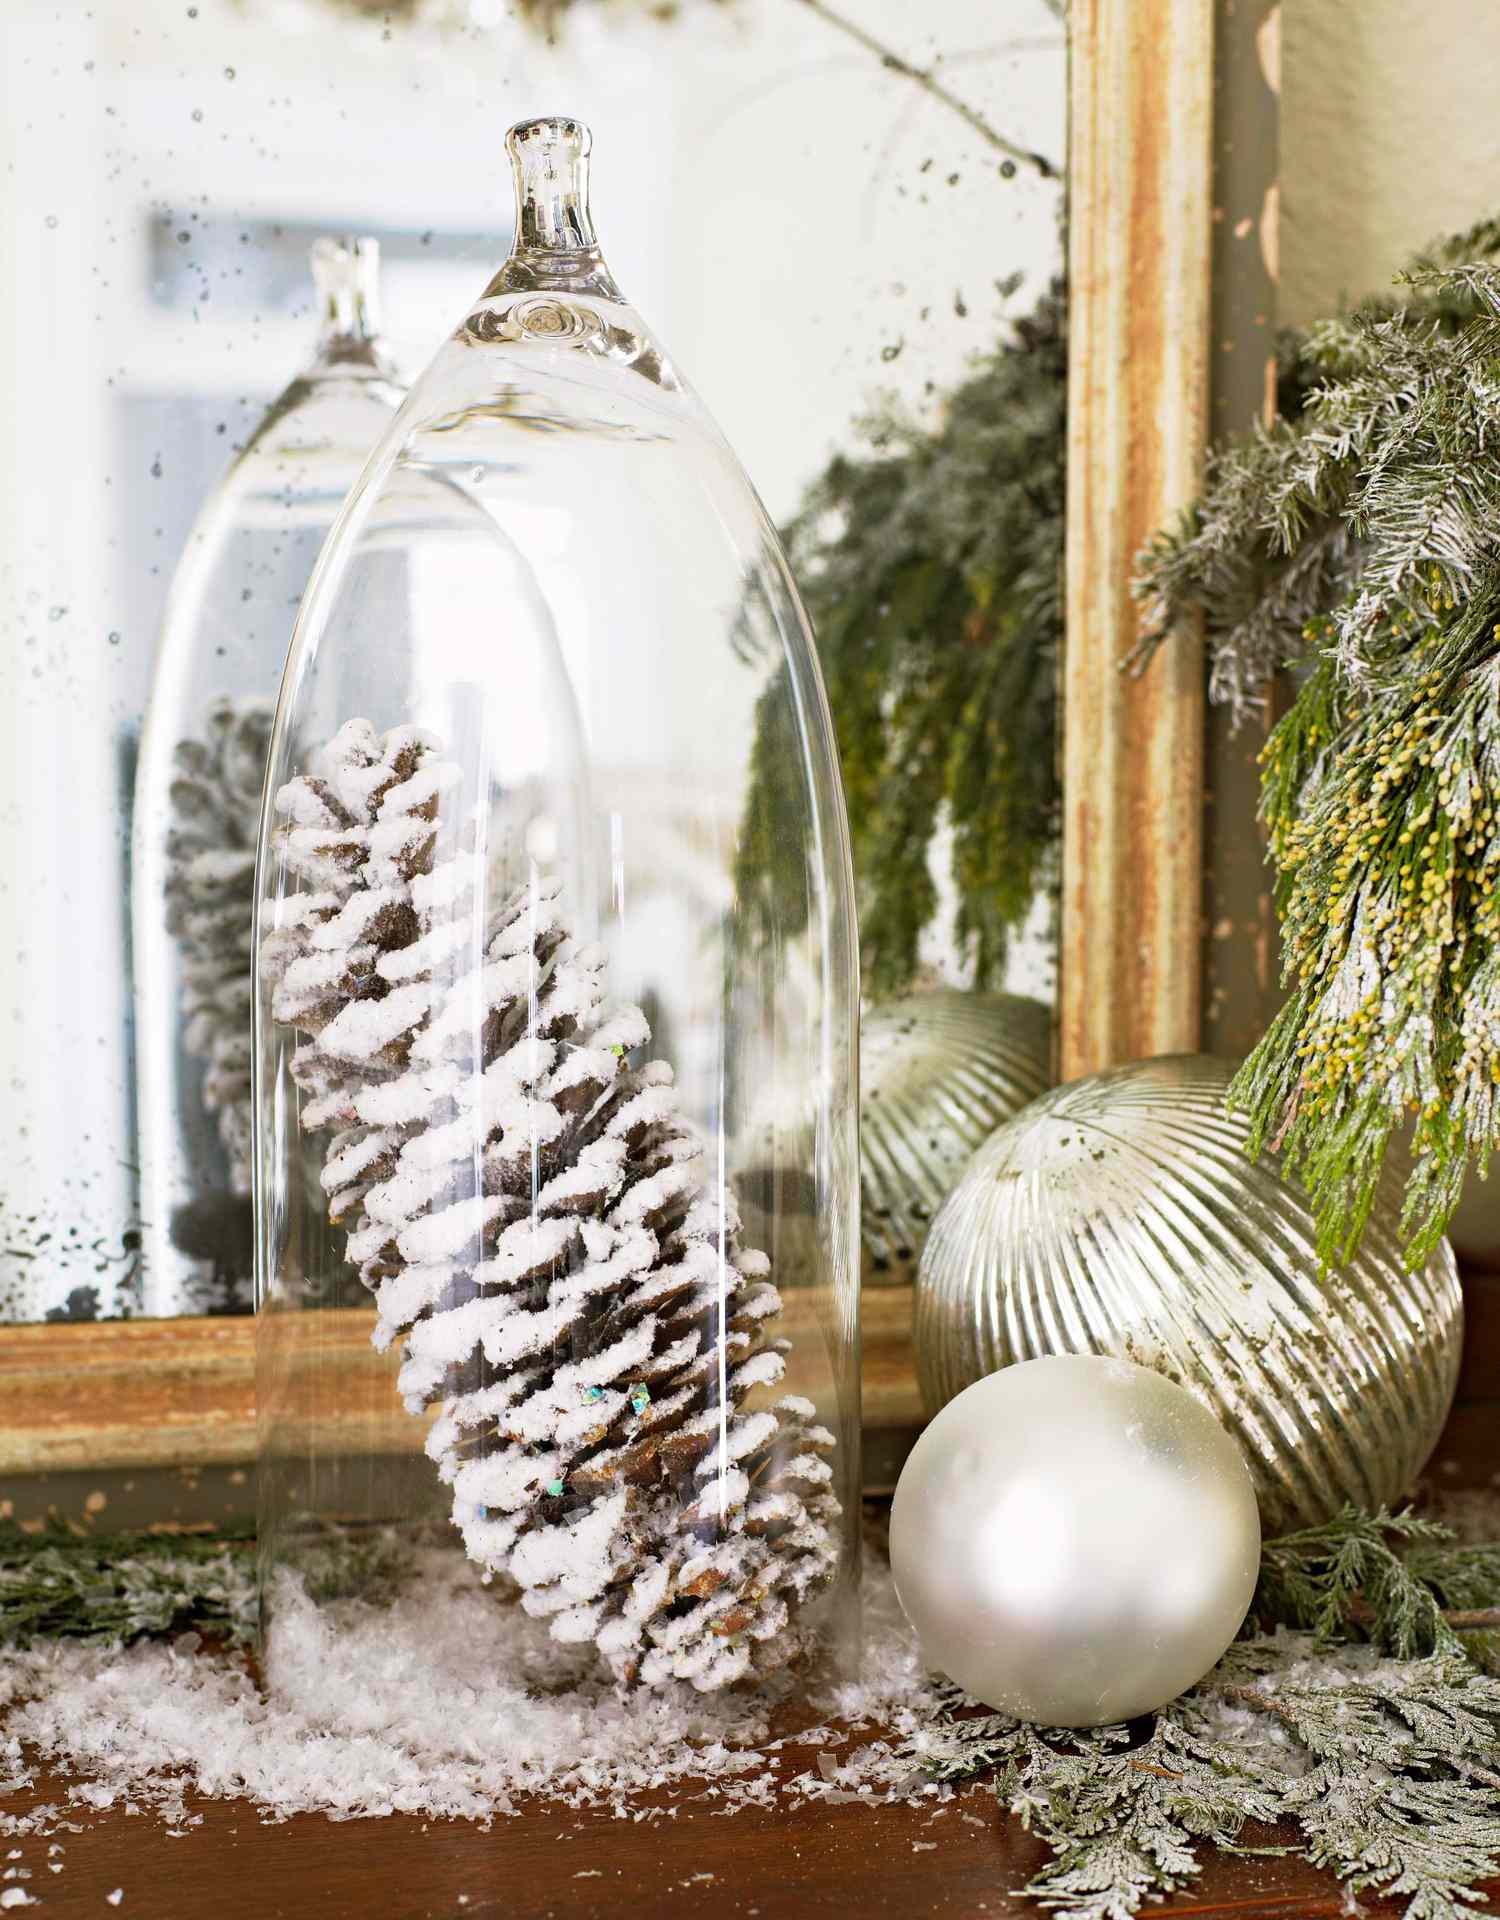
“The glass cloche is the star, but it’s also the most maintenance-intensive element in the entire arrangement.”
Condensation builds up inside any enclosed glass vessel, especially in rooms with fluctuating temperatures (dining rooms that go cold overnight, kitchens with cooking steam). That condensation will eventually cause the artificial snow to clump and discolor — expect to replace the snow bed every 3-4 weeks or whenever you notice yellowing. Dust on the outside of the cloche is instantly visible and ruins the pristine effect; wipe with a microfiber cloth and a 50/50 vinegar-water solution weekly. The mercury glass ornament will develop dark spots if it gets wet from nearby beverages — keep it away from any area where drinks might be placed. The frosted pinecone will gradually lose its “frost” as the artificial coating abrades against the snow bed when the cloche is moved; handle the base, not the dome, to minimize shifting. If you want similar wintery elegance with about 80% less maintenance, skip the cloche and cluster the mercury glass ornaments, matte white ornaments, and pinecones on a silver tray — same palette, no condensation issues.
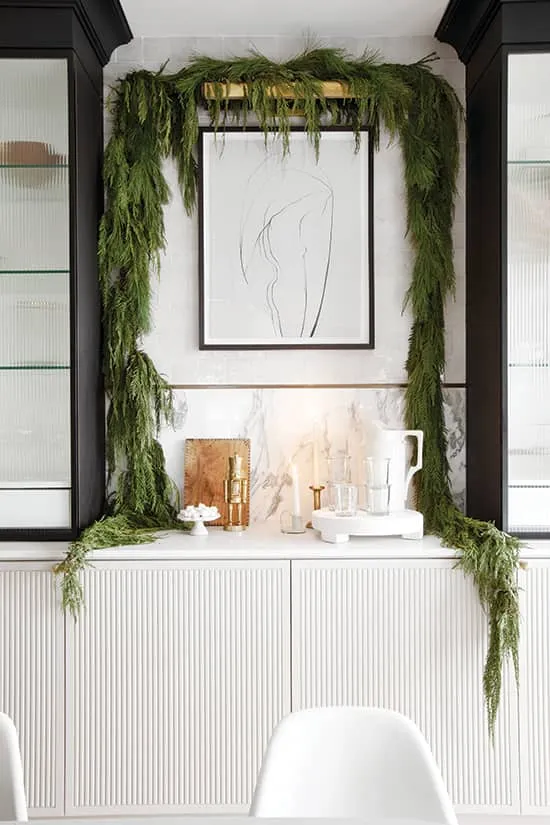
22. Fresh Garland Drape Over Fluted White Cabinetry
Fresh garland is a different animal than faux — it smells incredible, it looks organic and alive, and it dies within 10 days if you don’t treat it right. Here’s the method professionals use to keep fresh greenery looking vibrant through the entire holiday season:
“Before hanging, submerge the entire garland in a bathtub of cool water for 4-6 h”
- Before hanging, submerge the entire garland in a bathtub of cool water for 4-6 hours — it’ll absorb water through the cut stems and needles.
- While still damp, spray the entire garland with an anti-desiccant (Wilt-Pruf is the brand most florists use, $12 per bottle) — this seals moisture into the needles.
- Attach the garland to the black framed display cabinets using green zip ties rather than wire — zip ties won’t cut into the stems as the garland dries and contracts.
- Mist the garland lightly with water every 3 days, focusing on the areas nearest the marble backsplash where heat rises from the sideboard surface.
- Remove any browning sprigs immediately — they’ll accelerate decay in the surrounding greenery.
Time investment: about 30 minutes for the initial treatment, then 5 minutes every 3 days. The fresh scent payback is worth every second.
This elegant arrangement featuring a marble backsplash and white fluted cabinet doors requires substantial wall real estate. The full fresh garland draped over the black display cabinets and framed line art print needs at least 72 inches of wall width to achieve that generous, abundant drape. Sideboard height is critical: the marble backsplash means the countertop is already visually tall, so the wall above needs at least 36 inches of clearance to avoid the garland-print-cabinet cluster from feeling compressed. The golden nutcracker and white pitcher with stacked glasses sit on the countertop and need at least 12 inches of depth so they don’t teeter on the edge. Compare this with the gray paned sideboard in Idea #16 — that version uses lit faux garland in a similar drape but on a shorter wall, making it better suited for 8-foot ceilings. This fresh look with black accents demands 9-foot ceilings to breathe properly.
23. Green Mini-Bar Sideboard Beside a Red Velvet Sofa
The color theory in this sunlit room is absolutely singing: the forest green mini-bar sideboard with gold trim is directly complementary to the deep red velvet sofa with cream throw across the room, creating maximum visual tension and energy. Sunlight streaming through tall multi-paned windows illuminates both pieces and prevents the red-green combination from feeling dark or heavy. The decorated Christmas tree with red, gold, and white ornaments bridges the two furniture pieces — it shares the red of the sofa, the gold of the sideboard trim, and the white of the cream throw, tying the entire room together through deliberate color repetition. The table lamp with a cream shade on the sideboard provides focused task lighting for the mini-bar function (pouring drinks isn’t a job for ambient light alone), while the champagne glasses and bottles signal that this surface has a clear purpose beyond decoration. This is sideboard-as-hospitality-station, and it works because every element serves either beauty or function — ideally both.
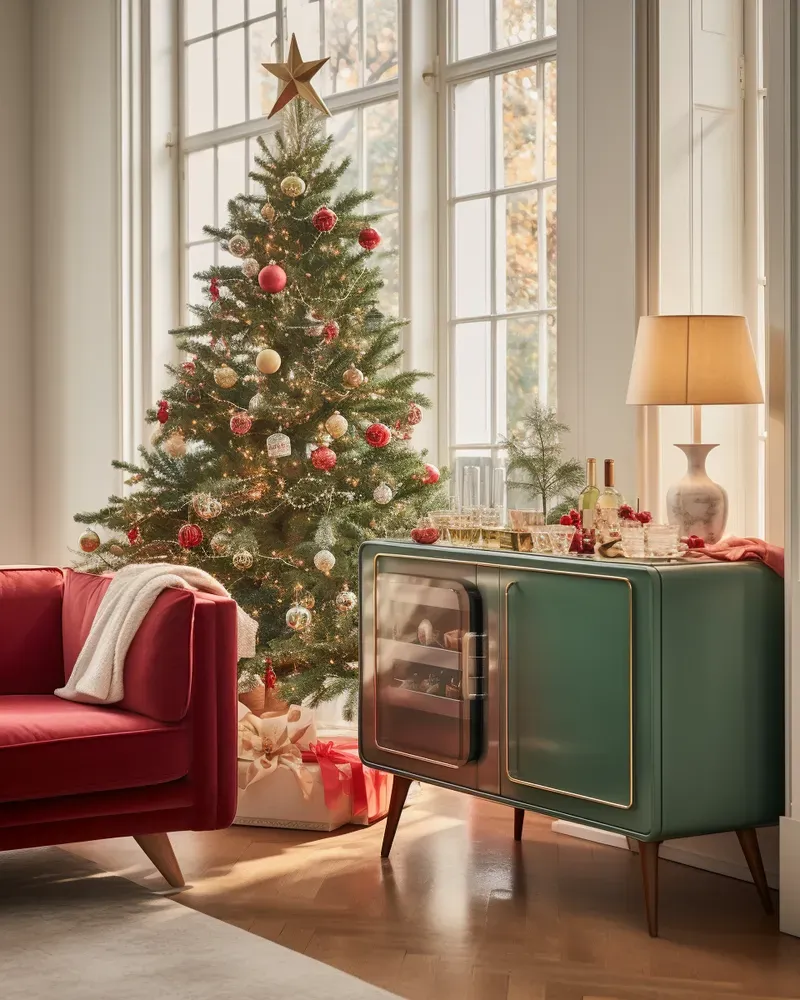
“Before committing to this look, verify these critical factors:”
Before committing to this look, verify these critical factors:
- Confirm the room gets at least 4 hours of natural light — the red and green saturation depends on daylight to read as vibrant rather than muddy; in low-light rooms, these colors will look heavy and oppressive.
- Measure the distance between the sideboard and the sofa — you need at least 42 inches of walking clearance for guests to access the bar comfortably; less than that, and the room feels cramped.
- If the sideboard will hold actual bottles and glassware (not just for show), verify the weight capacity of the surface — the gold trim suggests a wood substrate, which should handle 50+ pounds, but particleboard versions of similar pieces can bow under liquid weight.
- Place the tree at least 24 inches from the nearest heat source (radiator, heating vent, direct sunlight through windows) to prevent needle drop acceleration.
- Check for outlets near the sideboard — the table lamp needs one, and if you’re adding small string lights to the tree, that’s a second outlet; running an extension cord across the room kills the elegance instantly.
24. Illuminated White Branches and Abstract Golden Art
The illuminated white branch garlands draped across the dark glossy console table are the soul of this display — they introduce an organic, sculptural form that contrasts with the rigid geometry of the two large framed abstract artworks above. The glass vase filled with light-colored stones holding taller lit branches creates a secondary focal point that draws the eye upward, while the small illuminated birch-like tree on the opposite side balances the composition asymmetrically. But the abstract golden textured wall art is the unsung anchor — without it, the branches would feel like a random winter centerpiece. The gold in the art ties to the warm yellow glow of the lights, creating cohesion between the wall plane and the table surface. The dark glossy table itself is essential — it acts like a reflecting pool, bouncing the warm light back up into the branches and creating ambient glow that fills the surrounding space. The glass votive with a pinecone accent is a tiny moment of texture that keeps the display from being all-smooth-all-the-time.
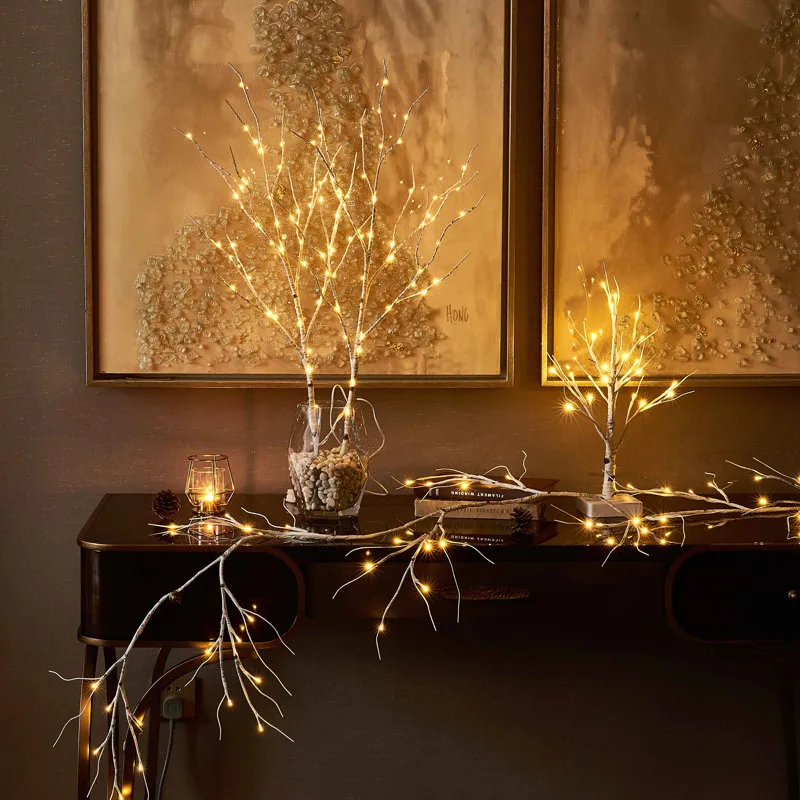
“Illuminated branch garlands are stunning, but they’re essentially delicate sculptures that happen to plug into the wall.”
The white coating on the branches (likely a paint or flocking finish) will flake if the branches are bent or bumped — expect small white particles on the dark glossy console surface within 48 hours of setup. The glass vase with light-colored stones is heavy — when filled, it could weigh 15+ pounds concentrated in a small footprint, which might scratch a glossy finish over time. Place a thin circle of felt ($3 at any craft store, cut to size) under the vase base. The small illuminated tree and glass votive will collect dust in their crevices; a can of compressed air ($6) is your best friend here — it cleans the delicate branch structures in seconds without touching them. The abstract golden art needs occasional dusting, but use a dry Swiffer cloth rather than anything damp, which could streak the textured surface. If you want to avoid the flaking issue entirely, look for branch garlands described as “pre-lit birch branches” (the bark is real birch veneer, not painted) — they cost about 30% more but last for 5+ seasons without degradation.
25. Rustic Wood Console With ‘Twas the Night Sign
The visual breakdown of this cozy, traditional, rustic scene: 40% warm brown wood (distressed sideboard, wooden reindeer figurine, wide plank flooring) + 25% white (shiplap wall, which is doing the same foundational work as the white walls in the farmhouse pie setup in Idea #3) + 20% deep green (artificial pine trees, garland draped across the sideboard front) + 10% red (small accents scattered through the display) + 5% beige/natural (woven lamp shade, neutral transition pieces). The framed “‘Twas the Night Before Christmas” sign is the storytelling element — it gives the entire display a narrative rather than just being a collection of objects. The two tall artificial pine trees create a symmetrical frame at either end of the console, while the wooden reindeer and Santa figure fill the center with whimsy. The lamp with a woven shade adds the kind of task lighting that makes a display feel livable rather than staged.
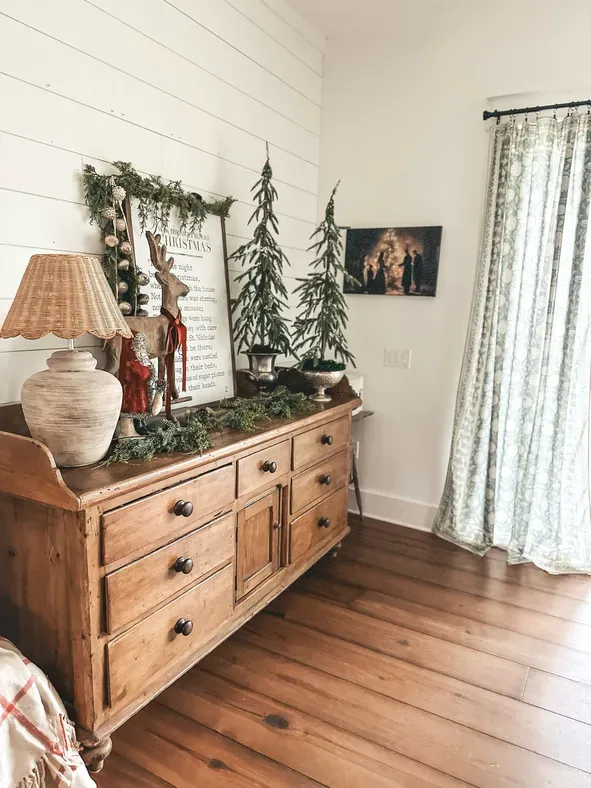
“This rustic look is one of the most budget-friendly ideas in the entire collection because distressed wood and farmhouse decor are abundantly available secondhand.”
The rustic wood sideboard itself: Facebook Marketplace is flooded with similar pieces for $40-120 because the farmhouse trend is cycling out of some homes — you’re benefiting from trend churn. Artificial pine trees: Walmart and Target both carry 3-foot versions for $12-18 each in November; wait until December 26th and they’ll be 50% off. The wooden reindeer figurine: $8-15 at any craft store, or thrift one for $4. The “‘Twas the Night Before Christmas” sign: a DIY version using a reclaimed wood plank ($5 at Habitat ReStore), stenciled lettering ($6 stencil kit), and white paint ($3 sample pot) takes about an hour. This entire display can come together for under $150 including the sideboard, and under $60 if you already own the furniture. The only element worth spending on: quality artificial pine trees with realistic needle texture — the $12 versions look like green plastic, but the $35 versions can fool you from 5 feet away.
Your Sideboard Deserves Its Own Holiday Moment
We’ve just walked through 25 real-life setups — from gold barware with leopard print attitude to serene bottle brush forests and vintage Santas on distressed white — and if one thing is clear, it’s that the sideboard is no longer just a storage piece. It’s the unsung hero of holiday decorating, a surface that can tell a story, host a party, display a collection, or just make your morning coffee feel more festive. Take the ideas that sparked something, tweak them until they sound like your house and not a catalog, and don’t overthink it — the best sideboards look like they evolved, not like they were installed. Ready to give yours the spotlight this season?
📌 Save this to your Christmas Decor board now — you’ll want to reference these ideas when you’re standing in front of your sideboard, garland in hand, wondering where to start.