You know that feeling when you finally find the DIY floating shelf idea that looks exactly right for your space, but the ‘DIY’ part feels a little… intimidating? We get it. That’s why we dove deep into the world of floating shelves to find styles that are not just beautiful, but actually achievable. After filtering through hundreds of options, we narrowed it down to 29 incredible ideas that deliver on both style and substance, covering rustic, minimalist, and eclectic looks.
These aren’t just pretty pictures; we’re showing you how to bring these designs to life. As we head into 2026, the trend is all about creating personal, curated displays that tell your story—and floating shelves are the perfect canvas. And stay until the end — we break down the most common mistakes that can ruin these looks. 📌 Save this to Pinterest for later — you’ll want to revisit these ideas.
1. Start Here: Planning the Perfect Floating Shelf
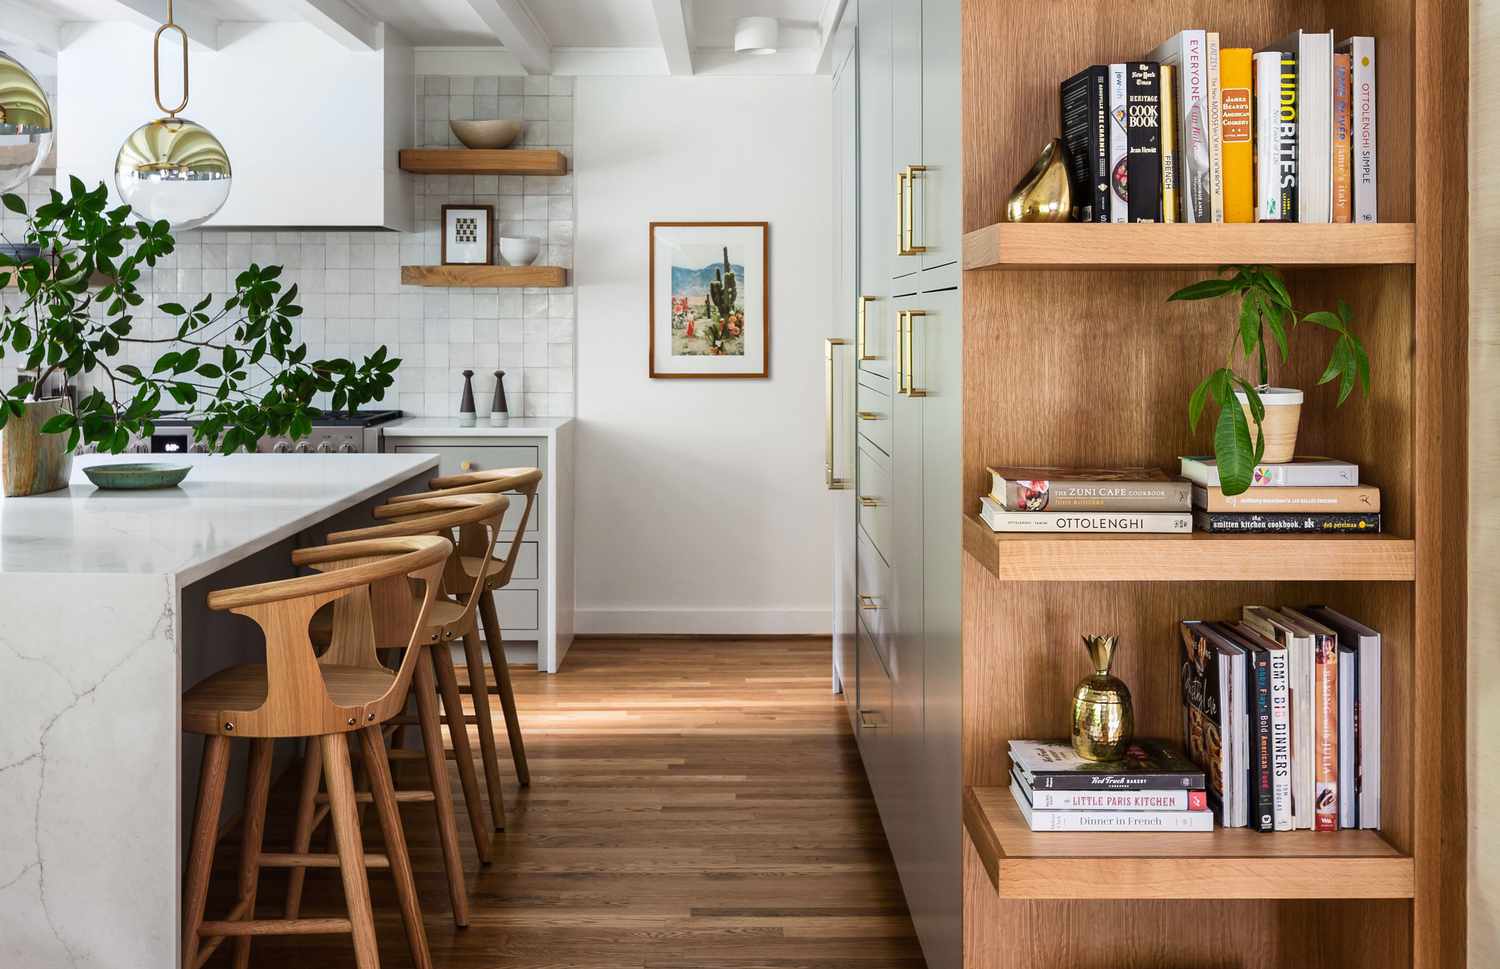
Before you even pick up a drill, a little planning goes a long way. Nailing the execution of a floating shelf project is less about fancy tools and more about thoughtful prep work. Taking a moment to answer these questions will save you from patching up drywall later.
“What is the primary purpose?”
Is it for heavy books, lightweight decor, or daily-use items like coffee mugs? This determines the type of shelf and hardware you’ll need.Where are the wall studs? Use a stud finder and mark their locations. Relying on drywall anchors alone for anything other than the lightest objects is a recipe for disaster.What is the overall room aesthetic? The shelf material, thickness, and finish should complement your existing decor, not fight it.
Let’s be honest: not all floating shelves are created equal. The super-slim, minimalist shelves you see on Pinterest often require specialized hardware that’s recessed into the wall, which might mean cutting into your drywall. Heavier-duty shelves for things like dishes or a TV stand need to be anchored directly into multiple studs with beefy lag bolts. If you’re a renter or new to DIY, consider shelves with visible brackets first. They offer a similar look with a much more forgiving installation process and are surprisingly stylish.
2. Light Wood Shelving Integrated with a Living Room Niche
This design is a masterclass in creating cohesion. By extending the lowest of the light wood-grained shelves beyond the wall niche to meet the light beige sofa, the designer turns two separate elements—storage and seating—into one unified feature. This blurs the line between furniture and architecture, making the whole room feel custom-built and thoughtfully planned. The consistent use of a warm, neutral palette, from the book collection to the sofa fabric, allows the texture of the wood grain and the pops of color from book spines to stand out without overwhelming the senses.
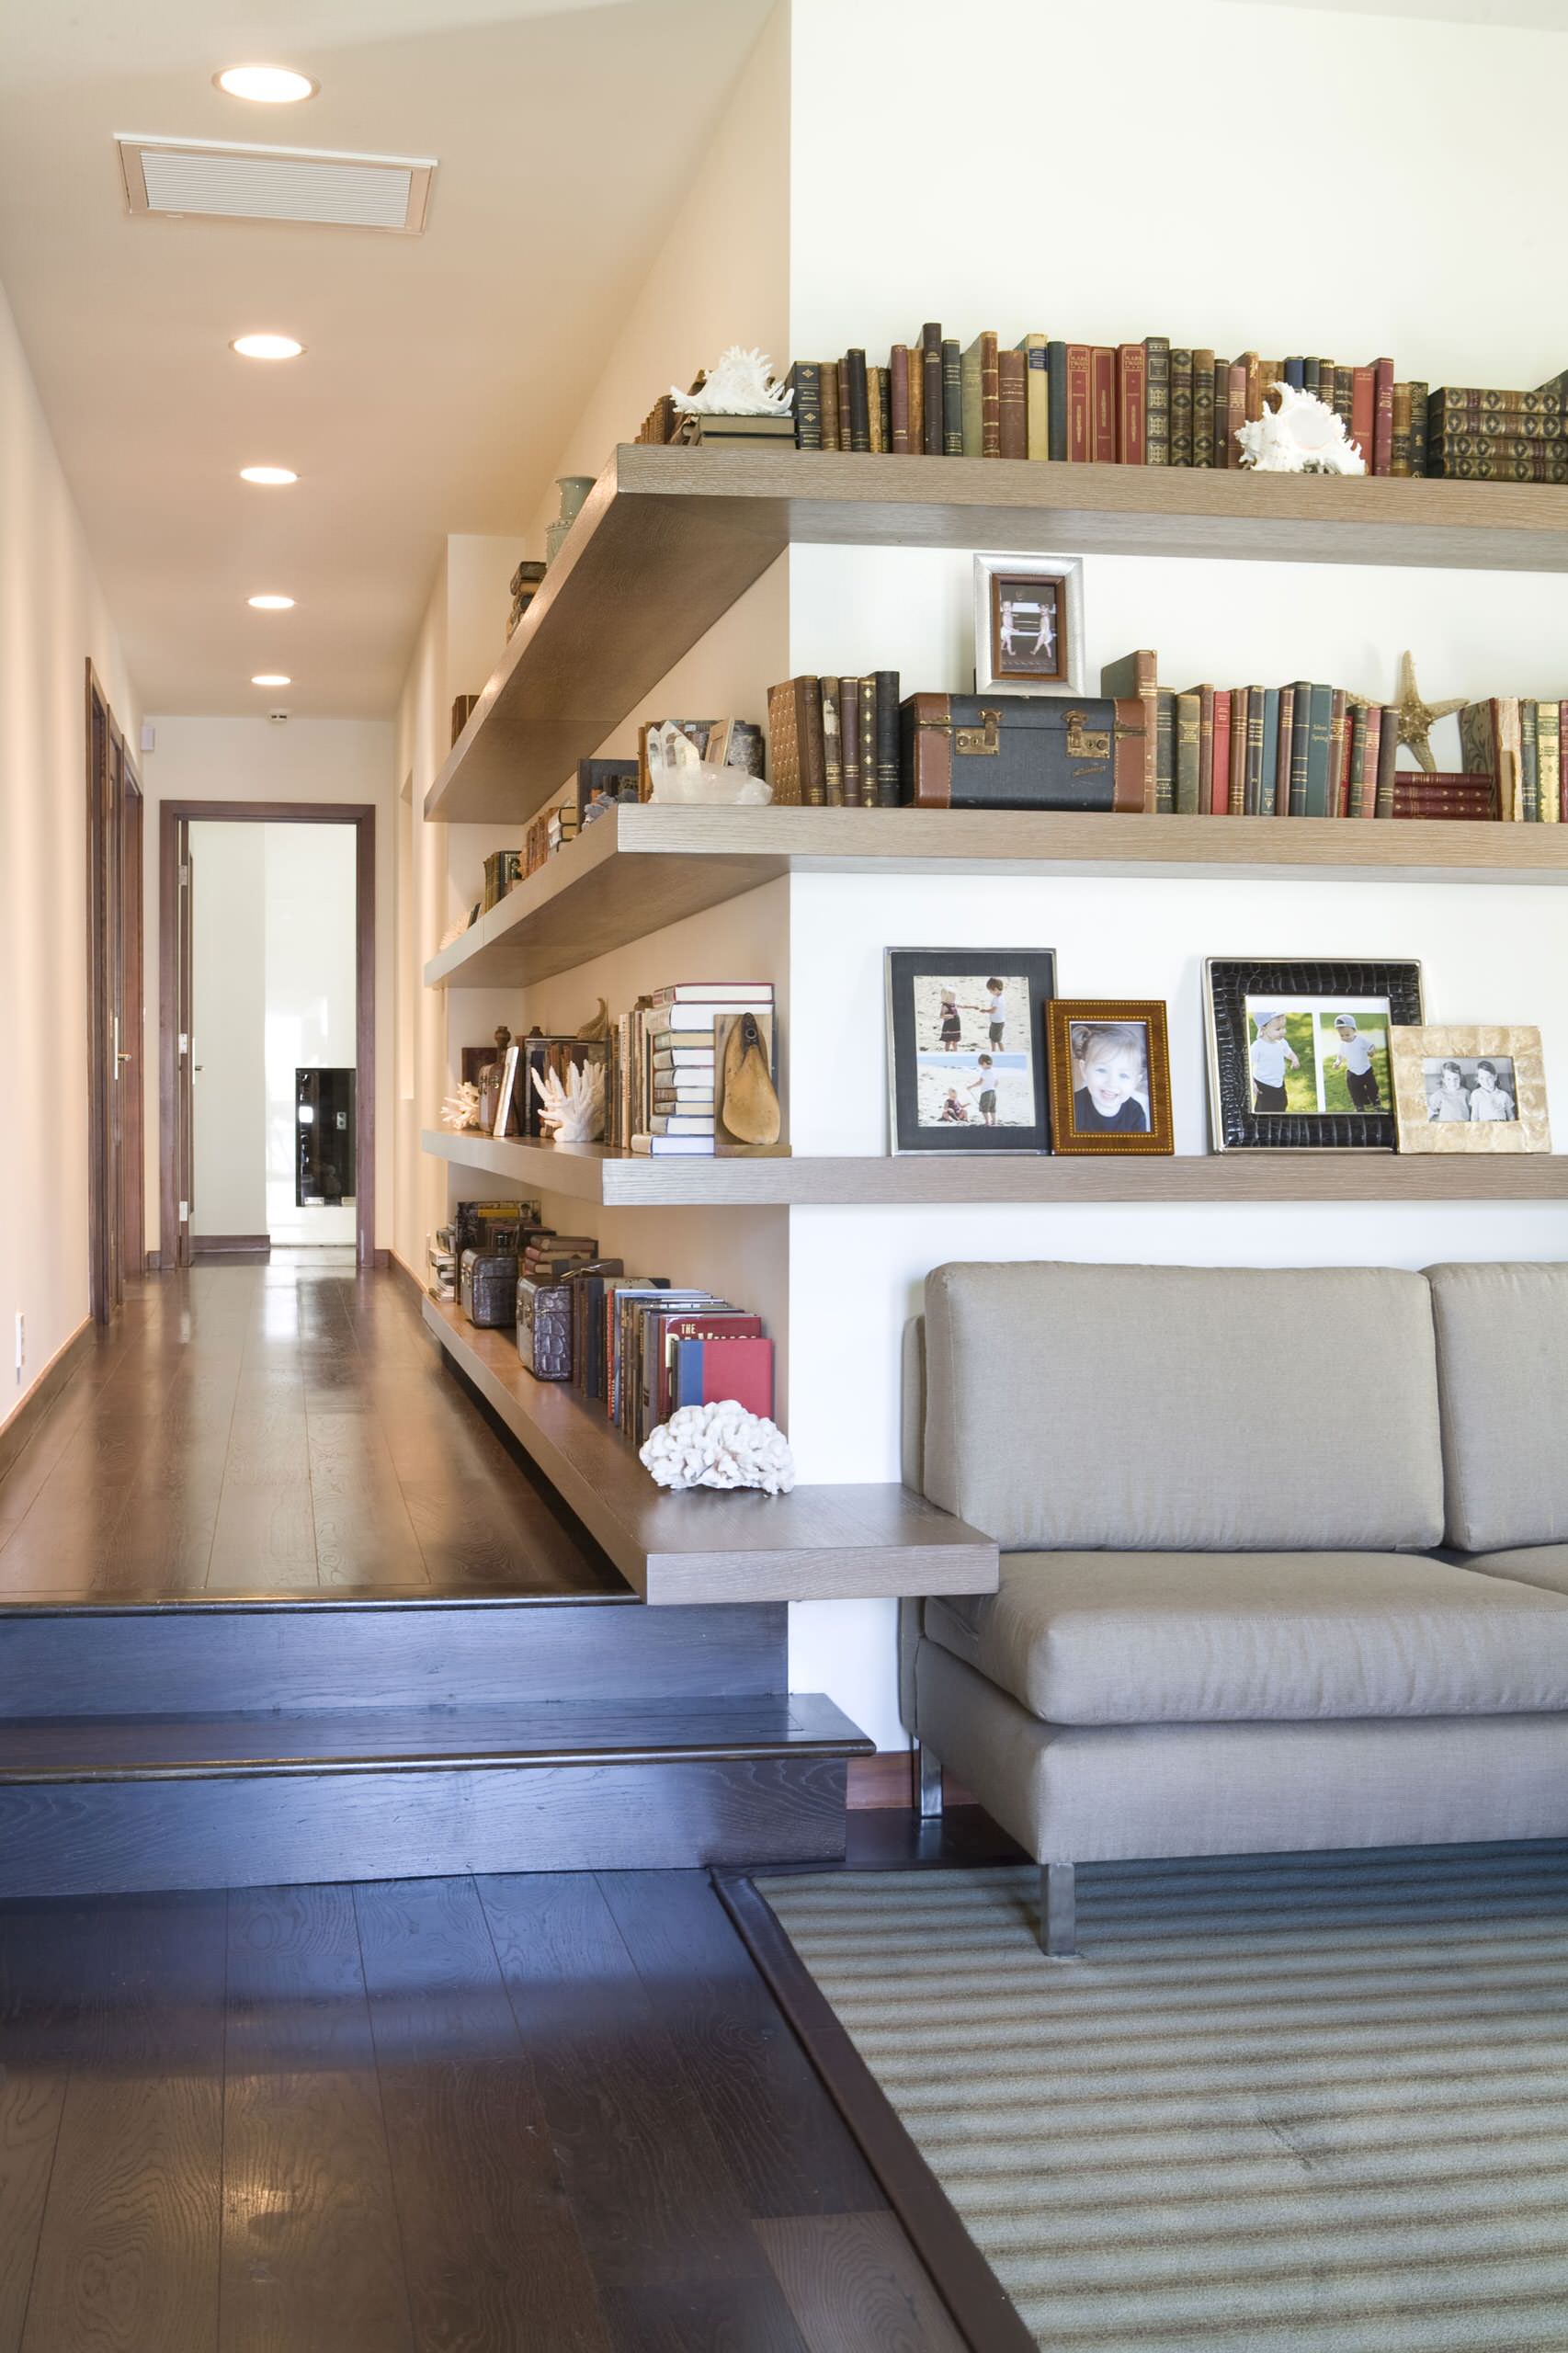
“A full-wall installation like this shines in a room with at least 10-12 feet of uninterrupted wall space and standard 8-foot ceilings.”
The key is giving the shelves room to breathe so they feel expansive, not cramped. For this to work, the recessed niche should be at least 6 feet wide. Anything smaller and the shelves might look stubby. The success of this look hinges on its generous scale. If you have a smaller room, consider adapting this concept with fewer, shorter shelves, like the corner display in Idea #3, to avoid overpowering the space.
3. Lively Corner Shelves with a Tiered Plant Display
This fresh corner display follows a simple but effective formula: 50% structural white + 40% natural elements + 10% curated accents. The white corner shelves and wall create a clean, bright canvas. The bulk of the visual interest comes from the natural textures and colors of the green plants and terracotta pots. The final 10% is the personality—the black-framed art, colorful book spines, and a single gold object. You could easily swap the accents to change the vibe: replace the terracotta and gold with concrete and black for an industrial feel, all while keeping the same balanced composition.
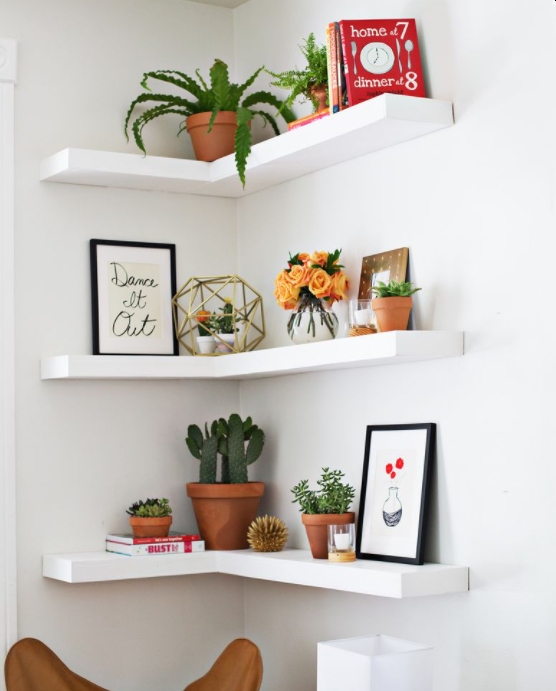
“When installing corner shelves, accuracy is everything.”
To ensure a perfect fit and a level surface, create a simple paper template of your shelf. Hold it up in the corner and use a pencil to mark your drill holes for the brackets. Then, use a small level on your marks *before* you drill. For hollow walls, always use appropriate drywall anchors—toggle bolts are great for this kind of medium-weight load. This little bit of prep work prevents the dreaded shelf-slope and ensures your plant collection stays put.
4. Constructing a Box-Frame Shelf with Pocket Hole Joinery
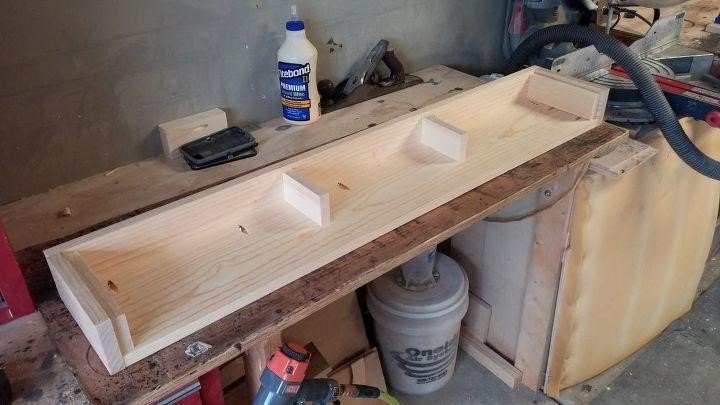
Building a sturdy box-frame shelf like this is easier than it looks, thanks to pocket holes. Time: 2 hours. Cost: $30-$50 in lumber.
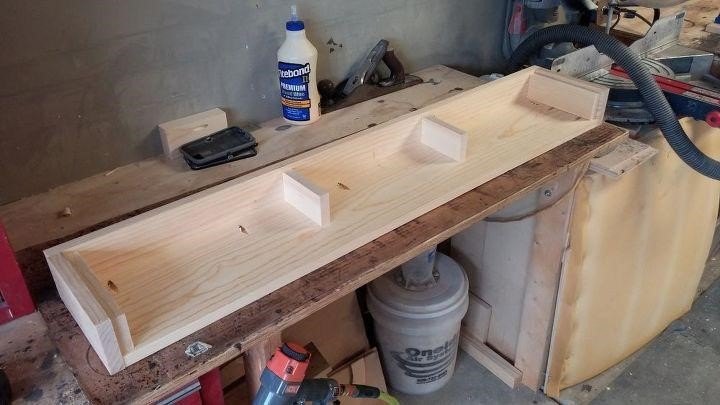
“Cut your top, bottom, side, and internal support pieces to your desired dimensions from a 1×6 or 1×8 board.Set your pocket hole jig for the thickness of your wood (typically 3/4 inch).Drill two pocket holes on the ends of your bottom panel where it will meet the side pieces.Drill two pocket holes on each side of your internal support pieces.Attach the sides to the bottom panel using wood glue and 1 1/4-inch pocket hole screws.Position your internal supports and secure them from the bottom with glue and screws.”
Finally, attach the top panel.
The beauty of building your own floating shelves is the massive cost savings. A pre-made solid wood floating shelf of this size could cost $150-$300. By going the DIY route with basic pine or poplar boards from a hardware store, you can achieve the same structural integrity for under $50. For an even cheaper option, use a single sheet of 3/4-inch plywood, which costs around $60-$80. You can get multiple shelves out of one sheet, bringing the per-shelf cost down to around $20. The pocket hole jig is a one-time investment (around $40) that you’ll use for countless other projects.
5. The Anatomy of a Floating Shelf: Exposed Plywood Construction
This ‘before-and-after’ on a single wall is brilliant because it demystifies the floating shelf. Seeing the raw plywood box construction with its internal supports next to the finished, dark-stained version removes the magic and shows you the bones. It demonstrates that the ‘floating’ effect is just a simple box that slides over a hidden wall cleat. This side-by-side view is empowering for a DIYer, showing that the sleek final product is just a matter of wood, screws, and a good finishing job. The contrast between the raw and finished states makes you appreciate the transformation even more.
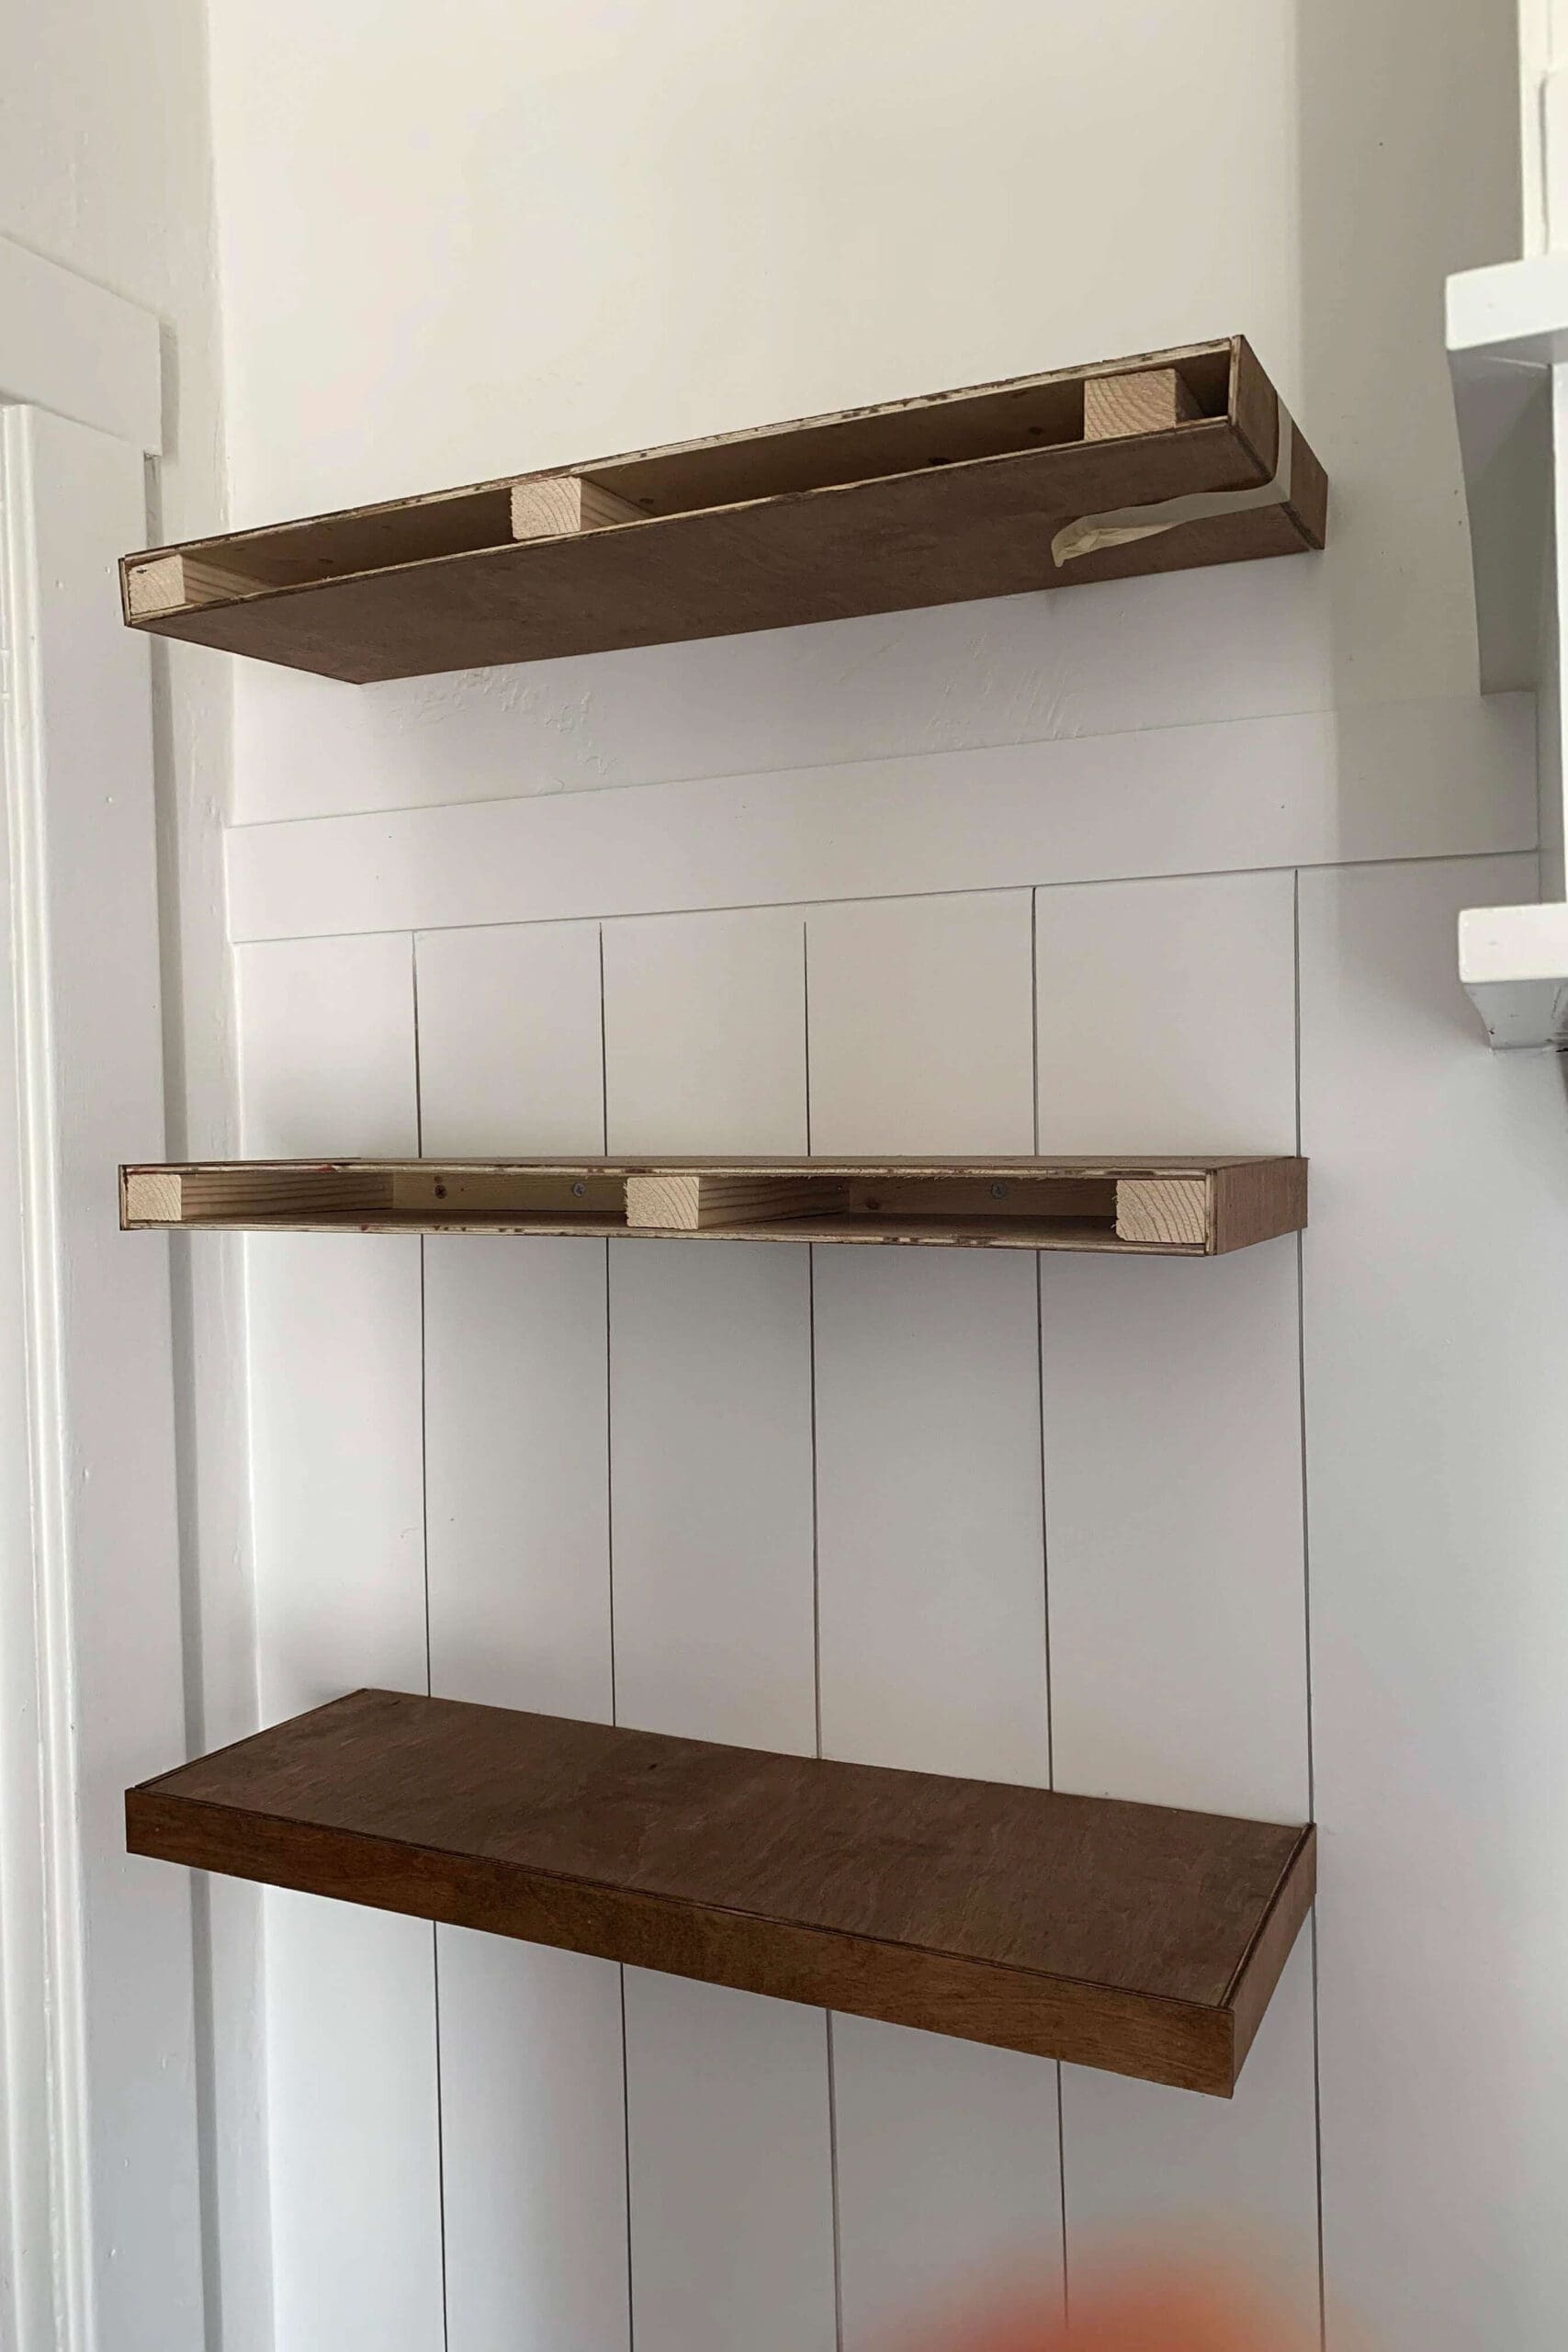
“Leaving wood unfinished, like the top two plywood shelves, has a certain rustic appeal but comes with trade-offs.”
Raw plywood is highly susceptible to moisture, which can cause it to warp, swell, or delaminate over time—a major issue in humid climates or bathrooms. It also stains incredibly easily. A simple water glass ring can become a permanent feature. The dark-stained bottom shelf, however, is sealed and protected. A few coats of polyurethane or a hardwax oil not only give it the rich color but also create a durable barrier against spills and moisture, making it far easier to wipe clean and maintain long-term.
6. Three Minimalist Floating Shelves in a Gray Wall Nook
The single element that makes this simple setup work is the medium-gray paint inside the recessed nook. Without it, the light brown shelves would blend into the surrounding beige walls, looking flat and unintentional. The gray creates depth and contrast, visually ‘carving out’ the space and turning a simple architectural quirk into a deliberate design feature. It makes the shelves pop and gives the objects on them a proper backdrop. If you removed that splash of color, the entire composition would lose its impact and architectural definition.
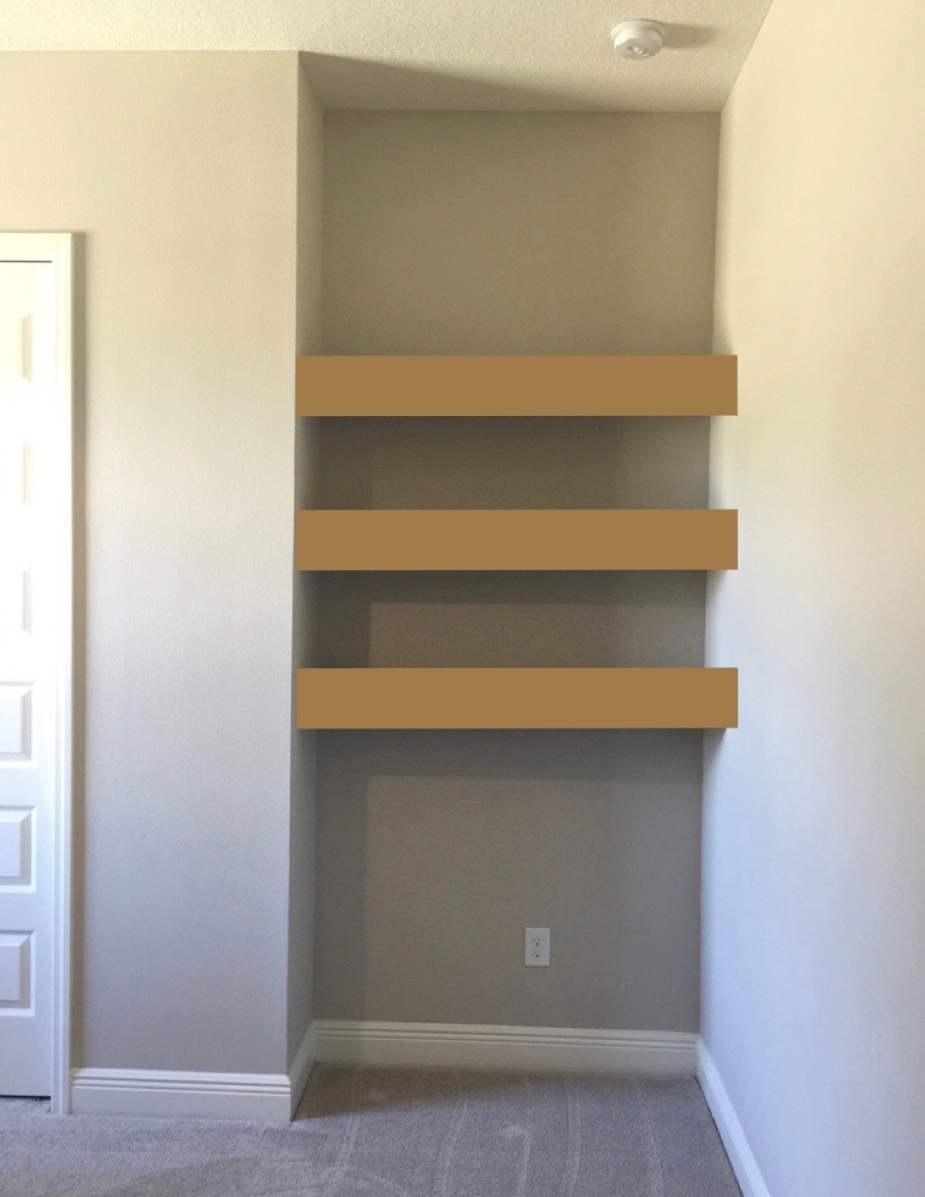
“When you have a recessed nook, custom-cut shelves will always look more polished than standard sizes.”
Measure the depth and width of the nook at three different points (top, middle, bottom and back, middle, front) as walls are rarely perfectly square. Use the smallest of these measurements to cut your shelves. This ensures they’ll slide in easily. Aim for a gap of no more than 1/8-inch on each side for a professional, built-in look. You can use a bead of paintable caulk to fill any small gaps for a seamless finish.
7. Raw Wood Floating Shelves in a Blue-Gray Bathroom
Using completely raw, unfinished wood shelves in a bathroom is a bold choice with significant risks. Bathrooms are high-humidity zones, and steam from the shower will inevitably penetrate the wood. This can lead to warping, mold, or mildew growth over time. While the natural look is appealing, it’s not practical for a wet environment without some protection. At a bare minimum, these shelves should be sealed with several coats of a matte-finish marine varnish or a hardwax oil to protect them from moisture while retaining a natural look. Compare this with the sealed shelves in Idea #14, which are better suited for a high-traffic area.
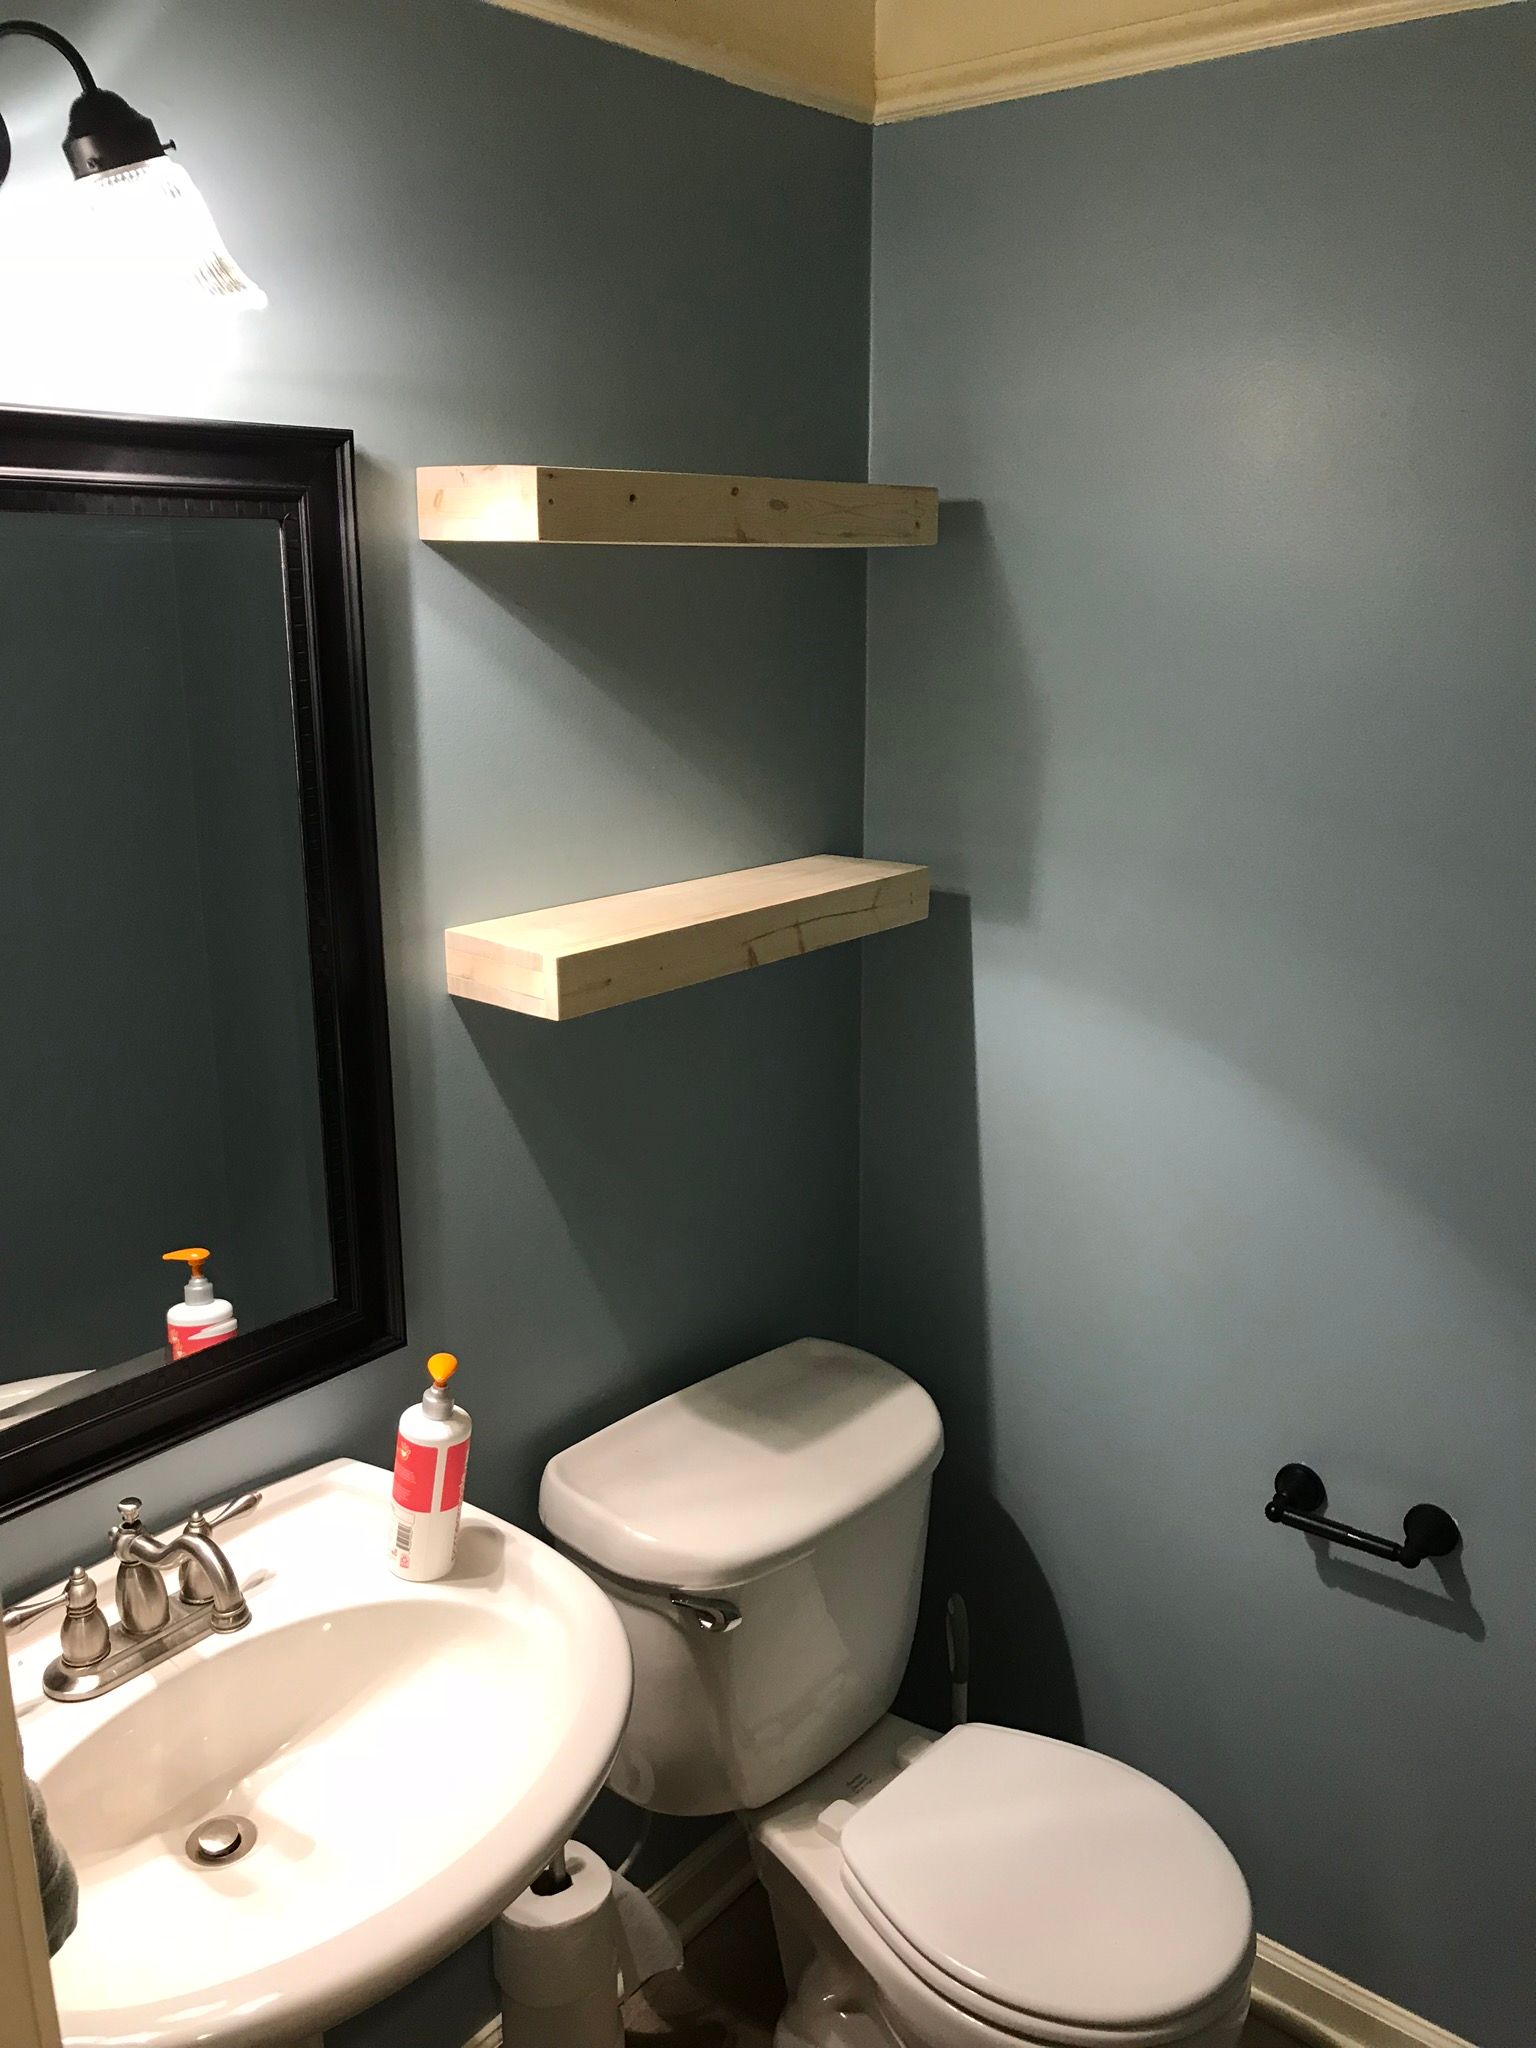
“Recreating this simple, functional bathroom corner is very budget-friendly.”
Recreating this simple, functional bathroom corner is very budget-friendly.
- Wall Paint (1 Gallon): $40 – $70
- Black-Framed Mirror: $80 – $200
- Unfinished Pine Shelves (2): $30 – $60
- Fittings (faucet, toilet paper holder): $100 – $250
- Decor/Accessories: $20 – $50
TOTAL: $270 – $630
Budget alternative: Find a mirror at a thrift store and paint the frame black ($50), use leftover paint ($0), and choose the most basic, affordable faucet and hardware options ($80) for a total look under $180.
8. Sage Green Wall with Light Wood Shelves for a Coffee Nook
This vignette is successful because of its tight color and thematic curation. The muted sage green wall provides a soft, calming backdrop that makes the light wood of the shelves feel warm and inviting. The styling is focused entirely around a single ritual: making coffee. Every item, from the ‘Coffee Atlas’ book to the glass pour-over, serves the theme. This intentionality prevents the shelves from looking like random clutter. The clear glass and black accents are repeated in the pots, bottles, and coffee maker, creating a satisfying visual rhythm.
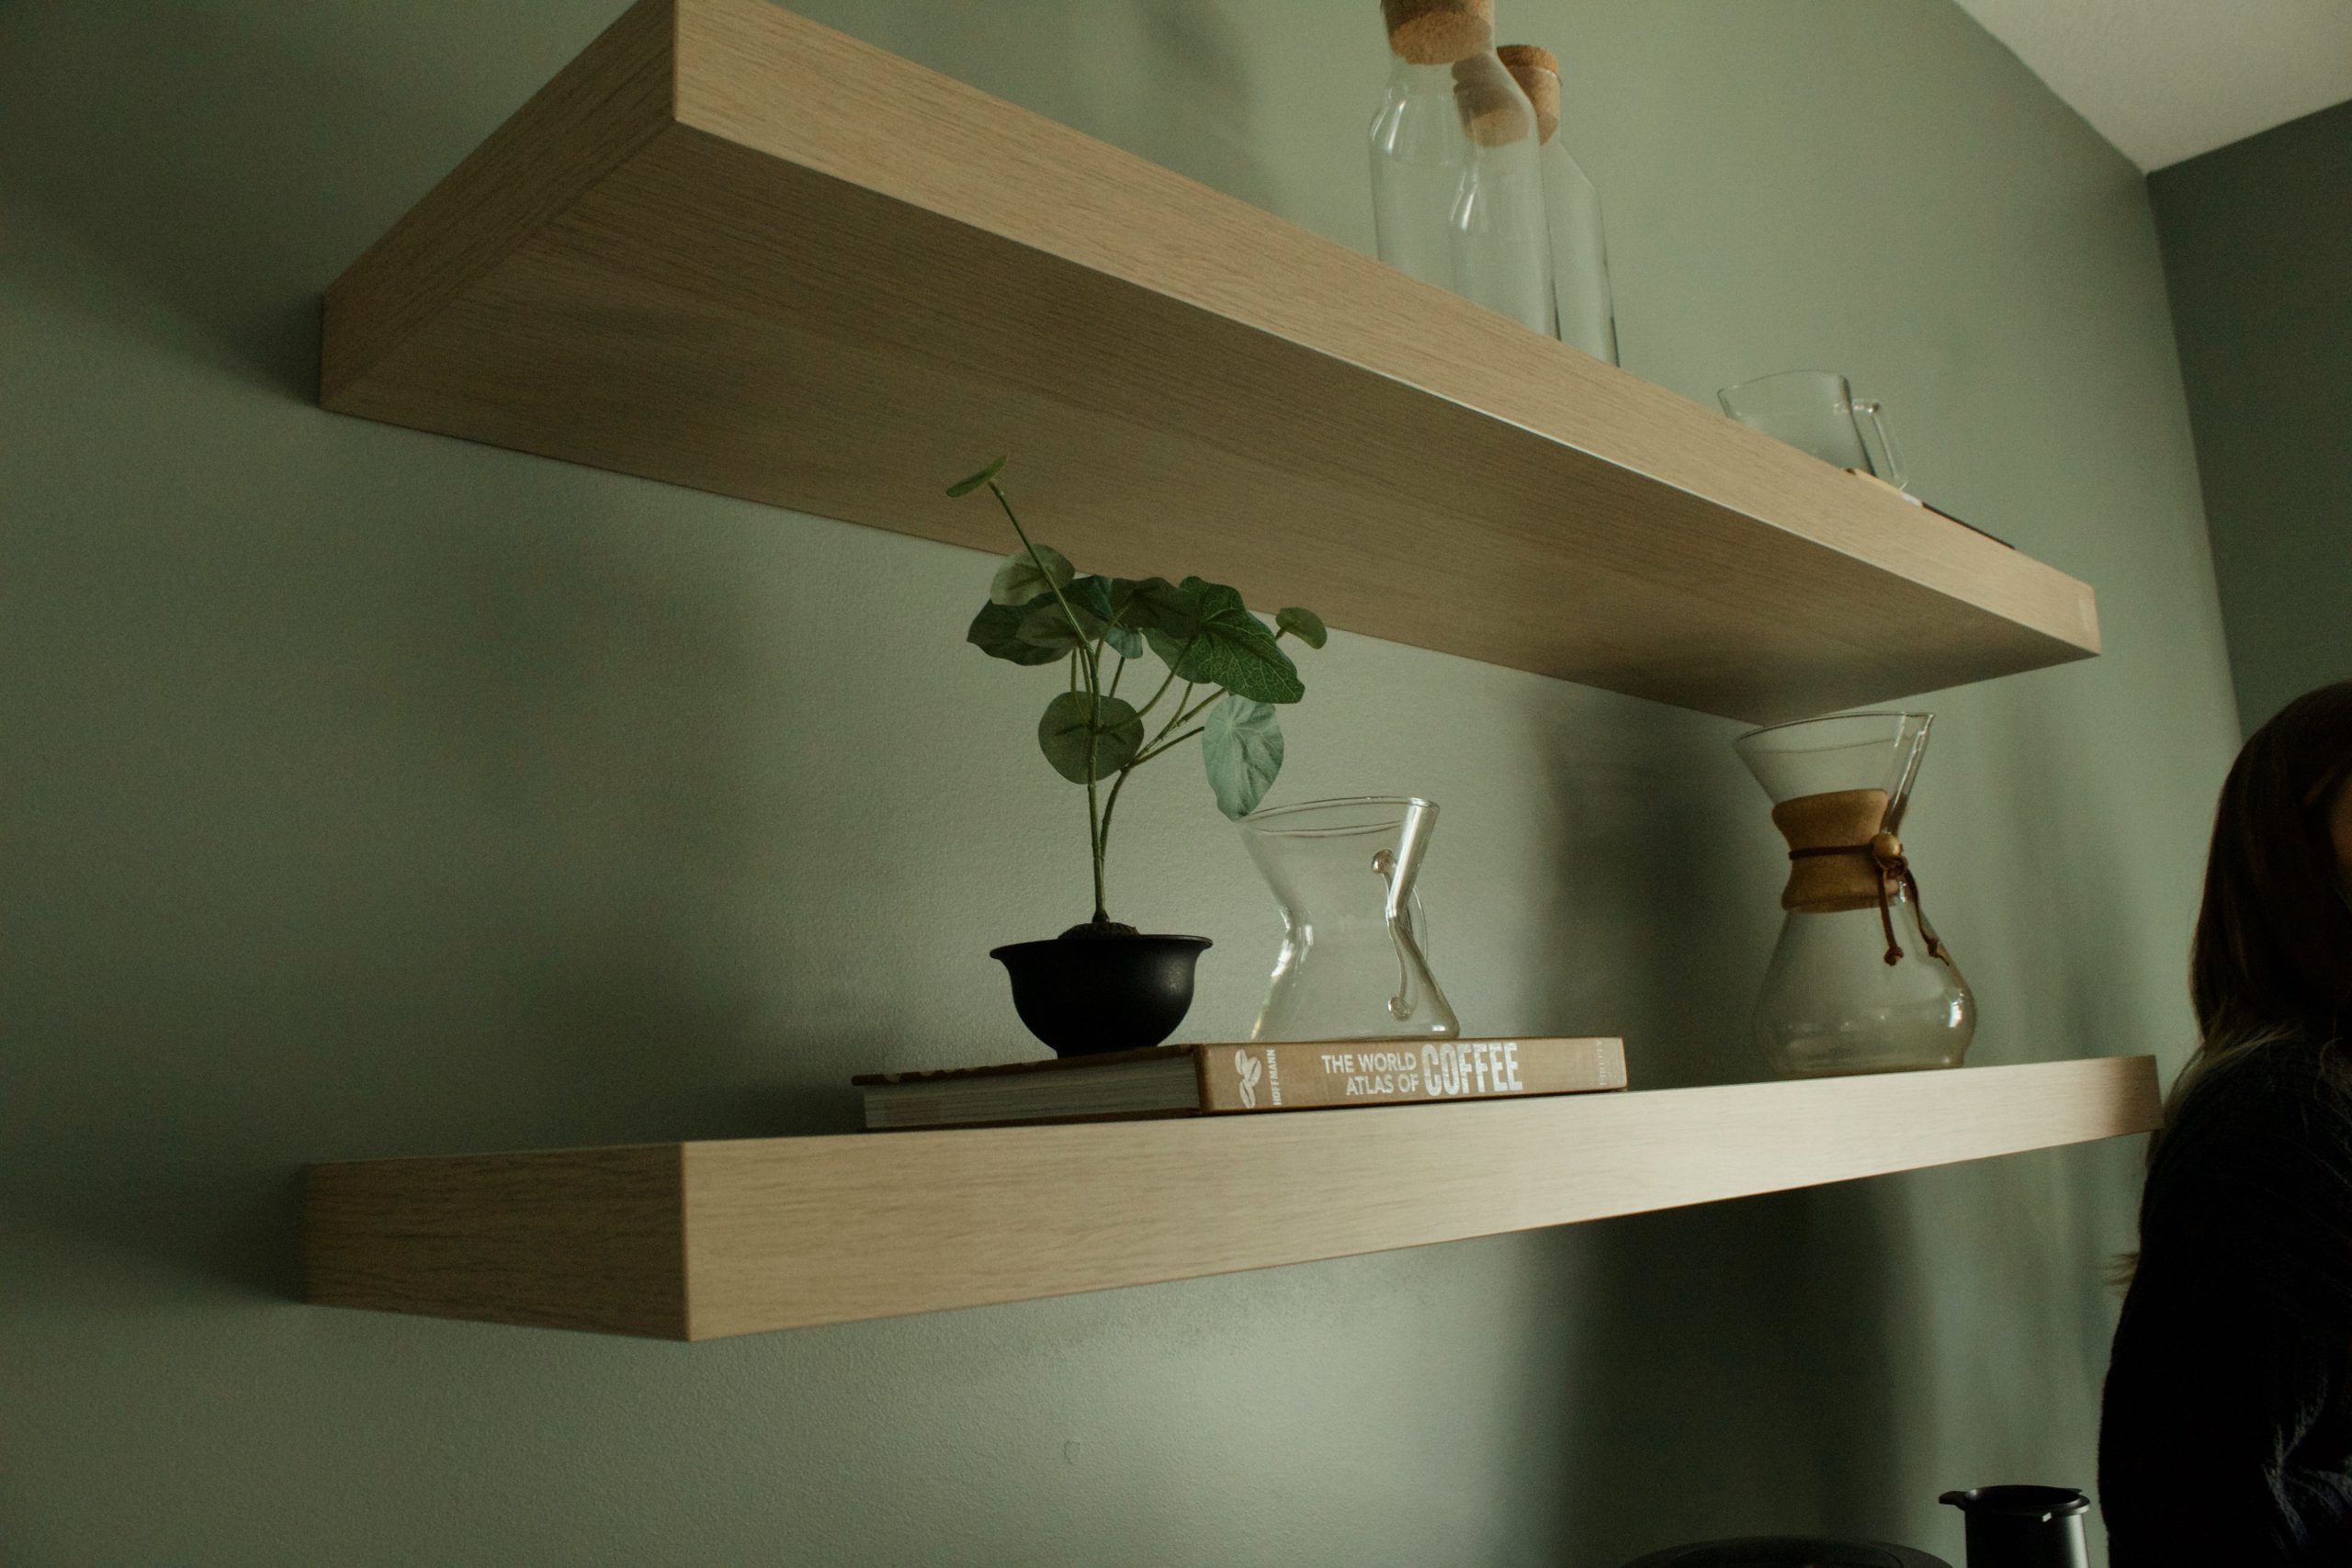
“The crucial element here is the sage green wall color.”
It’s the foundation that elevates everything else. If the wall were plain white, the light wood shelves and clear glass accessories would lack contrast and feel washed out. The green adds a layer of earthy sophistication and depth, making the simple objects feel thoughtfully curated. It bridges the natural wood tones and the leafy green plant, creating a harmonious, nature-inspired palette that feels both modern and comforting. Without that specific color, the mood would shift from a cozy nook to a generic kitchen shelf.
9. Asymmetrical White Shelves with Pampas Grass and Plants
Creating a balanced asymmetrical arrangement like this is an art. The trick is to visually balance ‘heavy’ and ‘light’ items. Here, the large vase of pampas grass on the right is visually heavy due to its height. It’s balanced by the trailing plant on the far left of the top shelf. The stack of books provides a solid block of color that anchors the lower shelf. To get this right, follow these steps:
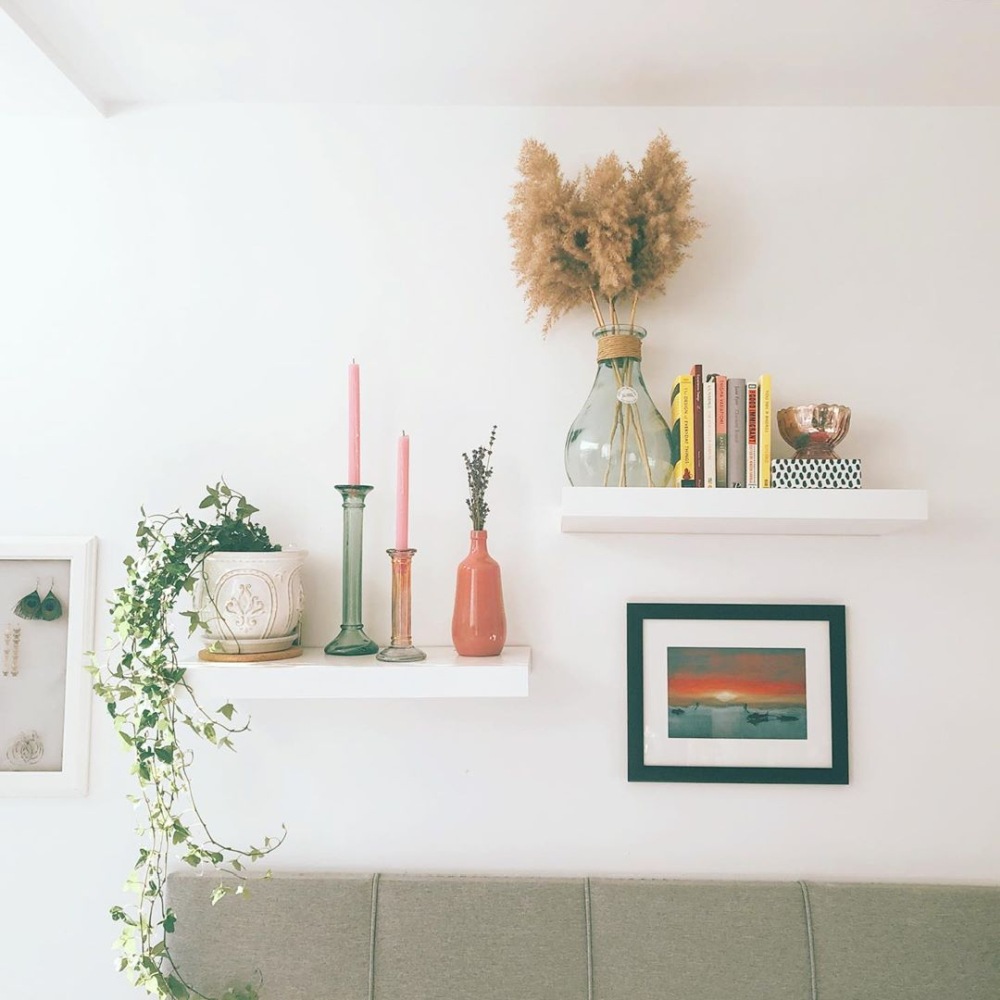
“Place your largest item first (the pampas grass).Place your second largest or mo”
- Place your largest item first (the pampas grass).
- Place your second largest or most contrasting item on the opposite side (the trailing plant).
- Fill in the gaps with smaller groups of objects.
- Step back frequently to check the overall balance.
An eclectic, personalized look like this is perfect for a tight budget because it thrives on found objects and personality, not expensive matching sets. You can recreate this entire vibe for under $75. The white floating shelves themselves are inexpensive (IKEA’s LACK shelves are a classic for around $20 each). Source colorful books from a thrift store for a dollar or two apiece. The pampas grass can often be foraged for free (with permission!) or bought cheaply at a craft store. Propagate a trailing plant from a friend’s collection. The key is to mix textures and shapes, which costs nothing but creativity.
10. Live-Edge Wood Shelves in a Simple White Niche
Live-edge wood has been a strong trend for years, and this application shows why it has staying power. As we move towards more biophilic design—the practice of connecting with nature within our homes—elements like this are more relevant than ever. This isn’t just a shelf; it’s a slice of a tree. The raw, organic edge brings an untamed piece of the outdoors inside, contrasting beautifully with the clean, sharp lines of the white niche. It taps into our collective desire for authenticity and natural materials in a world of mass-produced goods.
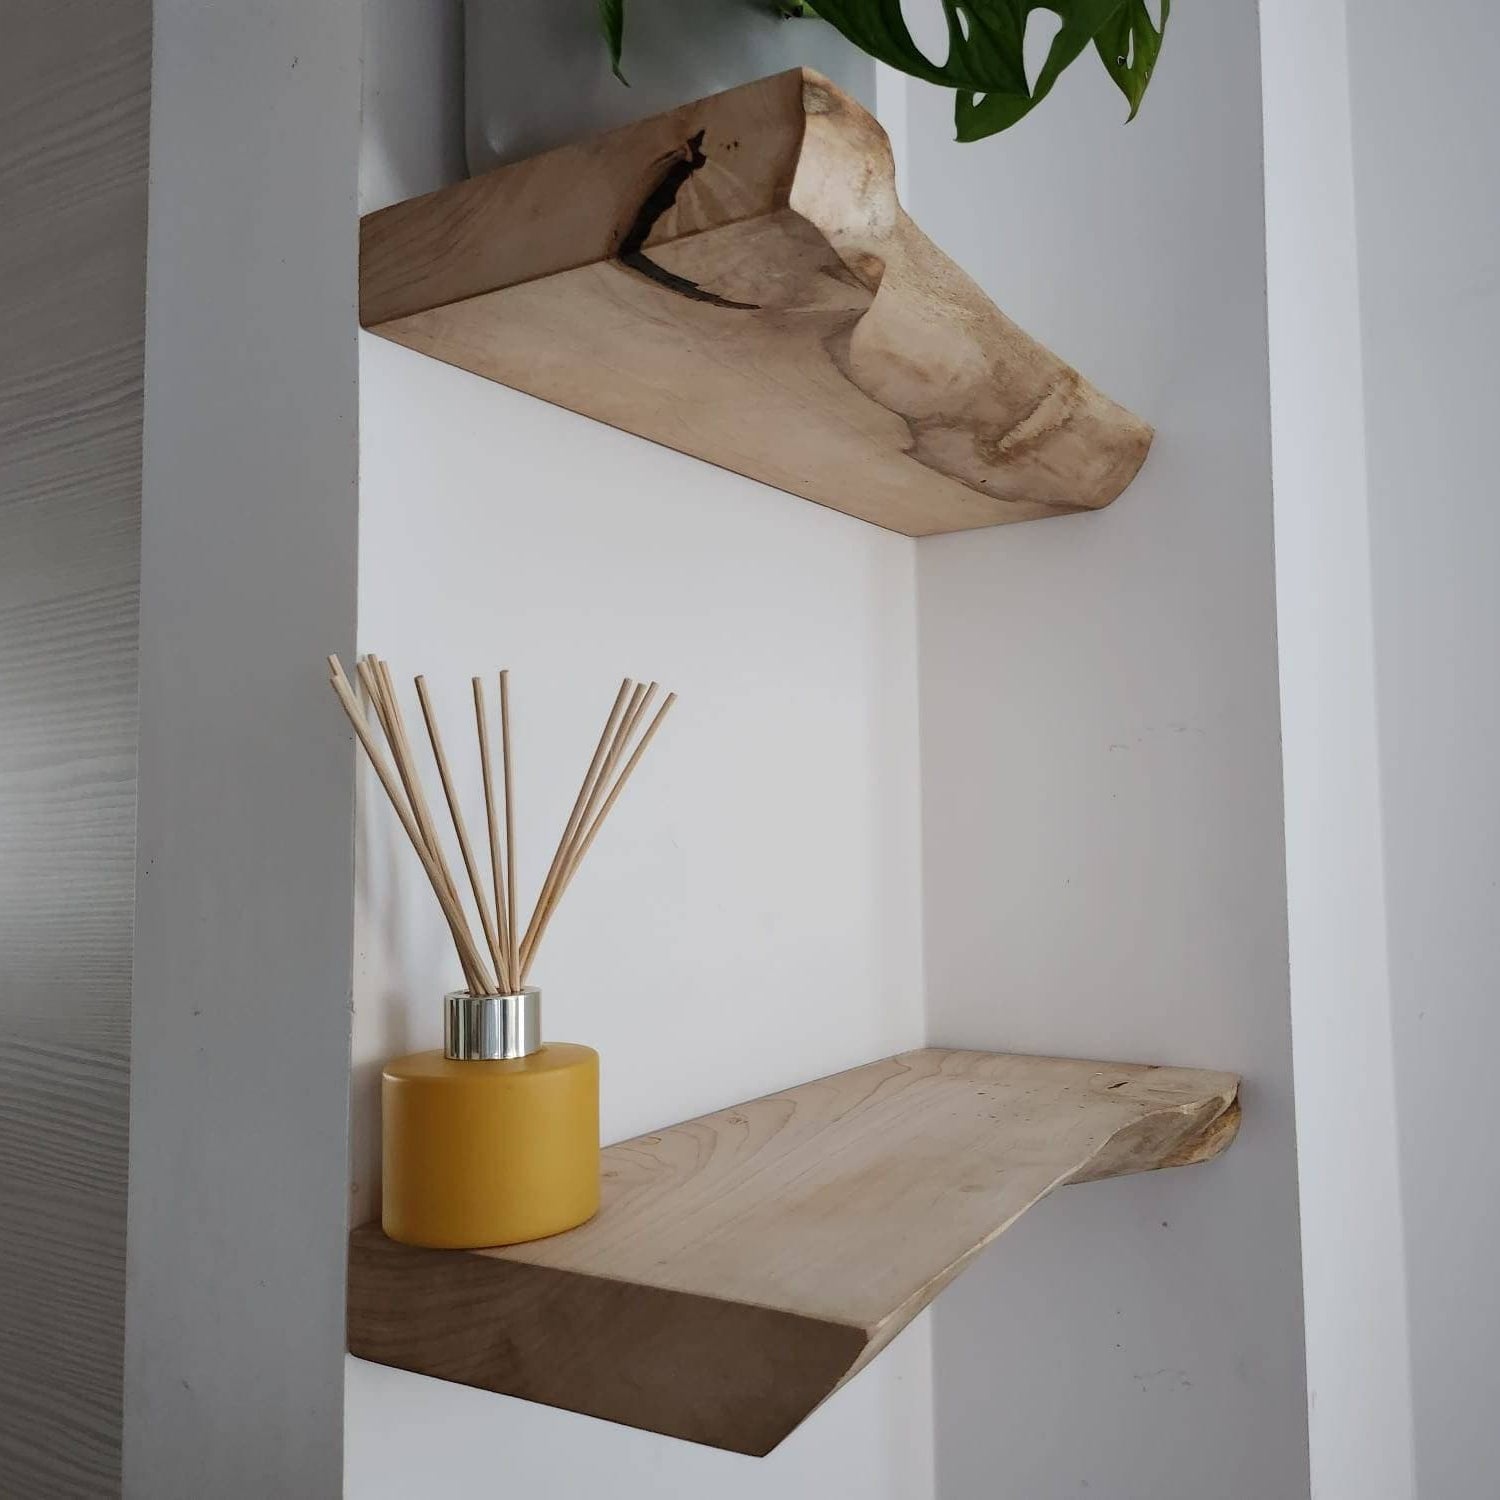
“Unquestionably, the one thing that defines this look is the live edge itself.”
If you replaced these with standard, straight-cut wooden shelves, the entire feeling would change from organic and special to generic and functional. The irregular, flowing line of the wood’s natural edge is the star of the show. It provides all the texture, pattern, and visual interest needed, which is why the styling can be so minimal—just a simple plant and a diffuser. The shelf *is* the decoration. For another take on this style, see the dark live-edge shelves in Idea #29.
11. Chunky Distressed Shelves with Eclectic Art and Greenery
This vibrant, plant-filled look can be assembled across a range of budgets, depending on your art and plant sourcing.
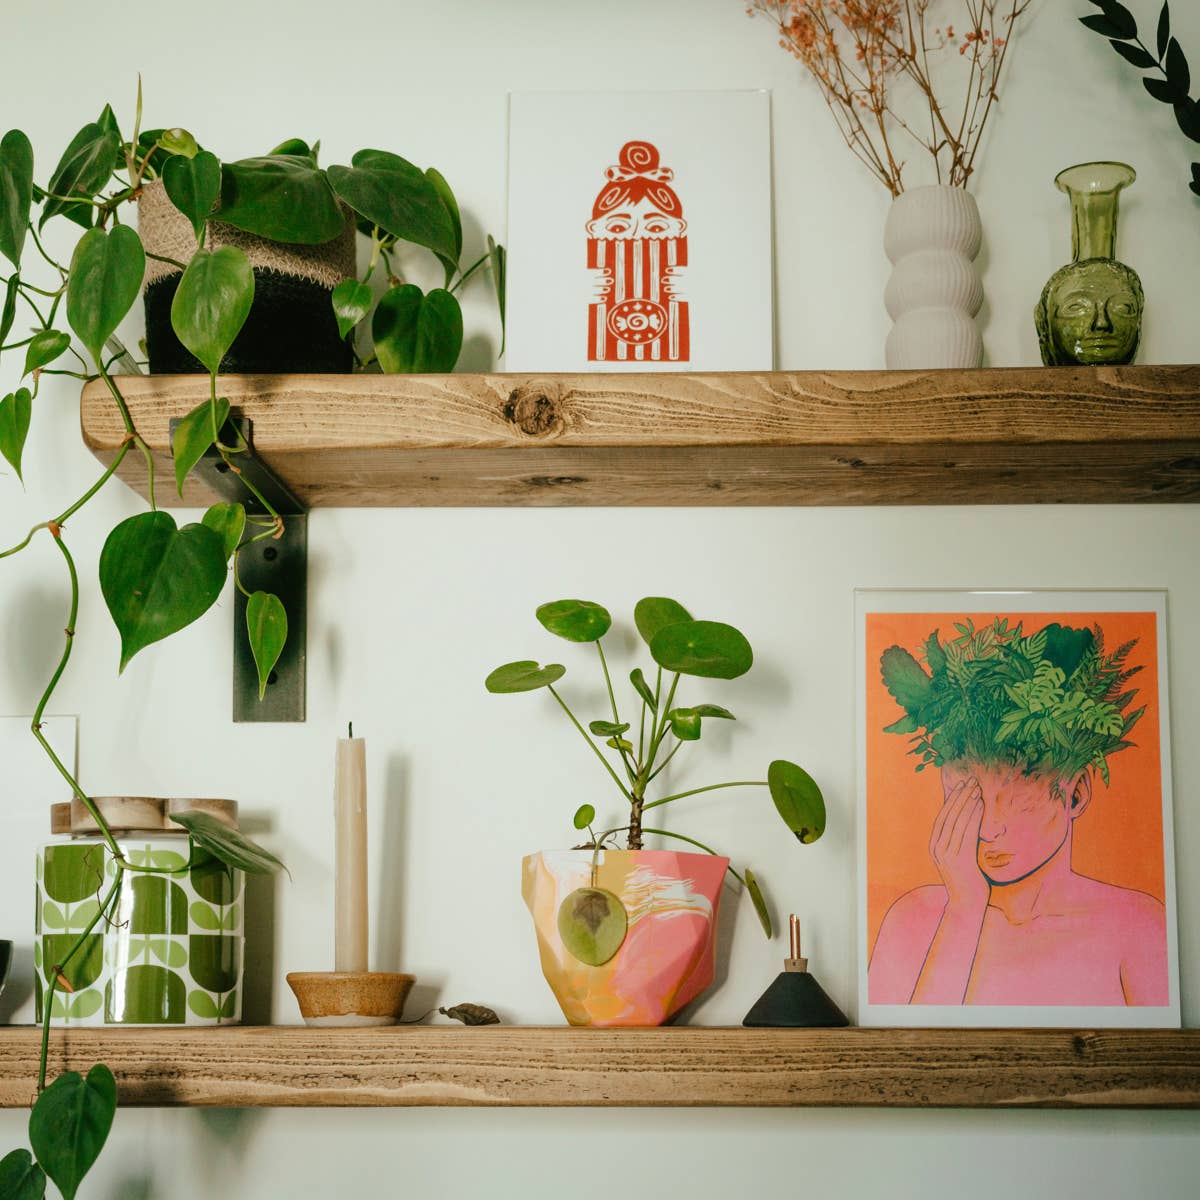
“Chunky Wood Shelves (2): $80 – $200Dark Metal Brackets (4): $40 – $100Potted Pla”
- Chunky Wood Shelves (2): $80 – $200
- Dark Metal Brackets (4): $40 – $100
- Potted Plants & Vases: $75 – $250
- Framed Art Prints: $50 – $400+
- Decorative Objects: $20 – $80
TOTAL: $265 – $1,030
Budget alternative: Use reclaimed wood for the shelves ($20), find printable art on Etsy ($15), source frames and vases from thrift stores ($30), and get plant cuttings from friends ($0) for a total look under $100.
The formula for this perfectly imperfect eclectic look is about balancing constants and variables. It’s roughly 40% Neutral Foundation (the white wall and warm wood shelves) + 40% Organic Greenery (the various plants) + 20% Personal Quirks (the colorful art and unique vases). The foundation provides a calm base, the plants bring life and a consistent color story, and the art and objects are where you inject your personality. You could swap the art for black-and-white photos or the colorful vases for neutral ceramics, and the formula would still hold because the core balance of neutral/natural/personal remains intact.
12. Tiered Rustic Wood Shelves on a White Shiplap Wall
The magic here lies in the textural conversation between the rustic wood and the clean shiplap. The rough, warm-toned wood of the shelves provides a beautiful organic contrast to the crisp, horizontal lines of the white shiplap wall. This pairing creates depth and visual interest without needing a lot of color. Furthermore, the styling is disciplined: sticking almost exclusively to white ceramics and a touch of green creates a calm, cohesive look that feels like a modern farmhouse boutique. The repetition of white across the mugs, pitcher, and cabinets ties it all together.
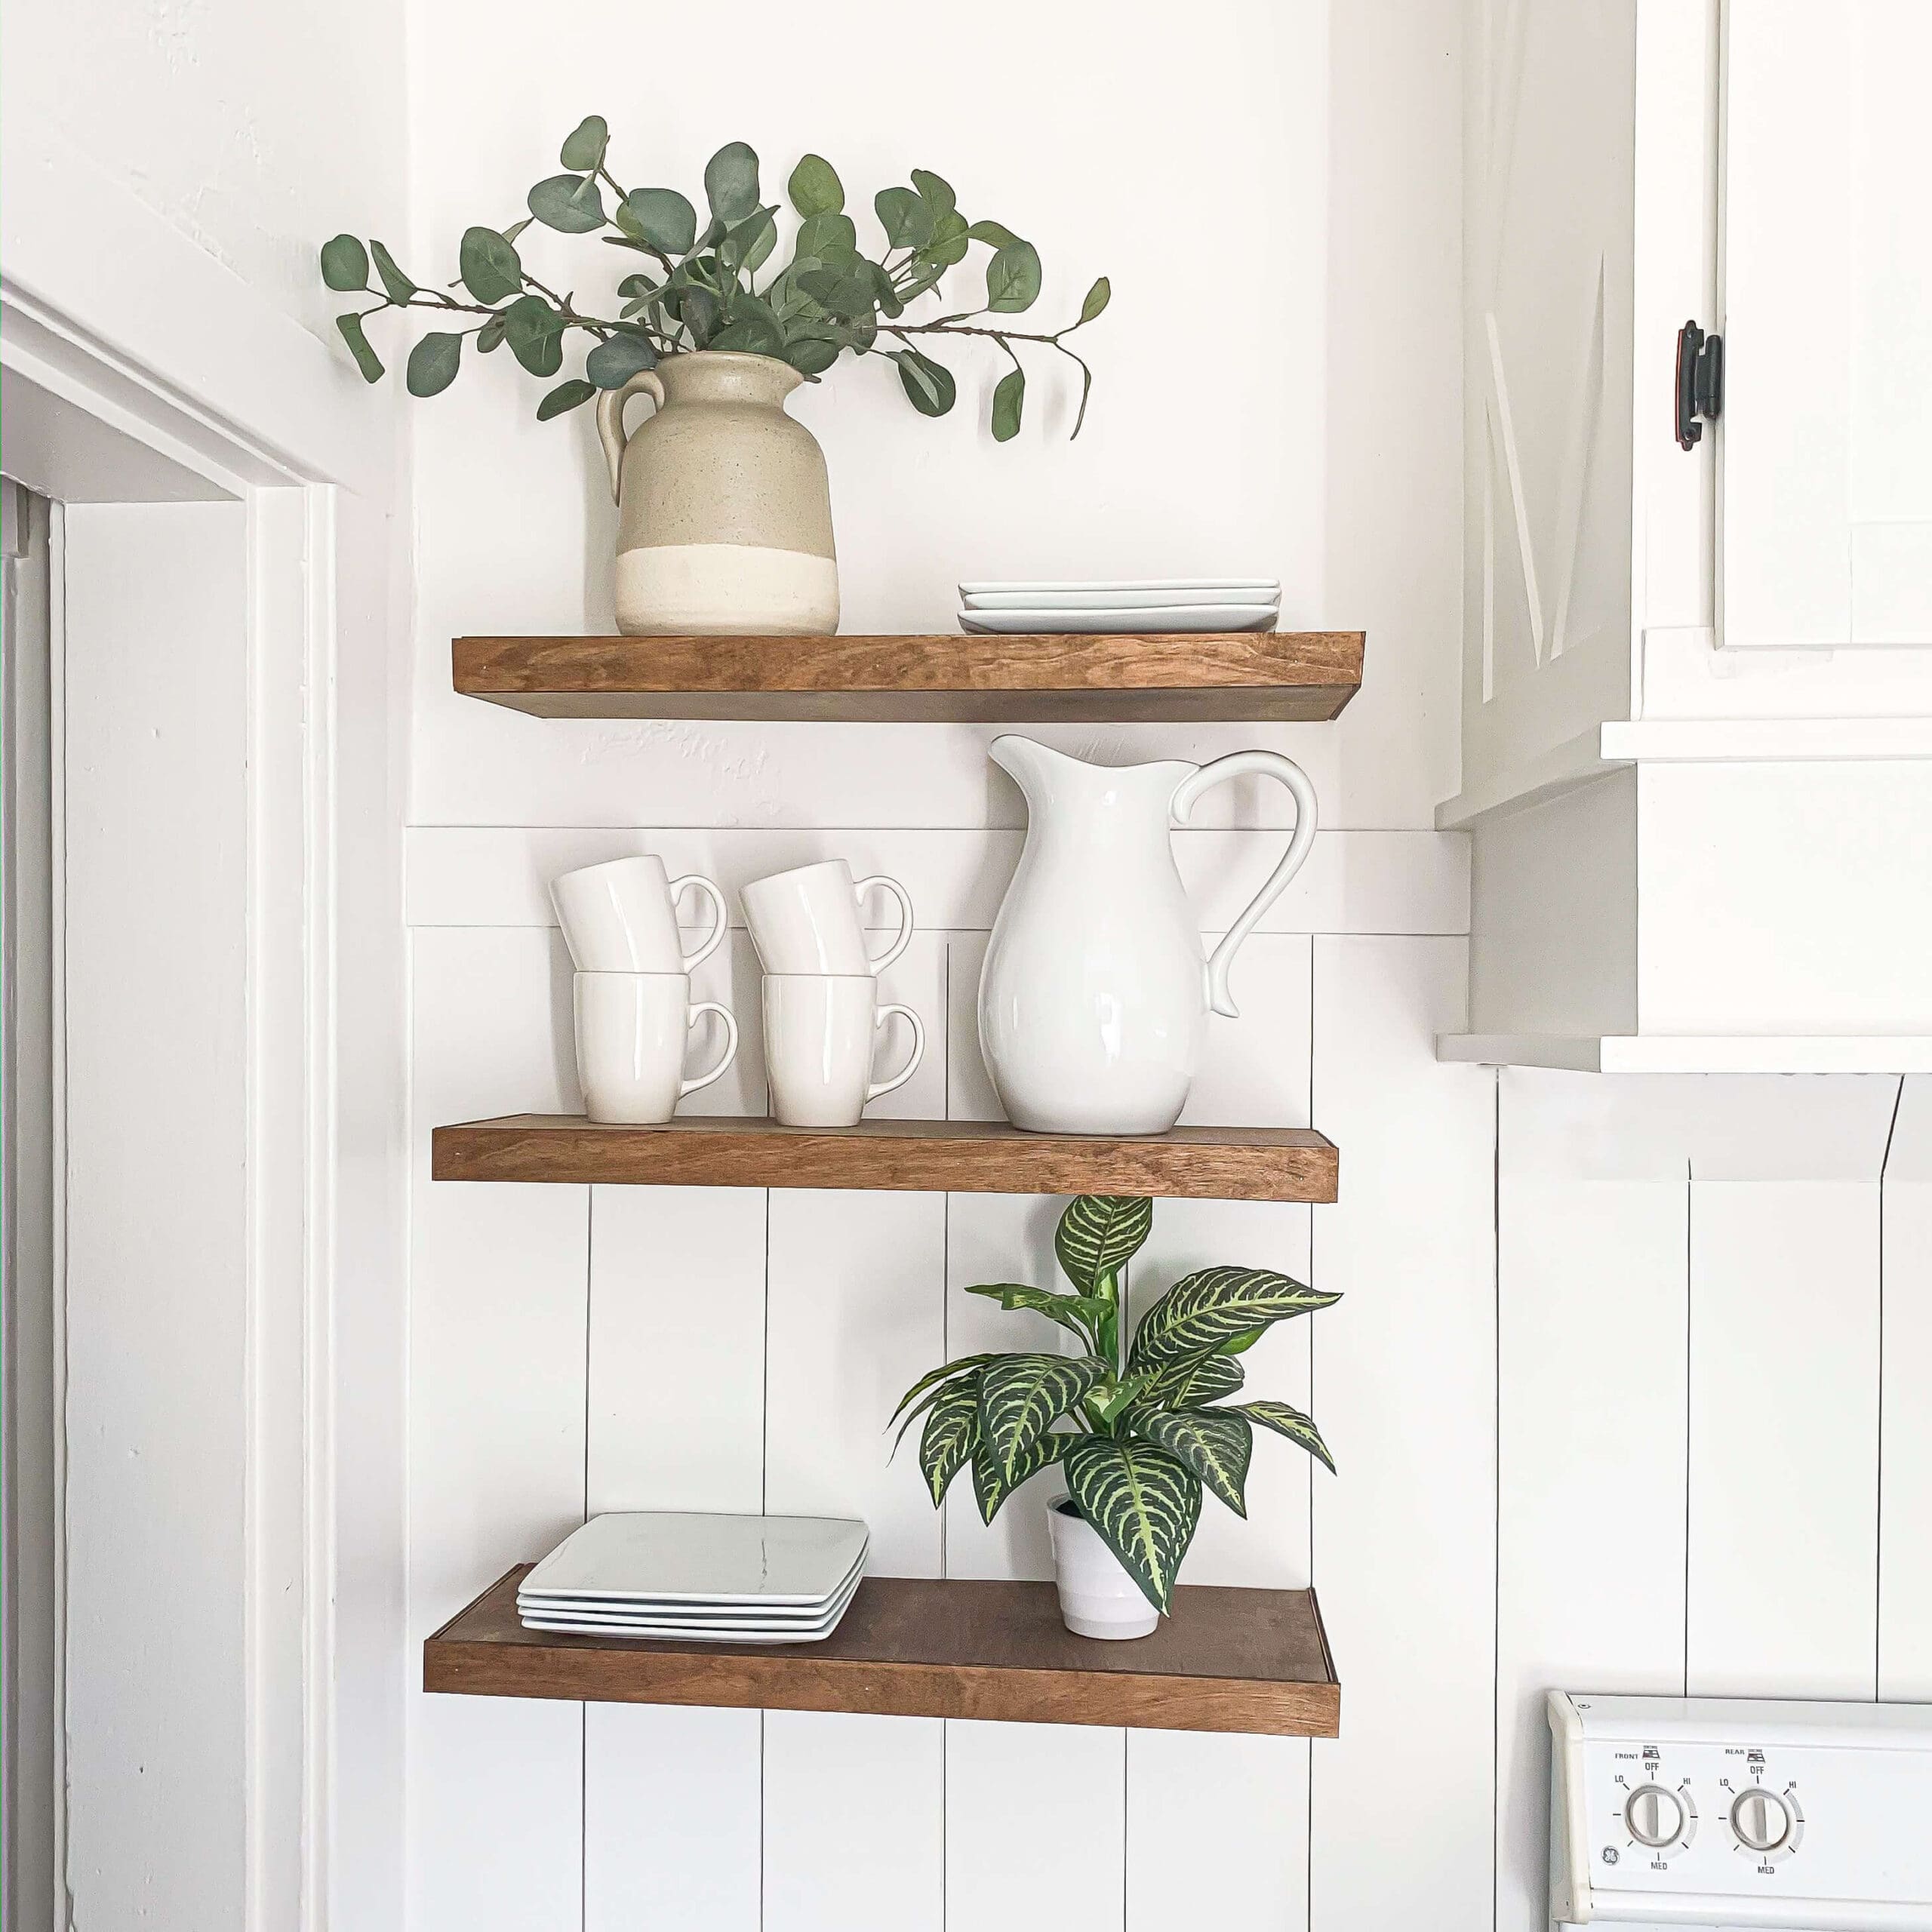
“This vertical, tiered arrangement is an excellent solution for kitchens with limited wall space or for that awkward empty wall next to your cabinets.”
It works well on a wall section that is 24 to 36 inches wide. The key is to use the vertical height effectively. With an 8-foot ceiling, you can comfortably fit three shelves spaced about 12-15 inches apart, which provides enough room for both decorative items and functional pieces like mugs and plates. Make sure the lowest shelf is high enough above the countertop (at least 18 inches) to allow for workspace.
13. Farmhouse Kitchen Shelves with White and Light Green Accents
The single most important element is the strict, two-color styling. By limiting the decor almost exclusively to white and a specific shade of light green, the shelves look incredibly curated and intentional. This disciplined color palette prevents the rustic shelves from feeling cluttered. It elevates everyday items like plates and glasses into a cohesive design statement. If you were to add other colors—say, red mugs or blue bowls—the serene, fresh feeling would be instantly lost, and it would just look like a collection of dishes. The restraint is what makes it sophisticated. Compare this to the similar setup in Idea #12, which relies on a monochrome white palette.
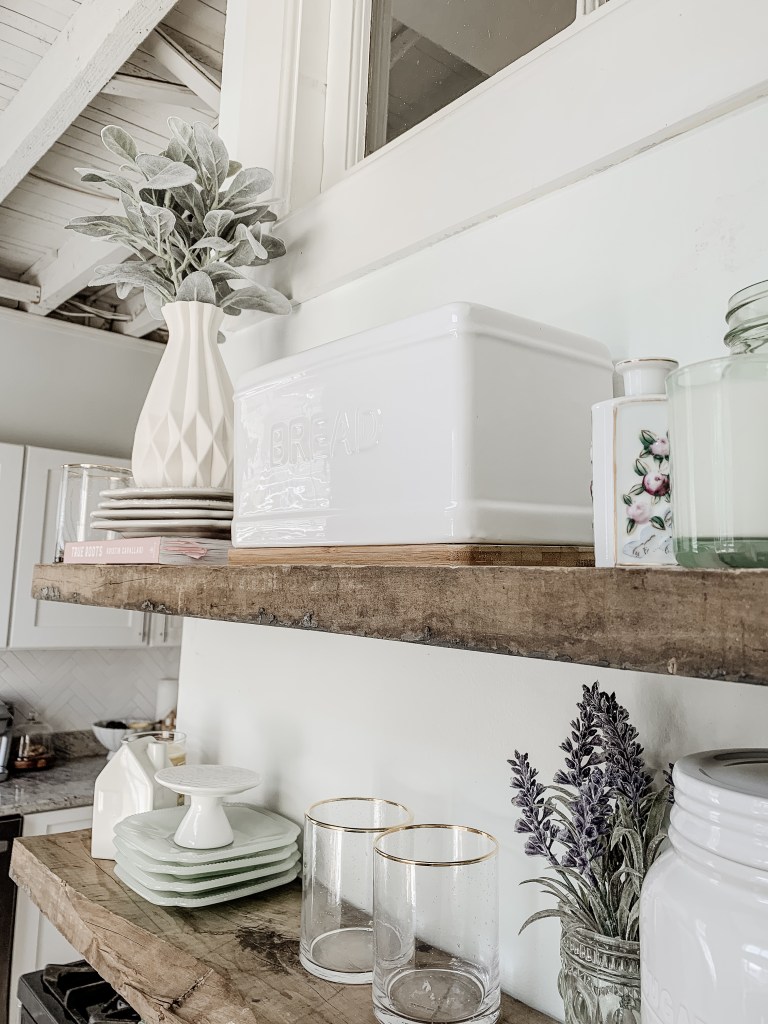
“You don’t need a custom woodworker to get these thick, rustic shelves.”
Head to the lumber section of a big box hardware store and look for untreated pine or fir beams (like a 4×6 or 4×8). They cost a fraction of what a finished ‘rustic shelf’ would. For about $30 in wood, you can get a long beam to cut down to size. Then, the real magic happens: use a wire brush, a hammer, and even some chains to distress the wood. Finish it with a dark stain and a matte polyurethane. You get the exact same chunky, aged look for about 70% less than buying them pre-made.
14. Rustic Shelves and White Shaker Cabinets in a Bright Kitchen
This kitchen design succeeds through the principle of repetition with variation. The rustic, dark-stained wood of the floating shelves is repeated in the finish of the island (partially visible), creating a cohesive material story. The clean white of the shaker cabinets is echoed in the ceiling beams, the wall color, and the ceramic decor on the shelves. This consistent use of white and dark wood throughout the space creates a strong, balanced foundation. The black pendant lights and stove add a third, graphic element that provides a contemporary edge to the rustic farmhouse style.
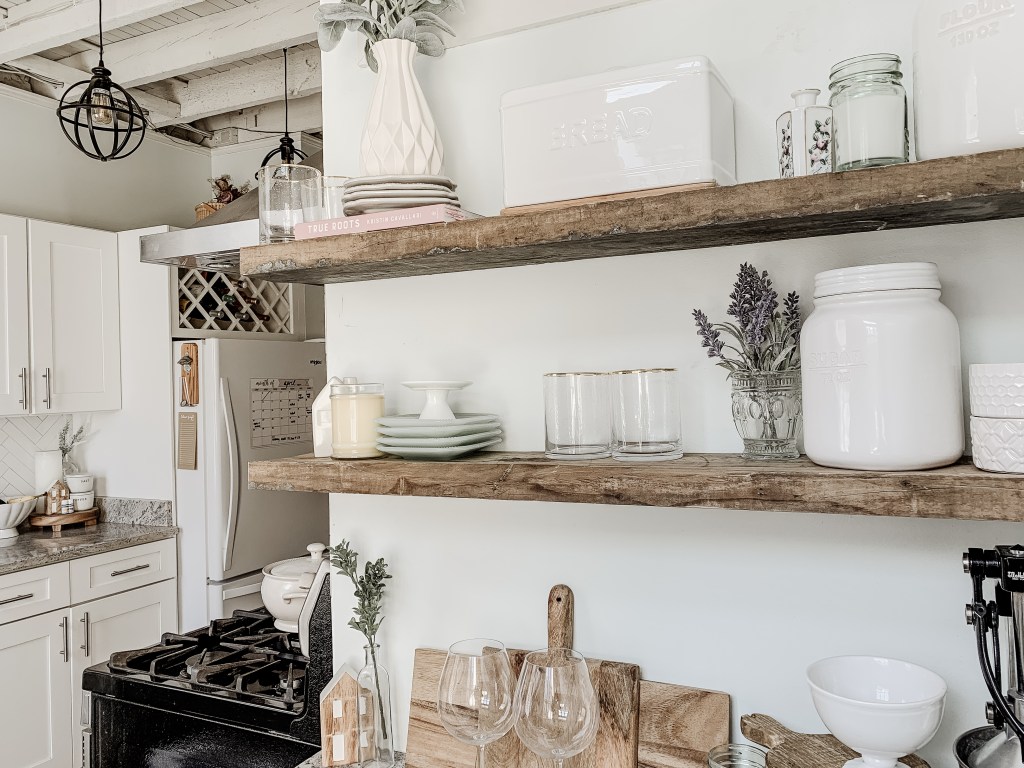
“Let’s have some real talk about open shelving in the kitchen, especially next to a stove.”
While they look gorgeous, they are magnets for grease and dust. Airborne cooking oils will settle on every surface, creating a sticky film that dust loves to cling to. To keep this looking fresh, you’ll need to commit to a weekly wipe-down of not just the shelves, but every single item on them. For lower-maintenance, only display items you use and wash frequently (like everyday dishes) or decorative pieces that are easy to clean. Avoid intricate items that will be a nightmare to de-grease.
15. Minimalist Dark Wood Shelves for Bathroom Towel Storage
Mounting shelves to hold a significant weight, like stacks of damp towels, requires anchoring directly into studs. Time: 1 hour. Materials: Shelves, stud finder, level, drill, lag bolts.
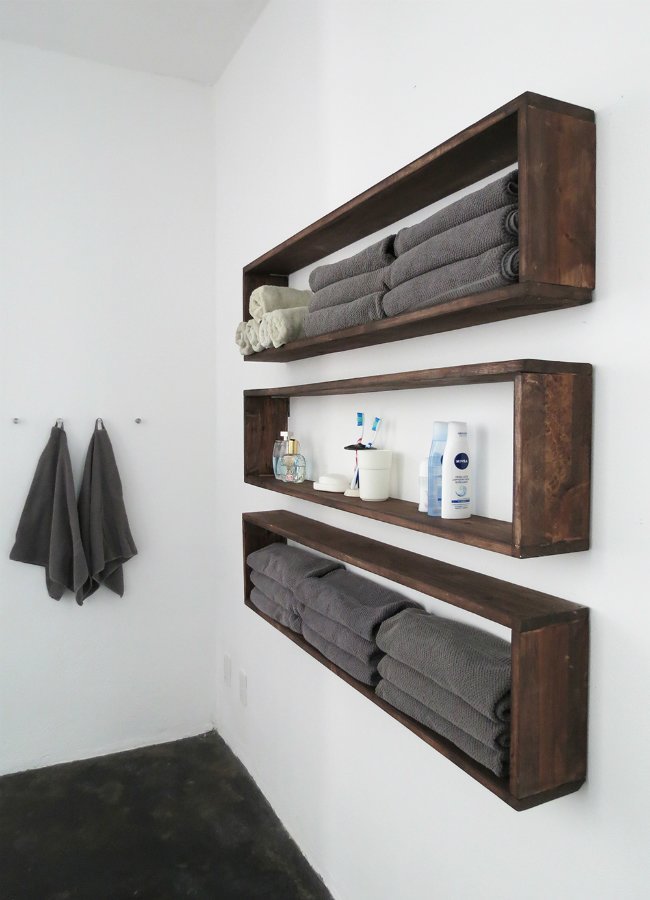
“Use a stud finder to locate and mark the wall studs in your desired shelf area.”
Most studs are 16 inches apart on center.Hold your first shelf (or its mounting bracket) against the wall, making sure it spans at least two studs. Use a level to ensure it’s straight.Mark your drill holes through the shelf/bracket directly over the center of the studs.Drill pilot holes into the studs using a bit slightly smaller than your lag bolts.Secure the shelf/bracket to the wall with lag bolts, using a socket wrench to tighten them securely.Repeat for the other shelves, using your level to ensure they are aligned.
This simple, effective storage solution is perfect for bathrooms of any size, especially those lacking a proper linen closet. For this look, you need a clear wall space of at least 24-30 inches in width. The depth of the shelves is crucial: aim for 10-12 inches deep, which is just right for a folded bath towel without protruding too far into the room. Spacing is also key. Allow for 15-18 inches of vertical space between shelves to comfortably stack towels and access them without knocking over the whole pile. Anything less will feel cramped and impractical.
16. Eclectic Shelves with Botanical Prints and Carved Frames
This charming vignette is a beautiful equation of textures and styles. Think of it as: 50% Clean Modern Base (the simple light wood shelves and the grey chest of drawers) + 30% Natural & Botanical (the trailing plants, floral prints, and etched metallic planters) + 20% Vintage Charm (the intricately carved wooden picture frames). The modern base keeps the look grounded and not overly fussy, while the botanical elements add life and softness. The vintage frames are the unexpected twist, adding a layer of history and personality that makes the whole arrangement feel collected over time, not bought in a single shopping trip.
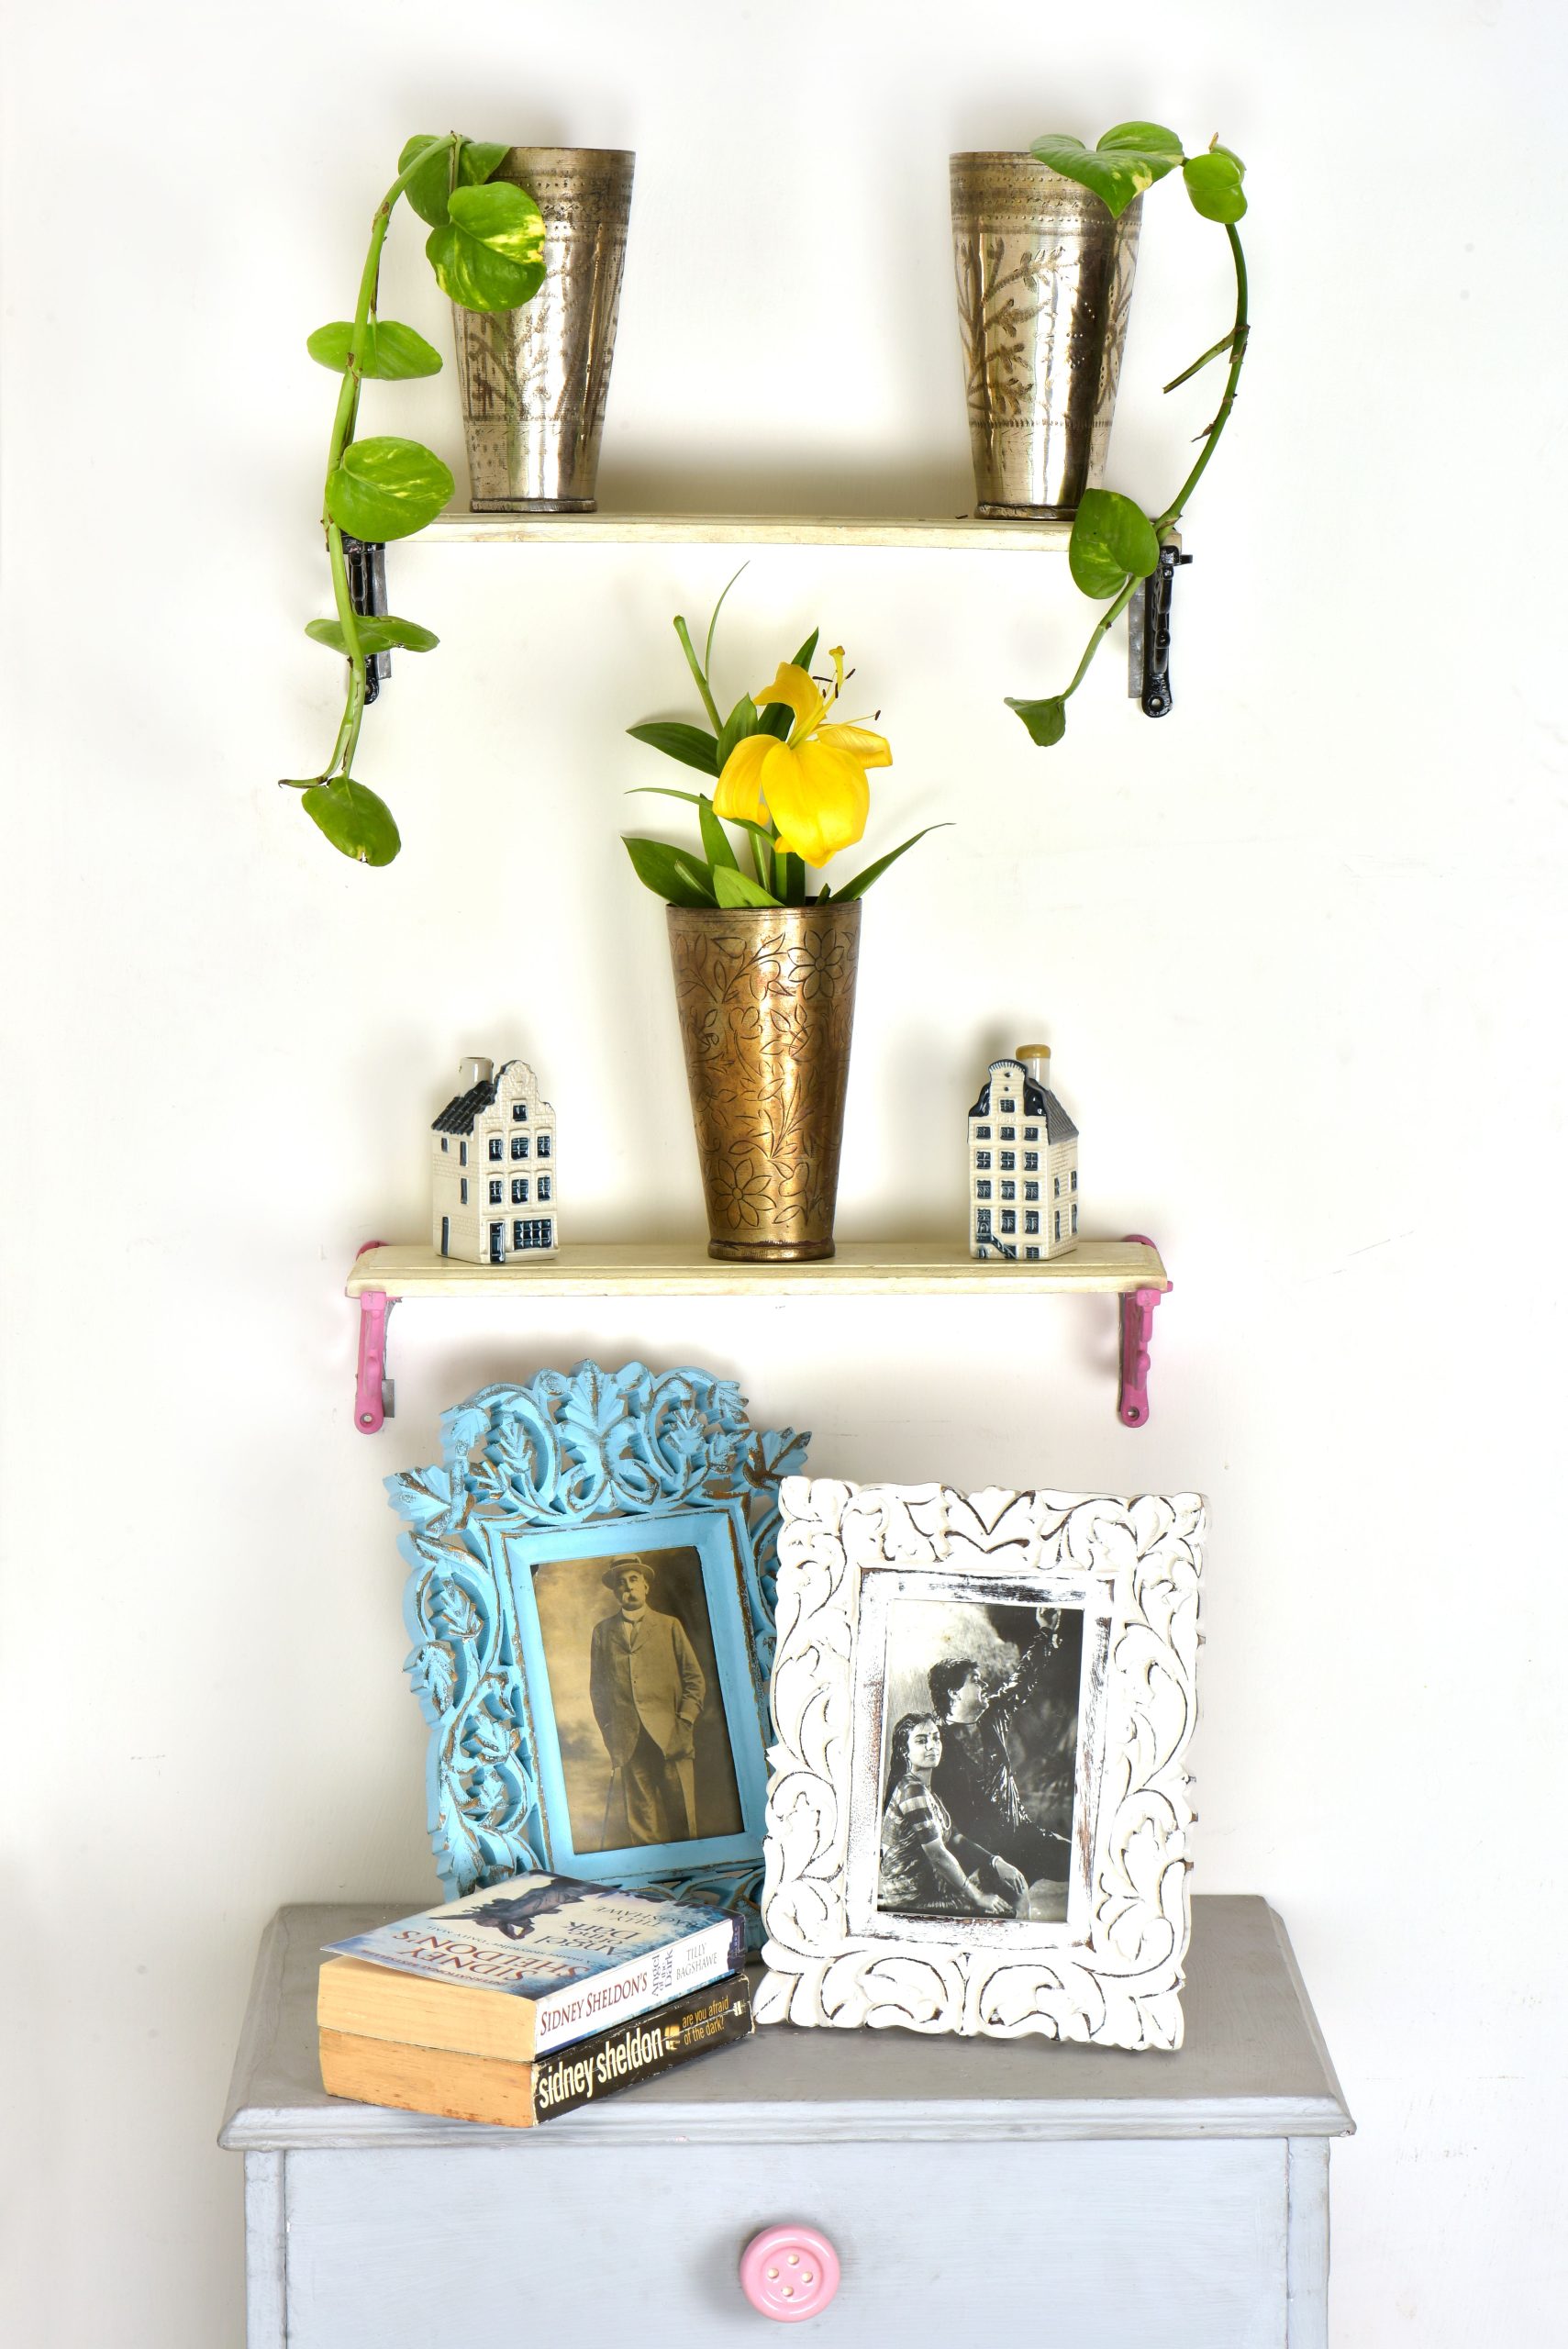
“Don’t be afraid to style *below* your floating shelves.”
The space between the bottom shelf and the furniture underneath is valuable visual real estate. Here, leaning the large, carved wooden picture frames against the wall creates a beautiful, layered effect. The key is to use larger-scale items that can stand on their own and visually connect the shelf to the surface below. This technique adds depth and makes the entire wall feel like a single, cohesive composition rather than a floating shelf with a random dresser shoved underneath it.
17. White Shelves with Woven Baskets on a Blue-Green Wall
The woven baskets are the undisputed heroes of this setup. Without them, these would just be decorative shelves. With them, they become a powerhouse of stylish, hidden storage. They solve the biggest problem of open shelving: clutter. You can toss in mail, keys, kids’ toys, or extra toiletries, and the mess instantly disappears behind a beautiful, textural facade. They add warmth and a natural element that contrasts beautifully with the crisp white shelves and the cool-toned wall paint, proving that storage can and should be beautiful. The whole system would be far less functional and visually interesting without them.
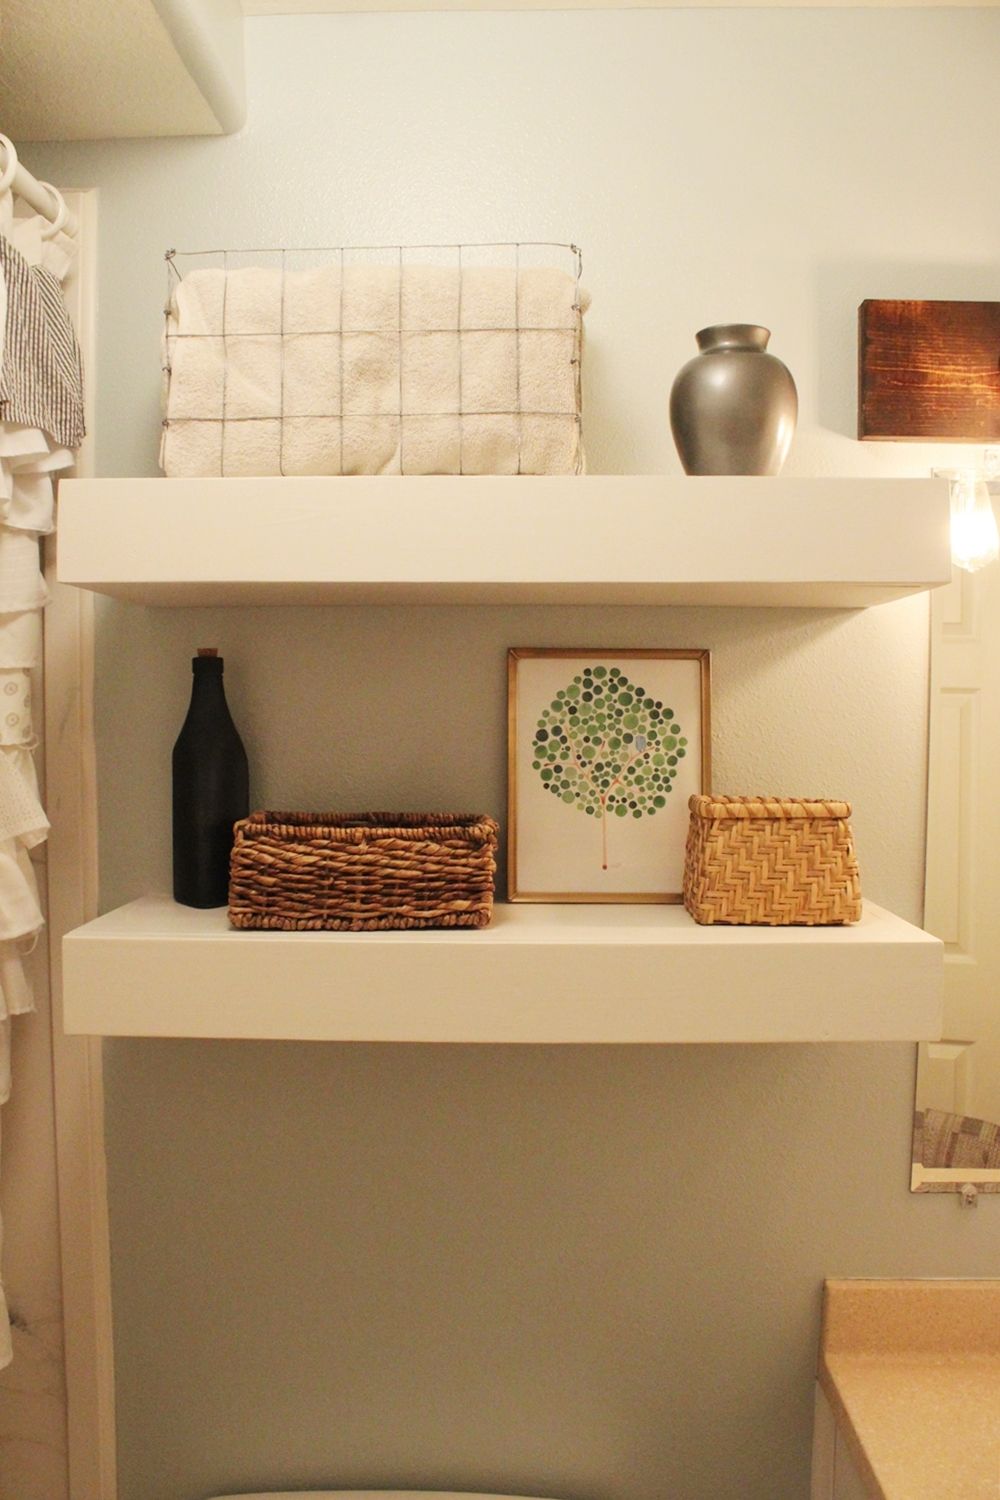
“Before you commit to this serene and organized look, run through this quick chec”
Before you commit to this serene and organized look, run through this quick checklist to ensure it will work in your space.
- Do you have the right wall color? The contrast between the white shelves and a soft color is key. A test patch of your chosen blue-green paint is a must.
- What are you storing? Measure the items you plan to hide in baskets to ensure you buy baskets that are the right height, width, and depth for your needs.
- Check your shelf depth. To hold decent-sized baskets, your shelves need to be at least 10-12 inches deep. A shallow 8-inch shelf won’t provide practical storage.
18. Staggered Rustic Wood Shelves Flanking a Blue Armchair
The key to a successful staggered shelf layout is to create a sense of intentional, zig-zagging movement, not chaos. A pro tip is to use painter’s tape to map out your shelf positions on the wall before drilling any holes. Place the tape strips, step back, and look at the overall composition. Does it flow? Is there a sense of balance? The goal is to have the empty spaces (negative space) between the shelves feel as deliberate as the shelves themselves. Aim for a mix of shelf lengths and vary the spacing, ensuring the arrangement as a whole feels balanced around a central vertical line.
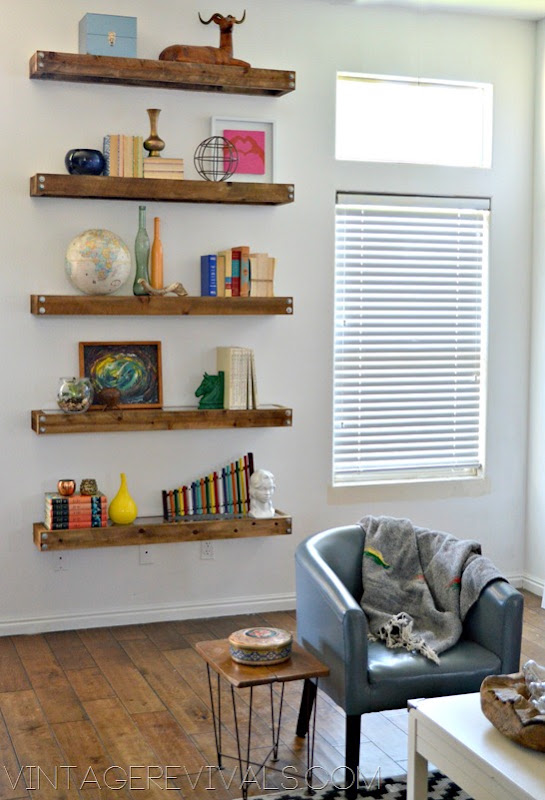
“This look is a feature wall, and it requires a decent amount of space to pull off effectively.”
It works best on a wall that is at least 8 feet wide, allowing the shelves to spread out and interact with the furniture. The staggered placement fills the wall both horizontally and vertically, so it’s great for rooms with higher ceilings (9 feet or more), as it draws the eye upward. In a smaller room or on a narrower wall, this many shelves would feel overwhelming and cluttered. In that case, opt for a simple vertical stack like in Idea #12.
19. Dark Stained Wood Shelves in a Rustic Shiplap Kitchen
This design works so well because of the strong contrast and material harmony. The dark, rich stain of the thick wooden shelves and countertop creates a bold, graphic statement against the bright white of the shiplap and cabinets. This high contrast is what gives the kitchen its visual punch. At the same time, the consistent use of the same dark wood for both the shelves and the counter creates a pleasing sense of unity and intention. The touches of blue glass and silver metal add a cool-toned sparkle that complements the warm wood perfectly. And be sure to avoid the cluttered look we break down in Mistake #3.
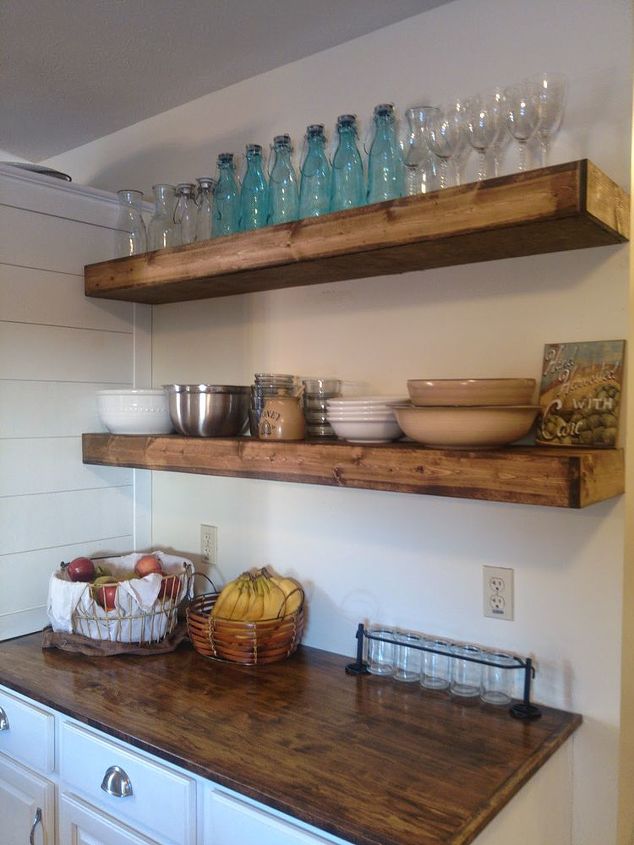
“While a wooden countertop paired with wooden shelves looks stunningly cohesive, be prepared for the maintenance.”
Wooden countertops, especially around a sink area, require regular sealing (typically once or twice a year with a food-safe oil or wax) to prevent water damage, staining, and bacterial growth. You have to be diligent about wiping up spills immediately. It’s a beautiful, warm material, but it’s not as forgiving as granite or quartz. If you love the look but not the upkeep, consider a wood-look laminate or quartz countertop paired with real wood shelves to get a similar vibe with less worry.
20. Industrial Pipe and Dark Wood Home Bar Shelving
Creating these industrial pipe brackets is a simple and affordable DIY project using parts from a hardware store. Time: 1 hour + staining time. Cost: $60-$100 for three shelves.
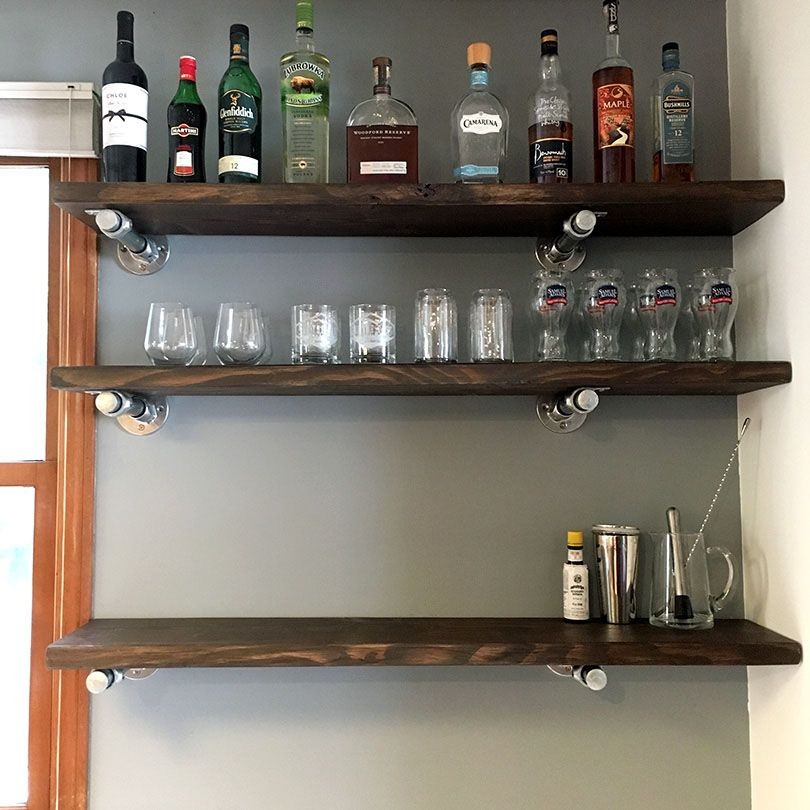
“For each bracket, you’ll need: one floor flange, one short nipple (e.g., 6 inches, for shelf depth), and one end cap.”
Use 1/2-inch or 3/4-inch diameter pipes.Clean all pipe pieces with a degreaser to remove factory oil.Spray paint the pieces your desired color (matte black or metallic silver are popular) and let them dry completely.Assemble each bracket: screw the nipple into the flange, and the cap onto the other end of the nipple.Mount the flanges to your wall, making sure they are level and screwed into studs.Rest your stained wood plank on top. You can secure it from below with pipe straps for extra stability.
Setting up a stylish home bar like this is surprisingly affordable compared to buying a dedicated bar cabinet.
- Dark Wood Planks (3): $60 – $150
- DIY Industrial Pipe Brackets (6): $80 – $120
- Glassware Set: $40 – $100
- Bar Tools (shaker, etc.): $30 – $70
- Liquor & Mixers: Varies
TOTAL (for structure & tools): $210 – $440
Budget alternative: Use common pine boards and a dark stain instead of hardwood ($40), find glassware at a thrift store or IKEA ($25), and buy a basic bar tool set ($20). The total cost for the setup can be as low as $165. For another functional setup, see the laundry room shelves in Idea #28.
21. Stacked Live-Edge Corner Shelves with Natural Light
When styling corner shelves, think in triangles. For each shelf, create a small triangular arrangement of objects with varying heights. On the bottom shelf here, the tall plant, medium jar, and low terracotta pot form a visual triangle. This creates a balanced, dynamic composition that feels natural, not stiff. It also ensures the items in the back corner are still visible. Avoid lining things up in a straight row, which will look flat and awkward. Let the objects overlap slightly to create a sense of depth and connection.
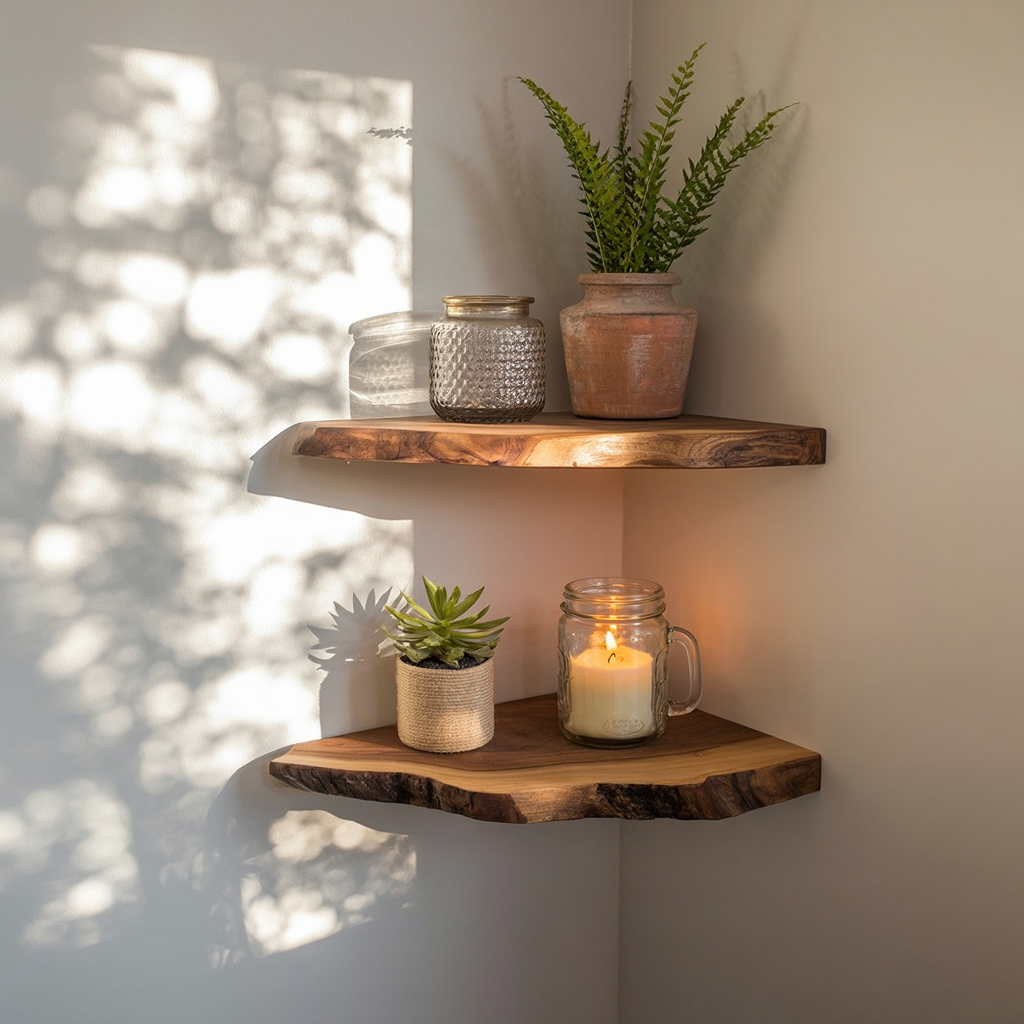
“This corner comes alive because of the beautiful interplay between the natural materials and the dappled sunlight.”
The live-edge wood, the terracotta pot, and the green plants all have an inherent warmth and organic texture. The sunlight filtering in from the side acts as a spotlight, highlighting these textures, casting soft shadows, and making the scene feel dynamic and alive. The lit candle adds another layer of warmth and ambiance. It’s a perfect example of how combining natural elements with natural light can create a powerful sense of calm and coziness in a simple corner. Compare this to the dramatic, artificially lit corner shelves in Idea #27.
22. Rope-Hung Gray Shelf with Rustic Succulent Display
A word of caution on rope-hung shelves: they are more decorative than structural. Because they hang from two points and can swing, they are not ideal for anything heavy, fragile, or frequently used. They are perfect for lightweight, decorative items like the faux succulents shown here. If you plan to use them for real plants, be mindful of the weight, especially after watering. And definitely don’t install one above a bed or a favorite armchair where it could be bumped. Think of it as a hanging piece of art that happens to hold a few things, not as a workhorse storage shelf.
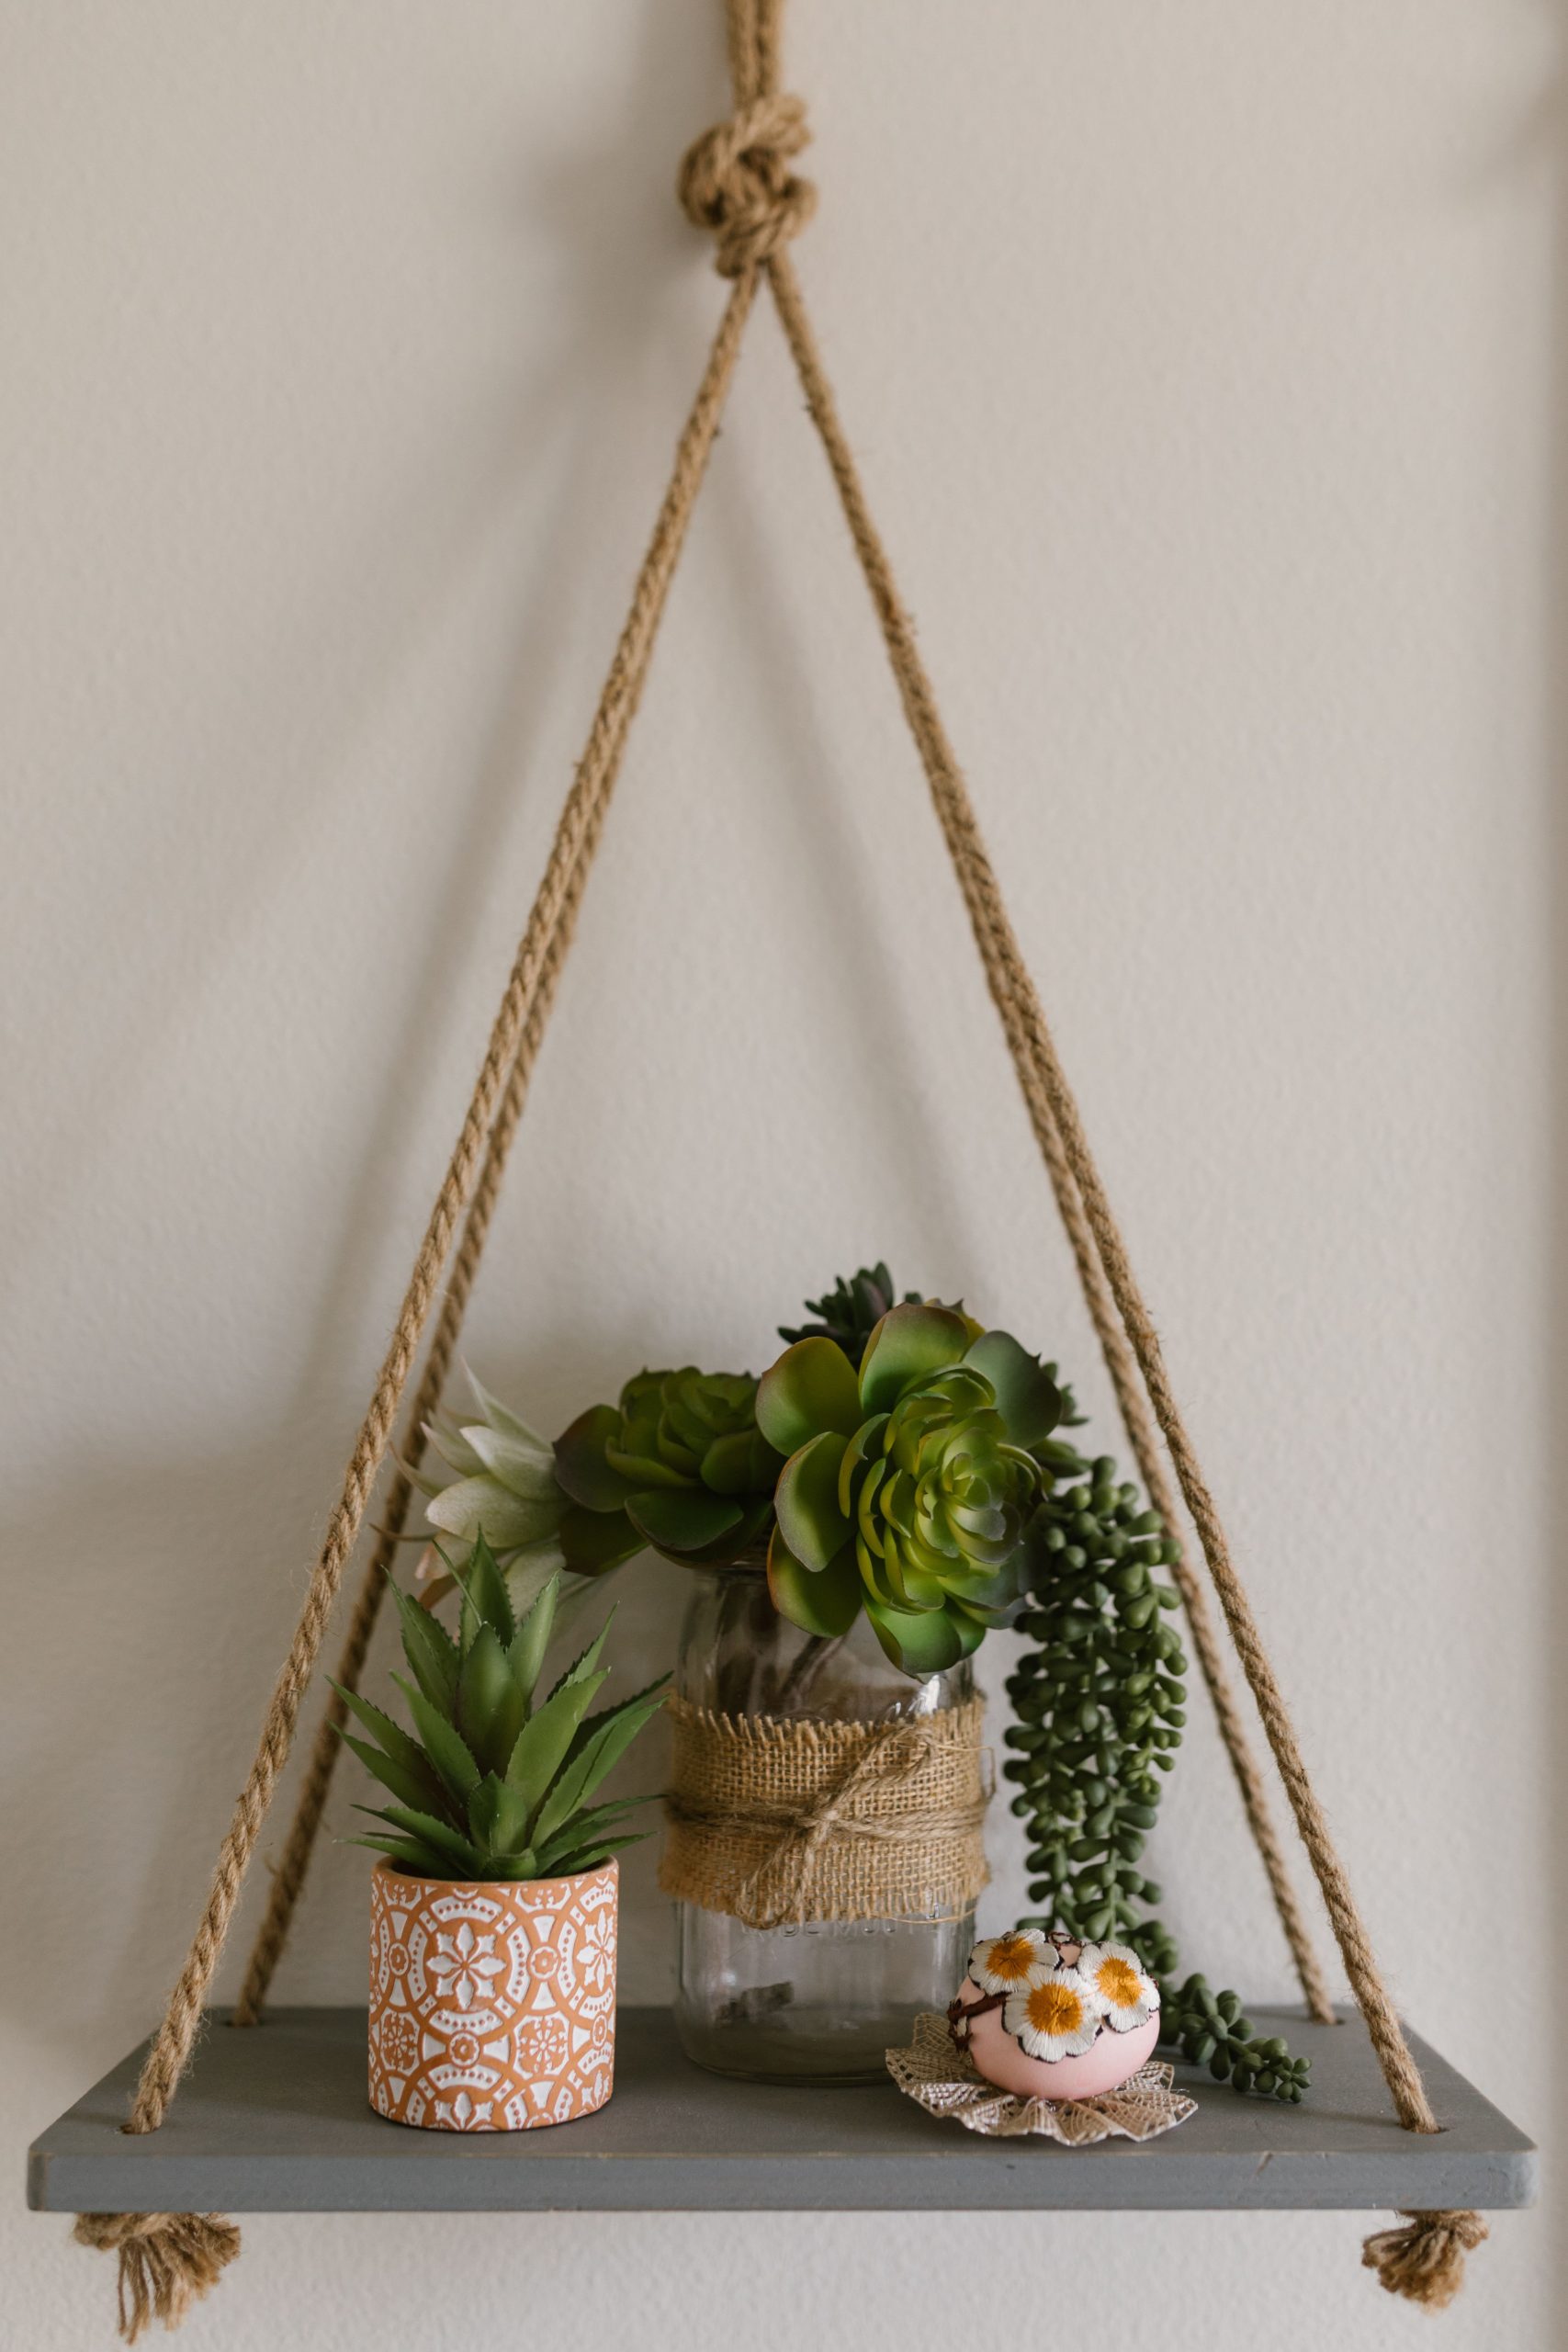
“Securing a rope-hung shelf requires a strong anchor point and some solid knots.”
Time: 30 minutes. Cost: $15-$25 in rope and a hook.
- Drill holes in the four corners of your shelf, slightly larger than your rope’s diameter.
- Cut two equal lengths of rope. The length will depend on how low you want the shelf to hang.
- For each side, thread one end of the rope down through the back hole and up through the front hole.
- Adjust the ropes so the shelf is level and the two long ends above the shelf are even.
- Tie the two long ends together using a strong knot, like a scaffold knot or a figure-eight loop knot.
- Install a heavy-duty hook securely into a ceiling joist or a wall stud and hang your shelf.
23. Dark-Walled Corner Office with Wraparound Wood Shelves
The dramatic, dark wall color is what makes this entire office design sing. It’s a bold, confident choice that turns a simple corner into a sophisticated, moody retreat. The dark paint provides a perfect backdrop for the light natural wood shelves, making them pop with incredible contrast. It also cleverly helps the black desk and chair blend in, reducing their visual bulk and making the room feel less cluttered. If this corner were painted a standard builder’s beige, the effect would be completely lost; the light wood would fade away, and the black furniture would look heavy and disjointed. The dark paint is the hero.
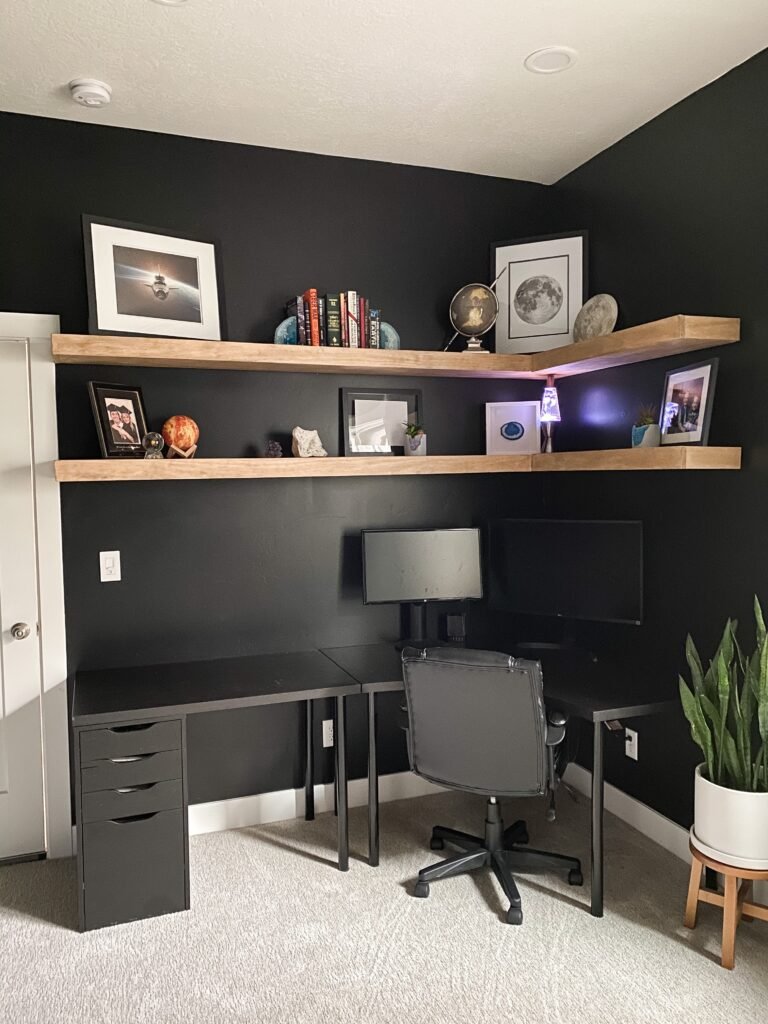
“This corner-wrap shelf design is a brilliant space-saver for home offices, working well in a footprint as small as 5×5 feet.”
The L-shaped configuration maximizes vertical storage without taking up valuable floor space. For this to feel right, the shelves should be around 10-11 inches deep—enough for books and binders without looming over your head. The lower shelf should be positioned about 20-24 inches above the desktop to provide ample clearance for monitors and task lighting. This setup provides far more functional surface area than the simpler corner shelves shown in Idea #3.
24. Kitchen Shelves Integrated Across Black-Framed Windows
This design is incredibly clever because it uses the shelves to unify a series of individual windows into one cohesive architectural statement. By running the long, light-colored shelves straight across the window frames, the designer creates a strong horizontal line that makes the entire wall feel wider and more expansive. The black window frames act as a graphic grid, and the shelves slice through it, adding another layer of geometric interest. This technique turns a potentially awkward wall of windows into the kitchen’s most dynamic and functional feature, proving that shelves don’t always need a solid wall behind them.
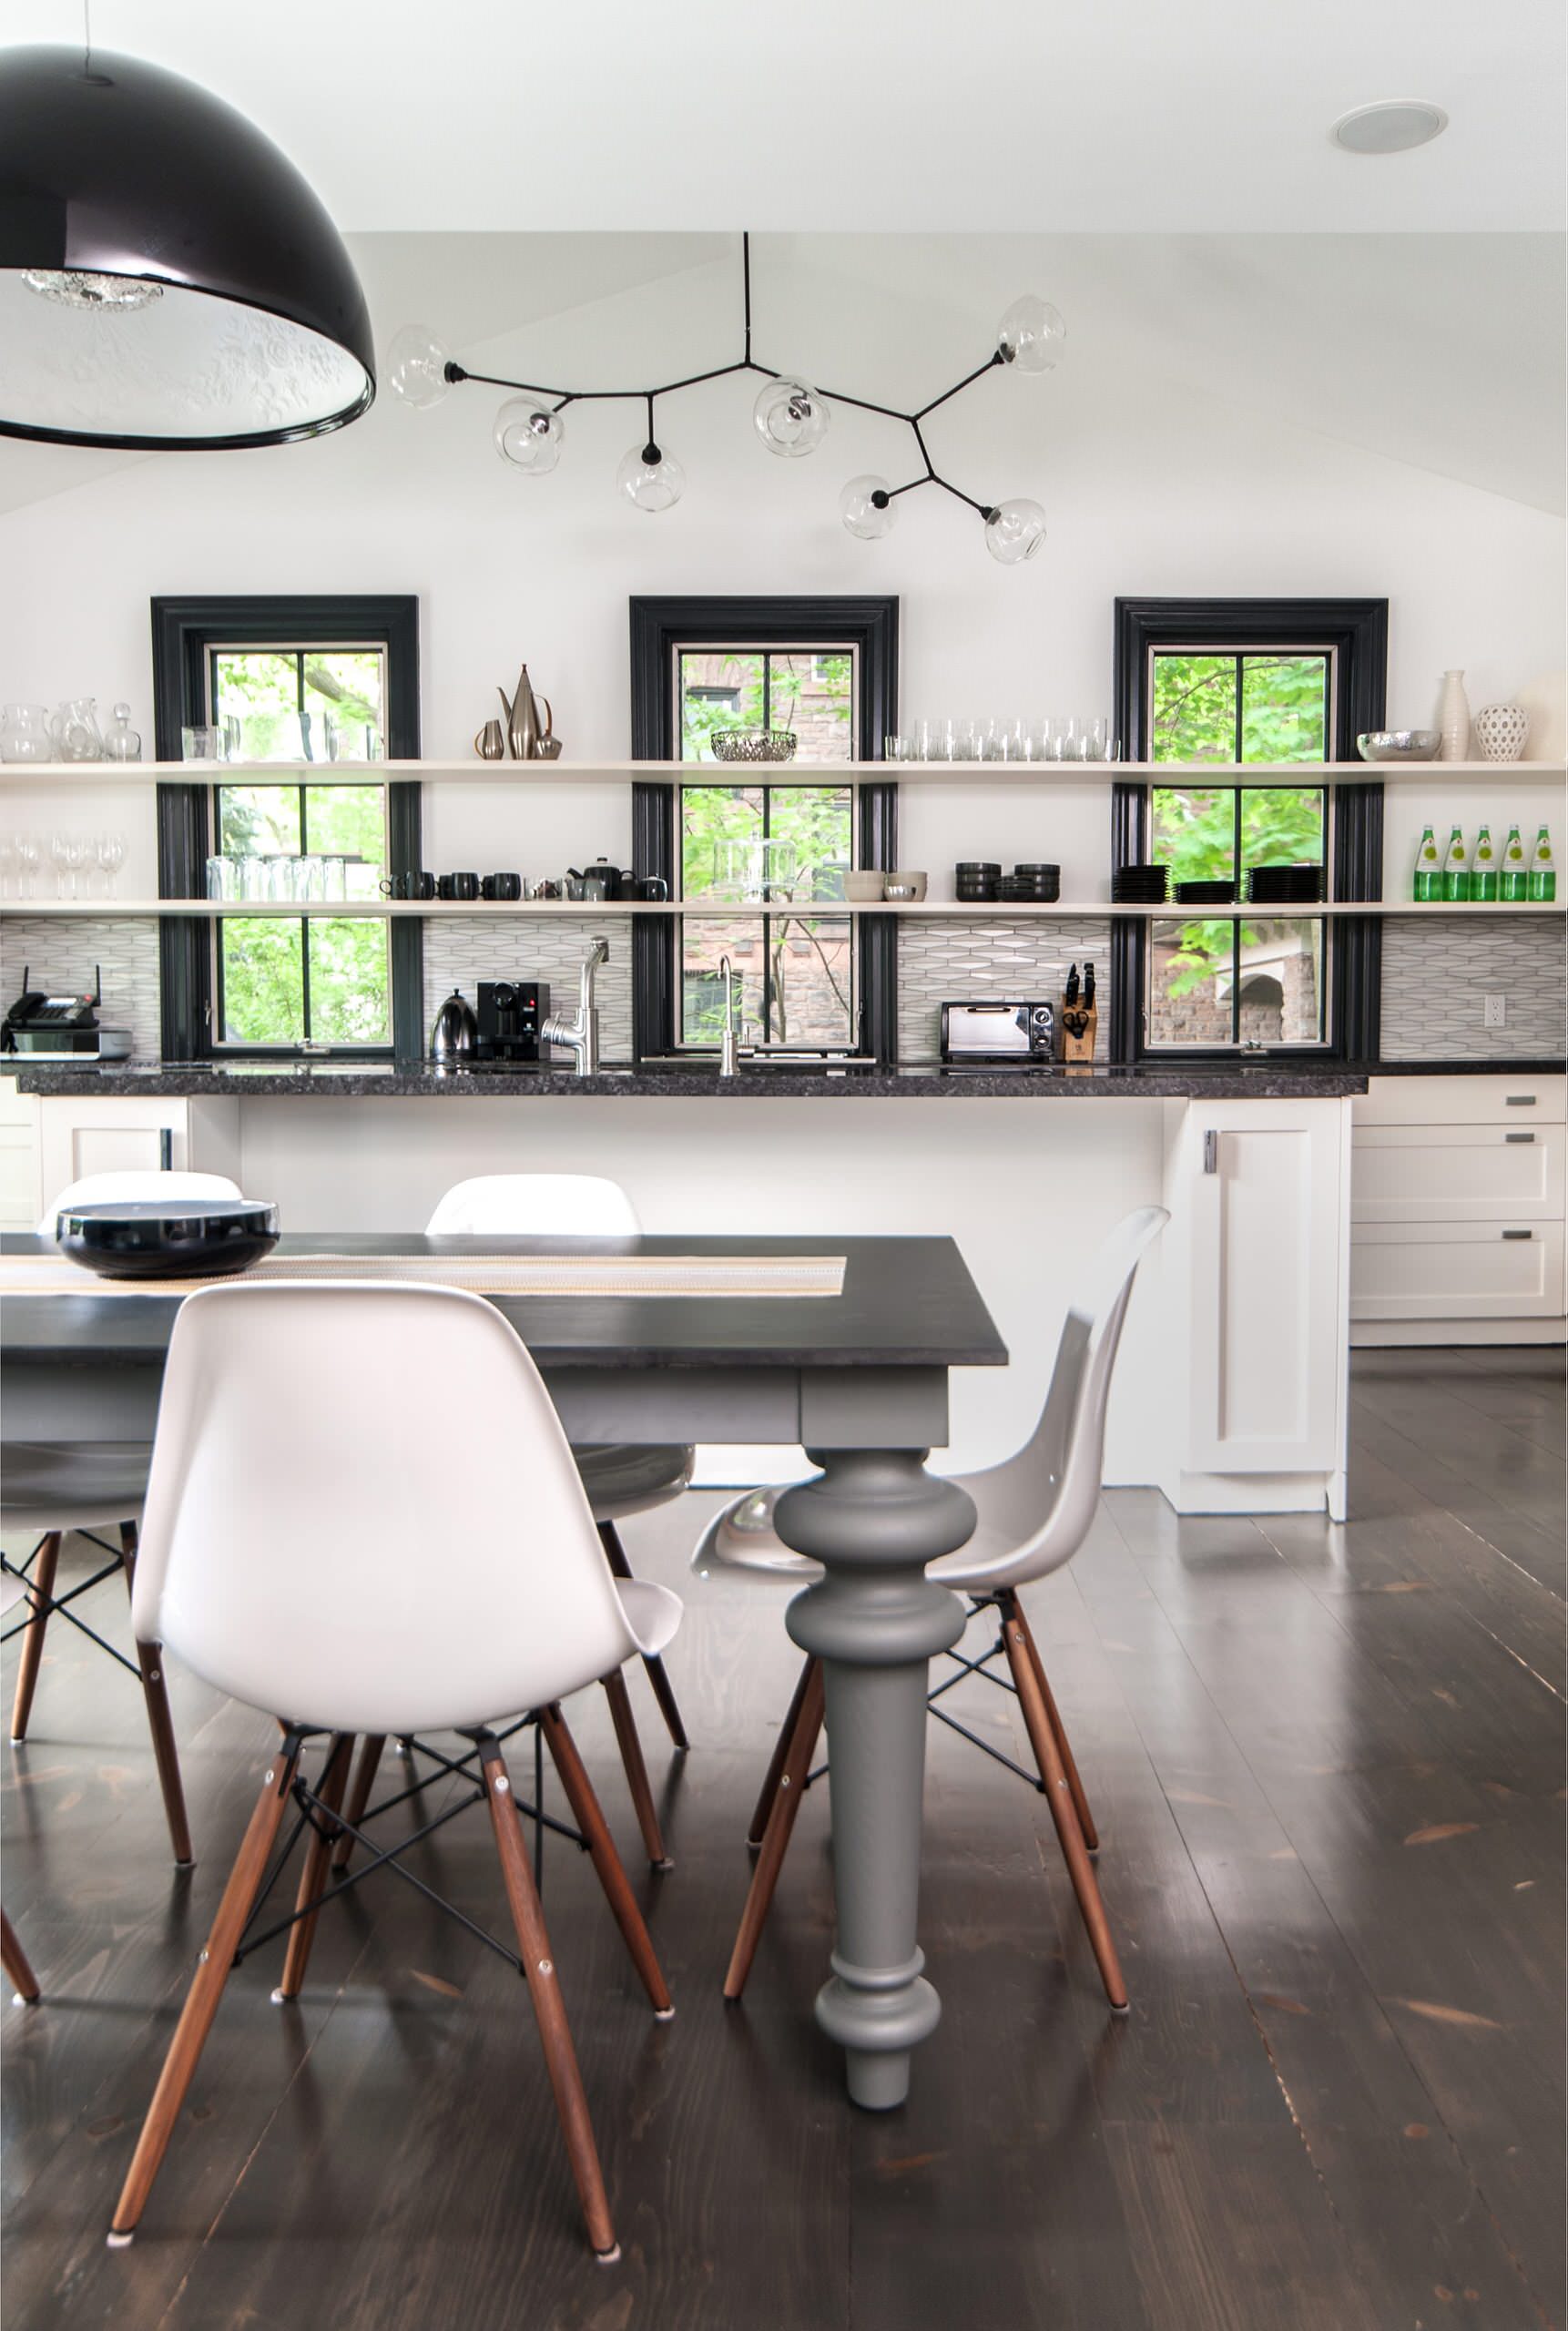
“When placing floating shelves across windows, the shelf depth is a critical decision.”
You want them to be functional, but you don’t want to block too much light or make the windows difficult to open. A depth of 8 to 10 inches is the sweet spot. It’s deep enough to hold glasses, small plants, or bowls, but shallow enough that it doesn’t feel like a heavy obstruction. Also, consider what you’ll place on them. Clear glassware, as shown here, is a perfect choice because it allows light to pass through, maintaining an airy, open feeling.
25. Thick Light Wood Shelves with Task Lamp in a White Alcove
Properly lighting an alcove with shelves is often an afterthought, but it’s crucial for making the space functional and beautiful. Installing a wall-mounted, articulated task lamp above the top shelf, as seen here, is a brilliant solution. It allows you to direct light exactly where you need it, highlighting decorative objects or providing focused light for tasks. For a more built-in look, you could install recessed puck lights into the ‘ceiling’ of the alcove or run LED strip lights along the underside of each shelf for a soft, even glow.
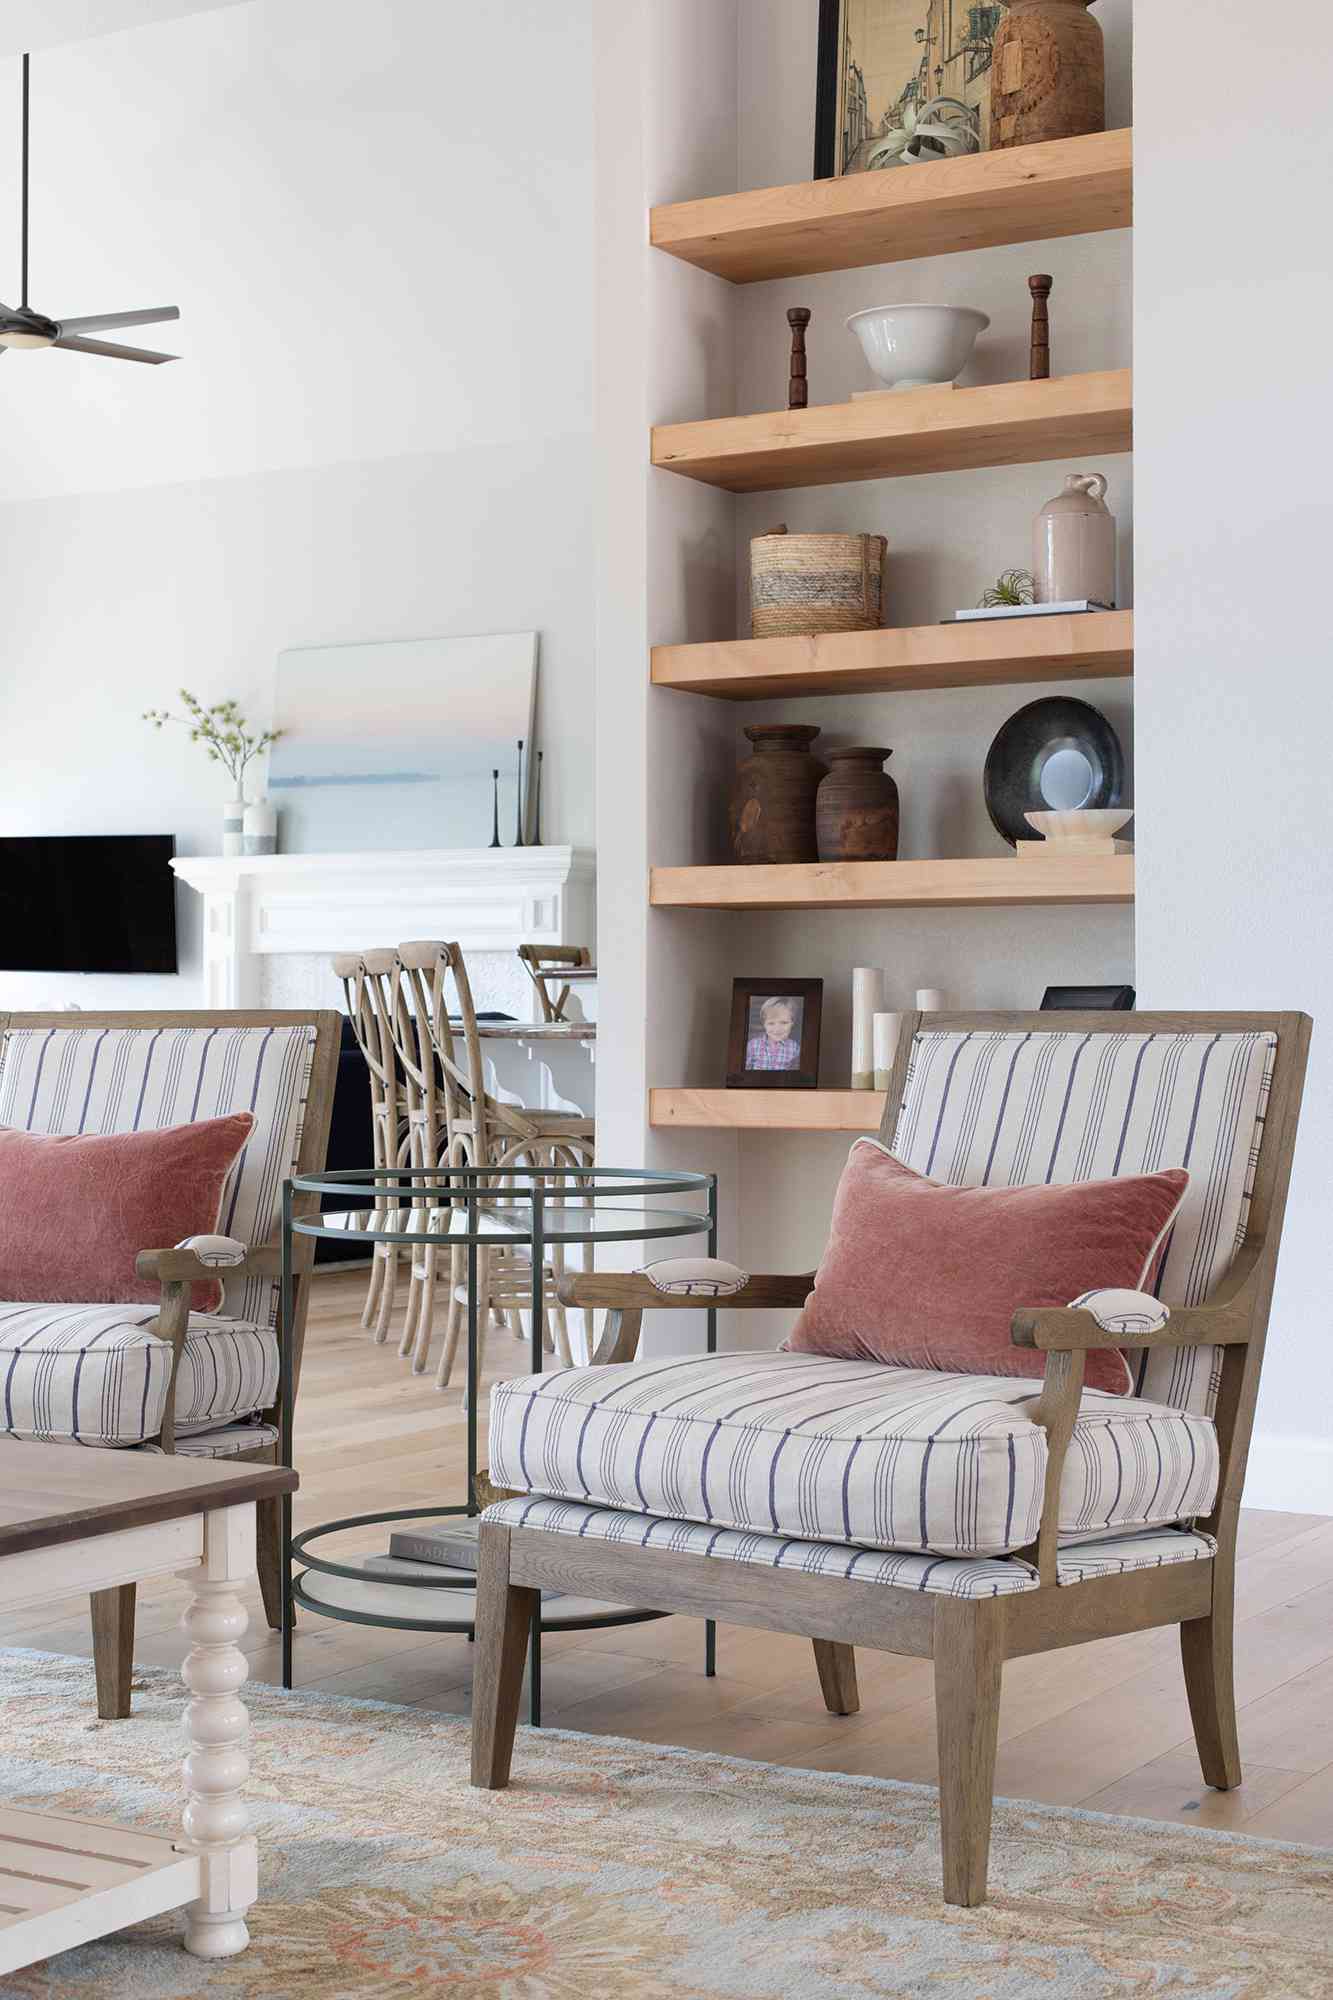
“An alcove installation requires precision.”
Before you start, check these key points.
- Measure carefully: Measure the width of the alcove at the back and the front, at the top, middle, and bottom. Use the smallest measurement for your shelf length to ensure it fits.
- Check for square: Use a large T-square to see if the corners of the alcove are a true 90 degrees. If they aren’t, you may need to scribe your shelves to fit snugly against the back wall.
- Locate studs: The side walls of an alcove are perfect for mounting shelf supports or cleats. Use a stud finder to locate them before you plan your installation.
26. Two-Tier Minimalist Shelves on a Subtly Textured Wall
This serene, minimalist look adheres to a strict visual diet. The formula is: 70% Neutral Base (the light wood shelves and the off-white textured wall) + 20% Monochromatic Accents (the white ceramic pots and decorative objects) + 10% Soft Organic Color (the small green plants). The key is the lack of high contrast. Everything is soft, light, and airy. The texture on the wall adds just enough interest to keep the neutral palette from feeling boring. This is a recipe for calm; to change the mood, you’d only need to swap the green plants for something more colorful, like dried florals.
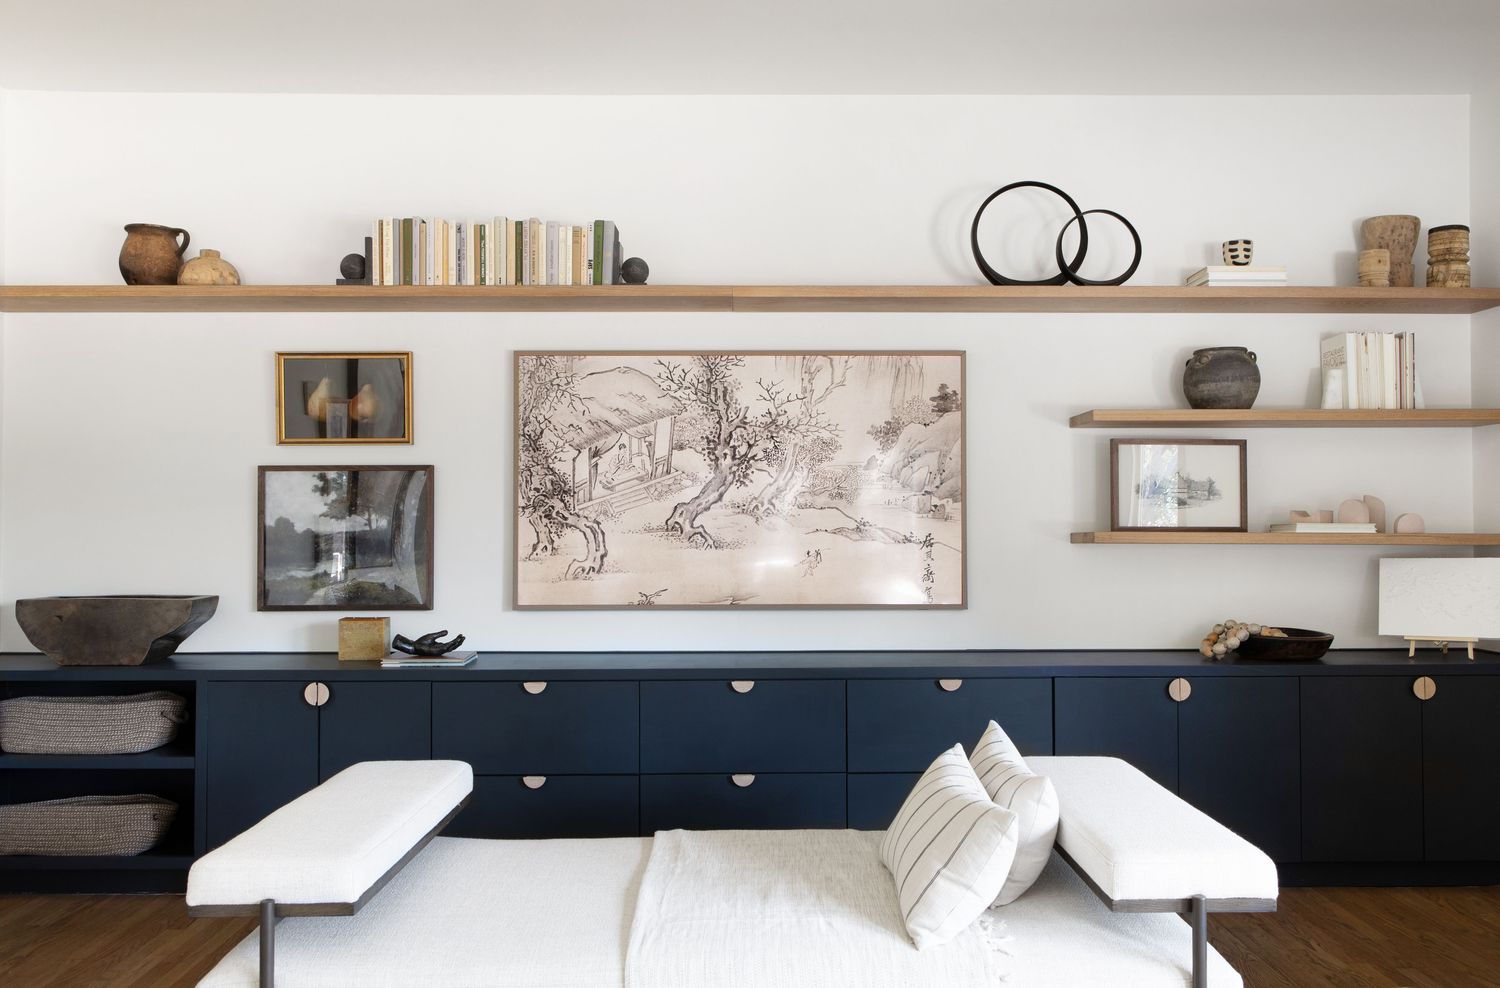
“Light, natural wood shelves like these are beautiful but require a bit of care to stay that way.”
Unsealed light woods like maple or pine are prone to yellowing over time, especially when exposed to direct sunlight. To preserve their pale beauty, it’s essential to finish them with a water-based, non-yellowing polyurethane or a clear hardwax oil. These finishes provide protection from stains and moisture without adding the amber tint that oil-based products often do. A quick dusting weekly and a wipe-down with a damp cloth is all that’s needed for cleaning.
27. Dark Wood Corner Shelves with Integrated LED Lighting
Adding integrated LED strip lighting to your shelves creates a high-end, custom look. It’s an easy and affordable upgrade. Time: 2 hours. Cost: $30-$60.
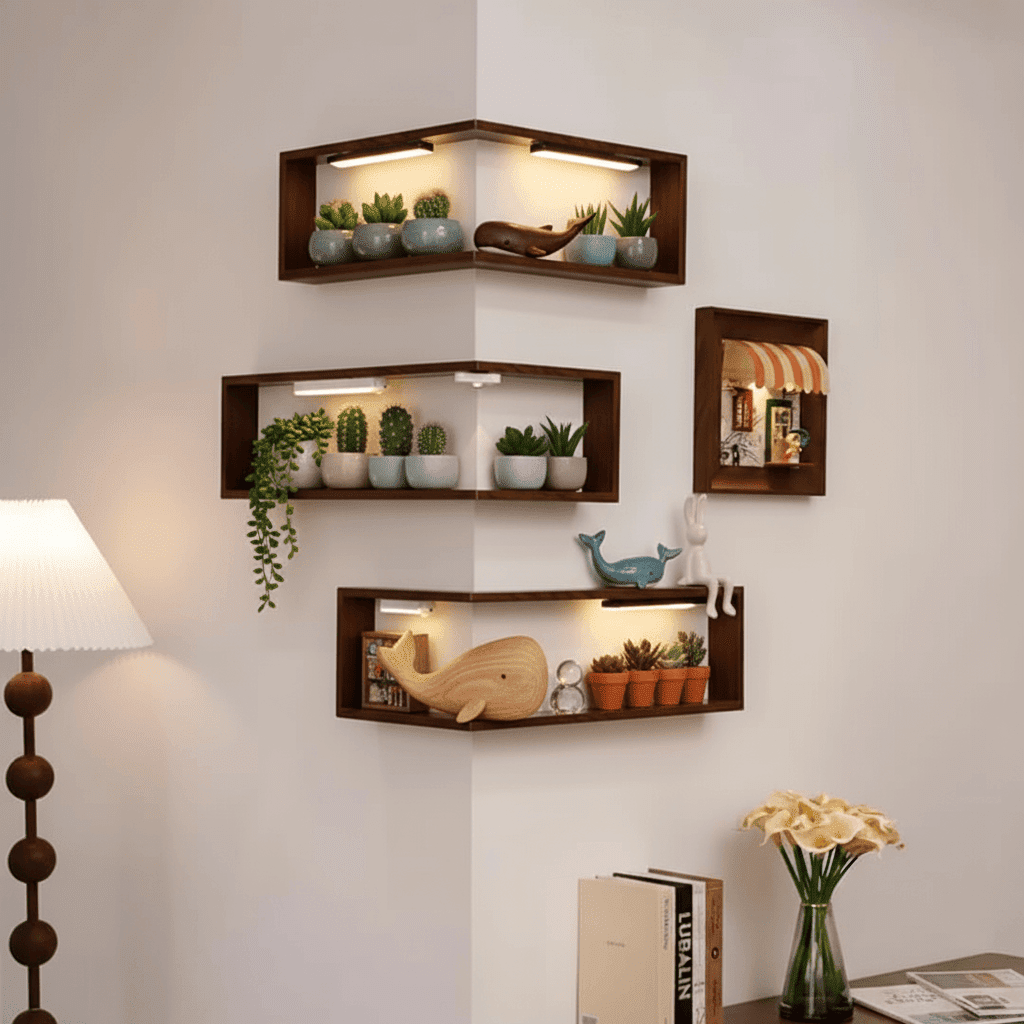
“Purchase a peel-and-stick LED light strip kit that includes a power supply.”
Choose a ‘warm white’ color temperature (around 2700K-3000K) for a cozy glow.Rout a shallow channel or groove on the underside of your shelves, near the front edge. This will hide the strip and diffuse the light. If you don’t have a router, you can buy a slim aluminum channel with a diffuser cover.Drill a small hole at the back of the shelf for the wire to pass through.Wipe the channel clean, then peel the backing off the LED strip and press it firmly into place.Run the wires down the corner behind the shelves (you can tape them or use small clips) and connect them to the power supply.
The integrated lighting is, without a doubt, the element that transforms these shelves from simple storage into a dramatic feature. In a dark corner, the wood and the objects would be lost in shadow. The warm glow from the hidden LED strips turns the entire corner into a luminous display case. It highlights the shapes of the succulents and decorative whales, casts beautiful shadows, and creates an incredible amount of ambiance. This is a perfect example of how lighting isn’t just for visibility; it’s a design tool that can completely define a space.
28. Dark Stained Floating Shelves Above Laundry Machines
This is pure, unadulterated function, and there’s no shame in that! Not every shelf in your house needs to be a perfectly styled vignette. In a utility space like a laundry room, the primary goal is practical storage. These shelves are doing exactly what they need to do: keeping bulky laundry baskets off the floor and within easy reach. The dark stain adds a touch of warmth and intention to the space, preventing it from feeling like a total afterthought, but their job is to be workhorses. Don’t feel pressured to style your laundry shelves with vintage glass bottles and folded linen towels if what you really need is a place to put the soap.
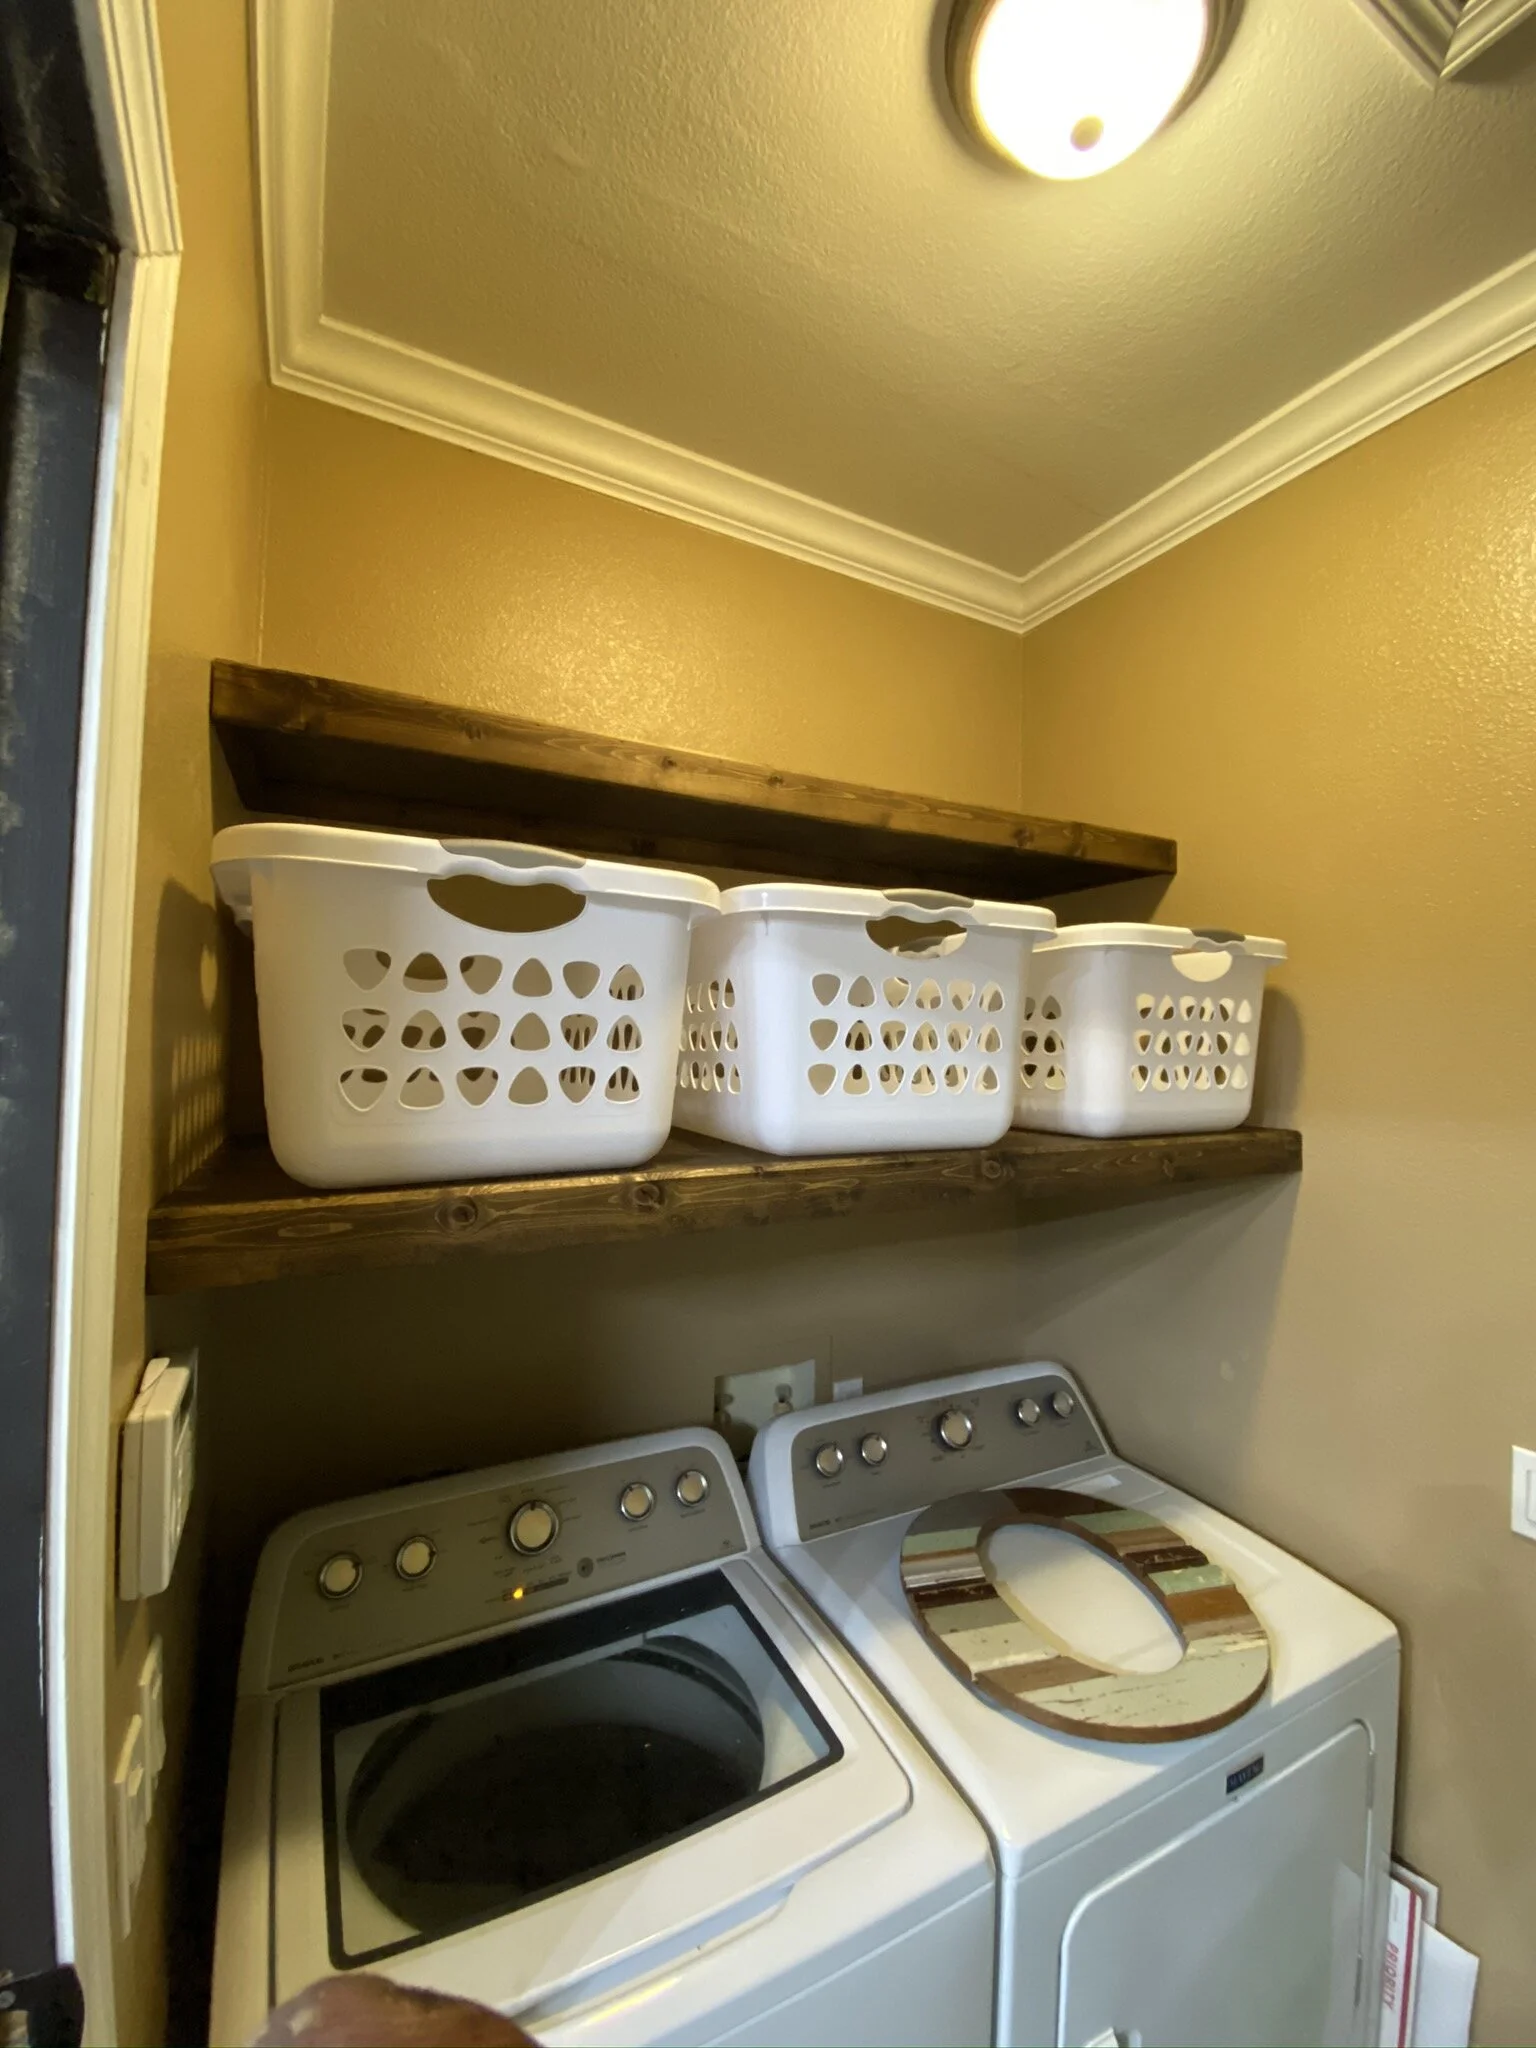
“You can create this exact functional setup for less than $50.”
Instead of thick, solid wood shelves, use standard pine boards (1x12s) from a hardware store, which cost about $20 for an 8-foot length. A small can of dark stain is another $10. The most affordable mounting option is simple metal L-brackets. A pack of 4-6 heavy-duty brackets will run you about $15. The look is more industrial than ‘floating’, but for a laundry room, it’s just as effective and saves you a significant amount of cash that you can spend on, well, anything other than laundry room shelves.
29. Curated Corner Display with Dark Live-Edge Shelves
This corner display feels so rich and personal because of its expert layering of objects, colors, and textures. The dark live-edge shelves provide a rustic, organic base. On top of that, the styling demonstrates the ‘Rule of Threes’ beautifully—grouping items in threes or odd numbers. Stacks of books create blocks of color, vases add vertical height, and metallic objects like the globe introduce a different material and shine. The key is the variation in height, shape, and texture, which encourages your eye to wander and explore each shelf. The navy blue accents scattered throughout provide a cohesive color thread.
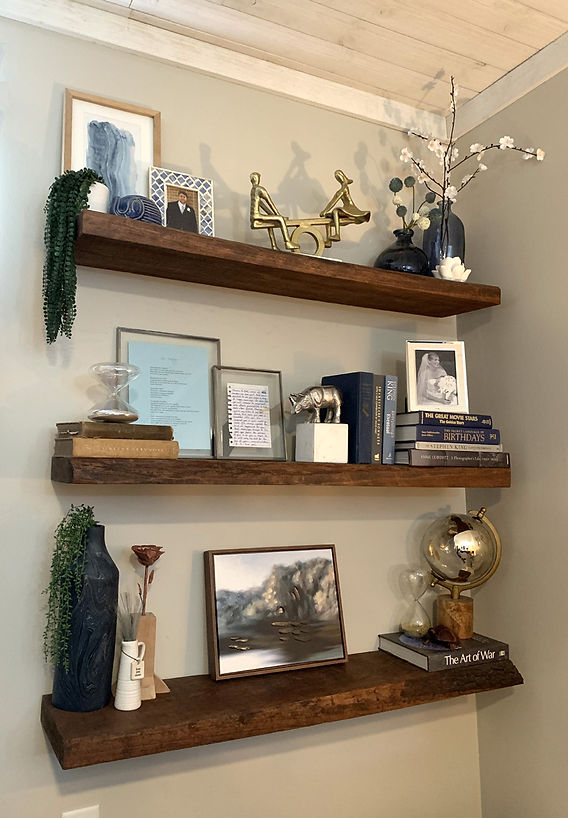
“This look is a perfect embodiment of the ‘bookshelf wealth’ trend that’s taking over Pinterest.”
It’s the idea that the best interiors aren’t filled with new, trendy items, but with a lifetime of collected books, art, and objects that reflect your actual life and interests. These shelves aren’t styled for a catalog; they feel lived-in and authentic. The mix of framed photos, travel souvenirs (like the globe), and well-loved books tells a story. It’s a move away from sterile minimalism towards a cozier, more personal aesthetic that celebrates intellectual and sentimental richness.
Your Walls Are Waiting for Their Story
As you can see, a floating shelf is so much more than a piece of wood on a wall. It’s a canvas for your personality, a solution for your clutter, and a project that can genuinely transform a corner of your home. Whether you’re drawn to the rustic charm of live-edge wood or the clean lines of a minimalist display, there’s a perfect idea here waiting for you. Now, go take another look at your Pinterest board and start planning!