You know that feeling when you finally find the Barbie storage idea that looks exactly right for your space, but you’re not sure how to make it happen? We’ve got you. After filtering through hundreds of options across IKEA, Target, and The Container Store, we narrowed it down to the 30 ideas that actually deliver on both style and function. Inside, you’ll find everything from display-focused solutions for collectors to clever IKEA hacks and practical playroom systems. In 2026, it’s all about integrating play into our home’s design in a way that feels intentional, not chaotic. Go ahead and save this—you’re going to want to reference it.
As an Amazon Associate, we may earn from qualifying purchases.
1. Create a Framed Doll Gallery with Vertical Shadow Boxes
This approach turns a doll collection into a sophisticated art installation. The grid-like structure of the shadow boxes brings a sense of rhythm and order to what can often be a chaotic collection of colorful toys. By mounting them on a neutral beige wall, the dolls themselves become the heroes. The thin, light gray frames and white dividers are key; they keep the focus on the dolls while providing just enough structure to feel intentional and clean. It’s a brilliant way to honor a collection in a main living space, not just a playroom.
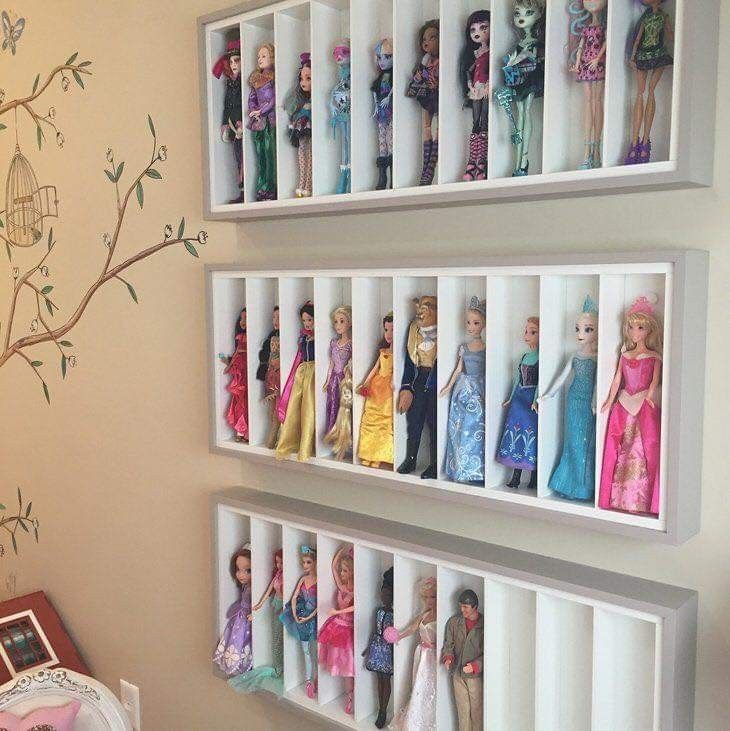
“When you’re mounting multiple frames or shadow boxes in a series, always treat them as a single piece of art.”
The ideal space between each box is between 2-4 inches. This small gap ensures they look like a cohesive triptych, not three random items. Anything wider, and you lose the effect. A laser level is your best friend here; it’s the one tool that guarantees a perfectly straight, professional-looking installation that won’t drive you crazy every time you look at it.
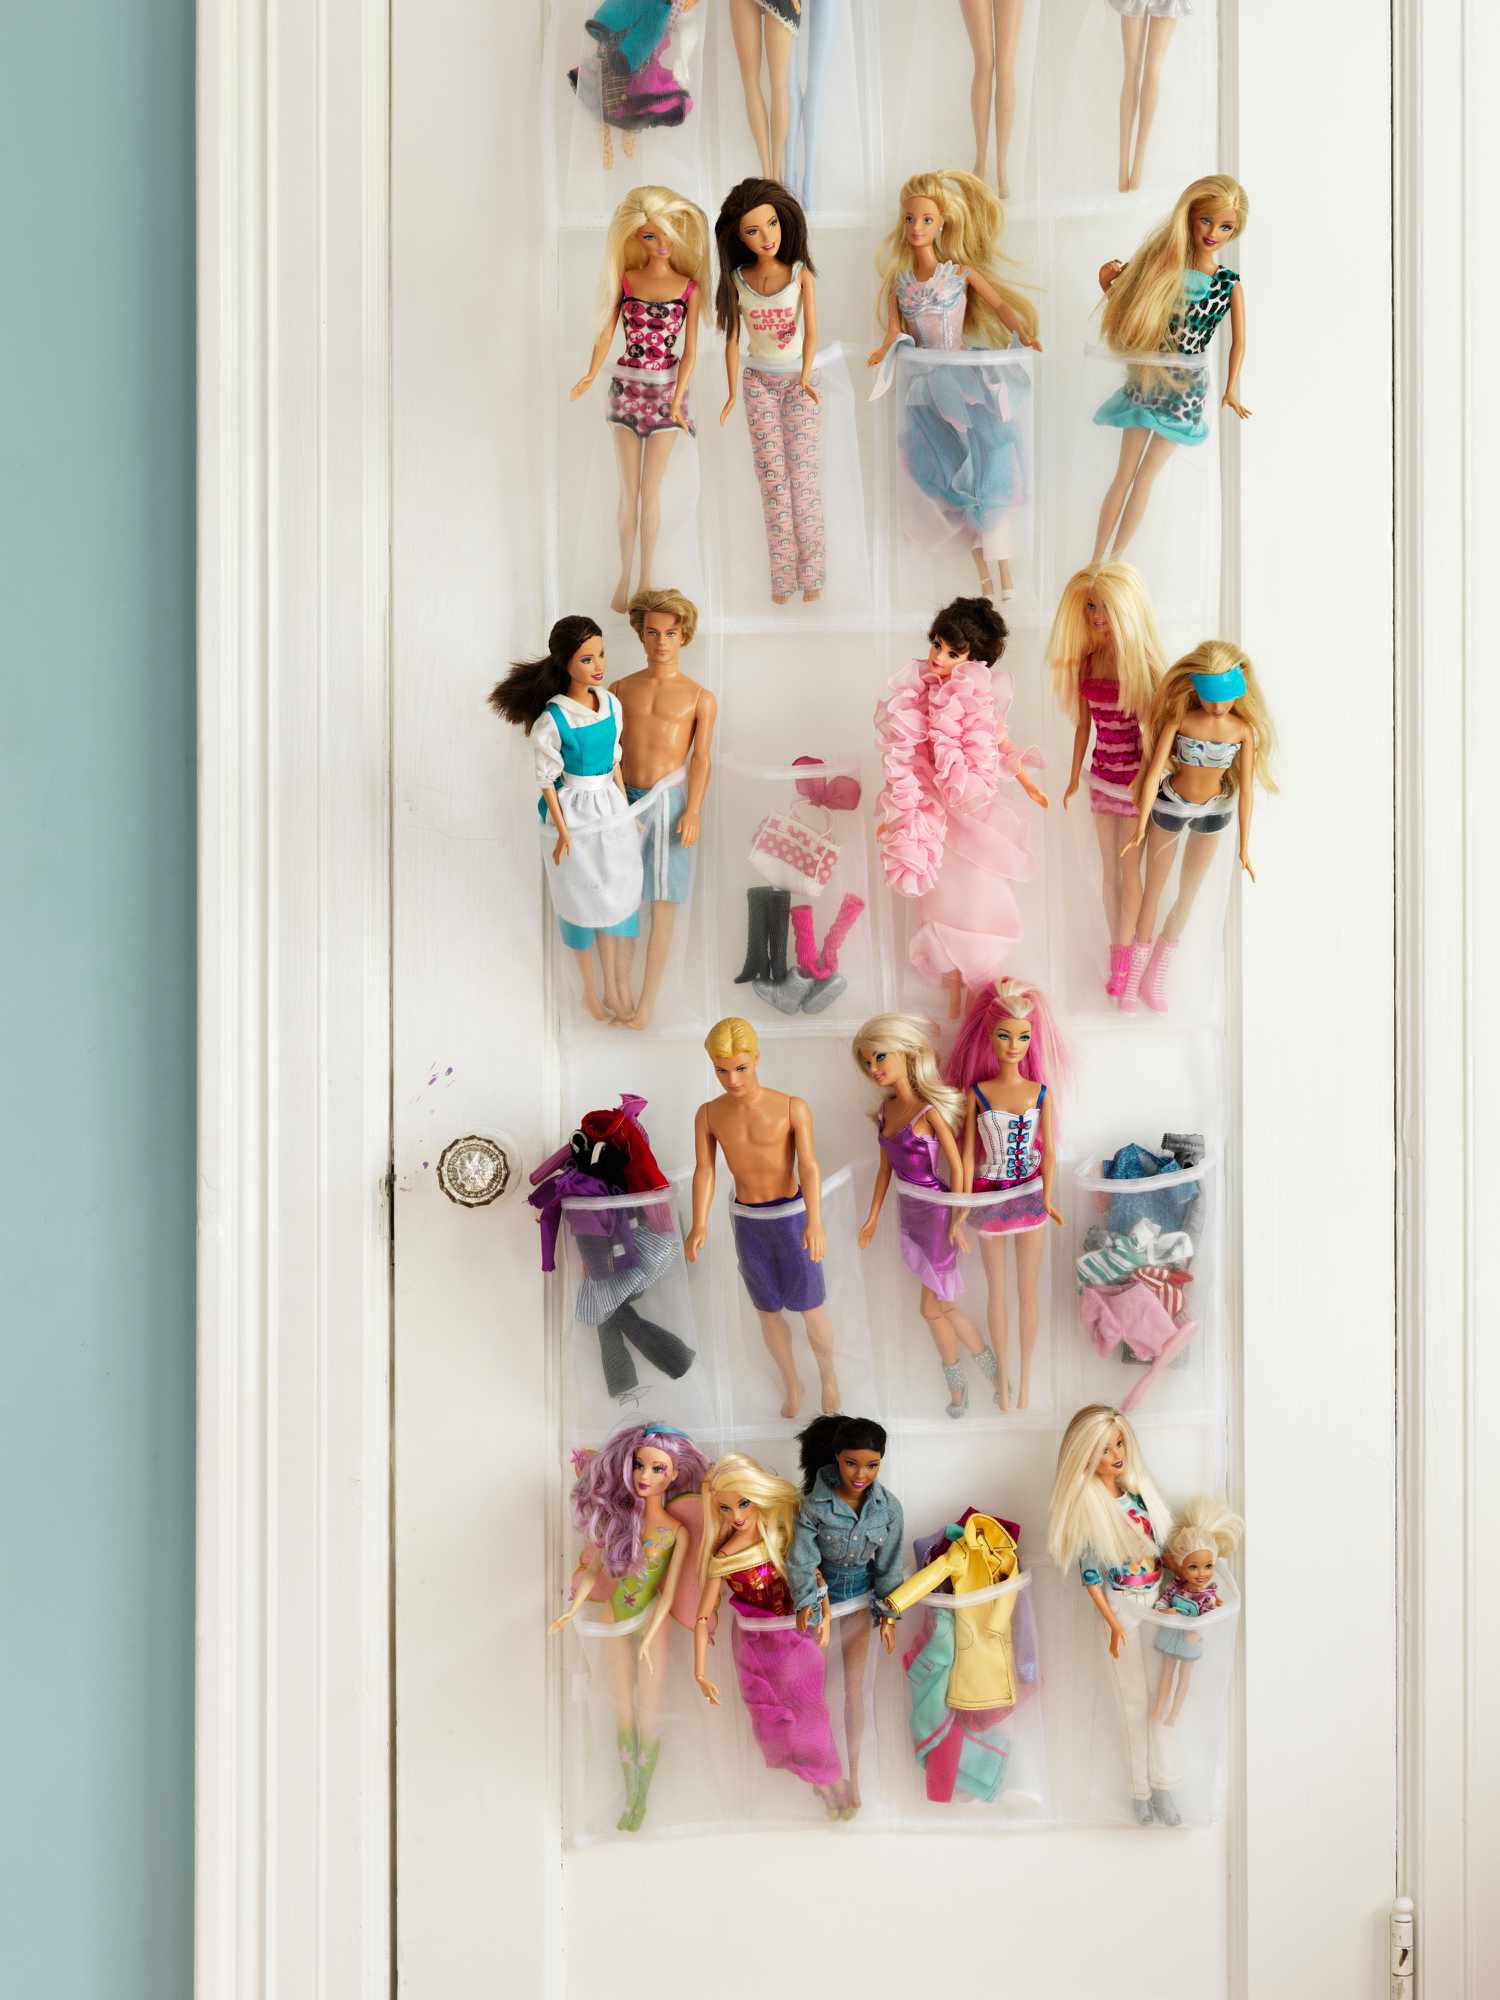
2. Use an Over-the-Door Organizer for Quick-Access Doll Storage
Let’s be honest: while this is a fantastically efficient use of space, especially in small rooms, it’s not the most aesthetically pleasing look for a main living area. The visual clutter of all the dolls and accessories crammed into clear pockets can be overwhelming. This is a workhorse, not a show pony. It’s perfect for the inside of a closet or a dedicated playroom door where function trumps form. Also, be mindful of the weight; a full organizer can strain door hinges over time, so check them periodically.
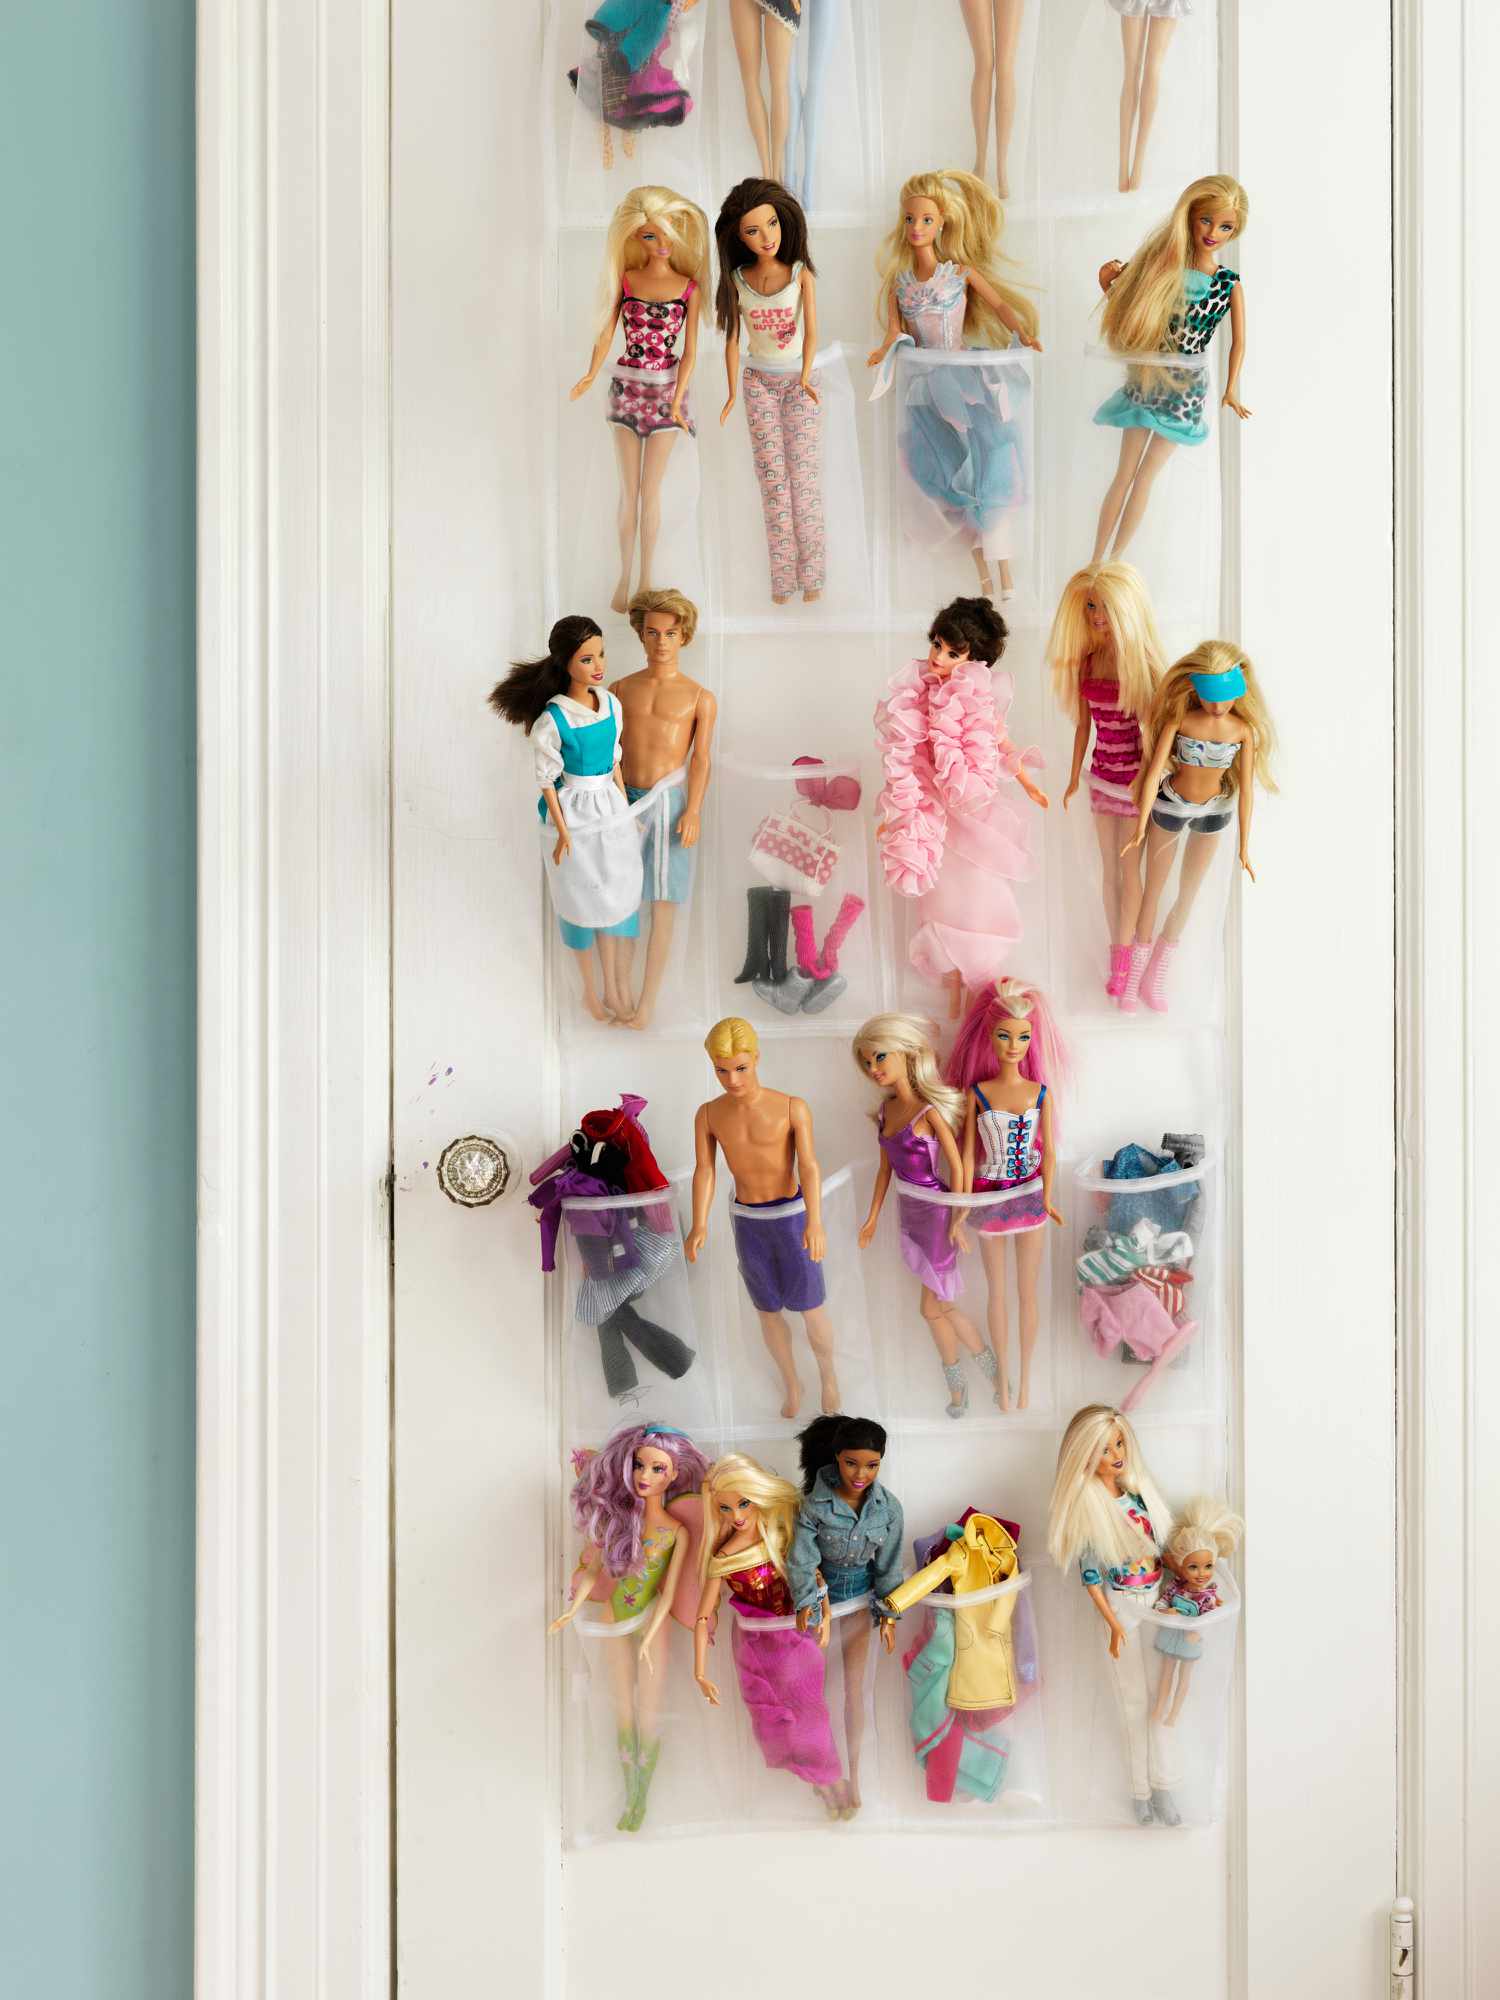
“The single element that makes this solution so effective is its transparency.”
If these pockets were opaque, the system would be a nightmare. The ability to see every doll and accessory at a glance is what prevents endless dumping and searching. It empowers kids to find exactly what they’re looking for *and* makes cleanup a simple matching game. Without the clear plastic, this would just be another frustrating junk drawer—but hanging on your door. Compare this with the more decorative Fuchsia Over-the-Door Organizer.
3. Organize Accessories in Labeled Clear Plastic Drawers
Want to create those adorable custom labels? It’s easier than you think and makes a huge difference in keeping things tidy. Here’s a quick guide:
- Time: 20 minutes
- Cost: $5-$10
- Get Supplies: You’ll need white cardstock, a printer, scissors, a marker, and some fun patterned washi tape or stickers.
- Design & Print: Create simple labels on your computer with clear categories (Shoes, Dresses, Kitchen, etc.) and print them on cardstock.
- Cut & Decorate: Cut the labels to fit the drawer fronts. Let your child decorate the borders with the washi tape or stickers.
- Attach: Use double-sided tape to affix the finished labels to the front of each clear drawer.
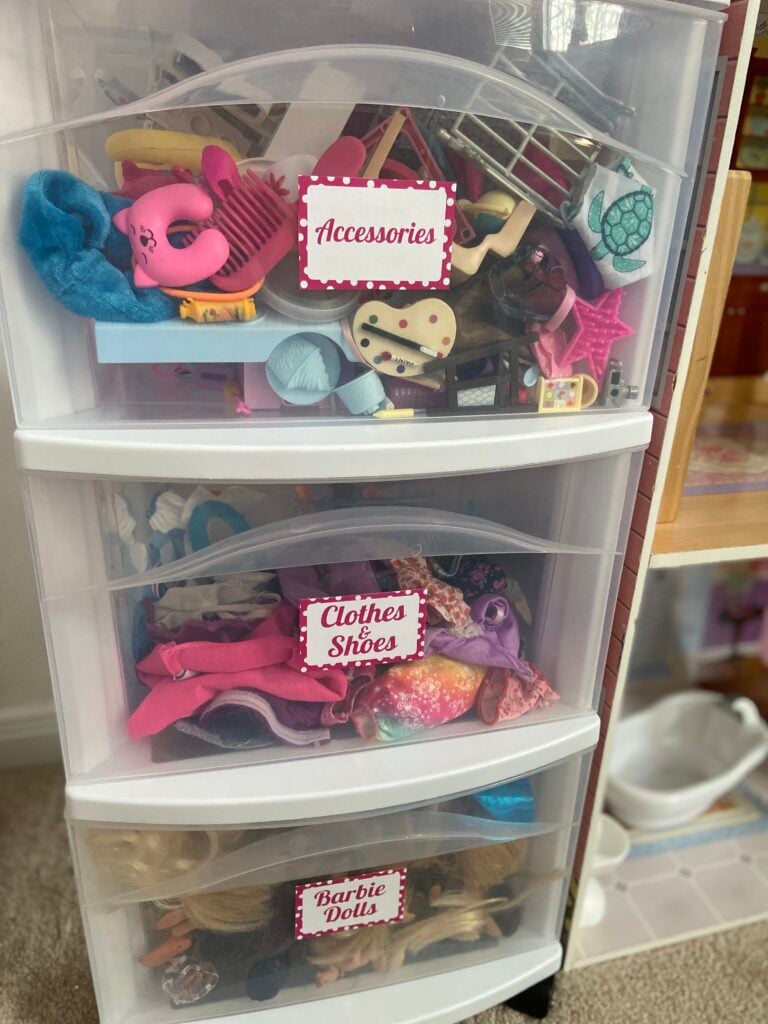
“This look is all about functional, visible organization.”
The formula is simple: 70% clear storage + 20% neutral frame + 10% colorful accents. The clear drawers are the main event, letting you see the contents easily. The white frame provides a clean, neutral backdrop that works in any room. The final 10% comes from the hand-made pink polka-dot labels and the colorful items inside, adding a dose of personality and fun. You could easily swap the pink for blue, green, or rainbow tape to match any room decor without losing the core functionality.
4. Showcase a Diverse Doll Collection on a Bright Yellow Bookcase
We’re seeing a major shift away from hiding toys and toward proudly displaying them as part of a room’s decor. This bright yellow bookcase is a perfect example of “dopamine decor”—using bold, happy colors to create an energizing and personal space. The open-shelf styling, especially with the inclusion of diverse dolls like those in wheelchairs, reflects a broader cultural move toward representation and inclusivity in play. It’s not just storage; it’s a statement about what we value.
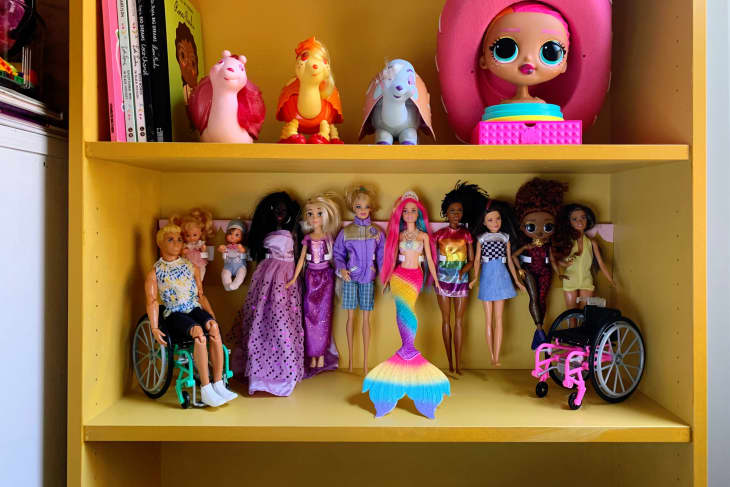
“The yellow bookcase itself is the undeniable star here.”
Remove it, and you just have a pile of toys on a generic shelf. The electrifying yellow injects so much personality and joy into the room, instantly defining the space as playful and creative. It acts as a vibrant frame for the collection, making each doll and accessory pop. It proves that storage furniture doesn’t have to be boring or neutral to be effective; sometimes, the bolder, the better.
5. Line a Dresser Drawer with Polka Dots for Hidden Doll Storage
Recreating this charming, hidden storage solution is incredibly affordable. It’s more about thoughtful details than expensive items.
- White Dresser: $150 – $400 (or use an existing one)
- Drawer Liner Paper: $10 – $25
- New Drawer Pulls (optional): $15 – $30
- Drawer Dividers (optional, but recommended): $20 – $40
- TOTAL: $195 – $495
- Budget alternative: Find a used dresser on Facebook Marketplace for $50-$75 and use gift wrap or scrapbook paper as a liner for under $5. The total cost could be well under $100.
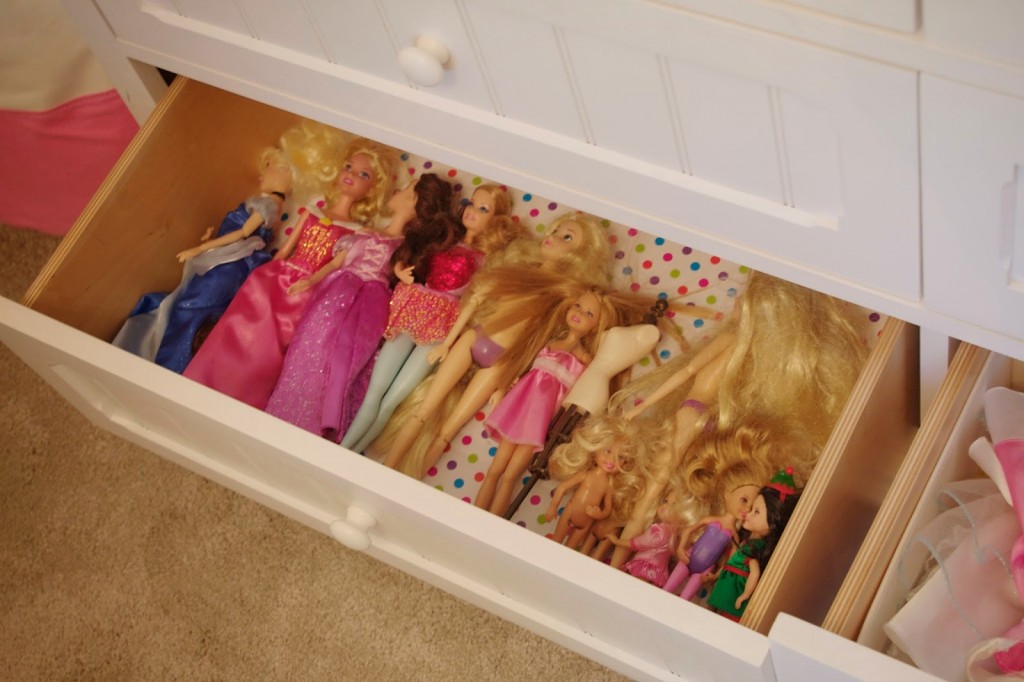
“A word of caution: the “just toss them in” method shown here is a recipe for tangled hair and lost accessories.”
While it looks cute in a photo, the reality of this system is chaos. A single drawer with this many dolls will quickly become a jumbled mess, leading to frustration during playtime and potential damage to the dolls. Without dividers or individual bags for accessories, tiny shoes and brushes will be lost forever in the pile. This is a great starting point, but it needs a bit more structure to be truly functional.
6. Combine Open Shelves and Fabric Bins in a Cube Unit
The success of this setup lies in its balanced visual formula: 50% open display + 50% concealed storage. The open cubes are perfect for items that are either beautiful or frequently accessed, like books or neatly organized clear bins. The fabric bins handle the rest—the messy, awkwardly shaped toys that create visual clutter. The key is the consistent color palette; the white unit provides the neutral base, while the black-and-white pattern on the bins adds a graphic punch without introducing too many new colors.
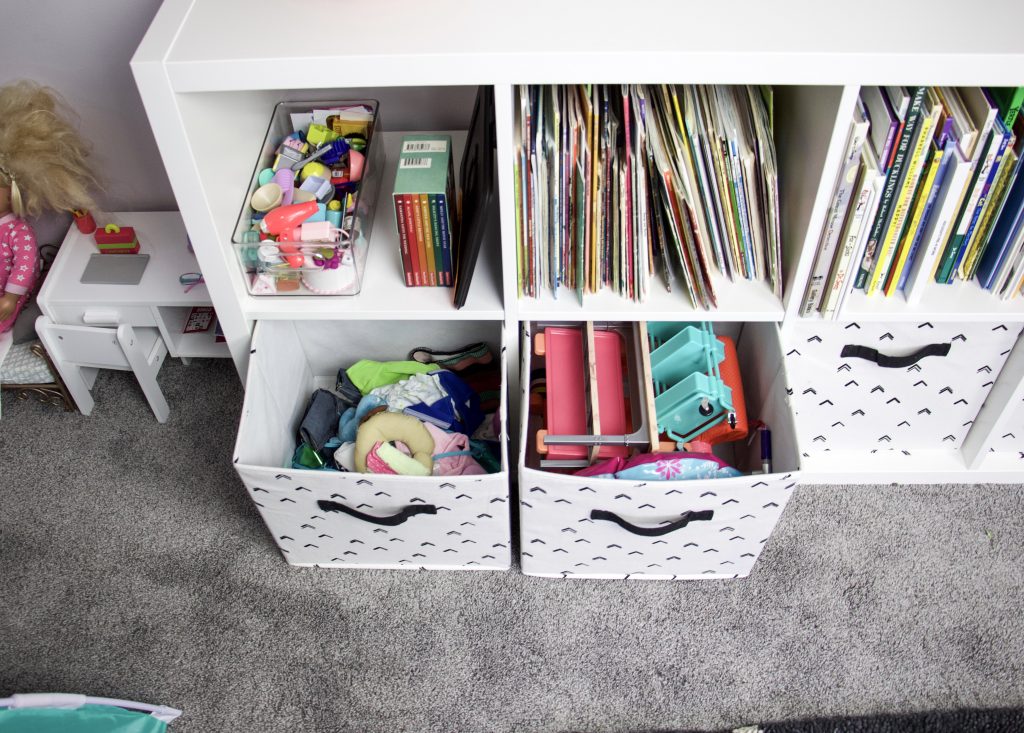
“A modular cube unit like this is incredibly versatile, but it works best in rooms with at least 8 feet of available wall space to avoid feeling cramped.”
For this 3×3 or 4×4 configuration, you’ll want a standard ceiling height of 8-9 feet. The beauty of this system is its scalability. In a smaller room, a simple 2×2 cube unit can provide a similar mix of open and closed storage. This is a much more space-conscious approach than the sprawling Chrome Wire Shelving unit, making it ideal for bedrooms.
7. Use a Miniature Cube Shelf for Tiny Decorative Displays
This little scene is a masterclass in playing with scale. By using a miniature shelving unit—something that belongs in a dollhouse—as a decorative object itself, it creates a whimsical, slightly surreal focal point. The dark gray textured wall provides a dramatic backdrop that makes the tiny white shelf and its miniature contents pop. It’s a sophisticated, clever way to add personality that invites you to look closer and appreciate the tiny details, like the stack of miniature books and petite potted plants.
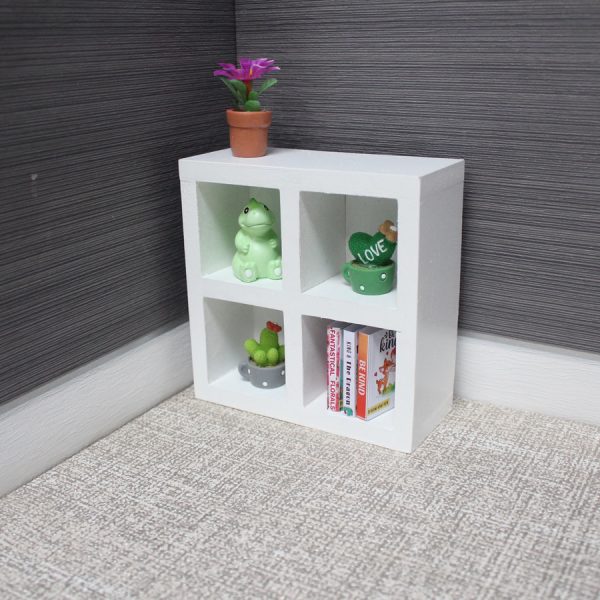
“When styling miniature scenes, texture is your secret weapon.”
Notice the contrast between the smooth white shelf, the rough texture of the wall, and the varied surfaces of the tiny decor items. To replicate this, aim to include at least three different textures. For example, pair a tiny metal object with a miniature woven basket and a small ceramic piece. This textural variety is what gives a miniature display depth and makes it feel rich and interesting, rather than flat and toy-like. Check out the Doll’s Striped Closet for another great example of miniature detailing.
8. Install Wall Ledges with Gold Rods for a Floating Doll Display
The gold retaining rod is the absolute key to this entire concept. Without it, these would just be standard picture ledges, and the dolls would constantly be tipping over. This single, simple addition transforms the shelves from passive surfaces into active, secure display holders. The metallic glint of the gold against the white shelves adds a touch of glam and sophistication, elevating the dolls from simple toys to prized collectibles. It’s a small detail that does all the heavy lifting, both functionally and aesthetically.
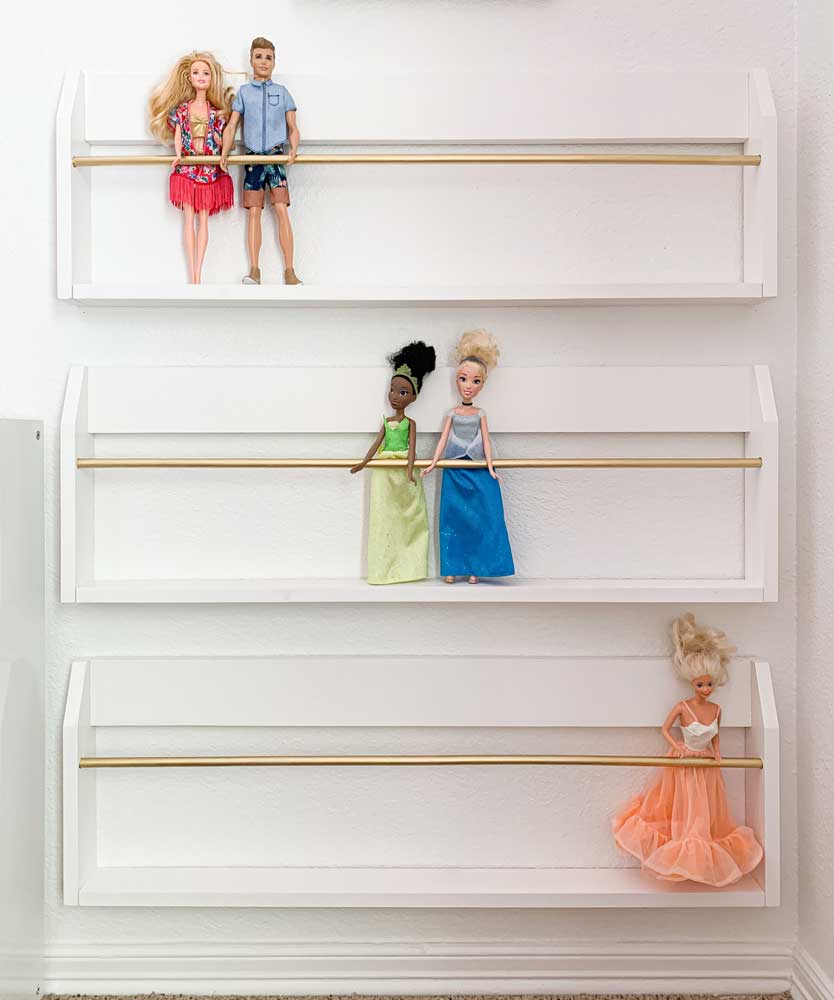
“Installing floating ledge shelves like these is a perfect weekend DIY project.”
Time: 1 hour
Cost: $40-$80 (for 3 shelves)
Measure & Mark: Decide on your vertical spacing. 12-15 inches between shelves is usually perfect for Barbie-sized dolls. Use a pencil and a level to mark where your first shelf will go.
Install Anchors: If you’re not drilling into a stud, tap drywall anchors into the wall on your marks. This is critical for ensuring the shelves are secure.
Attach Shelf: Drill the screws through the shelf’s mounting holes into the anchors or studs.
Repeat: Measure from the top of the installed shelf to mark the position for the next one and repeat the process.
9. Go Bold with a Fuchsia Over-the-Door Pocket Organizer
This works because it commits unapologetically to a bold color. Instead of trying to blend in, the fuchsia pink organizer becomes a major design element in the room. It turns a purely functional item into a vibrant vertical stripe of color. Paired with the cream-colored door, the contrast is cheerful and energetic. The clear pockets break up the solid block of pink, while the dolls themselves add even more color and pattern, creating a rich tapestry of textures and hues. It’s a maximalist approach to a minimalist storage solution.
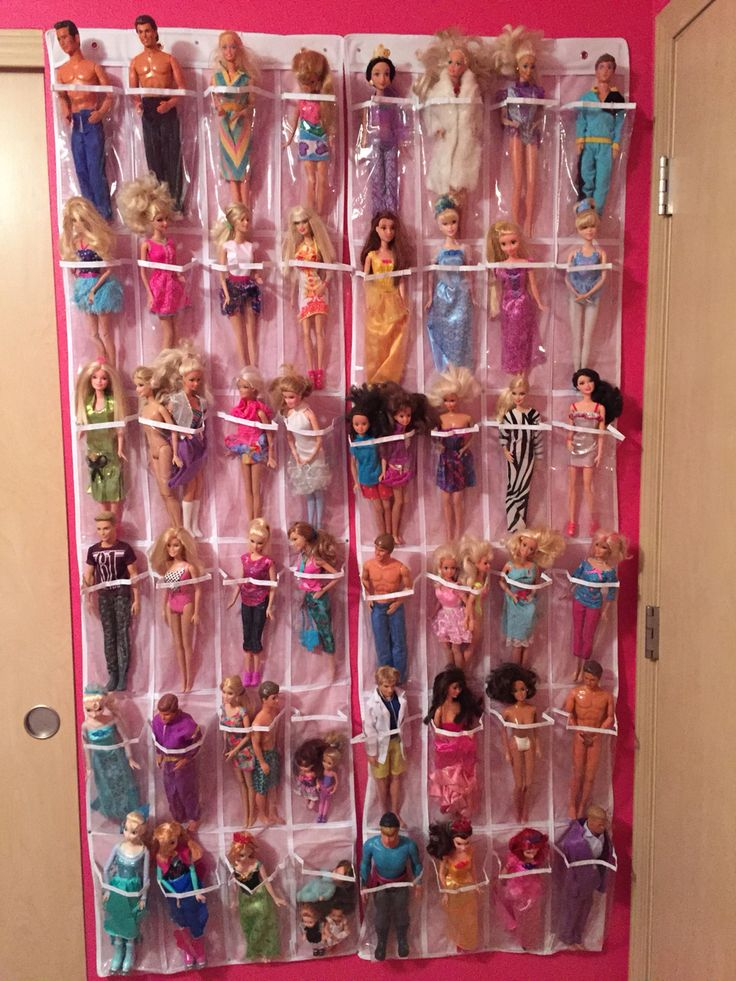
“You don’t need to spend a lot to get this high-impact look.”
While branded versions exist, you can find colorful over-the-door shoe organizers at places like Walmart, Amazon, or even dollar stores for $10-$20. The key is to look for one with clear pockets. For an even cheaper alternative, check thrift stores! People often donate these when moving. You might find one in a perfect, vibrant color for less than $5, offering a huge pop of color for next to nothing. It’s a much more vibrant take compared to the purely functional Clear Organizer.
10. Light Up a Dollhouse with Wardrobes and LED Strips
Integrating lighting into dollhouses is a huge trend, driven by the rise of miniature hobbyists and the desire to make play spaces feel more realistic and immersive. Battery-powered LED strip lights, like the ones seen here, are inexpensive and easy to install, instantly adding warmth and drama. This setup, with its open pink wardrobes and styled scenes, treats the dollhouse less like a toy and more like a miniature interior design project. It reflects a desire to create a truly special, almost magical, play environment.
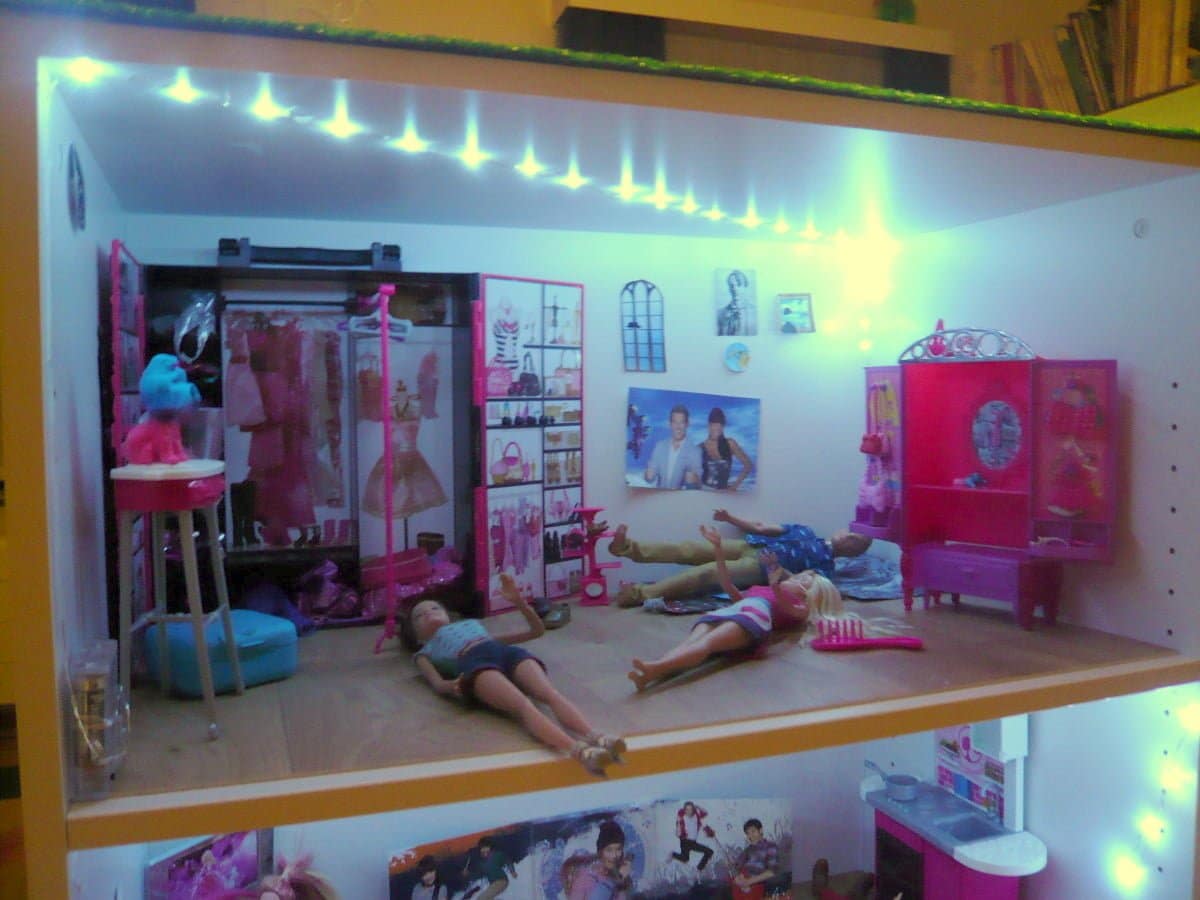
“A beautifully lit dollhouse is magical, but those tiny LED light strips can be a real headache.”
The adhesive backing often fails, especially on plastic or painted wood surfaces, causing them to droop. Battery packs add bulk and require frequent changes, which can be a pain to access inside a furnished dollhouse. If you’re going for this look, consider using small dabs of hot glue or tiny clear command hooks to better secure the light strips. For a more permanent solution, explore wired dollhouse lighting kits, but be prepared for a much more complex installation process.
11. Use an Official Barbie-Branded Pink and Purple Storage Unit
The single element that defines this piece is the iconic ‘Barbie’ logo. Without that looping script, this would be a generic, brightly colored plastic organizer. The branding instantly ties it to the world of Barbie, making it feel like an official, ‘correct’ place to store the collection. For a child, this isn’t just a storage unit; it’s an accessory for their dolls, an extension of the play world itself. This branding is what elevates it from a simple container to a coveted piece of the Barbie ecosystem.
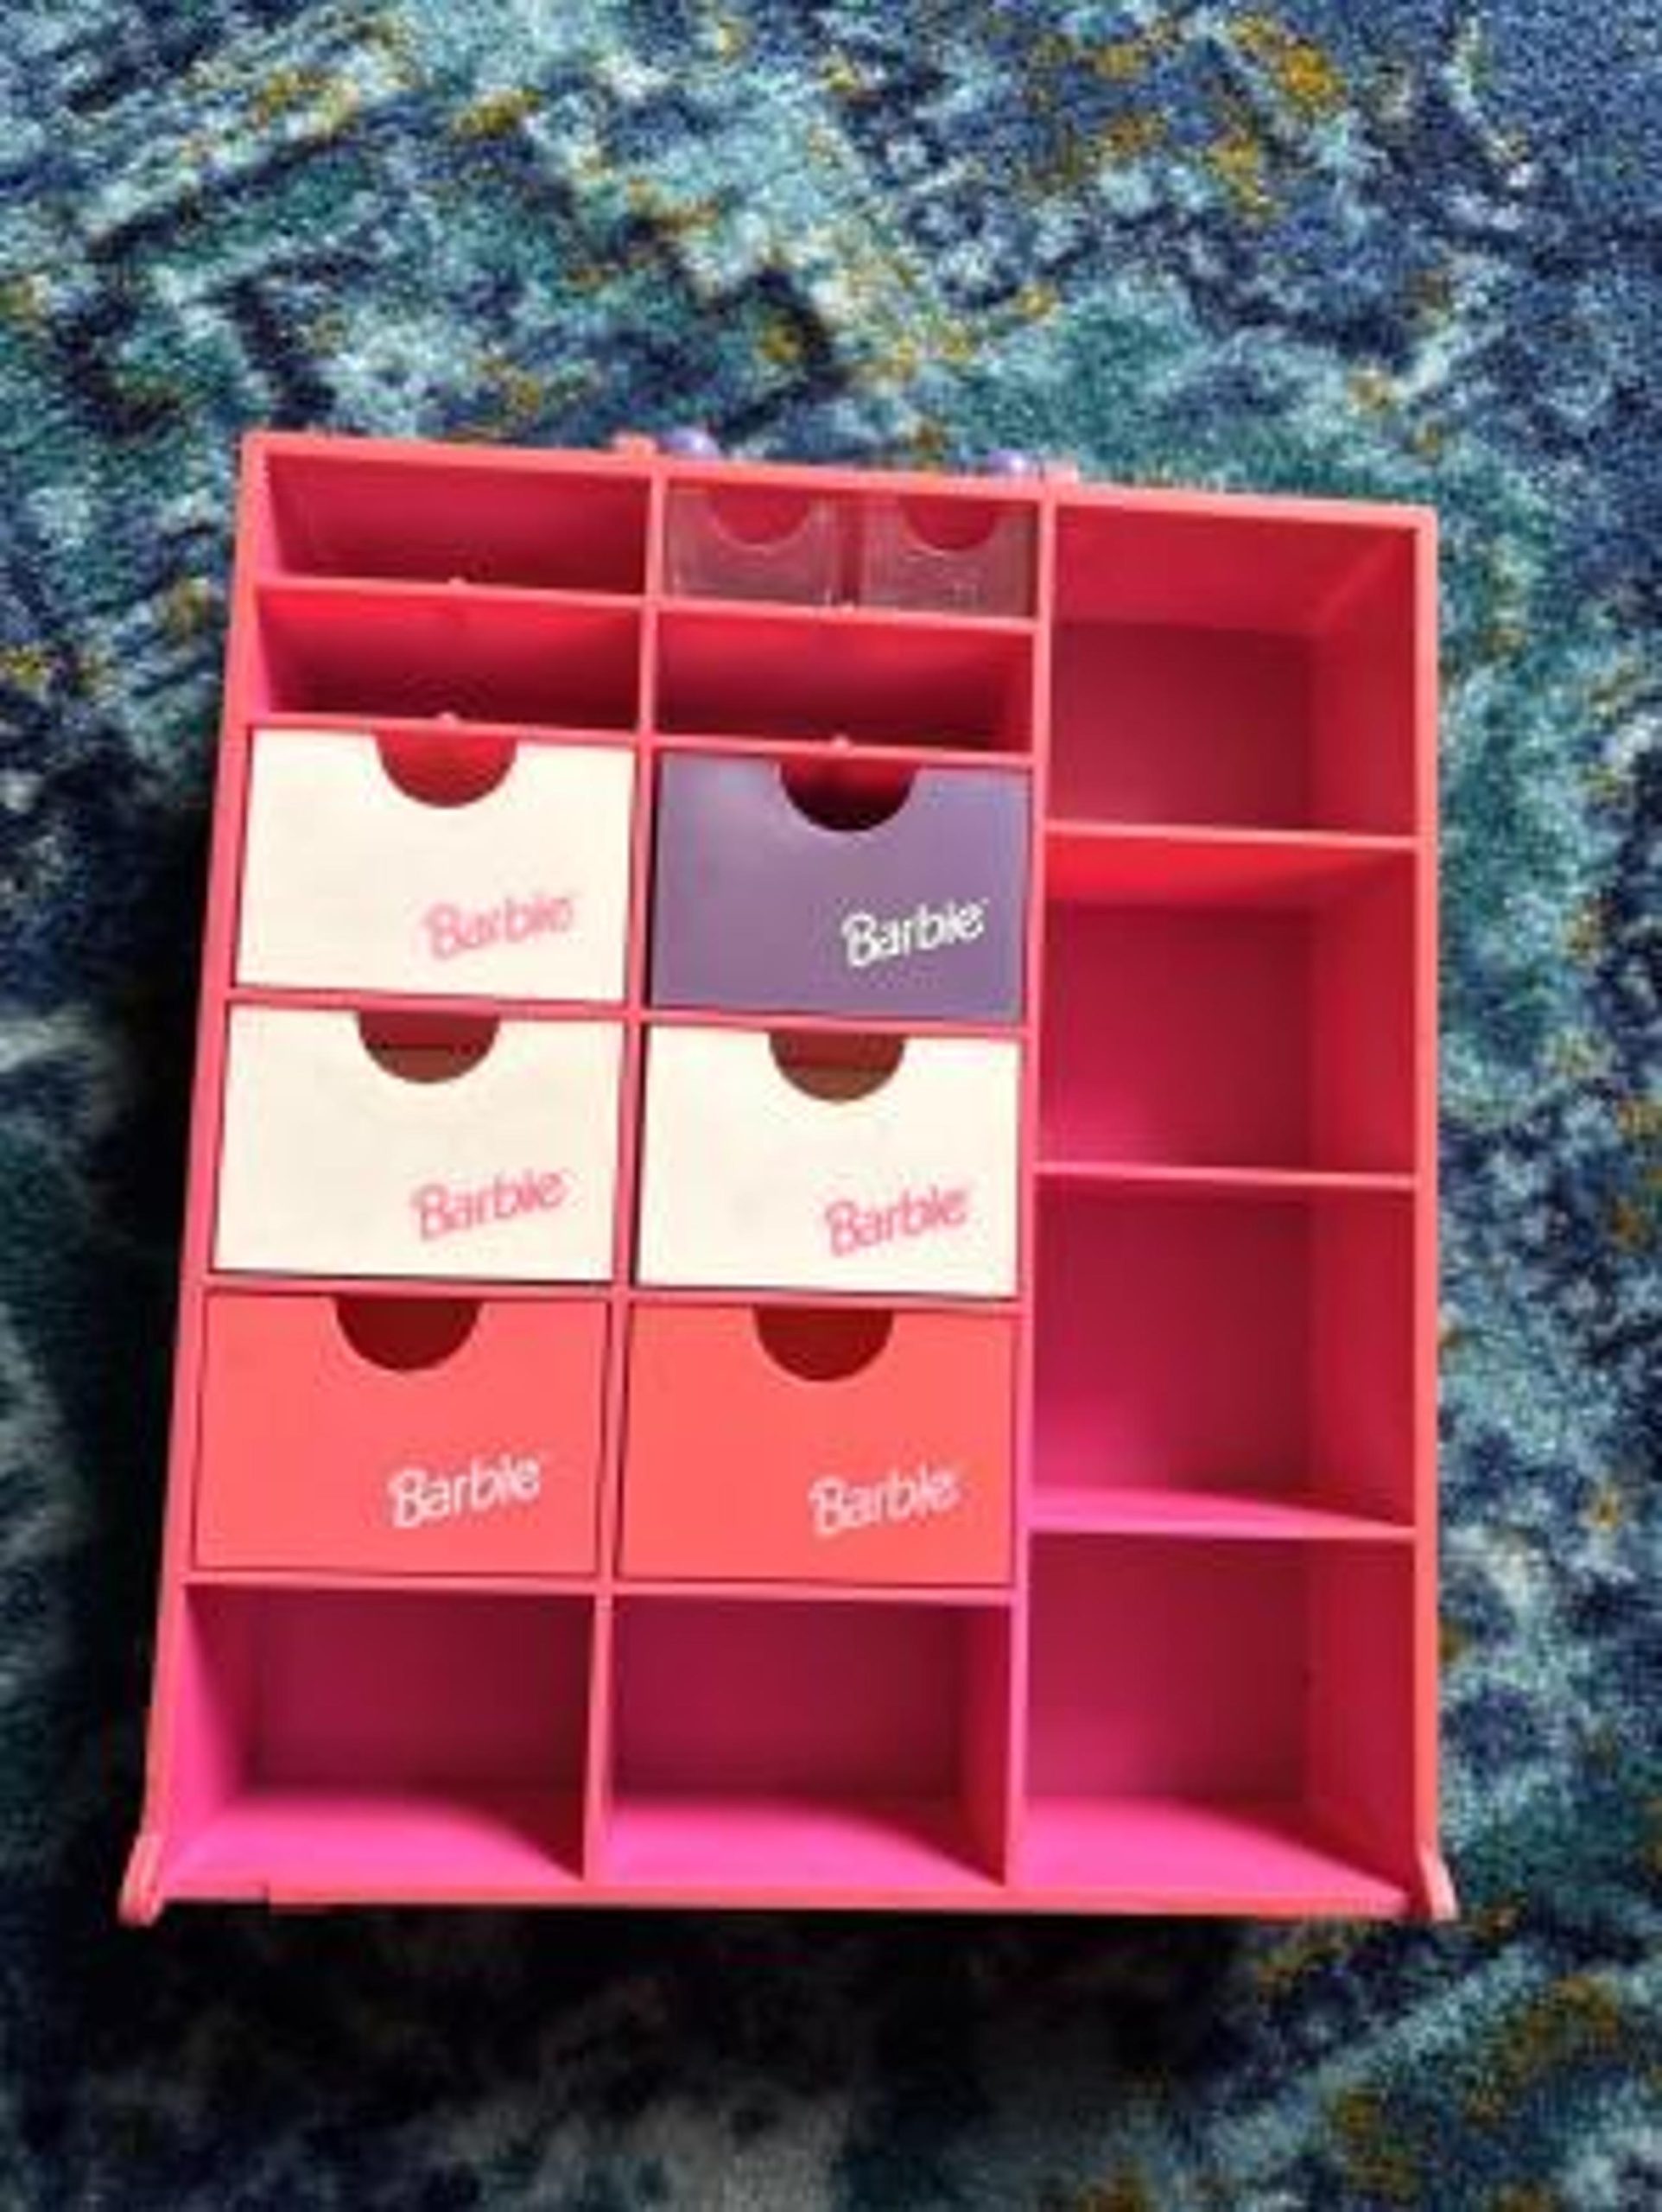
“Plastic organizers like this are fantastic for visibility and easy wipe-downs, but they are magnets for dust and fingerprints.”
The open shelves will need weekly dusting to look their best. While the plastic itself is durable, the ‘Barbie’ logo is often a sticker or a thin paint application that can peel or scratch off with aggressive cleaning or rough play. Use a soft, damp cloth with mild soap to clean, and avoid abrasive sponges or harsh chemical cleaners, which can dull the plastic and damage the branding.
12. Choose a Portable Caddy with a Bow Handle for Accessories
This design is successful because it perfectly understands its user: a child. The combination of fuchsia pink and purple is classic Barbie, while the oversized bow handle is both whimsical and functional, making it easy for small hands to carry from room to room. The mix of small drawers for tiny treasures (shoes, jewelry) and open cubbies for slightly larger items (brushes, wands) provides just the right amount of organizational variety. It feels like a treasure box, which encourages a child to actually use it.
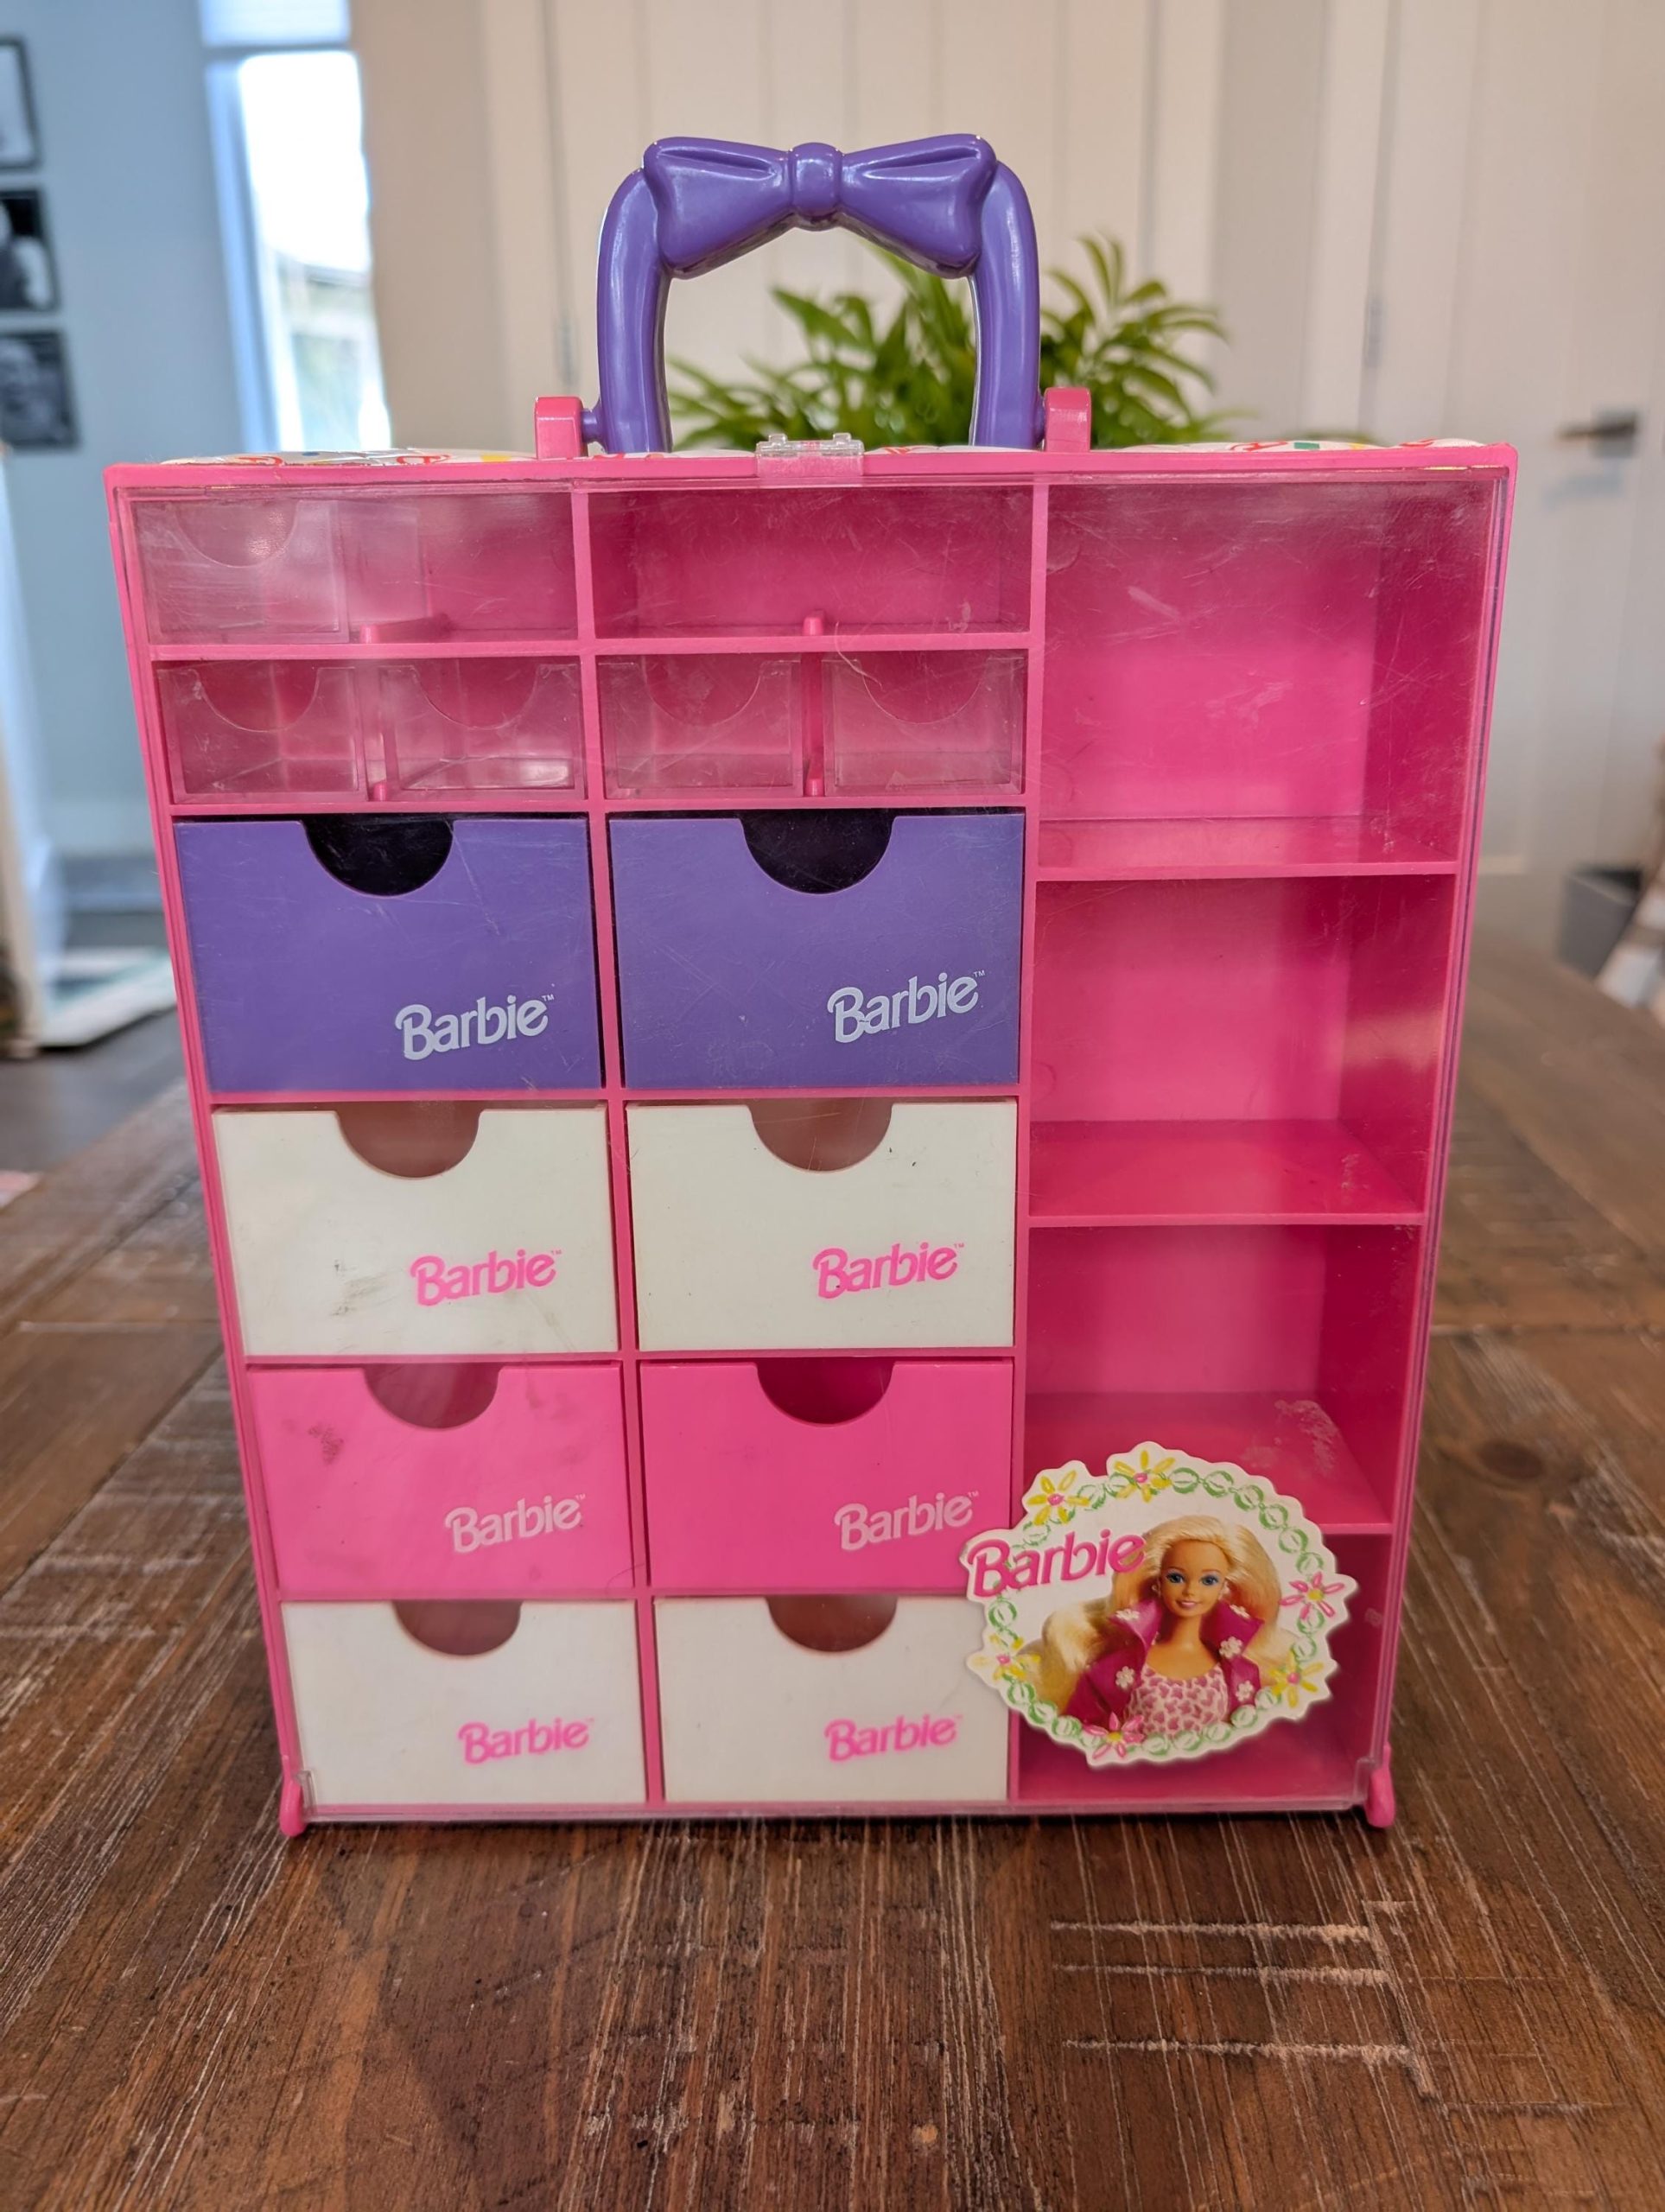
“This type of small, portable caddy is ideal for containing a specific subset of a collection, not the whole thing.”
It’s perfect for a child who has 5-10 dolls and wants to keep their absolute favorite accessories close at hand. Think of it as a ‘doll purse.’ It works great in small spaces, as it can be tucked onto a bookshelf or under a bed. It’s not the solution for a massive collection, which would be better served by a larger system like the Clear Drawer Unit or a full cubby system.
13. Organize Barbie Items in a Bedroom Setting
When organizing toys in a bedroom, the key is to create designated ‘zones.’ Don’t just have one giant toy box. Instead, create a ‘doll zone,’ a ‘book zone,’ and a ‘craft zone.’ Use furniture to define these areas. A specific bookcase for dolls, a comfy chair for reading, and a small table for crafts. This teaches kids that everything has a home, which makes cleanup infinitely easier. Even in a small room, visually separating the play functions helps contain the chaos and makes the space feel more intentional and restful.
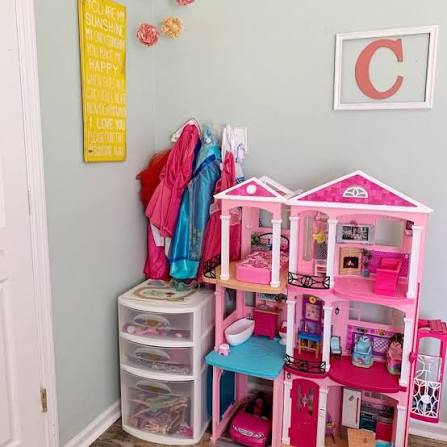
“Intentional living and organized kids’ rooms sound great on Pinterest, but the reality is that they require daily maintenance from you, the parent.”
A perfectly organized system will revert to chaos in about ten minutes of active play unless the habit of cleaning up is consistently reinforced. Start small: insist that the Barbies go back in their designated spot before the LEGOs come out. It will feel like a battle at first, but consistency is the only way to make these beautiful systems actually work long-term.
14. Soften a Pink Cube Unit with Animal-Faced Fabric Bins
This adorable setup follows a clear recipe: 60% simple furniture + 30% whimsical storage + 10% curated decor. The light pink cube unit with its simple wooden legs is the neutral foundation. The playful animal-faced fabric bins provide the personality and charm, making the storage itself part of the fun. The final 10% comes from the thoughtful items on top, like the floral box and stuffed lamb, which tie the color scheme together. You could swap the animal bins for dinosaur bins and the pink for blue, and the formula would still work perfectly.
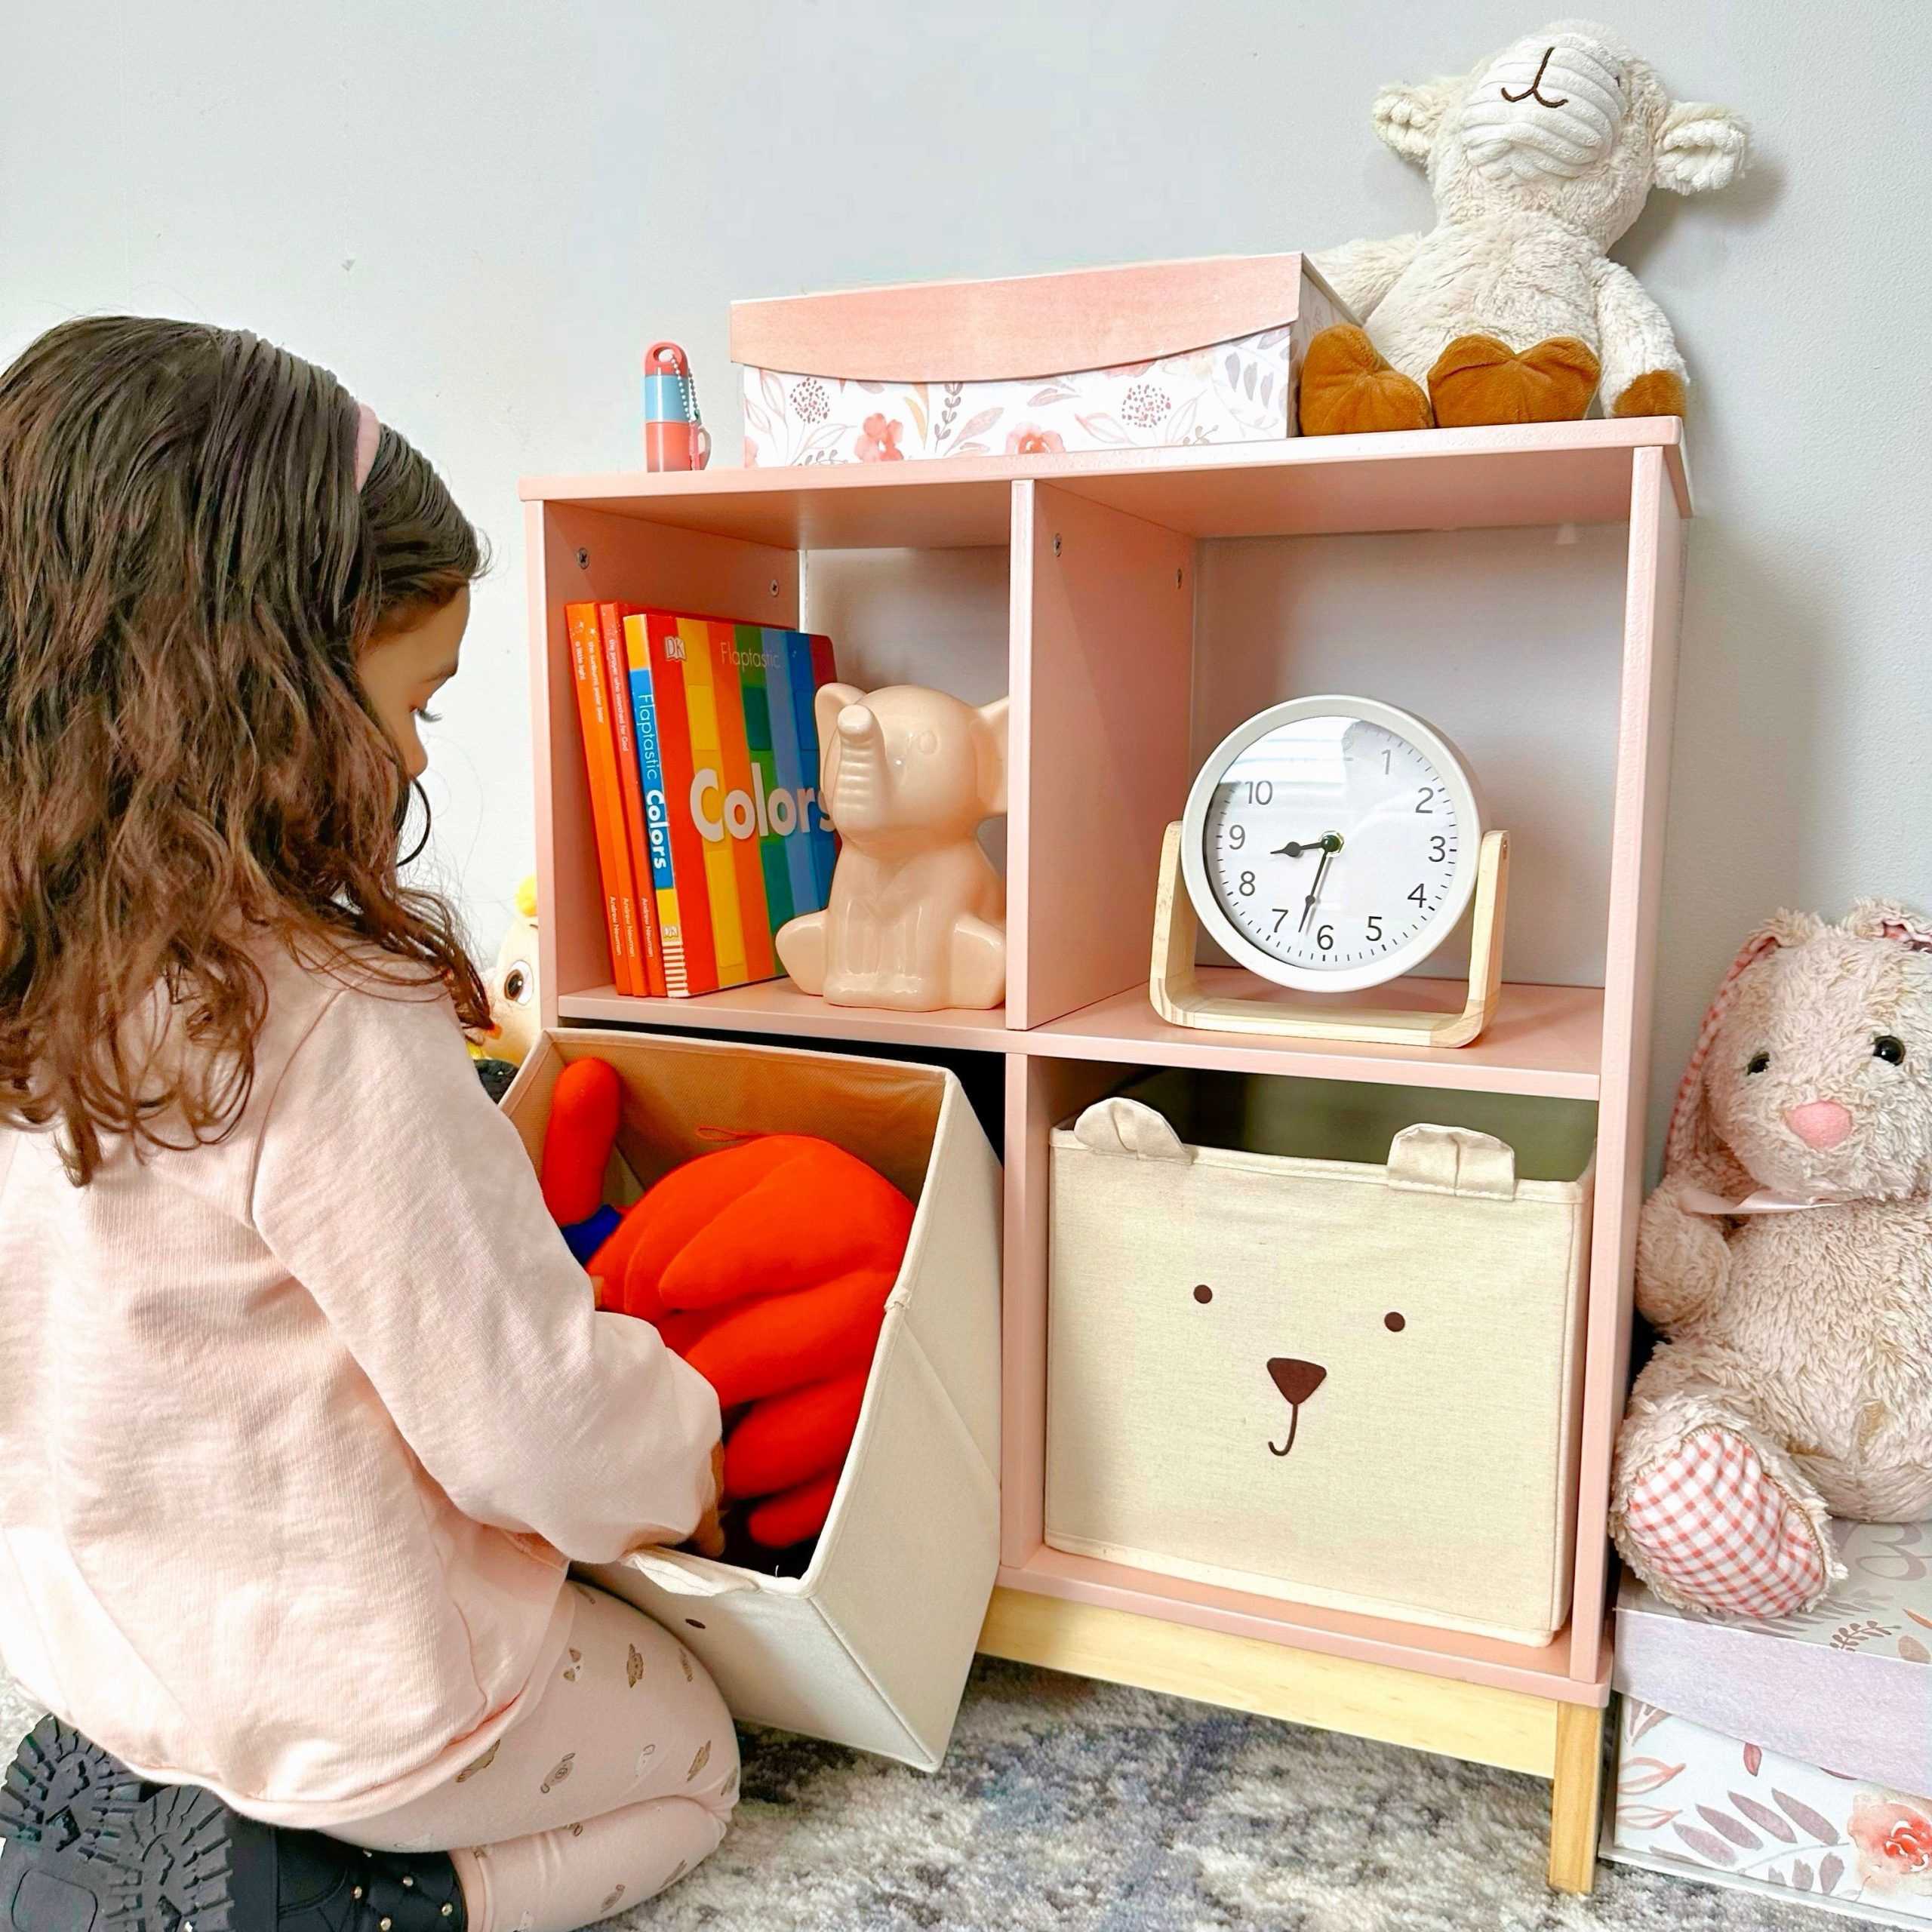
“This design feels so warm and inviting because it expertly mixes hard and soft textures.”
The clean lines and solid structure of the pink cube unit are balanced by the soft, touchable fabric of the storage bins and the plushness of the stuffed lamb on top. The light wood legs add a touch of natural warmth, connecting with the cozy feeling of the toys. This textural play is what makes the setup feel like a sweet, curated nursery corner rather than just a sterile piece of storage furniture.
15. Fill a White Cubby Unit with Natural Woven Baskets
This clean, natural nursery look is a timeless choice and can be adapted to various budgets. The main investment is the cubby unit itself.
- White 9-Cube Storage Unit (e.g., IKEA Kallax): $90 – $150
- Woven Baskets (9): $10 – $25 each, totaling $90 – $225
- Floating Wall Shelves (2): $30 – $60
- Framed Art & Decor: $50 – $150+
- TOTAL: $260 – $585
- Budget alternative: Look for baskets at thrift stores or craft stores like Michaels (use a coupon!). You can often find them for $5-$8 each, significantly reducing the total cost.
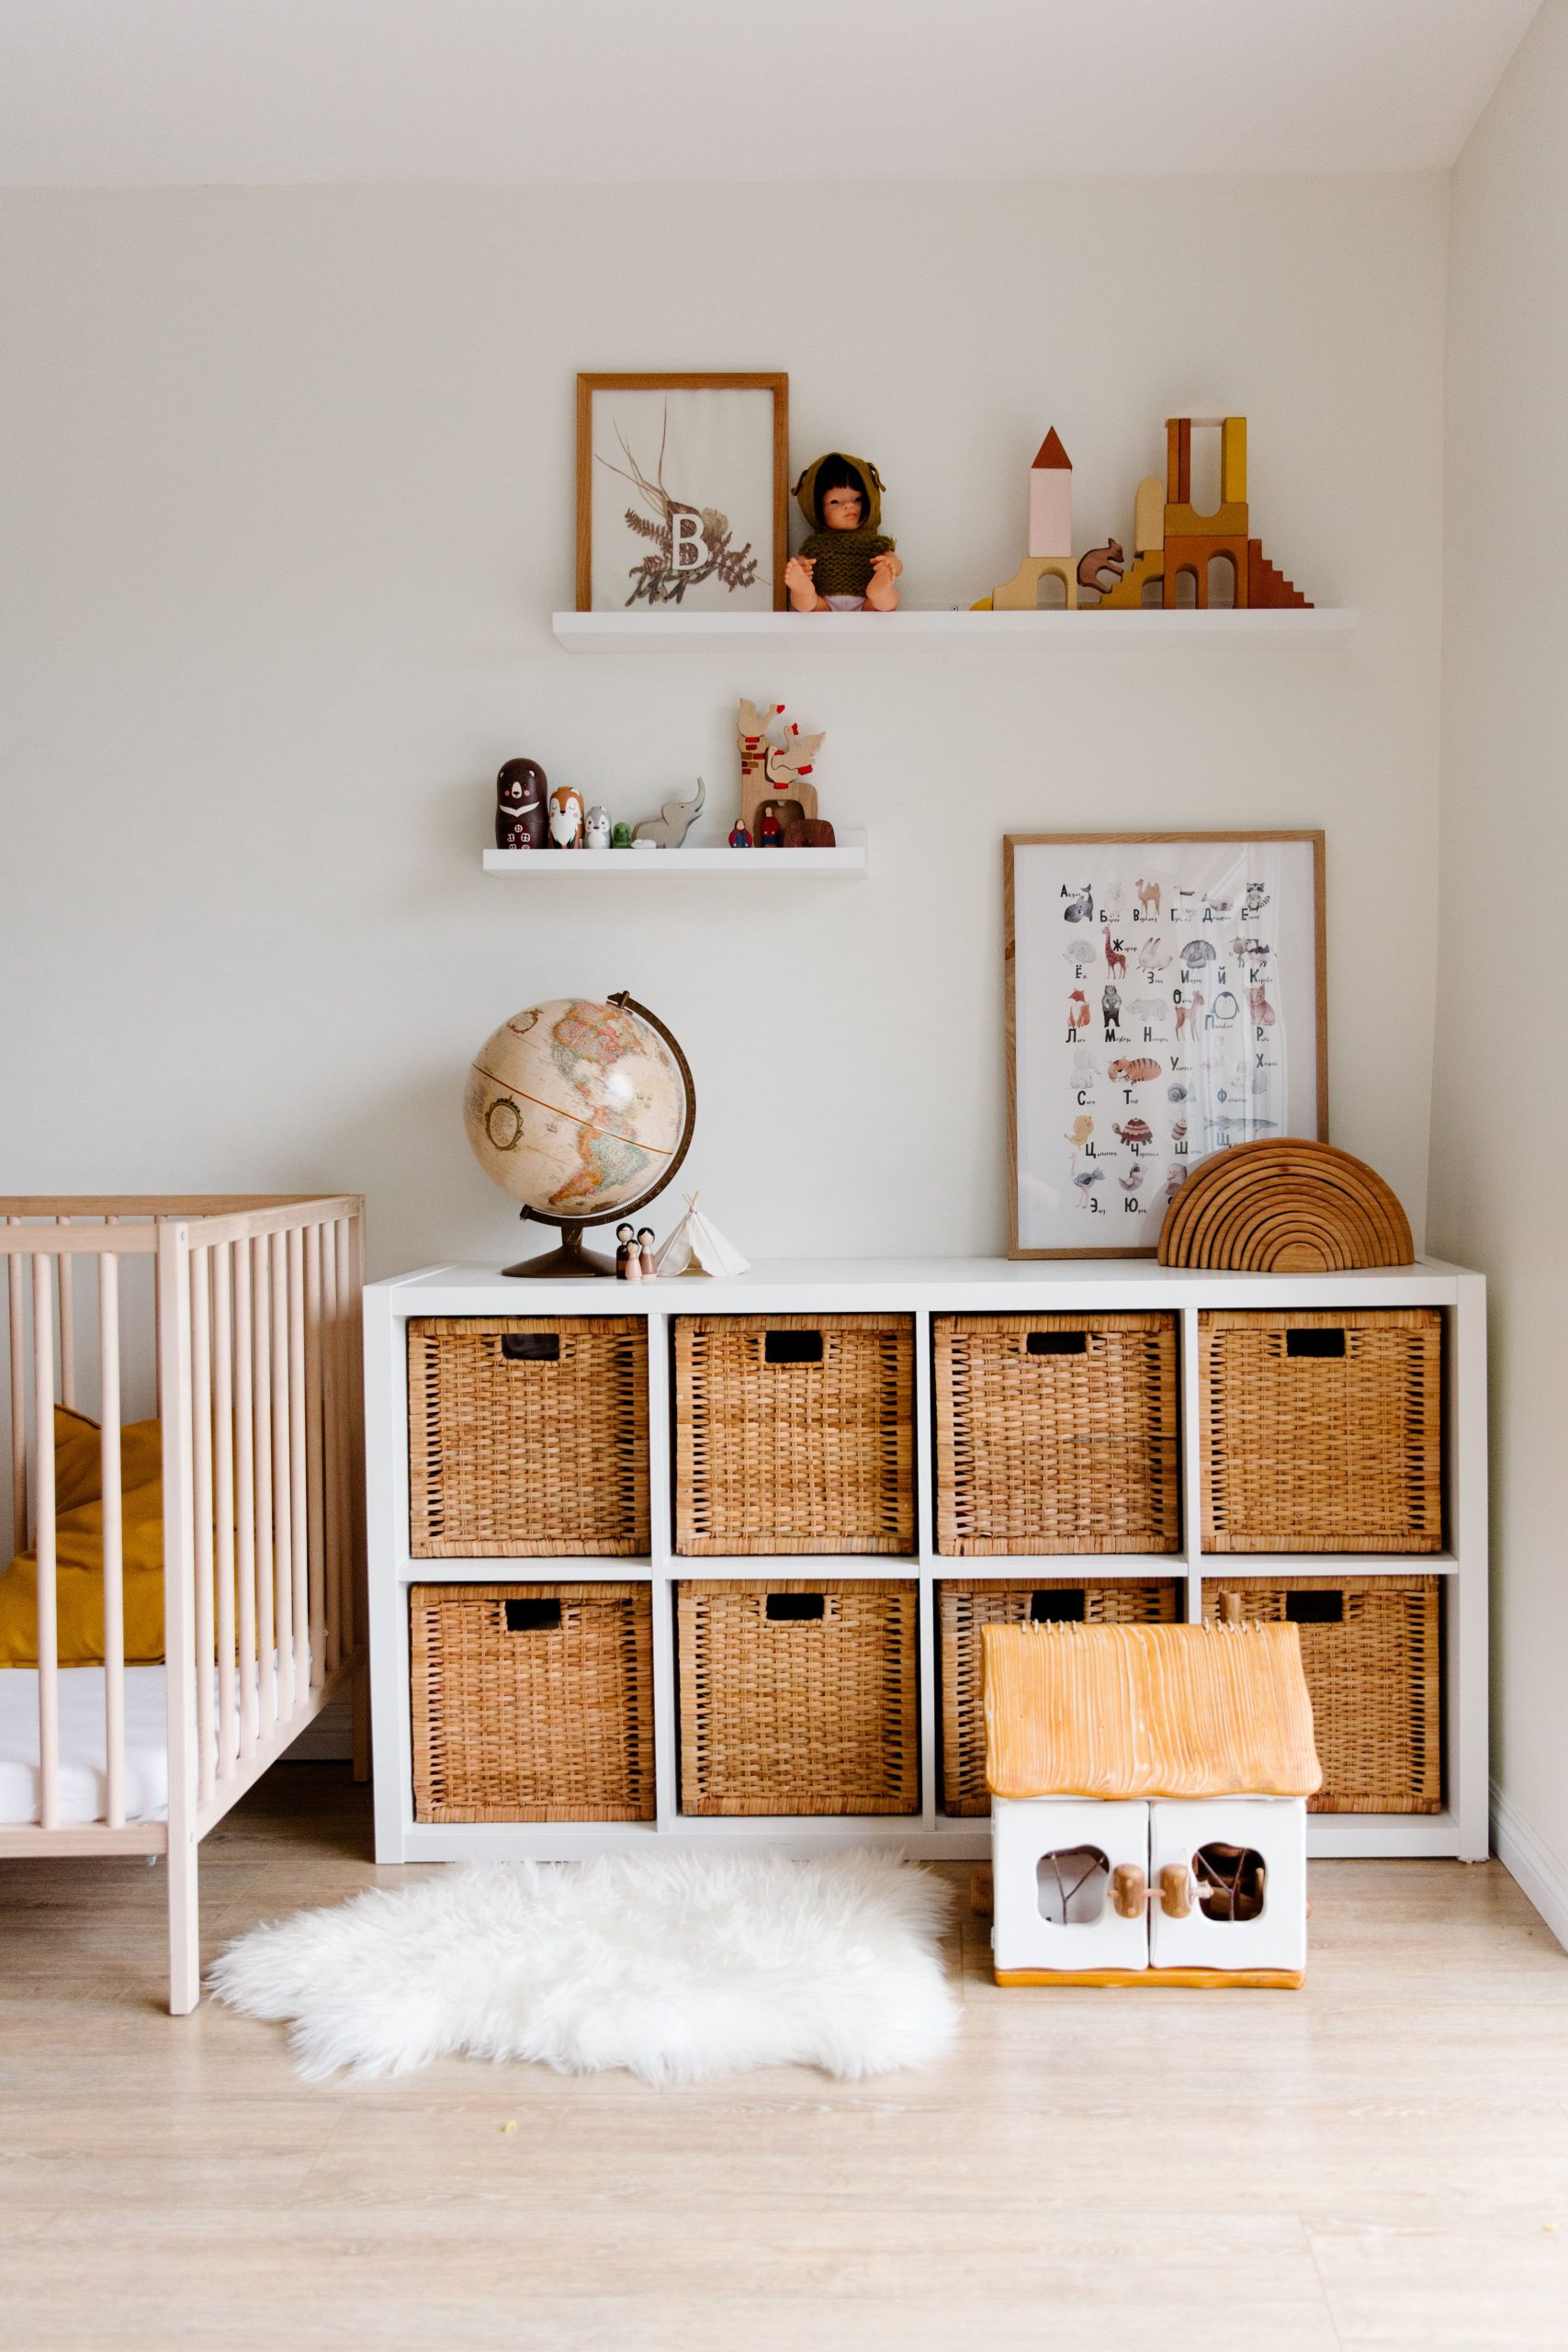
“Before you commit to a wall of baskets, think about what you actually need to store.”
This checklist will help you decide if this system is right for you.
Measure your items: Are the toys you need to store small enough to fit comfortably in standard 13×13 inch cube baskets?
Consider visibility: Are you okay with the contents being hidden? This is great for messy items but not for things kids need to see to remember they have.
Check basket material: If storing delicate items, ensure the woven material is smooth and won’t snag fabrics. Some natural fibers can be rough.
16. Display Plush Keychains in a Two-Tier Cylindrical Case
The clear cylindrical cover is the game-changer for this storage solution. Without it, this would just be a keychain stand, endlessly collecting dust. The acrylic cover transforms it from a simple holder into a protective display case. It keeps the plush keychains pristine and turns the entire object into a self-contained little world, like a snow globe of collectibles. This protective element is what elevates it from a toy organizer to a display piece worthy of a collector’s shelf.
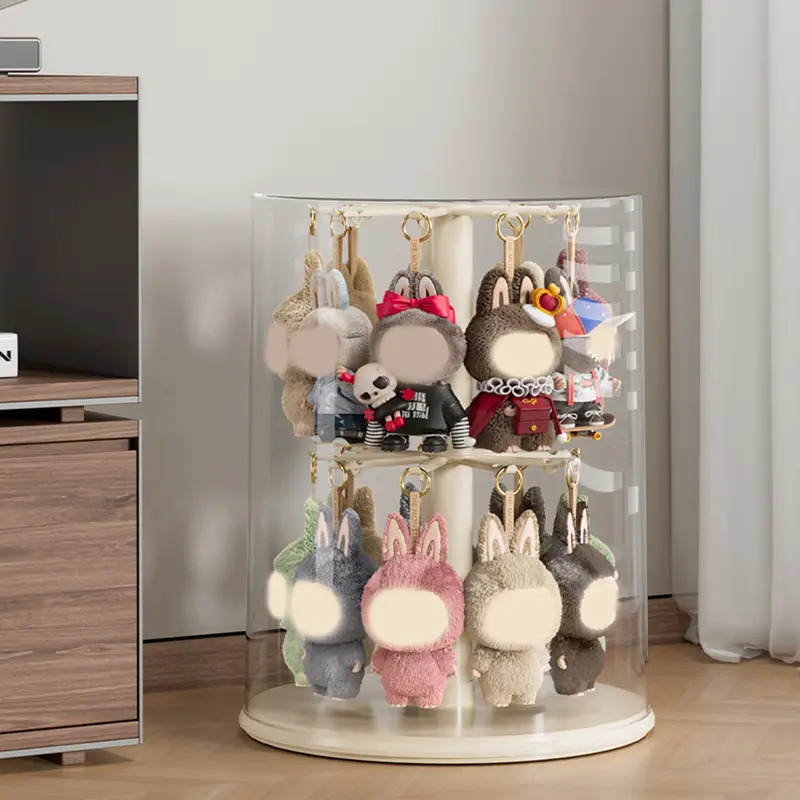
“A countertop display case like this is designed for small, curated collections.”
It’s perfect for a desktop, a dresser, or a specific shelf in a bookcase. Its footprint is small, likely no more than 10-12 inches in diameter. This is not a solution for large, bulky items. It’s specifically for showcasing a prized collection of small, lightweight objects like keychains, enamel pins, or miniature figurines. Think of it as jewelry box for toys; it’s about highlighting, not hiding.
17. Protect Collectible Dolls in Individual Clear Acrylic Cases
While these clear acrylic cases are fantastic for protecting dolls from dust and preserving their condition, they do require some upkeep to look their best. Acrylic can scratch easily, so always use a soft microfiber cloth for cleaning—never paper towels. It also generates static, which attracts dust to the outside of the case. Anti-static sprays or wipes made specifically for acrylic can minimize this. To avoid yellowing over time, make sure the dolls are displayed out of direct sunlight, as UV rays can degrade the plastic.
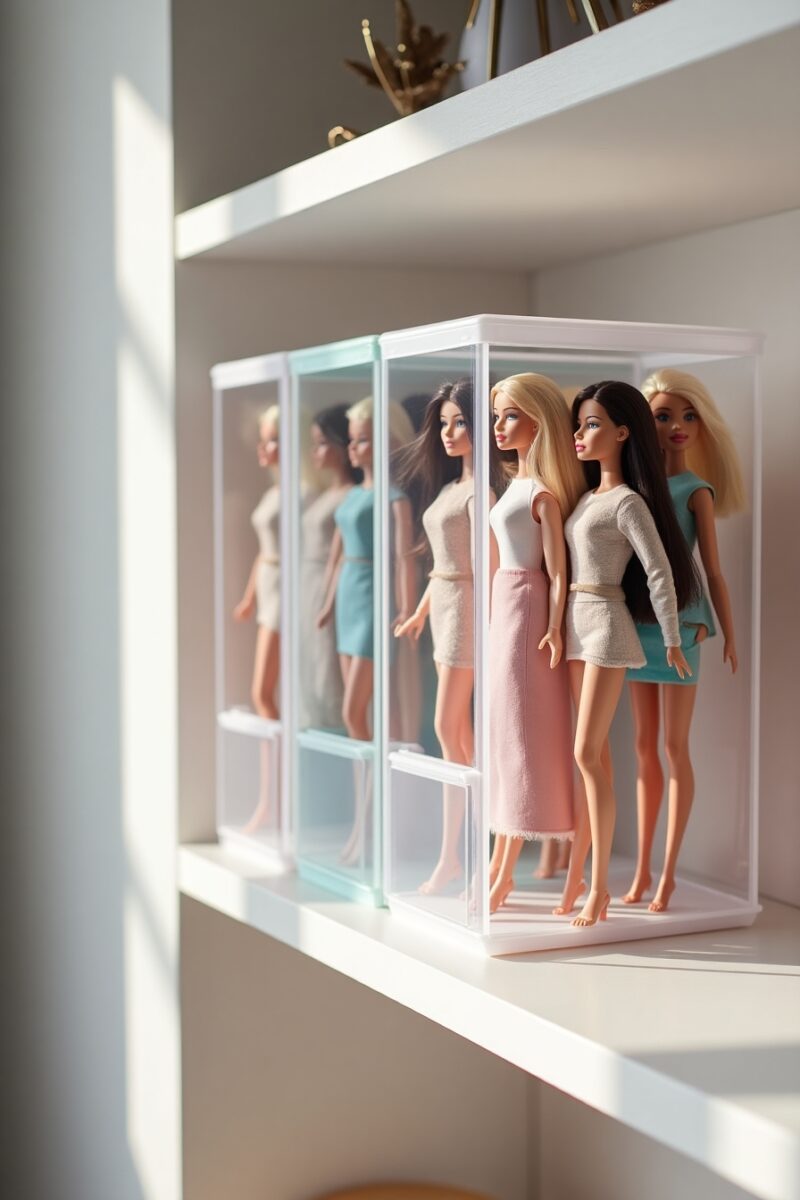
“When displaying multiple dolls in cases, give them some breathing room.”
Don’t cram the cases tightly together on the shelf. Leaving just a half-inch of space between each case allows light to pass between them, making the display feel less heavy and monolithic. It also makes it easier to remove a single case without disturbing the others. This small bit of negative space is a subtle but effective trick that designers use to make collections feel more curated and less like inventory in a warehouse. This is a more formal approach than the Shadow Box Gallery.
18. Elevate a Ballerina Doll in an Ornate Cylindrical Display
This display is effective because it creates a complete narrative. It’s not just a doll in a box; it’s a scene. The light blue base suggests a stage or a frozen pond, while the etched white designs of swans and architecture evoke the setting of a classical ballet like Swan Lake. The ornate gold trim adds a touch of theatrical grandeur. The case itself becomes part of the storytelling, providing context and transforming the ballerina doll into the star of her own miniature performance.
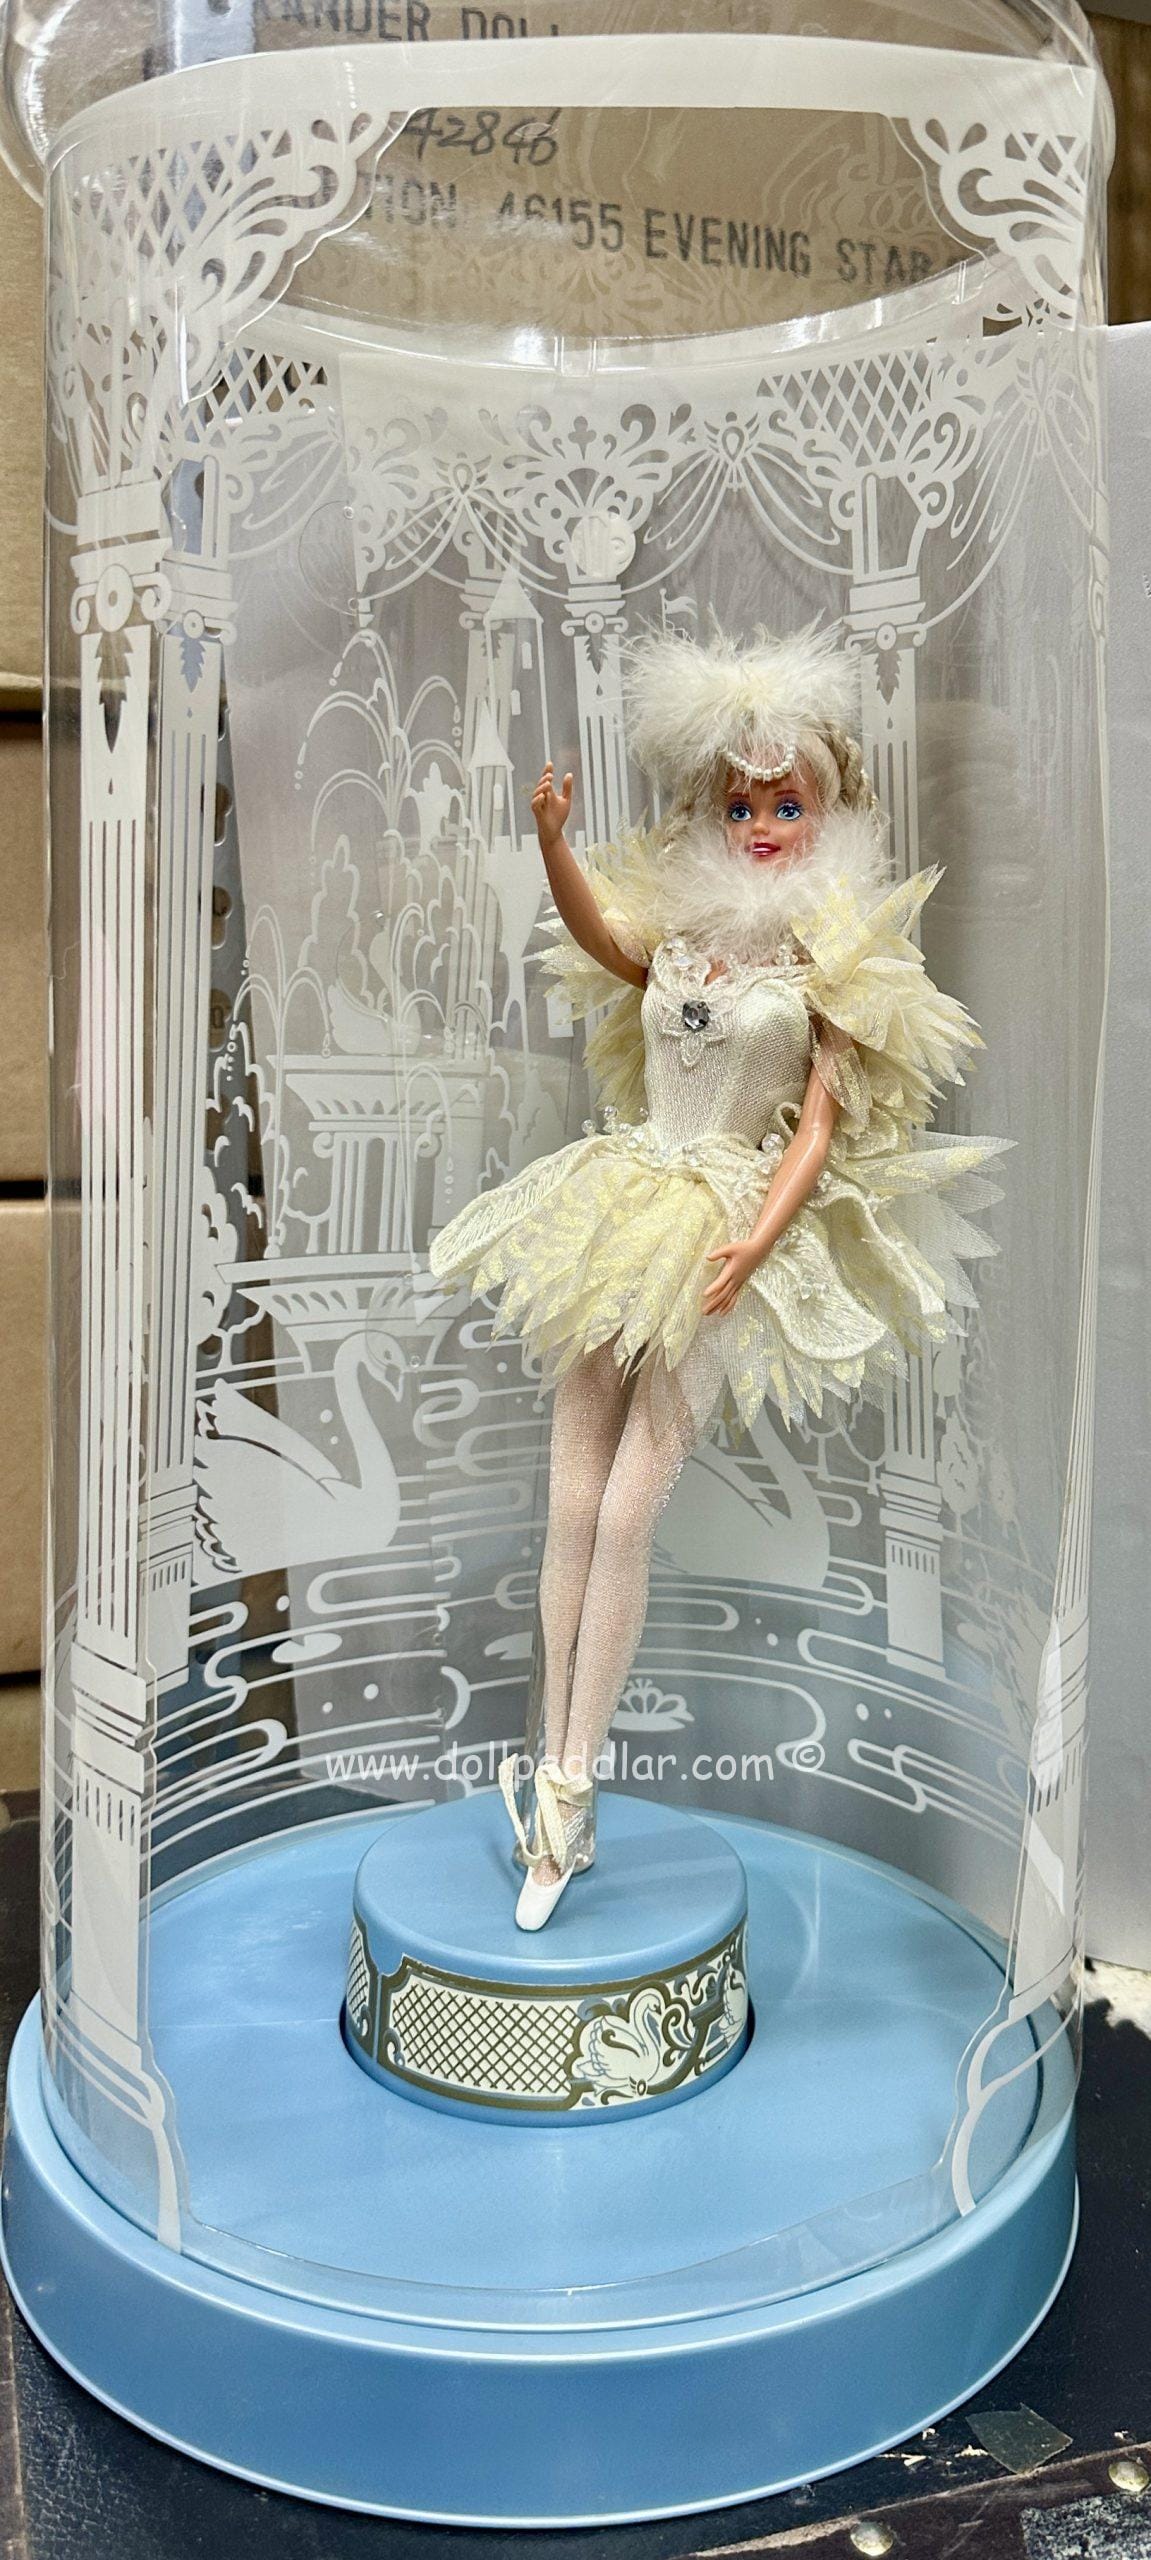
“A display this ornate and delicate is absolutely not for a playroom.”
This is a collector’s piece intended for a shelf or mantelpiece, to be admired from a distance. The clear case is likely thin and fragile, and the decorative base could be easily chipped or broken. This is a ‘look-don’t-touch’ item. If you want to store a doll that a child actively plays with, a sturdier, simpler case or a more accessible storage method would be a much more practical choice.
19. Use a Hot Pink Barbie Carry Case for On-the-Go Play
In an era of peak nostalgia, classic 90s and 2000s items are having a major comeback, and this hot pink carry case is a perfect example. It hits all the right notes: the iconic Barbie logo, the vibrant color scheme, and the pure, screen-free fun it represents. For many parents, this is the exact case they had as a child, and buying one for their own kids is a way to share a piece of their childhood. It’s less about storage and more about passing on a tradition.
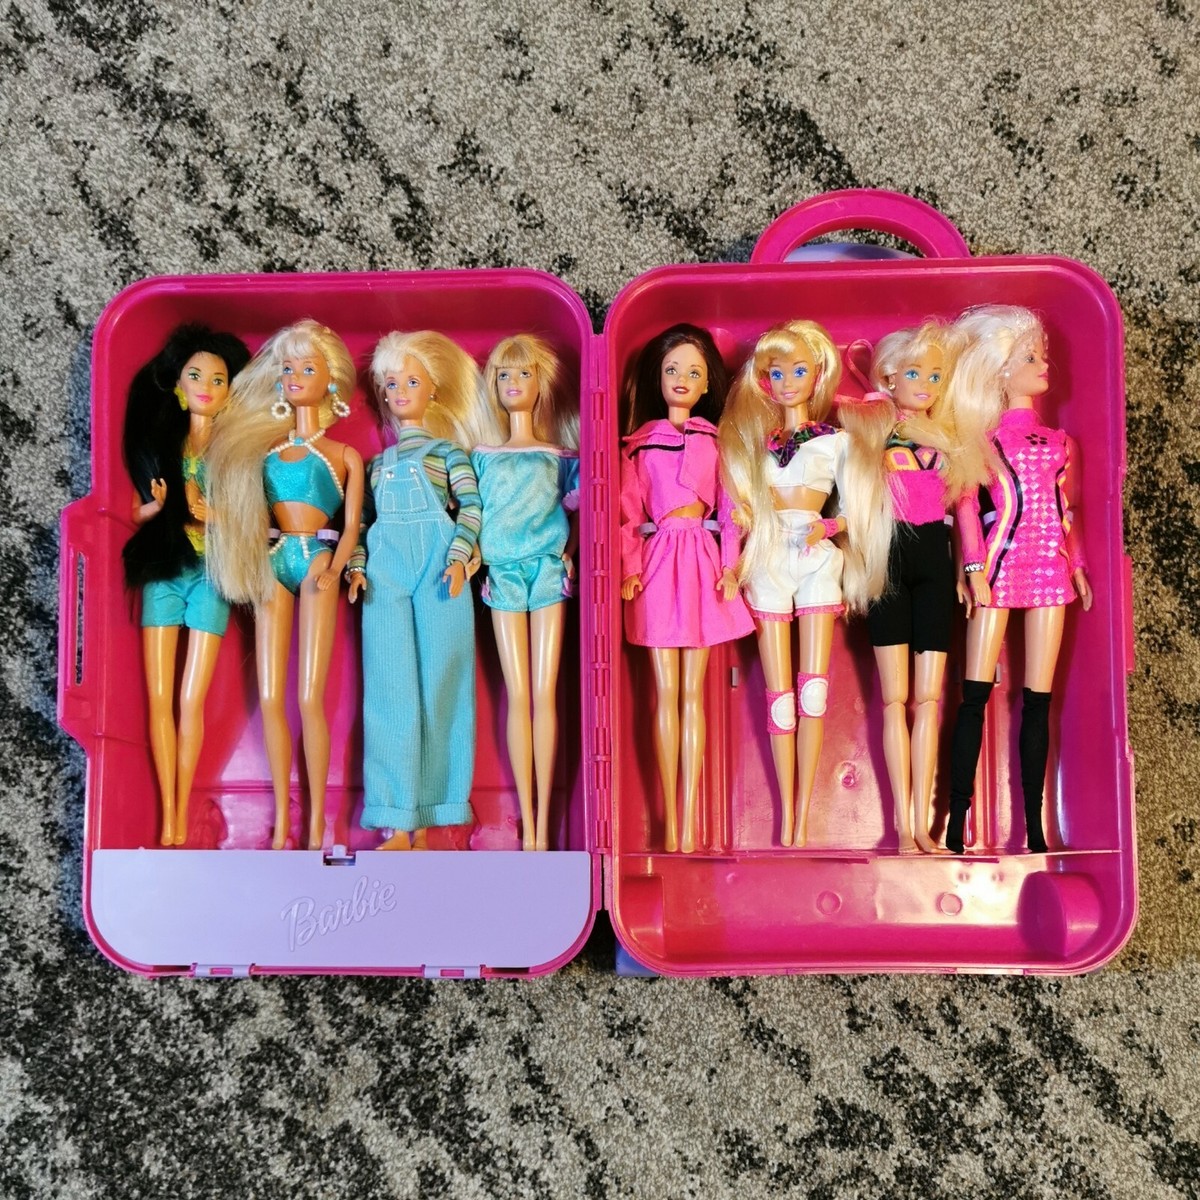
“Portability is the one thing that makes this case a perennial favorite.”
It’s not the most efficient way to store dolls (they can still get a bit jumbled), nor is it the most beautiful display. But its purpose is to get the dolls from Point A to Point B—from home to a friend’s house, to grandma’s, or on a road trip. The sturdy plastic construction, the secure latch, and the integrated handle are all designed for mobility. It’s the original grab-and-go solution for a playdate.
20. Set Up a Collector’s Archive with Chrome Wire Shelving
This is a serious solution for a serious collector. A bank of tall, deep wire shelving units like this requires significant space, both horizontally and vertically. You’ll need a dedicated wall, likely in a basement, office, or large bonus room, with at least 8-10 feet of width and 8-foot ceilings. This isn’t a bedroom solution; it’s a small-scale archive. The industrial nature of the shelving works best when you can dedicate an entire zone to it, rather than trying to integrate it into a decorated living space.
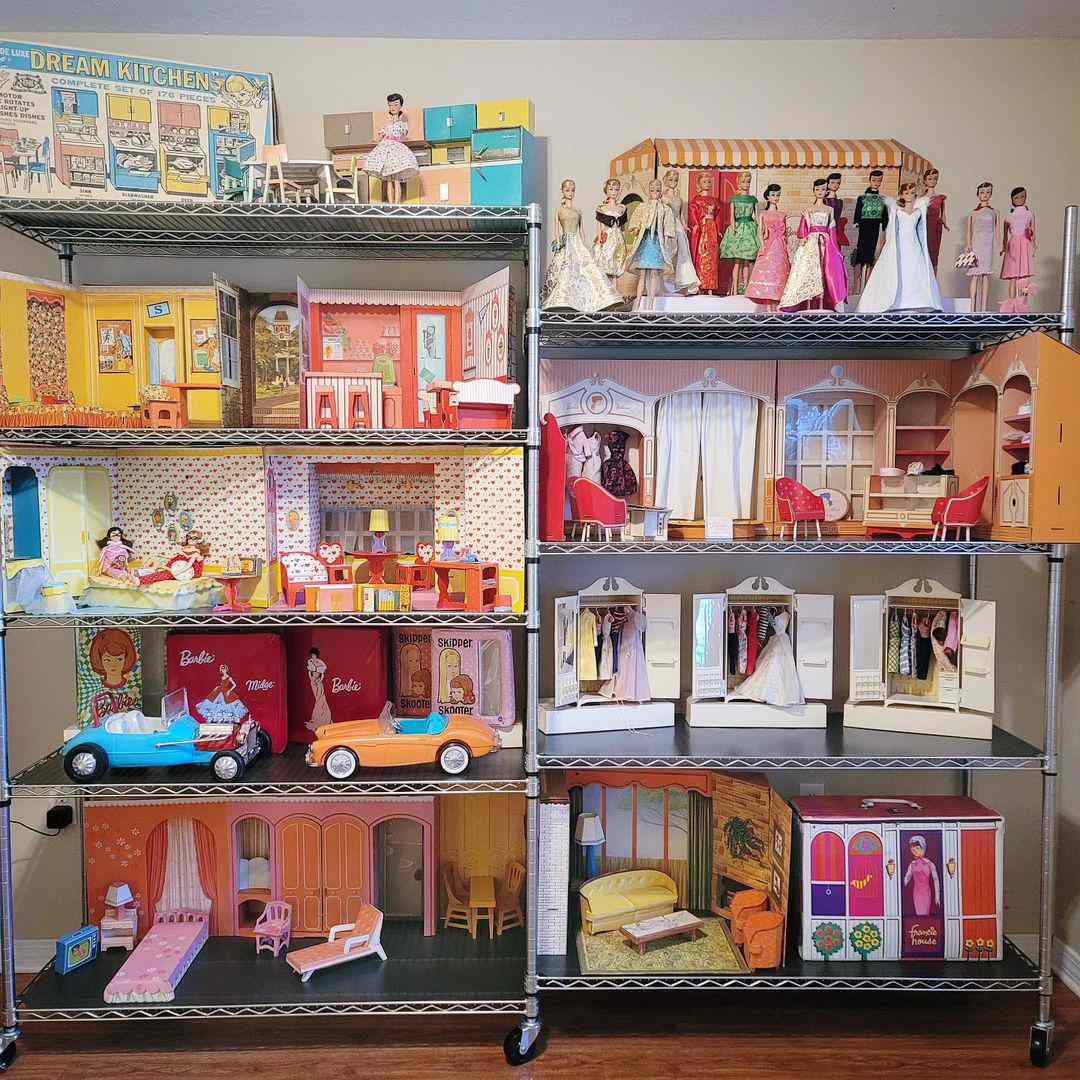
“Wire shelving is a notorious dust magnet.”
Every single wire is a surface for dust to settle, and with a collection this vast, dusting can become a monumental task. You can’t just wipe a flat surface; you have to get into all the nooks and crannies of the shelving *and* the items themselves. A handheld vacuum with a soft brush attachment is your best bet. For vintage items and packaging, dusting should be done very gently, at least once a month, to prevent buildup that can degrade cardboard and plastics over time.
21. Incorporate a Miniature White Cube Shelf into a Doll Scene
The charm here comes from the high-contrast color scheme and the realistic architectural details. The stark white of the miniature shelf stands out dramatically against the dark gray striped wallpaper, creating a modern, graphic look. The inclusion of the white baseboard trim is a crucial detail; it grounds the scene in reality, making it feel like a real room that has been shrunk down. This attention to architectural realism is what elevates it from a simple toy to a compelling miniature vignette. Compare it to the similar but life-sized miniature display.
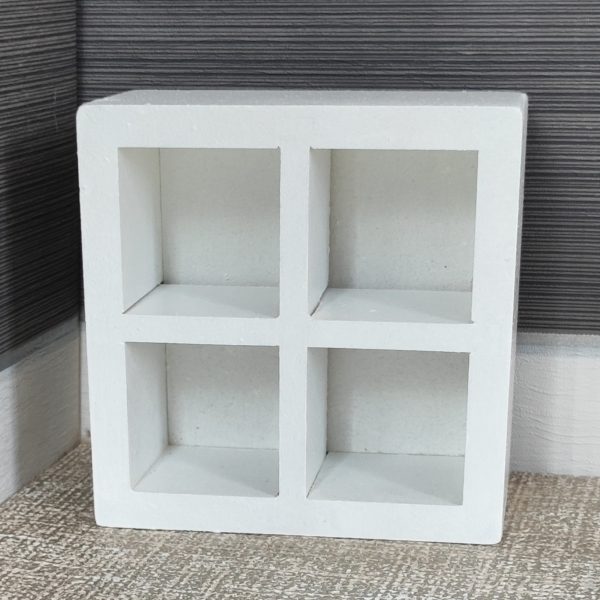
“When creating miniature scenes or dollhouse interiors, lighting is everything.”
Even a simple, well-placed ‘window’ (an off-camera light source) can bring a scene to life. Position a small LED lamp to the side of your scene to simulate sunlight coming through a window. Notice how the light casts soft shadows in the cubbies and on the floor. This play of light and shadow creates depth and mood, making your miniature world feel much more believable and dynamic.
22. Opt for a Doll Closet with Striped Walls and Functional Drawers
The most special feature of this doll closet is its functionality. It’s not just a static box; it’s a piece of miniature, interactive furniture. The hinged design allows it to open up for play, the wooden rod is ready for tiny hangers, and the five separate drawers actually pull out. This interactivity is what sparks imagination. It allows a child to mimic the real-life actions of choosing an outfit, getting dressed, and putting clothes away, making playtime a much richer, more engaging experience.
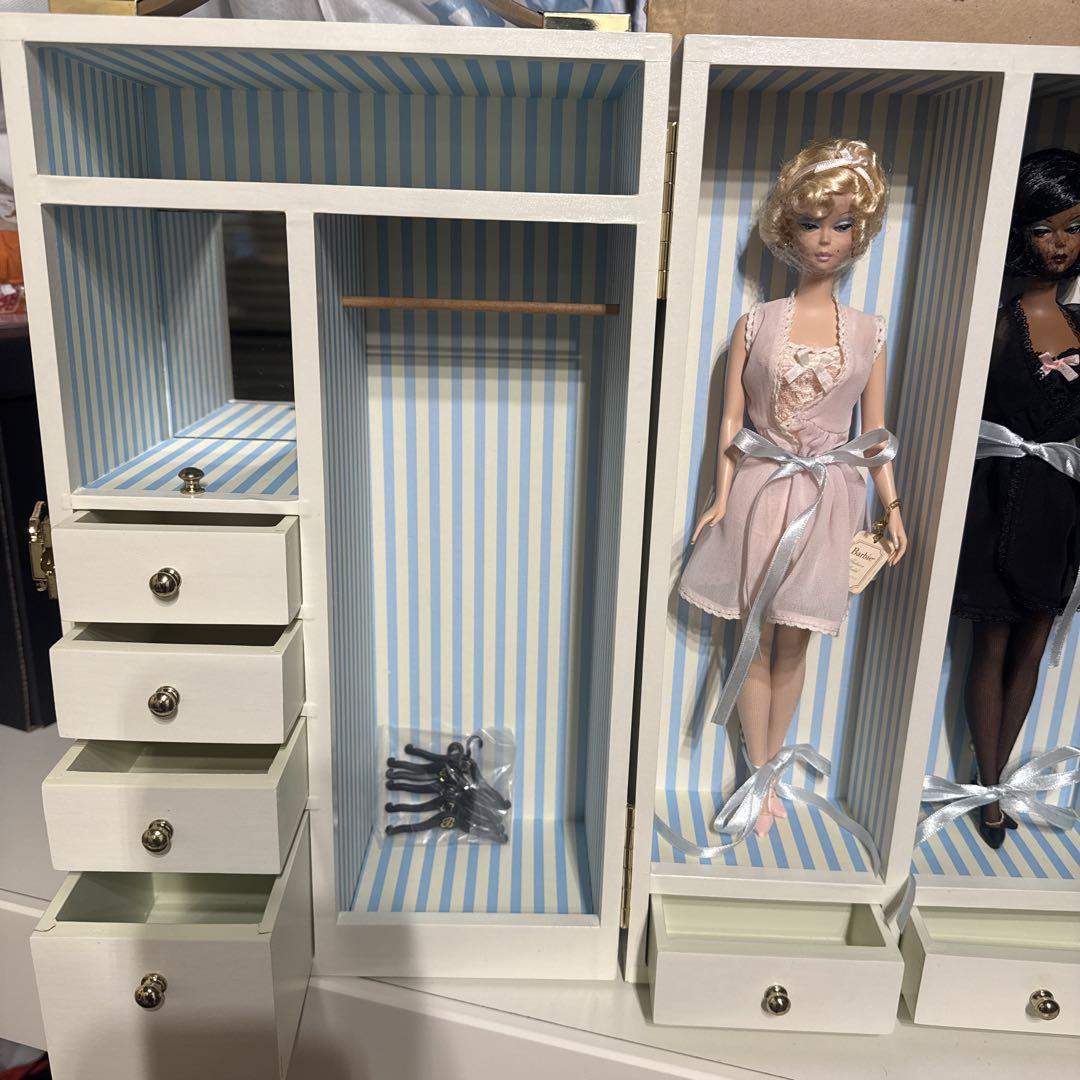
“You can create a custom doll closet from two wooden craft boxes from a store like Michaels or Hobby Lobby.”
Here’s how:
Time: 1.5 hours (plus drying time)
Cost: $30-$45
Assemble the Frame: Hinge two identical wooden boxes together on one side so they can open like a book.
Paint & Paper: Paint the exterior white. Line the interior walls with patterned scrapbook paper (like these blue stripes) using Mod Podge.
Add a Rod: Cut a small wooden dowel to size and glue it into place in one of the compartments.
Install Drawers (Optional): For a simpler version, you can glue small painted blocks into the bottom to act as shelves instead of functional drawers.
23. Mix Fabric Bins and Decor on a Black Metal Shelving Unit
This is a perfect example of a grown-up, decor-first approach to toy storage. The formula is roughly: 70% sophisticated neutrals + 20% natural textures + 10% accent color. The black metal shelf and grey fabric bins provide a chic, neutral foundation. Natural elements like the canvas bins, hanging plant, and bouclé chair add softness and warmth. Finally, the single orange vase provides a small, strategic pop of color that energizes the whole setup without screaming ‘playroom.’ It’s a formula that works for any room in the house.
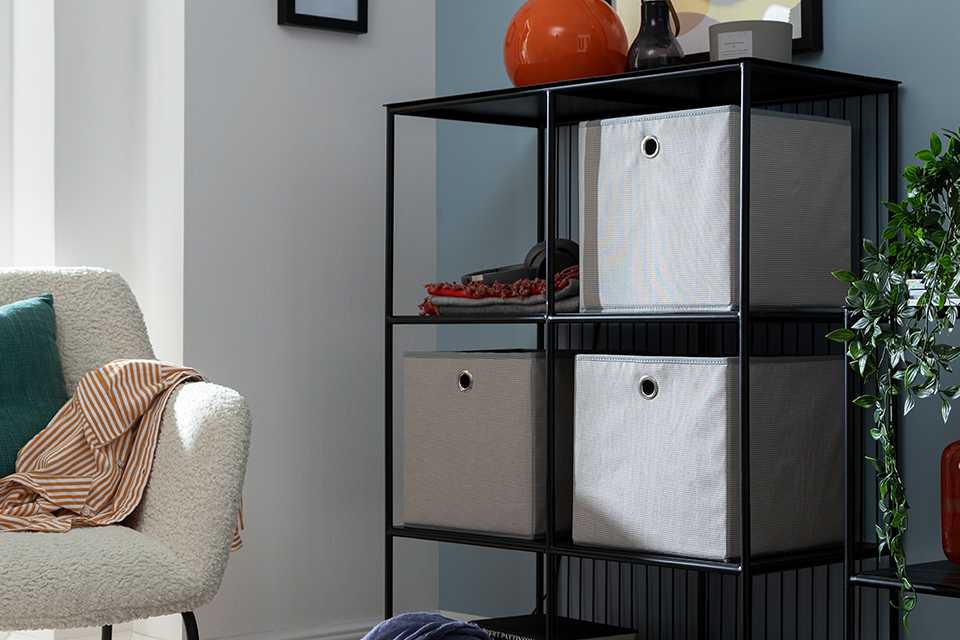
“While this looks incredibly chic, be real about who this setup is for.”
Fabric bins without lids, especially light gray ones, are not the most practical choice for messy art supplies or sticky hands. If this is for a child’s primary use, expect those bins to get stained. Also, open shelves with decorative objects are a magnet for curious toddlers. This beautiful, minimalist approach works best for older kids who can respect the ‘look-don’t-touch’ decorative items, or in a family room where adult supervision is constant.
24. Organize a Closet with Wire Shelving and Pink Patterned Bins
A wire shelving system is one of the most cost-effective ways to max out closet space. You can get a similar look for less by building it piece by piece. Instead of a full kit, buy individual shelves and brackets from a hardware store like Home Depot or Lowe’s. This allows you to customize the layout to your exact needs. For the bins, hit up stores like HomeGoods or T.J. Maxx, where you can often find stylish patterned storage containers for $10-$15, much less than specialty organization stores.
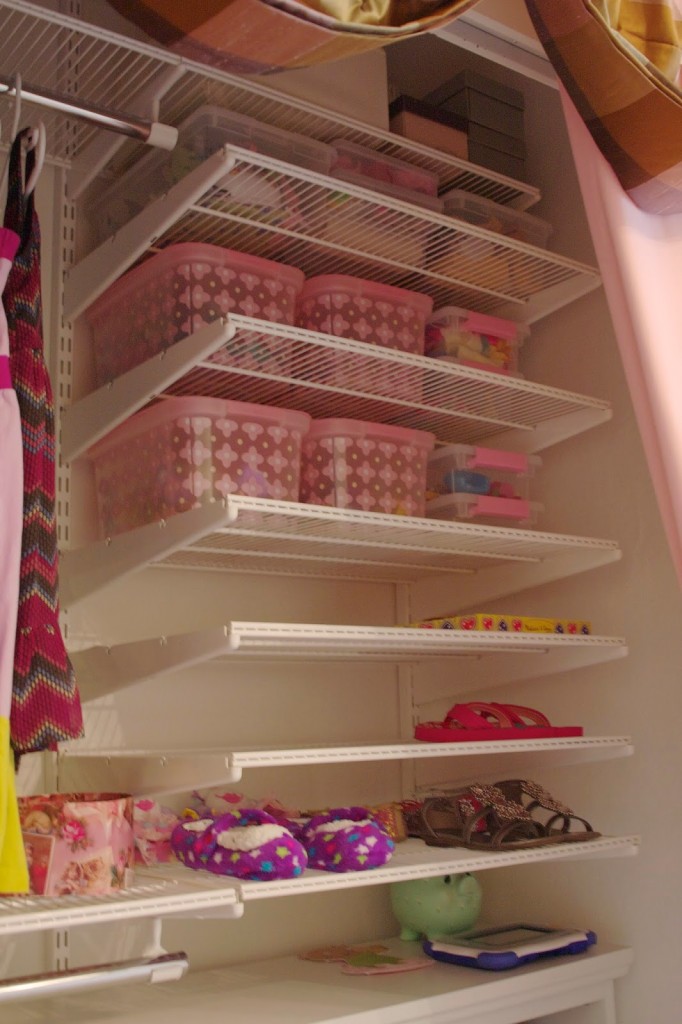
“Wire shelves are practical, but be warned: small items love to fall through them.”
The little gaps in the wire are notorious for letting tiny doll shoes, accessories, or even the heels of real shoes slip through. This is why using bins and containers is essential. The pink patterned bins aren’t just for looks; they’re critical for making the shelves functional for small-item storage. Without them, you’d have a constant rain of tiny plastic treasures falling to the closet floor.
25. Design a Gentle Infant Closet with Pink and Gray Accents
organizing a small closet, make a plan to maximize every inch. Here’s a quick checklist to run through:
- Go vertical: Do you have space for a second hanging rod or high shelves for out-of-season items?
- Use the door: Is the back of the door clear and available for an over-the-door organizer like the one shown here? It’s free real estate!
- Measure for cubbies: Will a standard cube unit fit underneath the hanging clothes? Measure the depth and height clearance before you buy.
- Plan for growth: The sparkly pink bins are cute for now, but will the system adapt as baby clothes get bigger and toys change?
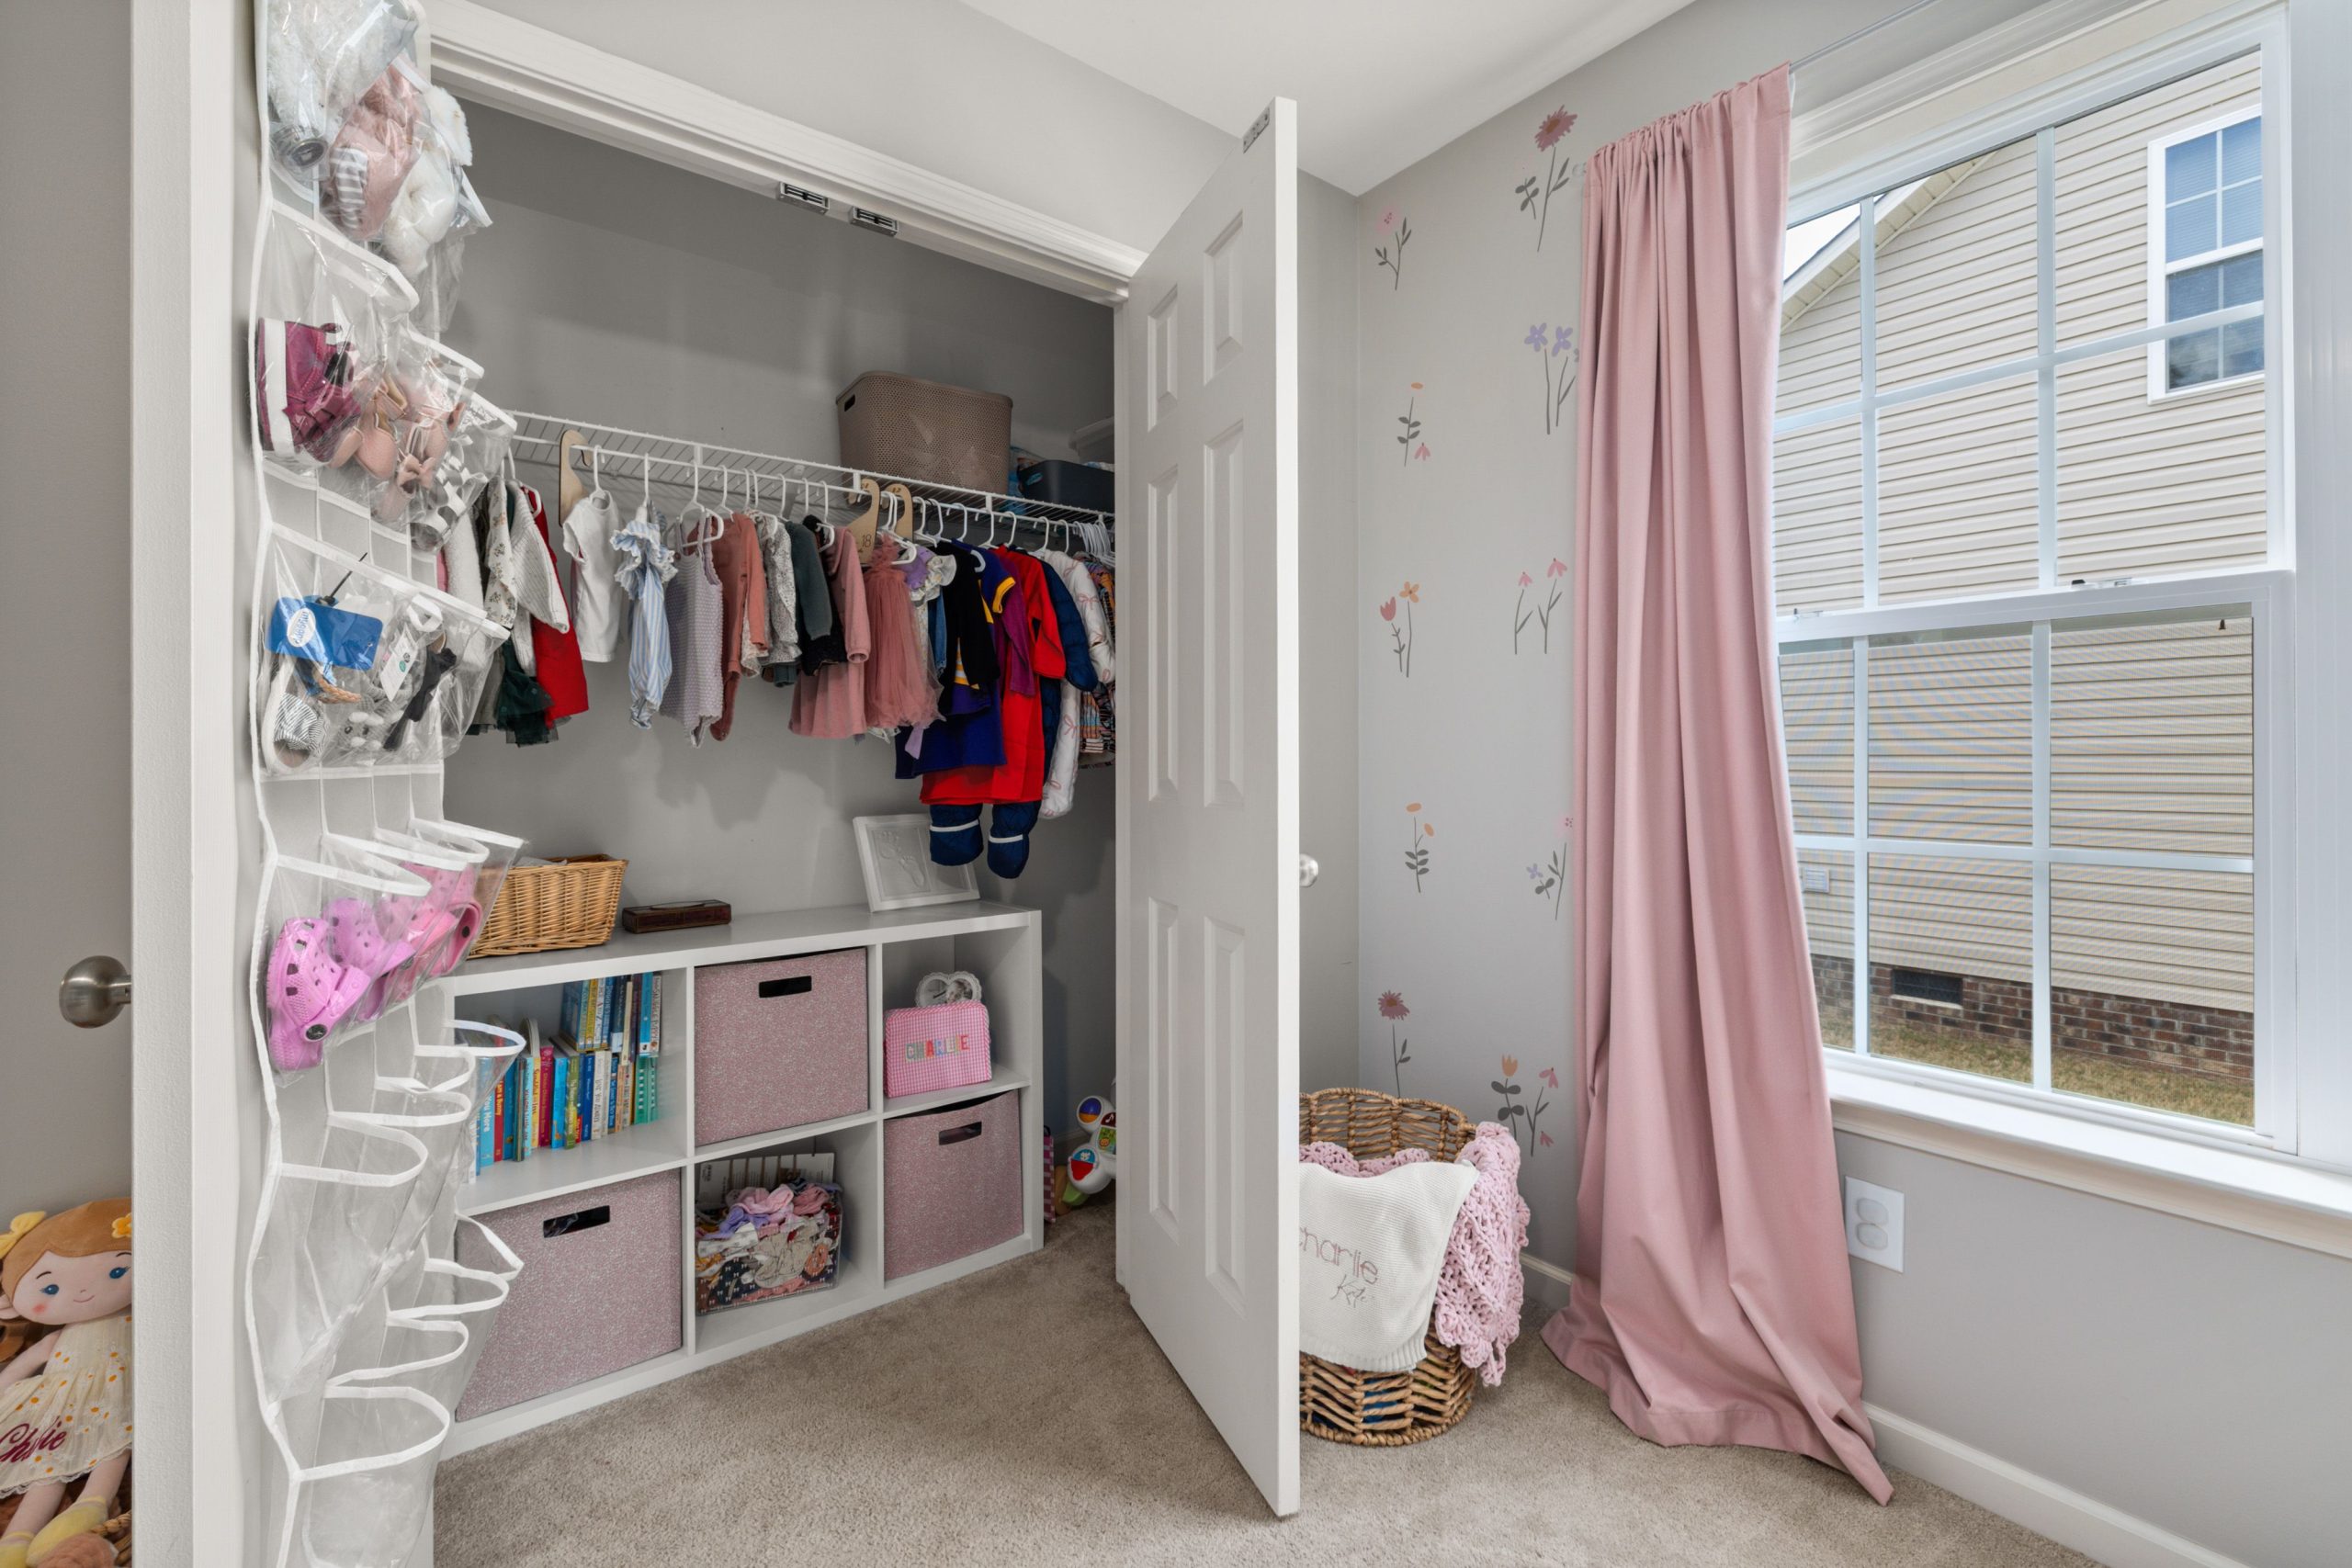
“This design creates a calm and gentle atmosphere through its soft, low-contrast color palette.”
The light gray walls, white furniture, and pale pink accents blend harmoniously, with no single element shouting for attention. The sparkle in the pink bins and the delicate floral decals add a touch of whimsy without overwhelming the serene feeling. The mix of textures—the soft clothes, the woven basket, the smooth clear pockets—adds interest and depth, making the small space feel thoughtfully layered.
26. Give a Dollhouse a Modern Glow with Cool-Toned LED Lights
When lighting a dollhouse with LED strips, color temperature makes a huge difference. The cool-toned, slightly blueish lights seen here create a modern, futuristic, almost nightclub-like vibe. If you want a cozier, more traditional feel, opt for warm-white LEDs. They mimic incandescent bulbs and give off a soft, yellowish glow. For the most versatility, look for color-changing RGB LED strips with a remote. This allows your child to change the house’s mood from a cozy cottage to a vibrant dance party with the press of a button. Also see the warmer lighting in the other dollhouse.
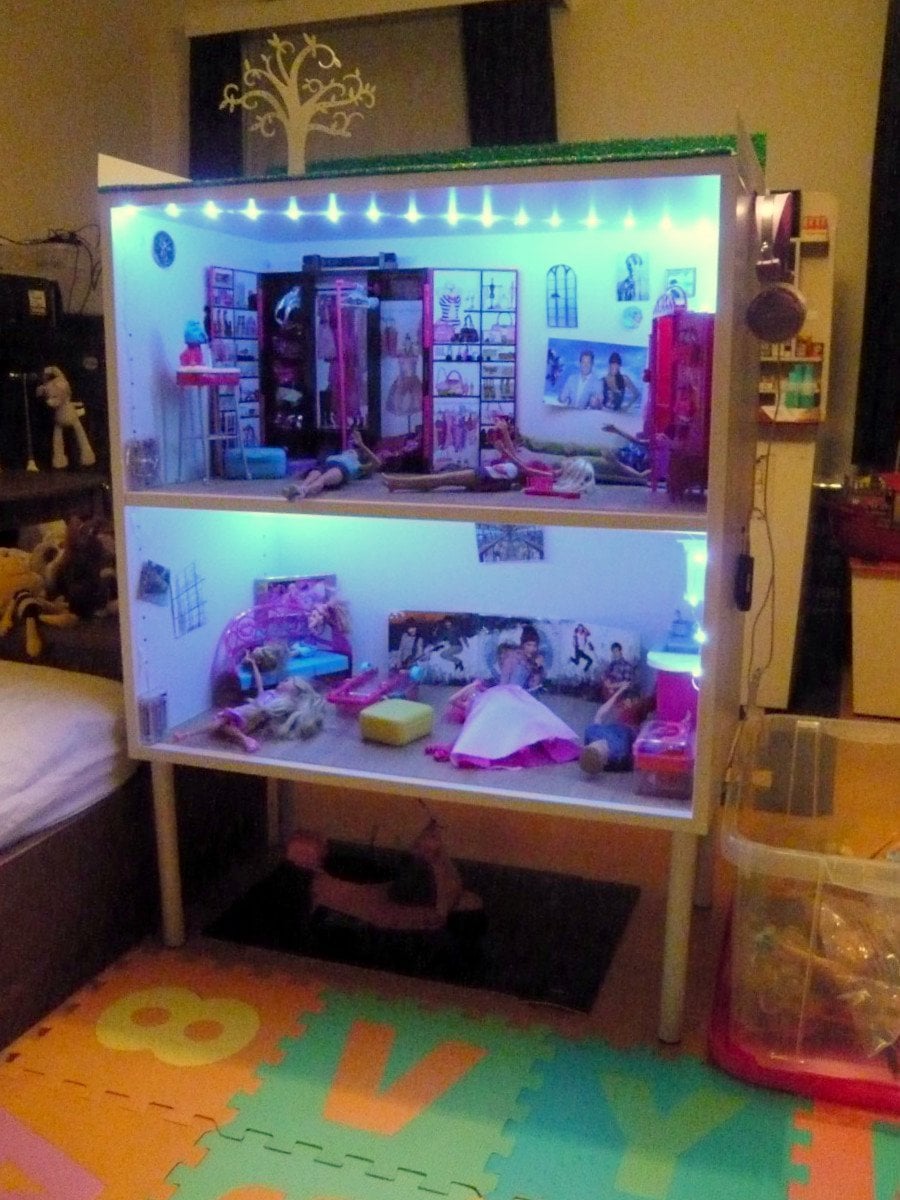
“They call it ‘organized chaos’ for a reason.”
A setup like this, with dozens of tiny furniture pieces and accessories, is a magnet for clutter. While it looks amazing when perfectly styled, it takes a dedicated and patient child (or parent) to maintain any semblance of order. Be prepared for this to look like a tiny tornado hit it after every single play session. If the idea of constantly resetting miniature scenes fills you with dread, a storage solution with more bins and drawers might be a better fit for your family.
27. Anchor a Playroom with a Large Patterned Rug and Play Zones
This room successfully contains multiple large play items without feeling chaotic because it uses ‘zoning.’ The large patterned rug acts as the primary play zone, anchoring the dollhouse and providing a soft surface. The pink tent is tucked into a corner, creating a separate, cozy reading nook. The dress-up station is in another area. By dedicating specific locations for each type of play, the room feels organized and purposeful, even with a lot going on. The consistent color palette of pink, purple, and blue across the rug and toys ties everything together.
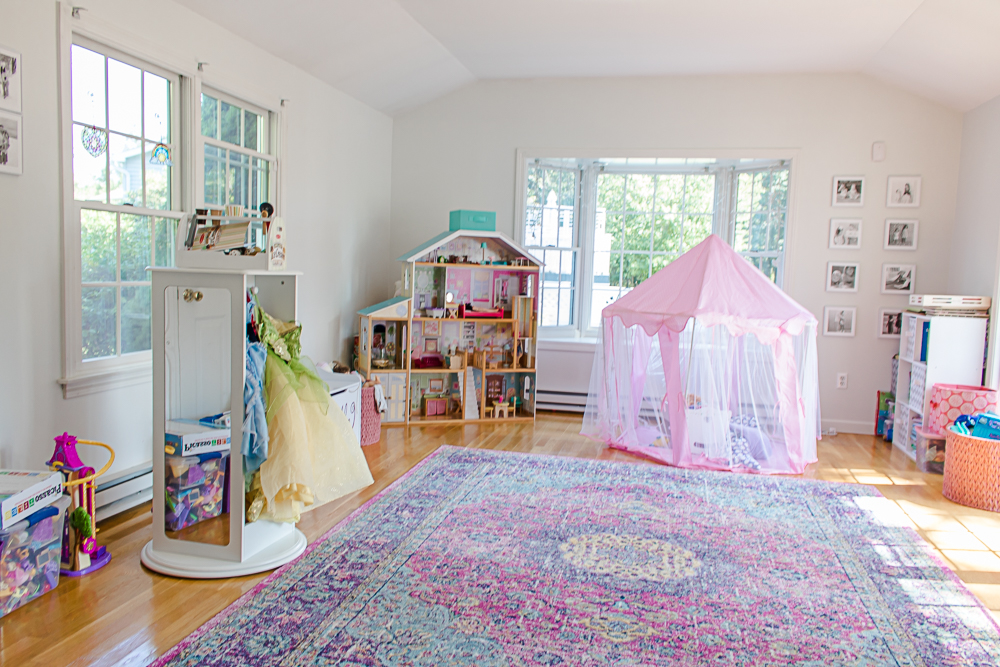
“The large, colorful area rug is the undisputed hero of this room.”
If you roll up that rug, you lose the entire foundation of the design. The rug does three critical jobs: it defines the central play area, it introduces the vibrant color scheme that makes the room feel fun and cohesive, and it adds a huge dose of softness and comfort. It’s the single element that pulls the dollhouse, tent, and storage units together into a unified, inviting space.
28. Create a Collectible Keychain Display with Door-Mounted Racks
You can DIY this look for a fraction of the cost of specialty collectible displays. Look for clear stick-on wall hooks or small utensil racks from stores like IKEA, Target’s Bullseye’s Playground, or even a dollar store. You can get packs of 6-10 small, clear adhesive hooks for under $10. Arrange them in a neat grid on the inside of a cabinet door or closet door. This gives you the exact same function—a tiered display for hanging small collectibles—for a much lower price point, and you can customize the layout to fit your collection perfectly.
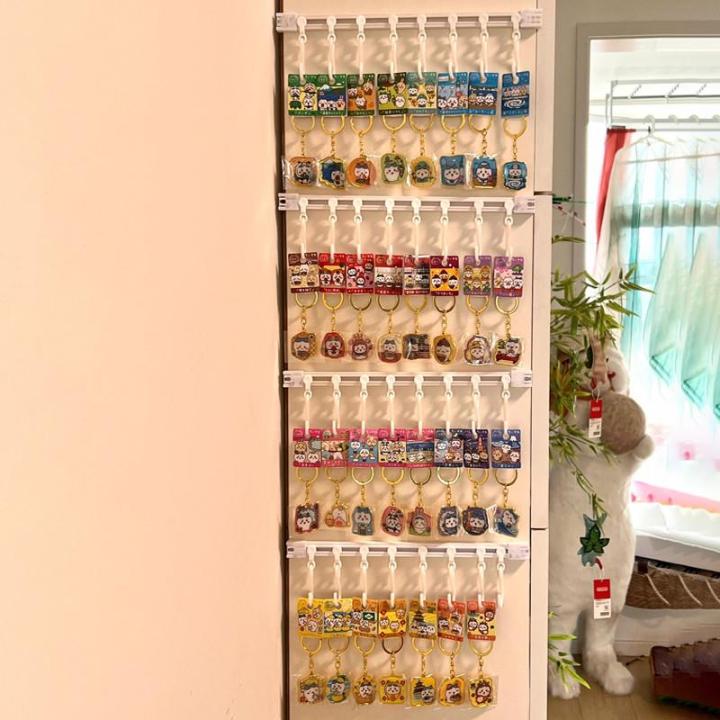
“This door-mounted rack system is designed for flat, small, and lightweight items.”
It’s perfect for things like keychains in pouches, enamel pins on cards, or even small, flat packets of doll accessories. The shallow depth of the hooks means it won’t work for bulky items. It’s an ideal solution for maximizing unused vertical space on the back of a bedroom or closet door, which typically offers a surface area of about 24-30 inches wide by 60-70 inches tall. It’s a small-space superhero.
29. Display ‘In-Box’ Collector Dolls on a Simple Wooden Shelf
When displaying a collection of boxed dolls, the shelf itself should be a quiet supporting actor, not the star. A simple, stained wooden shelf like this one is perfect. The key is to choose a wood stain that complements the colors in the packaging without competing with them. A medium-brown tone adds warmth and richness, grounding the colorful boxes. Avoid shelves that are too ornate or have a busy wood grain, as they will distract from the dolls themselves. The goal is to provide a handsome, sturdy stage for your collection.
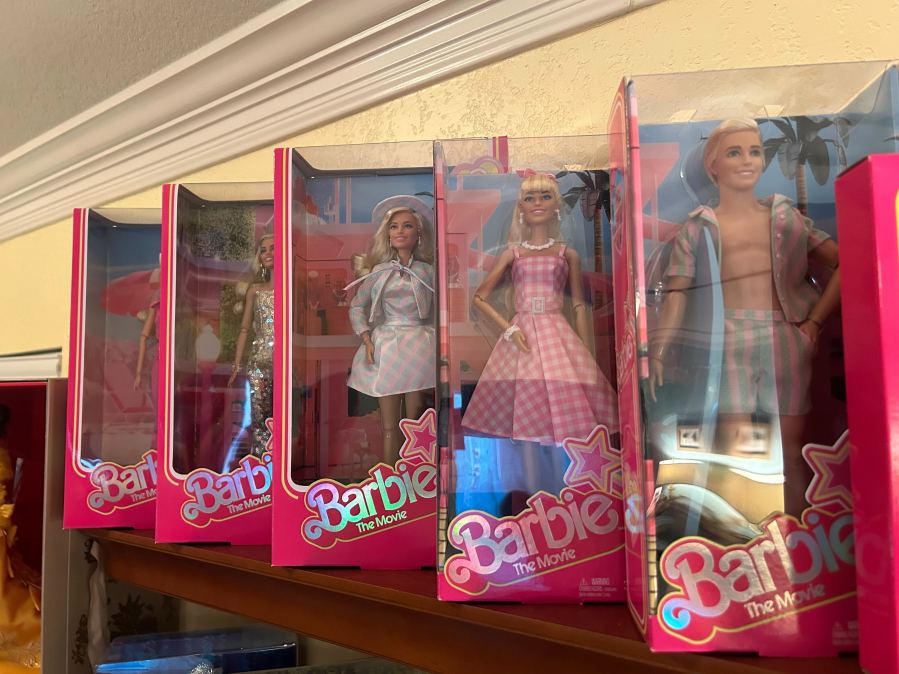
“Leaving dolls in their original packaging is the gold standard for preserving collector value, but the boxes themselves require care.”
Cardboard and plastic can degrade over time, especially when exposed to light and dust. The pale yellow wall in the photo is a good choice, but make sure it’s not a wall that gets direct sunlight, which can fade the packaging and yellow the clear plastic windows. A regular, gentle dusting with a soft, dry cloth is essential to prevent grime from building up on the box tops.
30. Use a Multi-Tiered Bookcase with a Built-in Toy Bin
This piece of furniture is so successful because it understands the different types of storage kids need. The upper shelves, with their cubby-like dividers, are perfect for items that can be stood up and displayed, like books and smaller, stable toys. The large, open bin at the bottom is the ‘dump zone’—the perfect place for a jumble of soft, awkwardly shaped plush toys. By providing both ‘display’ and ‘dump’ storage in one unit, it works with a child’s natural tendencies instead of fighting against them, making cleanup more intuitive.
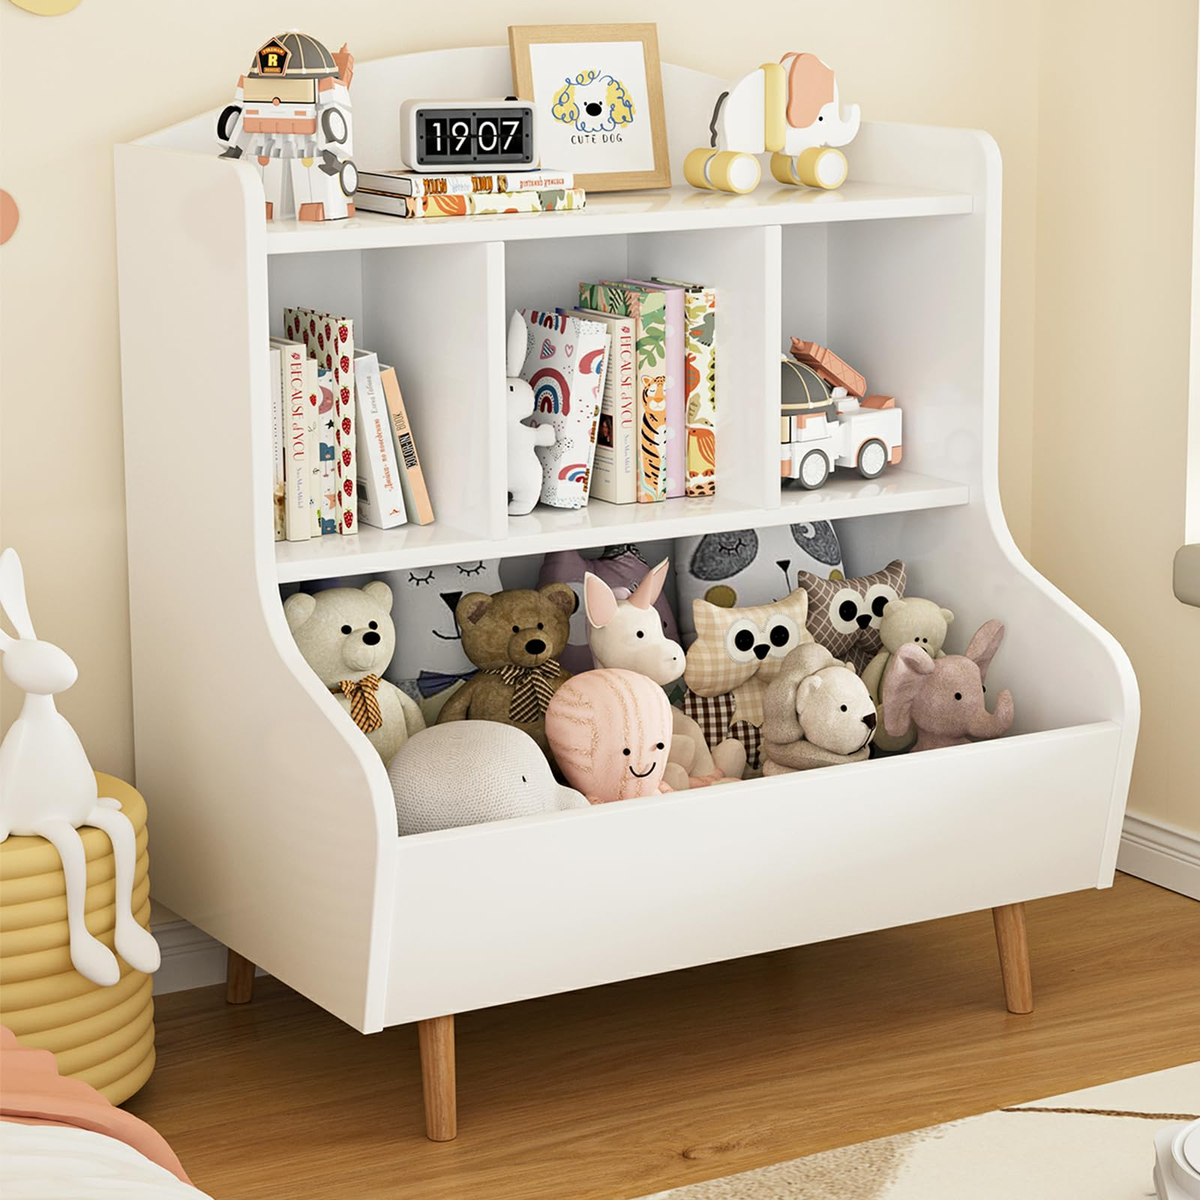
“A multi-functional, stylish piece like this is a great investment for a playroom or bedroom.”
Here’s a general cost estimate.
Bookcase/Toy Bin Combo Unit: $150 – $350 (from stores like Crate & Barrel Kids, Pottery Barn Kids, or Target’s Pillowfort line)
Plush Toys & Books: (Assuming you own them) $0
Assembly (if not doing it yourself): $50 – $100
TOTAL: $150 – $450
Budget alternative: Pair a standard, inexpensive white bookcase ($40-$60) with a large, separate fabric toy bin ($20-$30) placed in front of it. This creates the same two-zone system for a much lower cost.
Your Playroom’s Next Chapter Starts Here
Hopefully, these 30 ideas have sparked some serious inspiration for taming the Barbie chaos and turning it into something beautiful and functional. Remember, the best organization system is the one you and your kids will actually use, so pick a style that fits your real life. Now, which one will you try first?
Found a look you love? Pin it to your favorite board, and make it happen!