
That feeling when you finally spot the perfect basement ceiling idea on Pinterest and just *know* it’s the one? That’s what this guide is all about. Forget endless scrolling through questionable designs. We did the hard work, curating 30 genuinely inspiring, real-home ideas that work for 2026.
We’ve covered everything from rustic exposed beams and sleek modern blackouts to smart, inexpensive DIY options. Basements are no longer just bonus rooms; they’re our offices, gyms, and family hideaways. Giving the ceiling a proper design treatment is the one thing that makes the space feel truly finished. And stay until the end — we break down the most common mistakes that can ruin these looks.
📌 Save this to Pinterest for later — you’ll want to revisit these ideas.
1. Classic White Recessed Panel Ceiling
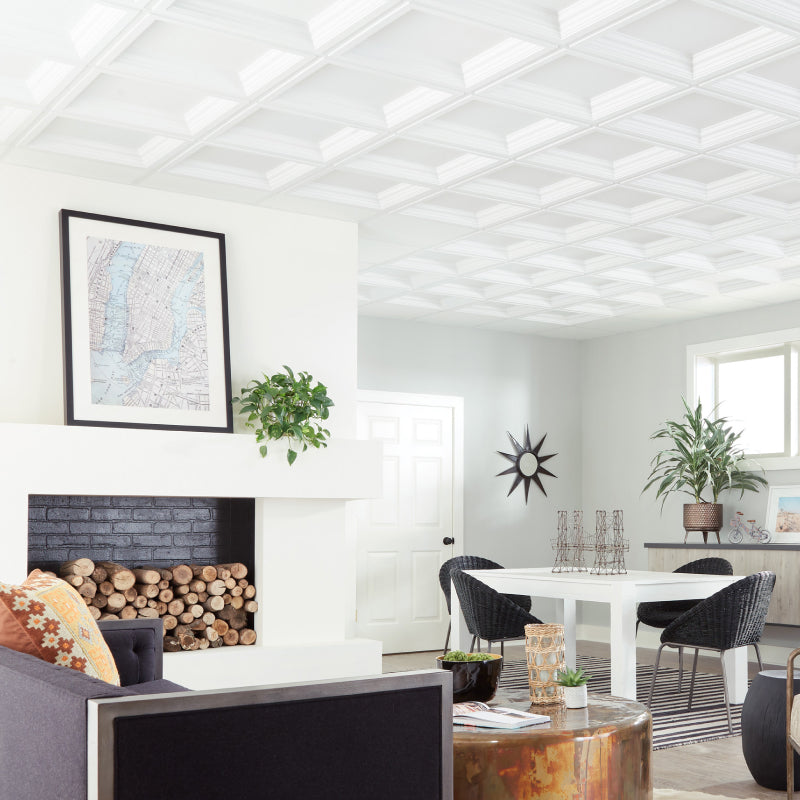
This look is a classic for a reason. The grid of white recessed panels adds architectural interest without lowering the perceived ceiling height—in fact, the dimensionality makes the ceiling a feature, drawing the eye upward and making the whole room feel taller. It’s a brilliant way to add character to a standard basement living room. The clean white finish reflects light beautifully, which is often a top priority in below-grade spaces. The precise geometry here brings a sense of order and sophistication that contrasts nicely with the relaxed living area below.
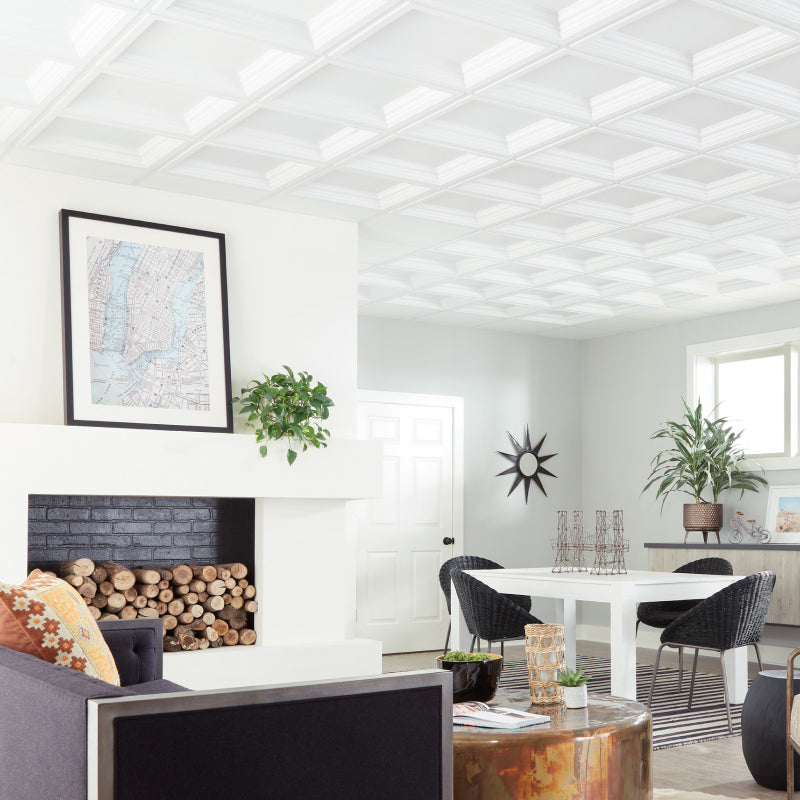
“If you want to install a similar recessed panel or coffered ceiling system, here’s a pro tip: paint your grid components *before* you install them.”
It is infinitely easier to get a clean, professional finish on the ground than it is to paint upside-down in a hundred little corners once the grid is up. You’ll just need to do minor touch-ups on nail holes and seams afterward. This will save you hours of uncomfortable neck-craning and result in a much sharper look. It also makes cleanup a breeze.
2. Multi-Level Dropped Ceiling with Integrated Lighting
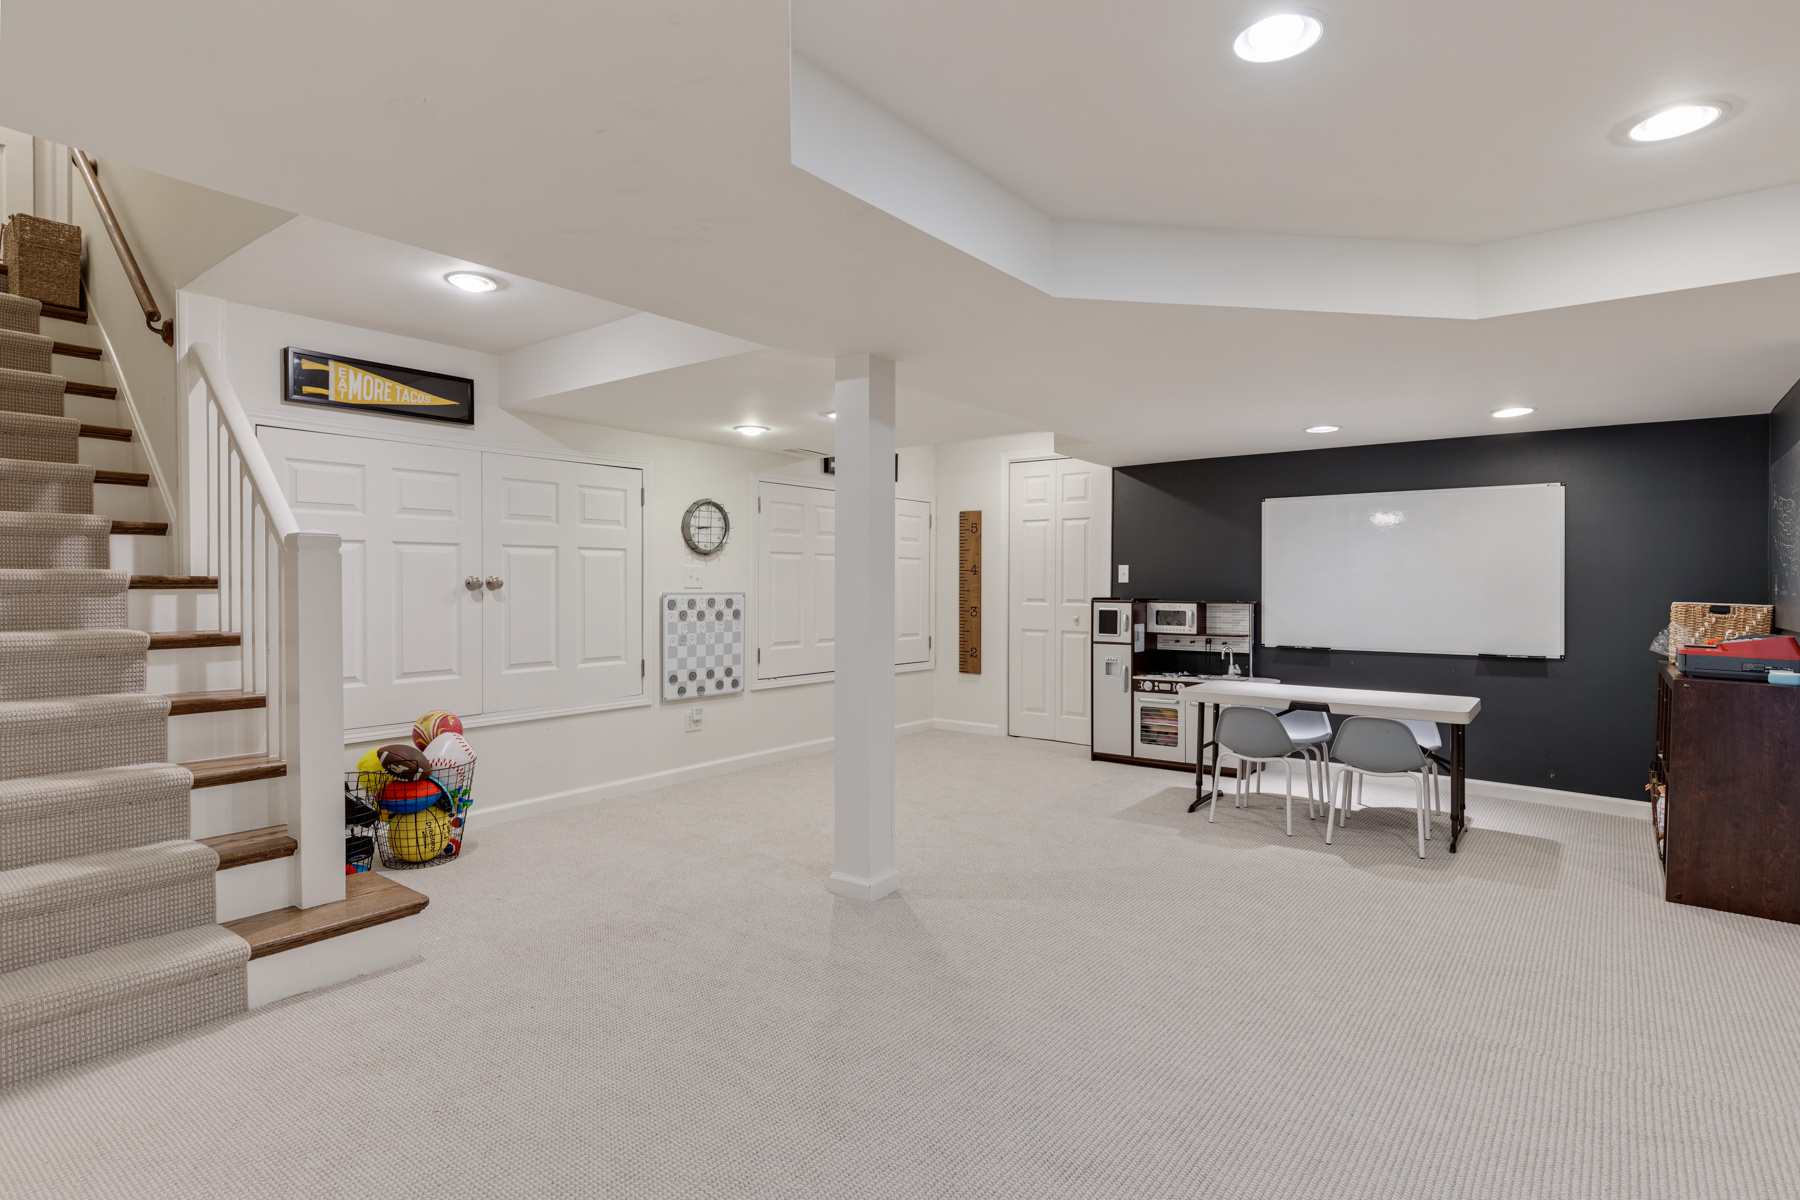
A multi-level dropped ceiling is a fantastic solution for basements with lots of ductwork and pipes, but it does require a certain amount of vertical space to work. For this layered look, you’ll want a minimum ceiling height of 8 feet *before* you start. This allows you to have a main dropped level at around 7 feet 6 inches, with the lower soffits hanging down to about 7 feet, which is generally the minimum legal height for a habitable room. This design is less suited for basements with very low clearance, where a flat treatment like in Idea #8 would be better.
“Let’s be honest: creating these soffits and dropped sections is not a simple DIY weekend project.”
This is a job for a skilled framer and drywall contractor. The complexity lies in precisely boxing out the utilities while keeping everything level and square, and properly integrating the electrical for recessed lights. Trying to cut corners here can result in wavy lines, uneven surfaces, and a ceiling that looks more chaotic than custom. Budget for professional labor to get those crisp, clean lines that make this look so effective.
3. Tray Ceiling with Light Wood Arabesque Inlay
The single element that elevates this entire space from lovely to truly special is the arabesque pattern in the tray ceiling. Without it, you have a nice, but standard, tray ceiling. With it, you have a custom, artistic focal point that feels both intricate and airy. It’s a testament to how the “fifth wall” can become a major piece of decor. It pulls the light wood tones from the floor and furniture upward, creating a balanced, cohesive room. It’s a sophisticated detail you might expect in a high-end dining room, but it brings unexpected elegance to a cozy basement setting.
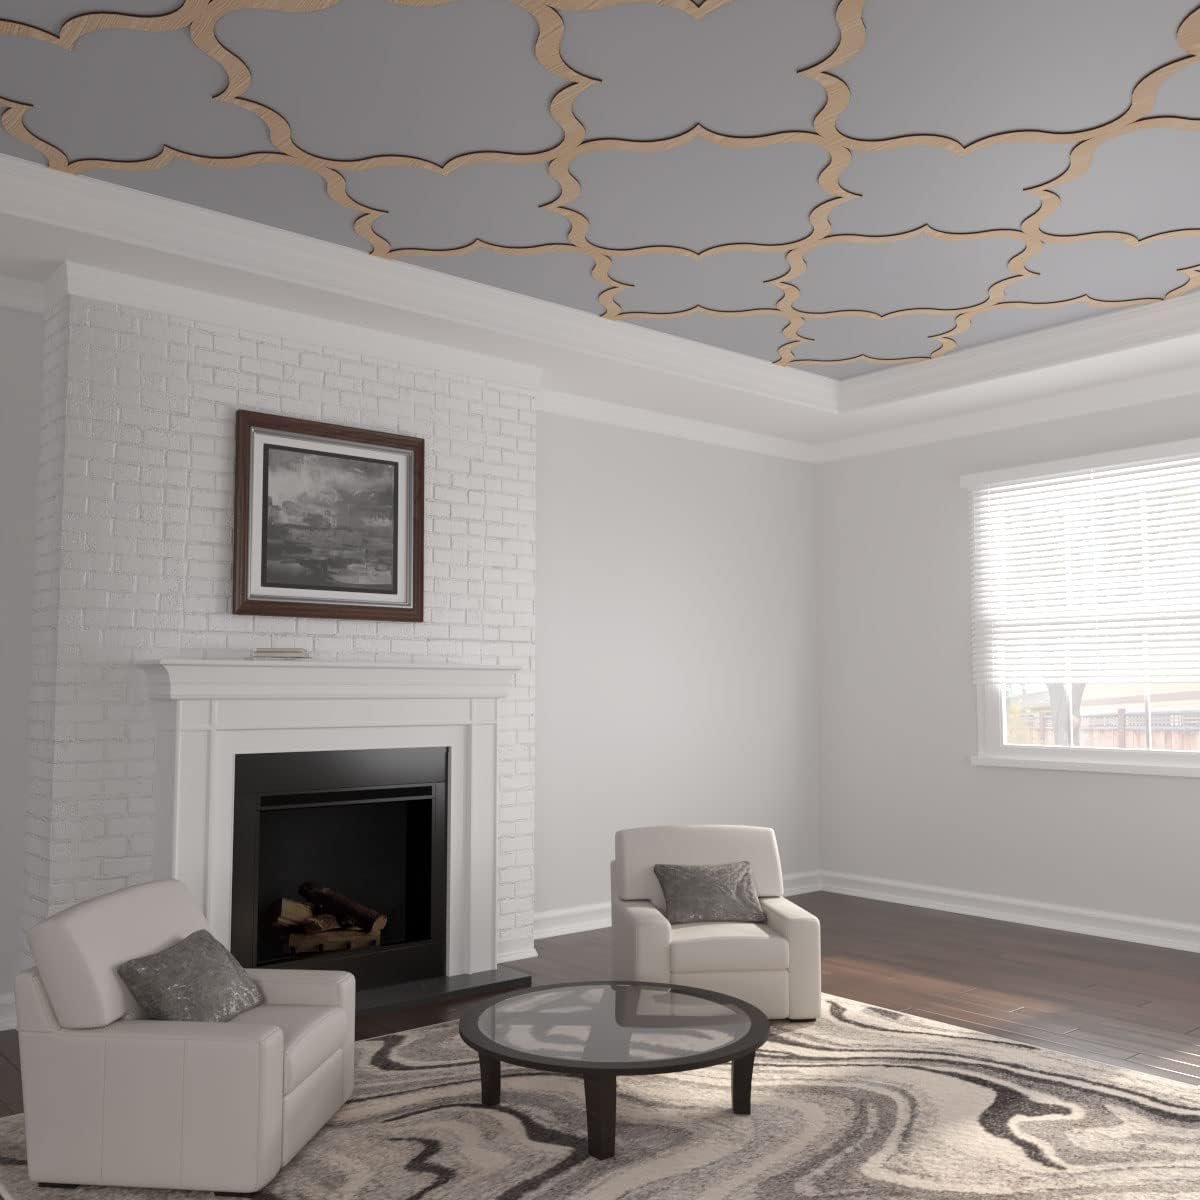
“The success of this room can be broken down into a simple formula: 50% Soft Neutrals (white brick, cream chairs, light gray ceiling), 40% Natural Texture (the wood arabesque pattern, patterned rug, firewood), and 10% Dark Accents (black artwork frame, chair legs, firebox).”
You could easily swap the palette here. Imagine the arabesque in a dark-stained wood with navy walls for a moody library feel, or even a metallic finish for a touch of glam. The formula of a neutral base plus a large-scale patterned ceiling and grounding dark accents remains the same.
4. Bright White Ceiling Panels with Integrated Spotlights
These white recessed panels have a clean, almost tin-tile-like appearance that adds texture and reflects a ton of light. While contractor-grade systems can be pricey, you can get a very similar vibe for a fraction of the cost using off-the-shelf materials. Look for paintable textured wallpaper, often sold in 20-inch by 30-foot rolls for about $40-$60. Applied to a clean, flat drywall ceiling, it can mimic the look of embossed panels. You can then install simple, inexpensive surface-mount puck lights instead of recessed cans to save on electrical work.
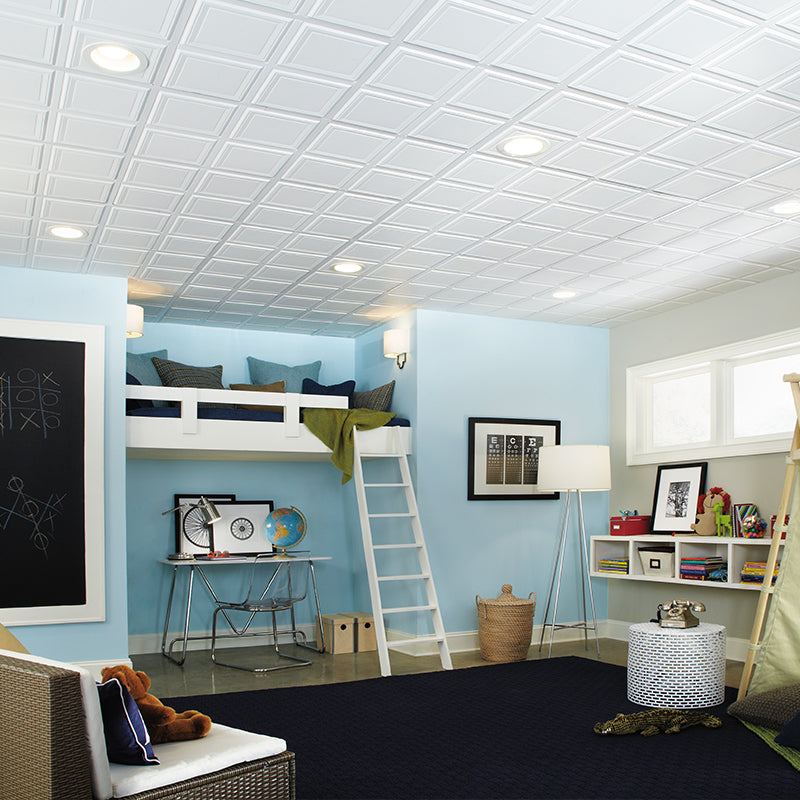
“Want to add recessed lights to an existing drywall ceiling?”
Here’s a quick guide for installing remodel-style canless LED lights:
Time: 2-3 hours for 4-6 lights | Cost: $100-$150 for lights and tools.
Step 1: Plan Layout. Mark the locations for your lights on the ceiling with a pencil, ensuring they are evenly spaced and not directly over a joist. Use a stud finder!
Step 2: Cut Holes. Use the paper template included with your lights and a drywall hand saw or hole saw drill attachment to cut the openings.
Step 3: Run Electrical. FROM A SAFELY SWITCHED-OFF CIRCUIT, run electrical cable from the power source to the first hole, and then from hole to hole.
Step 4: Wire Lights. Connect the house wiring to the driver box for each light, then plug the light fixture into the driver.
Step 5: Install. Push the driver box up into the ceiling hole, then push the light fixture into the opening until its spring-loaded clips snap into place.
5. Exposed Black Joists with Warm Leather Sofas
This look is surging in popularity because it perfectly nails the “industrial-cozy” aesthetic that so many people are chasing. For years, the default was to hide all the basement’s inner workings. But there’s a growing appreciation for honest materials and functional elements. Painting the joists, pipes, and ducts a uniform black turns that chaotic “unfinished” look into a deliberate, graphic statement. The black ceiling recedes, making the space feel taller, while providing a stunning contrast to the white walls and warm wood and leather below. It’s a trend with staying power because it’s both practical and stylish.
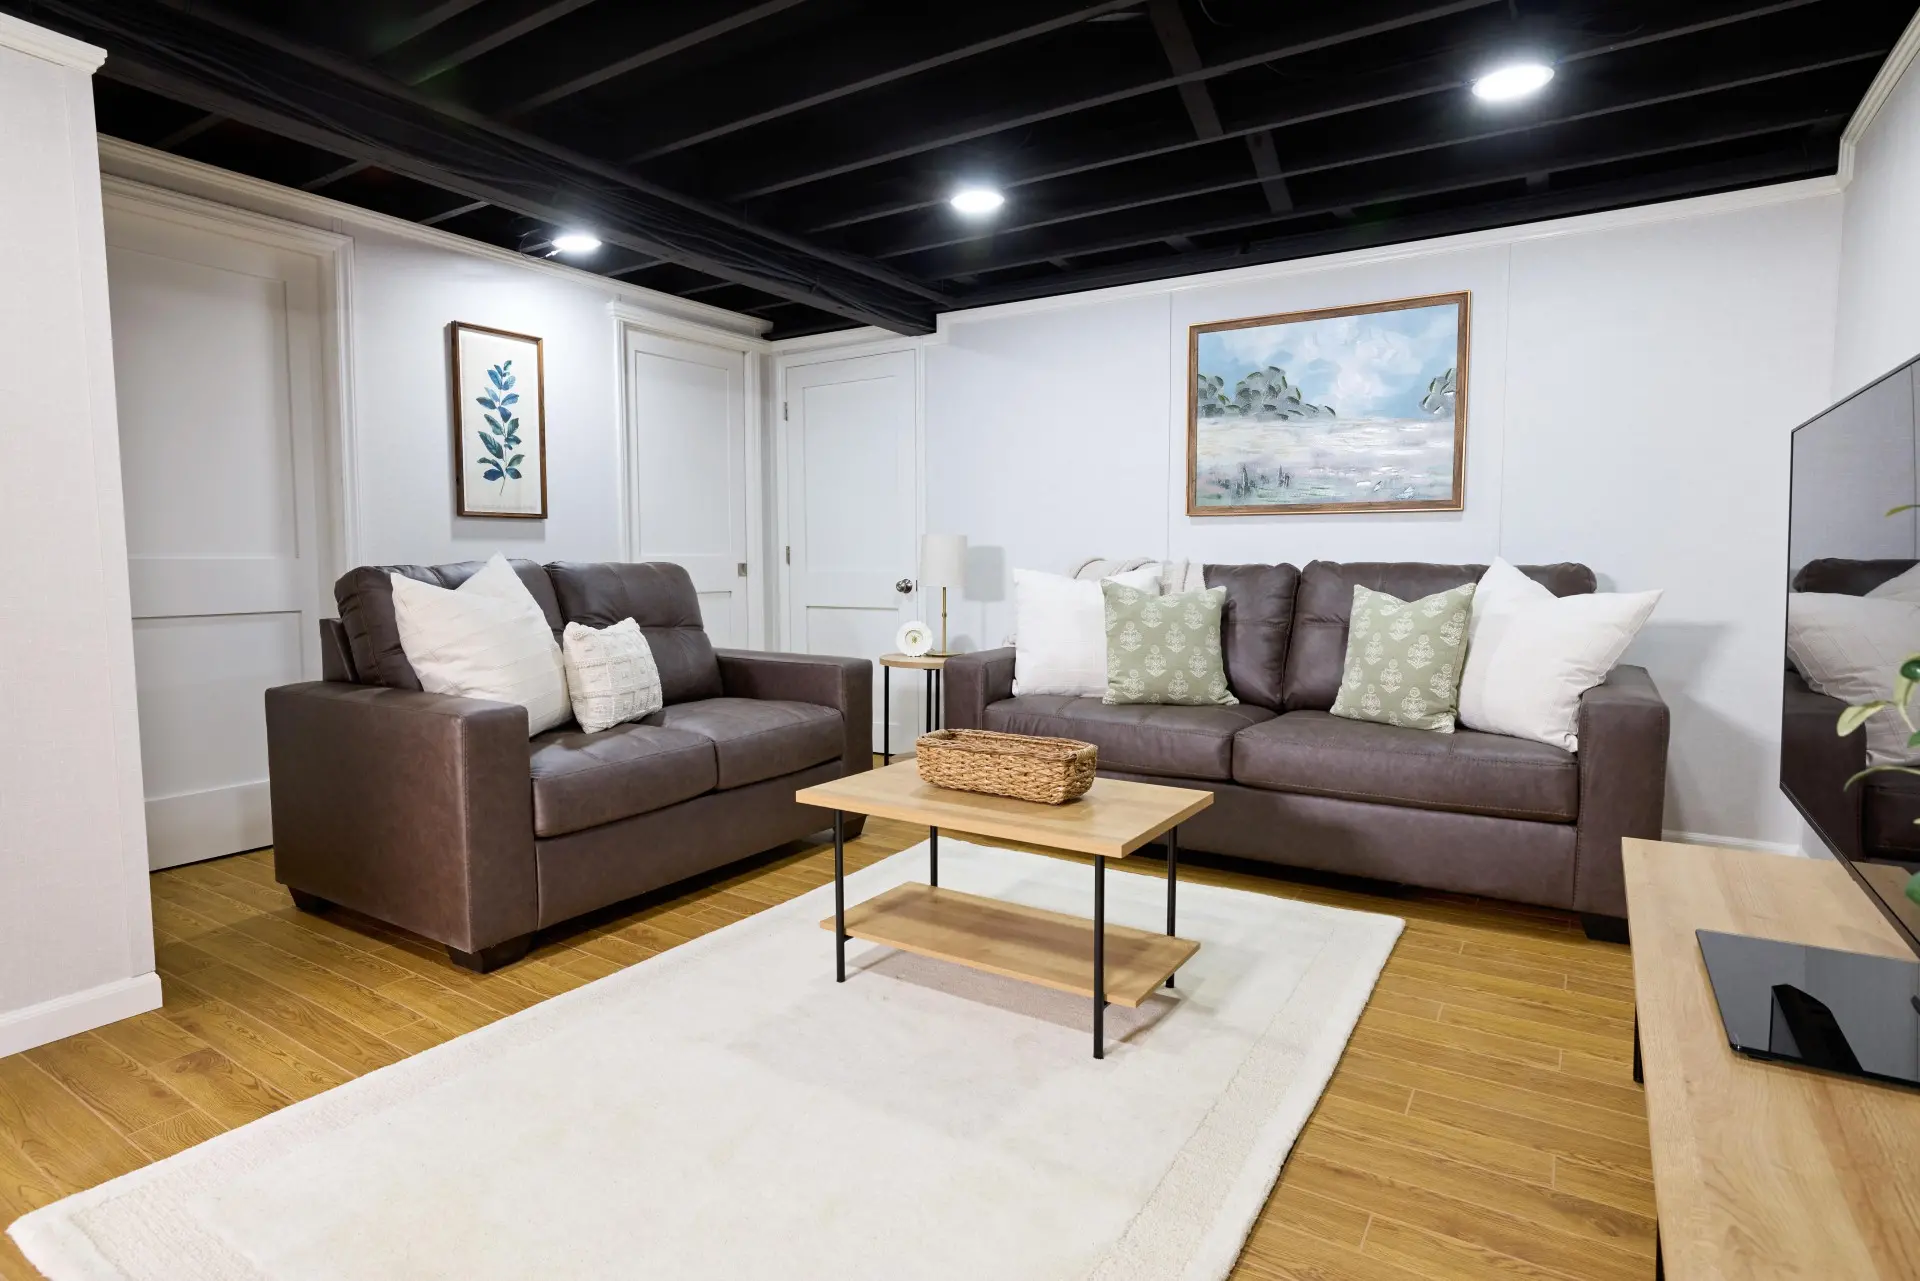
“What the pretty pictures don’t show you is the dust.”
An exposed joist ceiling, especially a dark one, will collect dust and cobwebs in its many nooks and crannies. It’s not a deal-breaker, but you have to be realistic about maintenance. Plan on a thorough cleaning with a long-handled duster or a shop-vac with a brush attachment at least two or three times a year. If you have significant allergies or a strong aversion to dusting, a smooth, sealed ceiling might be a better fit for your lifestyle.
6. Flat Ceiling with a Wide Beam and Chic Kitchenette
Here’s a perfect example of how to handle a necessary structural element. Instead of trying to hide the large beam, it’s been integrated into the design as a clean, intentional feature. By painting it the same crisp white as the ceiling, it helps define the different zones of the room (living vs. kitchen/dining) without visually lowering the space. This works because the rest of the ceiling is kept perfectly flat and simple. The beam adds just enough architectural detail to prevent the ceiling from being boring, while the recessed kitchenette and bold furniture choices provide the personality.
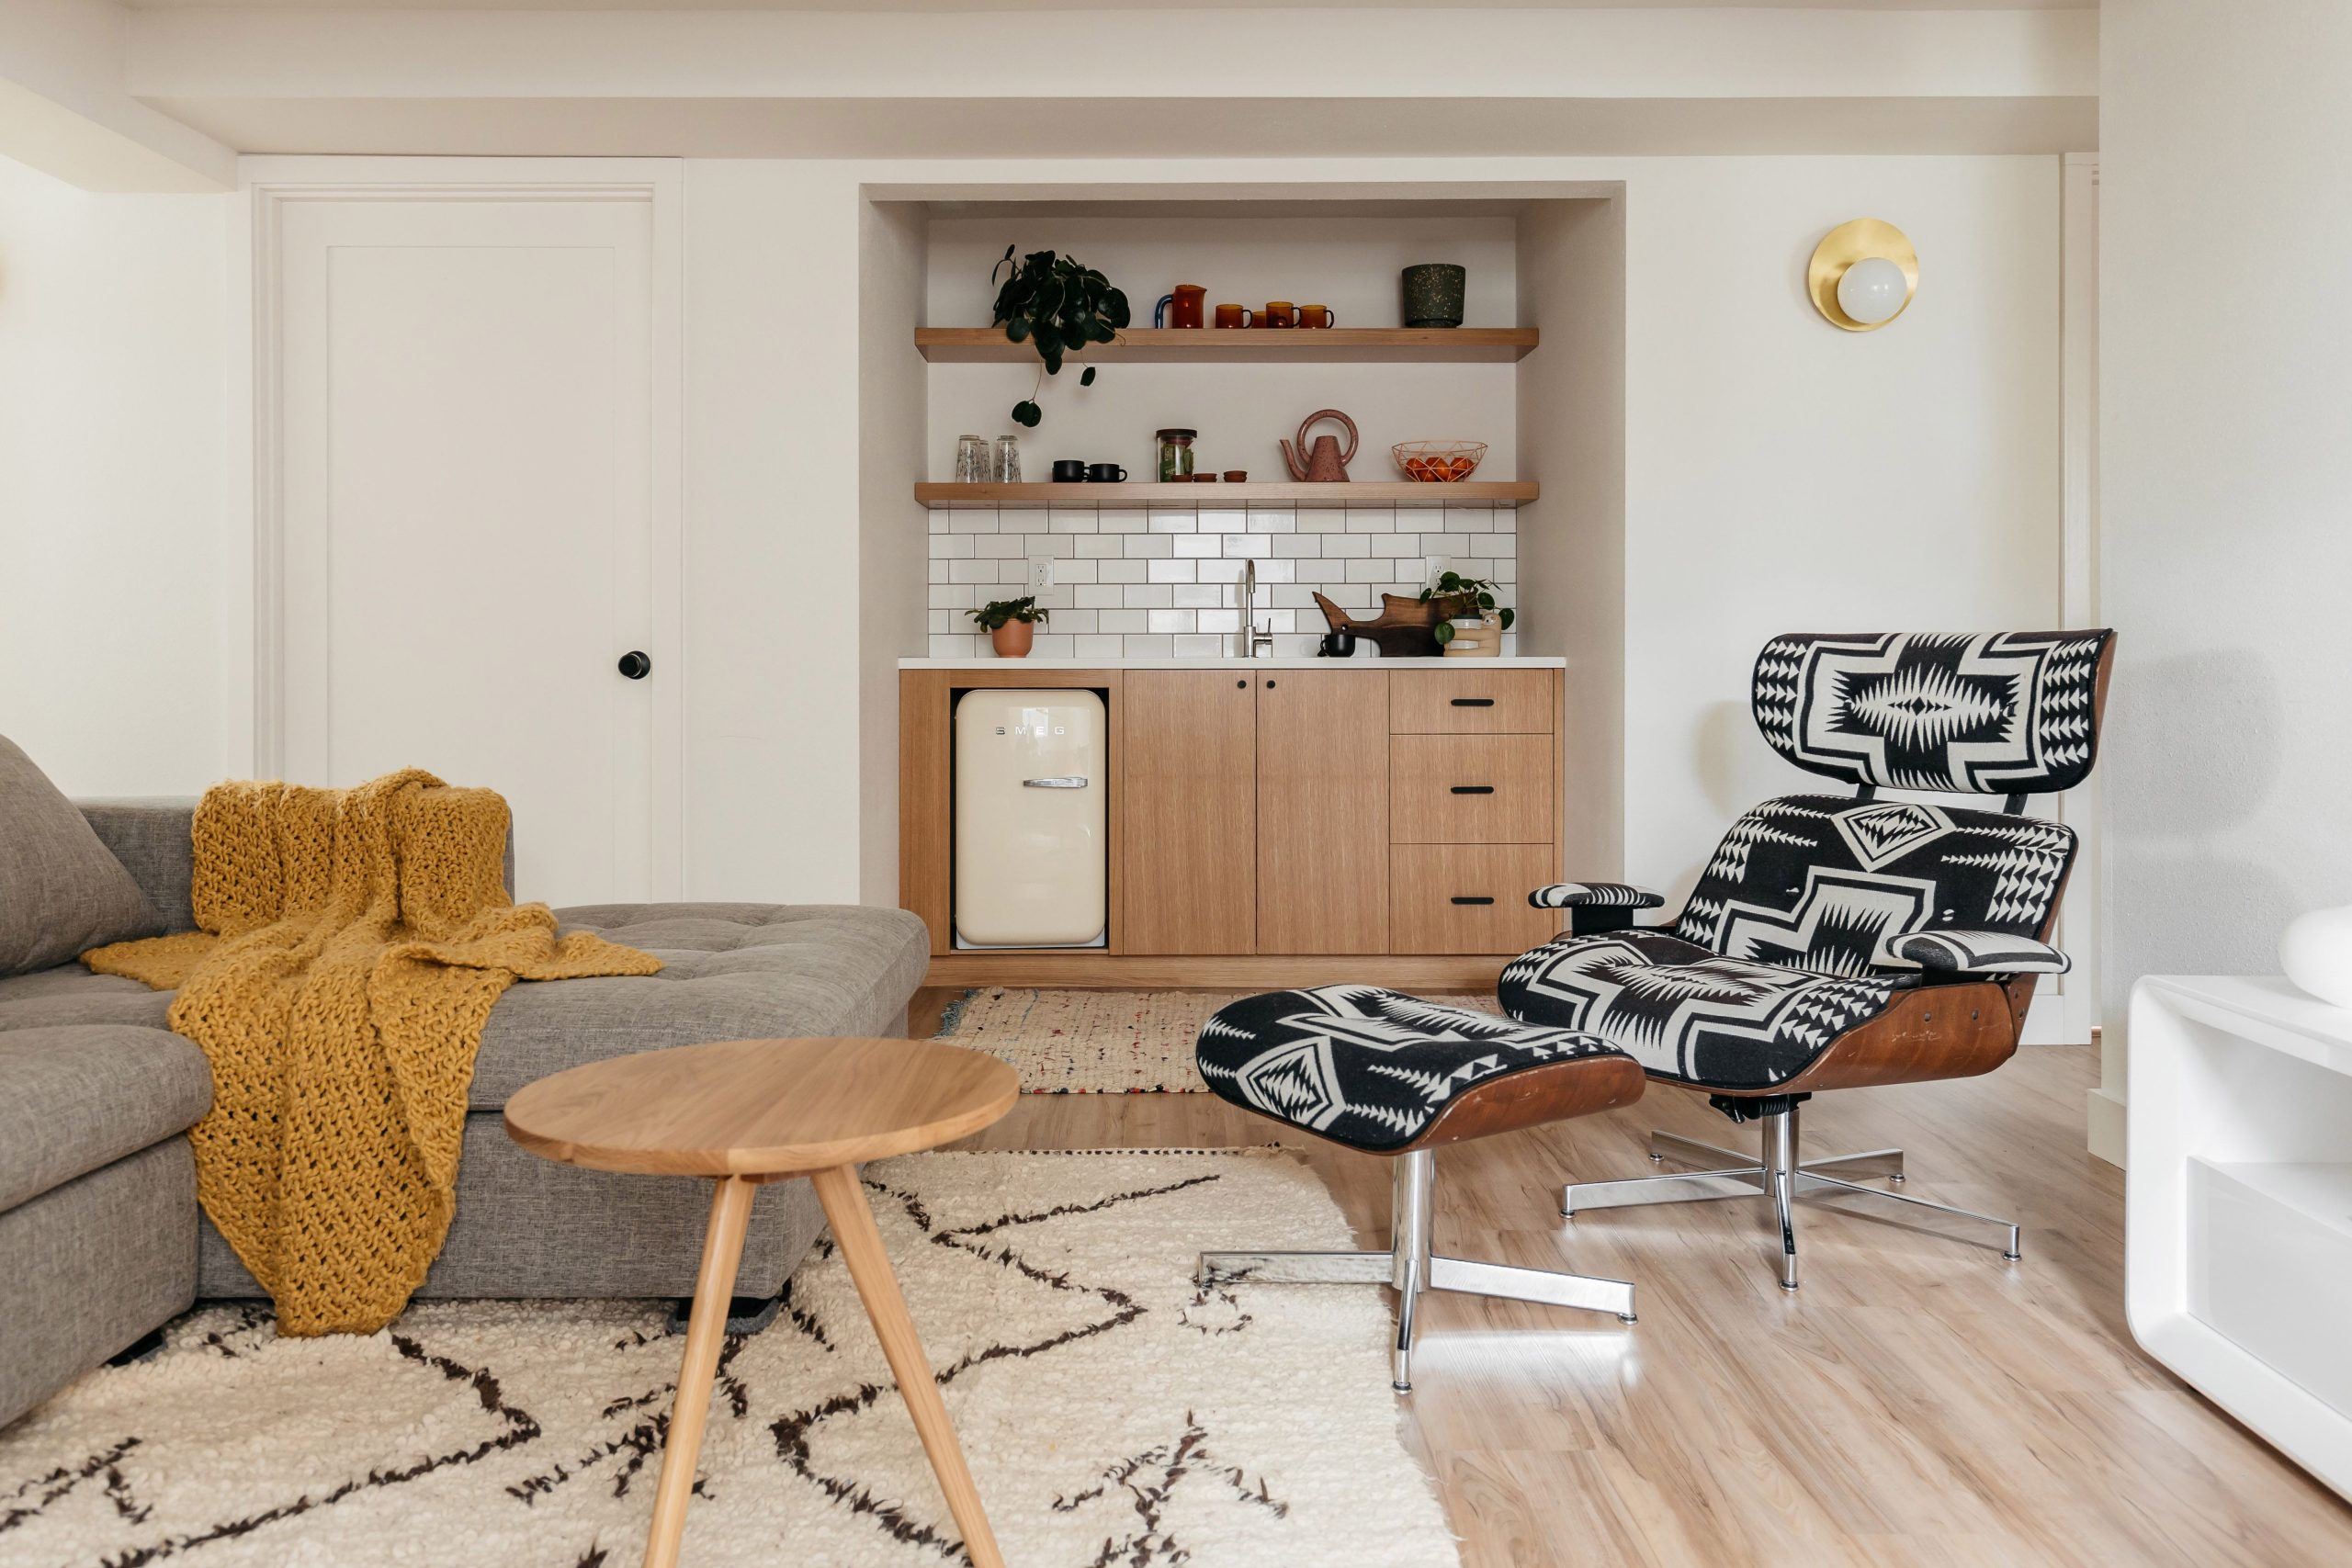
“When you have a large, open-plan basement, using a beam to create psychological zones is a classic designer trick.”
To take it a step further, consider your lighting. Install one type of lighting on the “living” side of the beam (e.g., recessed lights on a dimmer) and a different type on the “kitchenette” side (e.g., under-cabinet task lighting and a decorative pendant). This reinforces the idea of separate “rooms” within the open space and allows you to create different moods for cooking, dining, and relaxing.
7. Ceiling Covered in a Botanical Palm Leaf Wallpaper
The wallpaper is, without a doubt, the star of the show here. It’s a bold, slightly surprising choice that instantly injects personality and life into what could otherwise be a plain room. Applying a pattern to the ceiling is a designer move that draws the eye up and makes a space feel custom and thoughtfully designed. The green palm leaf motif creates a fresh, vibrant, almost tropical vibe, turning a simple room into an escape. Removing it would leave you with a beige box; with it, you have a statement.
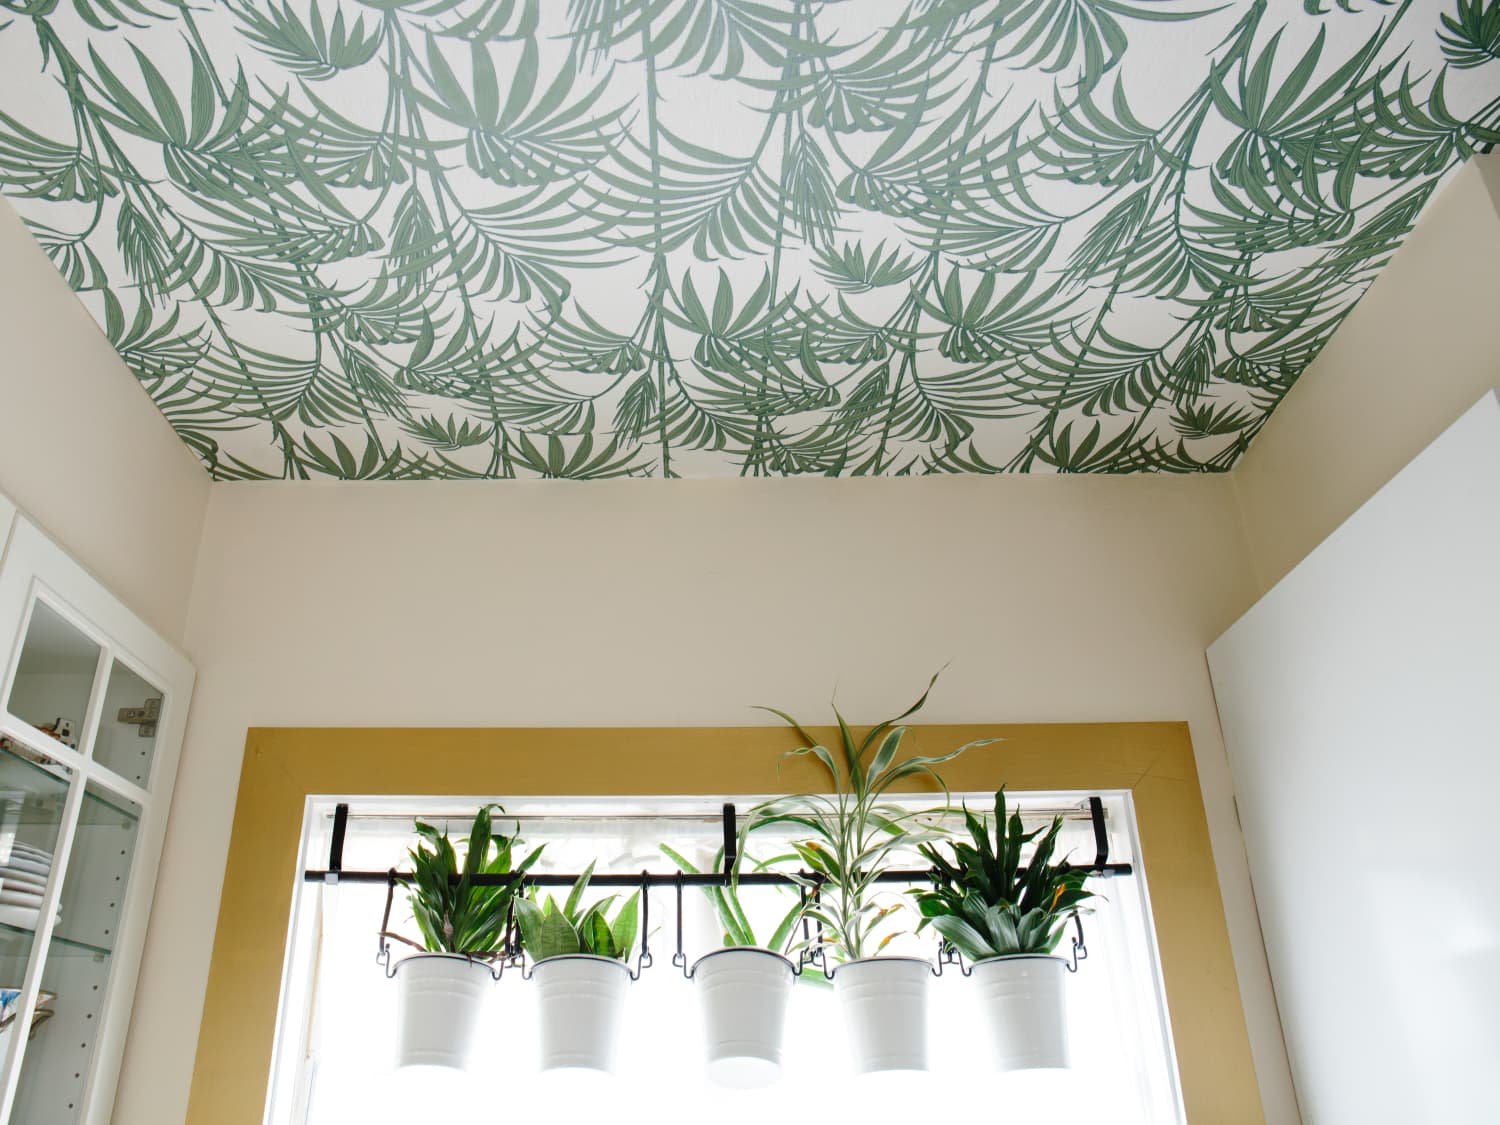
“Recreating this botanical-on-the-ceiling look is surprisingly affordable, as the major impact comes from the wallpaper itself.”
It’s a high-impact, low-cost upgrade.
Paint (for walls): $50 – $90
Wallpaper (for a 10’x12’ ceiling): $150 – $300
Hanging plant rod & hardware: $30 – $50
Potted Plants: $40 – $80
TOTAL: $270 – $520
Budget alternative: Find a similar botanical stencil kit online for $40 and use a quart of green paint ($20) to create the pattern yourself. Total cost: ~$110.
8. White Exposed Joist Ceiling with Black Pendant Lights
The visual recipe here is simple and effective: 80% Monochromatic Base + 15% Industrial Elements + 5% Natural Texture. The overwhelming white on the joists, pipes, and walls creates a bright, airy canvas that feels clean and modern. The black pendant lights provide a crucial graphic punch (industrial element). The natural wood of the joists, visible up close, adds that 5% of warmth and texture. You could change the accent color from black to brass for a warmer feel, or even a bright primary color for a more playful, gallery-inspired look.
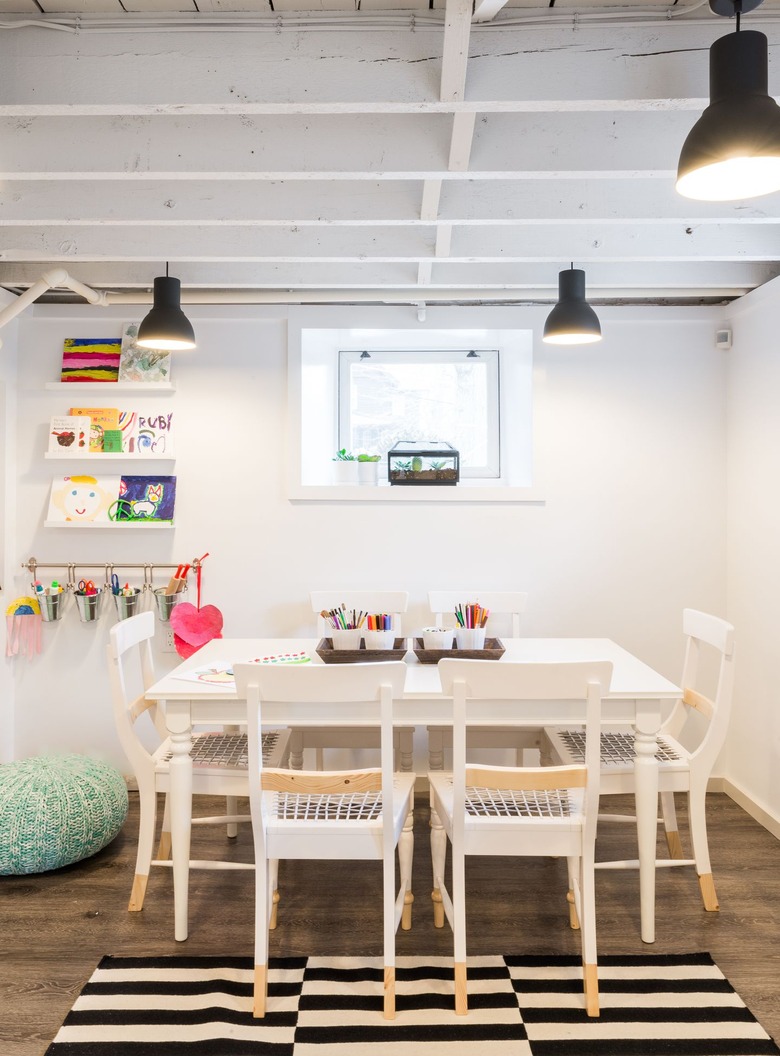
“Painting an exposed basement ceiling white is a fantastic way to brighten the space, but be prepared: it takes more paint than you think.”
A lot more. All those nooks, crannies, and rough surfaces of the joists, plus the bridging, pipes, and wires, soak up paint. Using a paint sprayer is not optional here; it is mandatory. Trying to do this with a brush and roller will take you weeks and result in a patchy, frustrating finish. Renting a sprayer for a weekend is your best bet for achieving that smooth, uniform look.
9. Bright Workspace with Exposed White Joists and Copper Pipes
An exposed ceiling like this is fantastic for making a low basement feel taller. But before you commit to painting everything, run through this checklist:
- What’s up there? Identify every single wire, pipe, and duct. Are there old, abandoned coaxial cables or phone lines you can remove to simplify the look? Tidy up and secure any loose wiring.
- Prep Work: Is there any rust on pipes or ductwork? You’ll need to treat that with a rust-inhibiting primer first. Is the wood clean, or does it need a deep cleaning to remove decades of dust and grime?
- Lighting Plan: Where will your light fixtures go? With exposed joists, you need to plan your electrical runs carefully. This is a good time to map out can lights or junction boxes for pendants.
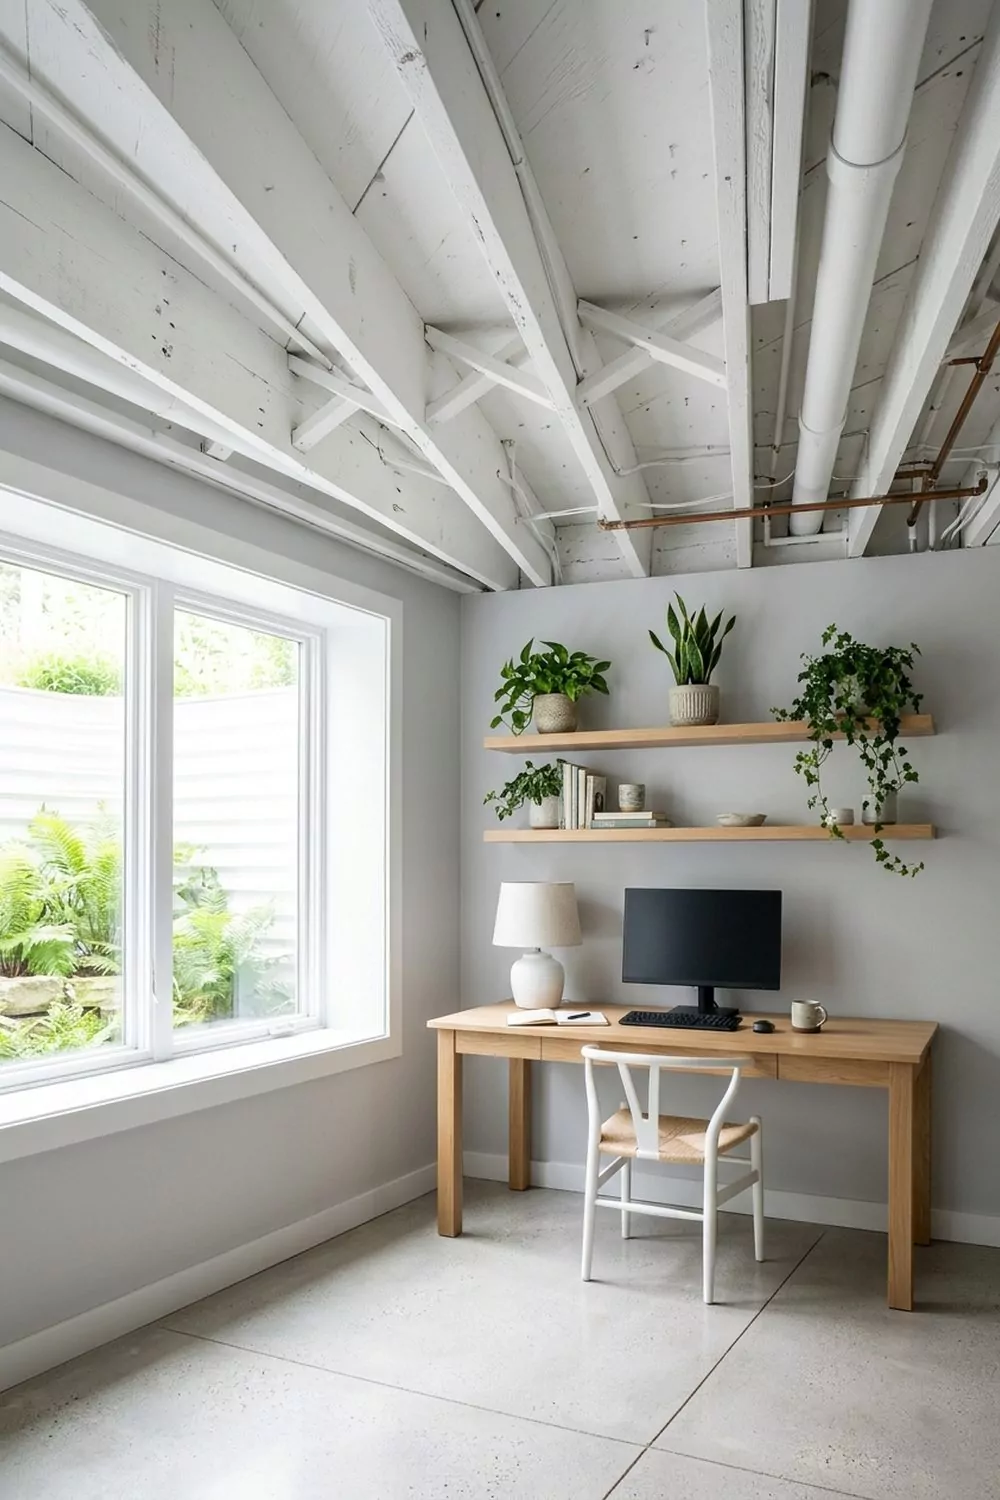
“This airy, open-joist style works best in basements with ceilings that are at least 7 to 7.5 feet high to the bottom of the joists.”
This height provides enough clearance to make the space feel intentionally open rather than just unfinished. It’s particularly effective in smaller rooms or defined zones, like this office nook, where the texture overhead adds character without overwhelming the entire basement. For much lower ceilings (under 7 feet), a flat, smooth white ceiling, like in Idea #16, might be a better choice to maximize every inch of perceived height.
10. Industrial Dark Gray Joist Ceiling Over a Cozy Nook
This design succeeds because of the powerful use of contrast. The dark, industrial ceiling, with all its exposed guts painted a uniform charcoal gray, feels utilitarian and massive. But directly beneath it, the cozy nook with its warm leather armchair, soft lighting, and wood floor feels protected and inviting. The dark ceiling visually recedes, an optical illusion that can make a low ceiling feel higher. The white walls act as a bridge, preventing the dark top and warm bottom from clashing. Compare this moody take with the bright and airy white exposed joists in Idea #8.
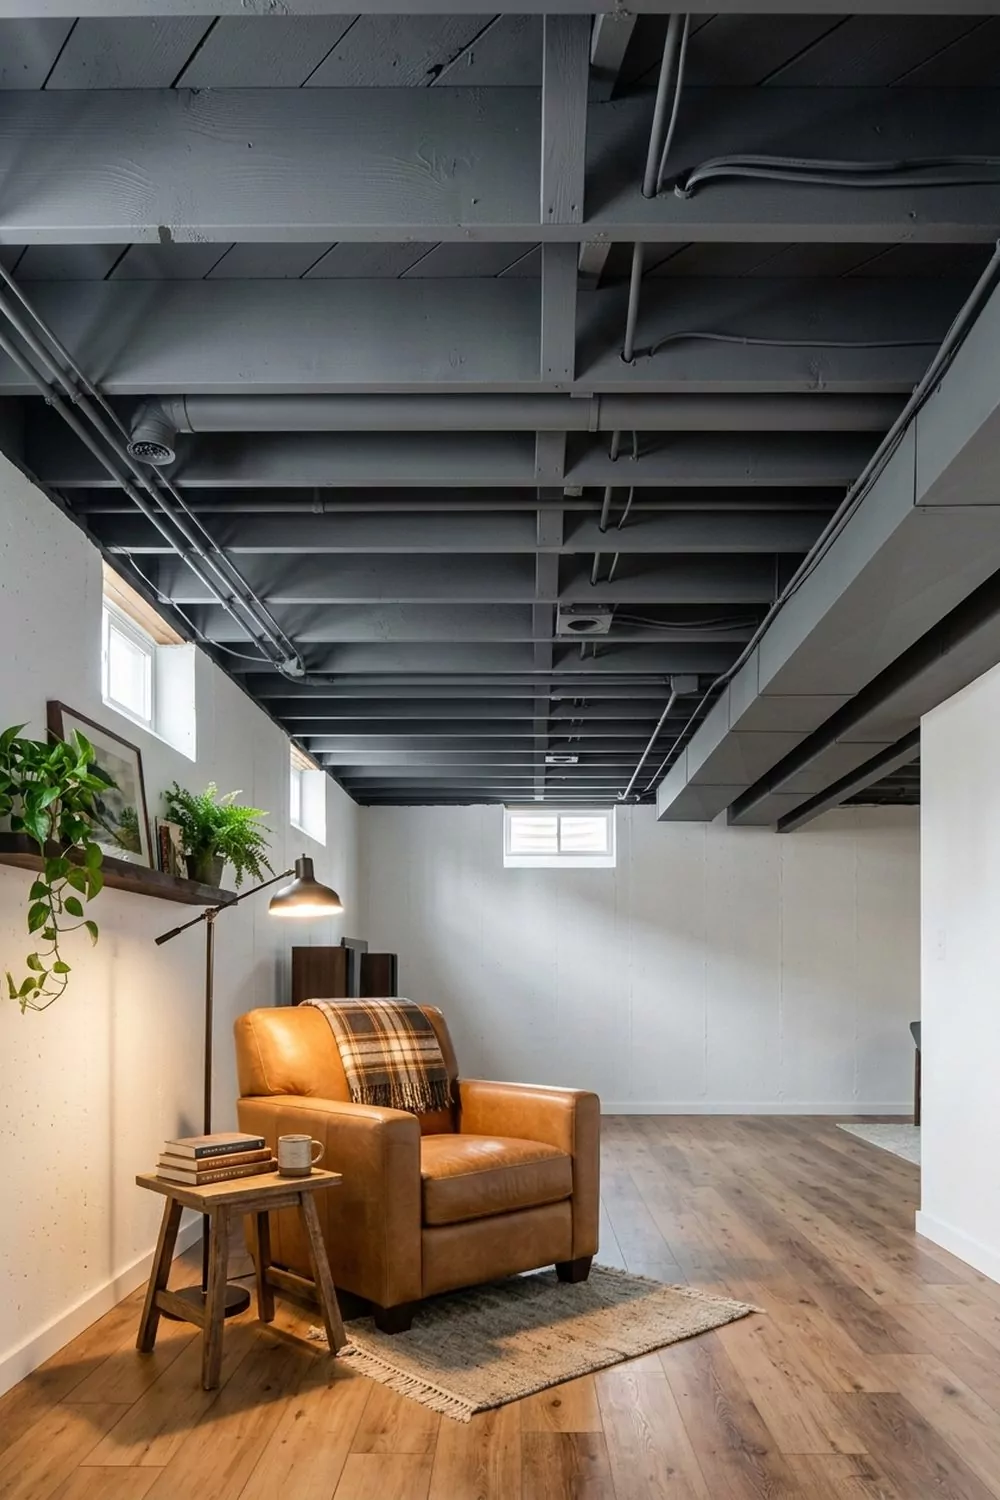
“You don’t need a designer armchair to get this cozy-industrial vibe.”
The key ingredients are the dark ceiling and the warm textures. Paint your exposed joists and ducts with a dark gray or black paint (a sprayer is your friend here!). Then, hit up Facebook Marketplace or a local thrift store. You can often find a worn-in leather or comfortable fabric armchair for under $100. Add a simple floor lamp from Target or Walmart for $30-$50, and you’ve created the perfect reading corner for a fraction of the cost.
11. Unfinished Farmhouse-Style Basement Ceiling
The term “unfinished” can be misleading. A truly unfinished ceiling means exposed insulation, messy wiring, and years of dust. The popular “unfinished look,” however, is actually quite finished. It involves cleaning the joists, tidying up or hiding unsightly wiring and plumbing, and often painting everything a uniform color, as seen in Idea #10. If you leave your ceiling truly raw, be aware of building codes. Many areas require a thermal barrier (like drywall) over foam insulation and may have rules about exposed wiring for safety.
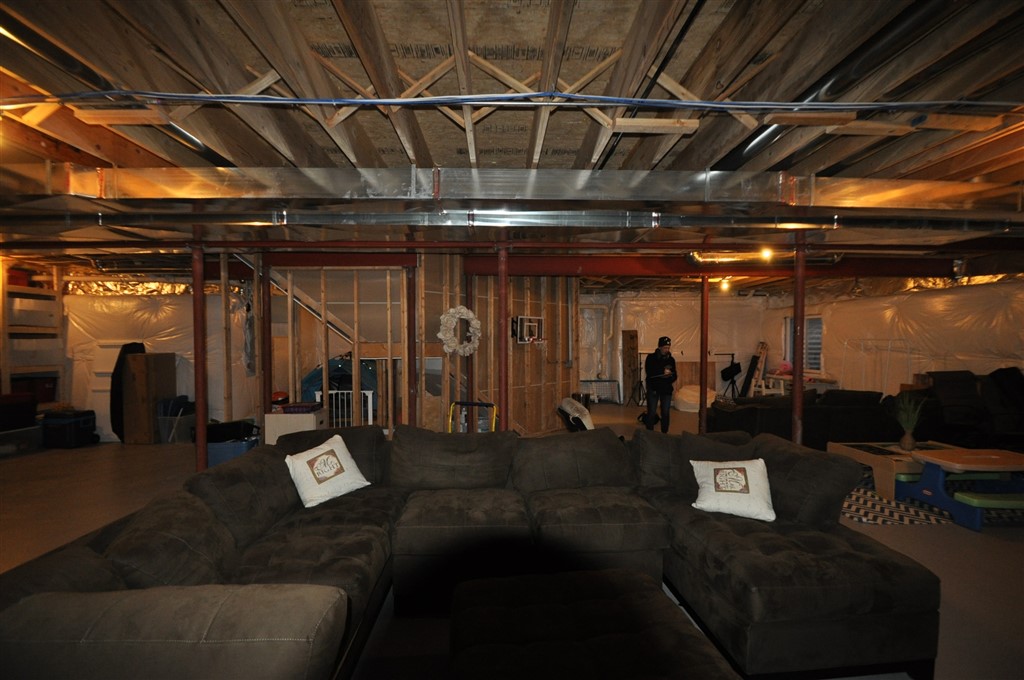
“Why is this deliberate, “unfinished” ceiling popular in farmhouse designs?”
It’s about honesty of materials. Farmhouse style celebrates the beauty in function—the sturdy barn door, the wide plank floors, the hardworking apron-front sink. An exposed-joist ceiling fits right into this ethos. It shows the “bones” of the house, celebrating the structure itself rather than hiding it. It adds a layer of rustic texture that feels authentic and grounded, a perfect complement to shiplap walls and reclaimed wood accents that are staples of the style.
12. Industrial Basement Ceiling with Exposed Joists and Ductwork
that defines this ceiling is its unapologetic honesty. Nothing is hidden. The raw wood joists, the silver ductwork, the black pipes, the electrical conduit—it’s all part of the design. This isn’t the clean, painted-out industrial of Idea #5; this is a much more raw, utilitarian version. It works in a space that fully leans into the industrial vibe, where you value function and process over polished perfection. It announces that this is a functional space, and it finds aesthetic value in that very function.
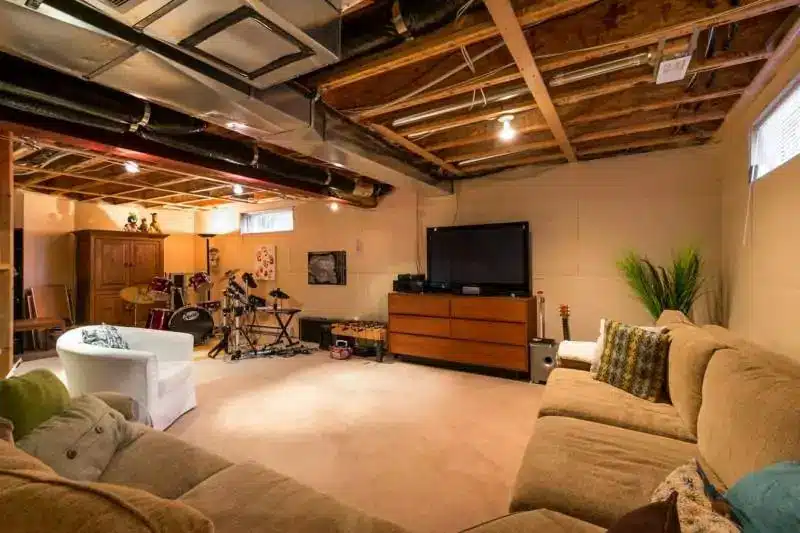
“An exposed ceiling like this one, with its mix of materials and textures, is the opposite of a low-maintenance choice.”
The top edges of the ductwork and pipes are perfect shelves for dust. The rough surfaces of the wooden joists can snag dusters and release splinters. You will need a shop vacuum with a good brush attachment to properly clean this ceiling. Also, be aware that any future plumbing leaks or electrical issues, while accessible, will be on full display until they are fixed. This look is a commitment to a certain rugged lifestyle.
13. Reclaimed Wood Plank Ceiling with Edison Bulb Pendants
When installing a reclaimed wood ceiling, the key to a natural, high-end look is variation. Don’t lay the planks in a perfectly repeating pattern. Mix lengths, widths, and tones randomly across the ceiling. Stagger the seams so they don’t line up, which can look artificial. Before you start, lay out the planks on the floor to get a sense of the overall pattern and color distribution. This allows you to arrange the wood for the most pleasing, organic effect before you commit to nailing it up overhead.
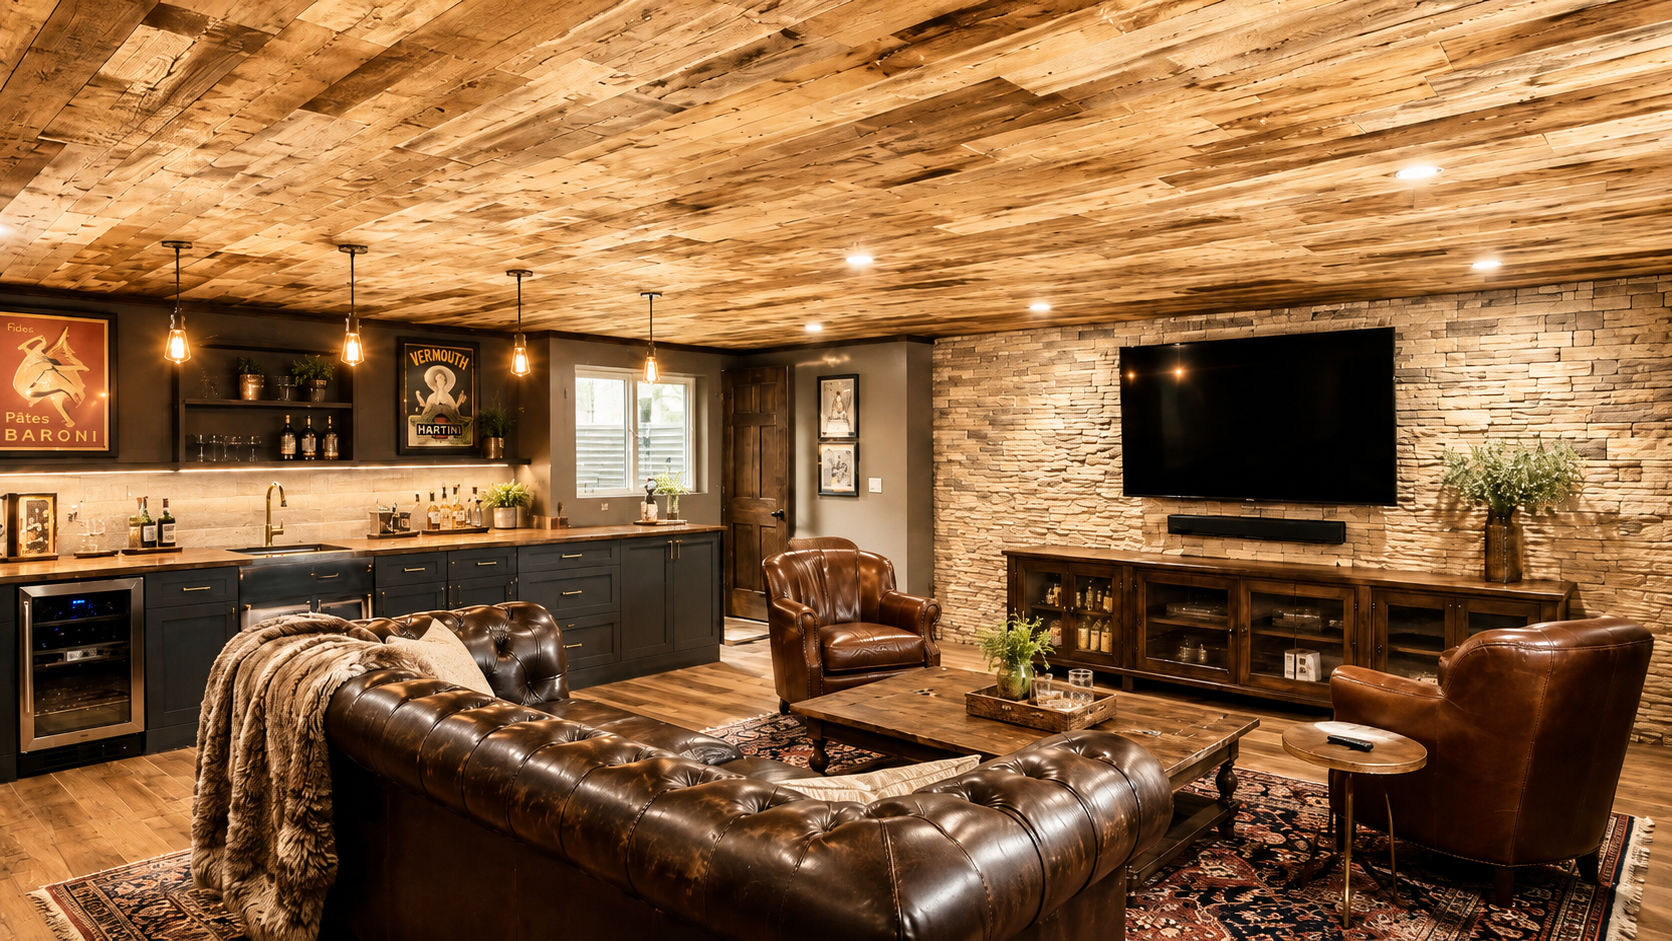
“This room’s cozy-yet-sophisticated feel comes from a well-balanced equation: 60% Rustic Texture (reclaimed wood ceiling, stacked stone wall) + 30% Modern Sleekness (dark gray walls, clean lines of the bar) + 10% Industrial Accents (Edison bulb pendants, metal bar stools).”
This formula prevents the room from feeling like a theme park cabin. By pairing the rough-hewn elements with smooth, dark walls and minimalist lighting, the design feels current and intentional. For a less expensive version, see the faux beams in Idea #28.
14. Dark Coffered Ceiling with Decorative Copper Tiles
A luxurious, custom-built bar and ceiling like this is a significant investment, intended to be a showpiece for entertaining. The cost is primarily in the custom millwork and high-end finishes.
- Custom Coffered Ceiling & Millwork: $8,000 – $15,000+
- Decorative Copper/Metal Tile Inlays: $1,500 – $4,000
- Lighting (Recessed & Pendants): $1,000 – $2,500
- Custom Bar with Stone/Granite Top: $10,000 – $20,000+
- ESTIMATED TOTAL: $20,500 – $41,500+
- Budget alternative: Use a standard drop-ceiling grid, paint it a dark color, and use decorative faux-tin PVC tiles ($2-$4 per sq ft) to get a similar patterned effect for about 80% less.
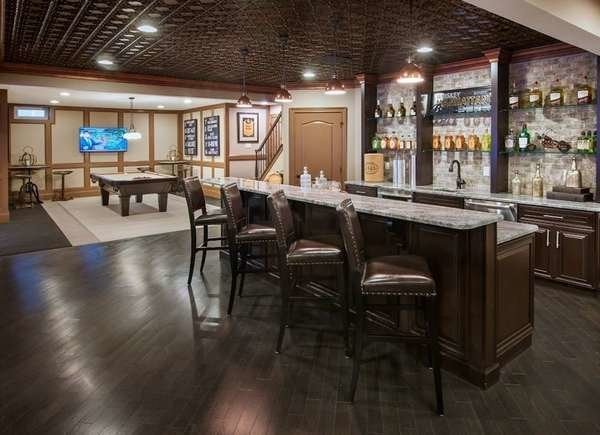
“This ceiling treatment works because it embraces the darkness to create a cozy, intimate atmosphere.”
In a basement designed for entertaining, movies, or enjoying a drink at the bar, you don’t always need bright, airy light. The dark coffers, combined with the warm metallic tiles, create a rich, enveloping feeling. The multiple light sources—recessed cans for general light, pendants for task lighting over the bar—are key. They provide plenty of illumination where needed, creating sparkling highlights against the dark, dramatic backdrop.
15. Fiber Optic Starry Sky Ceiling with Blue LED Lights
Creating a fiber optic star ceiling is a popular DIY project for home theaters. Here’s the basic process:
- Time: 1-2 weekends | Cost: $200 – $600 for a kit.
- Step 1: Get a Kit. Purchase a fiber optic ceiling kit online. It will include an LED illuminator (the light source) and a bundle of fiber optic strands of various diameters.
- Step 2: Prepare the Panel. Use a piece of drywall or black-painted foam board as your ceiling panel. Mark your “star” locations on the back.
- Step 3: Poke and Thread. From the back, poke holes at your marked spots and thread an individual fiber optic strand through each hole, leaving a few inches hanging on the front side. Secure them with a dot of glue on the back. Vary the strand diameters for a more realistic look.
- Step 4: Bundle and Connect. Gather all the strands on the back into the provided connector and attach it to the illuminator.
- Step 5: Install and Trim. Mount the panel to your ceiling. Turn on the illuminator, then use a flush-cut tool to trim the excess fiber optic strands on the front.
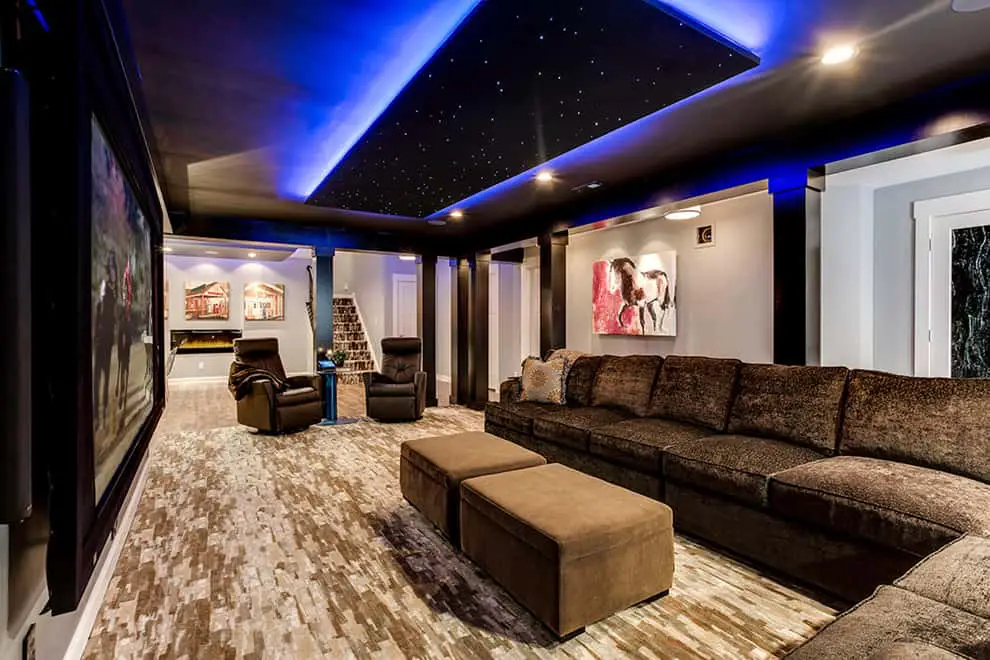
“here is pure, unadulterated drama.”
This isn’t a ceiling treatment; it’s an experience. The starry sky effect completely transforms the room from a simple basement into a personal cinema or a futuristic lounge. The blue LED cove lighting enhances this by creating a colorful, ambient glow that makes the space feel immersive. It’s a design choice that prioritizes mood and atmosphere above all else. It’s not just about lighting the room; it’s about creating an escape.
16. Modern White Basement with Extensive Recessed Lighting
A smooth, flat, white ceiling with ample recessed lighting is the universal donor of basement design—it works almost anywhere. This approach is ideal for basements with standard 7.5 to 8-foot ceilings where preserving every inch of height is crucial. It’s also a perfect canvas for large, open-plan basements with multiple zones, like this one. The uniform ceiling and lighting tie the different areas (bar, lounge) together, creating a cohesive and expansive feel. The lack of texture or beams makes the space feel clean, modern, and uncluttered.
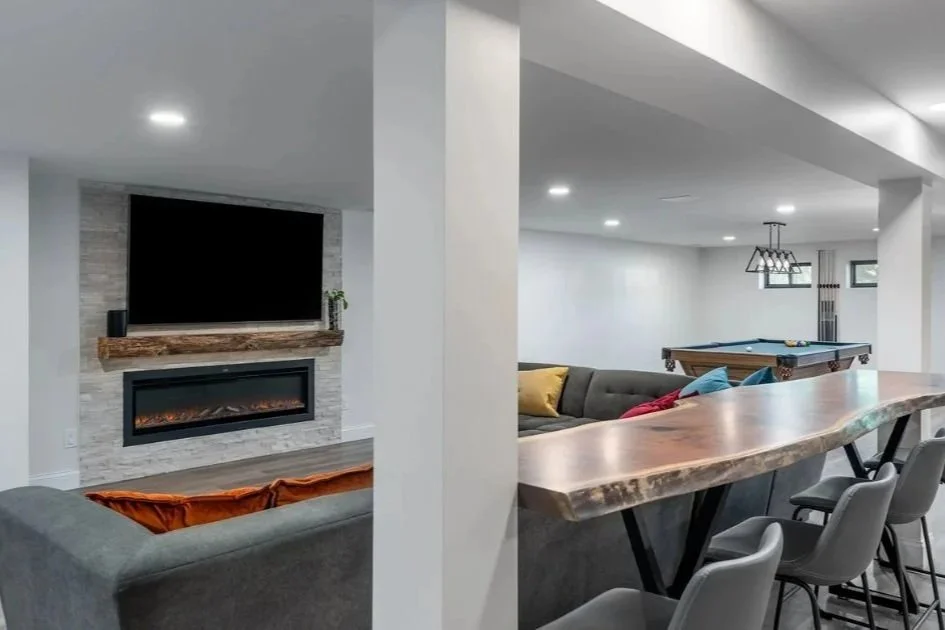
“Here’s the reality of achieving this seamless look: your drywall finish has to be perfect.”
A large, smooth, white ceiling is incredibly unforgiving and will show every wave, bump, and poorly sanded seam, especially under the glare of multiple recessed lights (an effect called “critical lighting”). This is not the place to skimp on your drywall contractor. It’s worth paying for a Level 5 finish, which is the smoothest possible, to ensure your ceiling looks like a single, flawless plane. A cheaper, sloppier job will undermine the entire sleek, modern aesthetic.
17. White Coffered Ceiling with an Orange Accent Wall
A true custom coffered ceiling can be expensive due to the labor-intensive framing and finishing. However, you can achieve a very similar look on a budget. Start with a basic drop ceiling grid system. Instead of standard flat panels, use molded PVC or fiberboard tiles that have a decorative, embossed pattern. These are widely available at home improvement stores for $2-$5 per square foot. Install the grid, pop in the decorative tiles, and you have a textured, dimensional ceiling for a fraction of the cost of custom millwork. Compare this to the high-end version in Idea #14.
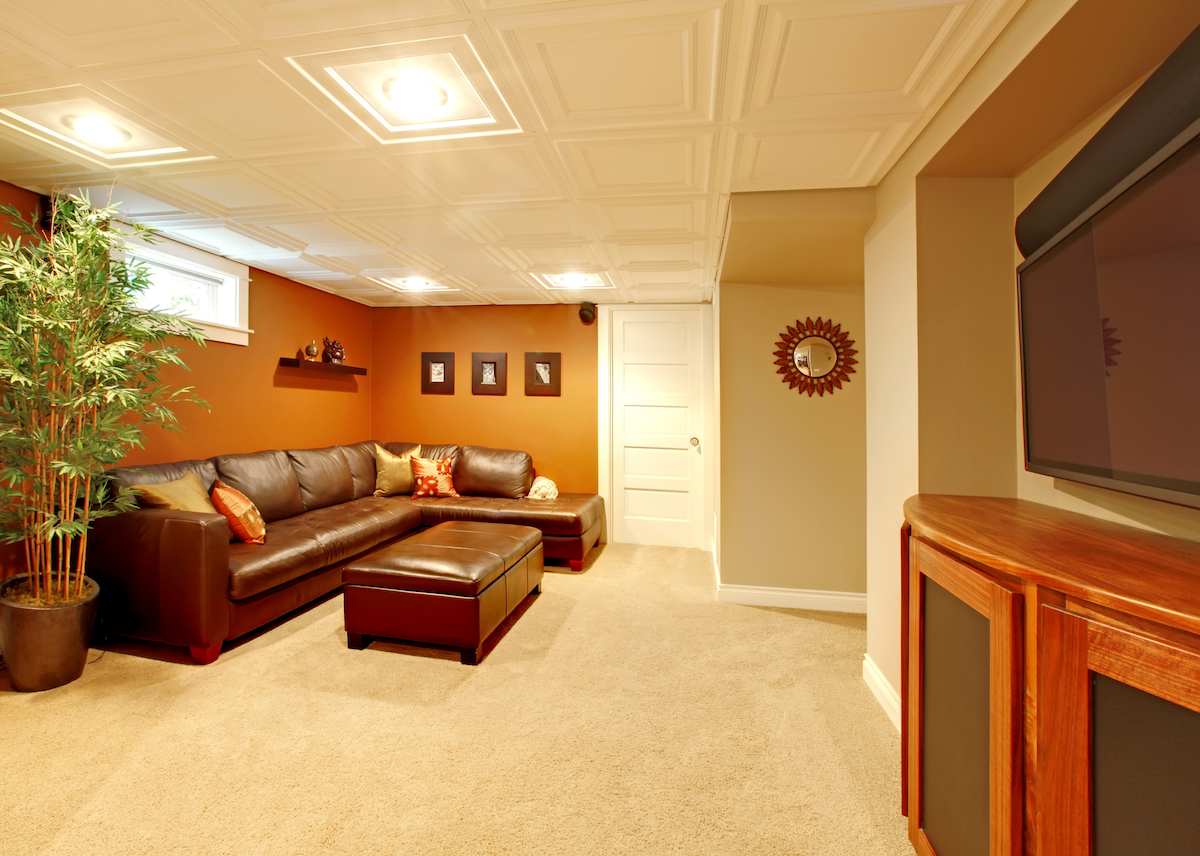
“When you have a strong architectural element like a coffered ceiling, a common mistake is to use light fixtures that are too small.”
The integrated square lights here work because their scale is appropriate for the size of the coffers. If you were adding a central fixture, you would need something substantial. A good rule of thumb: the diameter of a central light fixture (in inches) should be roughly the sum of the room’s length and width (in feet). So for a 12’ x 15’ room, you’d want a fixture around 27 inches in diameter.
18. Textured White Plaster Ceiling with Painted Stone Walls
This design works because it fully embraces texture. Instead of trying to create a perfectly smooth, modern space, the design leans into the inherent roughness of a basement. The textured plaster on the ceiling, the painted stone on the upper walls, and the vertical wainscoting below all contribute to a layered, rustic look. By painting all these different textures white and gray, the potential chaos is unified into a cohesive, industrial-farmhouse aesthetic. The single, simple light fixture doesn’t compete for attention, letting the surfaces be the star.
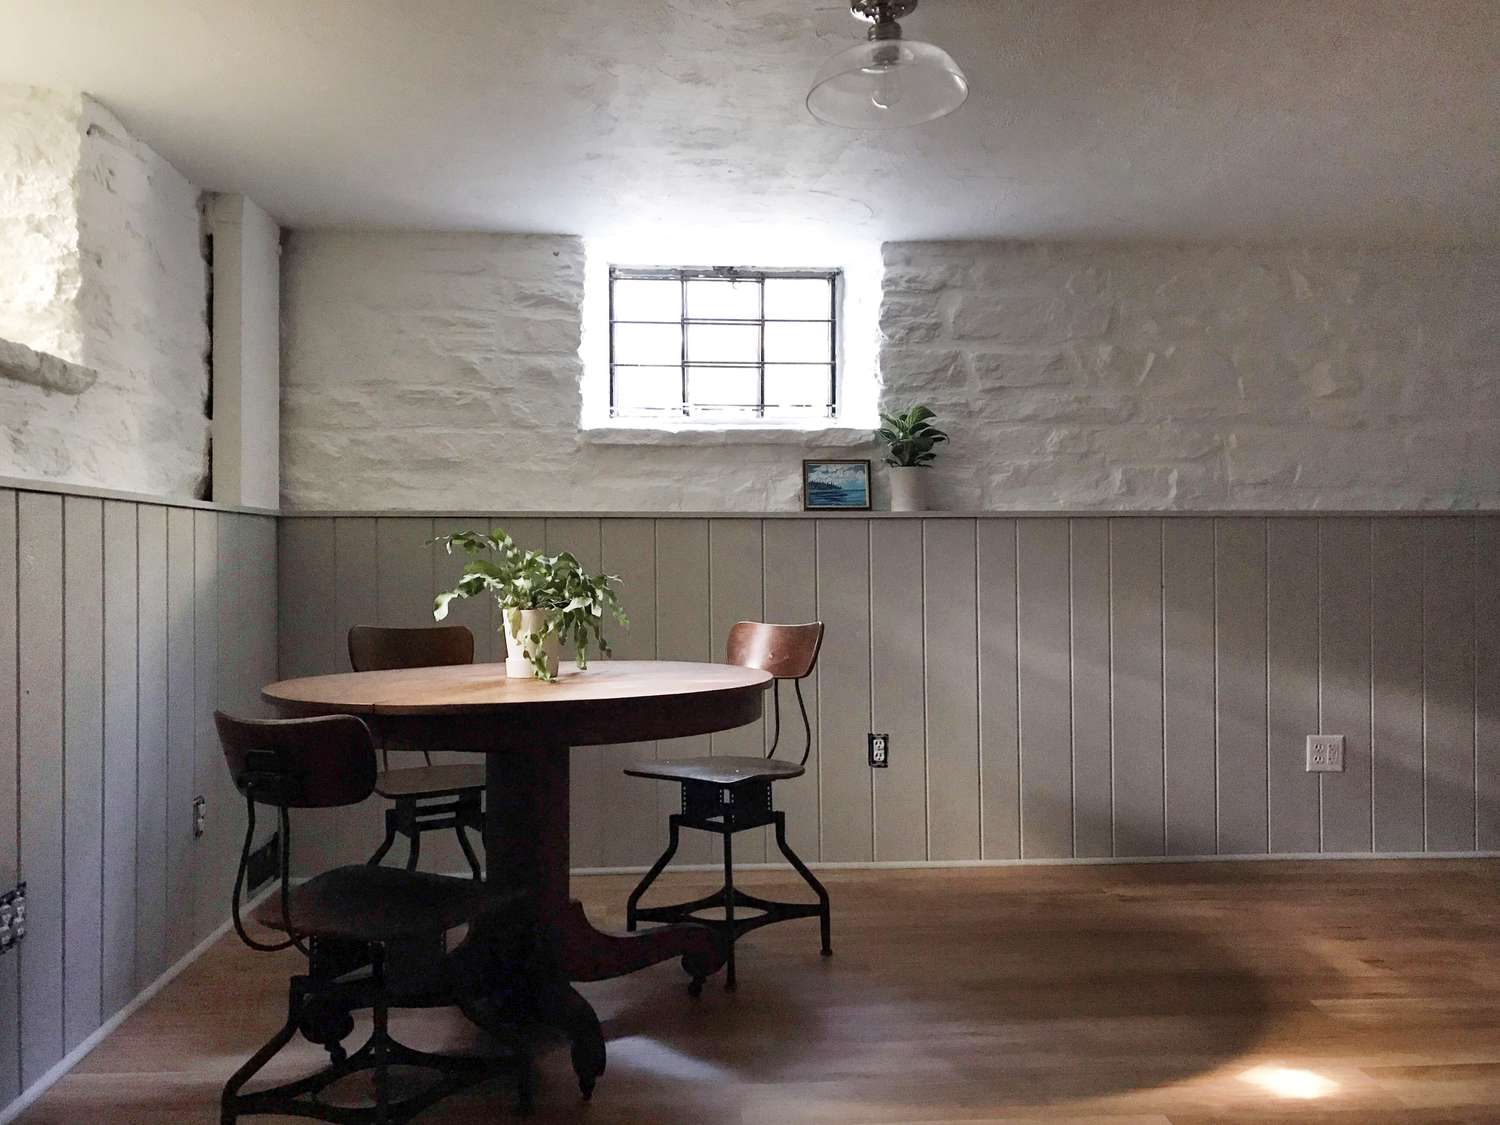
“The style math for this space is all about monochromatic texture: 40% Painted Rough Stone + 30% Textured Plaster Ceiling + 20% Gray Wainscoting + 10% Natural Wood and Black Accents.”
This formula is what gives it that rustic-yet-clean feeling. You could achieve a similar vibe by swapping the stone for painted brick and the plaster for rough-sawn wood planks. As long as you stick to a tight, neutral color palette, you can mix and match textures to create your own unique version of this rustic look.
19. Warm Wood-Paneled Room with Integrated Wood Ceiling
The defining feature here is the complete commitment to the wood. Paneling the walls *and* the ceiling creates a fully enveloped, cozy, cabin-like feel. It’s a bold choice that goes against the common advice to paint basement walls white for brightness. Instead, this room leans into the darkness and warmth of the wood grain, creating an intimate, retro-inspired sanctuary. The varied grain on the ceiling adds a beautiful, organic pattern that serves as the room’s main decoration. It’s a perfect example of how a single material can create a powerful mood.
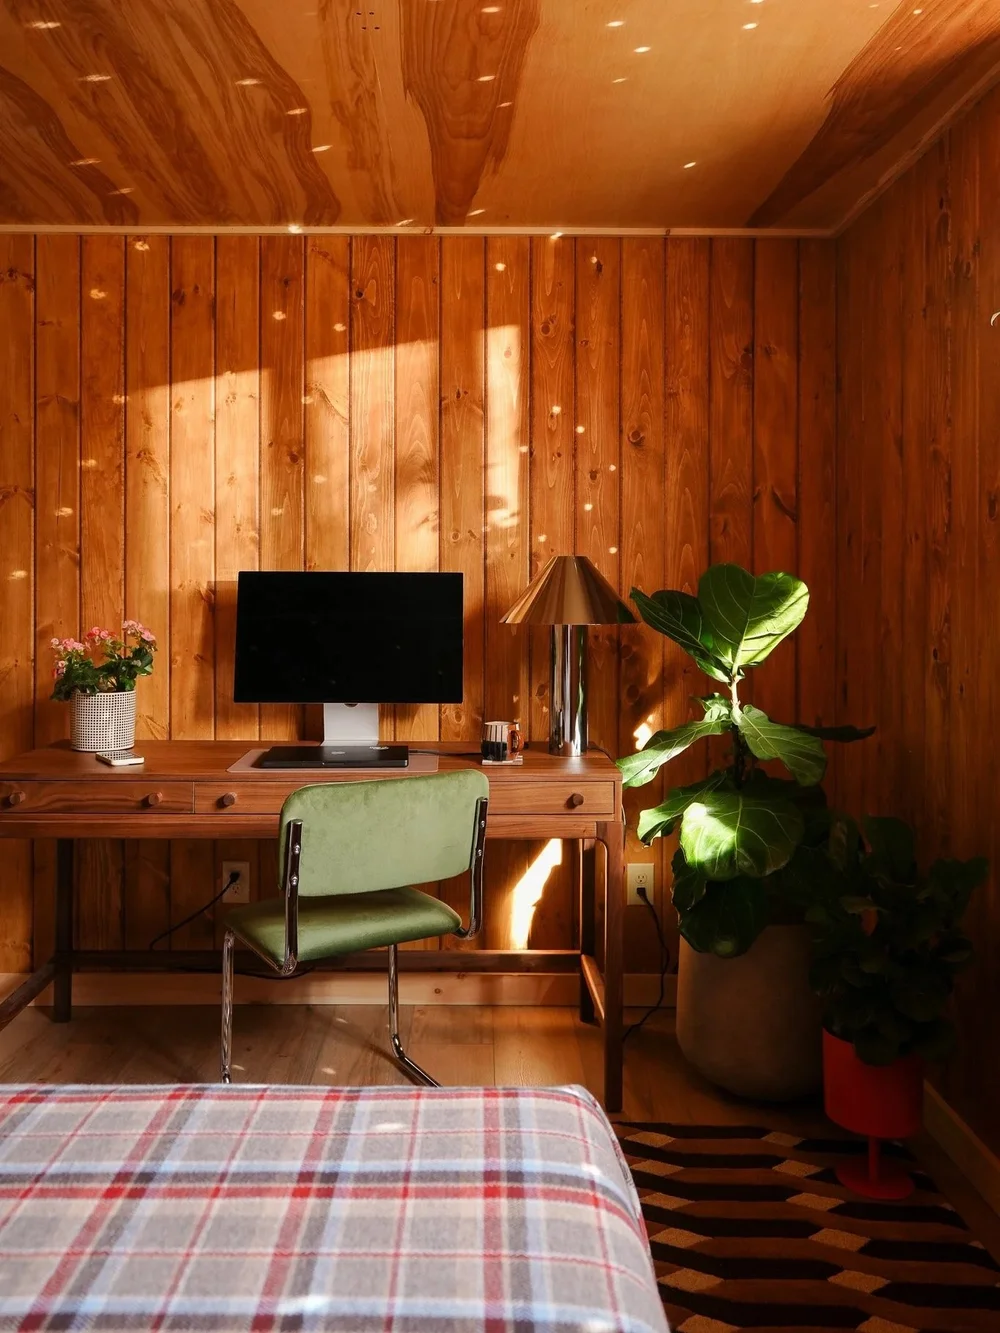
“A full wood-paneled room requires some specific care.”
Wood can expand and contract with changes in humidity, which is a major factor in most basements. It is absolutely critical to run a dehumidifier to keep the moisture levels stable and prevent warping or mold growth. Dusting is also a factor, as the small seams in the paneling can trap dust. A microfiber duster or a vacuum with a soft brush attachment will be your best friend. Periodically, you may want to clean the wood with a product specifically designed for wood paneling to maintain its luster.
20. Home Gym with Bright Yellow Exposed Ceiling Joists
Bold, energetic colors in functional spaces like home gyms and workshops are a huge trend. People are realizing that these utilitarian areas don’t have to be boring. The bright yellow ceiling here is a perfect example of “dopamine decor”—using color to evoke a positive emotional response. It’s playful, and motivating, and turns a mundane workout space into a room with a strong point of view. It reflects a broader shift away from all-gray-everything interiors toward more personal and joyful design choices.
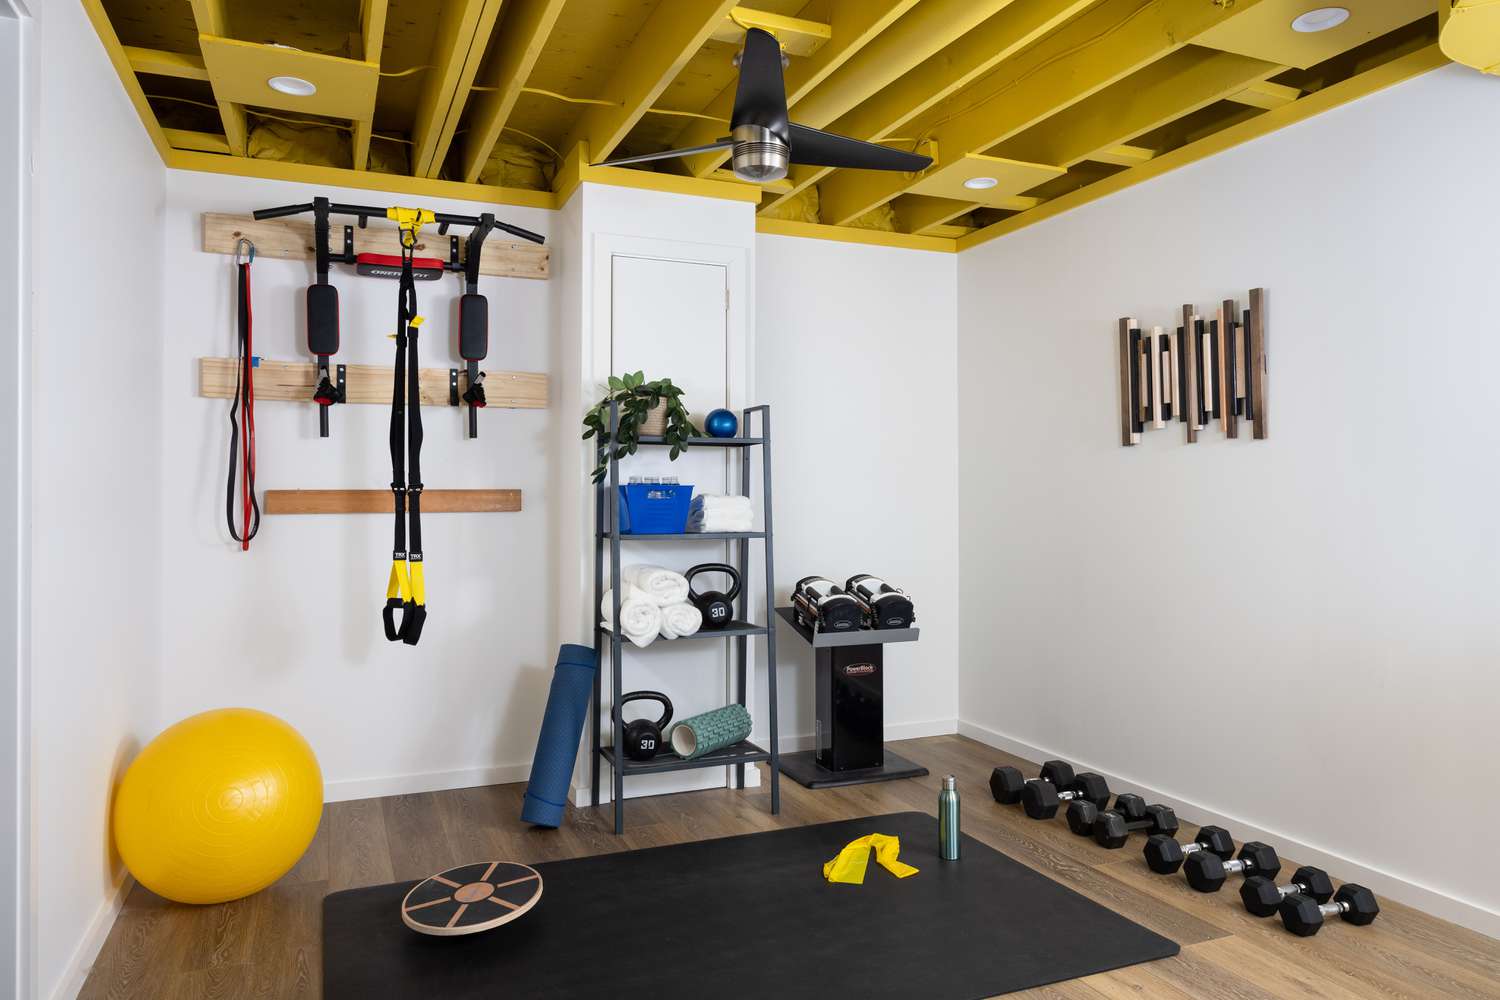
“Thinking of painting your exposed joists a bold color?”
Awesome. But first, do this:
Test the Color: Paint a large poster board with your chosen color and tape it to the ceiling for a few days. A color can look much more intense over a large area, especially in a basement with artificial light. Make sure you love it.
Get the Right Primer: For a vibrant color like yellow to really pop, you need a high-quality primer. A white or light gray primer will provide a neutral base and prevent the raw wood from soaking up your expensive color.
Plan for a Sprayer: As mentioned in Idea #8, a paint sprayer is essential for getting even coverage on all the complex surfaces of an exposed ceiling. Brushing a color this bold will lead to a streaky, unprofessional finish.
21. Simple Off-White Dropped Ceiling with Multiple Light Types
This is a workhorse ceiling solution for basements with non-uniform ceiling heights and scattered plumbing or ductwork. It works best in utilitarian or transition areas like hallways, laundry rooms, or the bottom of the stairs, as seen here. By dropping a section where needed to hide pipes, you can maintain maximum height elsewhere. The clean, off-white paint ties it all together. This approach is perfect for spaces that need to be functional and bright, but where a more complex design like coffered panels would be overkill.
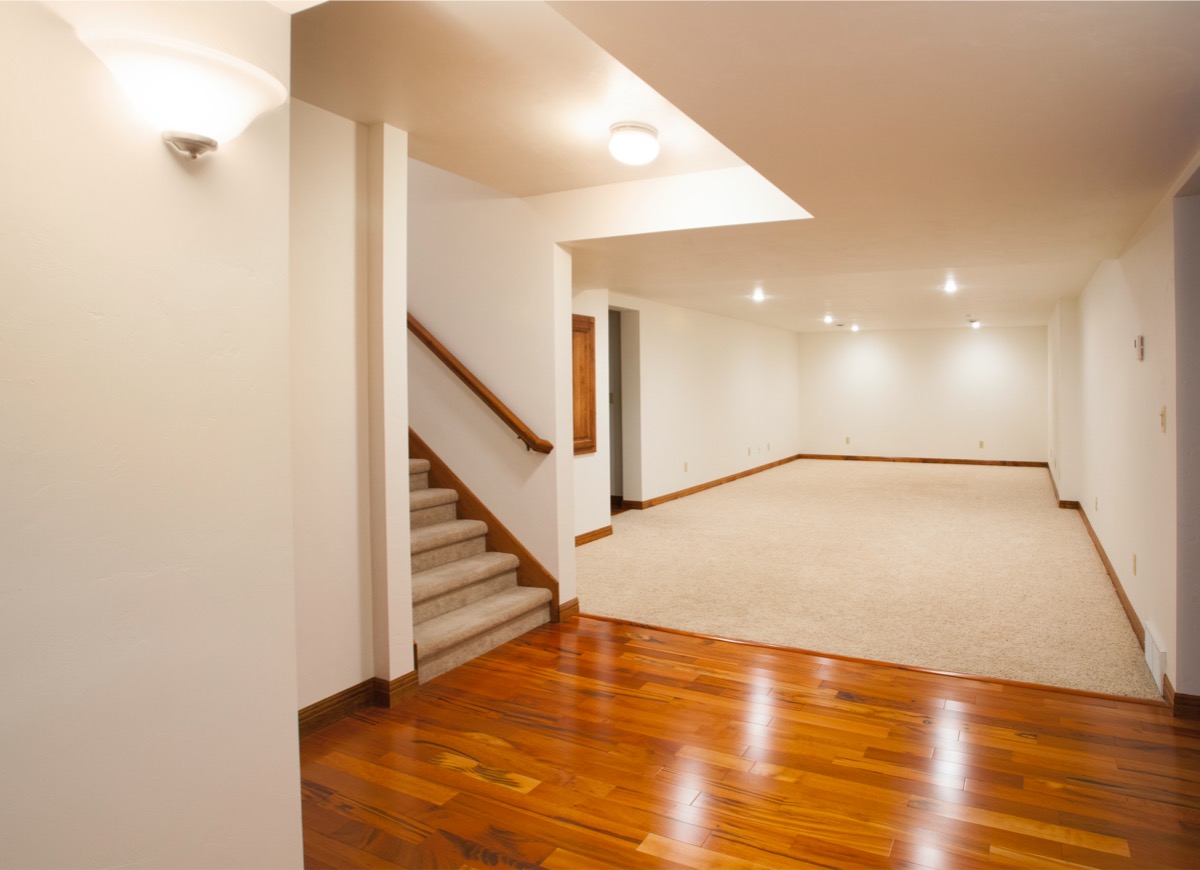
“The term “dropped ceiling” can sometimes bring to mind cheap, water-stained office tiles from the 1980s.”
While you can still get those, a modern dropped ceiling can be much more sophisticated. However, the one non-negotiable is access. Don’t frame and drywall a dropped ceiling section without planning for how you’ll access the pipes and valves hidden inside. Install a discrete access panel near any shut-offs or junctions. They are easy to install, can be painted to match the ceiling, and will save you from having to cut a hole in your beautiful new ceiling when a small plumbing issue arises.
22. Slanted Wood-Paneled Ceiling with Dark Exposed Beams
The combination of light and dark wood is what gives this ceiling its character. The light natural wood paneling keeps the slanted ceiling from feeling heavy or oppressive, reflecting the warm light from the sconce. The dark-stained beams provide strong graphic lines, adding a rustic structure and a touch of drama. This contrast creates visual depth and makes the architecture feel deliberate and custom. It’s a classic pairing that feels cozy, warm, and timeless, perfect for creating a cabin-like retreat in a corner of your basement.
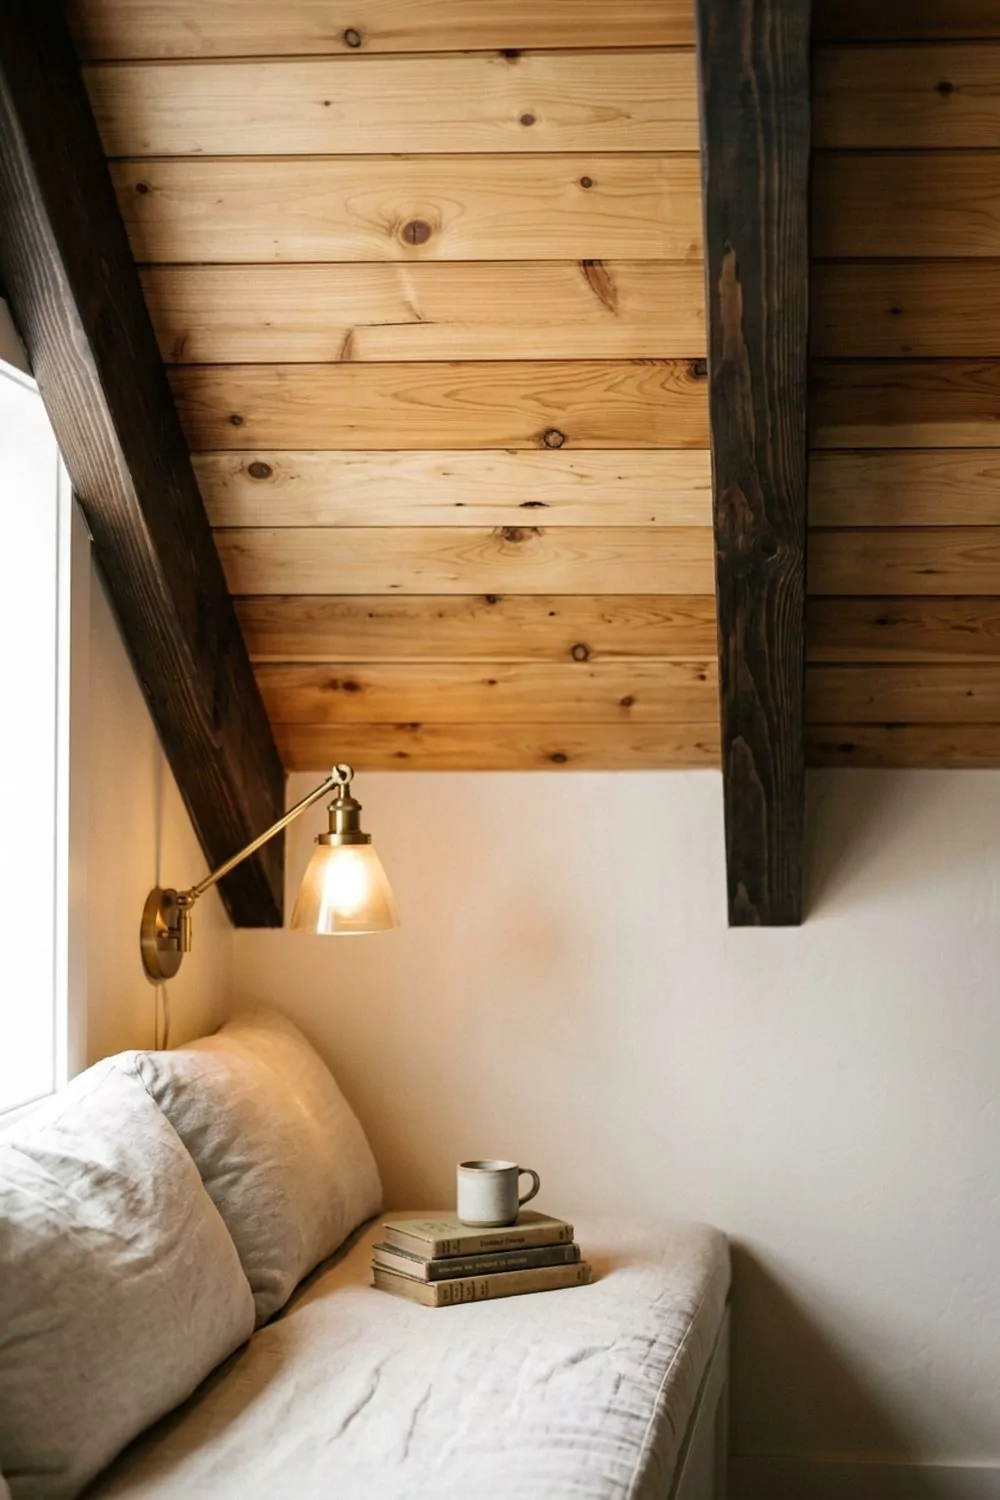
“When working with a slanted ceiling, lighting can be tricky.”
Recessed lights can create awkward shadows, and pendants can hang at odd angles. Wall-mounted sconces, like the brass one shown here, are often the perfect solution. Mount them on the taller walls to cast a warm, ambient glow across the wooden ceiling. This highlights the beautiful texture of the wood and provides comfortable, indirect light for the seating area below without needing to cut into the angled surface.
23. Sleek Black Ribbed Ceiling with a Central Fan
The ceiling is the statement piece that unlocks this entire room’s modern, elegant vibe. The glossy, black, ribbed texture is completely unexpected and incredibly chic. It creates a sense of drama and sophistication. Because the walls are essentially giant windows letting in tons of natural light, the black ceiling doesn’t make the room feel dark; instead, it makes it feel cozy and grounded. It provides a stunning, dark backdrop for the vibrant orange chairs and lush green plants to pop against.
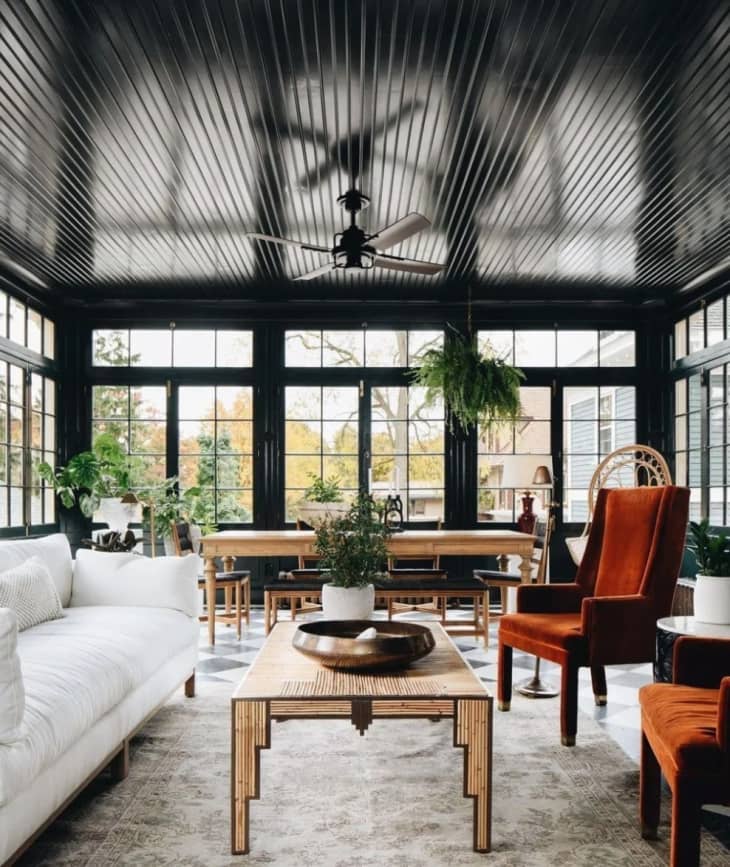
“This room is a masterclass in balancing contrasts.”
The style math is roughly: 50% Black Accents (ceiling, window frames, fan) + 30% Bright Neutrals (white sofa, light rug) + 20% Bold Color & Natural Elements (orange chairs, green plants, wood table). The black provides the sophisticated structure, the white keeps it from feeling gloomy, and the color and plant life make it feel vibrant and lived-in. You could swap the orange for a deep blue or emerald green and achieve the same dynamic balance.
24. Rustic Exposed Wood Beam Ceiling with a Modern Chandelier
Achieving this authentic rustic-modern look involves some substantial investment pieces, especially the structural and lighting elements.
- Exposed Wood Beams & Planks (materials & labor): $4,000 – $9,000
- Modern Multi-Arm Chandelier: $500 – $1,500
- Pool Table: $2,000 – $5,000+
- Dark Stained Wood Flooring: $3,000 – $7,000 (for a 300 sq ft room)
- ESTIMATED TOTAL: $9,500 – $22,500
- Budget alternative: Use faux wood beams ($100-$300 each), LVP flooring ($3-$5/sq ft), and look for a similar style chandelier on Wayfair or Overstock for under $300. You can achieve a similar vibe for 60-70% less.
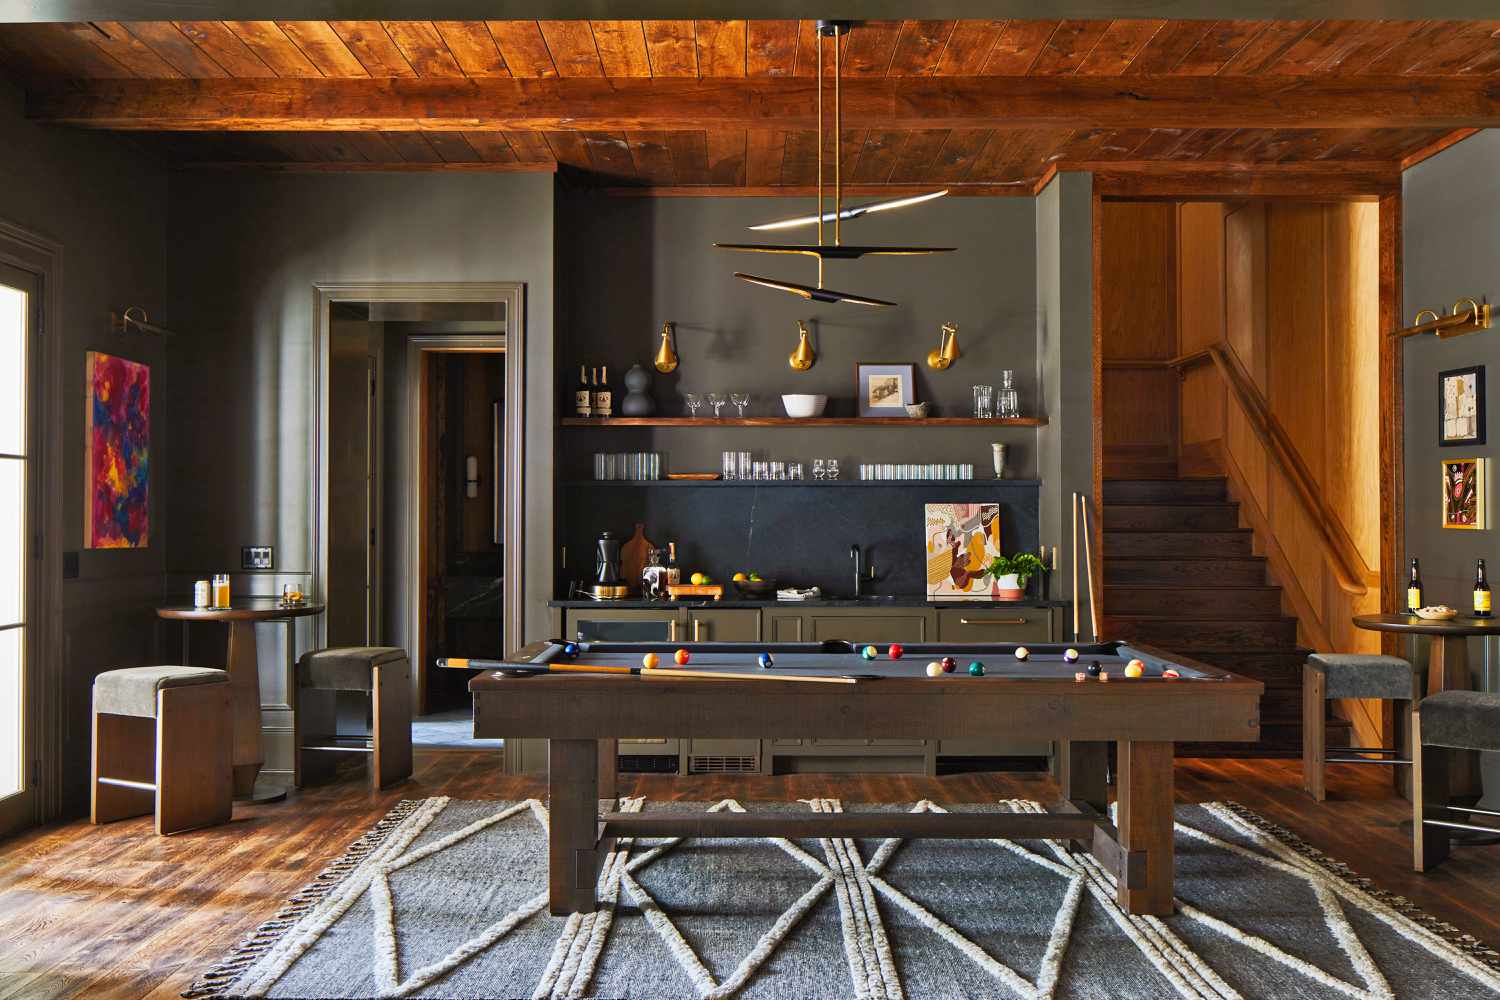
“Can’t afford solid wood beams?”
You’re in luck. The market for high-quality faux wood beams has exploded. You can find lightweight polyurethane beams that are molded from real wood, capturing the texture and grain with incredible realism. They are available at most big-box home improvement stores for a fraction of the cost of real wood. They are also much, much easier to install, as they can be lifted by one person and are simply screwed into blocking on the ceiling. This is the single best way to get this look for less.
25. Exposed Black-Stained Ceiling with Track Lighting
Want to recreate this black-stained ceiling? It’s a great way to get an industrial look while still showing wood grain. Here’s how:
- Time: 1-2 days | Cost: $100-$200 for stain and supplies.
- Step 1: Clean and Sand. Thoroughly clean the joists and sheathing to remove all dust and grime. Lightly sand any rough spots to prevent splinters and ensure the stain absorbs evenly.
- Step 2: Choose Your Stain. Select a solid or semi-solid black wood stain. Solid stain will look more like paint but still allows some texture through; semi-solid will show more wood grain.
- Step 3: Apply a Test Patch. Apply the stain to a hidden area to make sure you like the color and opacity.
- Step 4: Stain Everything. Using a brush or rag, apply the stain to all visible wood surfaces. Unlike paint, a sprayer is not ideal for stain as it needs to be worked into the wood. Wear gloves and eye protection!
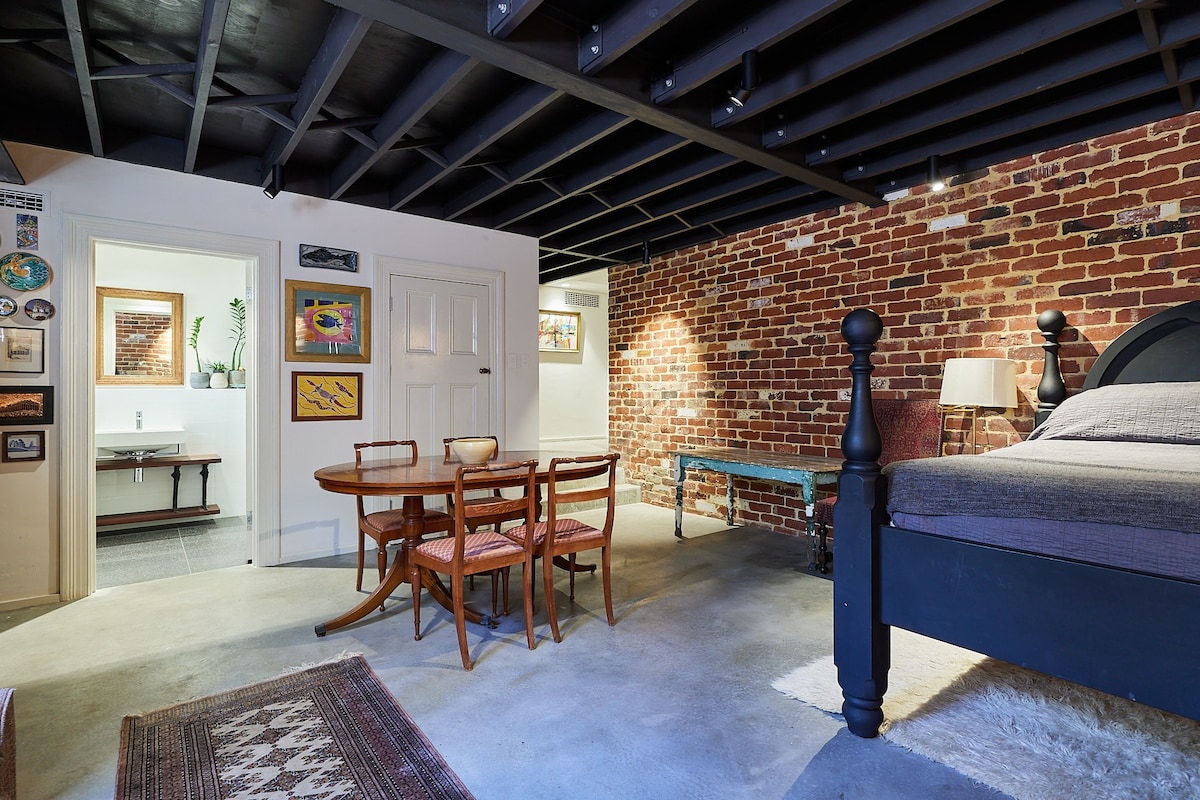
“Painting an exposed ceiling black is a powerful design move that can make a low ceiling feel infinitely high.”
However, it requires a serious commitment to your lighting plan. A black ceiling will absorb a massive amount of light. You absolutely cannot get away with a single central fixture. A system of track lighting, as seen here, is a perfect solution. It allows you to aim multiple, powerful beams of light exactly where you need them: on walls to highlight art, on task areas like a desk, and as general downlighting to keep the space from feeling like a cave.
26. Dark-Walled Home Theater with White Built-in Shelving
In a home theater, the goal is to minimize light reflection for the best viewing experience. That’s why dark walls and ceilings are the standard. A common mistake is to choose a pure matte black paint, which can feel flat and lifeless. Instead, opt for a very dark gray, navy, or charcoal with a flat or eggshell finish. These colors will absorb light effectively during movie time but will have more depth and richness than pure black when the lights are on. The dark gray used here is a perfect example.
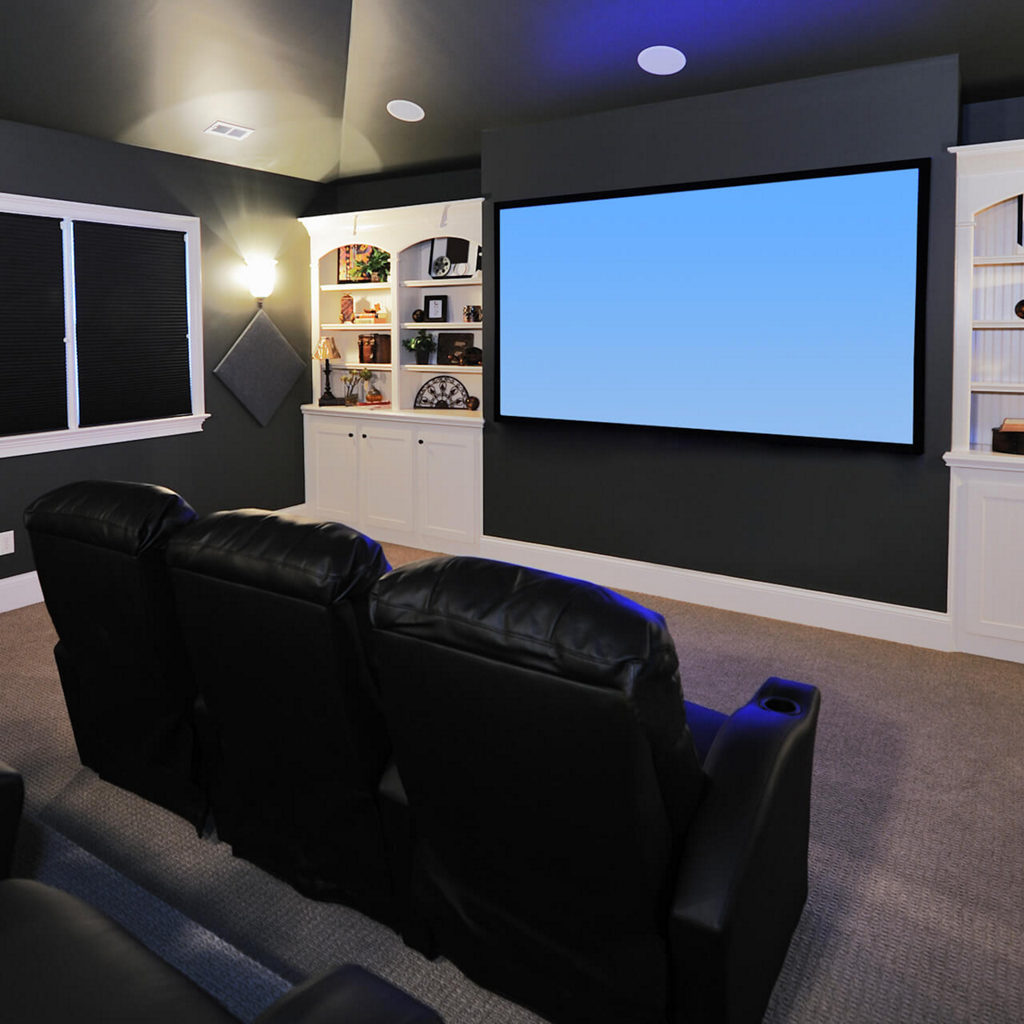
“A dedicated home theater room like this one works best in a space that allows for proper viewing distances.”
For a 100-120 inch screen, you’ll want your primary seating row to be about 10-14 feet away from the screen. This means the room itself should be at least 15 feet long to accommodate the chairs and some walkway. For ceiling height, standard 7.5 or 8-foot ceilings are perfectly fine. The key is controlling light and sound, which the dark paint and carpeting here do effectively.
27. Cozy Basement with Rustic Exposed Wood Beam Ceiling
This ceiling treatment is a masterclass in creating a cozy, cabin-like atmosphere through texture and warmth. The heavy, rough-hewn wood beams provide a sense of history and stability, while the lighter wood planks between them keep the look from becoming too dark. This combination of natural materials overhead, paired with the stone fireplace, immediately makes the space feel warm, rustic, and inviting. The recessed lights are a modern touch, but they are subtle enough not to break the rustic spell.
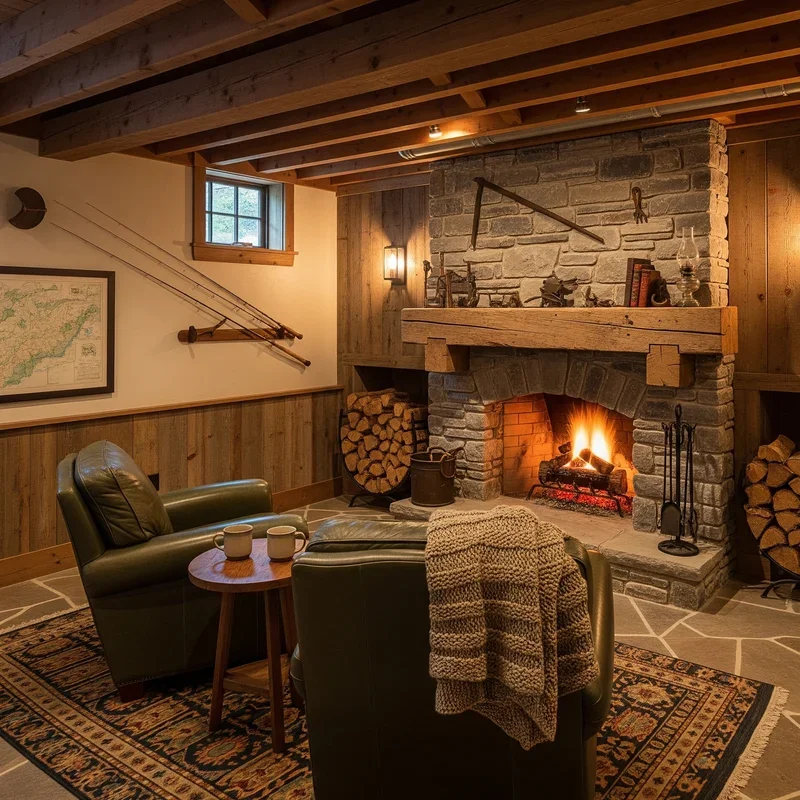
“The single most important element creating the rustic charm here is the texture of the wood.”
These aren’t smooth, polished beams; they are rough-hewn, showing the marks of the saw and the natural imperfections of the wood. This authenticity is what sells the entire look. If these beams were perfectly sanded and varnished, the room would feel more like a traditional library. The ruggedness of the wood is what transports you to a cozy mountain lodge, even if you’re just in the basement.
28. Faux Wood Beams with Recessed and Edison Bulb Lighting
This look is the poster child for achieving a rustic vibe without the expense or engineering of solid wood beams. High-quality faux wood beams, made from lightweight polyurethane, are incredibly realistic and can be installed on any drywall ceiling. You can buy them from stores like Home Depot or online retailers for $100-$300 per beam, depending on the size. Paired with inexpensive recessed LED lights and some trendy Edison bulb sconces from Amazon, you can replicate this entire rustic-industrial aesthetic for under $1,000.
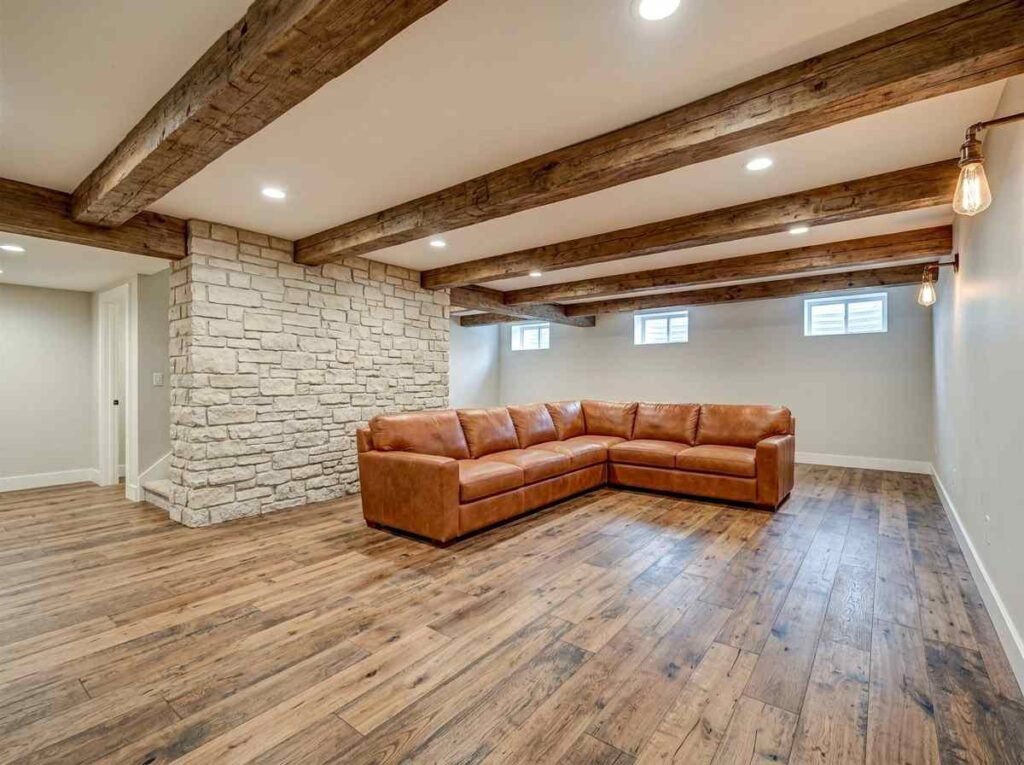
“Ready to install faux beams?”
Run through this checklist first to save yourself a headache:
Measure Twice, Order Once: Carefully measure your ceiling and plan your beam spacing. Beams are often sold in fixed lengths, so plan your cuts and layout to minimize waste. Do you want three heavy beams or five thinner ones?
Locate Your Joists: Faux beams need to be screwed into solid blocking or ceiling joists. Use a stud finder to map out your joists and plan your beam placement accordingly.
Plan Your Lighting First: If you’re adding recessed lights between the beams, you need to install them *before* the beams go up. Cutting holes for lights after the beams are in place is a nightmare.
29. Rustic Basement with Exposed Beams and Dark Joists
The visual formula here is a careful balance of rustic and refined. It’s about 50% Raw & Rustic (the large, rough-hewn wood beams, the stone fireplace) + 40% Traditional Comfort (the plush sectional sofa, the wood bar) + 10% Modern Polish (the dark painted joists and clean recessed lighting). The dark paint on the joists is the key modern element. It cleans up the visual “noise” between the main beams, making the ceiling feel more structured and less like a chaotic, unfinished attic.
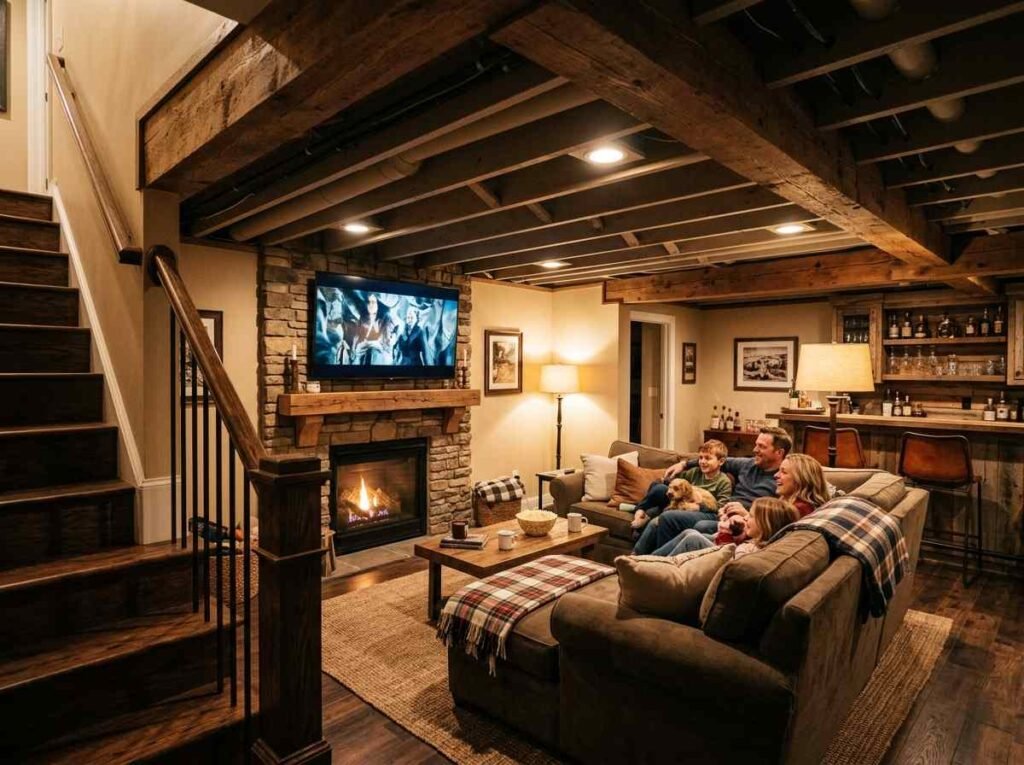
“Much like the other exposed ceilings we’ve looked at, this style will require regular dusting.”
The large, rough beams have a lot of surface area for dust and cobwebs to accumulate. What’s different here is the mix of finishes. You’ll need a different approach for the raw, rustic beams than for the painted joists. A soft brush attachment on a vacuum is best for the rough beams to avoid snagging, while a long-handled electrostatic duster will work well on the smoother, painted joists between them.
30. White Recessed Panel Ceiling with Muted Green Walls
Drop ceilings are fantastic for providing access to plumbing and wiring, but the standard metal grid can look a bit… corporate. The designer trick here is to use a grid cover system. These are thin PVC strips that snap directly over the existing metal grid, completely concealing it. They come in a variety of colors and profiles, allowing you to create a more custom, coffered look without replacing the entire system. It’s an inexpensive upgrade that makes a huge difference in making a standard drop ceiling feel more residential and intentional.
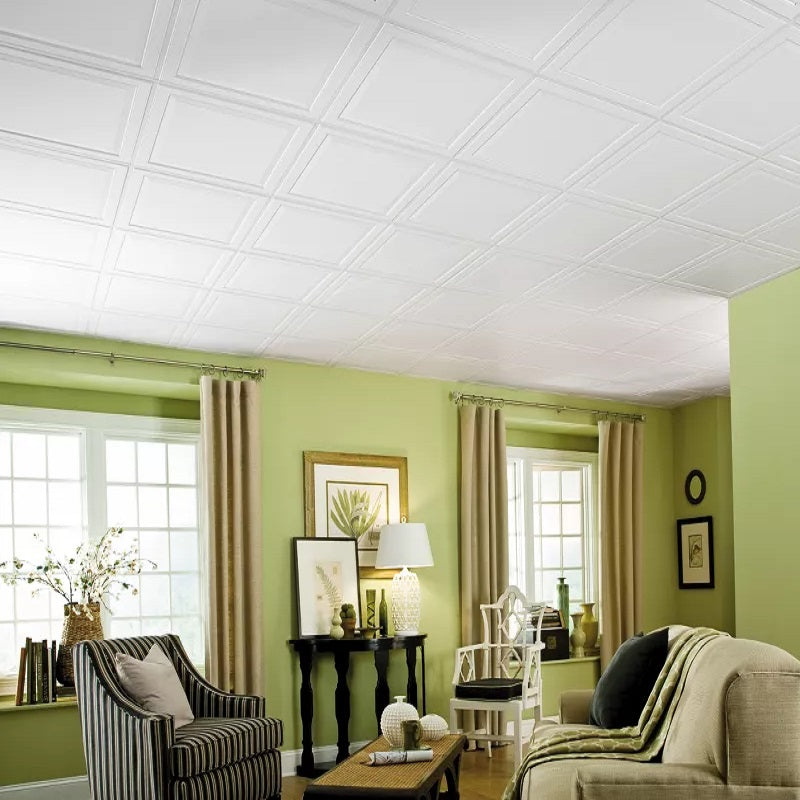
“Updating existing drop ceiling tiles with paint is a fast, affordable DIY project.”
Here’s a quick guide:
Time: 4-6 hours for a standard room | Cost: $50 – $100.
Step 1: Prep. Remove the tiles from the grid and lay them on a drop cloth. Wear gloves and a mask, as old tiles can be dusty. Clean them with a soft brush or vacuum.
Step 2: Prime. This is the most important step! Use a stain-blocking primer (like Zinsser) to prevent any old water stains or discoloration from bleeding through the new paint.
Step 3: Paint. Once the primer is dry, apply two coats of a good quality latex ceiling paint. A roller works well for flat tiles; you may need a brush for recessed panels.
Step 4: Reinstall. Let the tiles dry completely (at least 24 hours) before carefully placing them back in the grid.
Your Basement’s Next Level Starts Here
That awkward, unfinished basement doesn’t have to stay that way. As these 30 real homes show, the right ceiling is the key to unlocking the space’s potential, turning it from a storage area into a favorite room. Whether you go for rustic beams, a sleek black finish, or a smart budget solution, a thoughtful ceiling makes all the difference.
Feeling inspired? Pick your favorite look, save it to your Pinterest board, and start planning. Your basement’s glow-up is closer than you think.
