Still scrolling through endless Patio And Garden Pattern Decor Ideas photos without knowing where to start? It’s a common rabbit hole. You save dozens of beautiful backyards, but figuring out which patterns and materials will actually work for your space (and your budget) feels impossible. That’s where we come in. We spent serious time browsing Target, IKEA, and Walmart to bring you only what’s worth your attention this year. After filtering through hundreds of options, we narrowed it down to 31 ideas that actually deliver. We’re talking modern, natural, rustic, and cozy styles for every type of outdoor space. In 2026, it’s all about creating a true outdoor room, not just a place to put a grill. It’s an extension of your home’s style, and these ideas show you how to get it right. And stay until the end — we break down the most common mistakes that can ruin these looks.
📌 Save this to Pinterest for later — you’ll want to revisit these ideas.
1. Interlocking Pavers with Curved Paths and a Stone Retaining Wall
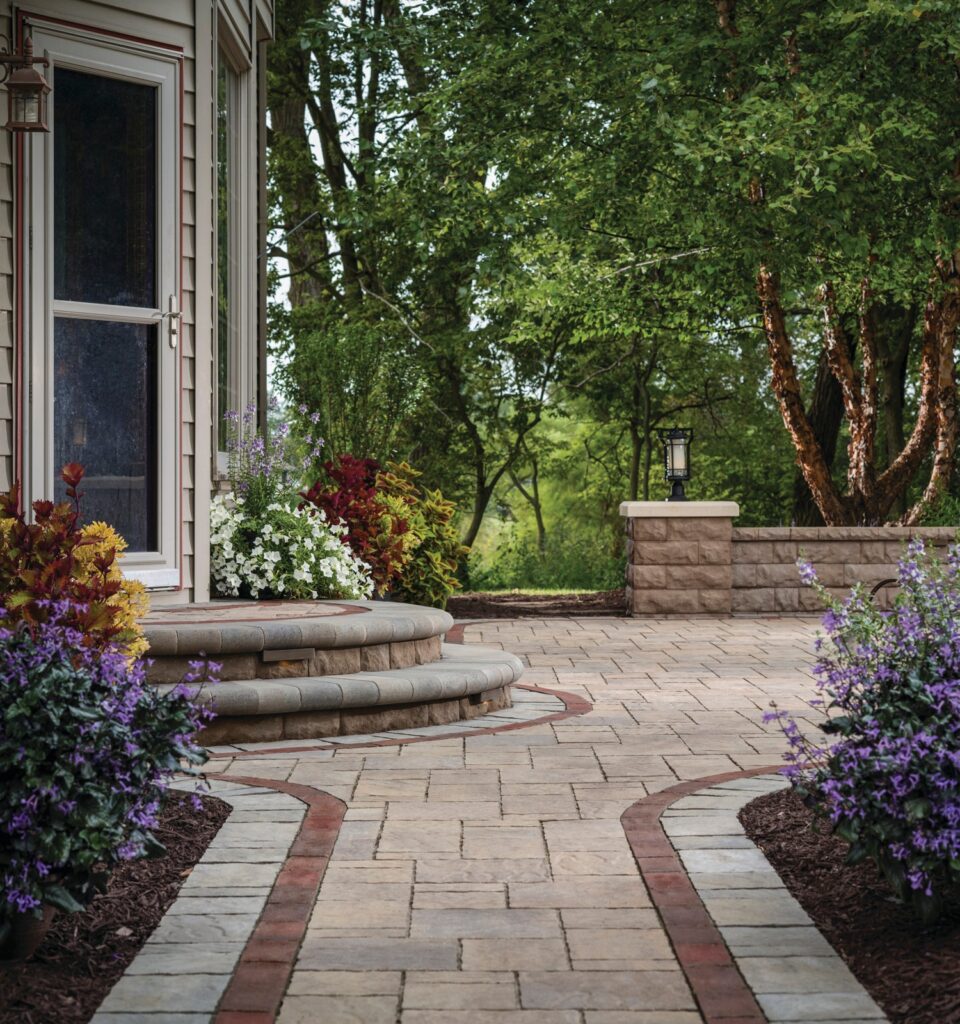
The magic here is in the curves. Hardscaping with pavers and stone can sometimes feel rigid, but the winding pathways, edged in a contrasting reddish-brown paver, create a gentle, organic flow. This design cleverly guides the eye (and foot) through the space, making the journey part of the experience. The low, segmental retaining wall isn’t just for holding back soil; it adds texture, dimension, and vertical interest, providing a perfect backdrop for the colorful perennial plantings. It’s a masterclass in balancing structured materials with the softness of nature.
“Keeping this look pristine requires a bit of seasonal attention.”
The interlocking pavers are durable, but be prepared for the possibility of weeds popping up in the joints. A yearly application of polymeric sand can lock the pavers together and keep weeds at bay. For the stone retaining wall, a simple scrub with a stiff brush and water is usually enough to remove any moss or algae that might build up in shaded areas. Inspect the wall annually for any shifting stones, especially after freeze-thaw cycles, to ensure it remains stable and secure for years to come.
2. A Modern Pergola Casting Strong Shadows on a Gravel Path
When designing a pergola for shade, the spacing of the top slats is everything. For this dramatic shadow effect, the slats should be spaced closer together than the width of the slats themselves. A good rule of thumb is a 1:1 or 1:1.5 ratio. For example, if your slats are 5.5 inches wide (a standard 1×6 board), spacing them 5.5 inches apart will give you equal parts sun and shade at high noon. To get deeper, more defined shadows like the ones shown here, you might tighten that spacing to 3-4 inches. Always consider the primary angle of the sun in your yard when orienting the slats.
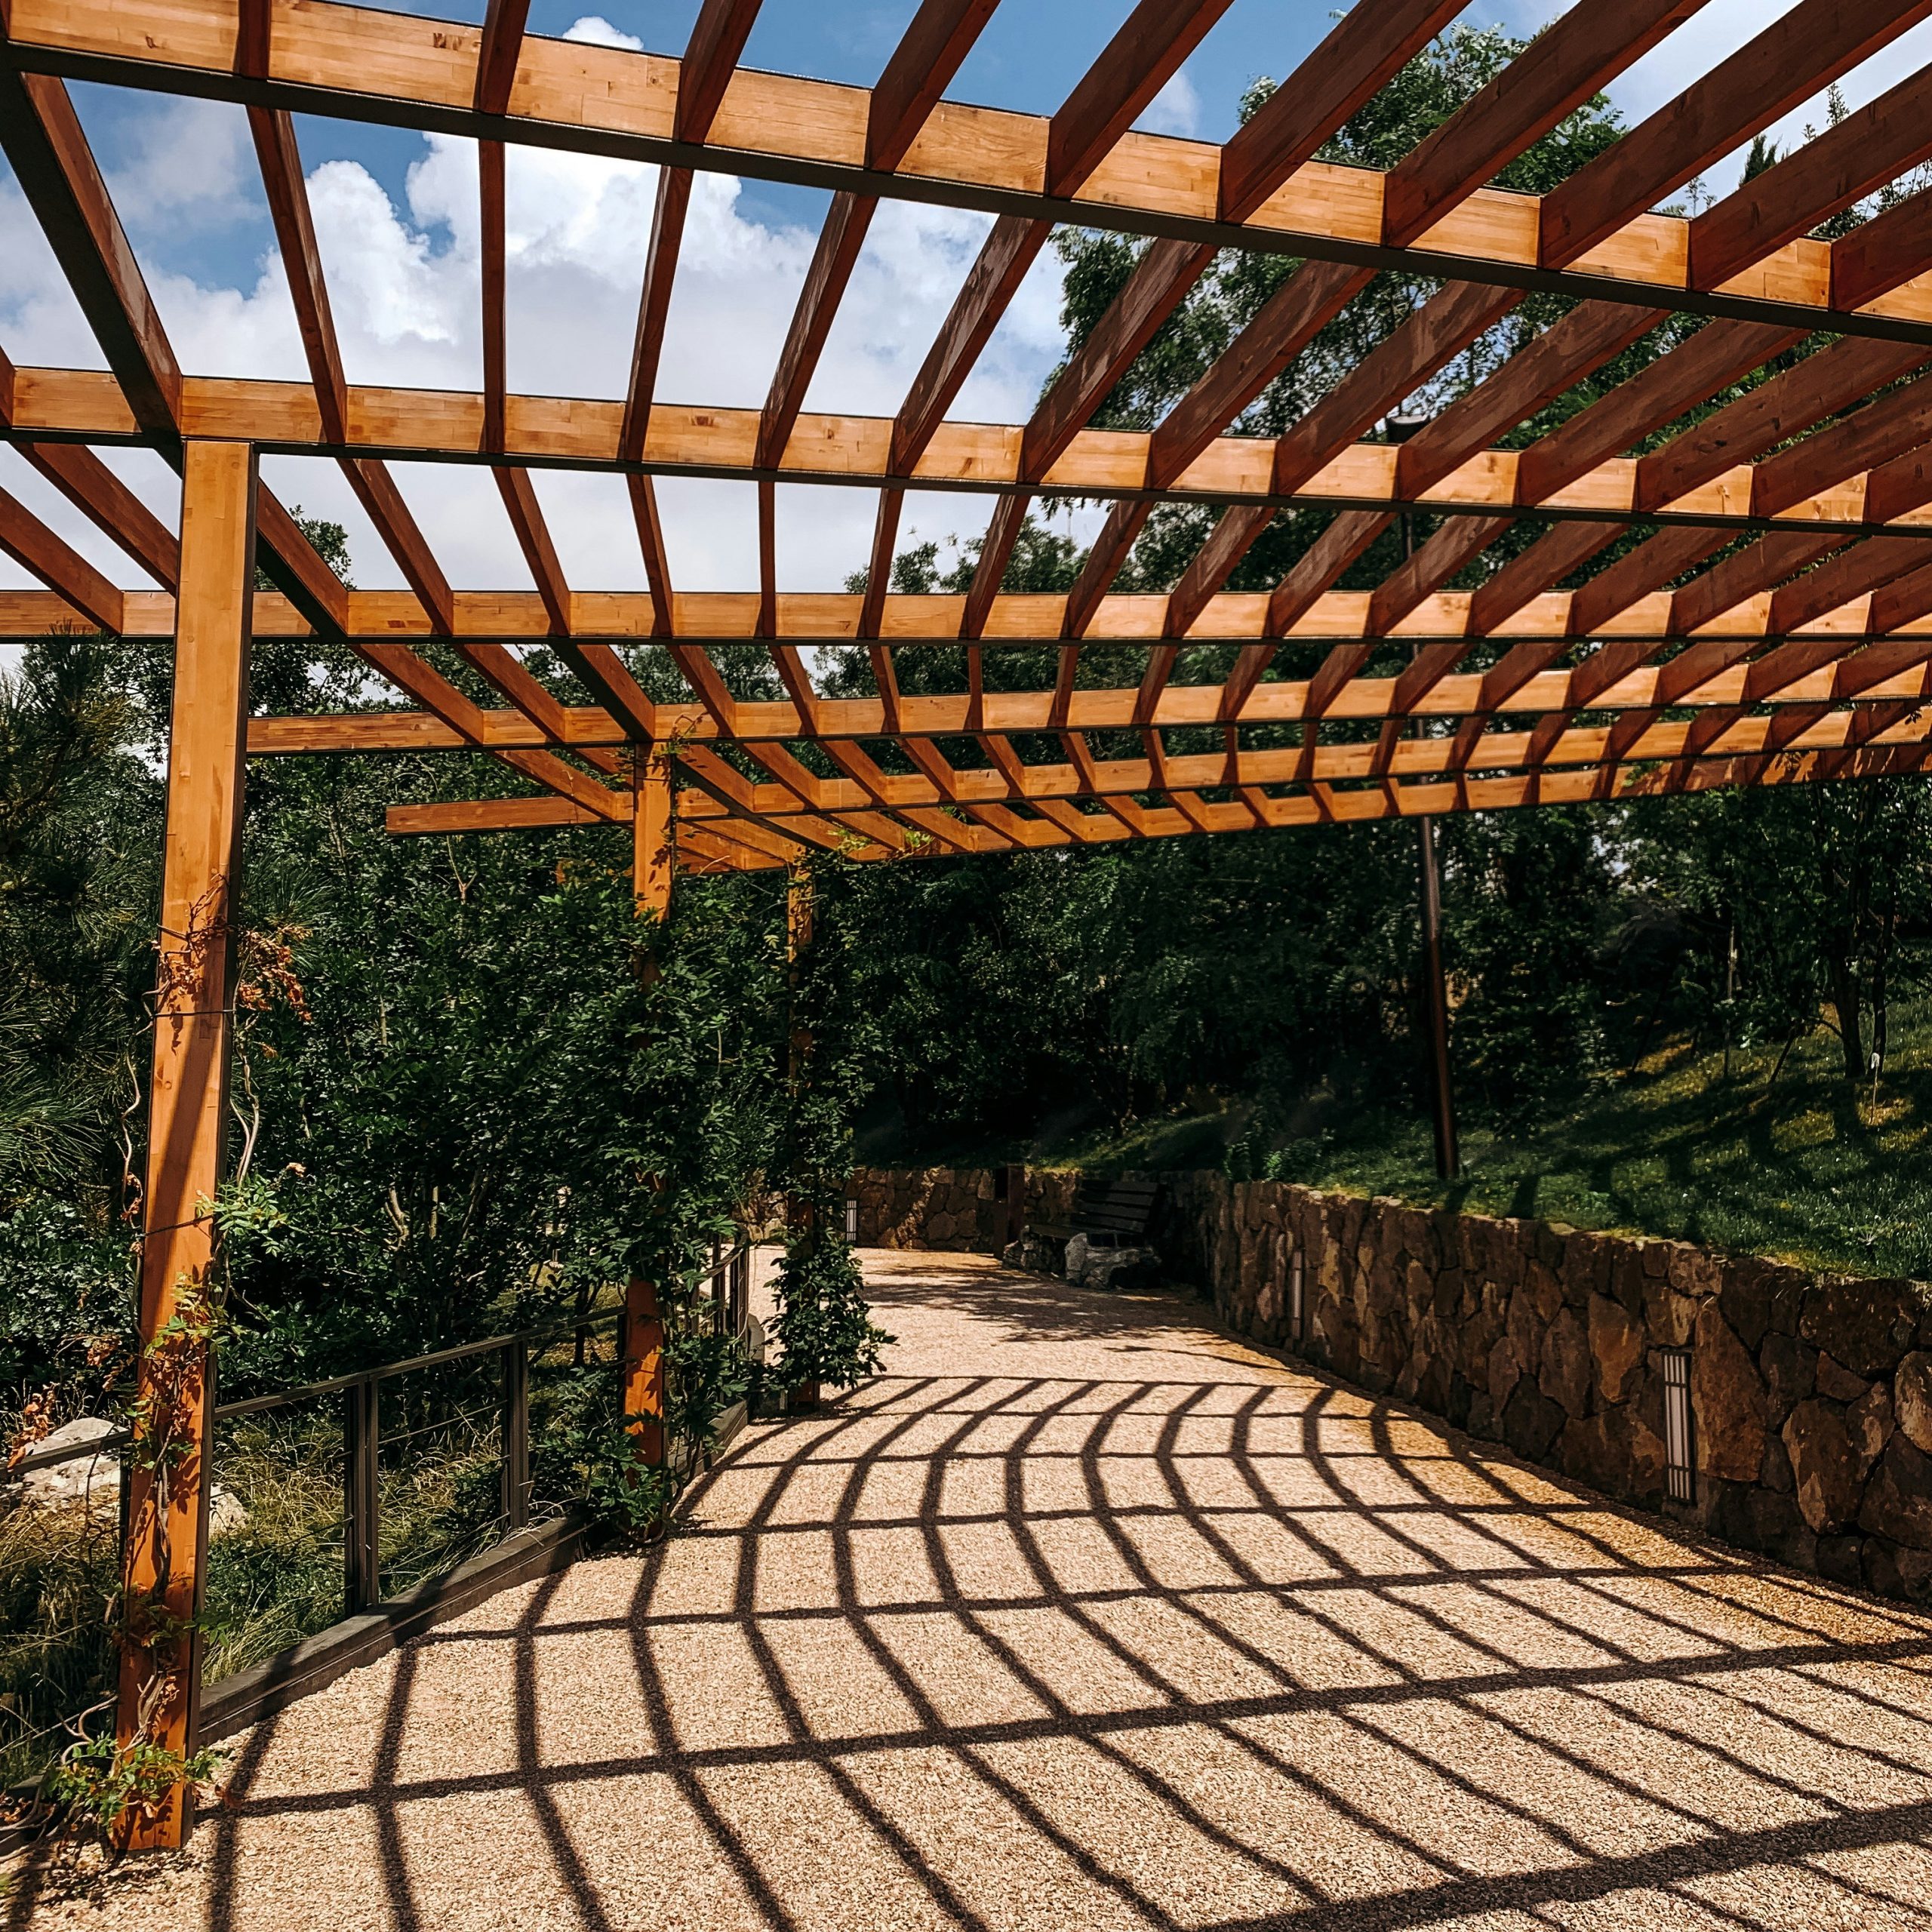
“The single element that makes this design so powerful is the pattern of light and shadow itself.”
Without the pergola, it’s just a simple gravel path next to a stone wall. Functional, yes, but not compelling. The pergola transforms the ground into a dynamic canvas, painting it with bold, repeating rectangles of light. This pattern adds a layer of architectural interest and a sense of movement to an otherwise static scene. It proves that you don’t always need more *things* to make a space beautiful; sometimes, you just need to manipulate the light you already have.
3. A Winding Gravel Path Through a Lush Cottage Garden
The visual formula for this charming cottage look is all about texture and managed wildness. Think of it as 60% lush, varied green foliage + 30% hardscape texture + 10% color pops. The key is the variety within the greenery—mix fine ornamental grasses with broad-leafed shrubs and everything in between. The hardscape combines the crunchy, light grey gravel path with the rugged, darker stacked stone walls. The final 10% comes from surprising pops of color, like the red-leafed plants, which draw the eye and add vibrancy. You could swap the red for deep purples or bright yellows and the formula would still hold.
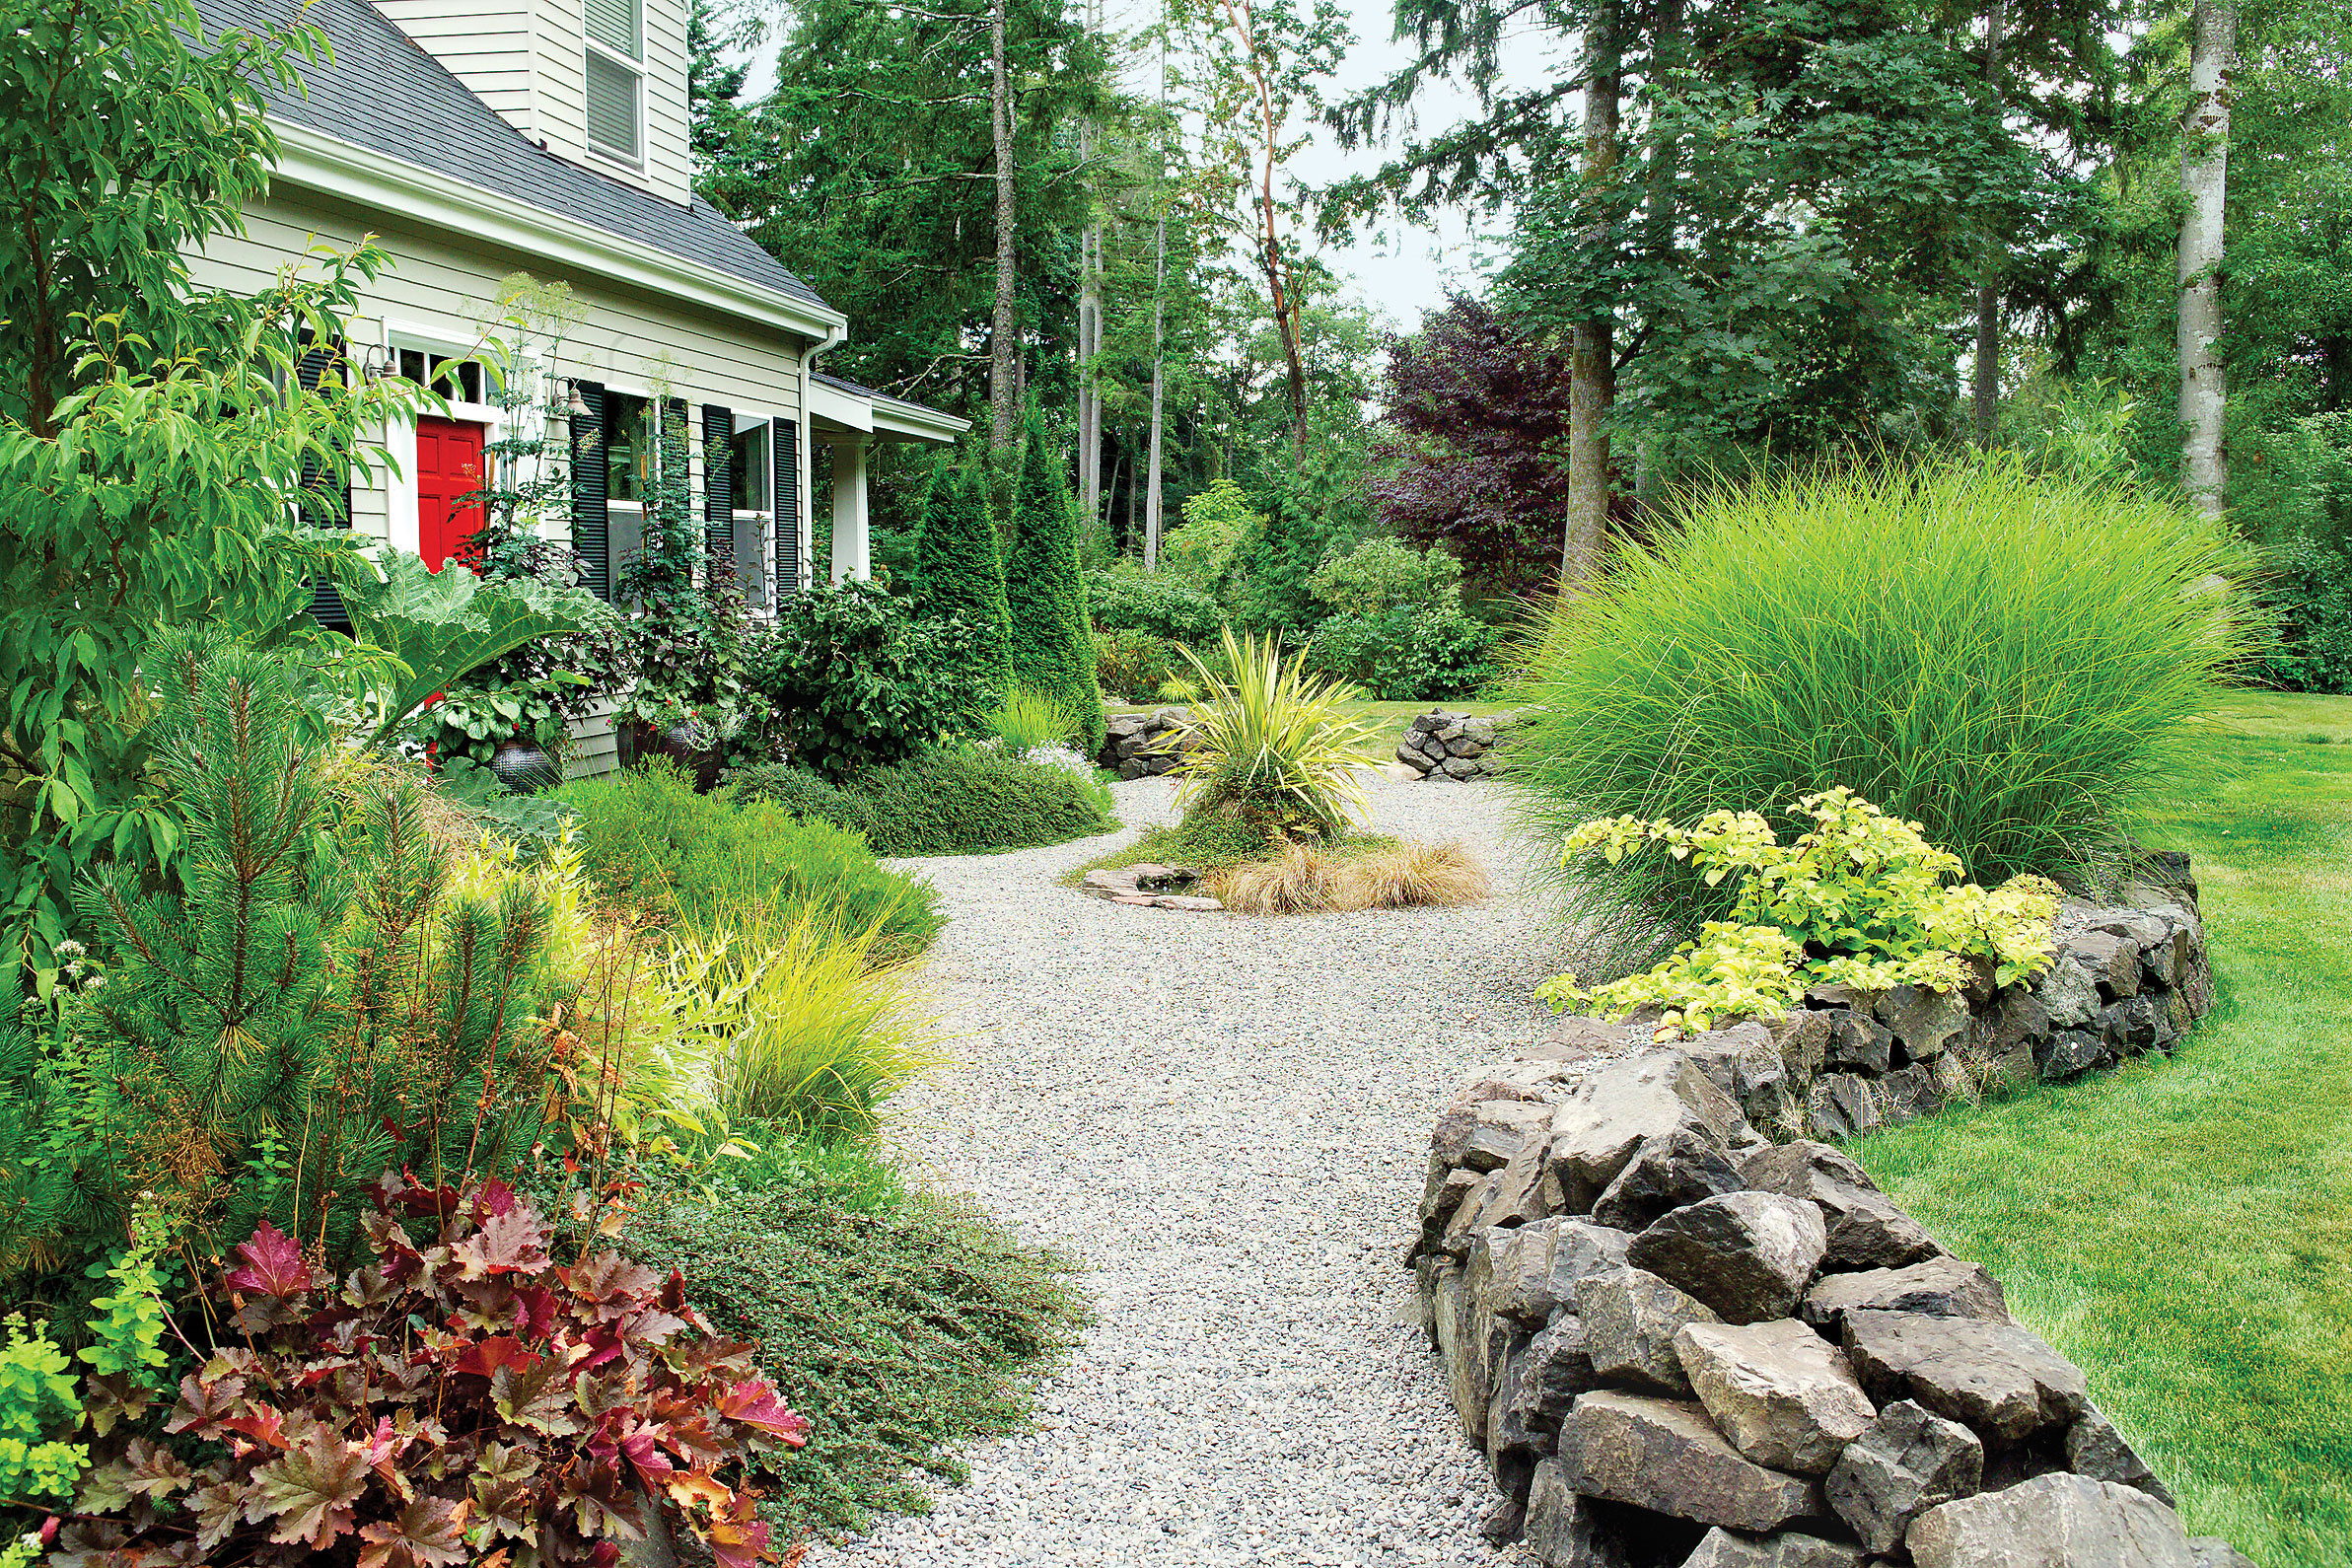
“You can achieve this abundant, layered look on a smaller budget with some patience.”
Start with smaller, less mature plants from a local nursery instead of large, established ones from a pricey garden center. Focus on perennials that will spread and fill in over a couple of seasons. For the path, pea gravel is one of the most affordable materials available. Sourcing stones for the retaining wall from local classifieds or Facebook Marketplace can save a fortune compared to buying them new. The initial look will be sparser, but with time and growth, it will mature into this beautiful, lush scene.
4. A Basket Weave Paver Patio with a Built-in L-Shaped Bench
An integrated bench like this works wonderfully in medium to large patios, generally 150 square feet or more. The L-shape helps to define a corner, creating a cozy, room-like feel. For comfortable seating, the bench should be at least 18 inches deep and stand about 18 inches off the patio floor. The length can vary, but a good minimum for each side of the ‘L’ is around 6 feet to comfortably seat three adults. In a smaller space, a straight bench might be more appropriate to avoid overwhelming the area. This concept is a fantastic space-saver, eliminating the need for bulky, freestanding chairs.
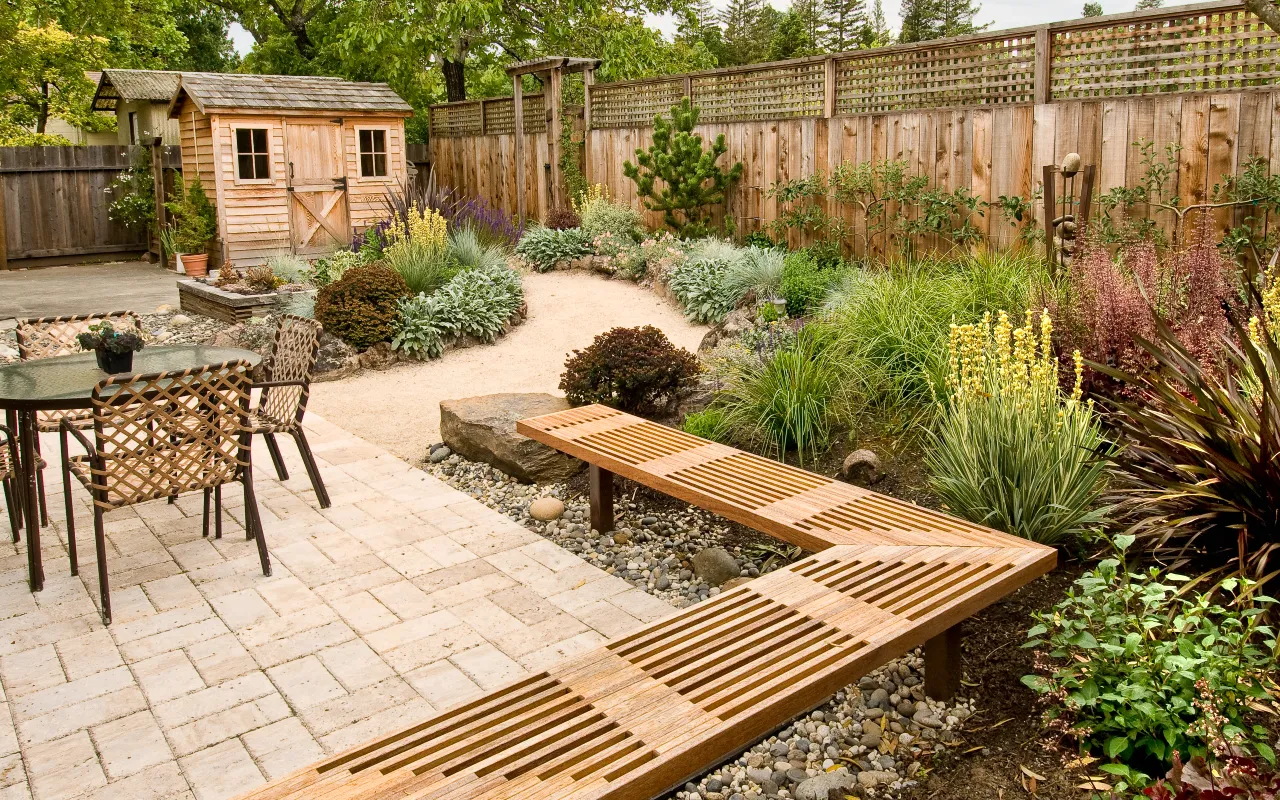
“Let’s be honest about that gorgeous slatted wood bench: it requires maintenance.”
To keep that natural wood tone and prevent it from turning a weathered grey, you’ll need to clean and seal it every 1-2 years, depending on your climate’s harshness. If you neglect it, the wood can splinter or even rot over time, especially in damp, shady areas. While the look is stunning, you have to commit to the upkeep. If you love the design but not the work, consider using composite decking boards that mimic wood for a lower-maintenance, albeit more expensive, alternative.
5. White Adirondacks and an Egg Chair on a Modern Gravel Patio
This inviting scene perfectly captures the 2026 trend of ‘layered relaxation.’ It’s no longer about having a single seating area, but creating multiple ‘moments’ for different moods. You have the classic, lean-back comfort of the Adirondack chairs for conversation around the fire pit, the solitary, gentle sway of the hanging egg chair for reading a book, and even a picnic table for casual dining. It all speaks to a desire for our backyards to be true escapes, offering the same variety of experiences we might seek on a vacation. The mix-and-match furniture approach feels personal and collected over time.
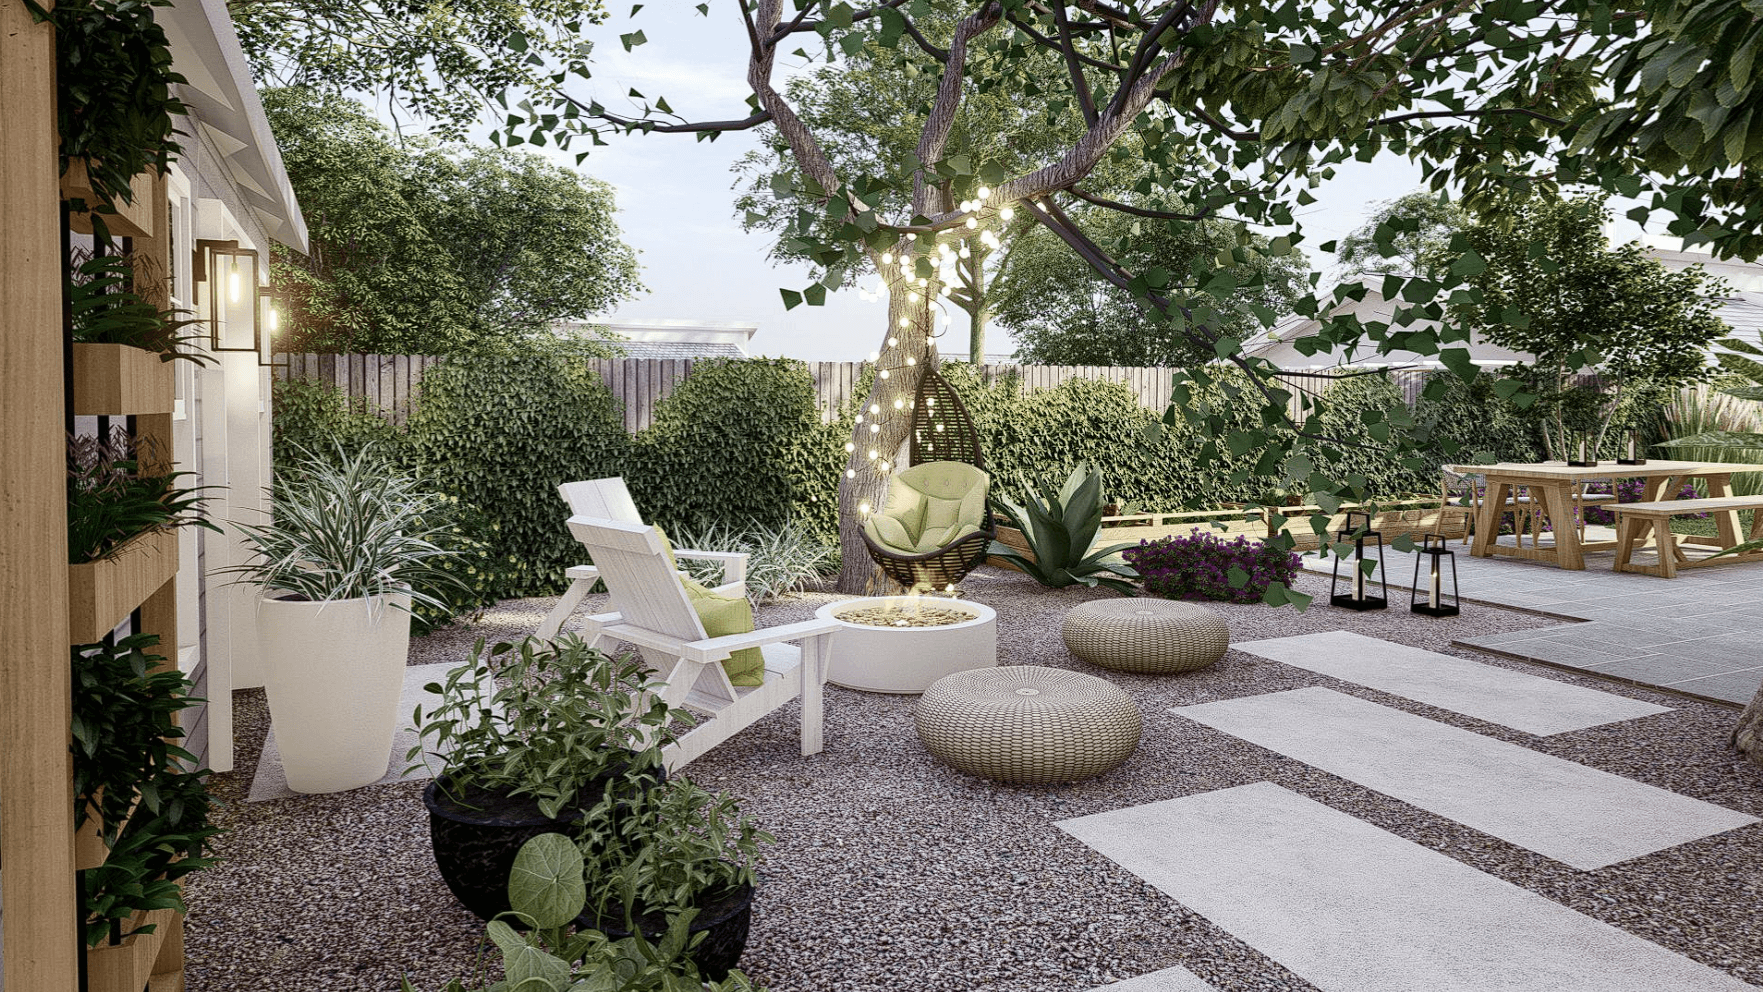
“Before you commit to a full gravel and paver patio like this, do a quick check on these items.”
First, is the area relatively level? A major slope will cause the gravel to shift and wash out. Second, consider the foot traffic. Gravel isn’t the most comfortable surface to walk on barefoot, and it can be tricky for wheeled items like grills or strollers. Third, what’s underneath? You’ll need to install a quality landscape fabric to prevent weeds from taking over your beautiful new patio. Finally, plan your lighting, like the string lights seen here, *before* you start so you can place posts or anchor points.
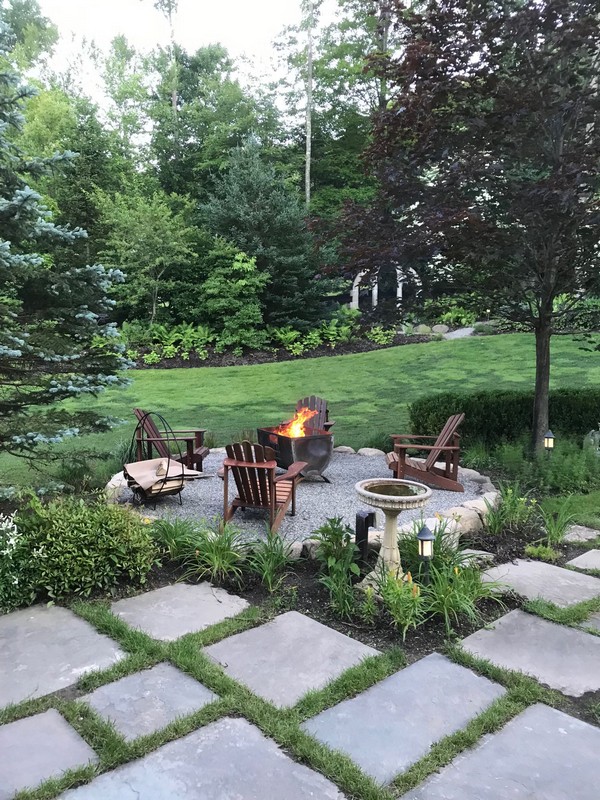
6. Irregular Stone Pavers Leading to a Gravel Fire Pit Circle
This design succeeds by masterfully blending two distinct textures and patterns. The pathway’s large, irregularly shaped stone pavers, separated by wide strips of green grass, have a very organic, almost rustic feel. This then transitions to the crisp, uniform texture of the light-colored gravel in the circular fire pit area. The change in ground cover clearly defines the fire pit as a separate ‘room’ or destination within the garden. The contrast makes both areas more interesting than if the entire space were just one material. It’s a clever use of hardscaping to create zones. For a similar, but more uniform look see Idea #11.
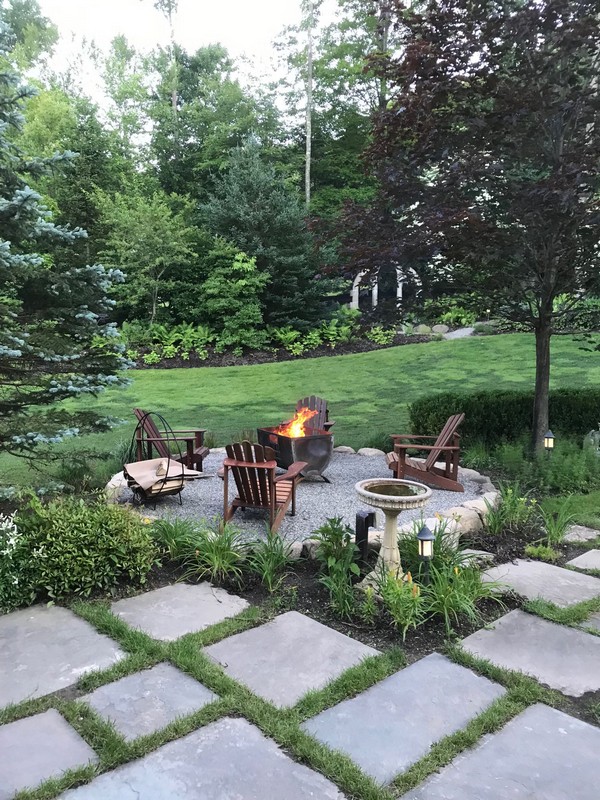
“When laying a flagstone path with grass joints like this, the secret to a professional look is in the foundation.”
Don’t just place the stones on top of the soil. Excavate 4-5 inches, lay a 2-3 inch base of compacted paver base (crushed stone), and then a 1-2 inch layer of sand. Set your flagstones into the sand, making sure they are level. The gaps between the stones should be at least 3-4 inches wide to give the grass enough room to grow. Fill the joints with high-quality topsoil and seed with a durable, traffic-tolerant grass variety.
7. A Pergola-Covered Dining Nook on a Clean Gravel Patio
- Main Furniture (Table & Chairs): $700 – $2,500
- Lighting (String Lights): $100 – $300
- Hardscape (Gravel & Edging): $400 – $1,200 (for approx. 150 sq ft)
- Structure (Pergola): $1,500 – $5,000+ (depending on wood and size)
- Budget Alternative: Skip the full pergola and install a sail shade ($200). Use a more affordable dining set from a big-box store ($400) and opt for a smaller gravel area. You could achieve a similar vibe for around $1,000 – $1,800.
- TOTAL: $2,700 – $9,000+
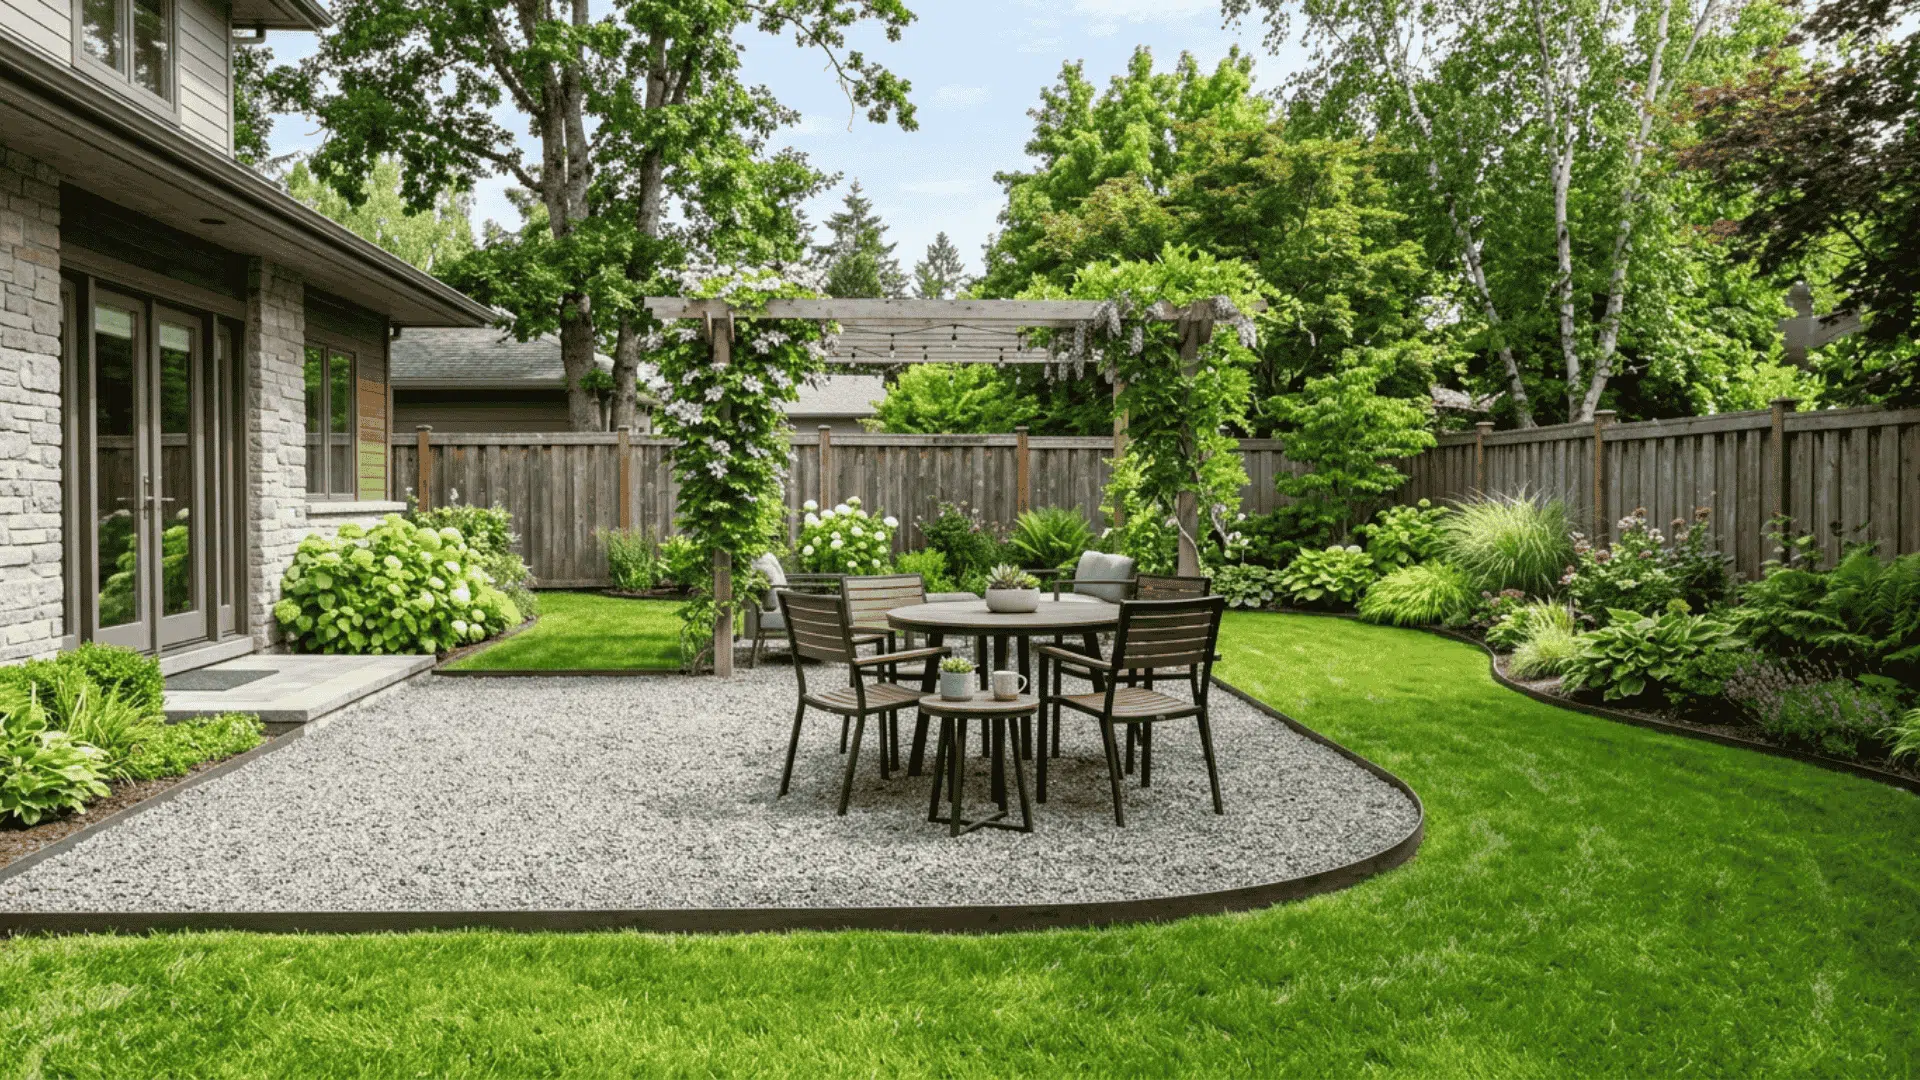
“That crisp, clean edge between the gravel patio and the lawn is a critical detail.”
It keeps the gravel contained and stops the lawn from creeping in, maintaining that sharp, contemporary look. Here’s a quick guide to installing that dark metal edging.Time: 2-3 hours for 50 ft. Cost: $100-$200First, mark your desired patio shape using a garden hose or spray paint.Use a flat-edged spade to dig a trench about 4-5 inches deep along your marked line.Place the metal edging into the trench. The top of the edging should sit about half an inch above the soil level to effectively contain the gravel.Use a rubber mallet to gently tap the edging into place. Drive the provided stakes through the edging into the ground to secure it.Backfill the trench on the lawn side with soil. You’re now ready to add your landscape fabric and gravel on the patio side.
8. Layered Orange Rugs Define a Vibrant Rooftop Lounge
The power of this rooftop design comes from the confident use of layered outdoor rugs. Take away the bold orange and patterned grey rugs, and you’re left with a collection of nice furniture on a plain surface. The rugs are what ground the seating vignettes, add a crucial layer of texture and softness, and inject that vibrant, warm personality. They act as ‘islands’ of coziness, defining the different zones of the patio and making the entire space feel like a thoughtfully decorated outdoor room. That terracotta orange is the hero, setting a warm, inviting tone for everything else.
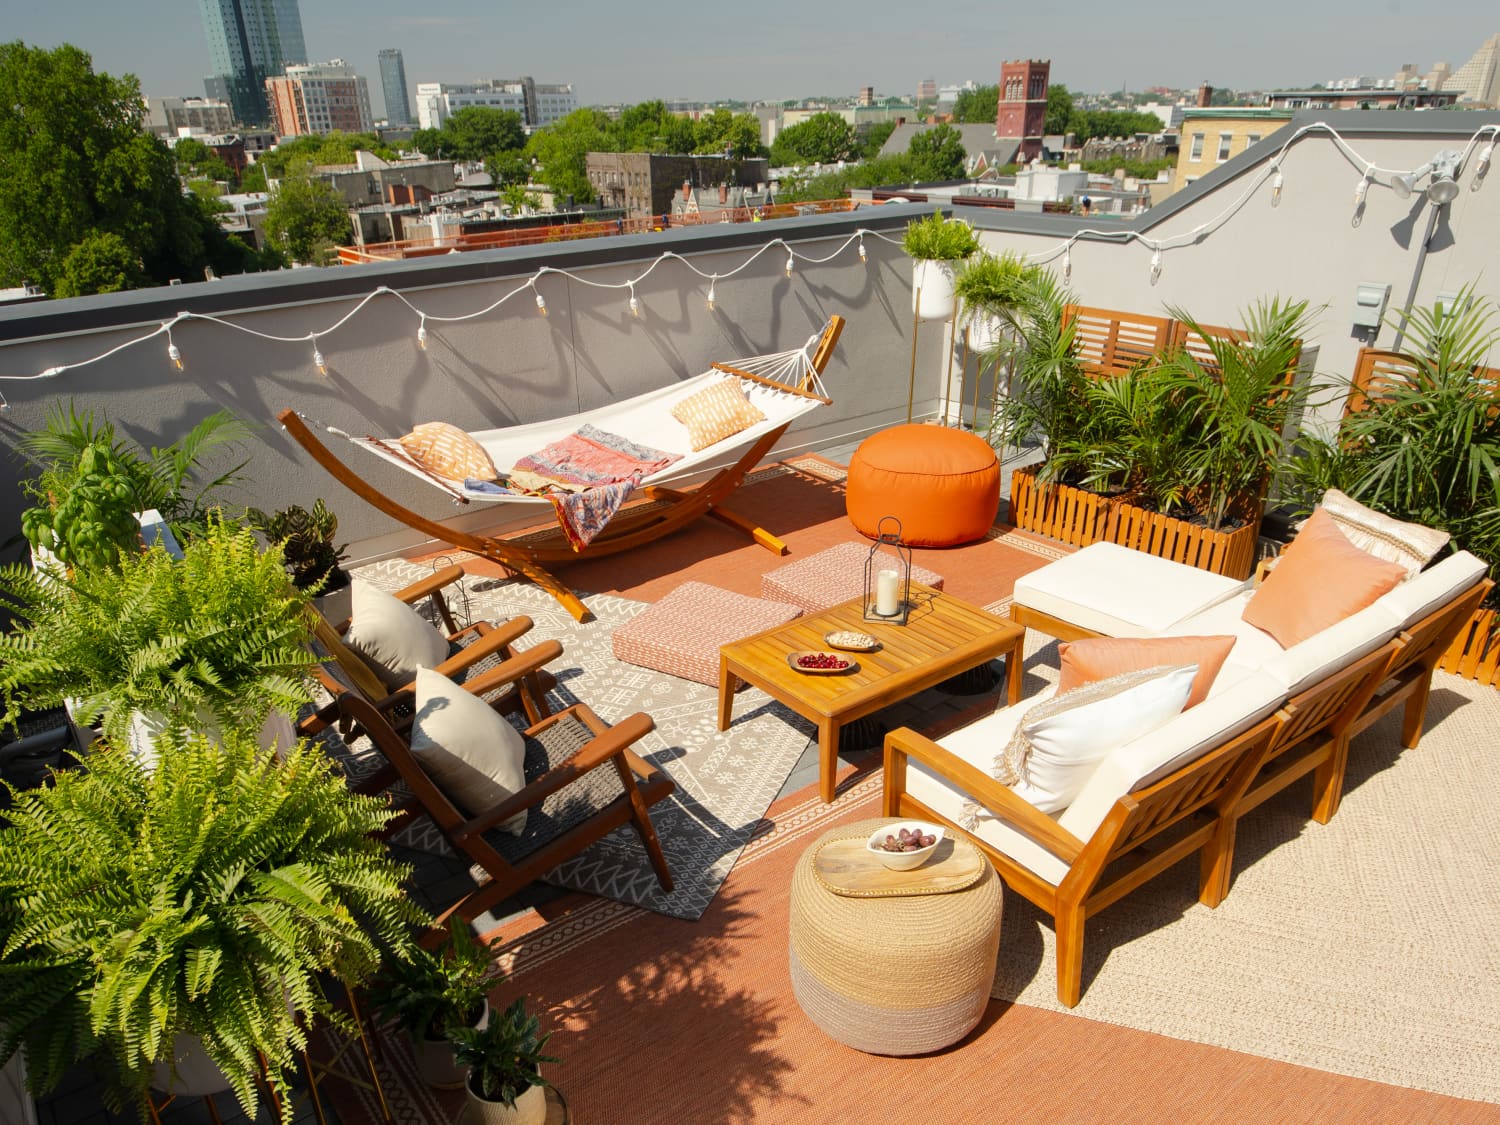
“This look is a beautiful equation of warmth and neutrality.”
The formula is approximately 50% warm color + 40% neutral base + 10% natural elements. The terracotta orange rugs and matching pillows provide the dominant warm tones. The neutral base comes from the cream cushions, the light grey patterned rug, and the surrounding city building tones. Finally, the natural elements—the green of the many potted plants and the wood of the furniture frames—add a crucial organic touch that keeps the space from feeling too sterile. You could swap the orange for a deep blue or a vibrant teal and still maintain the same balanced feel.
9. An Intimate Stamped Concrete Patio with Integrated Lighting
Stamped concrete is a fantastic choice for a high-end, custom look, but it’s a significant commitment. Unlike pavers or gravel, you can’t easily change it or repair a small section if it gets damaged. A major crack can be a real headache. The color is also mixed into the concrete or applied on top, so make sure you are 100% certain about the chosen shade and pattern before the pour begins. There’s no ‘undo’ button. This material is best for homeowners who are settled and have a clear, long-term vision for their outdoor space.
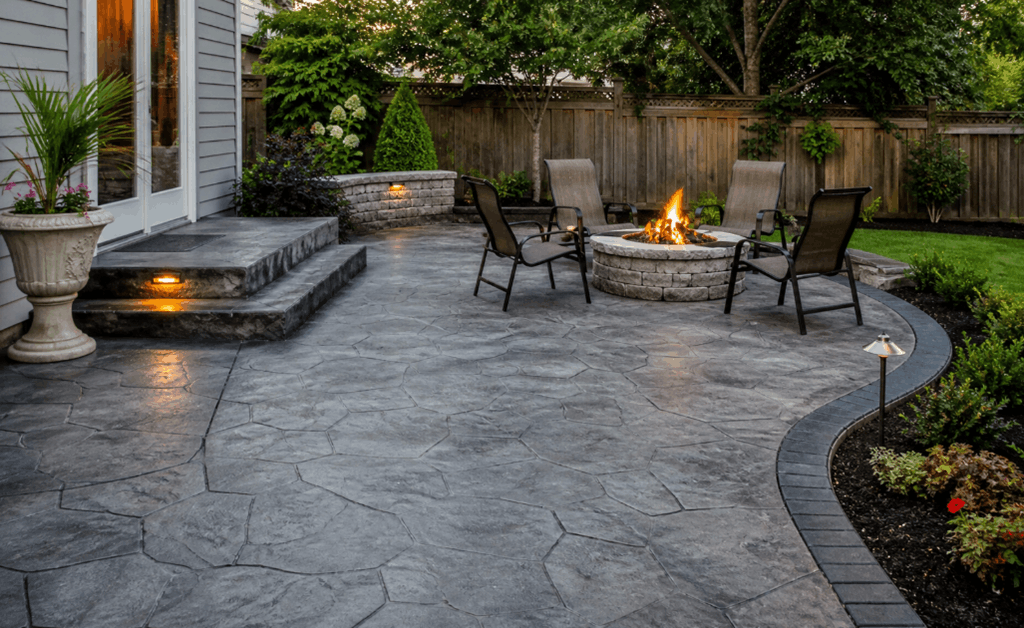
“While stamped concrete is durable, it’s not zero-maintenance.”
To keep the dark grey color rich and protect it from stains and weather, it needs to be resealed every 2-3 years. This involves thoroughly cleaning the surface and applying a quality concrete sealer. In snowy climates, avoid using harsh de-icing salts, which can damage the surface and sealant over time; opt for sand instead. The integrated lighting is low-maintenance LED, but the fixtures should be cleaned periodically to ensure they shine bright and the lenses don’t get clouded by dirt or mineral buildup from rain.
10. A Serene Pebble Ground Patio with White Cushioned Seating
This minimalist, high-contrast look truly shines in a medium to large space, ideally 200 square feet or more. The light pebble ground cover can make a small, enclosed area feel a bit like a fishbowl. Having ample room allows the clean lines of the furniture and the starkness of the pebbles to breathe. It provides enough space for the distinct zones—the curved sofa seating area, the access paths, and the deep planting beds along the dark grey fence—to feel separate yet connected. In a smaller yard, this might feel cramped, but here it feels expansive and serene.
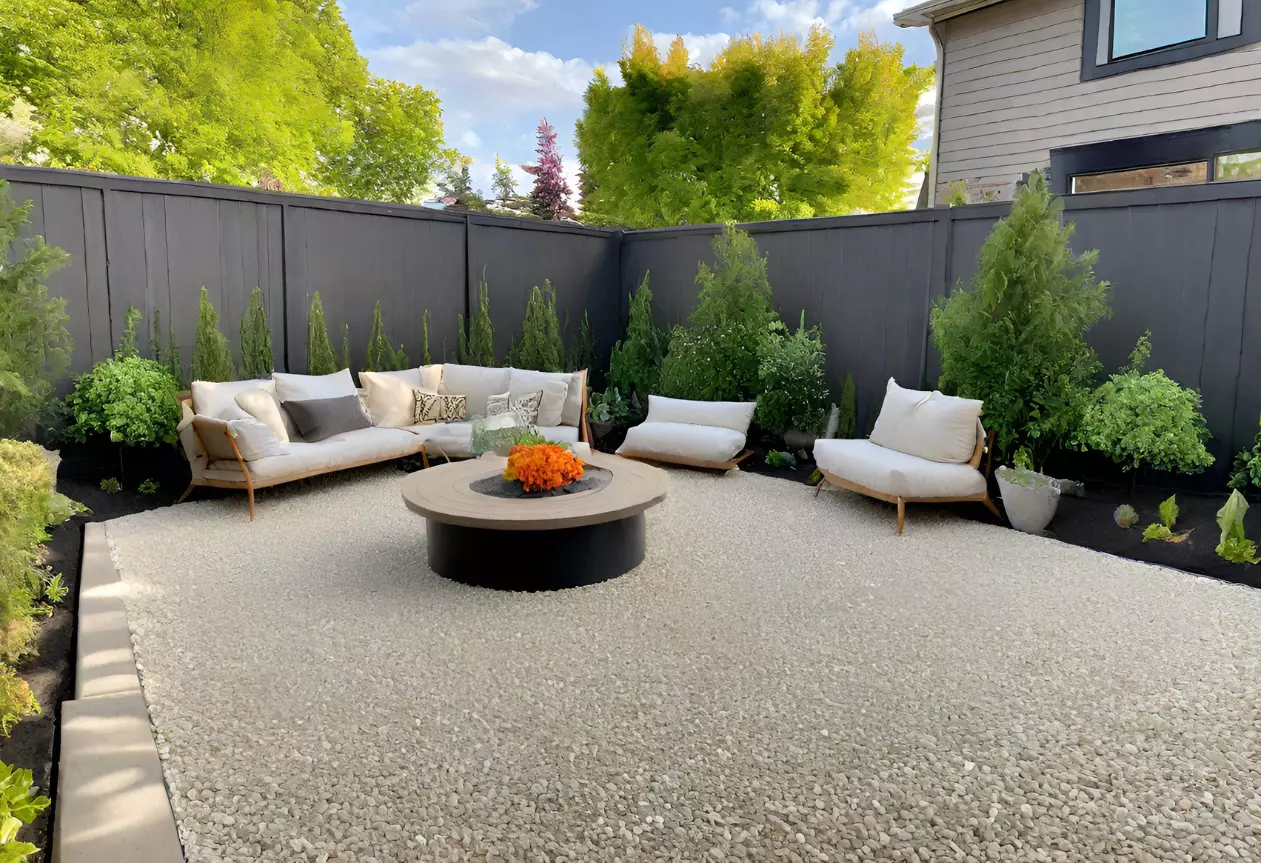
“The effectiveness of this design lies in its strict, limited color palette.”
The entire space is built on just a few colors: white, light grey, dark grey, and green, with a touch of natural wood. This restraint is what creates the serene, modern feel. The white cushions and planters pop against the dark gray fence. The light pebble ground provides a bright, textured floor, while the lush green plants add life and a splash of natural color. There are no distracting accent colors, allowing the textures and forms to be the main focus. It’s a lesson in the power of simplicity.
11. A Rustic Circular Fire Pit Nook with Adirondack Seating
You don’t need a huge budget to create this classic campfire vibe. Instead of building a stacked stone wall, you can get a similar effect by using a simple, pre-fabricated metal fire ring, which can cost as little as $50. Pea gravel is an inexpensive ground cover, and you can often find free or cheap boulders on local marketplaces to add that natural touch. While high-end wood Adirondack chairs can be pricey, you can find more affordable resin or plastic versions at most home improvement stores that give a very similar look. This whole setup could be a weekend DIY project for under $500.
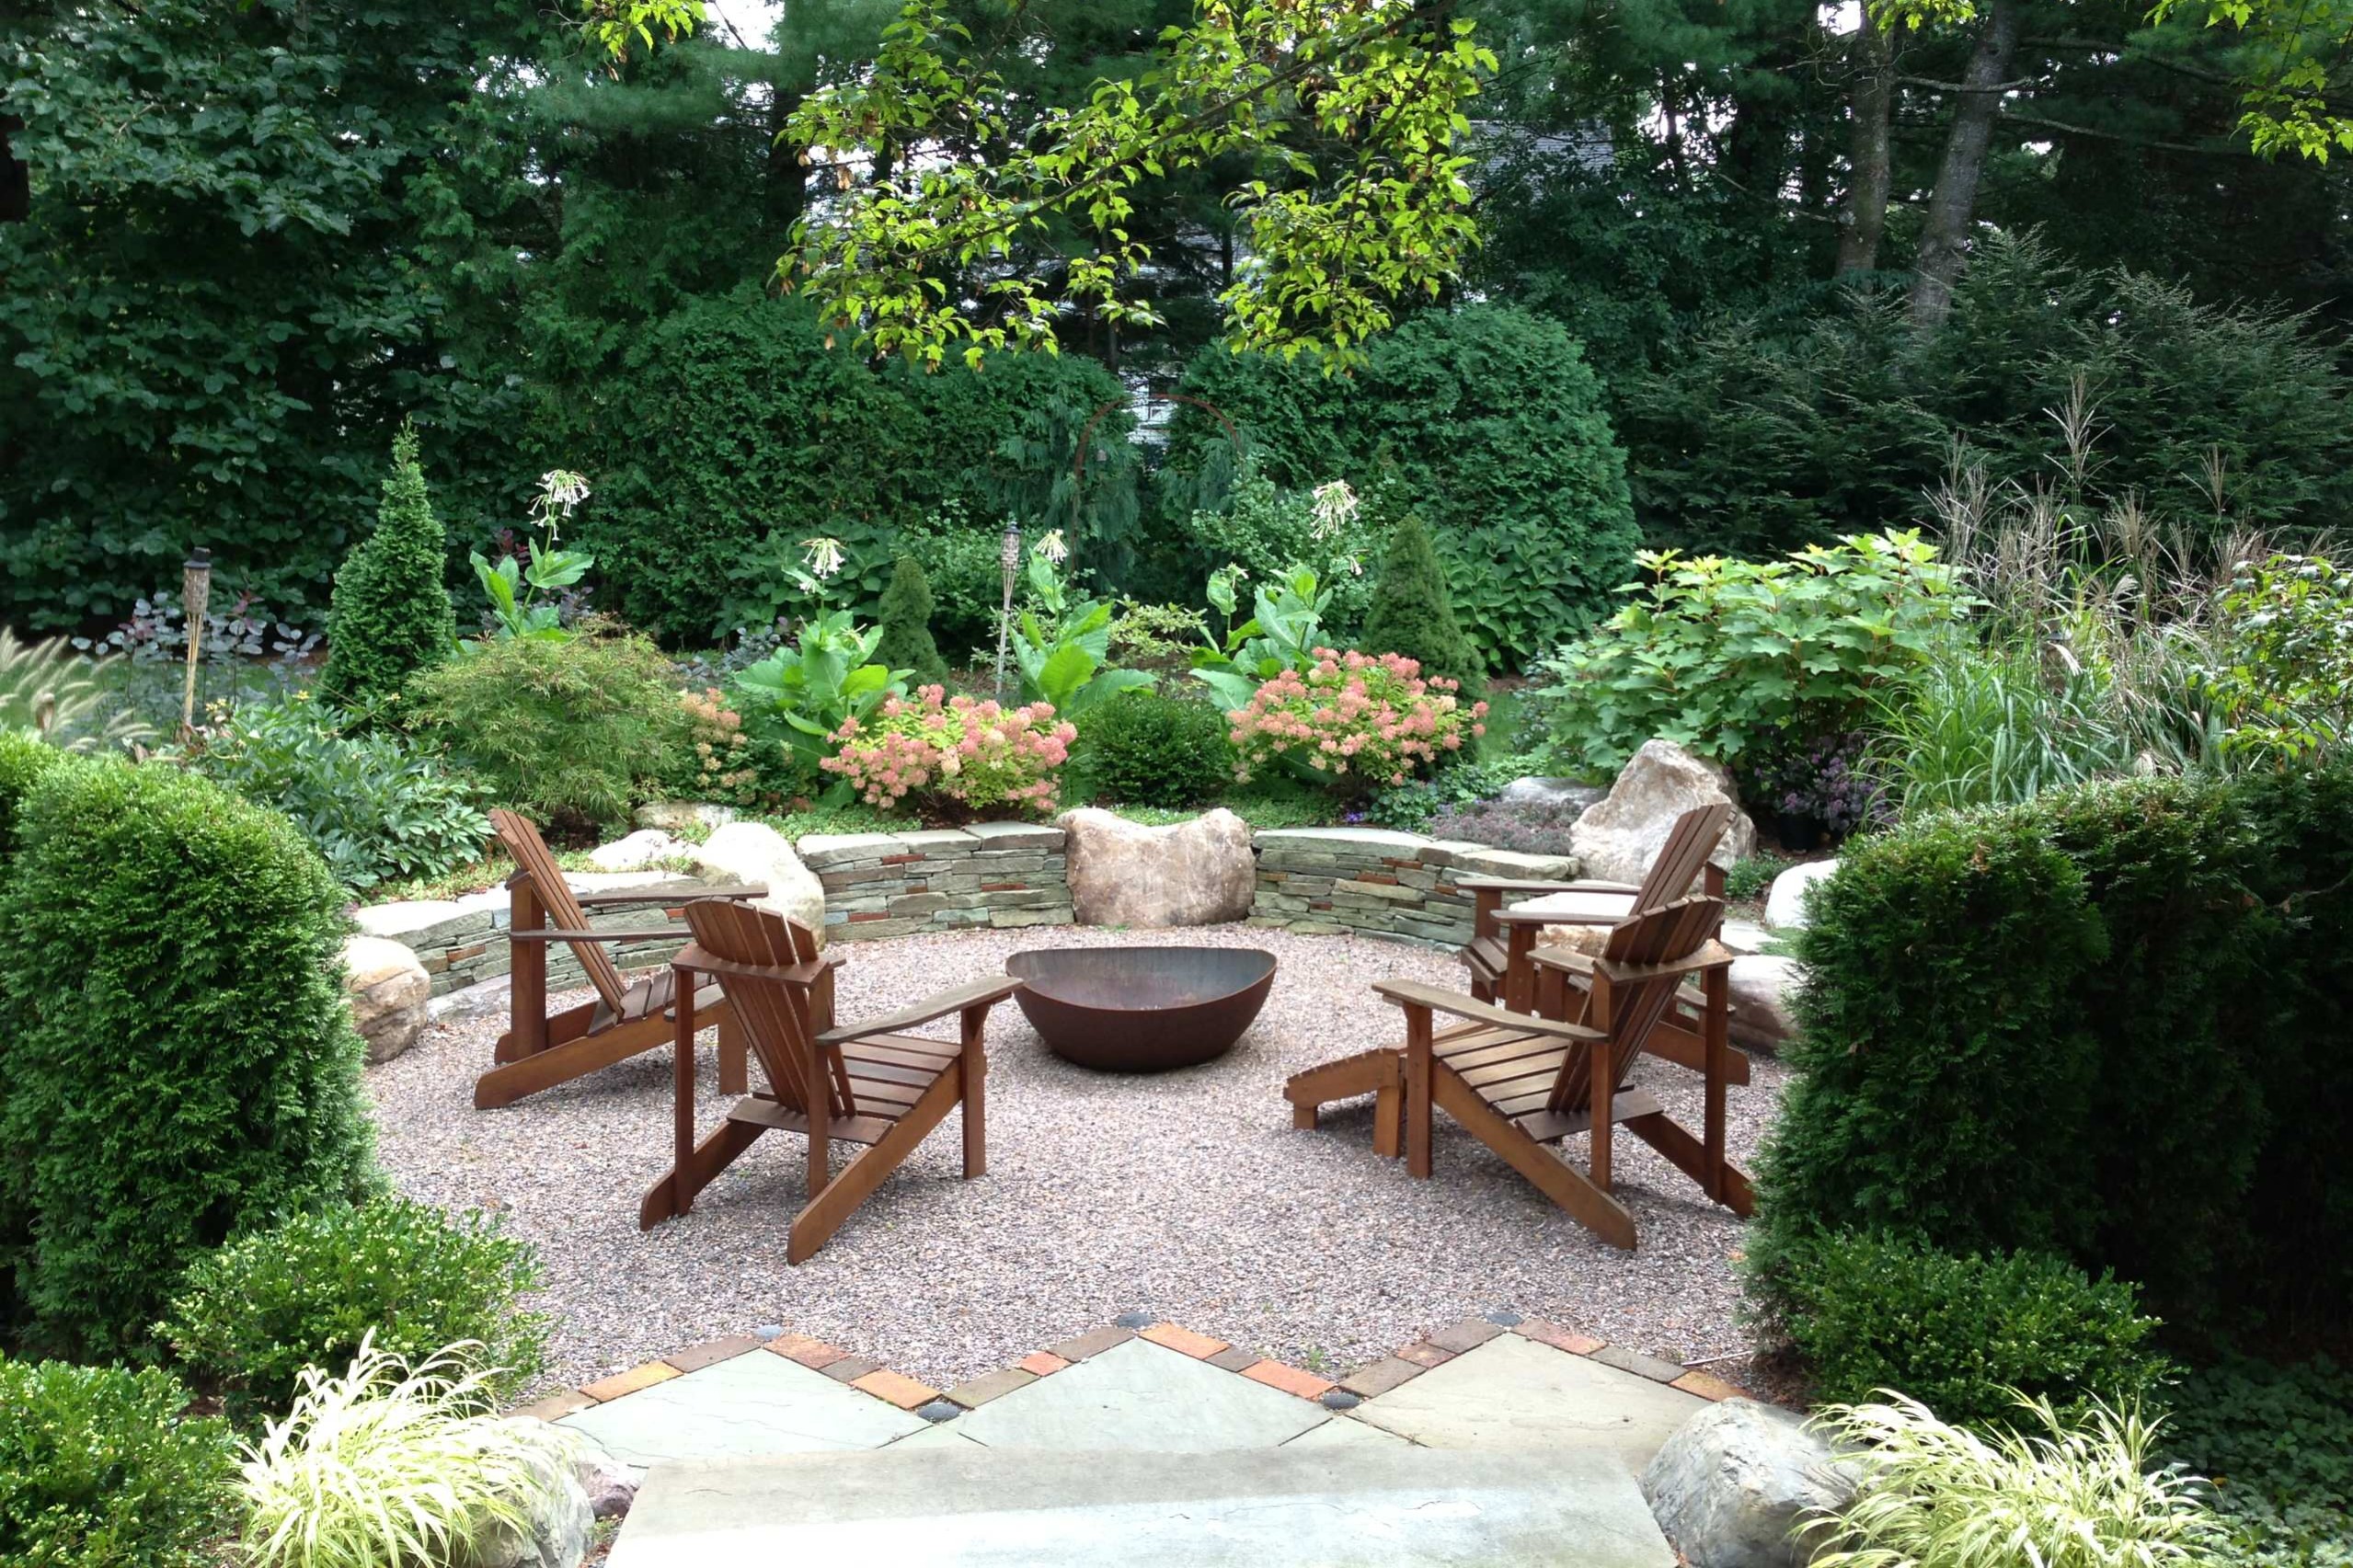
“When arranging chairs around a circular fire pit, think about creating a comfortable conversation circle.”
For 36-inch to 44-inch diameter fire pits, the ideal distance from the edge of the pit to the front of the chair is between 2 and 3 feet. This is close enough for everyone to feel the warmth and have a place to set down a drink or a s’mores stick, but far enough away to not feel scorched. It also leaves just enough room for people to safely walk behind the chairs. Any further, and the space starts to feel disconnected. Compare the spacious layout here to the more intimate one in Idea #5.
12. A Cozy Fire Pit Corner with Black Adirondacks and String Lights
Overhead lighting is what turns a simple patio into an outdoor room. Installing poles for string lights is a straightforward project.
- Time: 2-4 hours. Cost: $150-$300.
- Purchase 8-10 ft long 4×4 wood posts. Pressure-treated is best for longevity.
- For each post, dig a hole that’s about 2 feet deep.
- Place the post in the hole and use a level to make sure it’s perfectly vertical.
- Mix quick-setting concrete according to the package directions and pour it into the hole around the post, filling it to the top.
- Brace the post if necessary while the concrete sets (usually 20-40 minutes). Let it cure fully for 24 hours.
- Once cured, screw hooks into the tops of the poles and hang your favorite string lights.
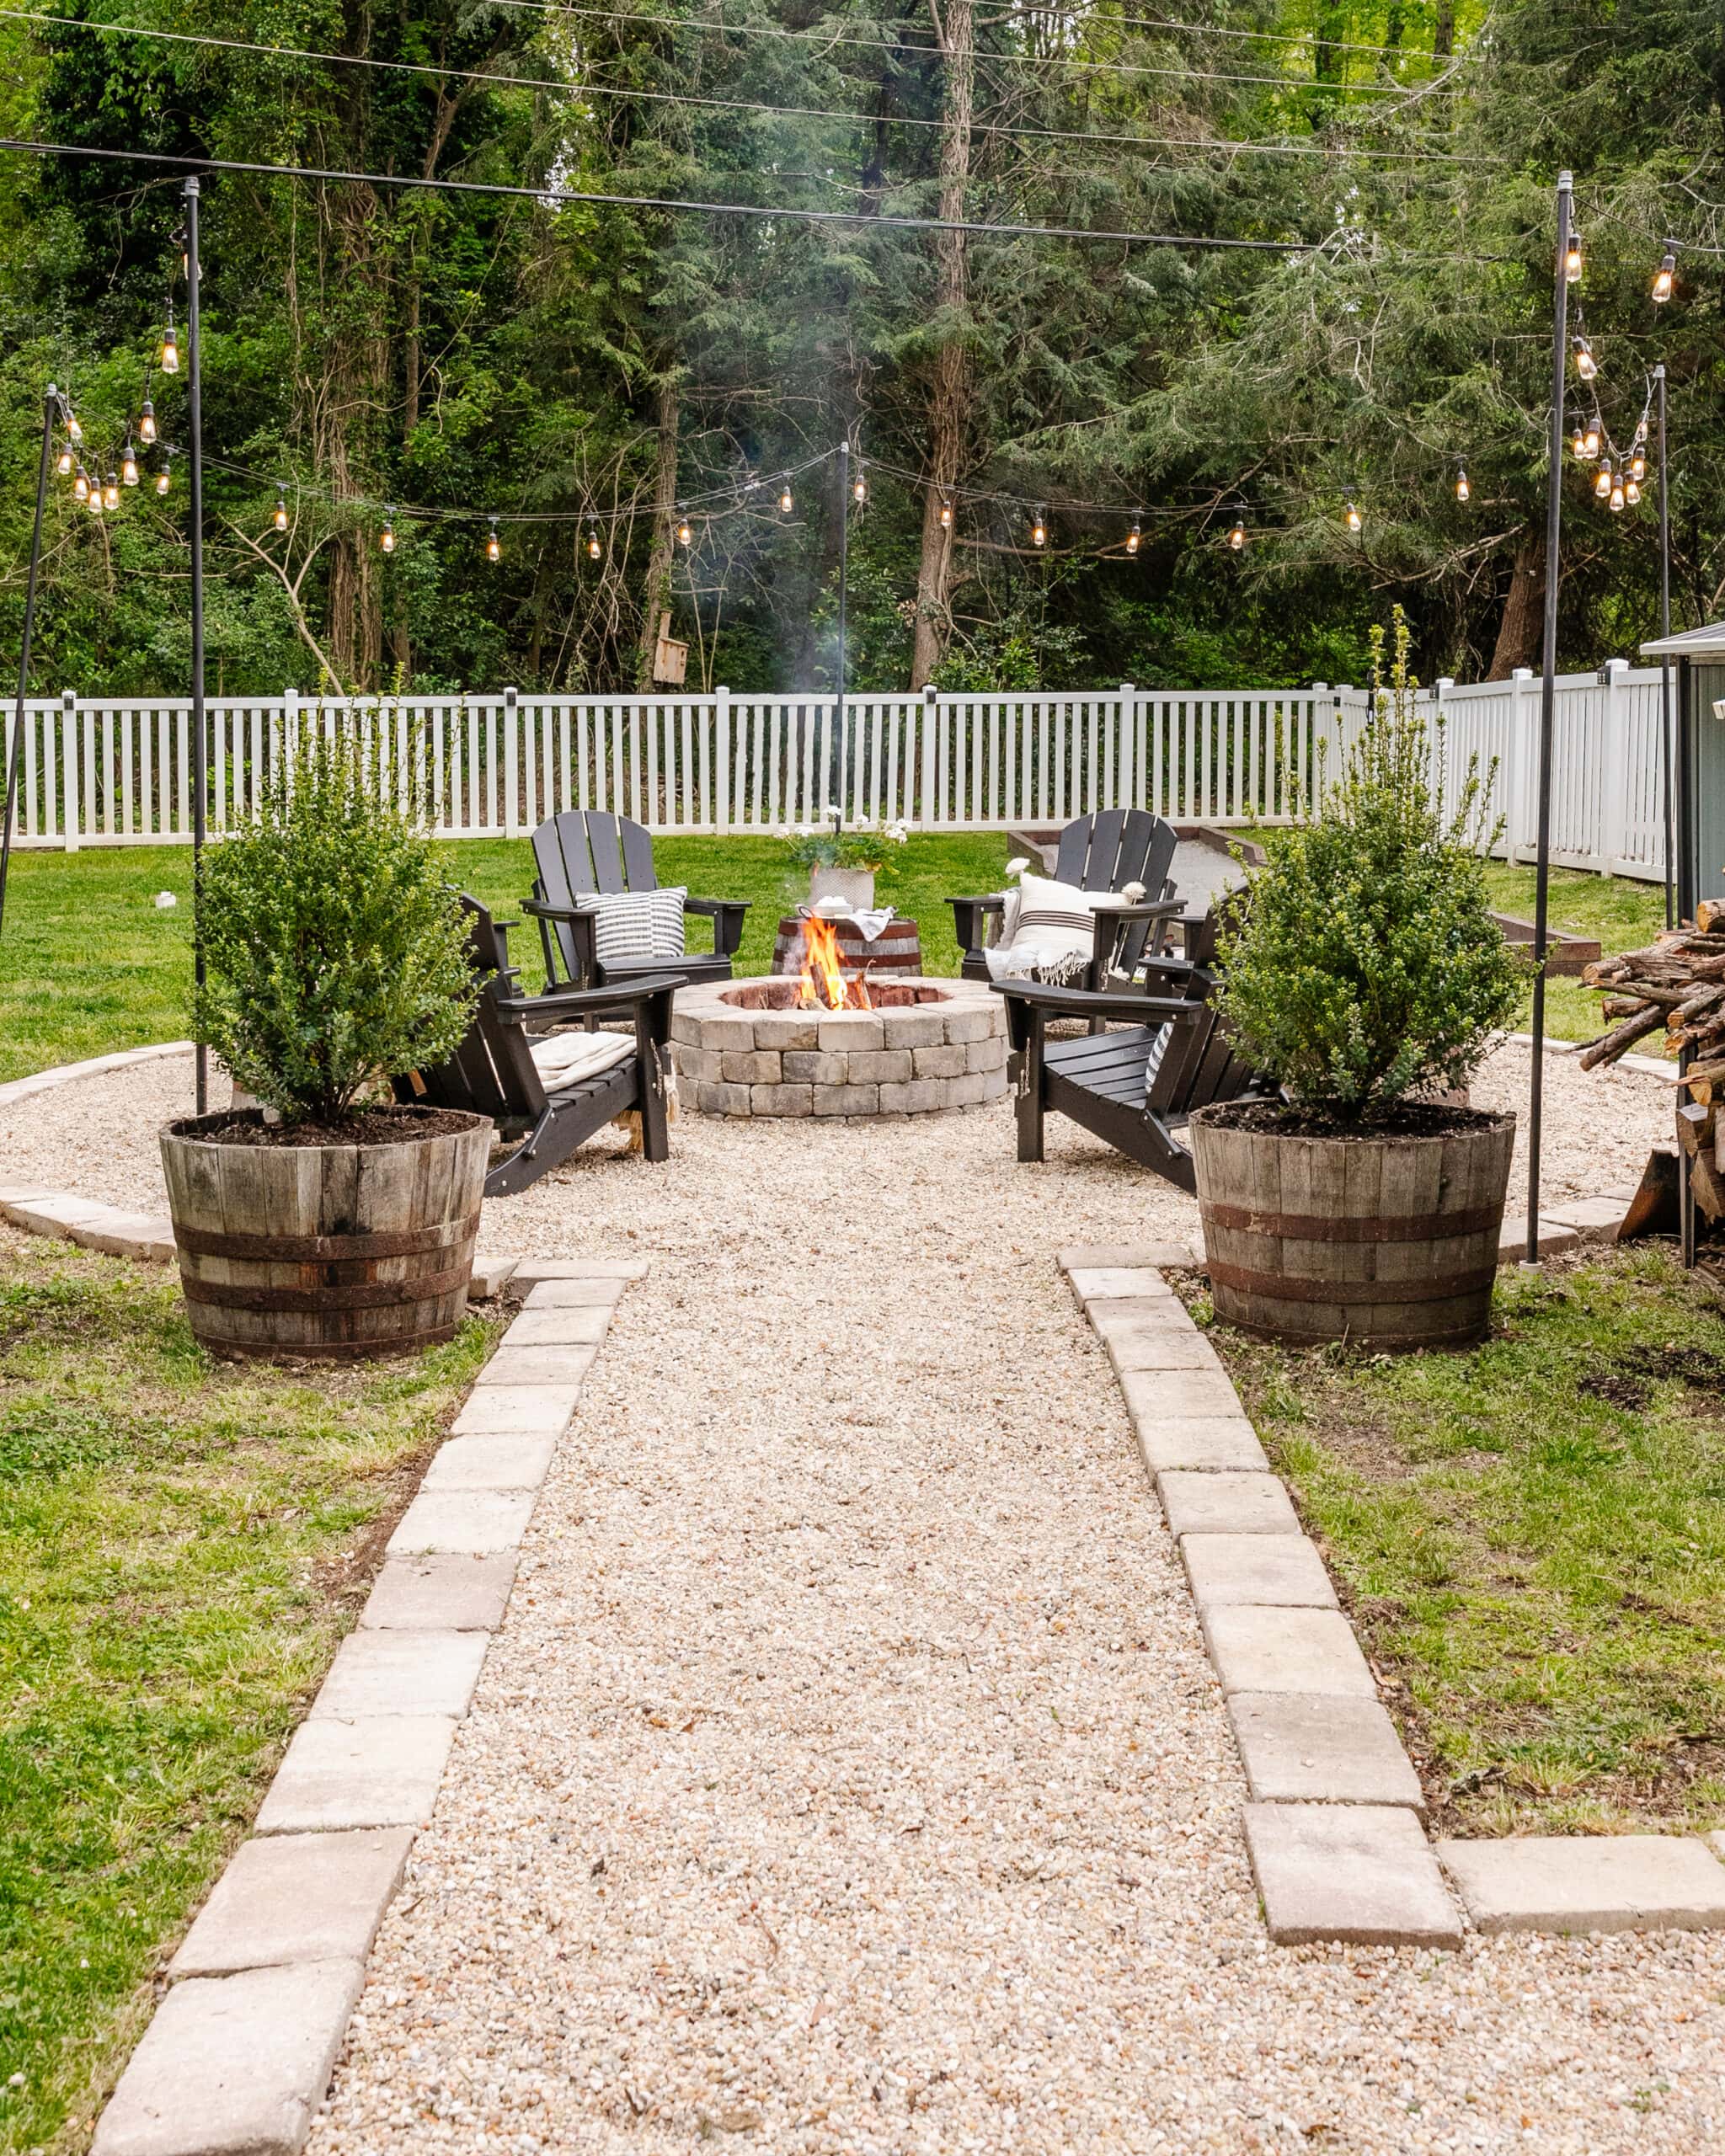
“The single most important element making this scene feel so incredibly cozy is the overhead string lights.”
They create a ‘ceiling’ for the space, enclosing it and making it feel protected and intimate, like a room without walls. The gravel ground, the comfy chairs, and the fire are all essential parts of a great patio, but the lights are what provide the magic. They cast a warm, inviting glow that encourages people to gather and linger long after the sun has set. Without them, it would just be a group of chairs in a dark corner of the yard.
13. Dramatic Stone Slab Steps Set into a Gravel Landscape
This design is a masterclass in scale. The use of massive, rectangular stepping stones and even larger, irregular stone slabs for the steps creates a sense of drama and permanence. In a garden, we’re used to seeing smaller-scale elements. By going big, the designer turns a simple change in elevation into a major focal point. The weight and size of the stones ground the entire landscape, making it feel ancient and deeply connected to the earth. The fine texture of the grey gravel serves as a quiet backdrop that makes the scale of the large stones even more apparent.
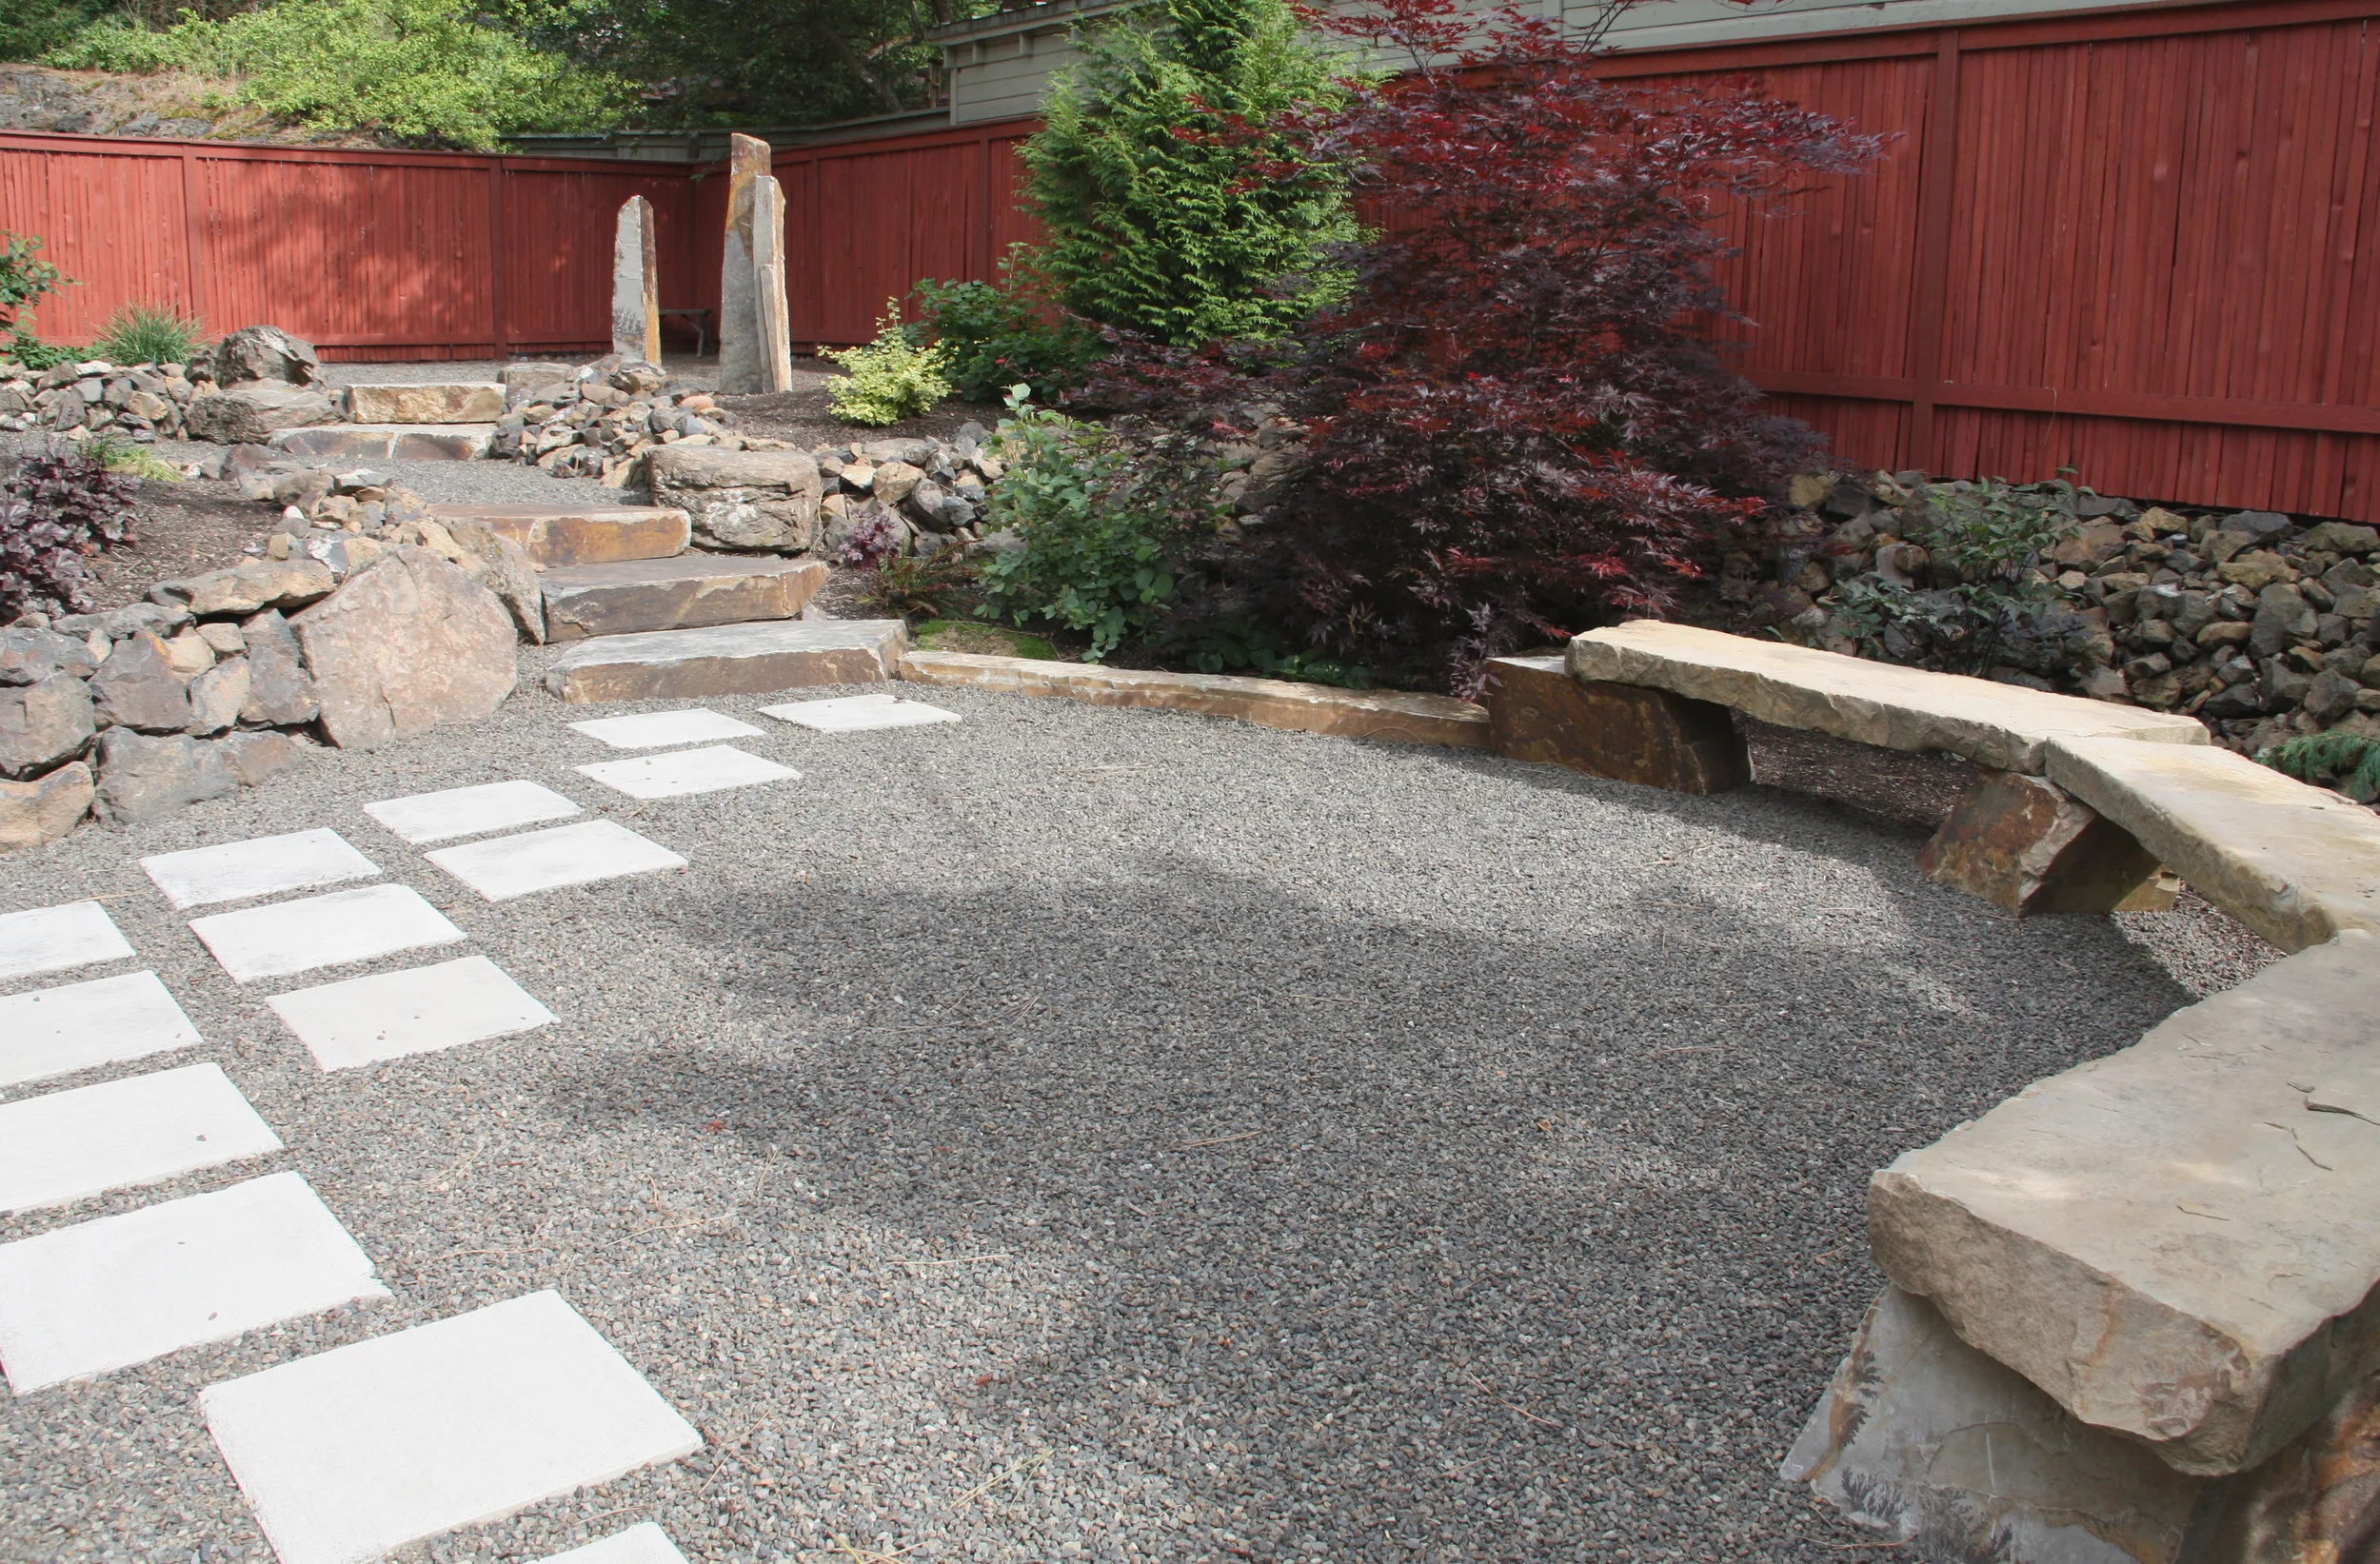
“An installation this ambitious needs to be approached with caution.”
Those large stone slabs are incredibly heavy and require professional equipment to move and place safely. This is not a weekend DIY project. Ensuring each step is perfectly level and secure is critical to prevent tripping hazards. Furthermore, in regions with frost, a deep, properly prepared gravel foundation is essential to prevent the stones from heaving and shifting over the winter. This is a design that requires significant investment in both materials and skilled labor to execute correctly and safely.
14. Natural Wood Adirondacks Gathered Around a Rust-Finish Fire Pit
The formula here is a perfect balance of rustic and refined elements. It breaks down to roughly 40% natural wood grain + 30% oxidized metal + 30% neutral texture. The unfinished wood of the Adirondack chairs provides warmth and a classic outdoor feel. The rust-colored patina on the Corten steel fire pit introduces a rugged, industrial edge that’s also deeply earthy. Finally, the light grey pea gravel acts as a clean, neutral base that doesn’t compete with the other elements, allowing the chairs and fire pit to be the stars of the show. The surrounding greenery softens the entire composition.
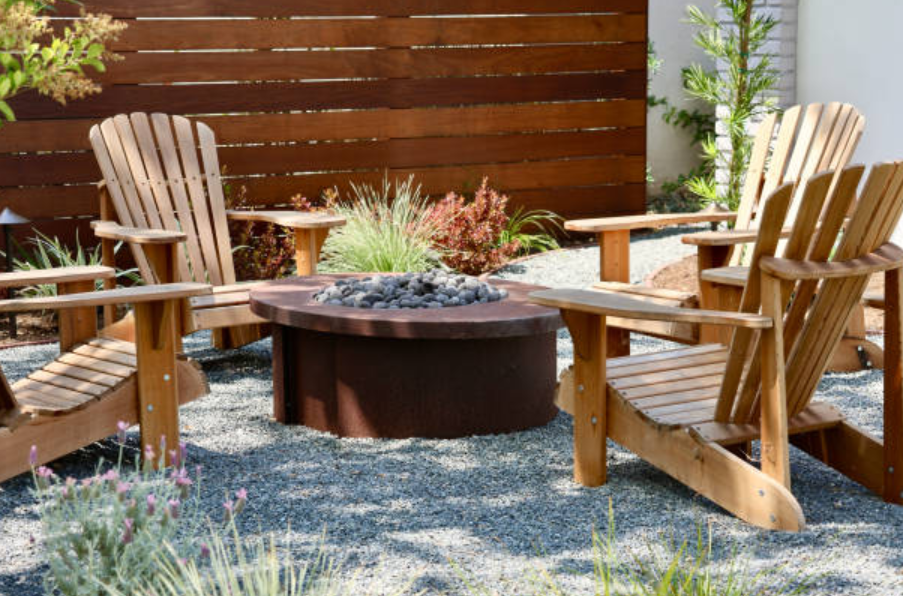
“That beautiful rust-colored fire pit is likely made of Corten steel, a material designed to develop a stable, rust-like appearance over time.”
While this ‘weathering’ process protects the steel from further corrosion, be aware that during the initial stages, it can leach rust stains onto the surface below. Here, the gravel base is forgiving, but if you were to place it on light-colored concrete pavers, you’d likely see orange stains. The natural wood chairs will also require upkeep; they’ll need to be sealed annually if you want to maintain their warm color and prevent them from weathering to a silver-grey.
15. A Quaint Brick-Edged Gravel Nook in an English Garden
This little garden moment is incredibly attainable on a tight budget. Creating a small 8×8 foot patio like this is a perfect DIY project. A brick border is inexpensive, and you can often find reclaimed bricks for free or cheap. Pea gravel is one of the most cost-effective materials for surfacing a patio. The two metal chairs and bistro table can be found at very reasonable prices at home improvement stores, or even better, at a thrift store or garage sale. Add a couple of affordable cushions, and you’ve created a charming destination for less than $300.
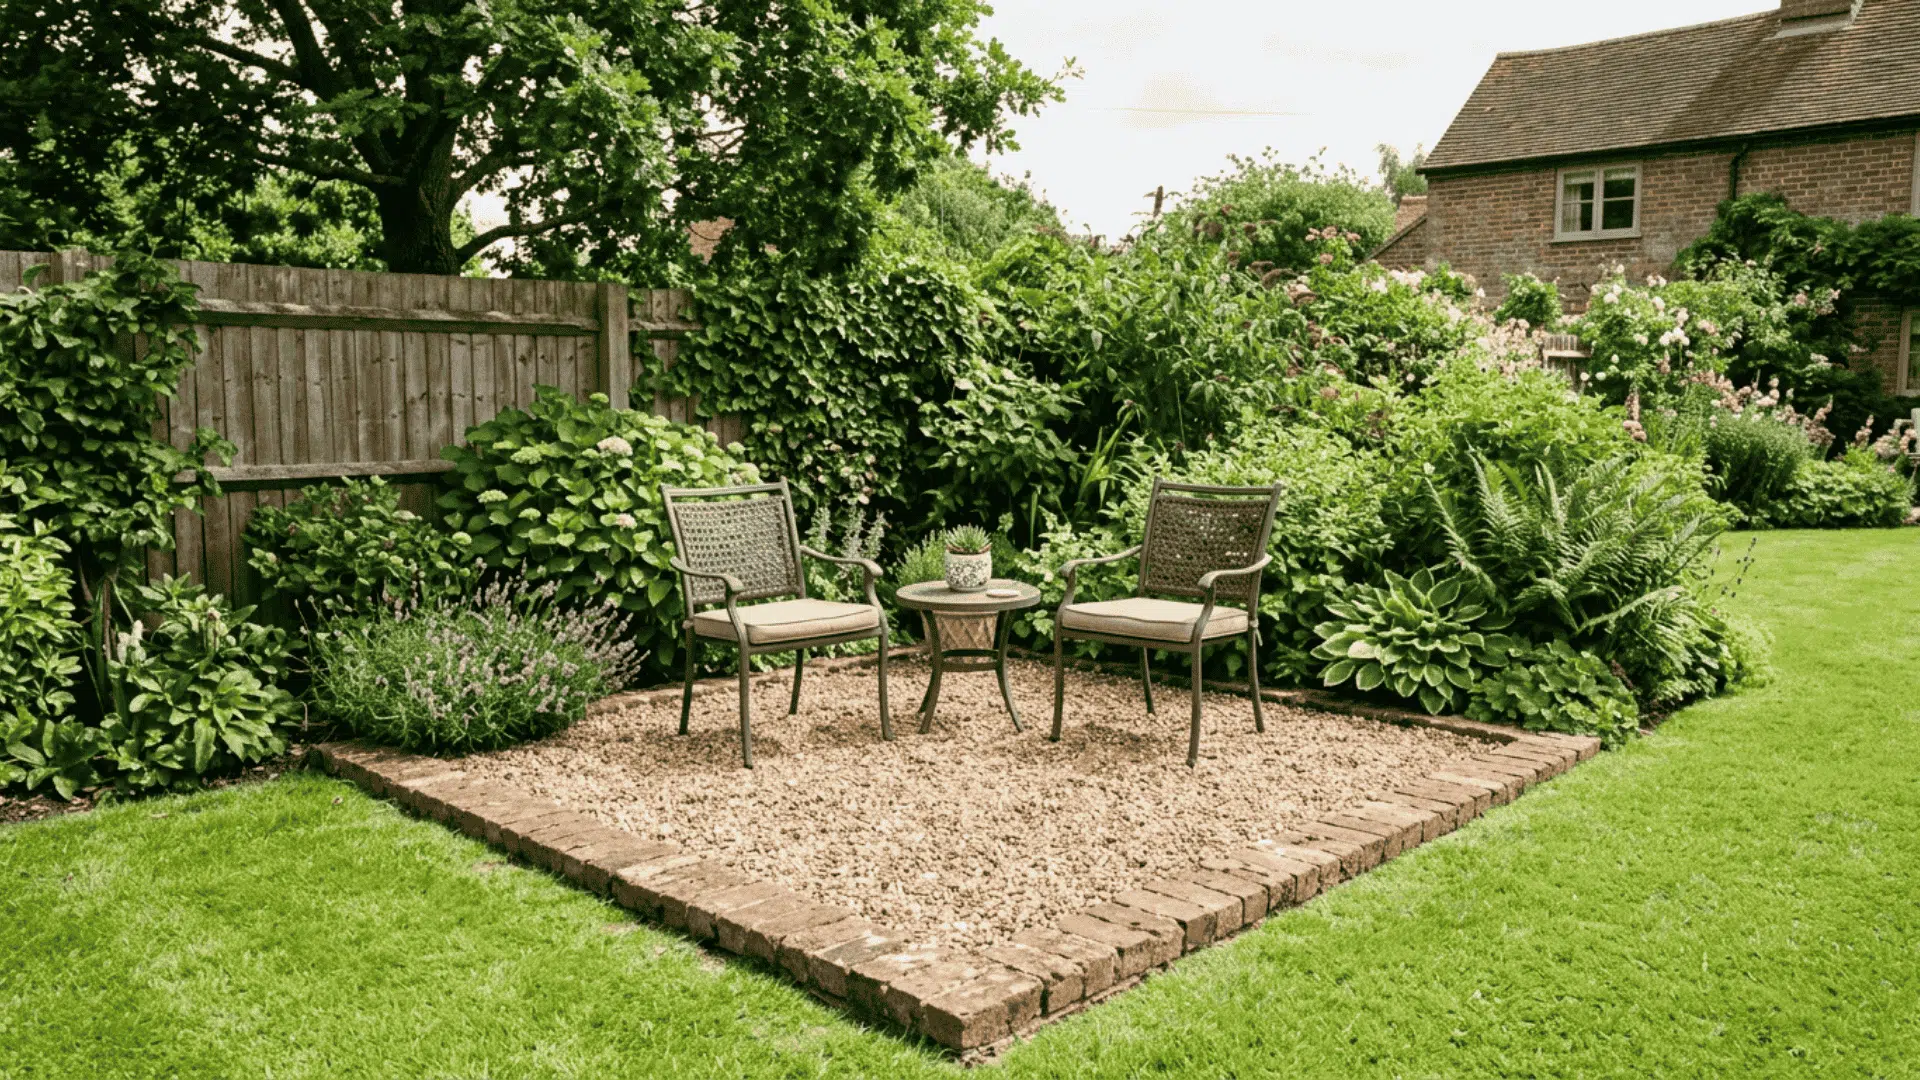
“This ‘patio-in-a-lawn’ idea is a brilliant solution for small backyards or gardens where you don’t want to commit to a large, permanent hardscape.”
It works in spaces as small as 50 square feet. By setting this small, defined area away from the house, you create a sense of destination and make the yard feel larger. It becomes a special spot for a morning coffee or an evening chat. This approach provides just enough hard surface for a table and chairs without overwhelming the lush, green feel of a garden. It’s a much softer approach than the large, dedicated patio in Idea #3.
16. A Cozy Gravel Nook with a Classic Wrought Iron Bistro Set
This cozy corner works because of the rich interplay of textures. You have the rough, aged surface of the red brick wall, the fine, crunchy texture of the light-colored gravel, the smooth, cool feel of the rectangular stepping stones, and the delicate, airy pattern of the wrought iron furniture. Each material brings a different tactile quality to the scene. The climbing ivy adds another layer of soft, organic texture that contrasts beautifully with the hard surfaces. This textural variety is what gives the small space depth and a feeling of history.
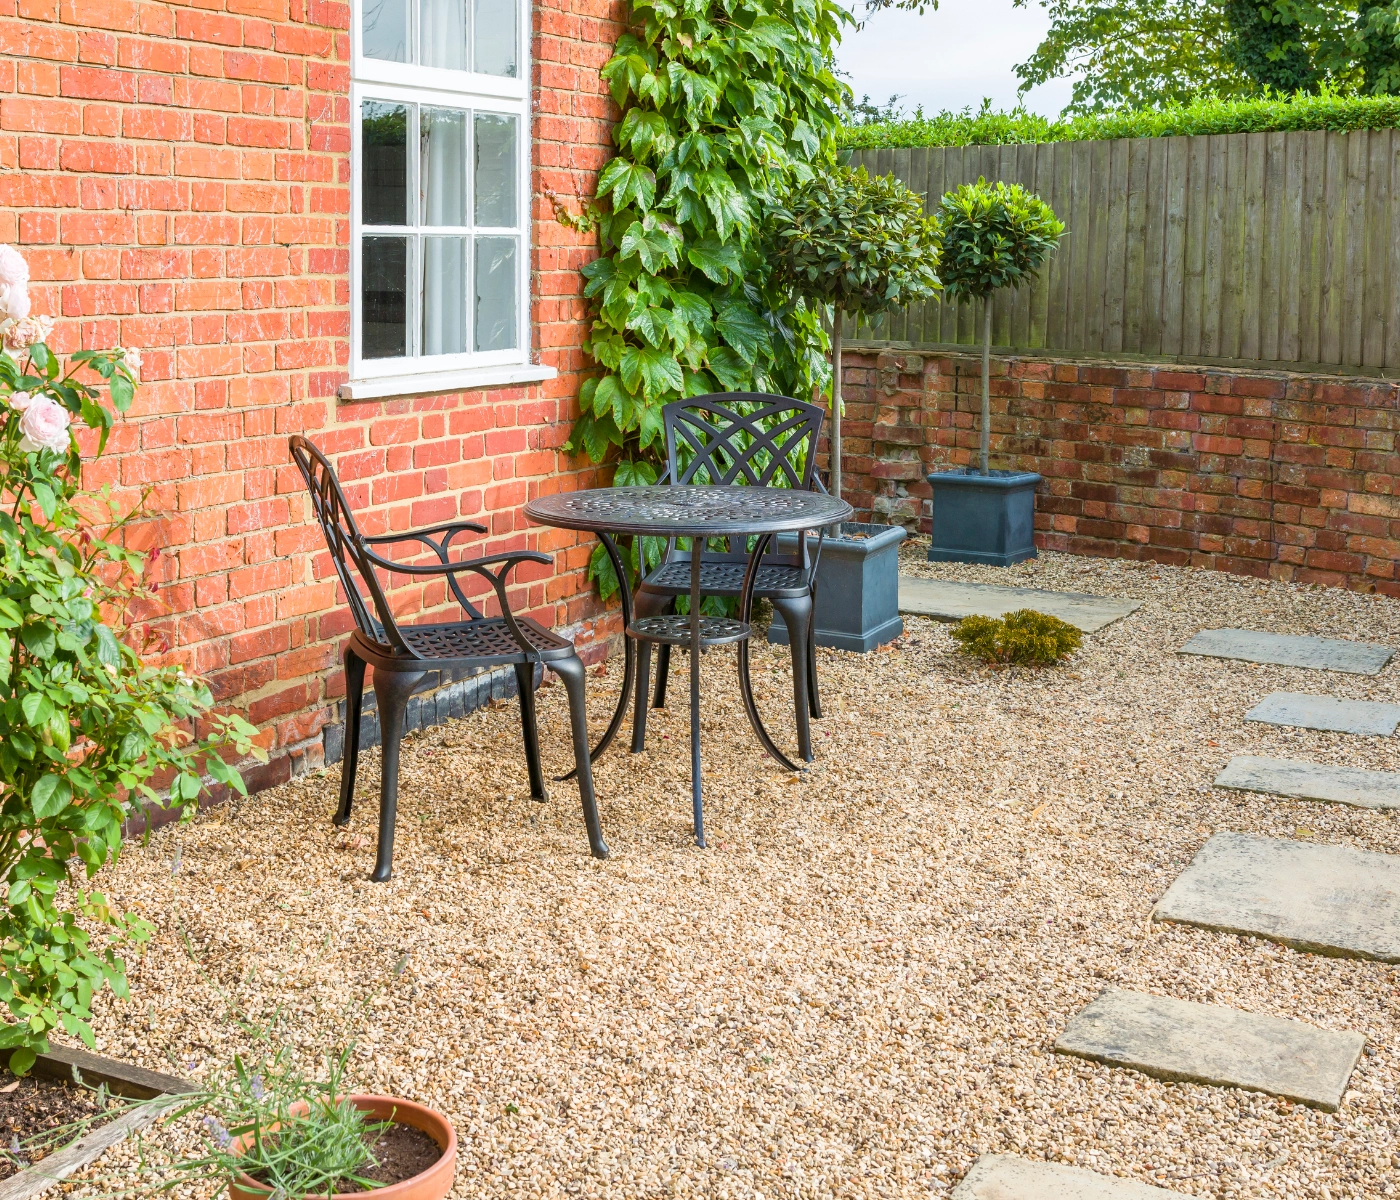
“The absolute key to this scene’s charm is the ivy-clad brick wall.”
It serves as a beautiful, living backdrop that makes the entire nook feel secluded and special. It adds a sense of age and establishment, as if this little seating area has been here for decades. Without the wall and its green covering, it would just be a bistro set on some gravel—pleasant, but not nearly as enchanting. The wall provides enclosure, texture, color, and a story. It’s a perfect example of how architecture and garden can merge into one cohesive idea.
17. A Circular Gravel Lounge Framed by Weathered Wood Sleepers
Using rustic wooden sleepers (or railroad ties) as a border adds incredible texture and a strong graphic element. However, be cautious when sourcing them. Traditional railroad ties are often treated with creosote, a preservative that can be harmful to skin and can leach into the soil, making it unsuitable for growing edible plants nearby. Look for ‘landscaping timbers’ or untreated sleepers from a reputable supplier. To get that aged, weathered look safely, you can use a non-toxic aging stain on new, untreated wood, which will give you the aesthetic without the potential hazards.
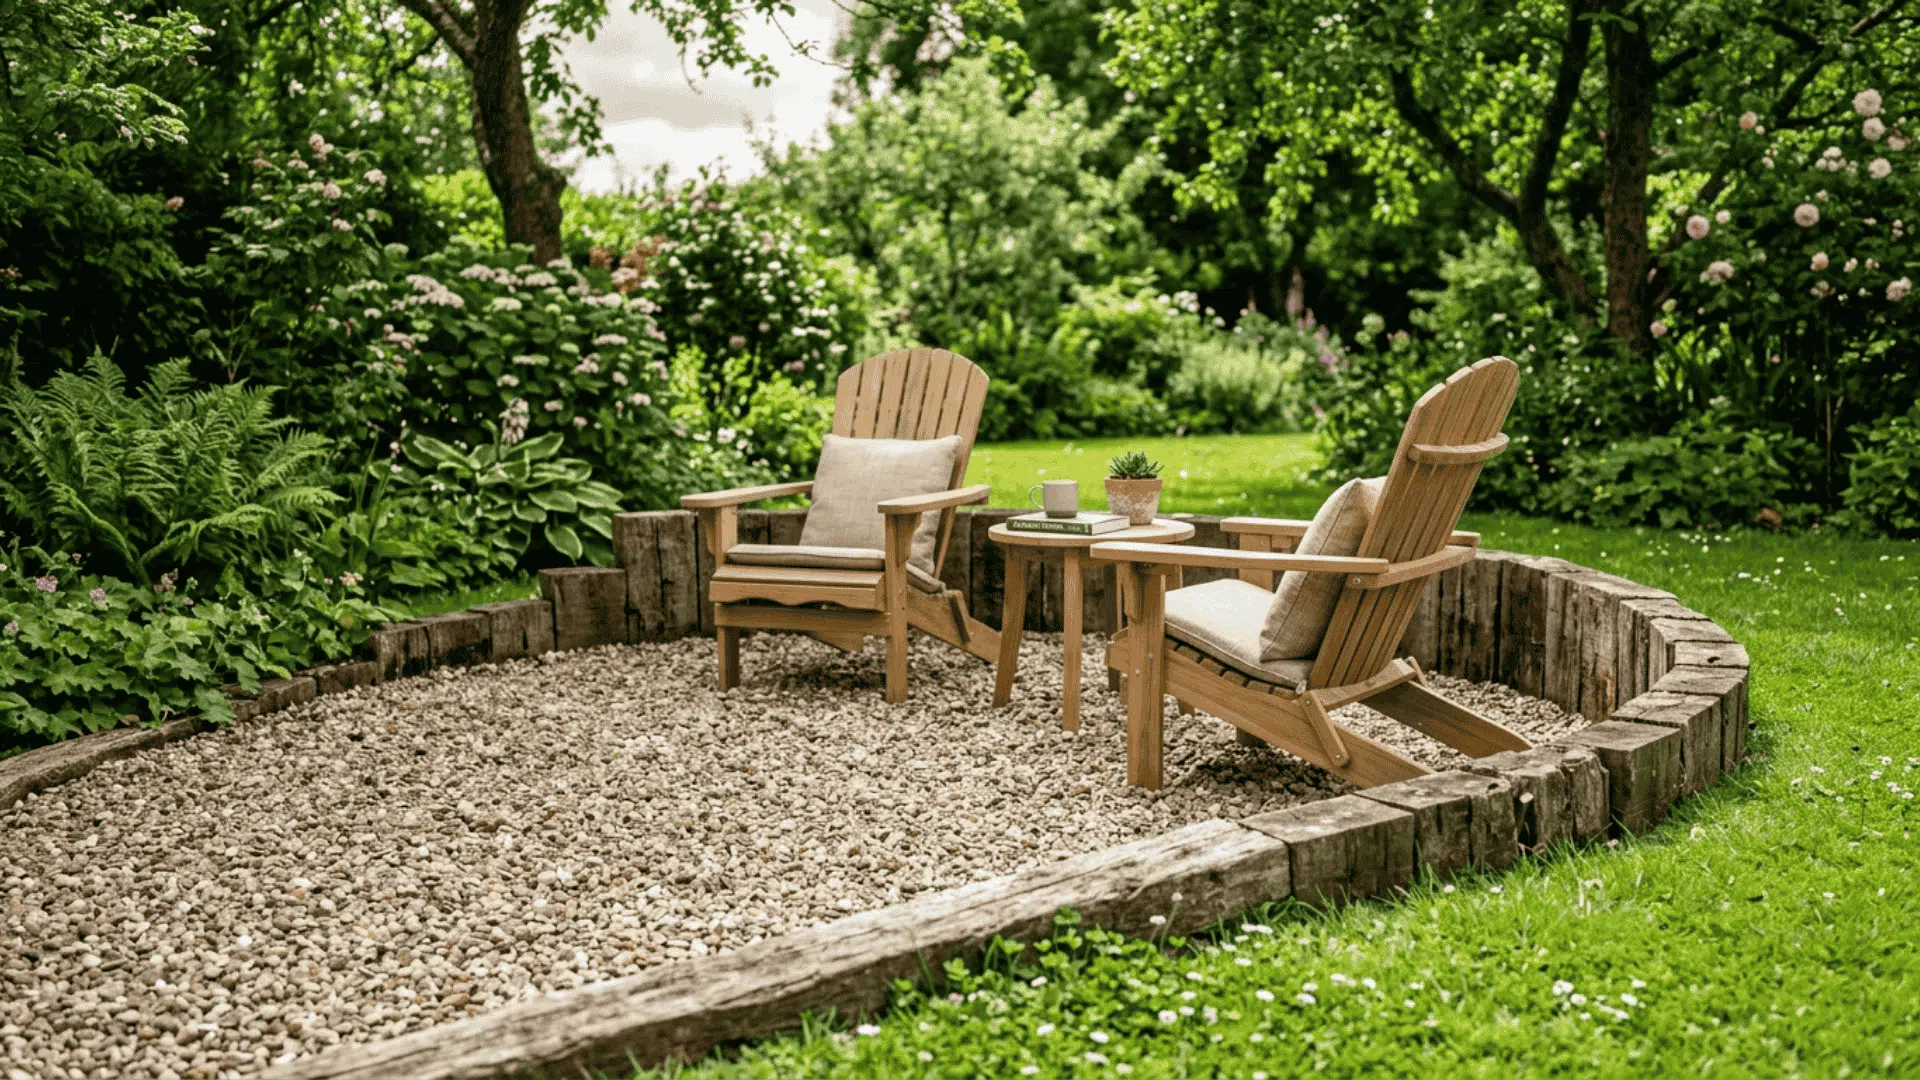
“Measure Your Space: Will the circle feel proportional?”
A 10-12 foot diameter is a great starting point for two chairs and a small table. Anything smaller might feel cramped.Check for Sun/Shade: Is this a spot where you’ll actually want to sit? Consider the time of day you’re most likely to use it and where the sun will be.Plan for Drainage: A gravel circle can become a shallow pond in a downpour if the ground beneath isn’t properly prepared with a slight slope and a good base layer.Confirm Your Material Source: As mentioned, ensure your wooden sleepers are safe for residential use and not treated with creosote.
18. Evening Ambiance with Illuminated Garden Beds and Slat Walls
The landscape lighting is unequivocally the element that makes this entire design sing. In daylight, it’s a handsome modern patio. But at night, the lighting transforms it into a magical, high-end retreat. The uplighting on the foliage makes the plants glow from within, creating a lush, vibrant backdrop. The subtle strip lighting along the patio edge defines the space and appears to make it float. This isn’t just about visibility; it’s about using light as a design tool to create mood, highlight texture, and add a layer of drama that simply doesn’t exist during the day.
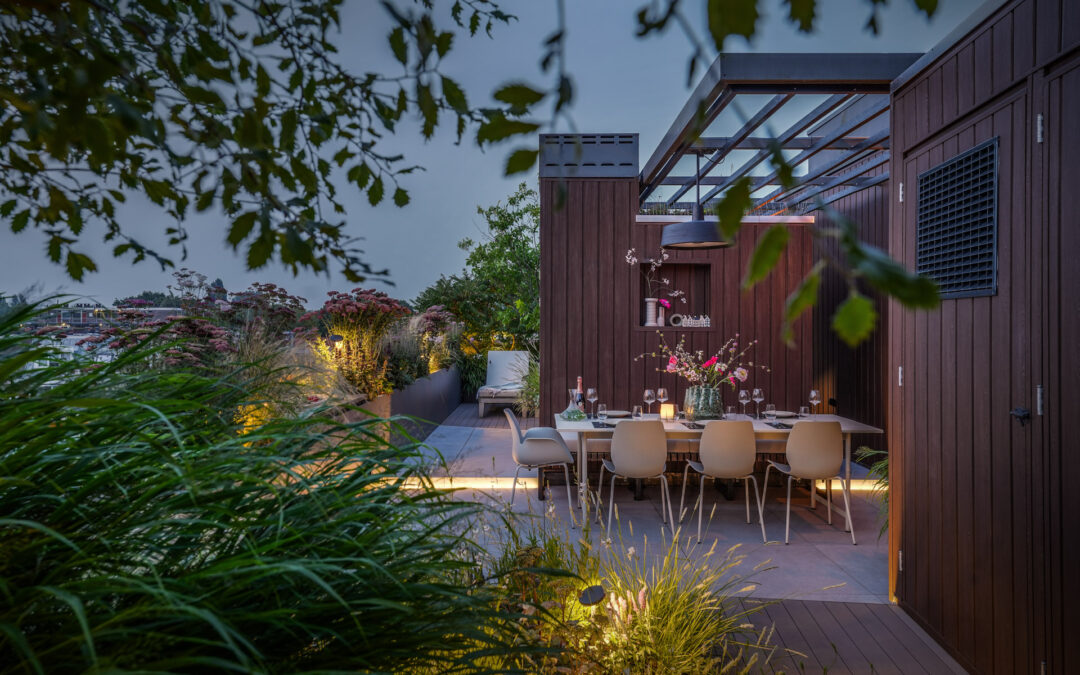
“This stunning nighttime look follows a clear recipe: 50% structured hardscape + 40% lush softscape + 10% strategic light.”
The dark wood slat walls and glass pergola provide a strong, modern architectural frame. The overflowing garden beds, filled with diverse plant forms, offer a soft, organic counterpoint. But the final 10%—the warm, expertly placed lighting—is the ingredient that activates the other two. It’s the interplay between the hard lines, the soft plants, and the glowing light that creates this perfect balance of modern design and natural beauty.
19. A Symmetrical Rooftop Garden with Underlit Trees and Planters
This formal, symmetrical design is best suited for medium to large rooftop terraces, think 300 square feet and up. Symmetry requires space to be appreciated; in a cramped area, it just feels forced. The large-scale planters and mature trees need room to breathe and command attention as focal points. This layout, with its central coffee table and flanking benches and planters, creates a clear axis and a sense of order and tranquility. On a smaller rooftop, a more asymmetrical, casual layout would likely feel more spacious and less rigid.
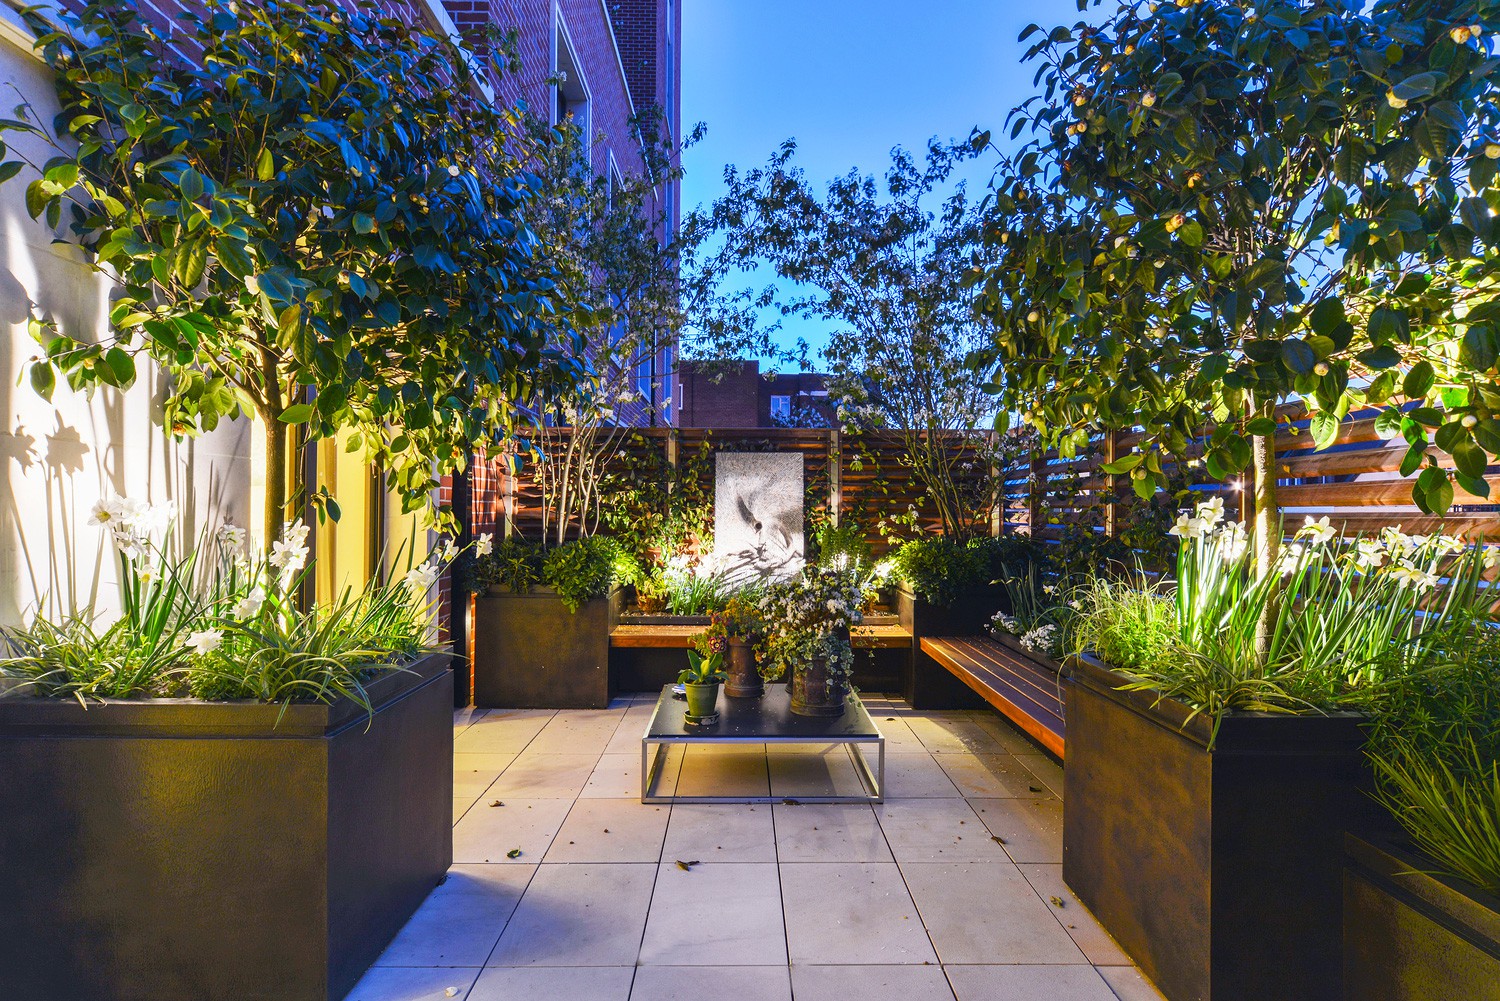
“Before you rush to install large trees on your rooftop, you have to do your homework.”
First and foremost: structural load. Soil, planters, and water-saturated trees are incredibly heavy. You absolutely must consult a structural engineer to ensure your building can handle the weight. Second is drainage. These planters need to drain properly without causing water damage to your roof membrane or the apartment below. Finally, consider wind and sun exposure. Rooftops are harsh environments, so select hardy tree and plant species that can withstand the conditions.
20. A Crisp White and Black Palette with a Playful Scalloped Umbrella
This look is a perfect example of the ‘Modern Resort’ trend that’s taking over Pinterest. It’s about capturing the clean, relaxed, and slightly playful feeling of a boutique hotel poolside. The trend moves away from rustic or farmhouse aesthetics towards something more refined but still comfortable. The scalloped umbrella is a key signifier of this style—it’s a fun, slightly nostalgic detail that signals this space is all about leisure. The strict black and white color scheme keeps it feeling modern and chic, not cutesy.
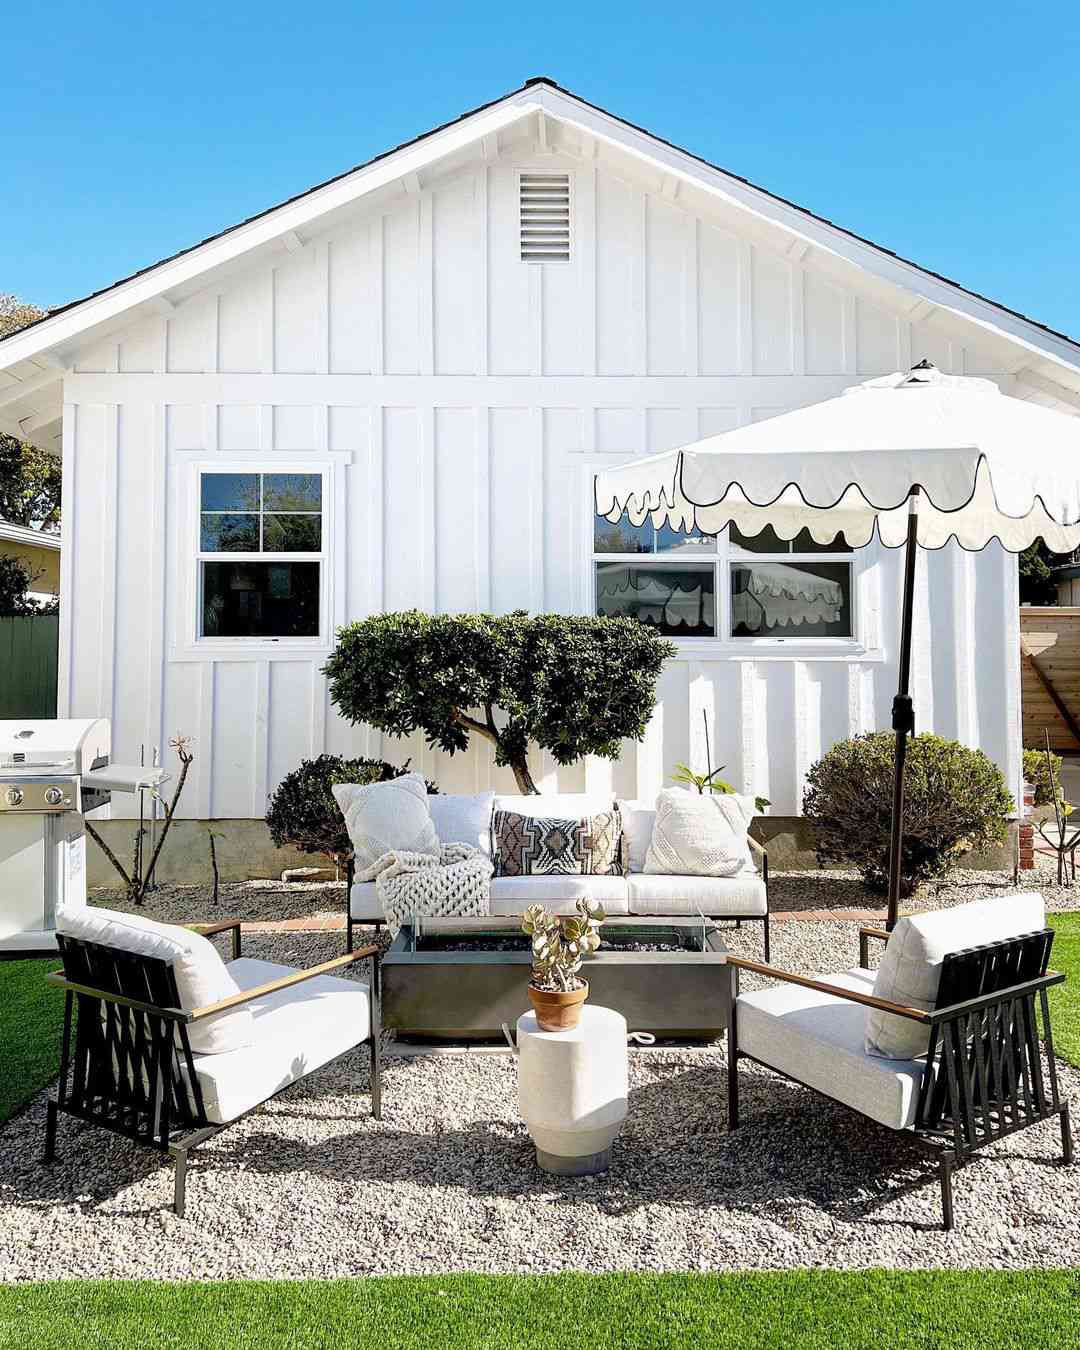
“This design’s success comes from its extreme discipline.”
By sticking to a rigid color palette of white and black with grey as a supporting neutral, the designer allows texture and shape to become the main story. Your eye is free to appreciate the vertical lines of the board and batten siding, the crunchy texture of the gravel, the clean lines of the furniture, and, of course, the distinctive scalloped edge of the umbrella. If other colors were introduced, that beautiful primary shape would lose its impact. It’s a confident look that knows when to stop.
21. A Minimalist Gravel Patio with Low-Growing Inset Plants
A gravel patio with plants, often called a ‘soft’ or ‘planted’ gravel garden, is beautiful but requires a specific type of maintenance. You can’t use a traditional rake, as you’ll dislodge the plants. Weeding must be done by hand. The best approach is to ‘top up’ the gravel every couple of years and use a leaf blower on a low setting for cleanup. The key is choosing the right plants—creeping thyme, sedum, or other low-growing, drought-tolerant species work best as they will spread and help suppress weeds naturally over time.
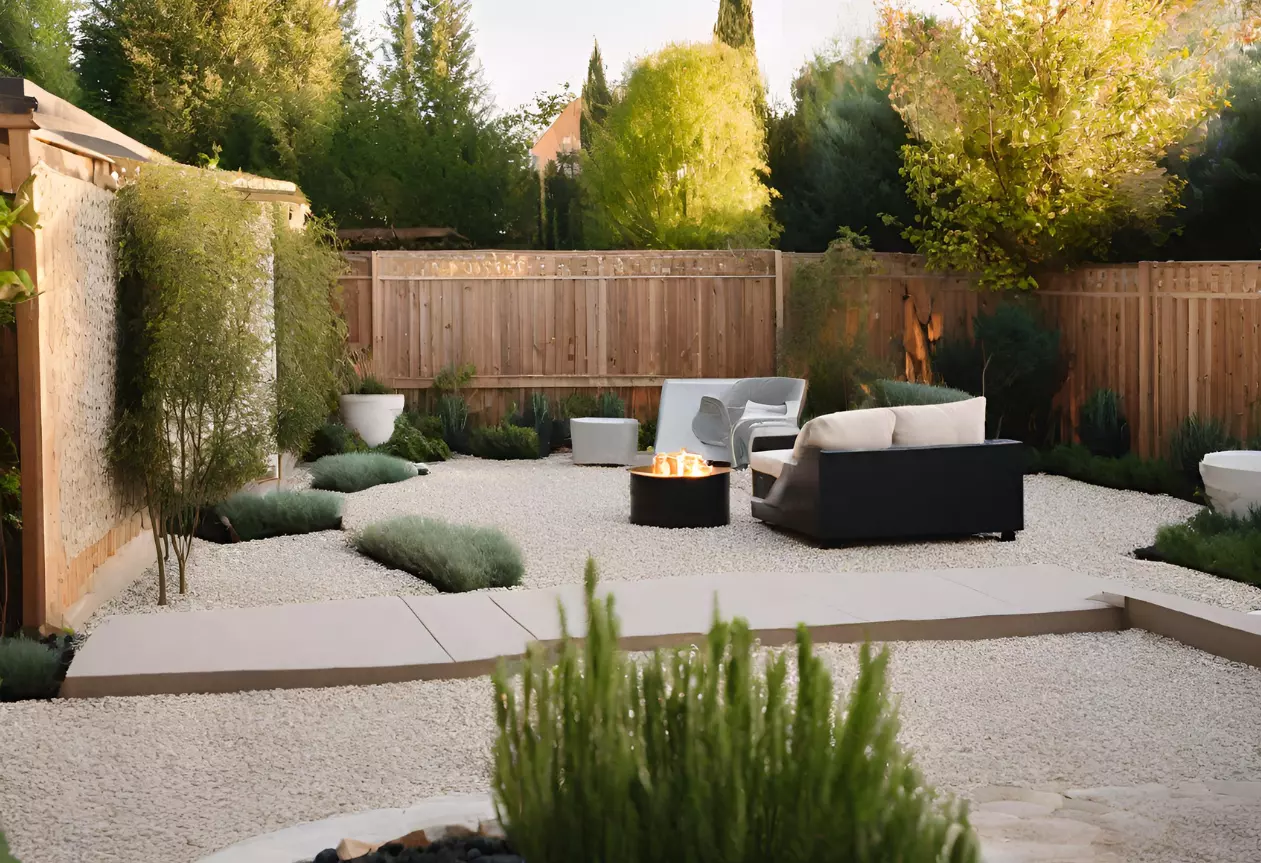
“Furniture (Sofa & Chairs): $2,000 – $6,000Hardscape (Gravel, Pavers, Edging): $800 – $2,500 (for a large area)Fire Pit: $400 – $1,500Plants & Planters: $500 – $2,000Budget Alternative: Use Facebook Marketplace to find a used modern outdoor sofa ($500-$1000).”
Opt for a simple metal fire bowl ($150) and start with smaller, younger plants to save on greenery costs. This could bring the entry point down to the $2,000-$4,000 range.TOTAL: $3,700 – $12,000+
22. A Play of Patterns with Hexagonal Floor Tiles and Herringbone Fireplace
Successfully mixing patterns is a pro-level move, and the key is to vary the scale while keeping the color story consistent. Here, you have the medium-scale hexagonal pattern on the floor and the small-scale, tight herringbone pattern in the firebox. One is geometric and bold, the other is classic and detailed. Because they are different sizes, they don’t fight for your attention. If you had two large-scale, bold patterns right next to each other, the result would be chaos. As a rule, combine one large or medium pattern with one small, detailed pattern.
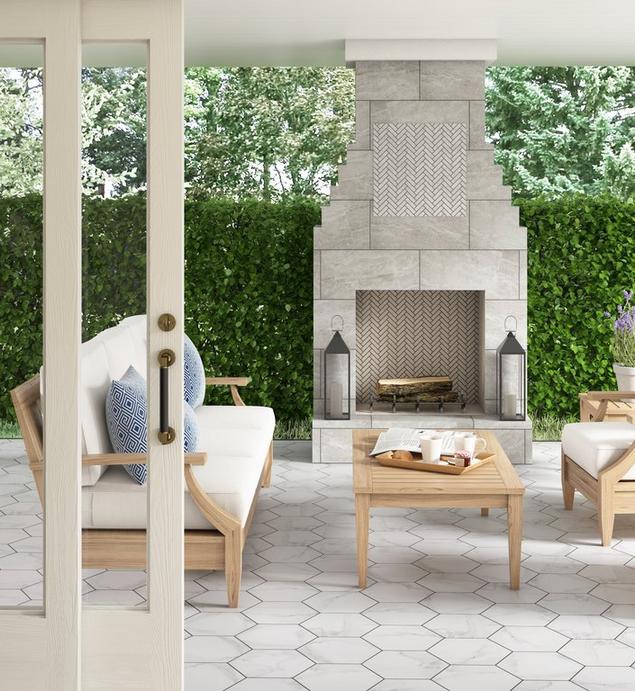
“This combination of patterns works beautifully because a disciplined color palette acts as the unifying thread.”
The floor tiles, the stone fireplace surround, the herringbone accent, and the furniture cushions all exist within a narrow range of light greys, whites, and tans. This cohesiveness allows the different shapes and patterns to create visual interest without feeling jarring. The blue pillows and green plants are the only real ‘colors’, used as accents against the neutral, textural backdrop. It proves that you can be bold with pattern as long as you are restrained with color.
23. A Modern Patio Anchored by a Geometric Privacy Screen
The geometric patterned screen is the undeniable star of this outdoor space. It does more than just provide privacy from the neighbors; it acts as a piece of large-scale art and an architectural feature. It introduces a modern, almost mid-century pattern that contrasts wonderfully with the organic shapes of the surrounding plants. Its bright white color pops against the dark wood fence, and it provides a stunning backdrop for the seating area. Remove the screen, and the whole design loses its focal point and its unique personality.
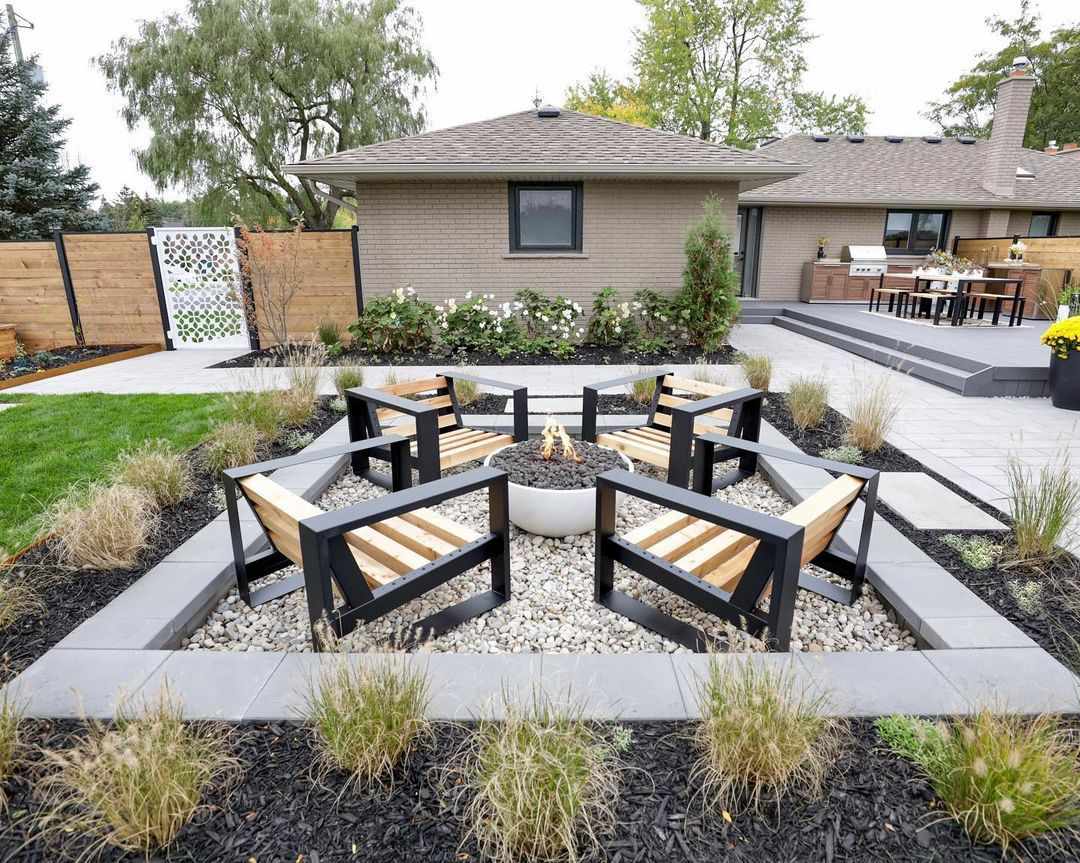
“Those laser-cut composite or metal screens can be pricey.”
For a similar effect on a smaller budget, you can create your own version using standard wooden lattice panels from a home improvement store. Purchase a few panels, build a simple frame for them using 2x4s, and then paint the entire structure a crisp, clean white. While it won’t have the same intricate pattern, it will create the same effect of a bright, textured privacy wall that defines the space and provides a beautiful backdrop. This DIY approach can give you a high-impact feature for a fraction of the cost. Compare to the slat walls in Idea #17.
24. A Curved Path of Stepping Stones and Multi-Colored Pebbles
Creating a durable and beautiful stepping stone path with pebble infill is all about the base. It’s a great weekend project.
- Time: 4-6 hours for a 15ft path. Cost: $200-$400.
- Lay out your desired path shape with a garden hose. Excavate the entire path area to a depth of 4 inches.
- Compact the soil, then lay down a high-quality landscape fabric across the entire excavated area. This is critical for preventing weeds.
- Lay your rectangular stepping stones in your desired pattern directly on the fabric, leaving 2-4 inch gaps between them.
- Install your brick edging along the sides of the path.
- Finally, pour in your multi-colored pebbles, filling the gaps between the stepping stones and up to the edging. Use a broom to spread them evenly.
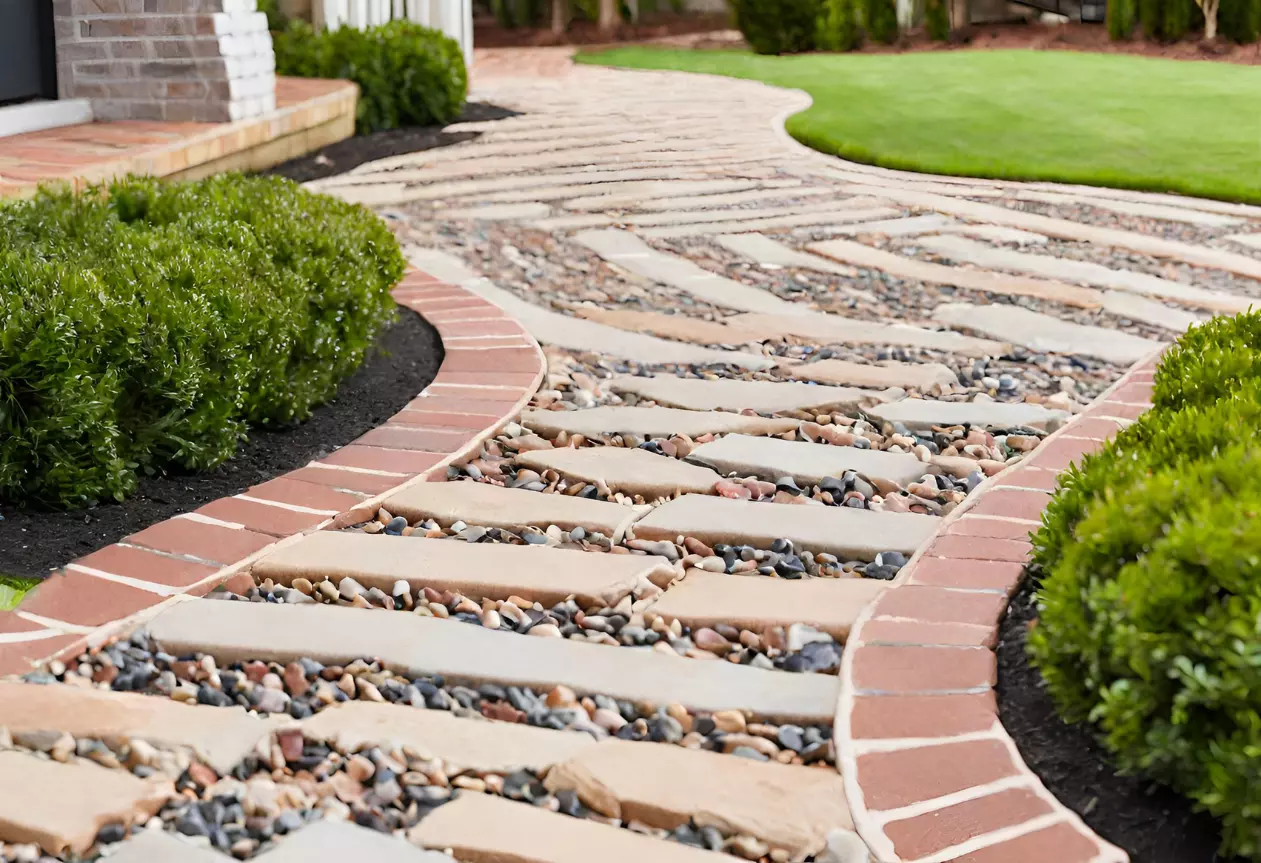
“The visual recipe for this charming path is a delightful mix of repeating shapes and natural textures.”
It follows a formula of roughly 50% smooth, uniform pavers + 30% varied, small-scale pebbles + 20% classic brick edging. The large, light-colored rectangular pavers provide a stable and clear walking surface. The multi-colored pebbles fill the negative space with texture and a range of earthy colors. The red brick edging contains the path and gives it a finished, traditional look that contrasts nicely with the more organic feel of the pebbles. This balance is what makes it so visually satisfying.
25. A Simple Gravel Seating Nook with Wooden Adirondack Chairs
This entire seating area is a fantastic example of high-impact, low-budget design. It’s one of the most achievable ideas in this entire article. Light brown pea gravel is very affordable, as is the black plastic landscape edging used to contain it. The irregular stepping stones can often be sourced inexpensively from garden centers or even found for free. The key is to find a pair of well-priced wooden Adirondack chairs, which are frequently on sale at the end of the season. This is a perfect DIY project that can transform a forgotten corner of your yard for just a few hundred dollars. This is the budget version of Idea #5.
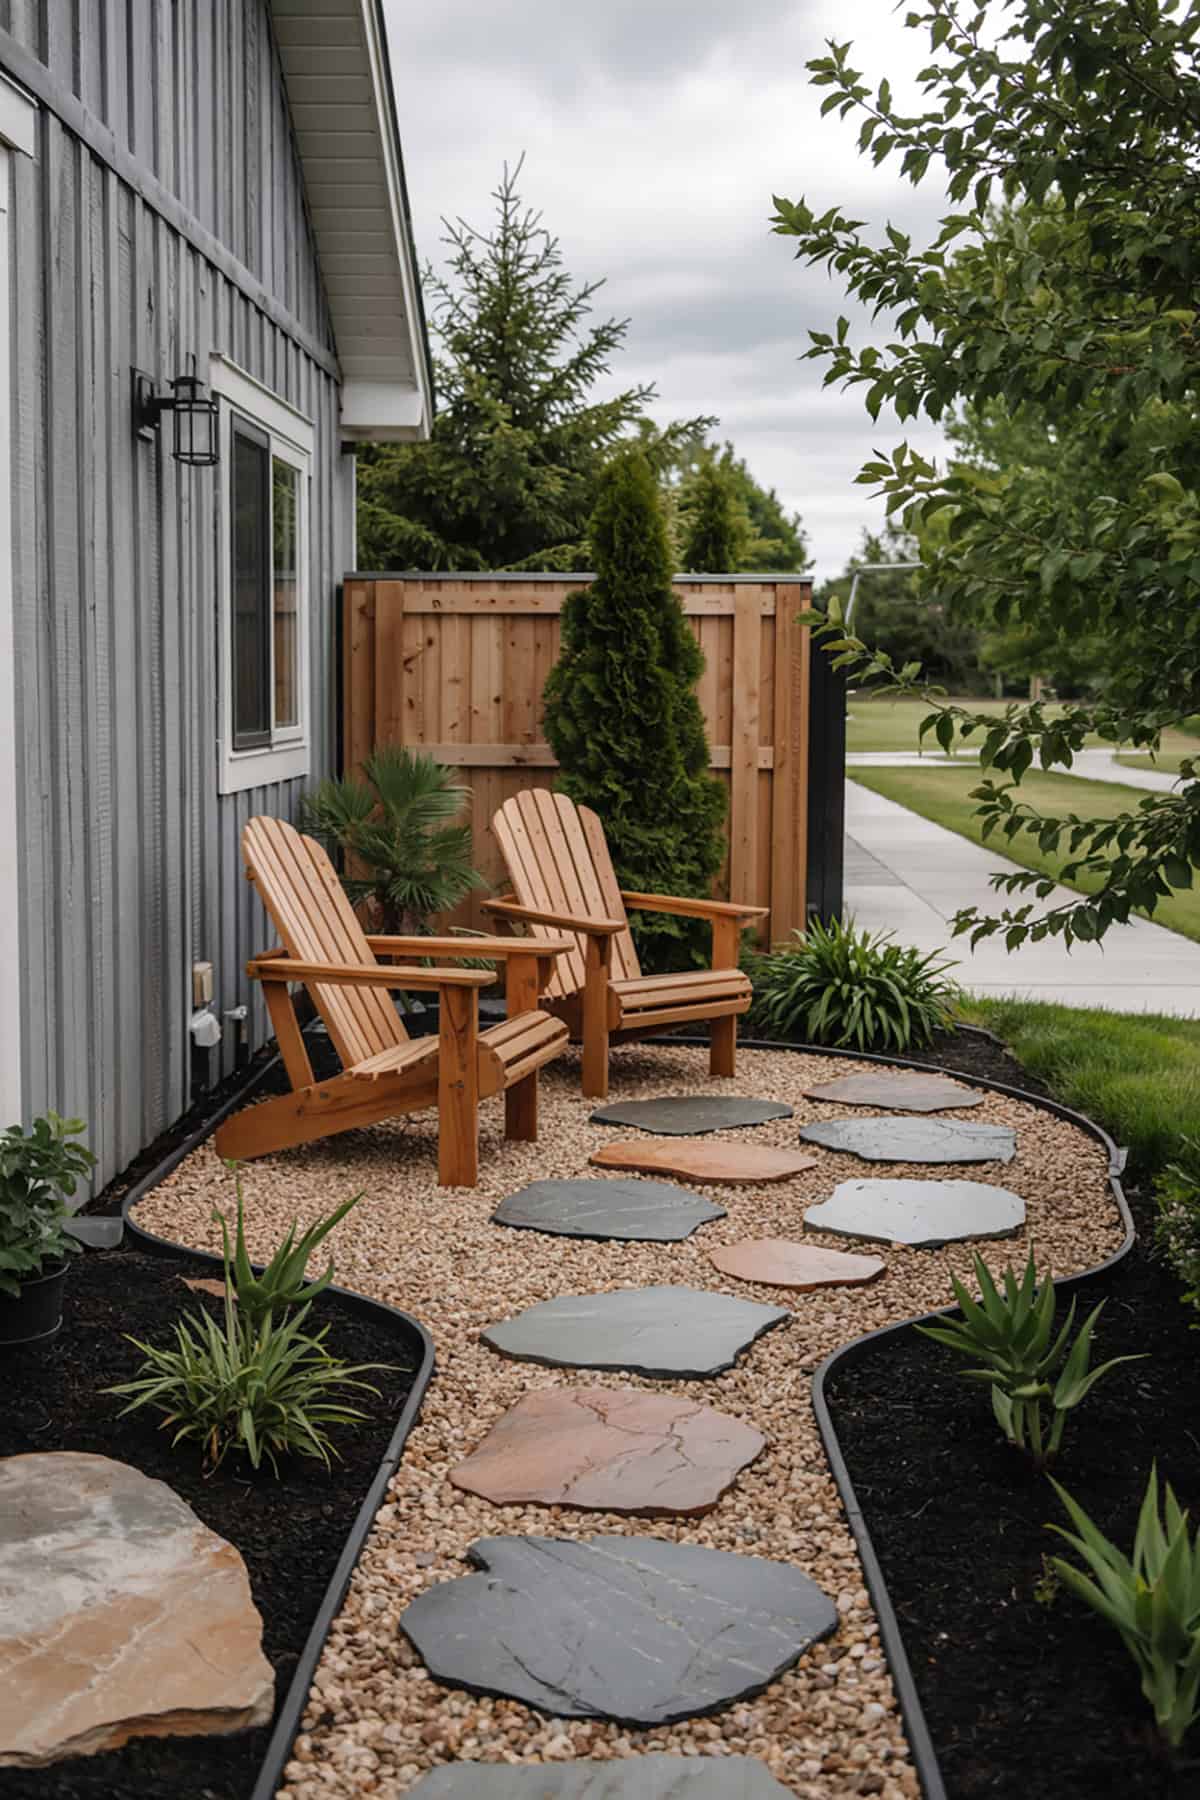
“This ‘pocket patio’ concept is ideal for small or awkwardly shaped yards.”
You don’t need a large, flat expanse to make it work. An area as small as 8×10 feet is sufficient to create this cozy little destination. It’s perfect for a side yard, a spot behind the garage, or a previously unused corner. By creating a specific, dedicated zone for seating, you add function and a sense of purpose to a small space, making the entire yard feel more utilized and thoughtfully designed. It’s proof that you don’t need a huge footprint to create a relaxing outdoor retreat.
26. Dining Under a Pergola on a Patio of Multi-Toned Pavers
The design works so well because of the beautiful balance between warm and cool tones, and light and dark materials. The light wood of the pergola brings a natural warmth and brightness to the upper portion of the scene. This is contrasted by the cool, darker shades of the multi-toned grey and brown pavers underfoot. The black metal of the dining set and umbrella pole acts as a strong, grounding accent that ties the two zones together. This layering of light over dark, and warm over cool, creates a space that feels balanced, dynamic, and complete.
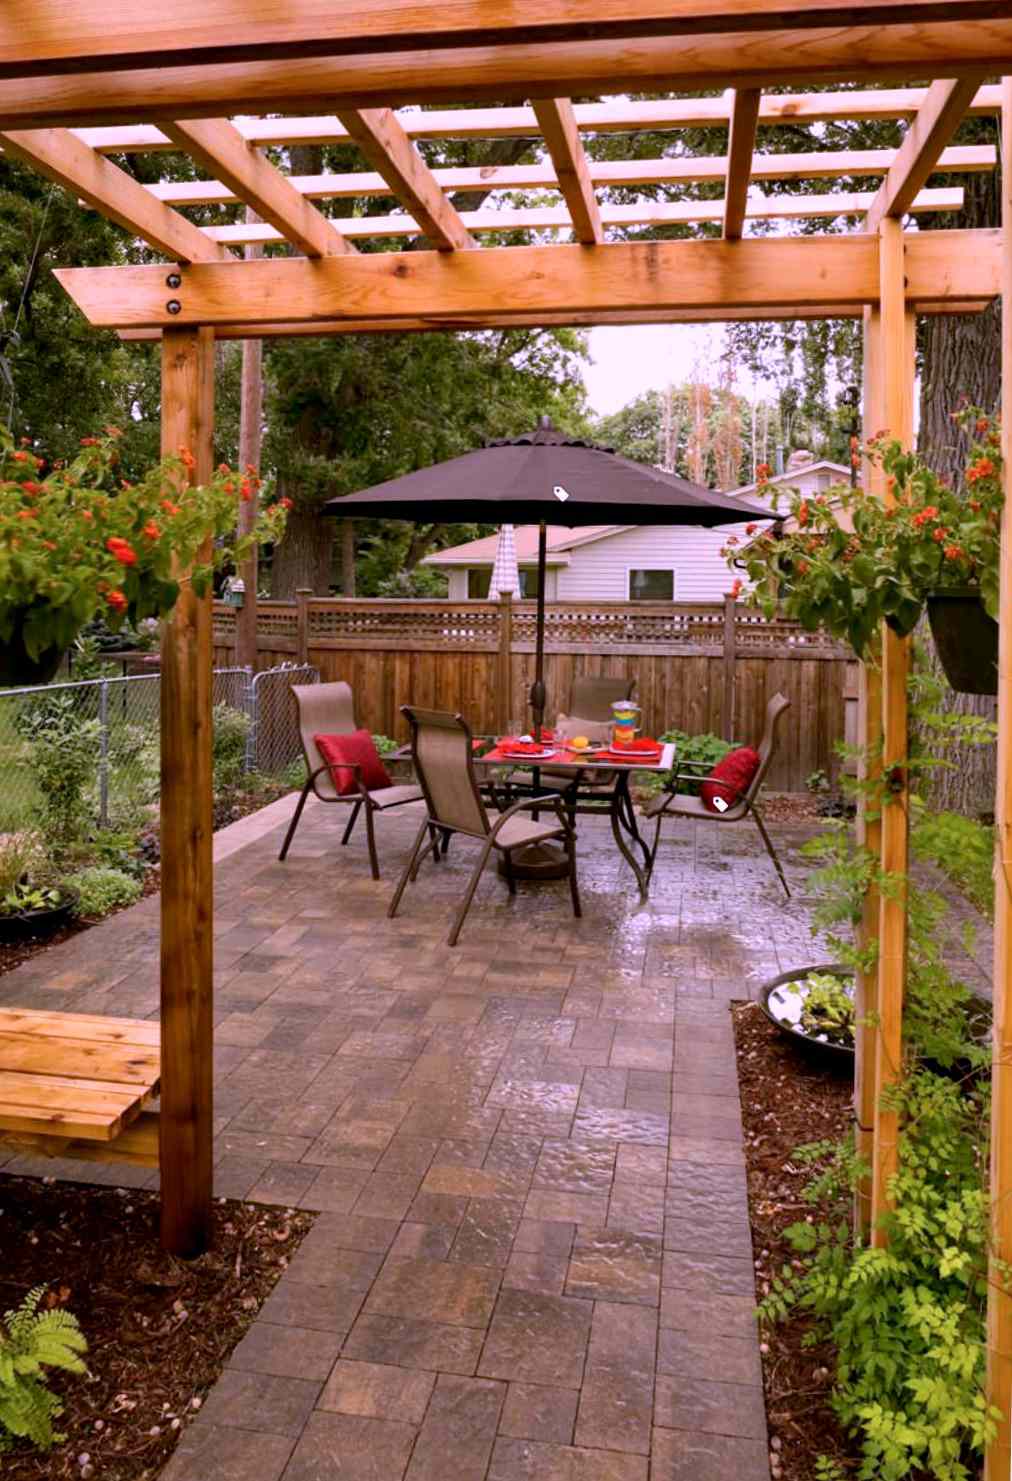
“A paver patio looks fantastic, but the joints between the stones can be a magnet for weeds and moss, especially in damp or shady areas.”
To keep it looking sharp, you’ll need to be proactive. A stiff-bristled broom and a bit of elbow grease can handle most surface growth. For stubborn weeds, a pressure washer (on a low setting) or a targeted application of a weed killer might be necessary a few times a season. Resanding the joints with polymeric sand every few years can also help significantly by creating a hard barrier that weeds can’t penetrate.
27. A Mediterranean Vibe with a Mosaic Table and Tiered Fountain
This rich, layered look taps directly into the growing ‘eclectic Mediterranean’ and ‘Tuscan farmhouse’ trends. Homeowners are craving spaces that feel personal, collected, and a little bit romantic. It’s a reaction against years of minimalist, grey-and-white design. The mosaic tile, terracotta pots, red brick, and lush, slightly unruly plants all contribute to a feeling of warmth and history. The sound of the tiered fountain adds another sensory layer, making the space feel like a true escape—a little piece of a European vacation right in your own backyard.
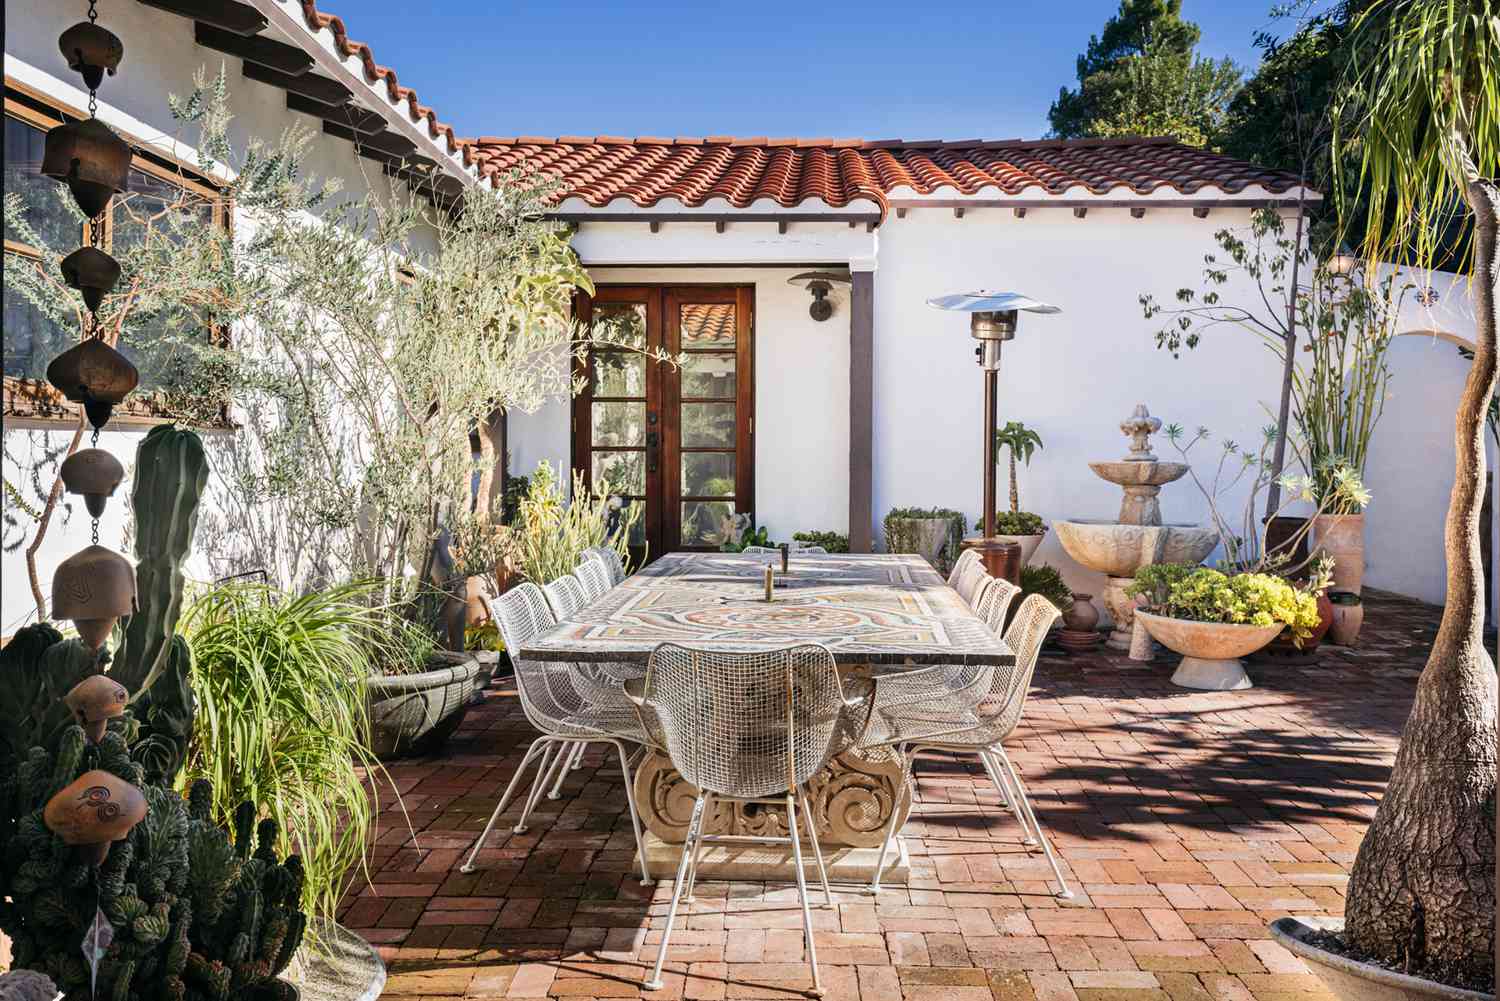
“That lovely tiered stone fountain is a major aesthetic win, but it comes with a chore list.”
You’ll need to clean it regularly (every month or two) to prevent algae buildup, which can turn the water green and clog the pump. The pump itself will need to be checked to ensure it’s free of debris. In colder climates, you’ll have to properly winterize the fountain by draining it completely and either covering it or bringing the pump indoors to prevent cracking and damage from freezing water. It’s not a ‘set it and forget it’ feature, but for many, the soothing sound is well worth the effort.
28. A Cohesive Hardscape of Beige Pavers and a Herringbone Brick Accent
A simple but incredibly effective way to create a high-end, custom look is to use borders to define different zones within your hardscape. Here, the dark brown brick is used to frame the planting beds and the edge of the pool, separating them from the main beige paver patio. This technique, known as ‘banding,’ creates clean lines and visual organization. Notice how it’s also used to create the special herringbone section for the fire pit. It’s like drawing rooms on your patio floor, giving each area its own distinct character while maintaining a cohesive look.
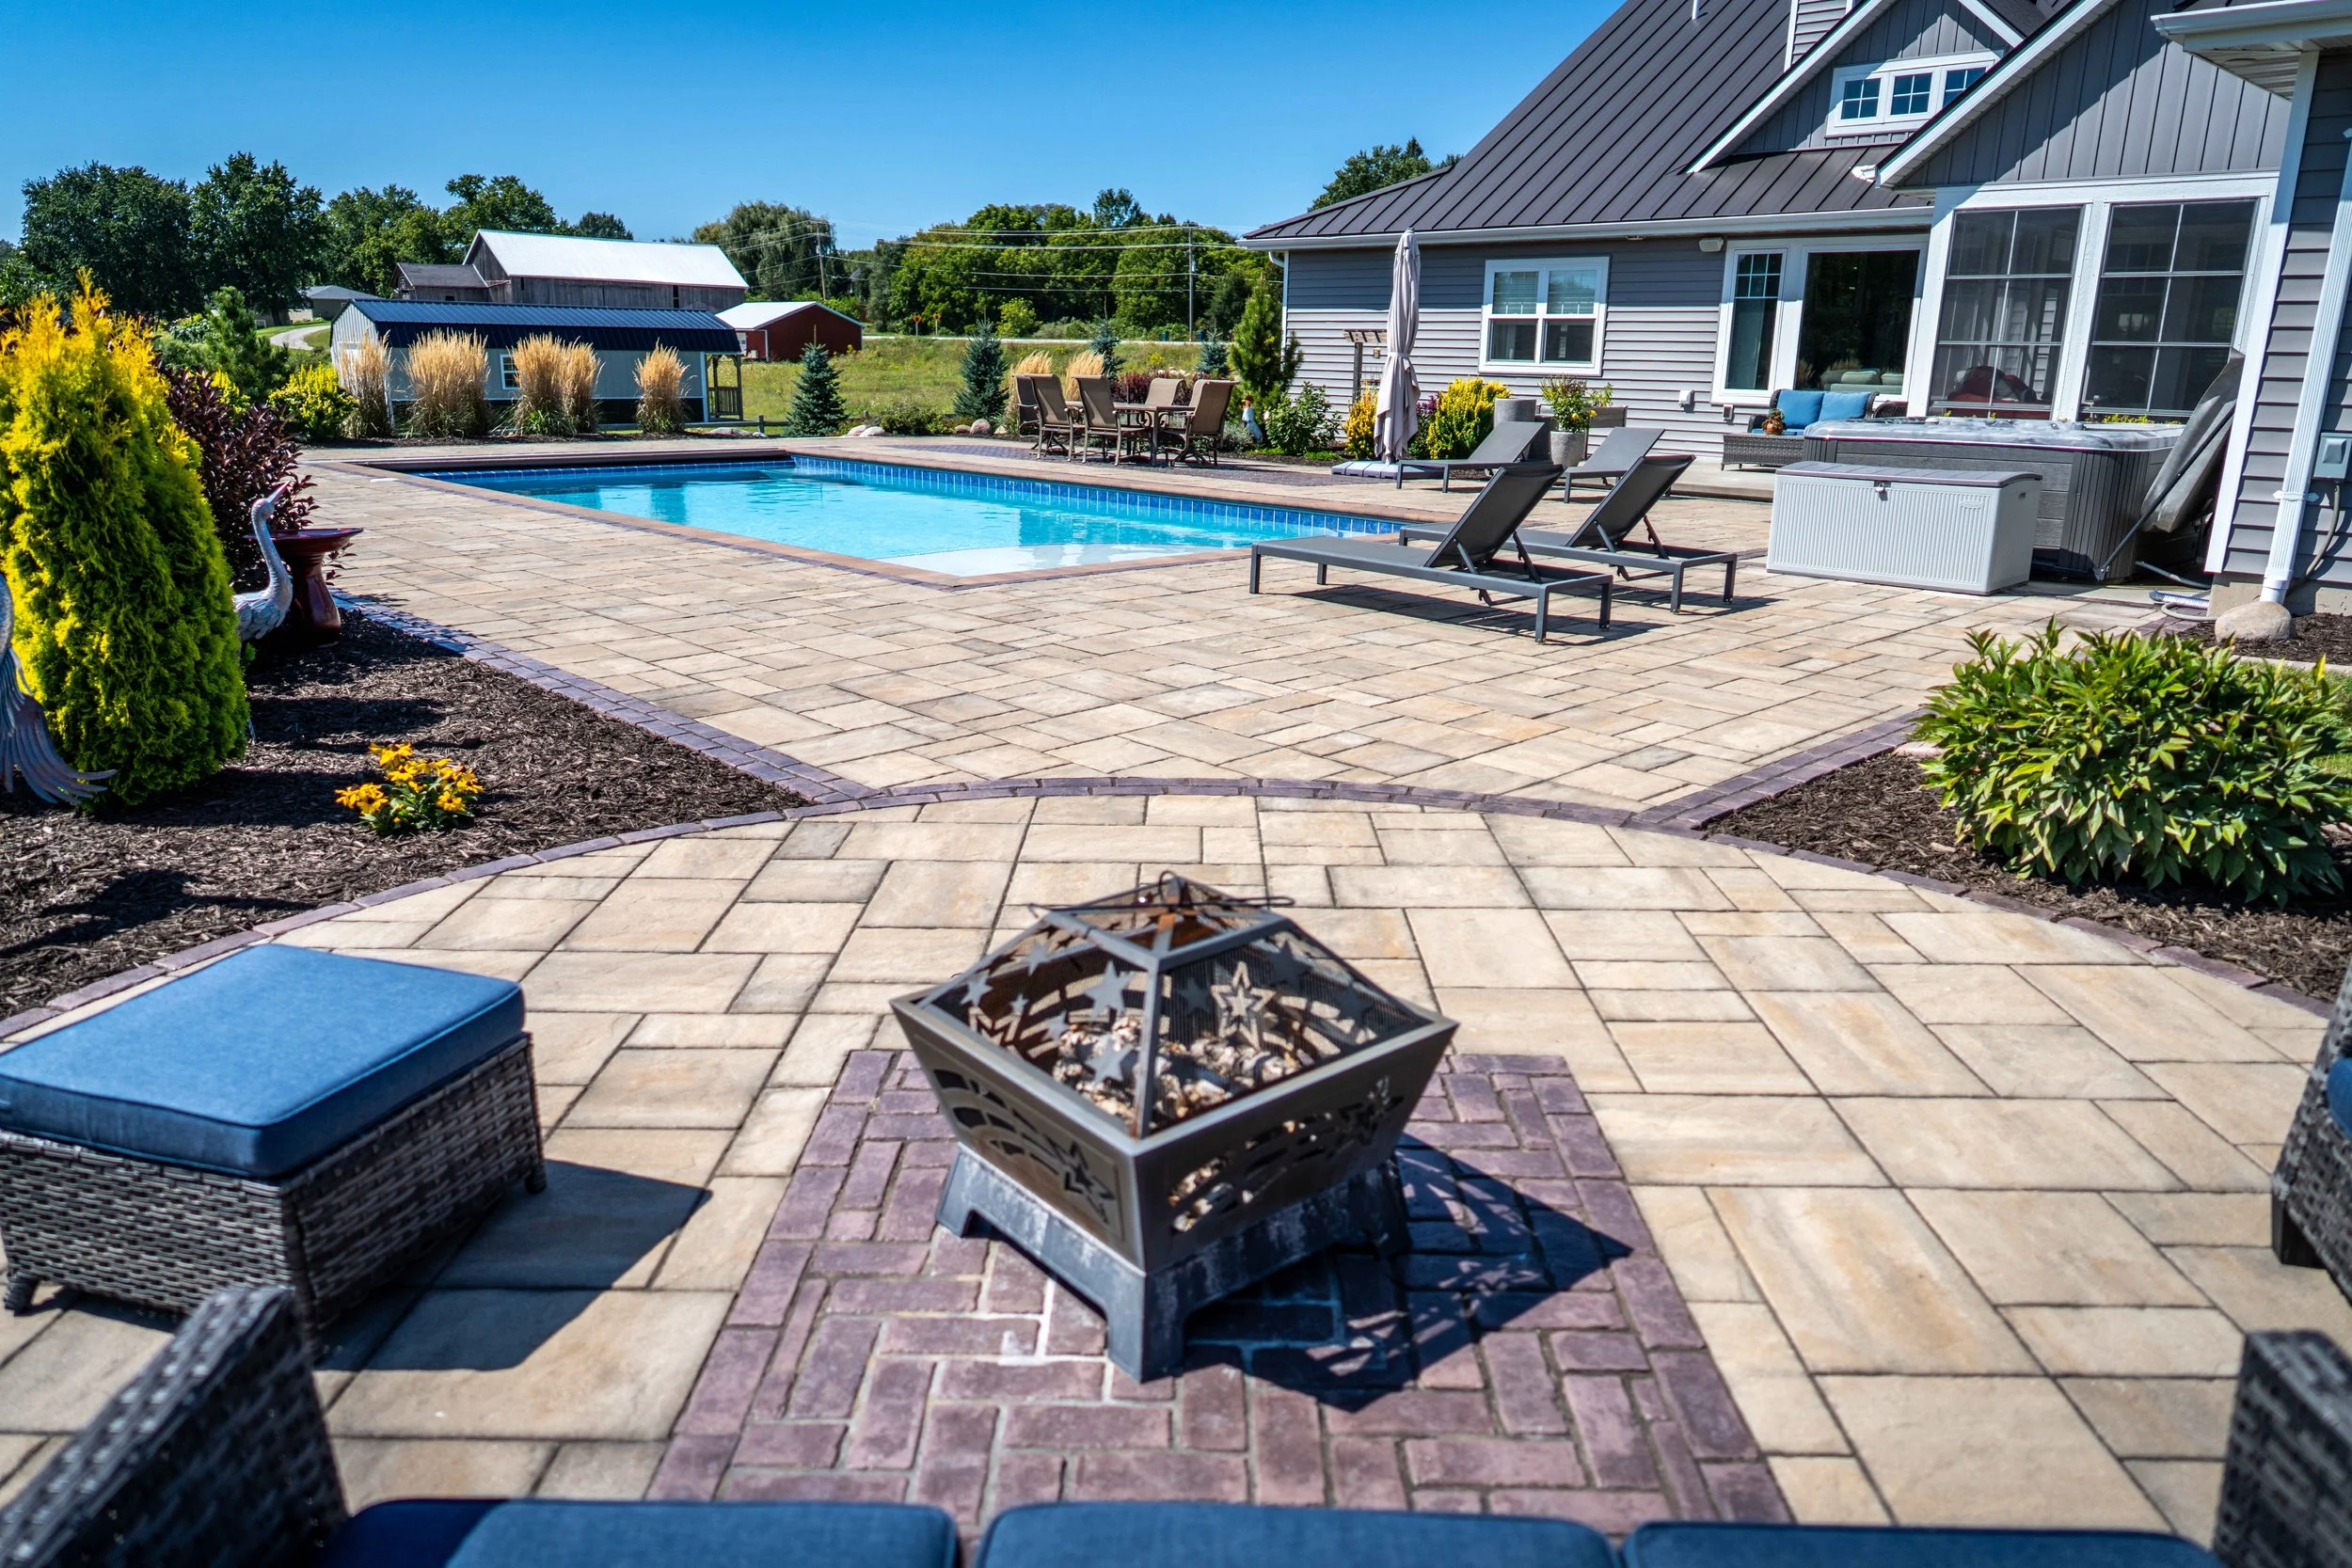
“The single detail that elevates this entire patio from ‘nice’ to ‘designer’ is the section of dark brown brick laid in a herringbone pattern beneath the fire pit.”
The main field of beige pavers is simple and functional. But this small, dedicated area of intricate pattern adds a surprising and sophisticated touch. It acts as a built-in ‘rug’ for the fire pit, anchoring it in the space and signaling that this is a special zone. It’s a small detail that shows a high level of design thought and stops the large expanse of pavers from becoming monotonous.
29. An Expansive Flagstone Patio with Natural Wood Seating Areas
A large, open-concept patio like this is best for a generous backyard space. To truly appreciate the distinct seating areas, you need a minimum patio footprint of around 400-500 square feet. This allows you to place a dining set and a separate lounge area without them feeling crowded. The key is to have enough ‘negative space’ or walkways between the zones, as seen here. This emphasizes the spaciousness and allows for comfortable flow. In a smaller space, trying to cram in two zones will feel cluttered; it’s better to perfect one. For a great small-space idea, check out Idea #14.
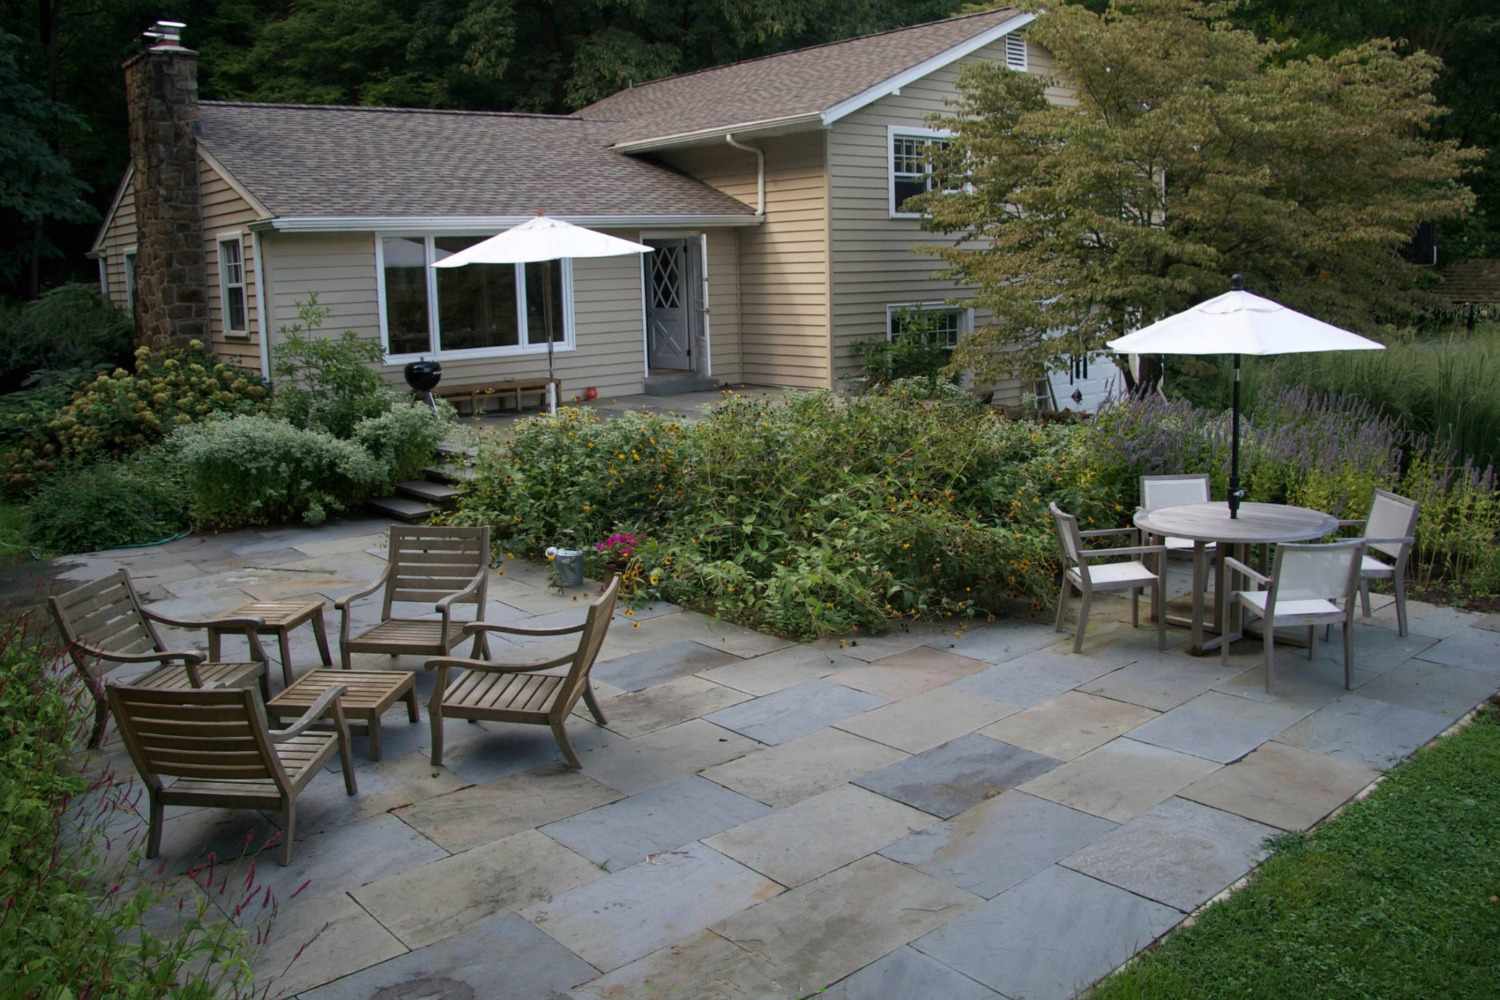
“The design succeeds by creating ‘outdoor rooms’ through strategic furniture placement.”
Rather than scattering furniture around, it’s clustered into purposeful groups. You have the intimate lounge area with the two slatted armchairs and a small table, perfect for a quiet chat. Then there’s the more social dining area with the round table and four chairs under an umbrella. Each grouping functions as a destination, with the flagstone patio acting as the floor connecting them. This zoning is what makes the large space feel usable and inviting rather than empty and vast.
30. A Tiered Patio with Rustic Flagstone and Cast Iron Furniture
Creating a multi-level patio with integrated stone walls is a major construction project, not a simple design choice. It involves significant excavation, a deep understanding of soil mechanics, and proper drainage engineering to be successful and safe. Retaining walls over a certain height (often 3-4 feet, depending on your local codes) typically require permits and a professional engineer’s sign-off. This look is absolutely beautiful and a fantastic way to handle a sloped yard, but it represents a very significant investment in professional labor and materials.
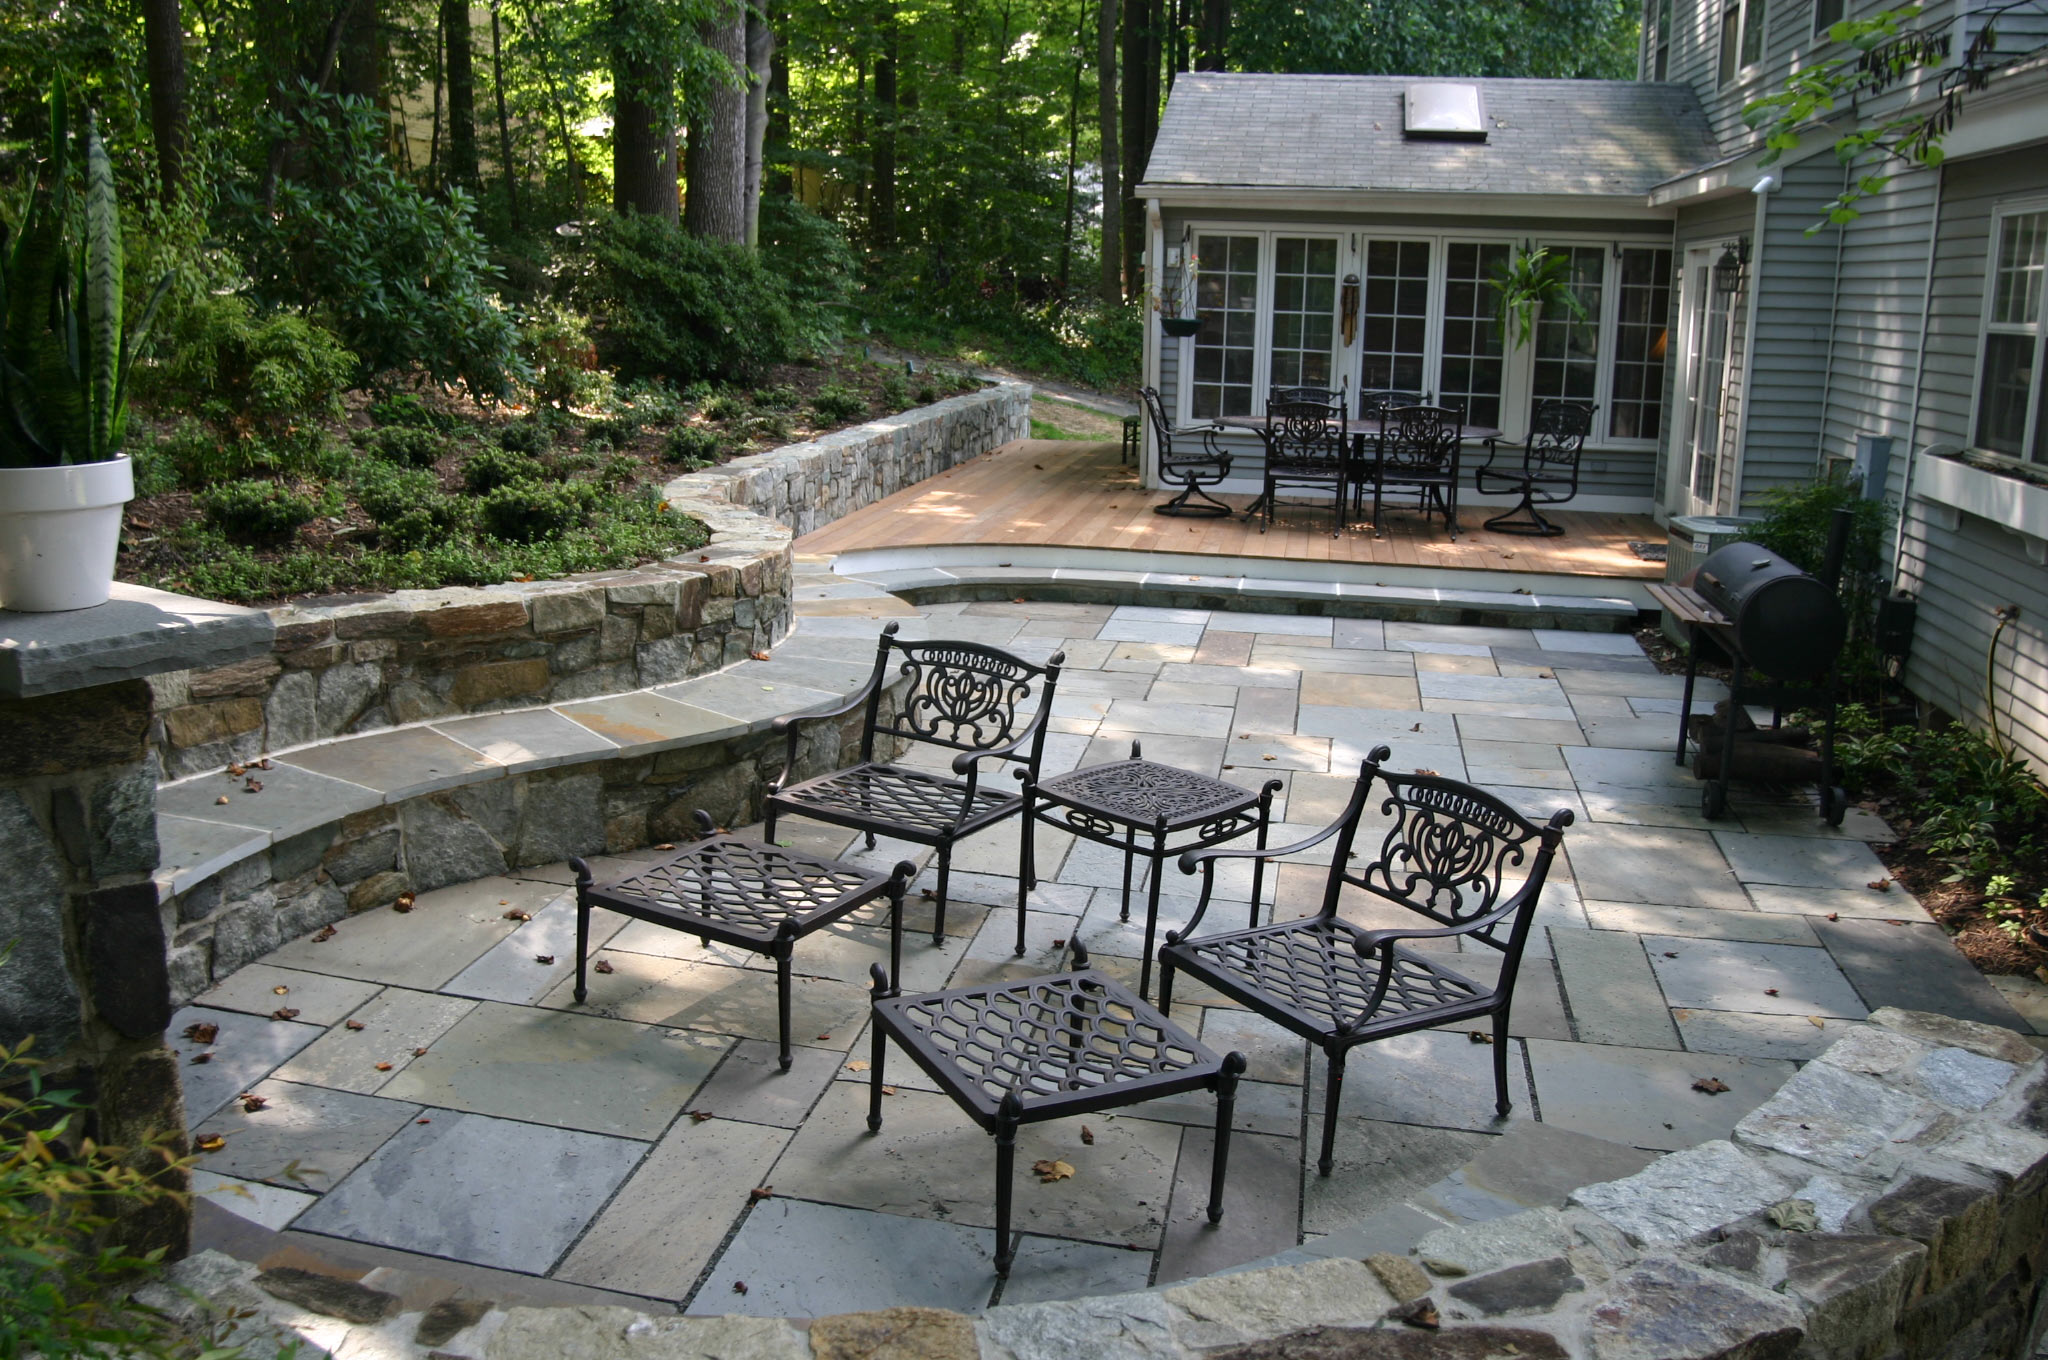
“This space feels so cohesive because it follows a rustic, nature-forward formula: 70% natural stone and wood + 20% lush greenery + 10% delicate detail.”
The dominant materials are the grey flagstone patio floor and the tiered stone walls, complemented by the wooden deck. These heavy, rustic elements are softened by the abundance of green foliage spilling over the walls and filling the garden beds. The final touch is the intricate, openwork pattern of the dark cast iron furniture. This delicate metalwork provides a point of contrast against the more rugged stone, adding a touch of elegance.
31. The Ultimate Outdoor Living Space with a Fire Pit and Pergola Kitchen
This is a high-end, all-in installation. The costs reflect a professionally designed and built space.
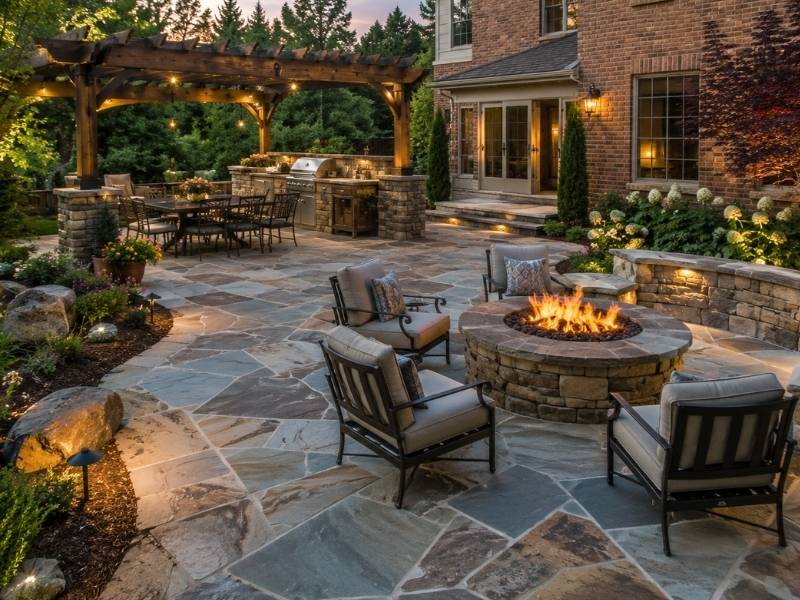
“Hardscape (Extensive Flagstone Patio): $15,000 – $40,000+Structures (Pergola & Outdoor Kitchen): $20,000 – $60,000+Features (Stone Fire Pit & Grill): $5,000 – $15,000Furniture & Lighting: $4,000 – $10,000Budget Alternative: This is a ‘dream big’ scenario.”
A more phased, DIY-friendly approach could involve starting with a simple paver patio and a standalone grill, then adding a fire pit kit and a pergola over time. This breaks the cost into manageable chunks over several years.TOTAL: $44,000 – $125,000+
An outdoor kitchen is a major upgrade. Before you even start looking at grills, run through this list:
- Check Local Codes: Does your town have specific regulations or require permits for outdoor kitchens, especially regarding gas and electrical lines?
- Map Your Utilities: Where are your existing gas, water, and electrical lines? The distance from these sources will dramatically affect the installation cost.
- Consider the Elements: Will the kitchen be exposed to harsh sun, wind, or rain? Choose materials (like stainless steel and stone) that can withstand your climate.
- Plan for Workflow: Think about the ‘work triangle’ just like an indoor kitchen. Ensure you have counter space next to the grill for prep and landing.
Your Garden’s Next Chapter Starts Here
Feeling inspired? We hope so! These 31 ideas show that no matter your space or budget, a beautiful and functional outdoor area is within reach. The key is to find a look that resonates with you and start planning. Don’t feel pressured to do it all at once; even a small change, like adding a gravel nook or a statement planter, can make a huge difference.
Ready to start your project? Pin your favorite ideas from this article to your Pinterest board, and let the transformation begin!