You know that feeling when you finally find the stepping stone walkway idea that looks exactly right for your yard? It feels like the whole garden suddenly clicks into place. But with so many options, getting to that “aha!” moment can be a journey in itself. We get it. After filtering through hundreds of options from local garden centers, Home Depot, and bespoke stone suppliers, we narrowed it down to the 29 ideas that actually deliver on style and function. Inside, you’ll find everything from rustic flagstone pathways to modern concrete paver designs. In 2026, the focus is all on creating harmonious transitions between the home and garden, and a well-designed walkway is the perfect way to start that story. And stay until the end — we break down the most common mistakes that can ruin these looks. 📌 Save this to Pinterest for later — you’ll want to revisit these ideas.
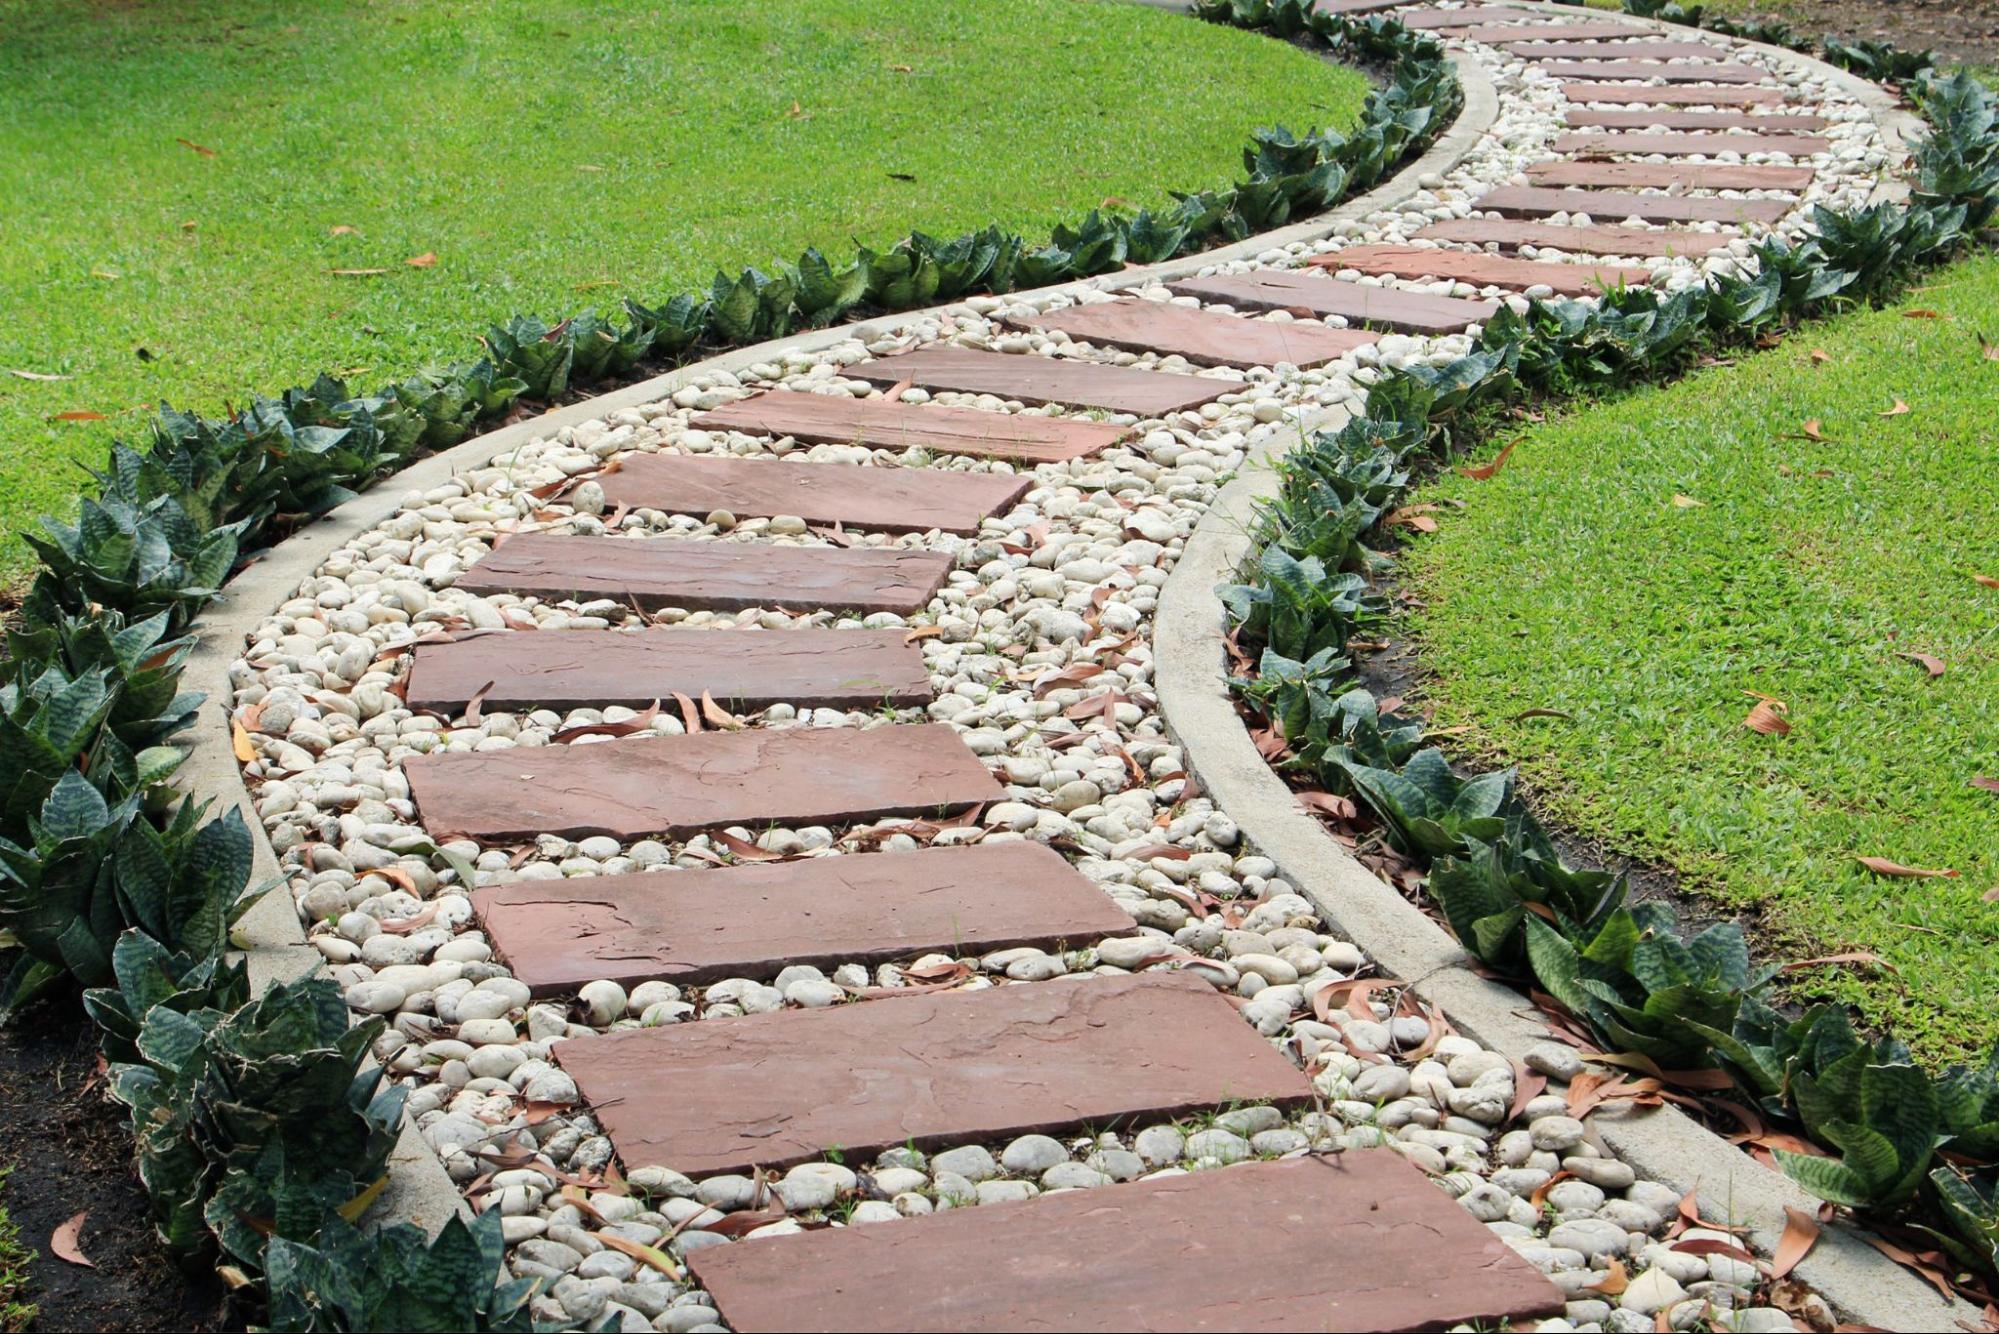
1. A Winding Paver Path with Natural Stone Accents
The magic here is in the masterful blend of structured and natural elements. The clean lines of the light grey rectangular pavers, sharply defined by a dark concrete border, provide a clear, easy-to-navigate path. This man-made geometry is then softened by the surrounding organic shapes: large, rough-cut boulders and the gentle curve of the path itself. It’s a classic design principle: pairing opposites creates visual interest and a sense of balance. The path feels intentional and designed, but not sterile or out of place in its natural setting.
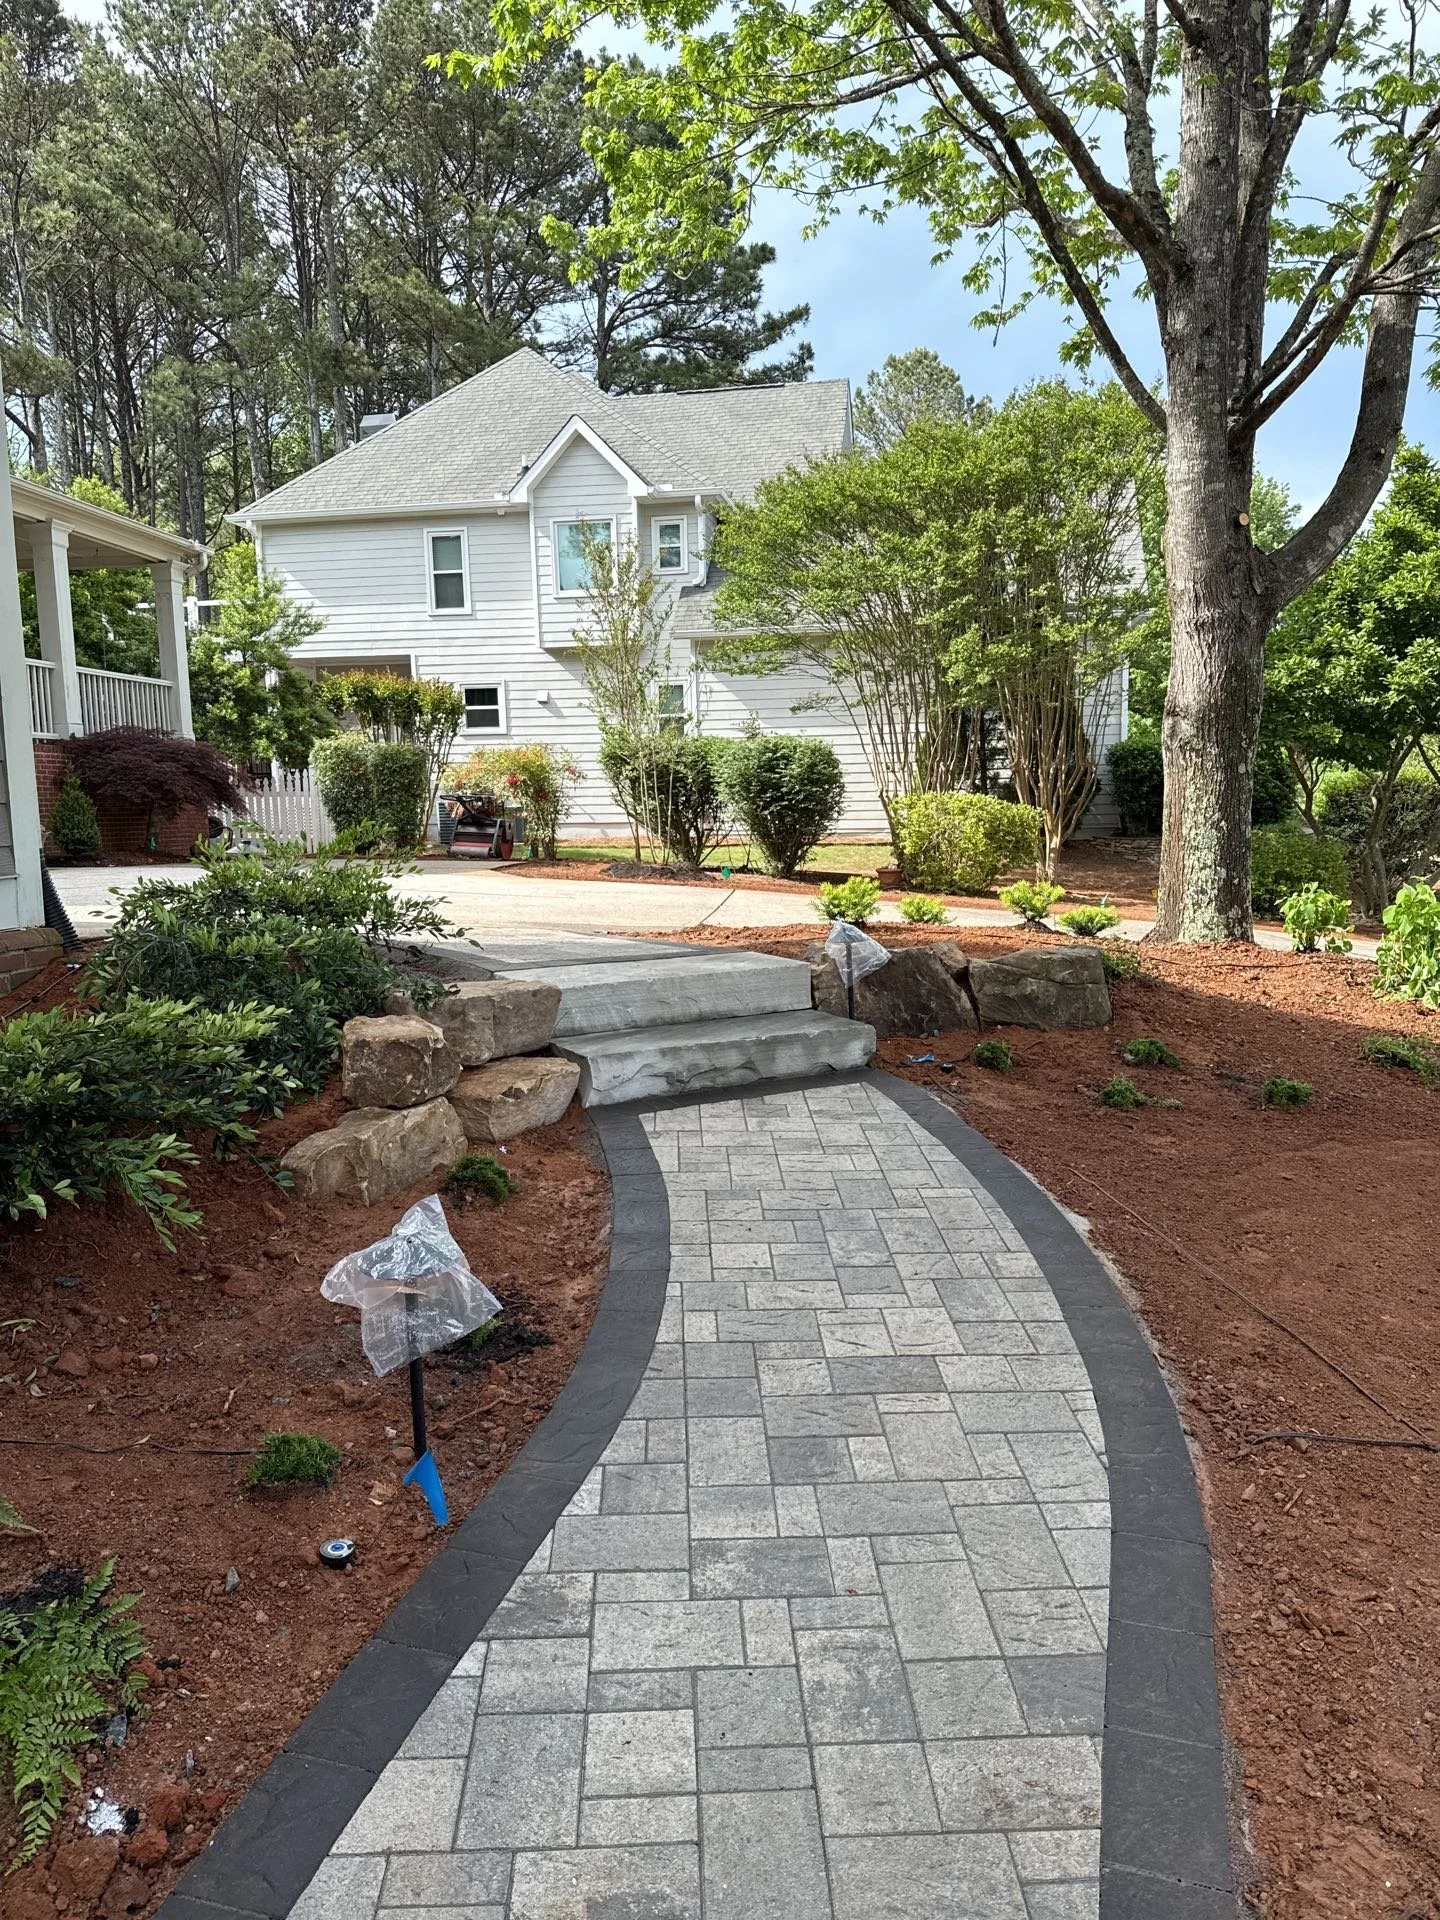
“To keep a curved paver path looking this clean, the edge restraint is everything.”
Don’t just rely on packed soil. For a path like this, use a heavy-duty plastic or metal edging, installed before you lay the border pavers. Make sure it’s staked every 3-4 feet, especially on the outside of the curves where pressure is greatest. This prevents the pavers from shifting and spreading over time, maintaining that crisp, professionally-installed look for years.
2. Classic Cobblestones Leading to a Welcoming Porch
This look follows a timeless recipe for curb appeal: 70% traditional material + 20% manicured nature + 10% crisp architecture. The light-toned square cobblestones provide the bulk of the texture and character. The neatly kept green lawn on either side acts as a simple, clean frame. Finally, the white-painted porch stairs and railings offer a bright, welcoming focal point. You could swap the cobblestones for classic red brick or the white paint for a friendly blue and the formula would still hold true, proving its versatility.
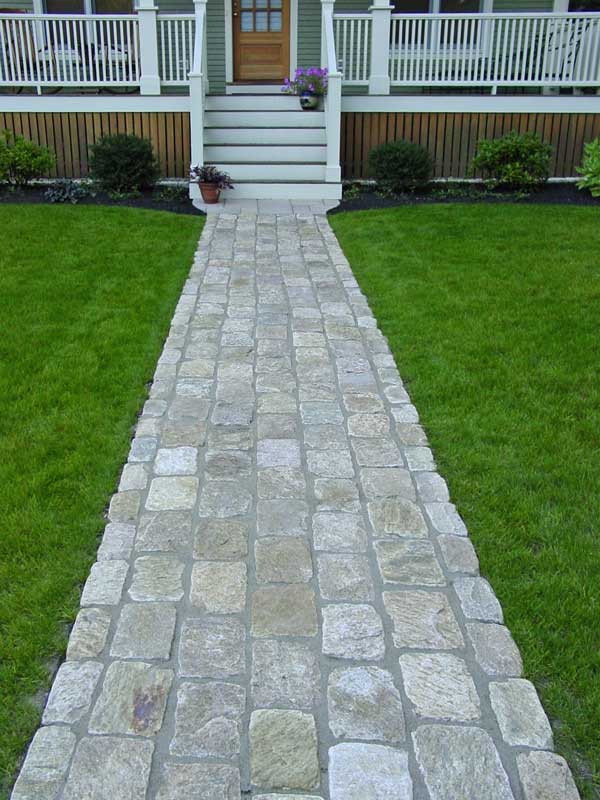
“A cobblestone path like this is undeniably charming, but be honest about the surface.”
The slightly uneven nature of the stones and the cement mortar lines can be tricky for anyone with mobility challenges, and it’s not the friendliest surface for rolling luggage, strollers, or a wheelchair. If universal accessibility is a priority for your front walkway, consider a smoother paver or poured concrete path. This style is often better suited for secondary garden paths where absolute evenness isn’t as critical.
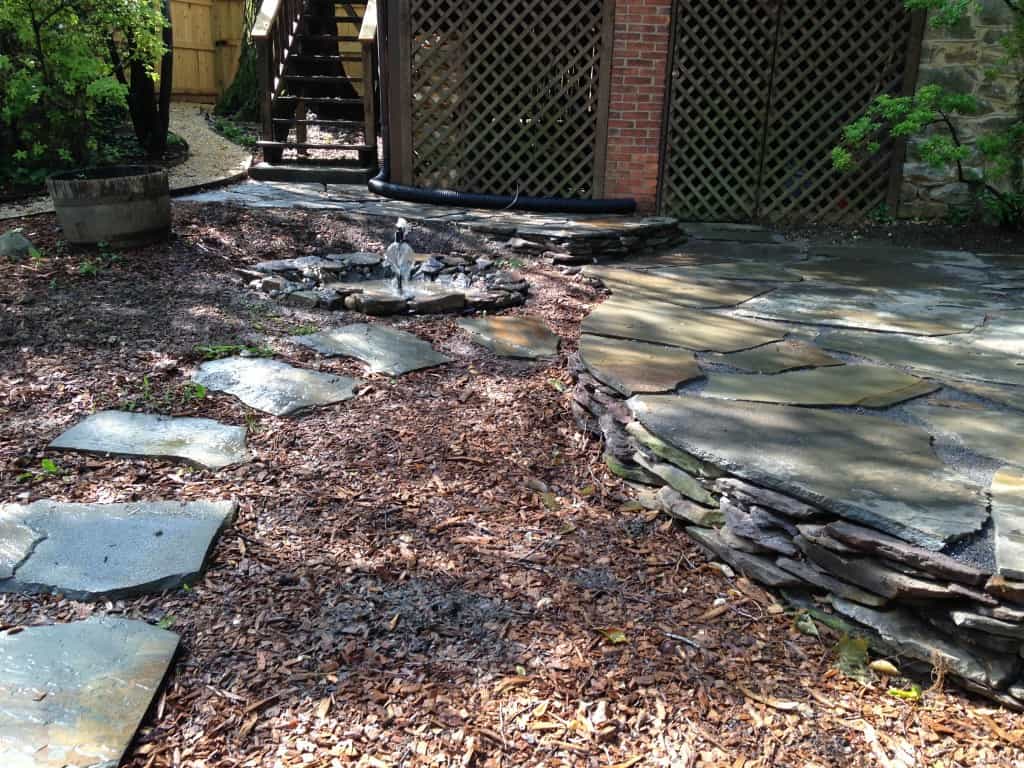
3. A Serene Stone Path Featuring an Integrated Water Garden
The single element that makes this design so captivating is the small, dark water feature integrated directly alongside the path. Without it, you’d have a lovely but standard garden walkway. With it, the journey becomes an experience. It introduces sound, reflection, and a touch of mystery. The water slows you down, encouraging you to pause and appreciate the lush surroundings. The use of larger stones as steps on one side further anchors the feature, making it feel like a completely natural part of the landscape.
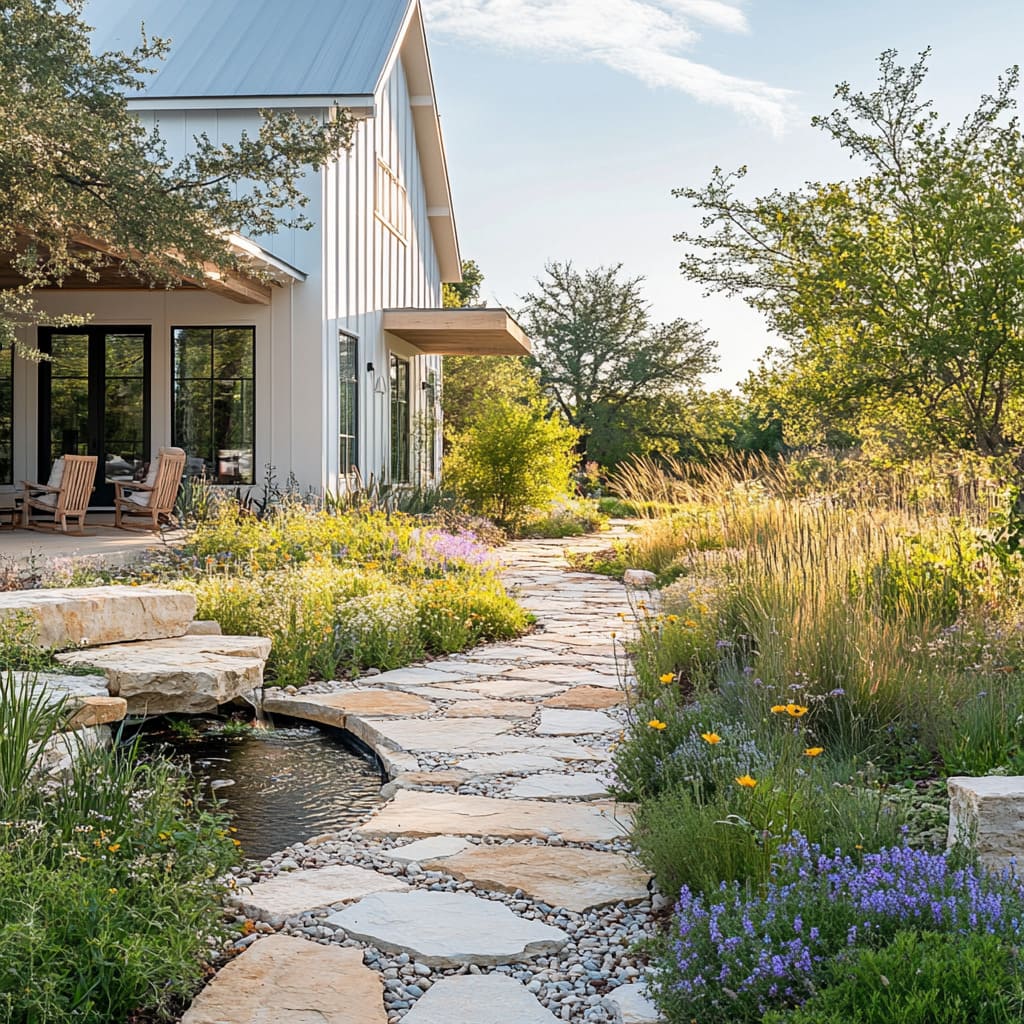
“A walkway with an integrated water feature is stunning, but it isn’t a set-it-and-forget-it installation.”
The small pond will require a pump to keep the water from stagnating, which needs to be checked monthly. You’ll also need to skim leaves and debris weekly, especially in the fall. Depending on your climate, you may need to perform a deep clean once or twice a year to manage algae growth. The reward is a truly unique, multi-sensory garden experience, but know the commitment before you dive in.
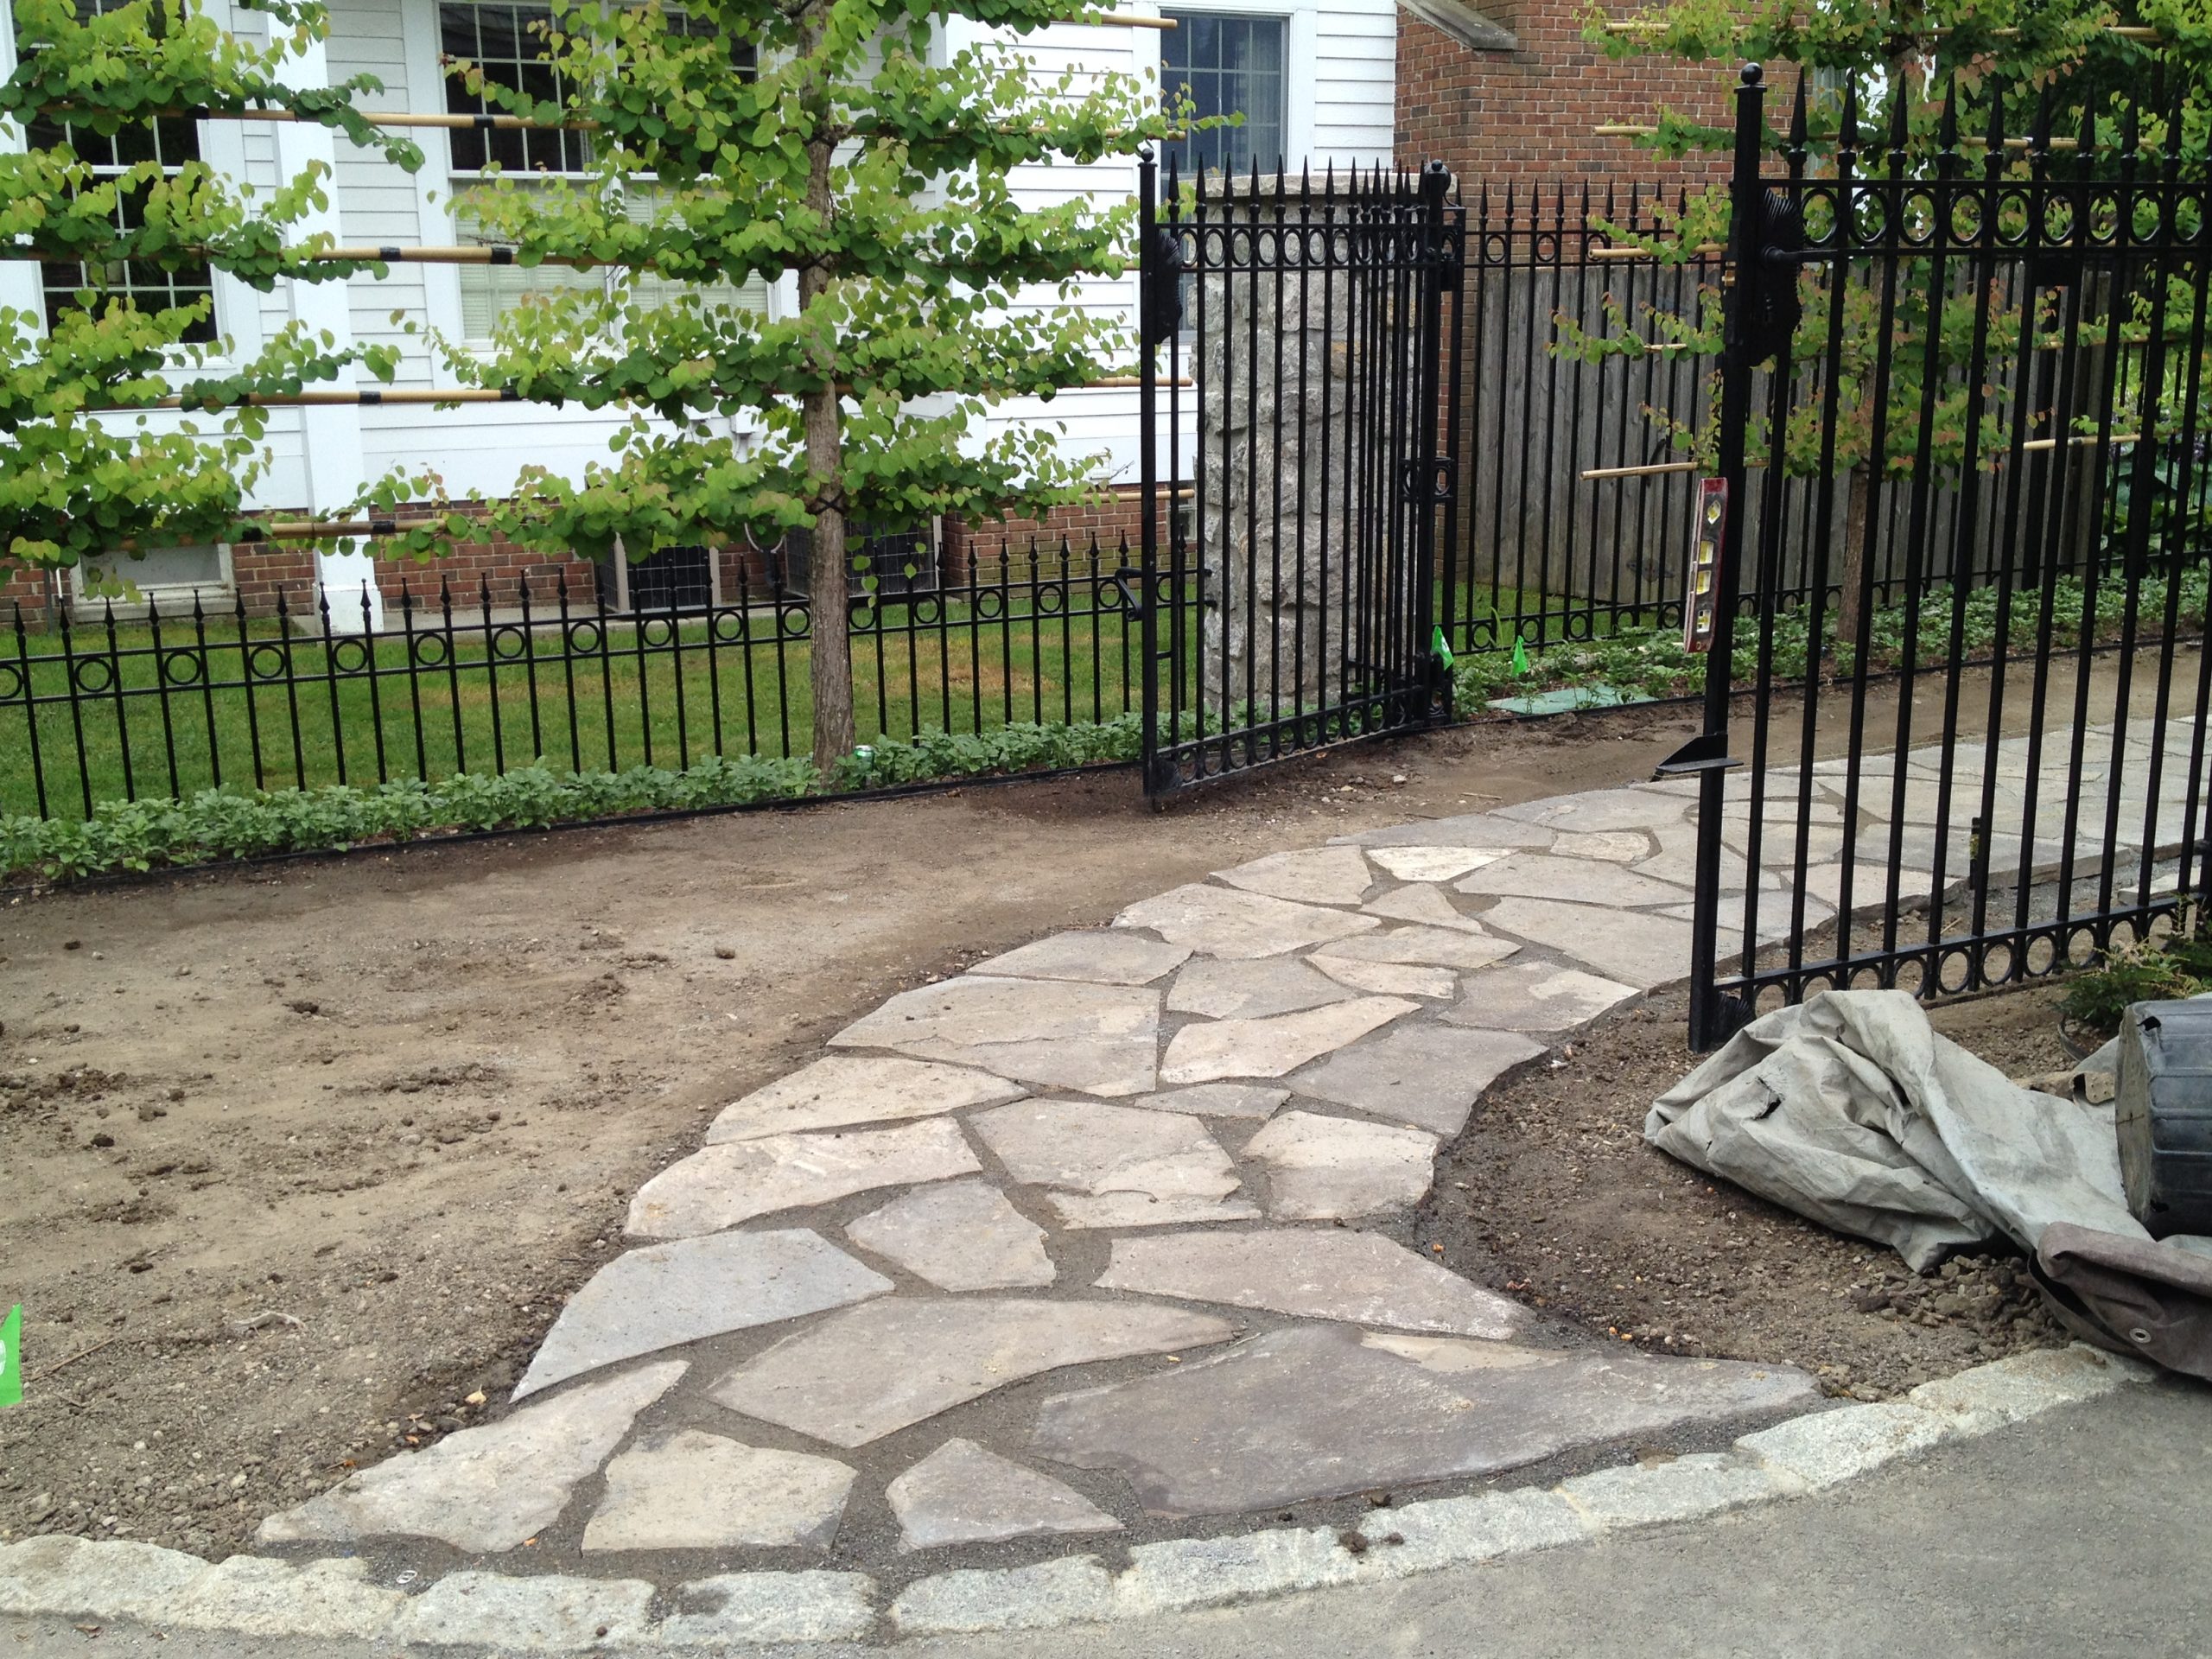
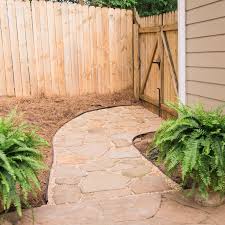
4. Rustic Flagstone Path Framed by an Iron Gate
Installing a simple flagstone path like this is a great weekend project. Here’s a quick guide to setting the stones in a dirt path:
“Lay out your stones: Arrange the flagstone pieces on top of the ground to finalize your desired path shape and spacing.”
Trace and excavate: Trace around each stone with a trowel. Move the stone aside and dig out the shape to a depth equal to the stone’s thickness plus about an inch.
Add a sand base: Pour a 1-inch layer of paver sand into the excavated area. This allows you to level the stone.
Set the stone: Place the flagstone on the sand bed and use a rubber mallet to tap it firmly into place, making sure it’s level with the surrounding ground and doesn’t wobble.
Fill the gaps: Sweep dirt or mulch back into the spaces around the stone to secure it.
A relatively narrow path like this works best when it has a clear destination, like the iron gate shown here. For a main thoroughfare, you’d want a width of at least 36-48 inches to allow two people to walk side-by-side. But for a secondary path leading to a side yard, a garden shed, or a gate, a width of 24 inches is perfectly adequate. The key is that the scale of the path should match its importance and frequency of use in the landscape hierarchy.
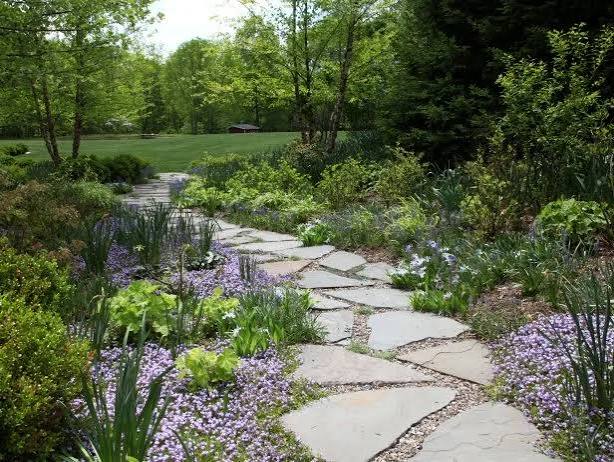
5. Interspersed Stone Slabs Through a Lush Garden
This walkway feels so natural because it rejects rigid lines. The irregularly shaped light gray stone slabs are set directly into the earth, allowing the rich green foliage to creep right up to the edges. This creates a soft, seamless transition between the path and the garden beds. The gentle curve of the path also encourages a slower, more meandering pace, inviting you to enjoy the journey through the garden rather than just rushing to the destination. It feels less like an installation and more like a discovery. Compare this to the more formal floral edging in Idea #14.
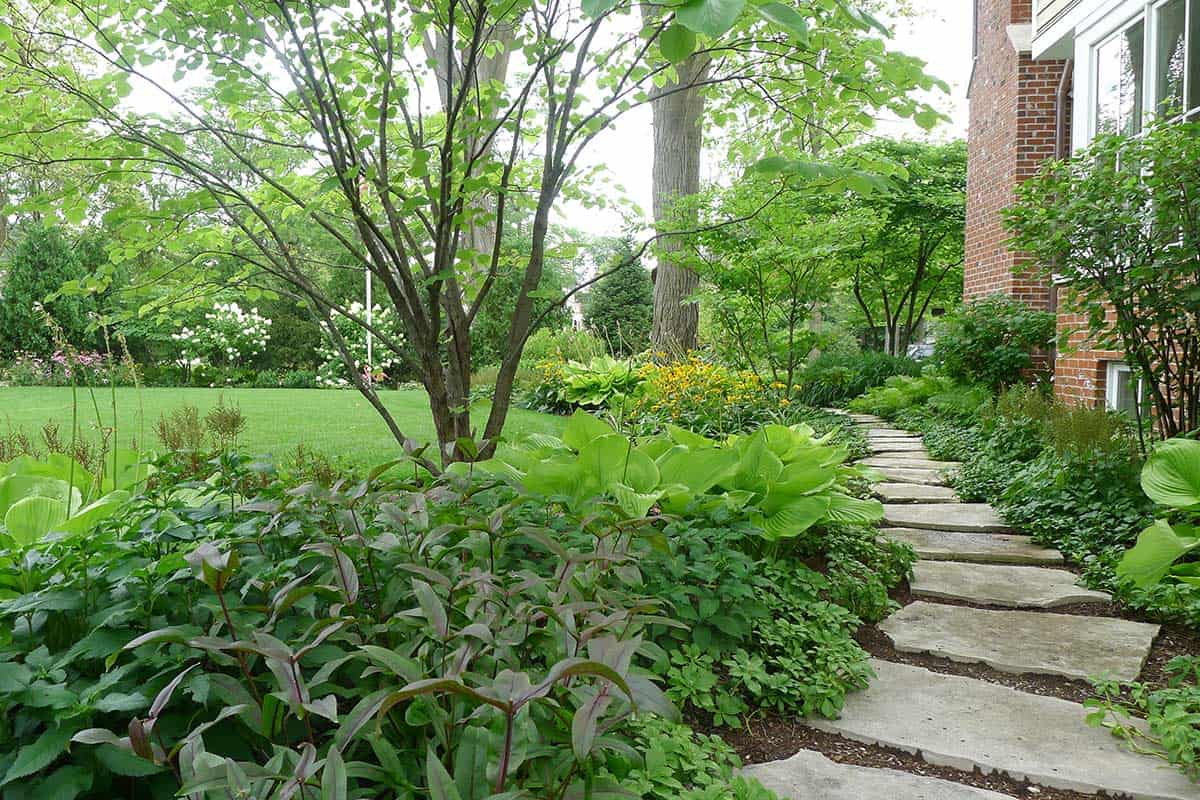
“You can achieve this “found path” feeling for a fraction of the cost of large stone slabs.”
Check Facebook Marketplace or Craigslist for people giving away broken-up concrete from a patio or sidewalk demolition. The irregular shapes and weathered gray color of old concrete can be a surprisingly effective stand-in for natural stone. A bit of digging, some leveling sand, and you can create a beautiful, rustic path for next to nothing.
6. The Essential Straight Stepping Stone Walkway
Before you lay a single stone for a straight path, it’s crucial to get your alignment right. A perfectly straight line can be unforgiving of errors. Here’s a quick checklist:
“Use stakes and string to create a perfectly straight guide line.”
Don’t just eyeball it.
Measure the distance from your guideline to the edge of each stone to ensure they are all perfectly aligned.
Decide if you want the *centers* of the stones aligned or the *edges*. Aligning the centers often looks better with irregular stones.
Walk the path with a normal stride to ensure the spacing is comfortable before you start digging.
The “secret” to a professional-looking straight path is obsessive consistency. For a path using uniform square or rectangular pavers, the gap between each stone should be identical. We’re talking about measuring it with a ruler, not just your eye. A gap of 2-4 inches is common. Use spacer sticks cut to your desired width to ensure every single gap is exactly the same as you lay the stones. This level of precision is what separates a DIY look from a high-end one.
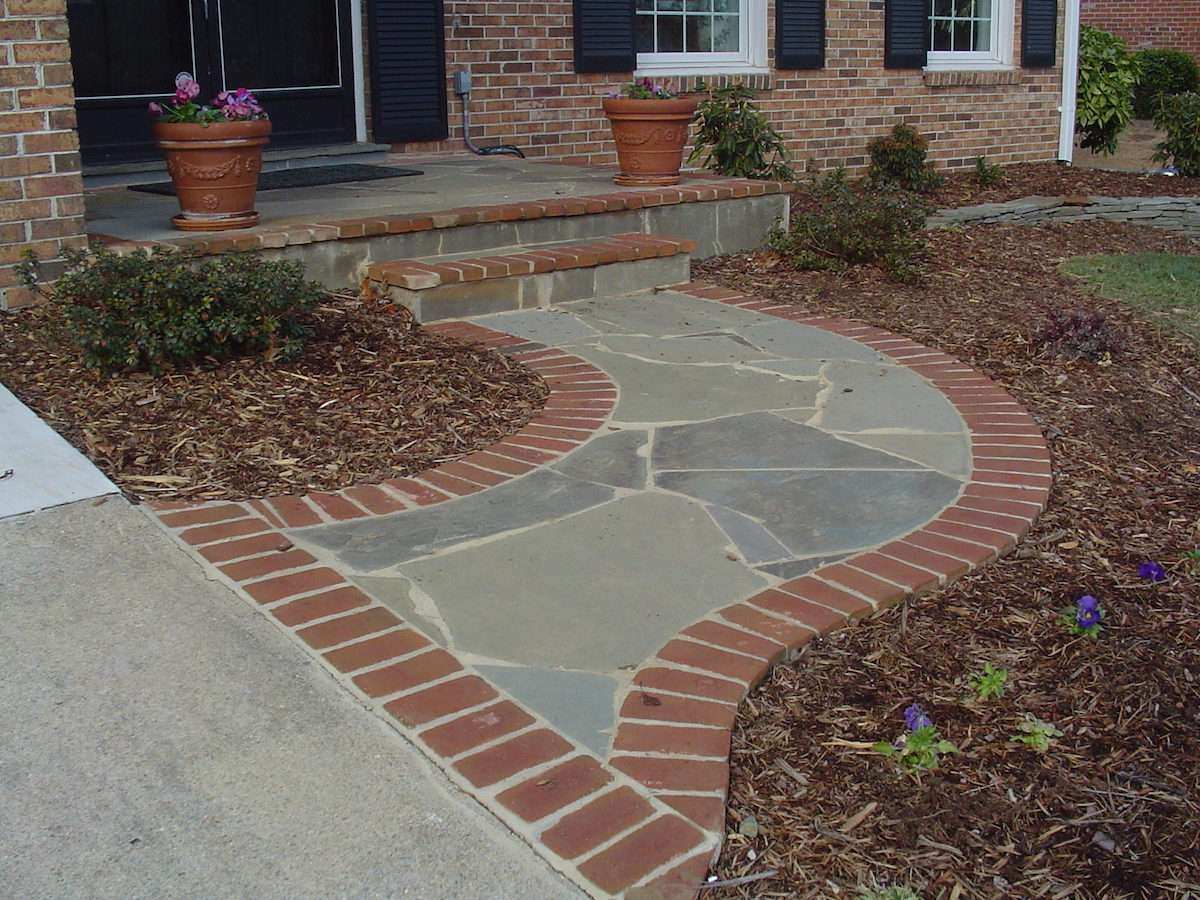
7. Winding Flagstone Walkway for a Coastal Vibe
There’s a growing desire for outdoor spaces that feel less manicured and more connected to their natural surroundings, and this coastal-inspired pathnails it. The use of multi-colored flagstones with earthy grays, blues, and tans mimics the look of a rocky shoreline. By setting them in visible cement rather than hiding the gaps with gravel or grass, the path takes on a solid, permanent feel, as if it has been there for decades. This aged, time-worn aesthetic is a direct reaction against overly perfect, cookie-cutter landscaping.
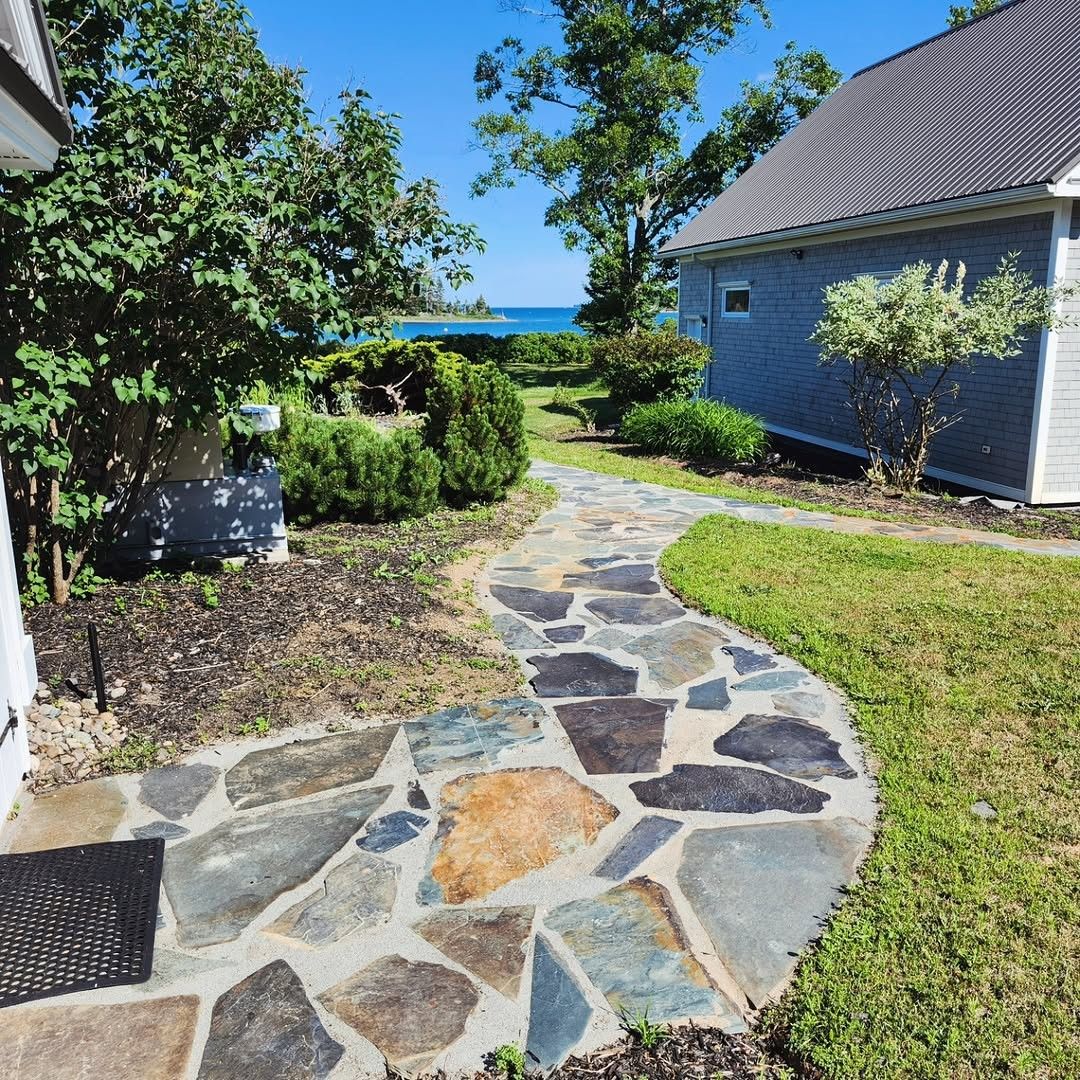
“This design is a beautiful balance of textures.”
Think of it as 50% smooth, hard surfaces + 30% soft, living texture + 20% loose, organic texture. The flagstone and cement provide the solid base. The vibrant green lawn offers a soft, uniform carpet. The mulched beds with their mix of shrubs and trees add a layer of complex, natural texture. This formula ensures the hardscape doesn’t overpower the landscape, creating a path that feels both grounded and alive. You could trade the mulch for river rock and still maintain the balance. Compare the brick border on this flagstone path to Idea #23.
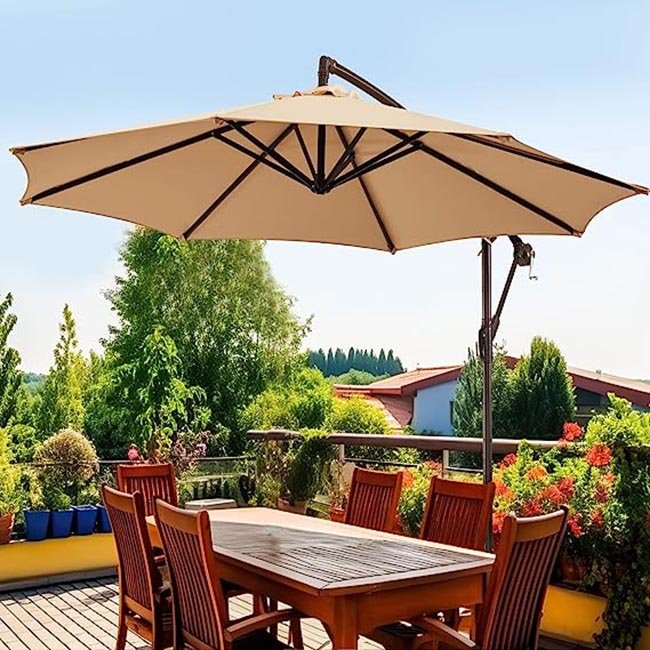
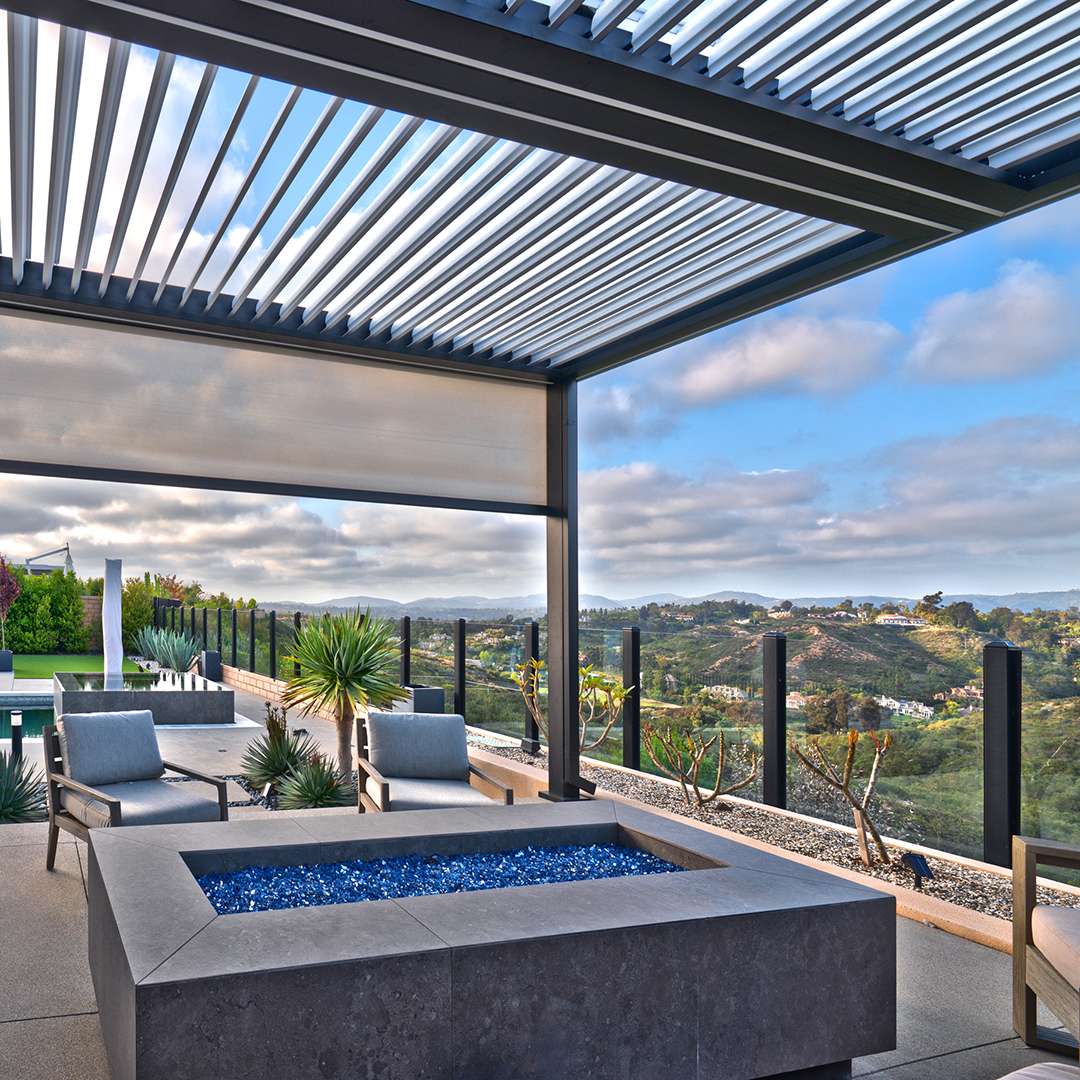
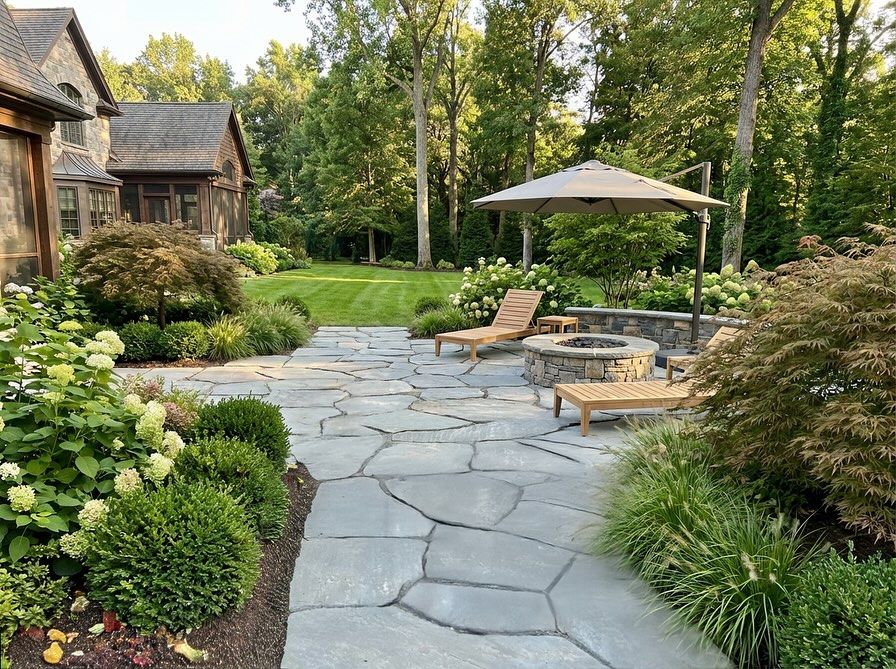
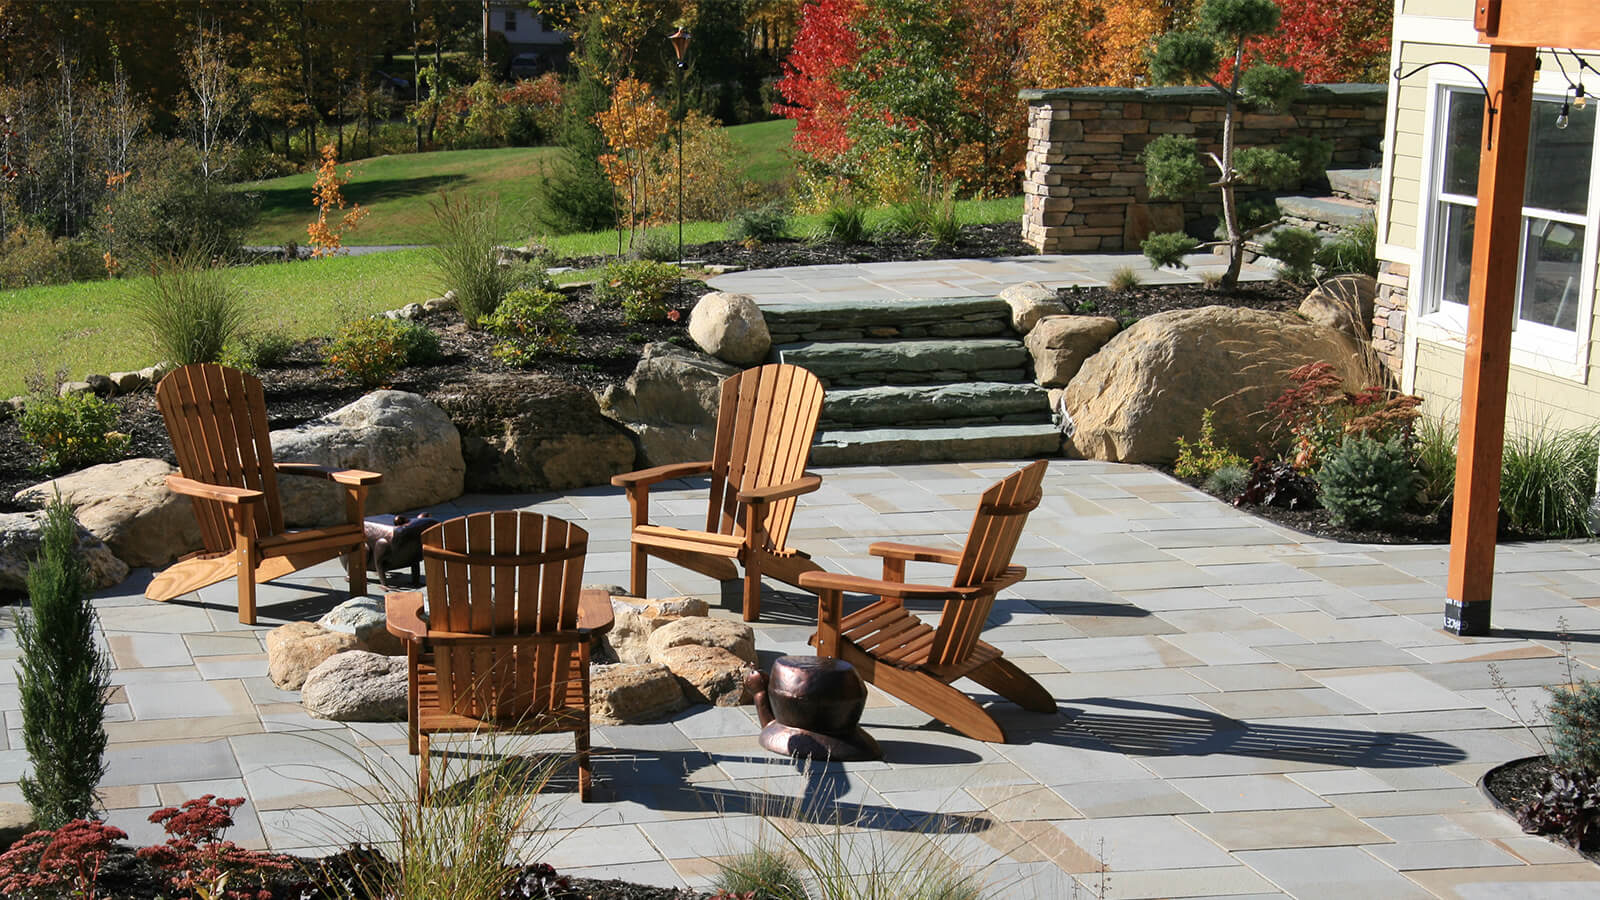
8. Expansive Flagstone Patio with an Inviting Fire Pit
Recreating a large flagstone patio and fire pit area is a significant investment in both materials and labor. Here’s a rough estimate for a high-quality installation:
“Main Furniture: Wooden lounge chairs & umbrella – $1,500 – $4,000
Hardscaping:”
- Main Furniture: Wooden lounge chairs & umbrella – $1,500 – $4,000
- Hardscaping: Flagstone pavers & stone-clad fire pit – $8,000 – $20,000+ (highly dependent on square footage and local labor rates)
- Landscaping: Mature shrubs and professional planting – $3,000 – $7,000
- Decor/Accessories: Cushions, lighting – $500 – $1,500
- Budget Alternative: Create a smaller gravel patio with a simple metal fire pit and DIY landscaping for about 60% less.
- TOTAL: $13,000 – $32,500+
While a sprawling flagstone patio is a dream for entertaining, be realistic about the heat factor. Natural stone, especially in lighter shades of gray, can get incredibly hot in direct summer sun, to the point of being uncomfortable for bare feet. A large, high-quality patio umbrella is not just a style choice here; it’s an absolute necessity for making the space usable during the hottest parts of the day. Without adequate shade, you may find your beautiful stone patio sits empty until sunset.
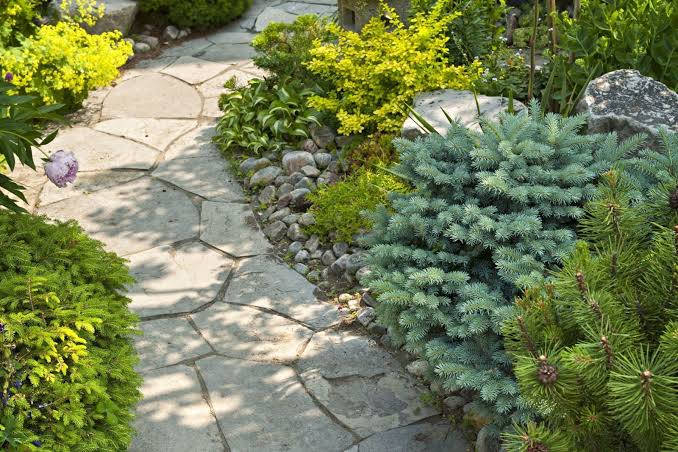
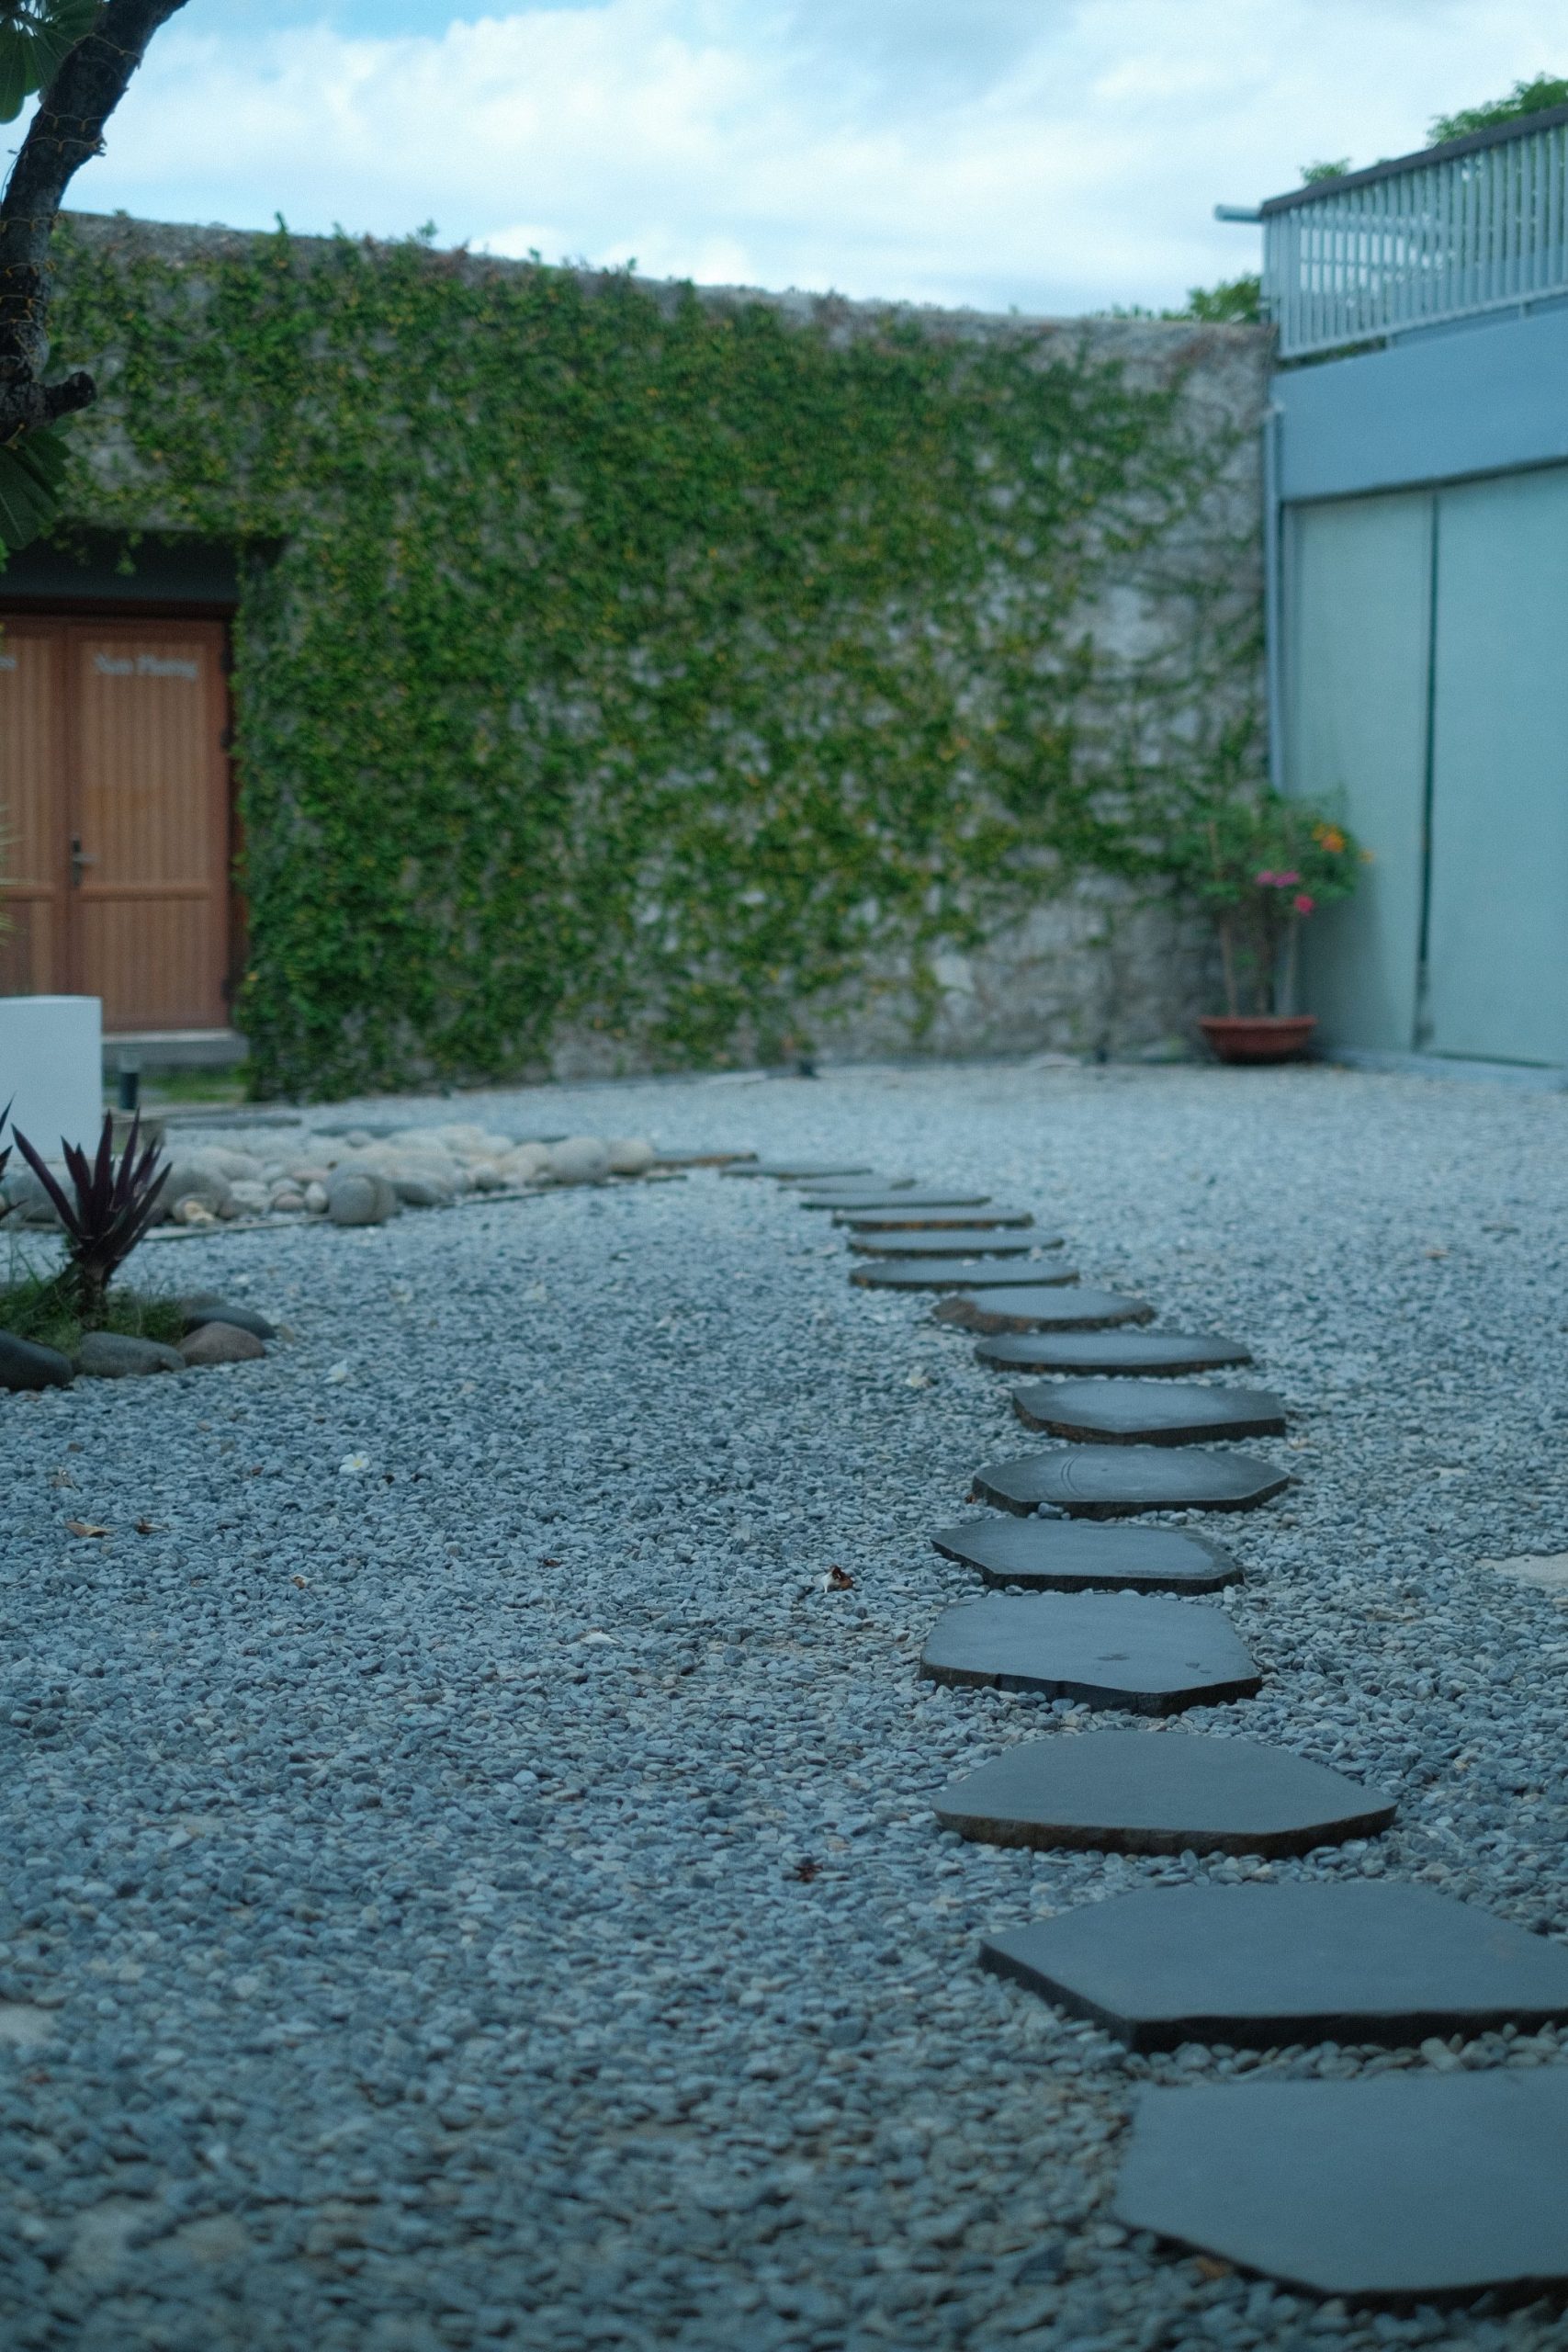
9. Natural Stepping Stones Set in Dark Grey Gravel
Contrast is the hero of this design. The smooth, light grey surfaces of the irregular stepping stones pop against the texture of the smaller, jagged, dark grey gravel. This color and texture difference makes the path easy to read visually and adds a layer of sophistication. The design is further enhanced by the contrast in form: the flat, horizontal plane of the path is juxtaposed with large, rounded boulders and neatly trimmed spherical bushes, creating a dynamic, multi-layered garden scene. For another take on dark stones, see Idea #25.
“A gravel path is fantastic for drainage, but it’s not a zero-maintenance solution.”
The biggest challenge is keeping the gravel free of organic debris. Leaves, twigs, and dirt will inevitably fall onto the path and, if left alone, will break down and become a perfect seedbed for weeds. Plan on using a leaf blower on a low setting every week or two to keep the surface clean. You will also likely need to top-dress the gravel every 2-3 years as it settles and gets displaced.
10. Creating a Backyard Flagstone Focal Point
The single most important element when combining a flagstone walkway, patio, and fire pit is creating a sense of cohesion. The “one thing” is not a single object, but the consistent use of the same type of flagstone throughout the entire project. Using the same stone for the walkway, the patio surface, and potentially even as capstones on the fire pit, ties the different functional areas together into a single, unified design. This repetition of material makes the whole space feel larger and more intentionally designed.
“The success of a multi-feature space like this depends heavily on adequate square footage.”
To comfortably accommodate a walkway, a seating area around a fire pit, and planting beds, you should plan for a minimum area of 20×20 feet (400 sq ft). This allows for a 3-foot wide walkway, a 12-14 foot diameter patio space around the fire pit (to allow for chairs and circulation), and at least 2-3 feet for surrounding garden beds. Trying to cram this into a smaller space will feel crowded and awkward.
11. A Casual Path of Stepping Stones in White Gravel
Building a gravel and stone path is one of the most approachable DIY walkway projects. But before you order a truckload of rock, confirm these details:
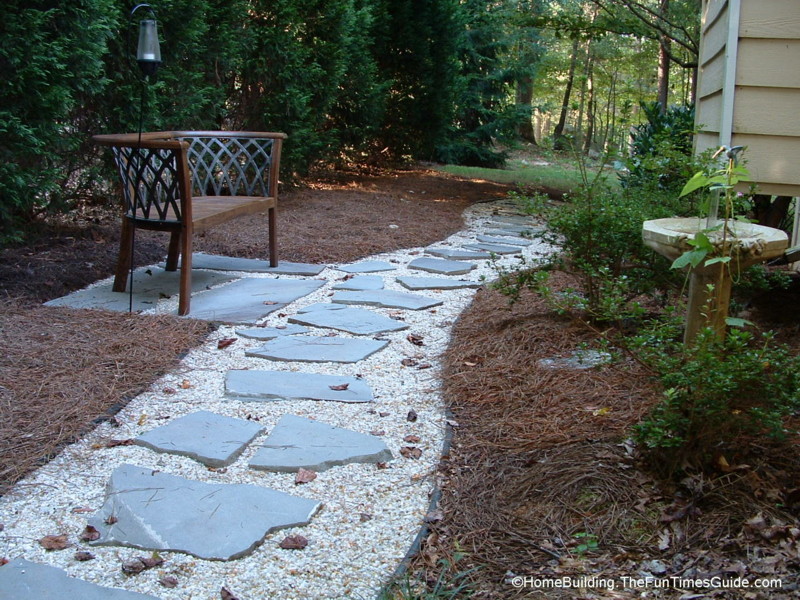
“Sunlight: How much direct sun does the path get?”
Bright white gravel in full sun can be blindingly bright; an off-white or light gray might be more comfortable on the eyes.
Edging: Do you have a plan for containing the gravel? Without a metal, plastic, or brick edge, your gravel will constantly migrate into your lawn and garden beds.
Weed Barrier: Will you lay down landscape fabric first? It’s a crucial step to prevent weeds from taking over your beautiful new path.
Base Layer: For high-traffic areas, a compacted base of crushed stone (like paver base) underneath your decorative gravel will prevent the stepping stones from sinking over time.
This is a look you can absolutely achieve on a shoestring budget. Instead of expensive, uniform flagstone, look for “seconds” or broken pieces at your local stone yard, which they often sell by the pound at a steep discount. For the filler, crushed white marble chips can be pricey. Consider more common and affordable options like pea gravel or light-colored decomposed granite. A sturdy wooden bench can often be found for under $100 at Target or Walmart during their spring sales.
12. Modern Concrete Slabs with Natural Pebble Infill
When creating a path with pavers and a pebble infill, the secret to a high-end look is “over-filling” the gaps. Don’t just sprinkle the pebbles in until they are level with the pavers. Instead, fill the gaps so the pebbles are slightly mounded, rising just above the paver surface. Then, extend that same pebble field 6-12 inches *beyond* the brick paver border. This technique blurs the hard edge of the path, creating a softer, more organic transition into the surrounding garden beds and making the entire installation feel more integrated and lush. For another take on concrete slabs, check out Idea #28.
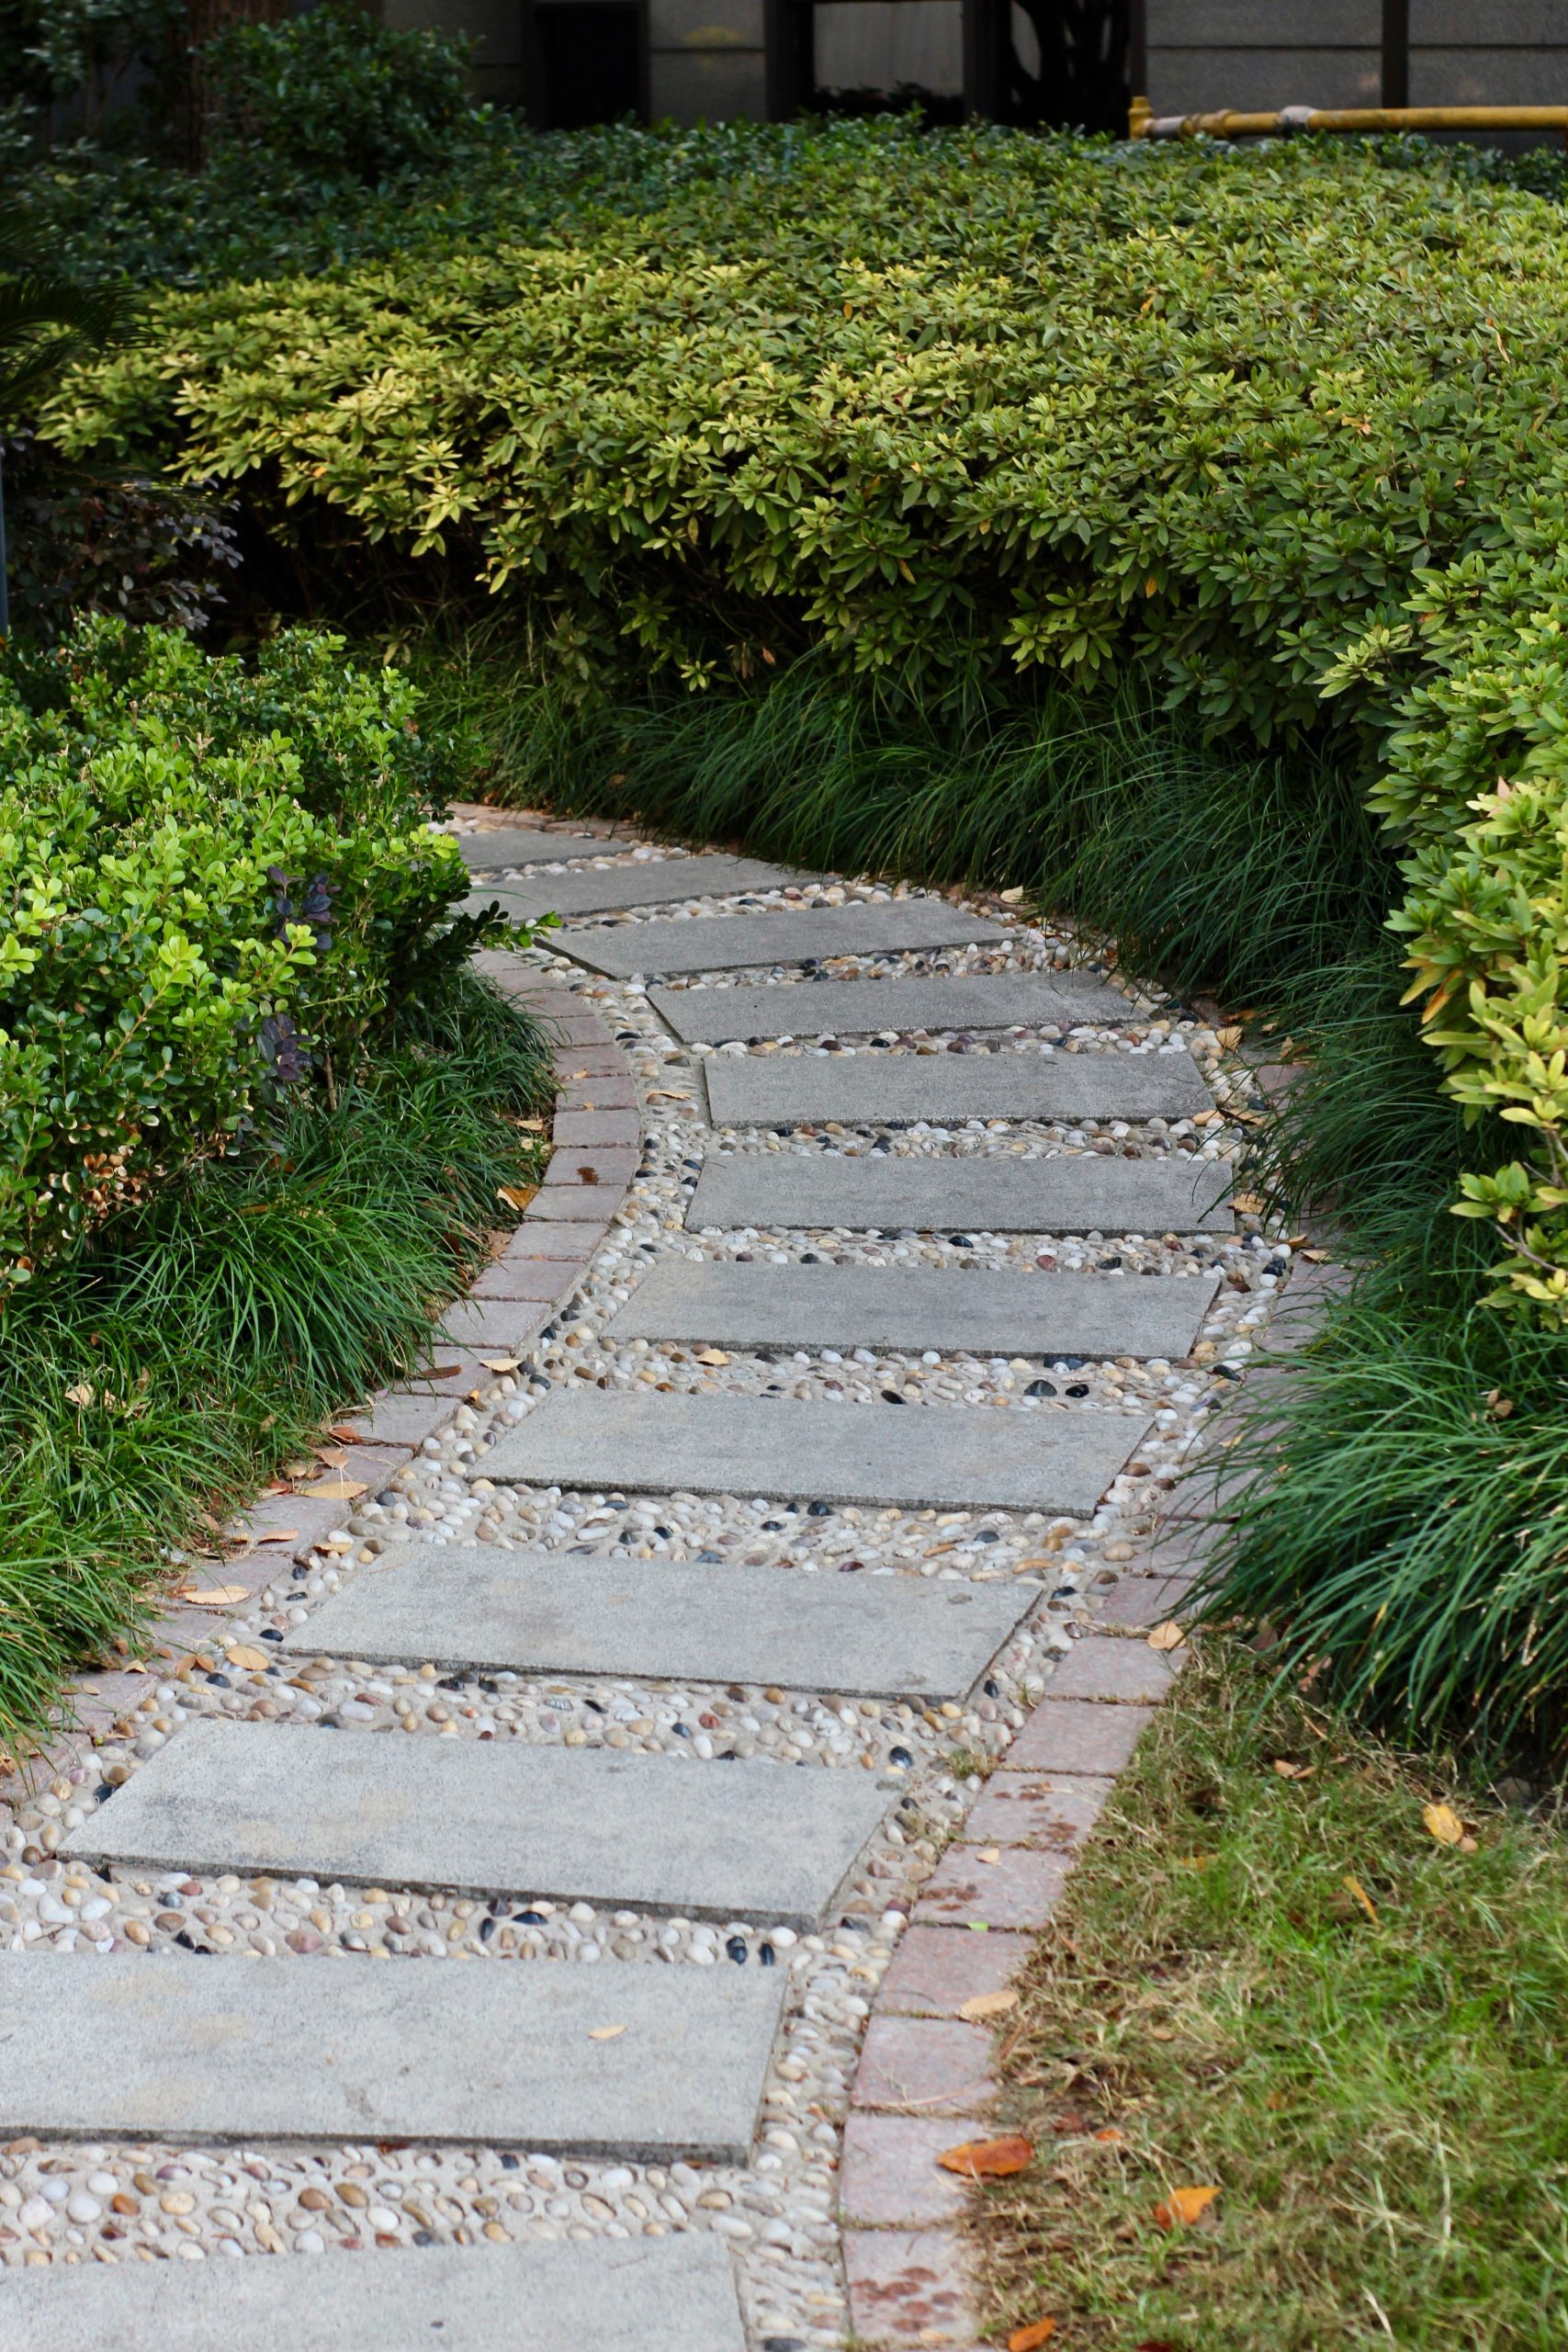
“The formula for this harmonious design is roughly 50% structured modern + 50% organic natural.”
The clean, rectangular concrete slabs and the formal brick paver border provide the strong, geometric element. The varied earth-toned pebbles and the lush, untamed green foliage provide the balancing organic softness. The curve of the path itself acts as a bridge between these two styles. You could swap the concrete slabs for dark slate tiles and the pebbles for black river rock for a moodier, but equally balanced, result.
13. Dual Flagstone Walkways Weaving Through Garden Beds
This idea of having two parallel or intersecting paths works best in a larger, wider yard. You need enough space to not only accommodate both walkways but also to allow for substantial planting beds in between and alongside them. A minimum width of 15-20 feet is recommended for the entire scene. This allows for a 3-foot main path, a 2-foot secondary path, and a generous 10+ feet of planting area. In a narrow side yard, this would feel cramped and busy, but in a sprawling backyard, it can help to define different “rooms” or zones within the garden.
“Having two walkways can be a beautiful way to add interest and functionality to a large space, but it also doubles your maintenance tasks.”
You now have twice the length of edges to keep clean and weed-free. The mulched beds in between will require regular weeding and refreshing every season. Be honest with yourself about the amount of garden upkeep you enjoy. If your goal is a low-maintenance yard, a single, wider path might be a more practical choice.
14. Stone Stepping Path Edged with Purple and Pink Blooms
It’s all about the flowers. The irregular grey stepping stones are simple and classic, but the overflowing masses of small purple and pink flowers are what elevate this path into something truly special. They create a soft, romantic, and slightly wild border that completely transforms the feeling of the walkway. Remove the flowers, and you have a basic path through a lawn. With them, you have a destination—a fairytale walk through a blooming meadow. This is a powerful reminder that sometimes the “path” is as much about what lines it as what it’s made of.
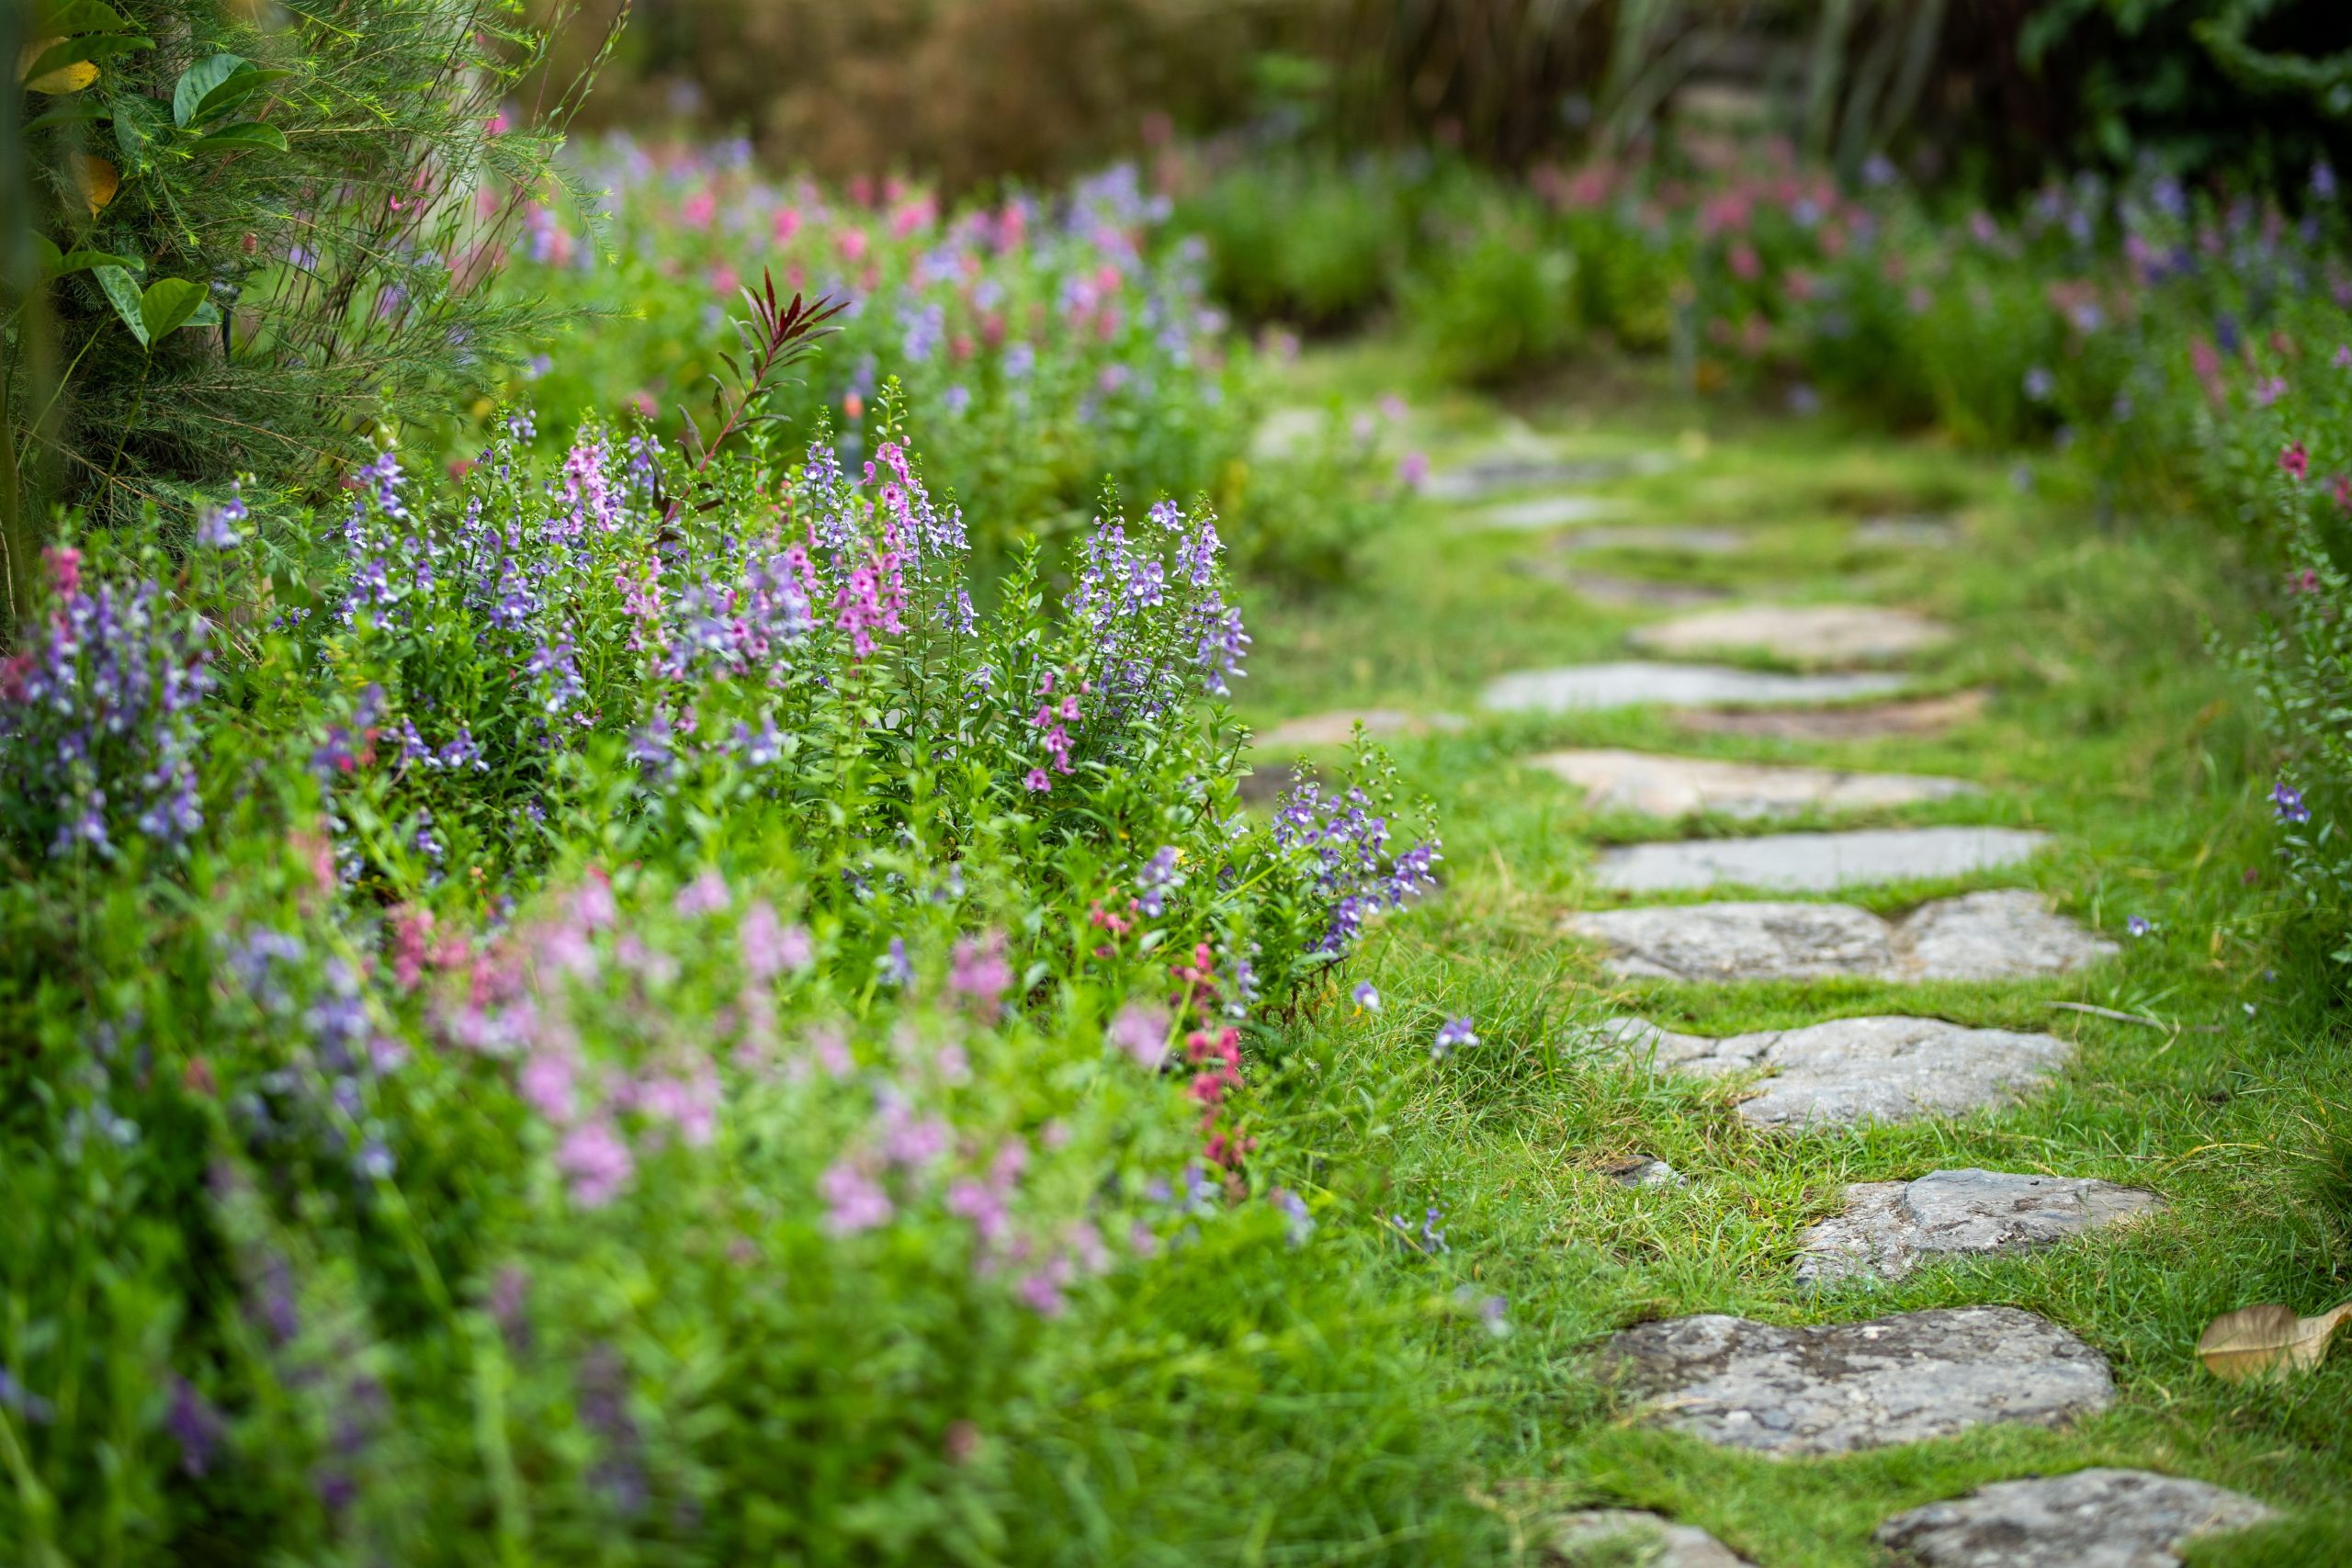
“This design works because of its masterful use of softness and repetition.”
The soft, mounding texture of the flower clusters contrasts beautifully with the hard, flat surfaces of the stone. The sheer volume of the blooms blurs the line between the path and the garden. Furthermore, the repetition of the purple and pink colors along the entire length of the path creates a strong sense of rhythm and cohesion, guiding the eye forward and pulling the whole scene together. It feels intentional and yet completely natural at the same time.
15. A Straightforward Path Using Simple Stepping Stones
For a basic path directly in a lawn, the installation is quite simple and doesn’t require a full gravel base. 1. Place your stone in the desired position. 2. Using a sharp spade or trowel, cut the sod around the entire perimeter of the stone. 3. Remove the stone and lift out the circle of sod you’ve just cut. 4. Dig out a bit more soil so the hole is about 1 inch deeper than the stone’s thickness. 5. Add a 1-inch layer of sand to create a stable, level base. 6. Place the stone and use a rubber mallet to set it so its surface is flush with the soil level, making it easy to mow over.
“You don’t need fancy flagstone for a simple, effective path.”
The most budget-friendly option is to visit the garden section of Home Depot or Lowe’s and buy their standard 12″x12″ or 18″x18″ concrete pavers. They often cost just a few dollars each. While they may seem plain on the shelf, once you lay them in a lawn and the grass grows snugly around them, they create a clean, functional, and surprisingly attractive walkway for a tiny fraction of the cost of natural stone.
16. A Storybook Path with Stones Set in Lush Groundcover
The key to achieving this look is choosing the right groundcover. You need a species that is tough enough to handle light foot traffic, thrives in the light conditions of your path (sun or shade), and won’t grow so tall that it covers the stones. For sunny spots, creeping thyme is a fantastic choice—it’s durable and releases a lovely scent when walked on. For shadier paths, consider Corsican mint or Scotch moss. Always plant in the gaps *after* you have fully set your stepping stones on a firm base.
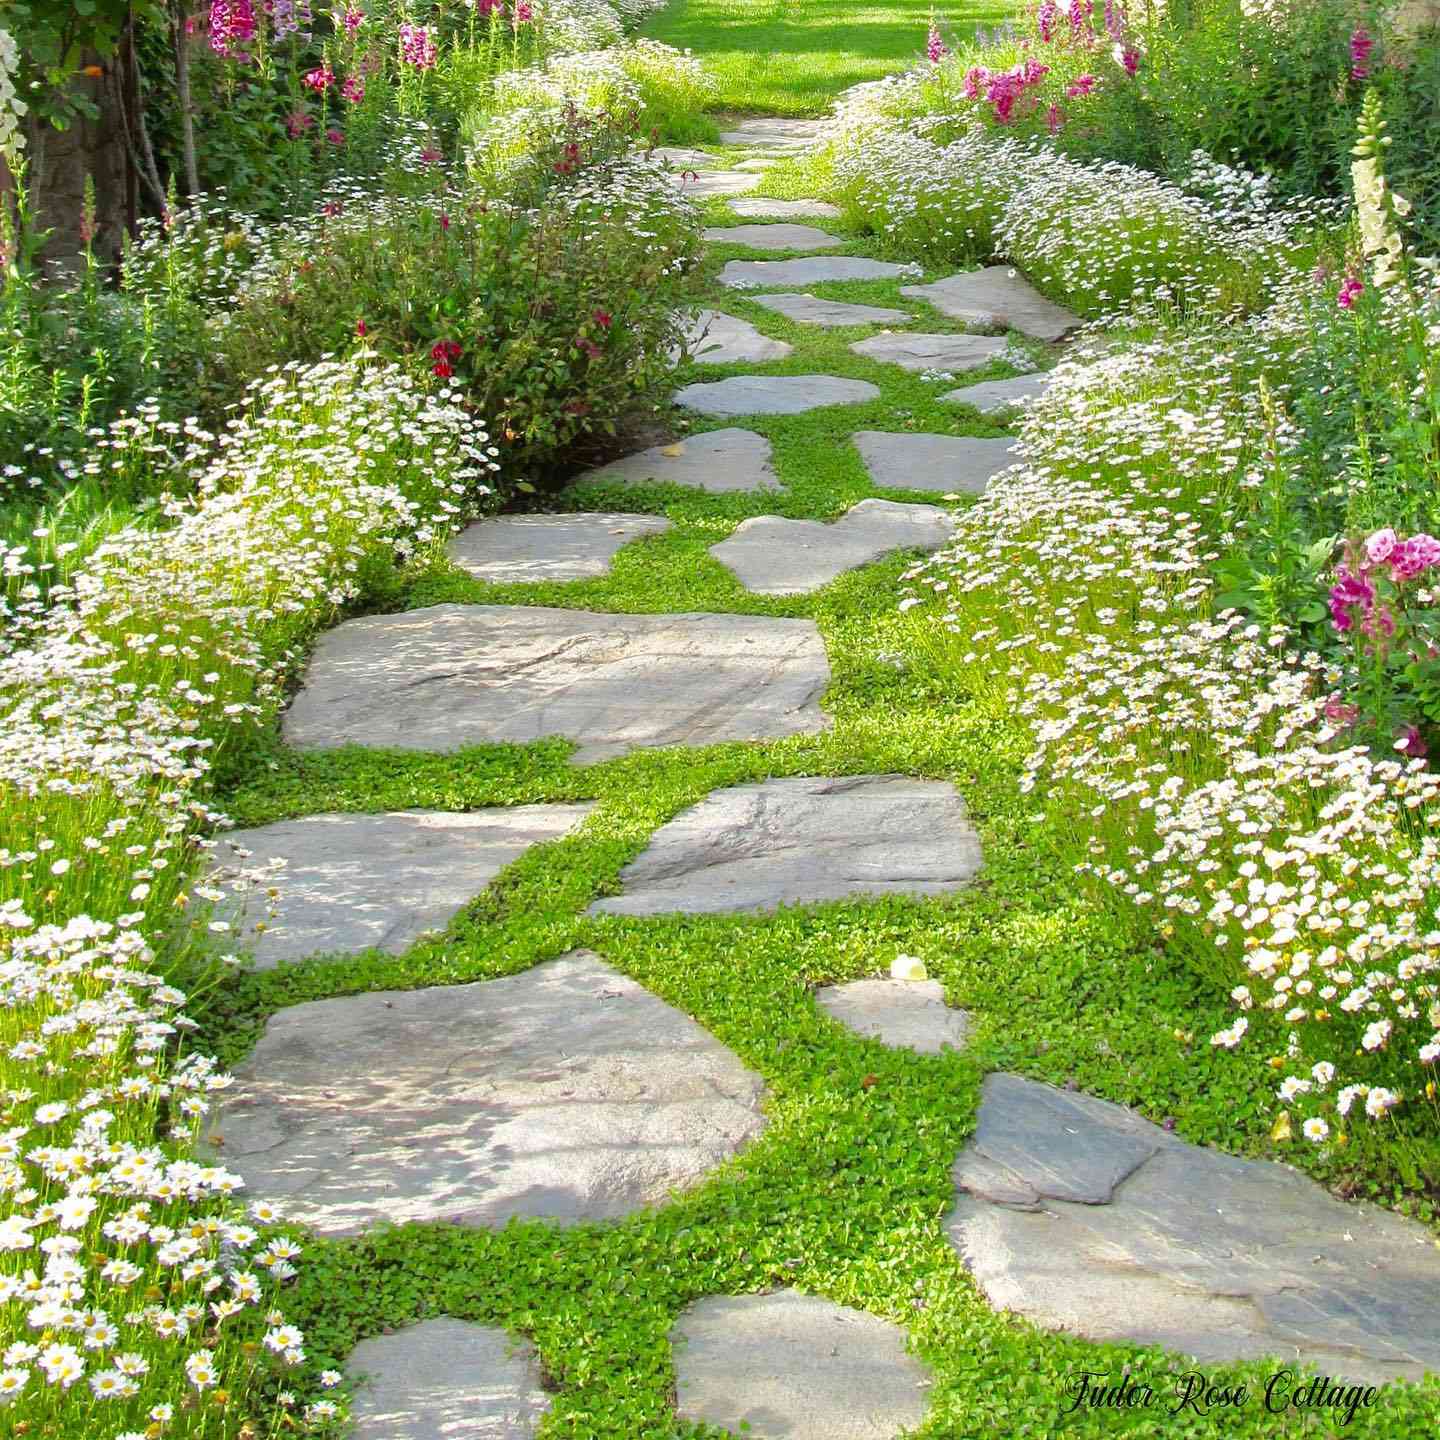
“A “living” path like this is gorgeous but requires a gardener’s touch.”
The groundcover will need regular watering to get established and during dry spells. You will also need to be diligent about weeding, as unwanted grasses and other invaders will try to move in. Periodically, you may need to shear or trim the groundcover back if it starts to overwhelm the stones. It’s a bit more work than gravel, but the payoff is a soft, green carpet that feels amazing underfoot.
17. A Minimalist Arc of Concrete Slabs in Green Lawn
The success of this minimalist design lies in its confidence and simplicity. It relies on just two elements: clean, rectangular concrete slabs and a uniform, vibrant green lawn. The beauty comes from the contrast between the rigid, man-made geometry of the slabs and the soft, organic texture of the grass. The gentle, sweeping curve of the path adds a sense of grace and movement, preventing the design from feeling too stark or severe. It proves that you don’t need complex materials or fussy borders to create a high-impact walkway.

“A path made of large slabs needs visual breathing room.”
This style is ideal for traversing a medium to large expanse of lawn. The slabs themselves should be substantial—at least 24×24 inches or larger. The spacing is also critical; place them with the center of each slab about 20-24 inches from the center of the next to match a comfortable walking stride. If your lawn area is small or narrow, using fewer, smaller stones might be a better choice to avoid overwhelming the space.
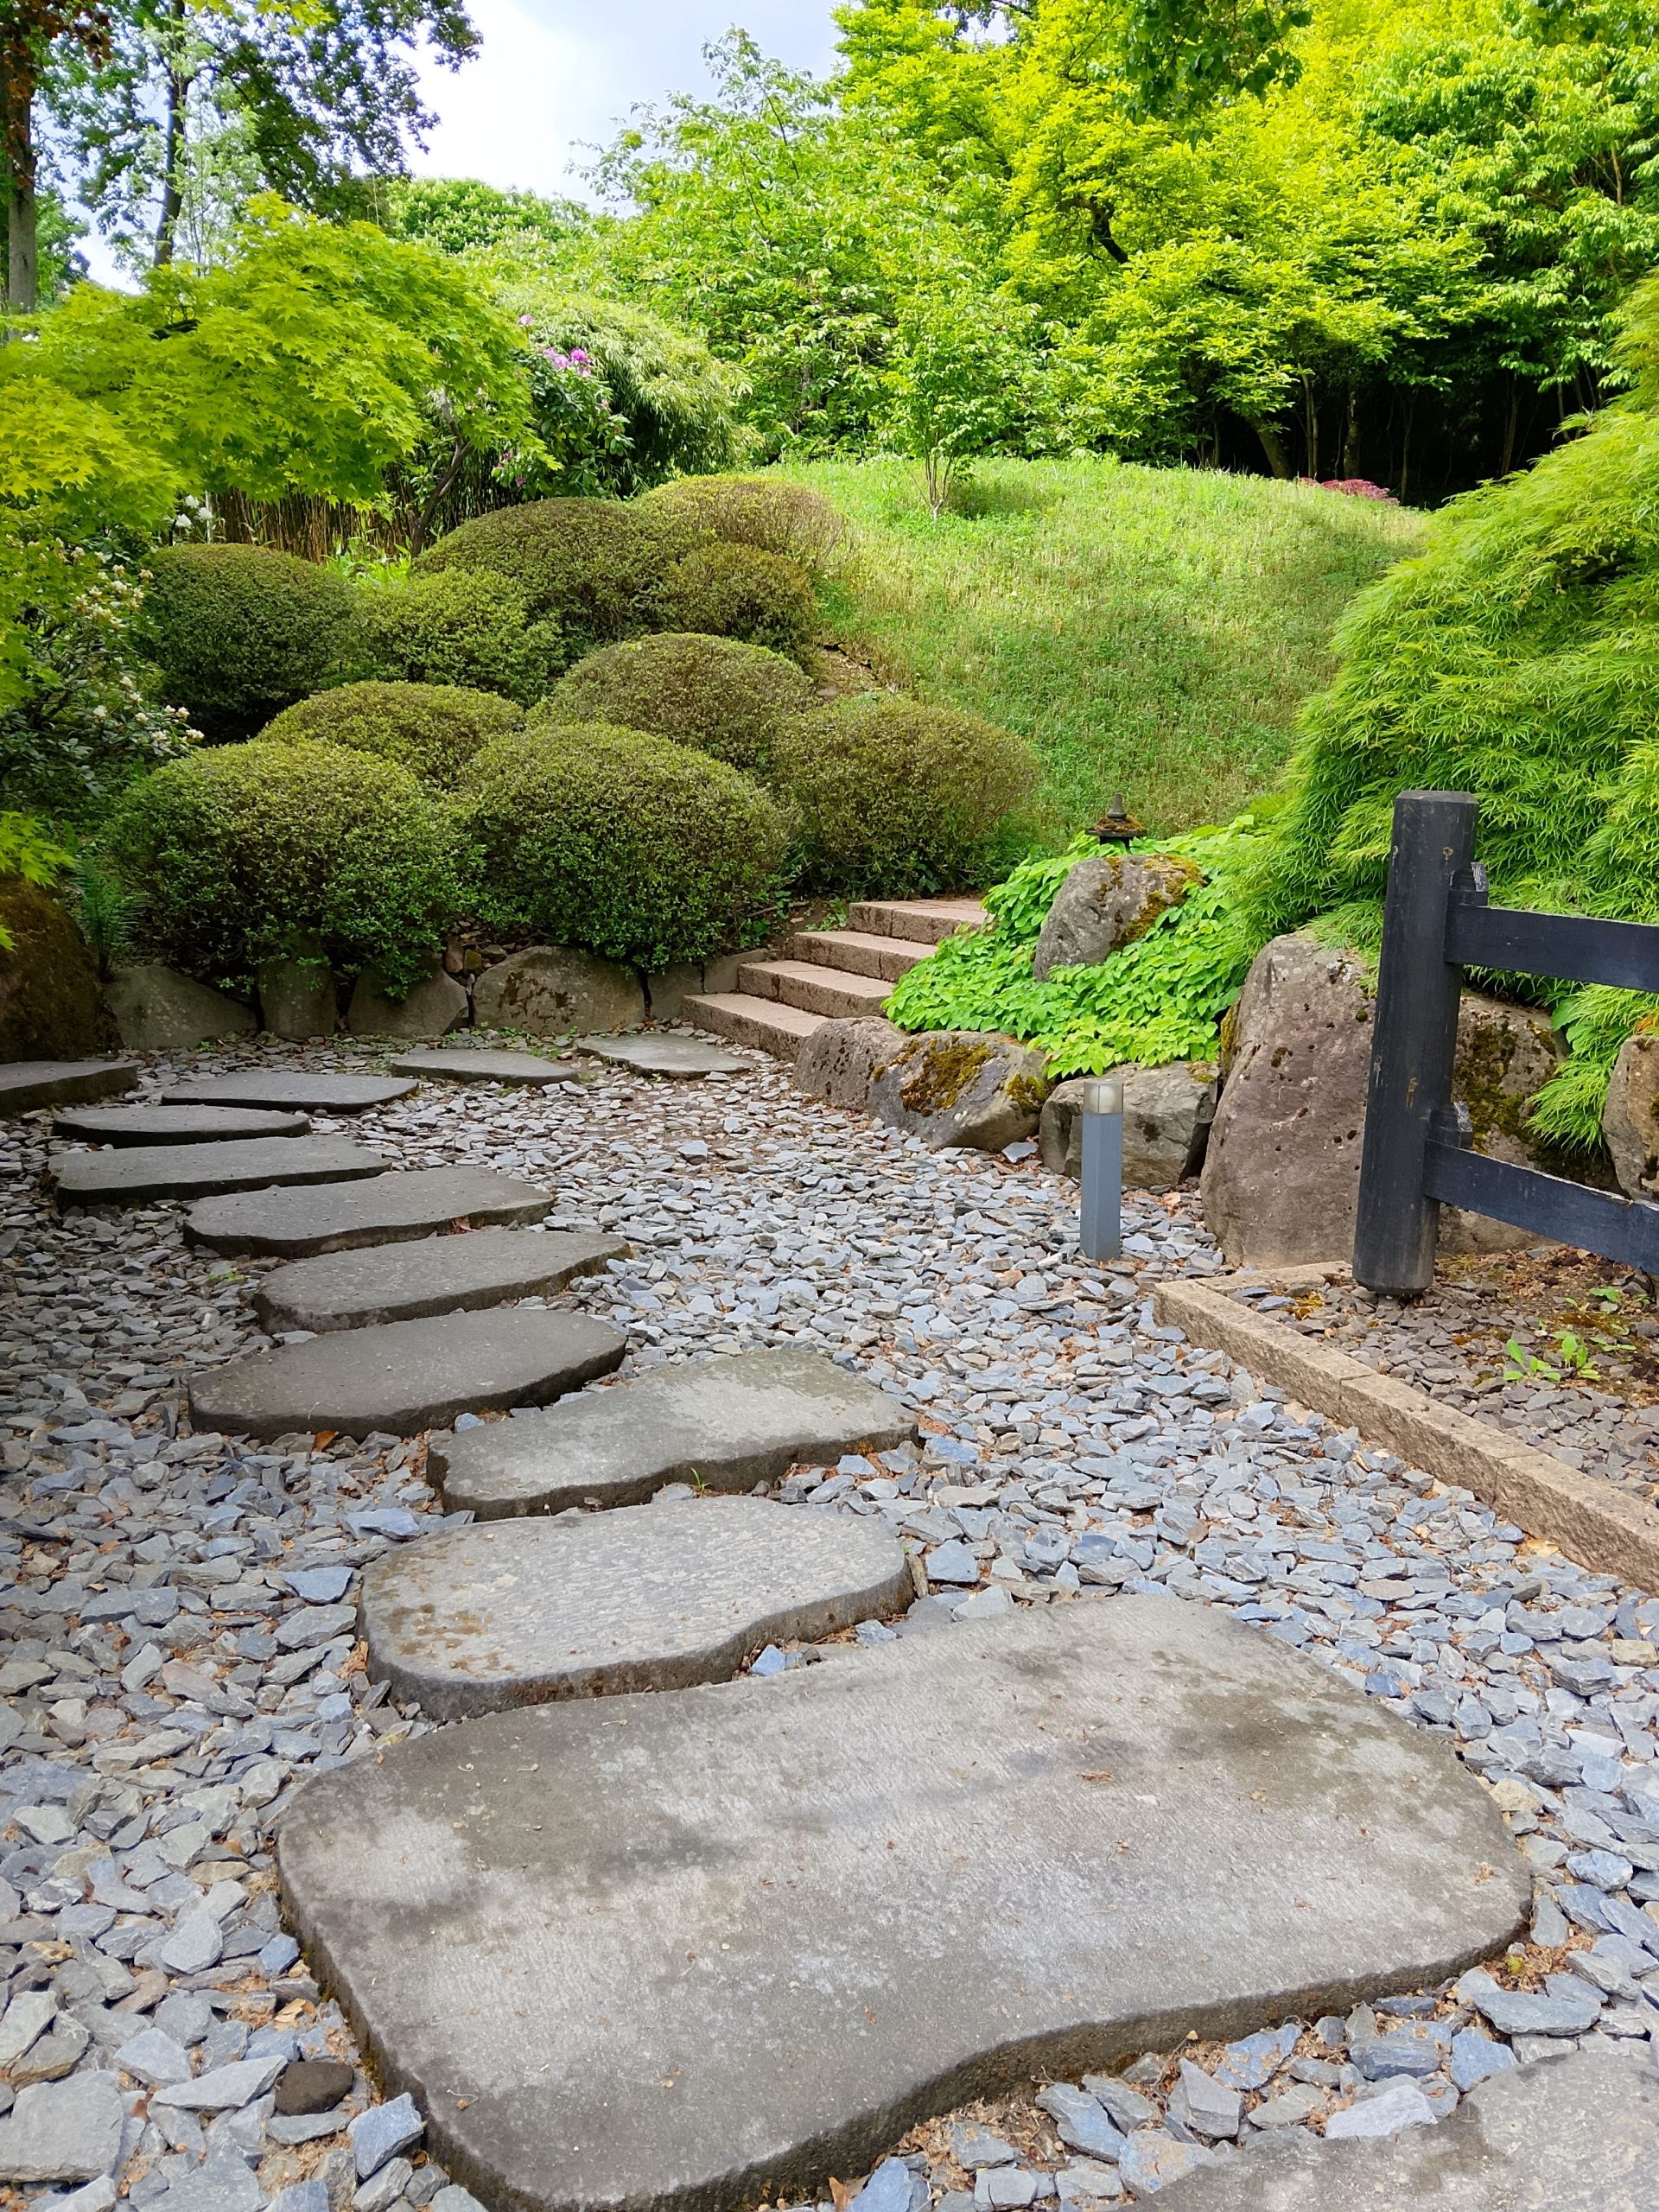
18. Serene Stepping Stones on a Bed of Gravel
This classic garden path follows a simple formula: 40% large stepping stones + 50% small gravel filler + 10% soft foliage edging. The large, flat stones provide a stable and comfortable walking surface. The gravel fills the space, providing excellent drainage and a satisfying crunch underfoot. The lush green foliage along the edges softens the hard lines of the stone and contains the gravel. You can change the materials—swap the gravel for wood chips or the green foliage for flowering perennials—but the ratio is key to its success.
“Be mindful of where a gravel path leads.”
The small stones are notorious for getting kicked around and tracked indoors on the bottoms of shoes, which can scratch up hardwood floors. If this path leads directly to a primary entrance of your house, you will be sweeping your entryway constantly. This type of path is often best reserved for journeys within the garden itself, connecting a patio to a shed or a seating area, where a few stray pebbles aren’t a domestic disaster.
19. Rustic Stone Slabs with a Stacked Retaining Wall
The stacked stone retaining wall is the undeniable anchor of this entire landscape. While the stepping stones and mulch create a functional path, the wall provides structure, dimension, and a powerful sense of permanence. It carves the space out of the surrounding yard, creating a distinct “room” and solving a grading problem at the same time. The wall isn’t just a border; it’s the backbone that gives the entire composition its rustic, established character.
“When combining different stone elements like a retaining wall, a stone patio, and stepping stones, you don’t need them to match perfectly.”
In fact, it often looks more natural if they don’t. Here, the wall is darker and more rough-hewn, while the patio and stepping stones are lighter and flatter. The key to making it work is to stay within the same color family (in this case, various shades of gray and tan) and to have one element—the reddish-brown mulch—that ties everything together visually.
20. A Magical Moss-Framed Walkway to a Stone Entry
This walkway is a masterclass in texture and aging. The combination of smooth, worn flagstones, fluffy green moss, and the delicate fronds of ferns creates a rich, tactile tapestry. It feels ancient and peaceful. The design intentionally blurs the edges between the path and the garden, allowing the moss and plants to grow right over the stone. This lack of hard-edging is what gives it that enchanting, “secret garden” quality. The path doesn’t cut through the landscape; it belongs to it.
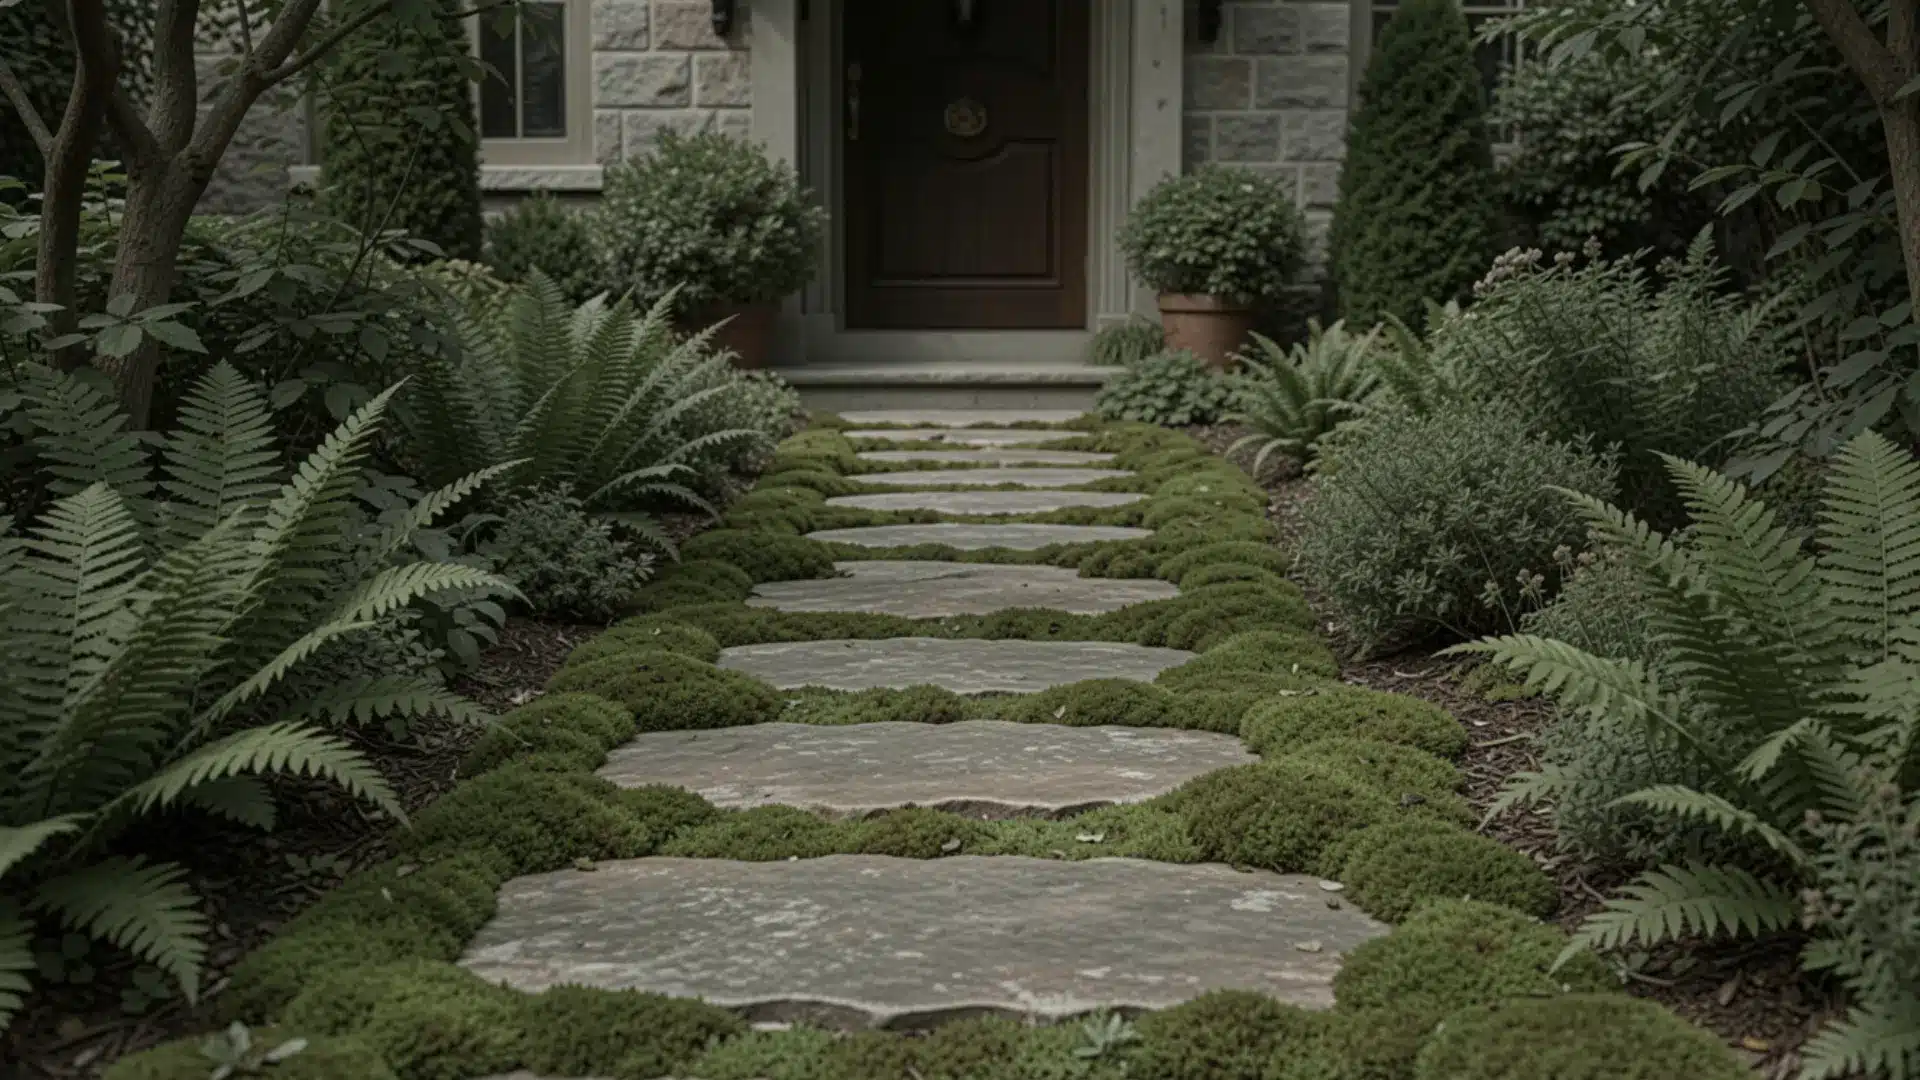
“As homeowners increasingly seek to create personal sanctuaries, designs that evoke a sense of peace and natural harmony are surging in popularity.”
This mossy, woodland look, inspired by Japanese garden principles and the forests of the Pacific Northwest, is the antithesis of a sterile, high-maintenance landscape. It celebrates imperfection, shade, and the beauty of nature reclaiming its space. It’s about creating a mood and an escape, not just a way to get from A to B.
21. Classic Charm with a Brick Stepping Stone Path
Brick is one of the most cost-effective and versatile materials for a stepping stone path. You can often find salvaged or used bricks for free or very cheap on Facebook Marketplace or Craigslist. Unlike larger, more fragile flagstones, bricks are easy to transport in any car. A small path might only require 50-100 bricks, which could cost you less than $50 if you’re buying new, and potentially nothing if you’re a savvy scrounger. The classic red color adds warmth and traditional charm to any garden setting.
“Before you commit to brick, check the type!”
Not all bricks are created equal. You need to use bricks rated for ground contact, often called “paver bricks” or “hard-fired” bricks. Standard “face bricks” used on the sides of houses are more porous and can absorb water, causing them to crack and crumble after a few freeze-thaw cycles. Ensure you’re getting the right kind of brick for the job to avoid having your path disintegrate in a few years.
22. A DIY-Friendly Flagstone and Gravel Combination
A flagstone and gravel path is a forgiving DIY project. Here’s the 5-step process: 1. Excavate the entire path area to a depth of 4 inches, ensuring the edges are clean. 2. Lay down a quality woven landscape fabric over the entire excavated area to suppress weeds. 3. Add a 2-inch layer of paver base (crushed stone) and compact it firmly with a hand tamper. 4. Arrange your large flagstones on top of the base, wiggling them in until they are stable and don’t rock. 5. Fill all the gaps and cover the base layer with a 2-inch layer of your chosen decorative gravel, sweeping it between the stones.
“This method is incredibly scalable.”
For a small side-yard path, you might only need a width of 24 inches. For a main backyard thoroughfare connecting a deck to a patio, a more generous width of 36-48 inches would be more comfortable. The beauty of this technique is that the materials and process are the same regardless of scale; you just need more of everything for a larger path. This makes it a great option for both small, intimate garden trails and more substantial walkways.
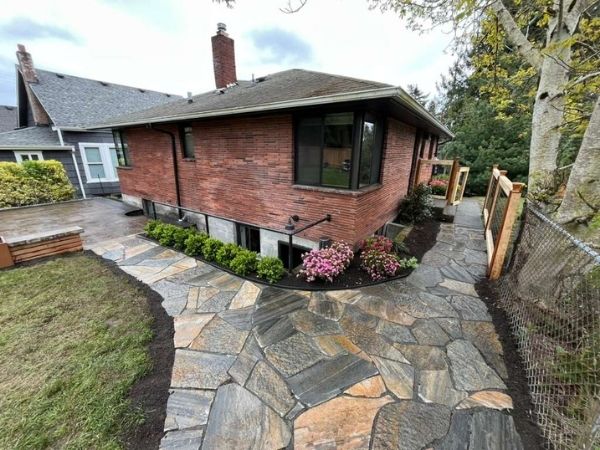
23. Curved Flagstone Path with a Traditional Red Brick Border
This path’s inviting feel comes from a well-executed 60/30/10 material mix. The irregularly shaped flagstones make up the main 60% of the visual weight, providing texture and a natural feel. The red brick border constitutes about 30%, adding a strong, warm-colored line that gives the path structure and a traditional touch. The final 10% is the dark wood chip mulch, which acts as a neutral backdrop and cleanly separates the path from the lawn and house. For a different vibe, you could swap the red brick for a dark grey paver. Also, check out Idea #7 for a different flagstone style.
“A brick border set in soil or mulch (as opposed to mortar) looks fantastic, but it is not a set-and-forget feature.”
Over time, soil movement, freeze-thaw cycles, and accidental kicks will cause the bricks to shift, tilt, or heave. Plan on spending an hour or two each spring resetting and re-leveling a few of the bricks to keep the edge looking clean and to prevent them from becoming a trip hazard. It’s a small price to pay for this classic, layered look.
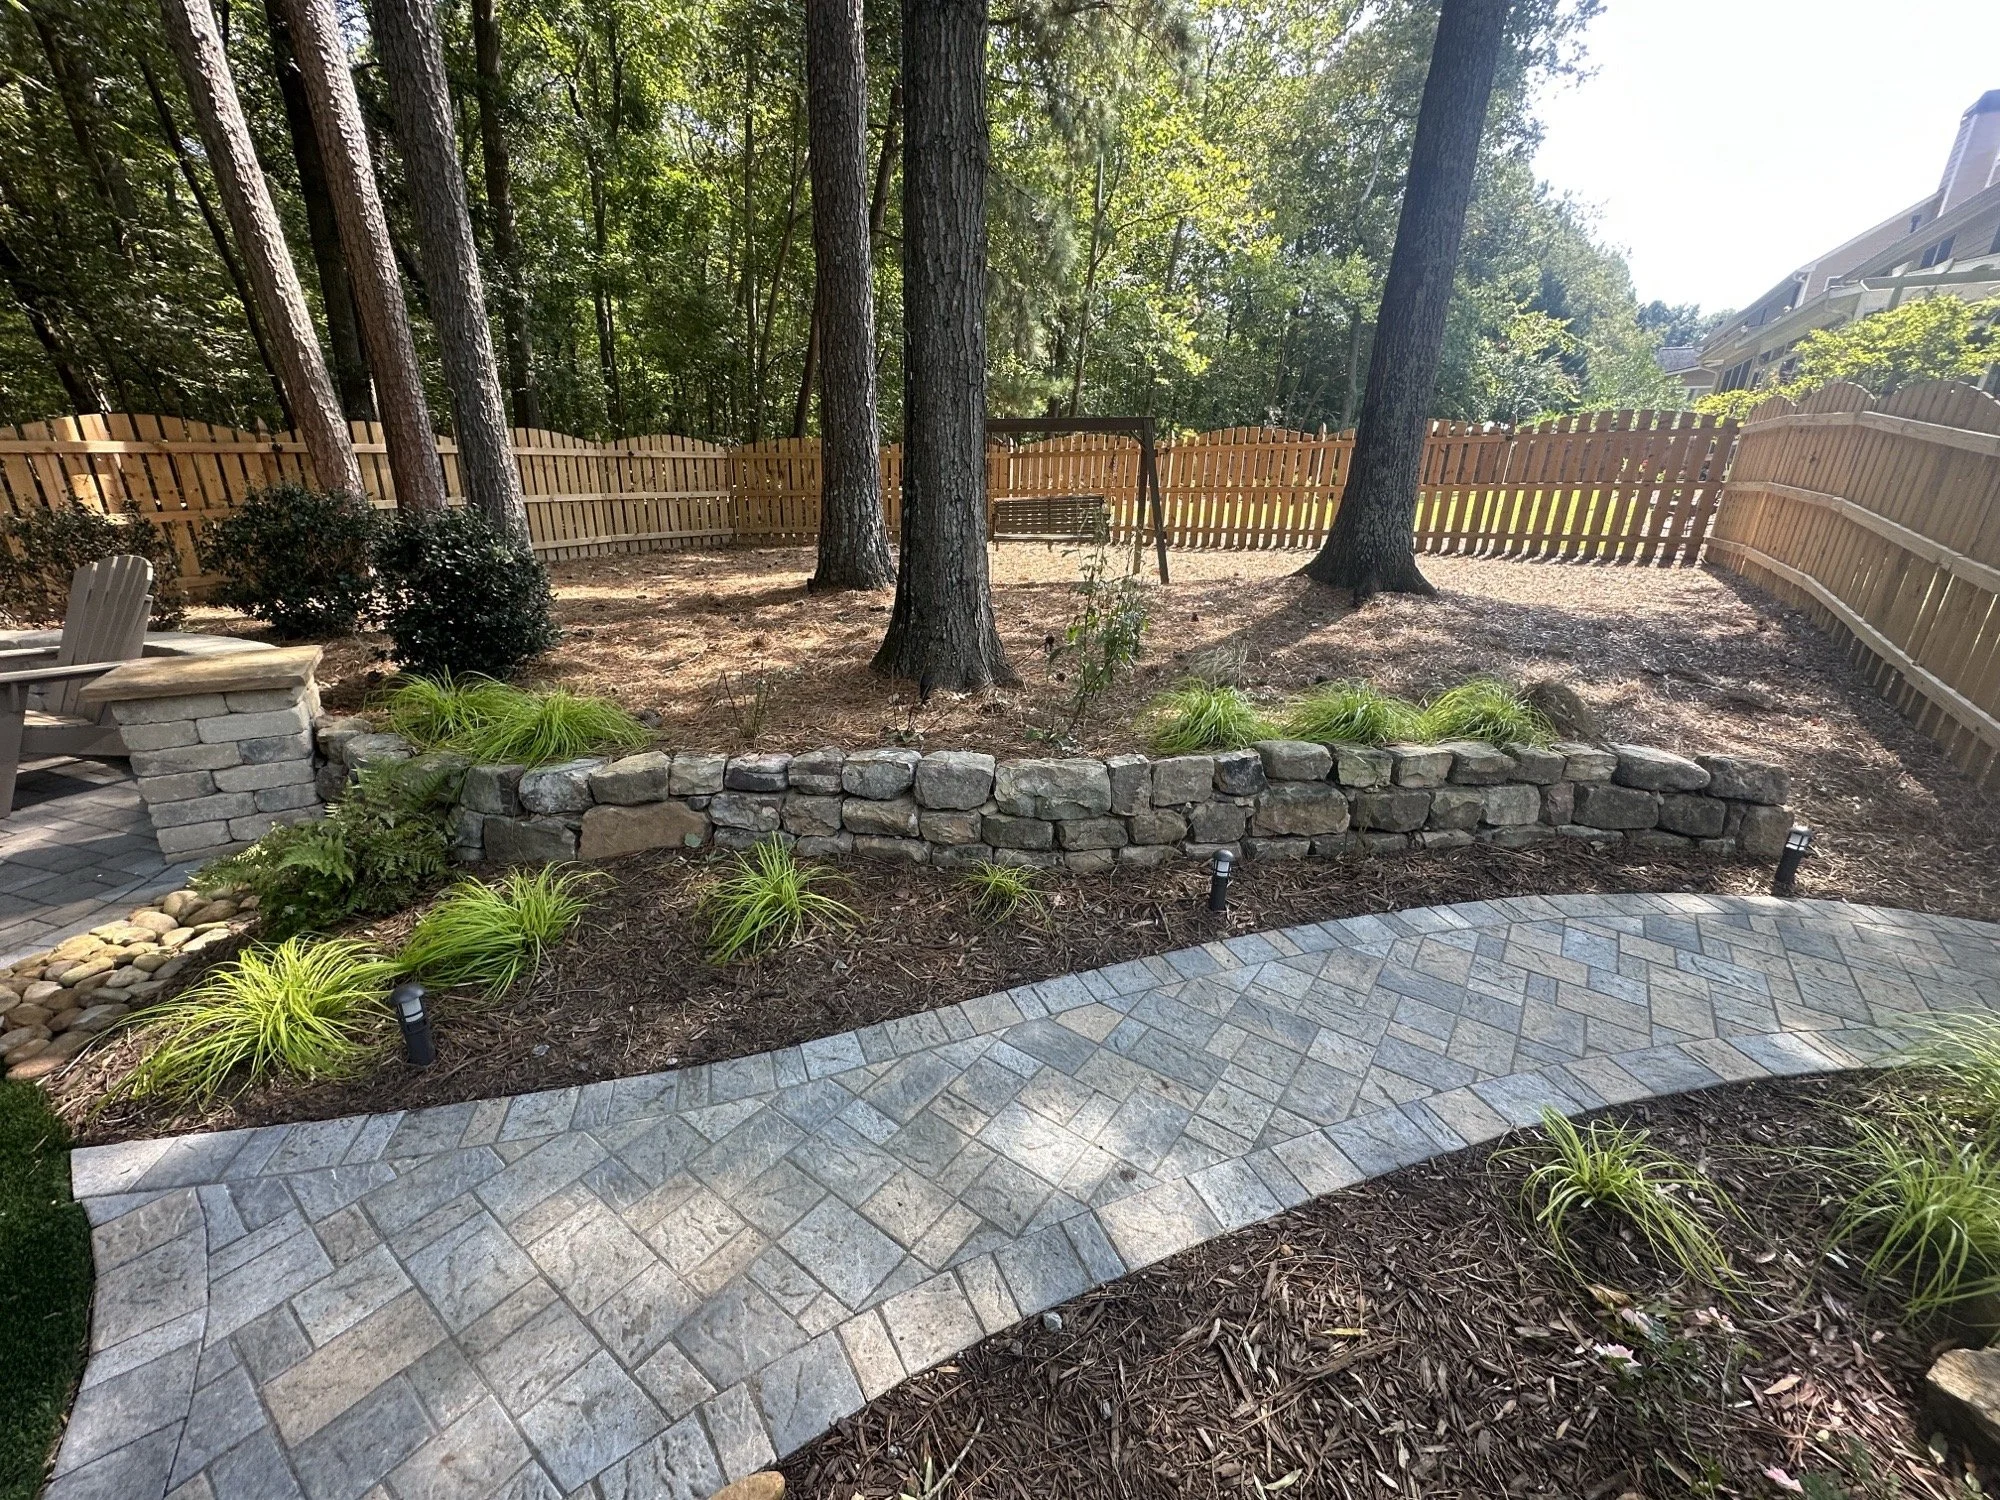
24. Winding Gray Paver Path Alongside a Stone Retaining Wall
Creating a professionally installed paver path with a stacked stone wall requires a healthy budget, primarily for labor. Here’s an estimated breakdown:
“Materials: Gray pavers, paver base, sand, stacked stone for wall – $2,500 – $6,0”
- Materials: Gray pavers, paver base, sand, stacked stone for wall – $2,500 – $6,000
- Labor: Professional installation for path and wall – $5,000 – $12,000+
- Lighting: Low-voltage path lights – $500 – $2,000
- Landscaping: Mulch, ornamental grasses – $300 – $1,000
- Budget Alternative: Use more affordable concrete retaining wall blocks and do the paver installation yourself to save 50-70%.
- TOTAL: $8,300 – $21,000+
This design succeeds by echoing shapes and textures. The gentle curve of the paver walkway is mirrored by the curve of the stacked stone retaining wall, creating a beautiful sense of flow and rhythm. The textures work in harmony as well; the relatively smooth, uniform surface of the pavers contrasts nicely with the rough, irregular texture of the stacked stone wall. This repetition of form and contrast of texture makes the entire design feel cohesive and visually interesting. For another curved paver idea see Idea #1.
25. High-Contrast Path: Dark Gray Stones on Light Gravel
It sounds simple, but the choice of dark gray stepping stones is what makes this path pop. In a world of beige and light gray flagstone, the moody, almost-black color of these irregular stones creates a bold, graphic statement. Placed against the light-colored gravel, the contrast is dramatic and modern. It draws the eye and gives the path a strong presence in the landscape. Using a standard tan or gray stone here would have resulted in a much more muted, standard-looking walkway. This proves the power of a daring color choice. For a lighter version, see Idea #9.

“To ensure your stepping stones stay put in a gravel bed, you need to give them a solid footing.”
After you’ve laid your landscape fabric, place the stone where you want it and trace its outline in the fabric. Cut an “X” within the outline and peel back the fabric flaps. Dig out about 2 inches of soil from under the stone’s footprint and fill it with paver base or sand. Now, set your stone on this prepared base. It will be much more stable and less prone to shifting and wobbling than a stone placed directly on top of the fabric and gravel.
26. A Winding Wet-Look Brick Path Through a Lush Garden
The beauty of this path lies in its elegant curves and the clever use of a border. The darker brick border acts like a picture frame, giving the main body of light brown bricks a crisp, defined edge. This visual separation elevates the whole design, making it feel more custom and intentional. The sweeping curve leads the eye gently through the garden, creating a sense of graceful movement that a straight path would lack. The wet surface, reflecting the sky, adds a layer of depth and drama, making the colors of the brick and surrounding foliage appear richer.
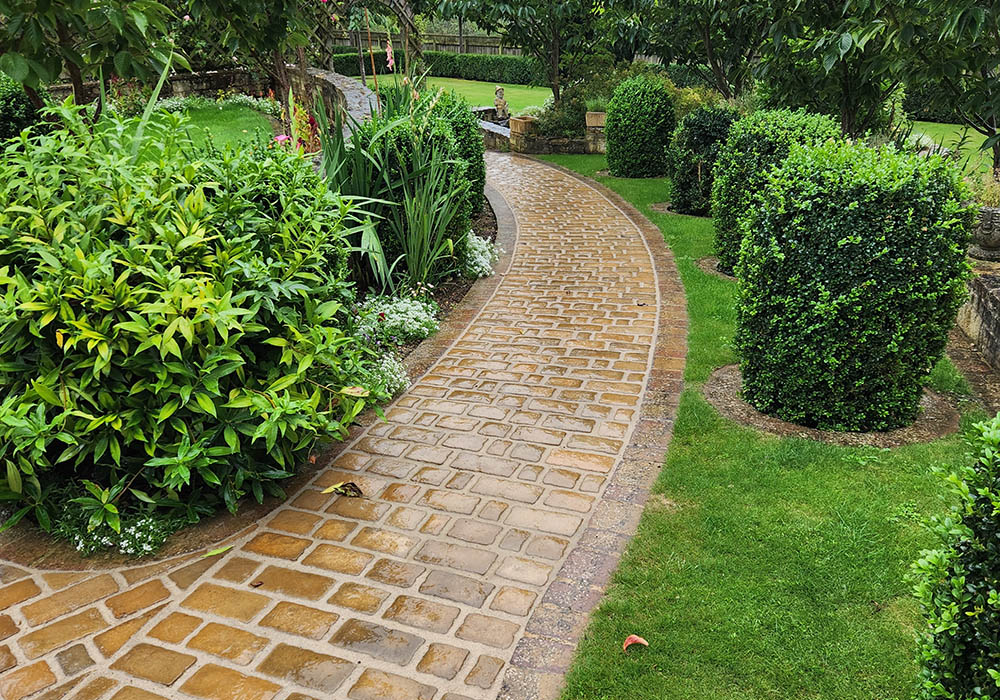
“A brick path in a lush, shady garden is a classic look, but it can be prone to moss and algae growth, which makes the surface slick and hazardous when wet.”
To keep it safe and looking its best, plan on a yearly cleaning. A pressure washer on a low setting is effective, or you can scrub the surface with a stiff-bristled brush and a solution of water and oxygen bleach. Regular sweeping to remove leaves and debris will also help to prevent growth from taking hold in the first place.
27. A Tranquil Walkway Through a Japanese Garden Stream
This is undeniably a show-stopper, but it is not a practical solution for a primary walkway. The uneven surfaces, the potential for slipperiness, and the fact that you’re literally walking through water make this unsuitable for daily, high-traffic use. Think of this as a “destination path” or a feature within a larger garden design, meant for slow, contemplative strolls. It would be a nightmare for carrying groceries, navigating with a stroller, or for anyone with unsteady footing. It’s a 10/10 for aesthetics, but a 2/10 for everyday practicality.
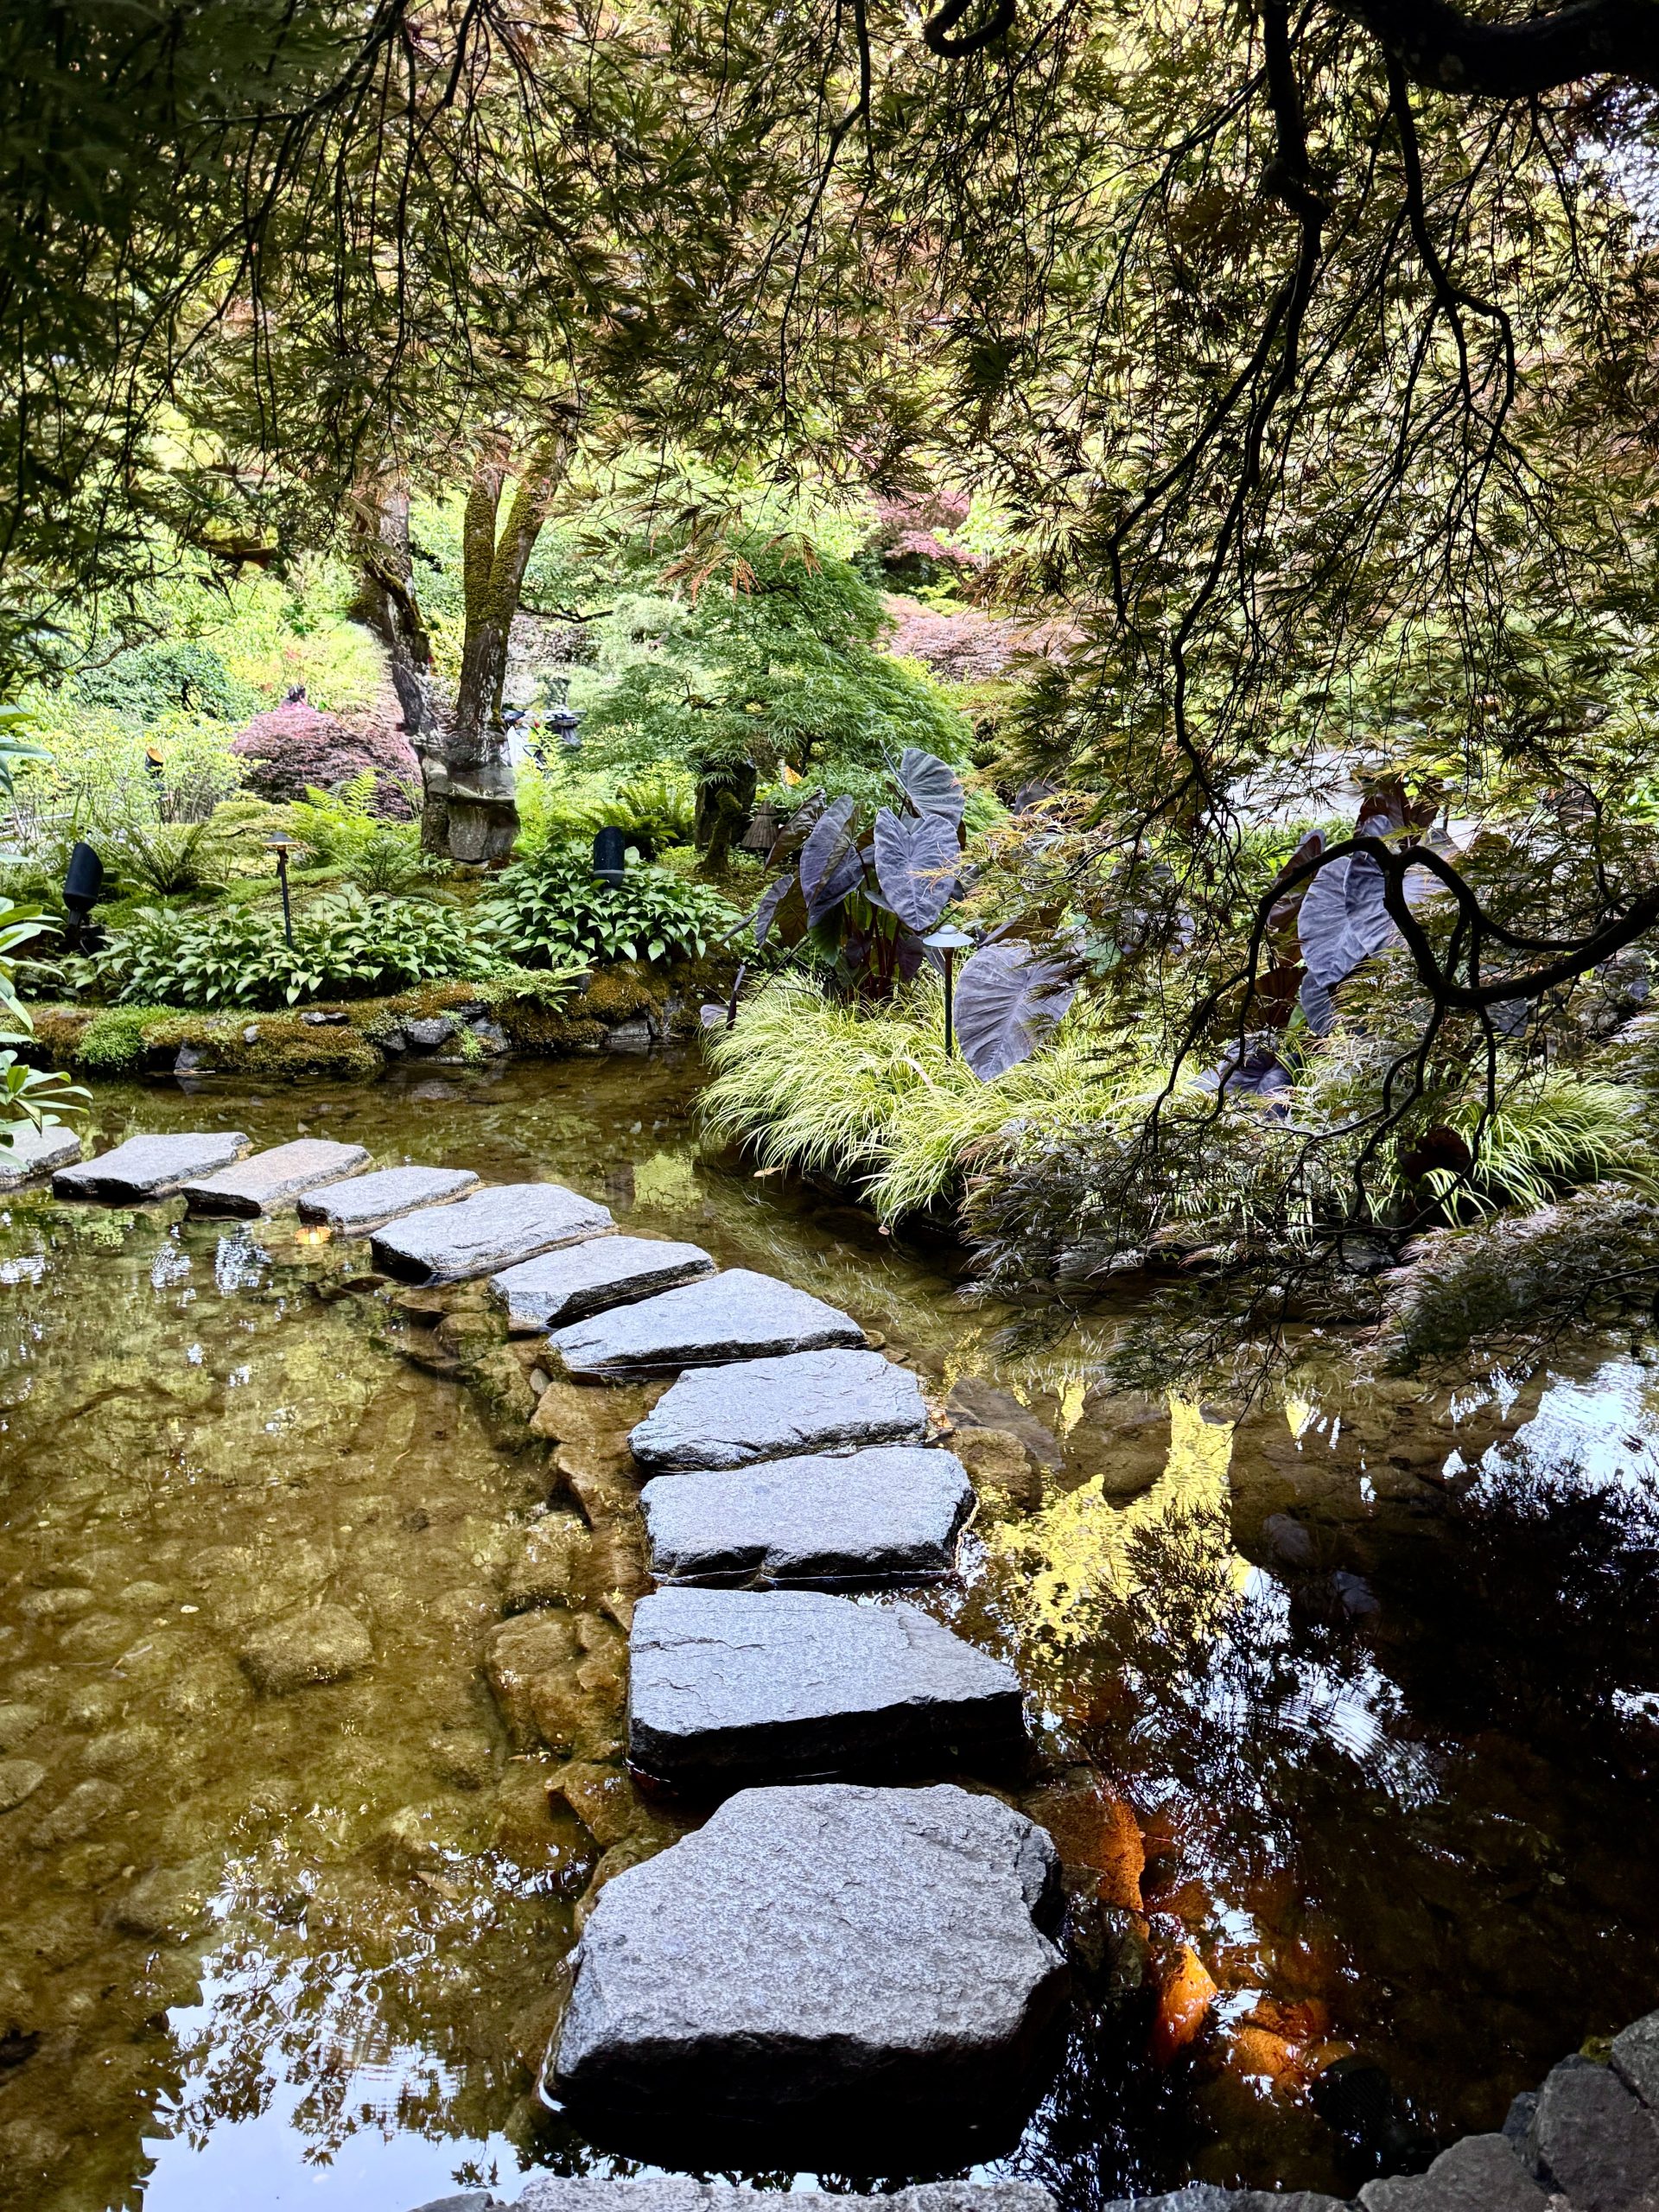
“The water is everything.”
This is the single element that transforms a simple stone path into a profound sensory experience. The sound of the stream, the feel of the cool air, and the sight of light reflecting off the moving surface create a powerful sense of tranquility and connection to nature. The stones are merely the means to immerse yourself in this atmosphere. The entire design is built around the decision to not build a bridge *over* the water, but to create a path *through* it.
28. Concrete Slab Path Leading to a Cozy Autumn Fire Pit Patio
This cozy autumn scene is a perfect equation: 40% clean modern lines + 50% rustic natural texture + 10% bold black accents. The rectangular concrete stepping stones and circular paver patio provide the clean, modern foundation. The dark brown mulch, large rocks, and colorful foliage bring in the rustic, organic feel of the season. Finally, the black metal fire pit and matching Adirondack chairs act as strong, grounding punctuation marks, giving the whole area a contemporary edge. For a different take on concrete slabs, check out Idea #12.

“You can get this look for much less.”
Instead of a professionally laid paver patio, create a simple circle of gravel or decomposed granite for your seating area. A bag of concrete mix from a hardware store can be used to pour your own custom-sized rectangular stepping stones for a few dollars each. For seating, look for end-of-season sales on Adirondack chairs at Target or Walmart, or search Facebook Marketplace for a secondhand set you can spray paint black.
29. A Hidden Path Through a Tunnel of Green Hedges
This design is all about creating a sense of mystery and enclosure. The neatly trimmed, bright green hedges act as living walls, forming a natural tunnel that obscures the view ahead and creates an intimate, secluded feeling. The path itself, made of faded, uneven stone slabs, feels ancient and discovered rather than newly built. This combination of formal (the trimmed hedges) and informal (the rustic stones) creates a dynamic tension that is incredibly compelling. It’s a path that beckons you to see where it leads.
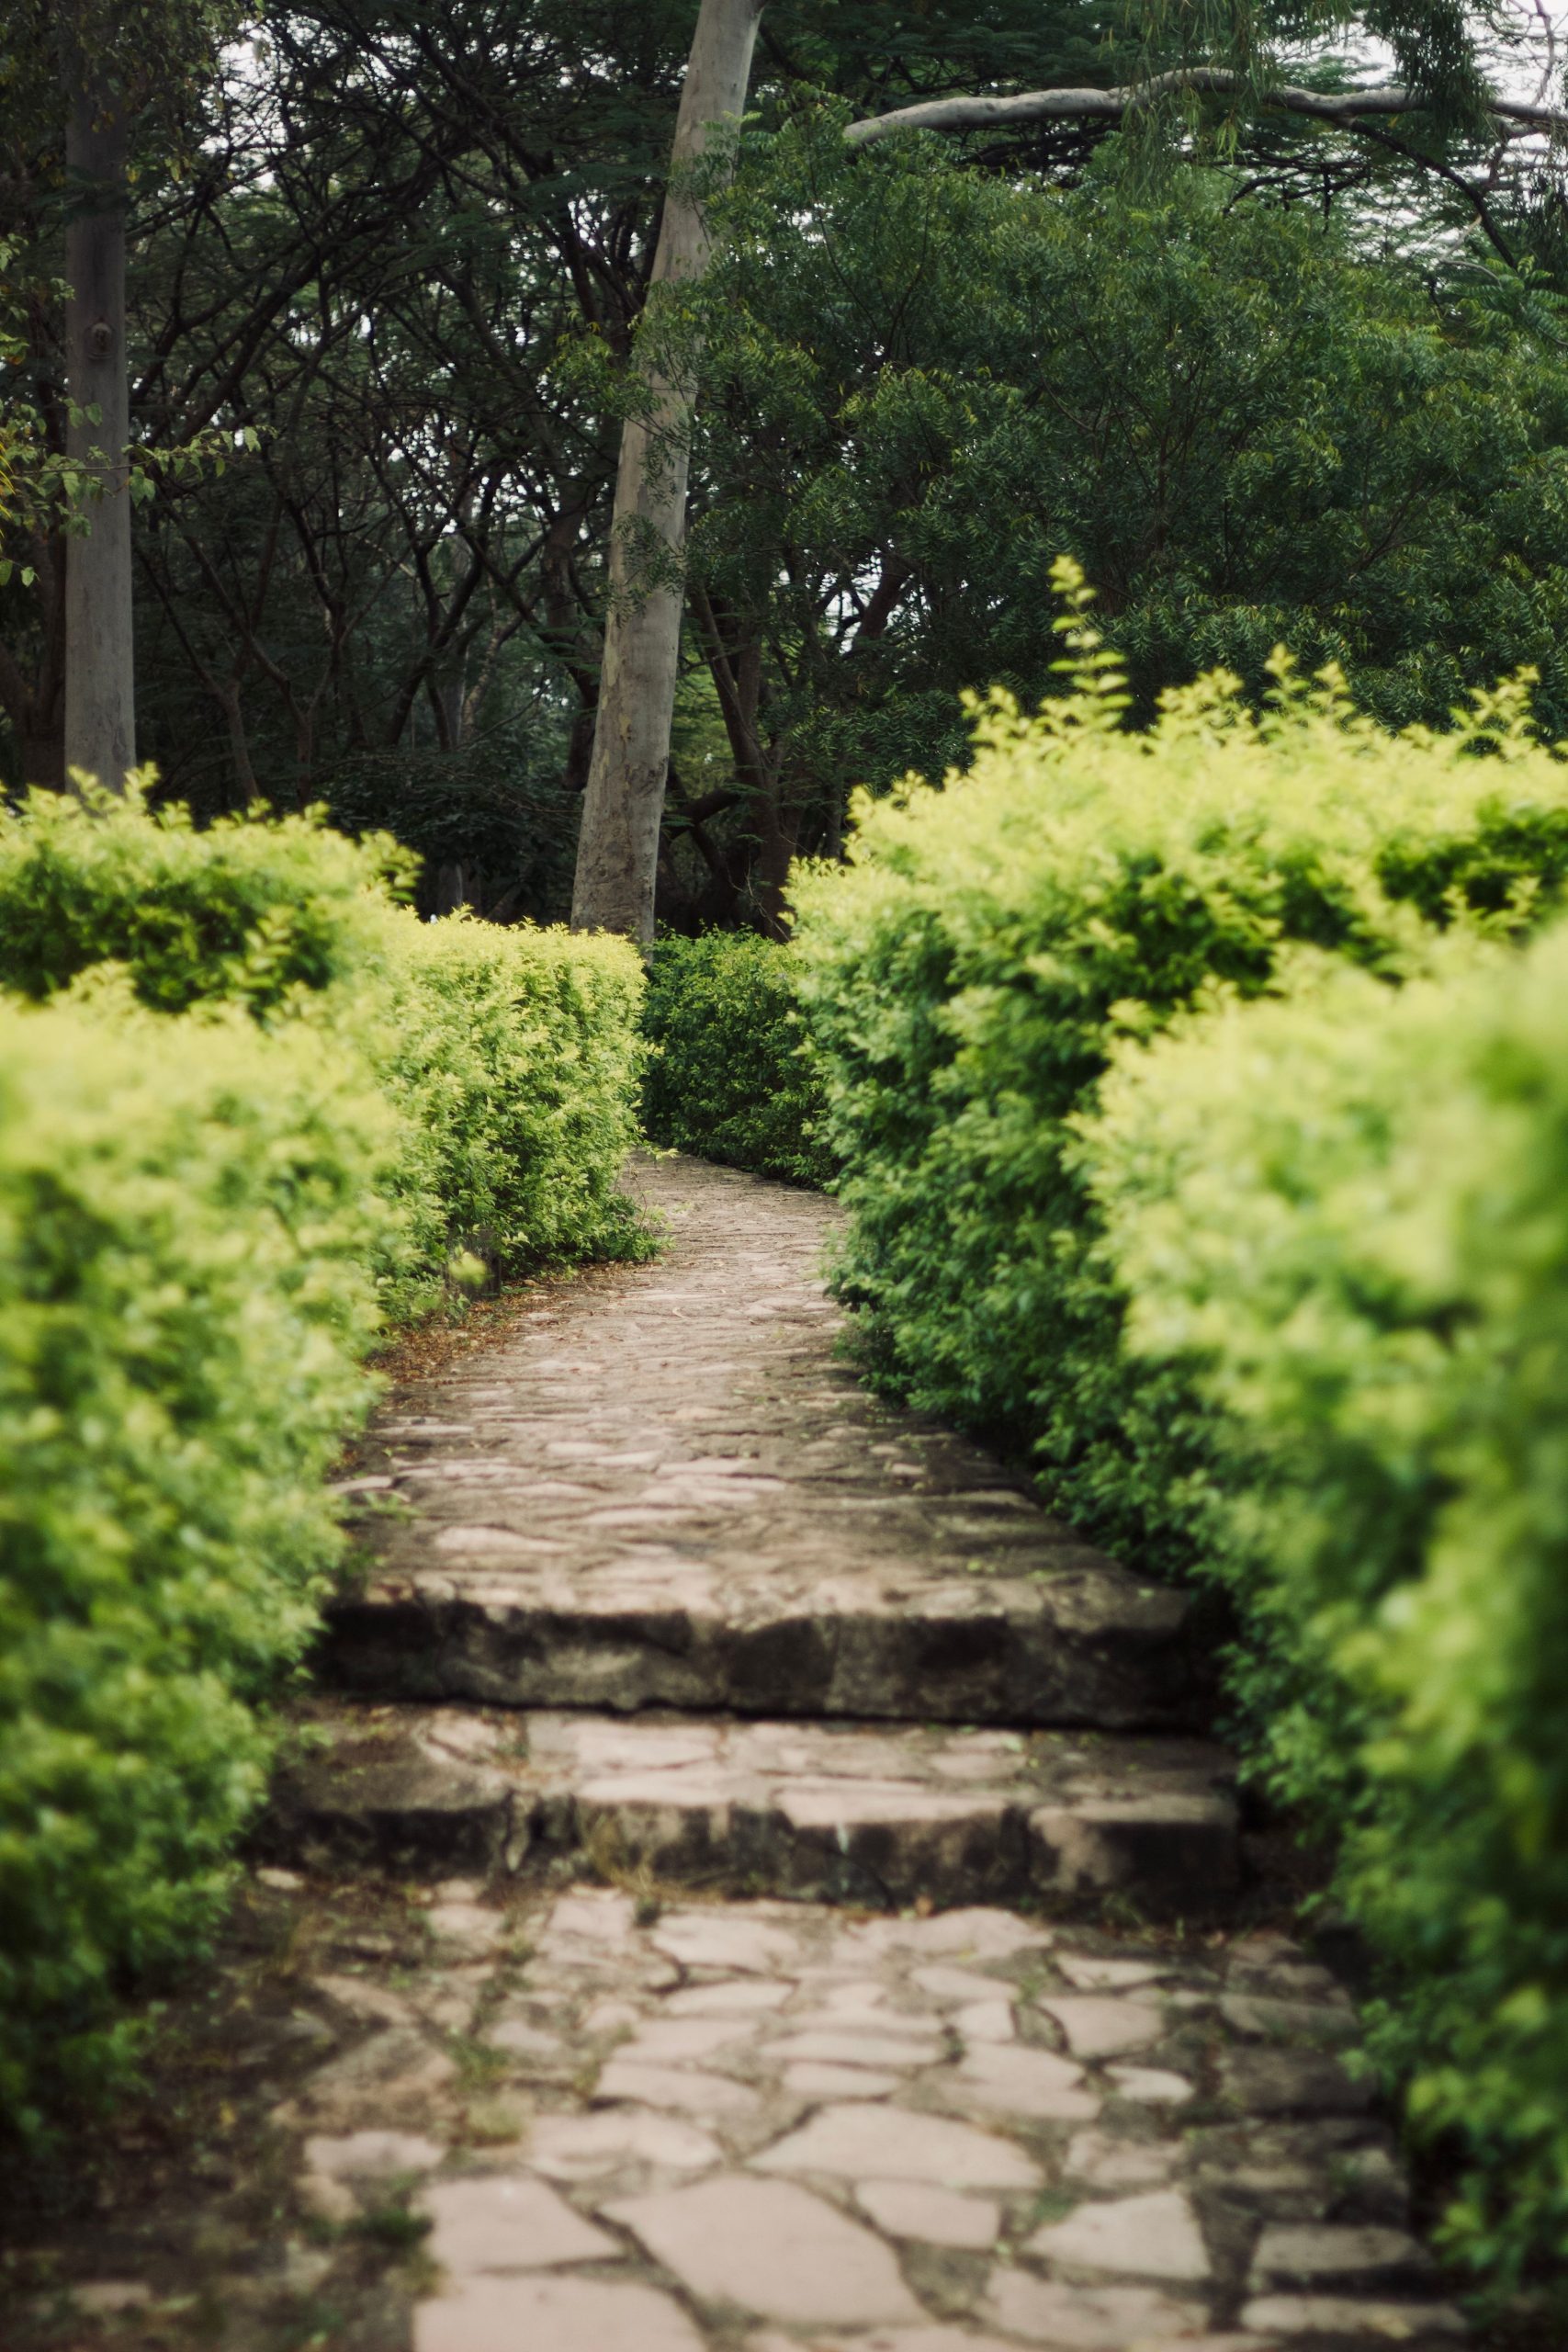
“Creating a “hedge tunnel” requires patience and a bit of space.”
This idea works best along a property line or to connect two distinct “rooms” in a larger garden. You need a path length of at least 15-20 feet to get the full tunnel effect. The hedges will need at least 3-4 feet of width on each side to grow full and dense. Therefore, you should dedicate a corridor of at least 8-10 feet in total width for this concept. It’s a long-term investment, as the hedges could take 5-7 years to mature fully.
Your Perfect Path Awaits
A great walkway does more than just get you from here to there; it sets the tone for your entire outdoor space. Whether you’re drawn to rustic flagstone or modern concrete, the right path can connect your home to your garden in a truly meaningful way. So take that first step, get inspired, and start planning. Your dream yard is closer than you think. Now go on, get that Pinterest board ready!