You’ve pinned a hundred photos, scrolled through countless feeds, and you can practically feel the cool tile under your feet—but you still haven’t landed on *the* idea for your bathroom remodel. We get it. The sheer volume of inspiration out there can feel more overwhelming than helpful. That’s why we did the heavy lifting, filtering through hundreds of designs to bring you the 31 most compelling and achievable bathroom remodel ideas for 2026. These aren’t just pretty pictures; they are real-world bathrooms we’ve broken down into actionable advice.
As wellness at home continues to be a huge priority, bathrooms in 2026 are becoming full-fledged personal sanctuaries, which is why you’re seeing this trend everywhere. And stay until the end — we break down the most common mistakes that can ruin these looks. 📌 Save this to Pinterest for later — you’ll want to revisit these ideas.
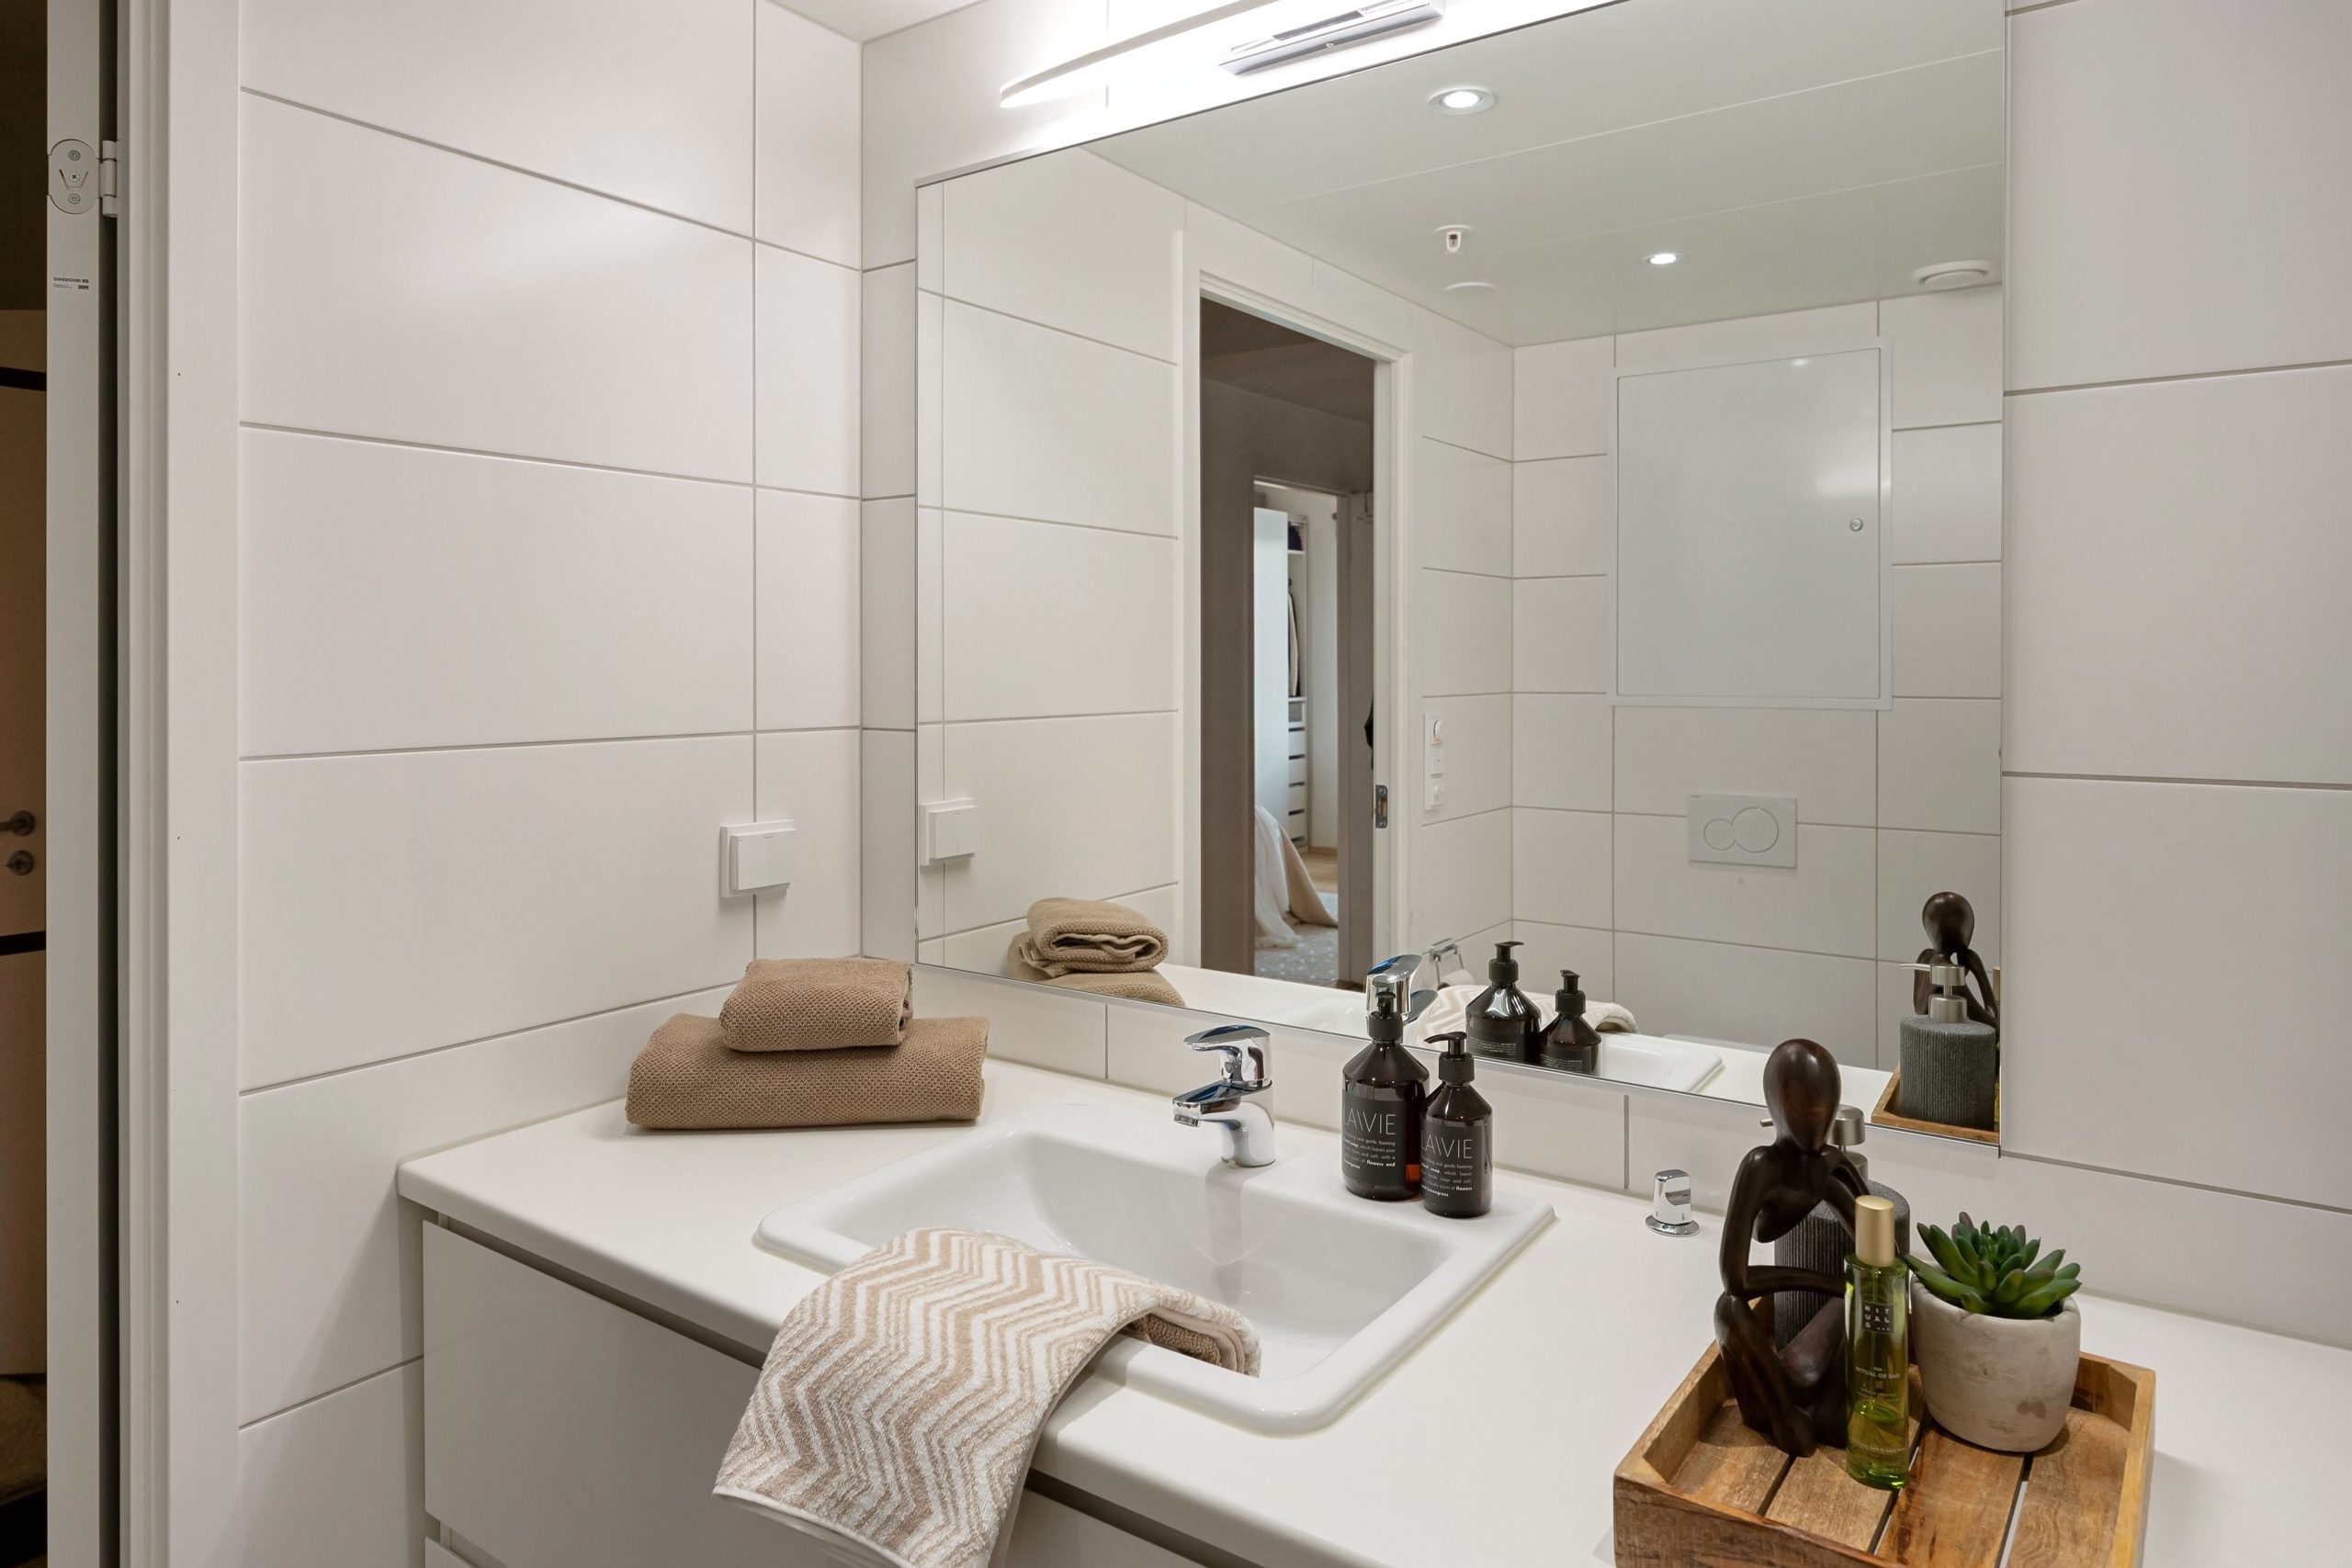
1. A Modern & Airy Bath with a Light Wood Vanity and Hexagonal Tile
What makes this space feel so refreshing is the masterful blend of textures and shapes. The crisp, straight lines of the white horizontal shiplap walls create a clean, structured backdrop that emphasizes the room’s height and brightness. This linear element is beautifully contrasted by the playful, geometric pattern of the white hexagonal floor tiles. It’s a classic design lesson: when you pair straight lines with geometric or organic shapes, you create a dynamic visual conversation that keeps the eye engaged and happy.

“For a double vanity to feel comfortable and not crowded, the magic number is 60 to 72 inches in total width.”
This provides enough space for two sinks while leaving adequate personal counter space for each person. When planning your plumbing, ensure the centerlines of your sink drains are at least 30 inches apart. This prevents elbow-jostling and gives each person a defined zone. The light wood vanity here looks to be in that perfect 6-foot range, offering a functional, balanced setup.
2. Balance Cool Tones and Natural Woods Around a Freestanding Tub
This room’s serene vibe comes down to a simple formula: 50% cool tones + 40% warm materials + 10% classic white. The light blue-green walls provide the cool, calming base. This is then balanced by the warmth of the dark wood cabinetry and rich, wood-look flooring. The final 10% is the crisp white of the freestanding tub and shutters, which acts as a visual palette cleanser, making both the cool and warm elements pop. You could swap the blue-green for a soft sage or a cool lavender and still get the same harmonious effect.

“A freestanding tub is the height of bathroom luxury, but be realistic about the space it requires.”
Unlike a built-in tub that tucks against a wall, a freestanding model needs clear space on all sides—not just for aesthetics, but for cleaning. You’ll want at least 6-8 inches of clearance between the tub and any walls. This makes mopping and wiping down the area much easier. If the space is too tight, it will become a dust and grime trap that you’ll regret.
3. Go Minimalist with White Tile and an Integrated Sink
The single element holding this entire look together is the integrated sink and vanity. By forming the countertop and basin from one seamless material, it eliminates visual clutter. There are no lines, seams, or material changes, which makes the small space feel significantly cleaner and more open. If you were to swap this for a traditional vanity with a separate drop-in or vessel sink, the room would instantly feel busier and less refined. It’s a testament to the power of minimalist, functional choices.
“You don’t need a custom-molded vanity to achieve this clean, integrated look.”
The IKEA ‘GODMORGON’ series offers floating vanities with integrated sinks starting around $300-$500, giving you that same seamless European vibe for a fraction of the price. Pair it with simple white subway tile from a big-box store like Home Depot (often less than $0.50 per tile), and you can replicate this entire wall for well under $800. The key is to keep the fixtures simple and let the clean lines do the talking.
4. Mix a Shiplap Ceiling with Brass Accents and a Wood Vanity
This bathroom nails the “warm modern” look by balancing three key elements: texture, material, and light. The white shiplap on the angled ceiling draws the eye upward and adds subtle, linear texture that contrasts beautifully with the smooth, light gray subway tile. The light-toned wooden vanity brings in natural warmth, which is then echoed and amplified by the brass hardware and mirror frames. Finally, the placement of sconces between and beside the mirrors ensures even, flattering light without harsh overhead shadows.

“This double vanity setup is ideal for a primary bathroom with a width of at least 10 feet.”
This allows for a generous 6-foot vanity, plus comfortable clearance on either side for movement and door swings. The angled shiplap ceiling is a brilliant trick for rooms with lower or sloped ceilings (common in second-floor bathrooms or converted attics), as it creates architectural interest while keeping the space feeling bright and open. Compare this with the more compact vertical layouts in Idea #19.
5. Embrace Minimalism with a Floating Vanity and Backlit Mirror
When using a wall-mounted faucet, the placement height is everything. The spout should sit high enough to comfortably wash your hands, but not so high that it causes splashing. A good rule of thumb is to position the center of the spout outlet 5-7 inches above the top rim of the sink. For the handles, place them with about 4-6 inches of space between their centers. This ensures a balanced, ergonomic layout that feels intentional and looks professionally installed. Always check the faucet’s spec sheet before your plumber roughs in the pipes!
“The backlit elliptical mirror is the undeniable star of this bathroom.”
Remove it, and you have a perfectly nice, minimalist space. But *with* it, the room gains a soft, ambient glow that elevates the entire mood. It turns a functional object into a feature that feels like architectural lighting. The light bouncing off the beige tiles creates a serene, hotel-like atmosphere that a standard mirror and overhead light fixture could never achieve. It proves that sometimes, the most important element is the light itself.
6. Channel Timeless Glamour with White, Gold, and Crystal
Getting this luxurious, classic look is all about layering elegant finishes. The budget can range significantly based on the quality of the marble and designer lighting, but here is a realistic estimate.

“Main Furniture: White vanity with marble top – $1,200-$3,000
Lighting: Cryst”
- Main Furniture: White vanity with marble top – $1,200-$3,000
- Lighting: Crystal chandelier and two wall sconces – $800-$2,500
- Fixtures: Widespread chrome faucet and vanity hardware – $300-$700
- Decor: Ornate framed mirror – $400-$900
- TOTAL: $2,700 – $7,100
Budget alternative: Find a similar vanity at a big-box store, use high-quality gold spray paint on existing hardware, and source vintage crystal lighting from Facebook Marketplace or a thrift store for about 40-50% less.
While stunning, this look requires a commitment to cleaning. Polished chrome faucets and gold finishes show water spots and fingerprints like it’s their job. You’ll want to wipe them down daily with a soft microfiber cloth to maintain their sparkle. The crystal chandelier will be a dust magnet; plan for a careful cleaning 2-3 times a year. For the marble countertop, be vigilant. Wipe up spills from makeup or colored soaps immediately, as marble is porous and can stain easily. Using a pH-neutral stone cleaner is a must.
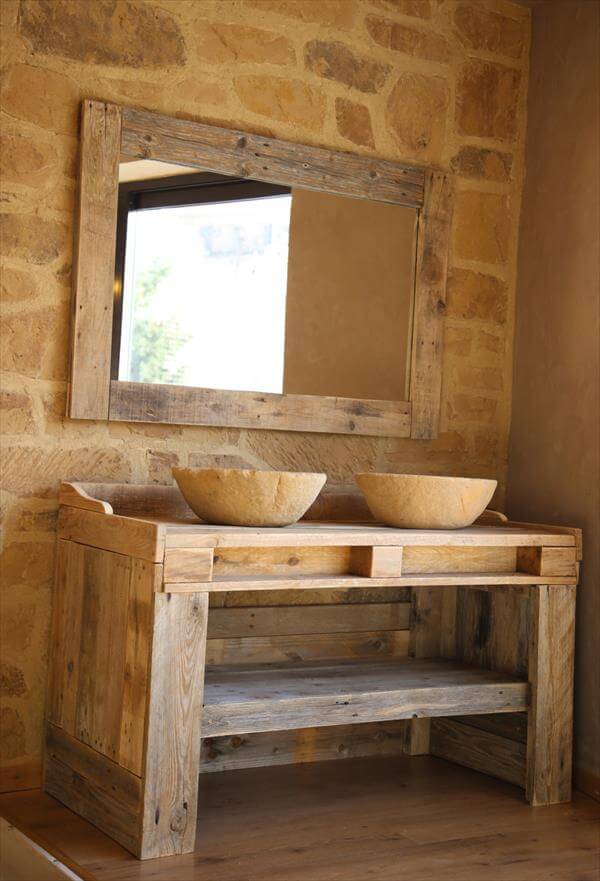
7. Create an Organic Cave Vibe with Textured Walls and Stone Sinks
This bathroom perfectly captures the “biophilic design” trend that has dominated interiors, and it shows no signs of slowing down for 2026. The idea is to connect with the natural world through materials, textures, and forms. The rough, cave-like accent wall isn’t just a backdrop; it’s an experience. Paired with the organic shape of the stone vessel sinks and the warmth of the wood shelves, it creates a grounded, sanctuary-like feeling. This is a direct reaction to our increasingly digital lives, fulfilling a craving for tactile, natural environments.
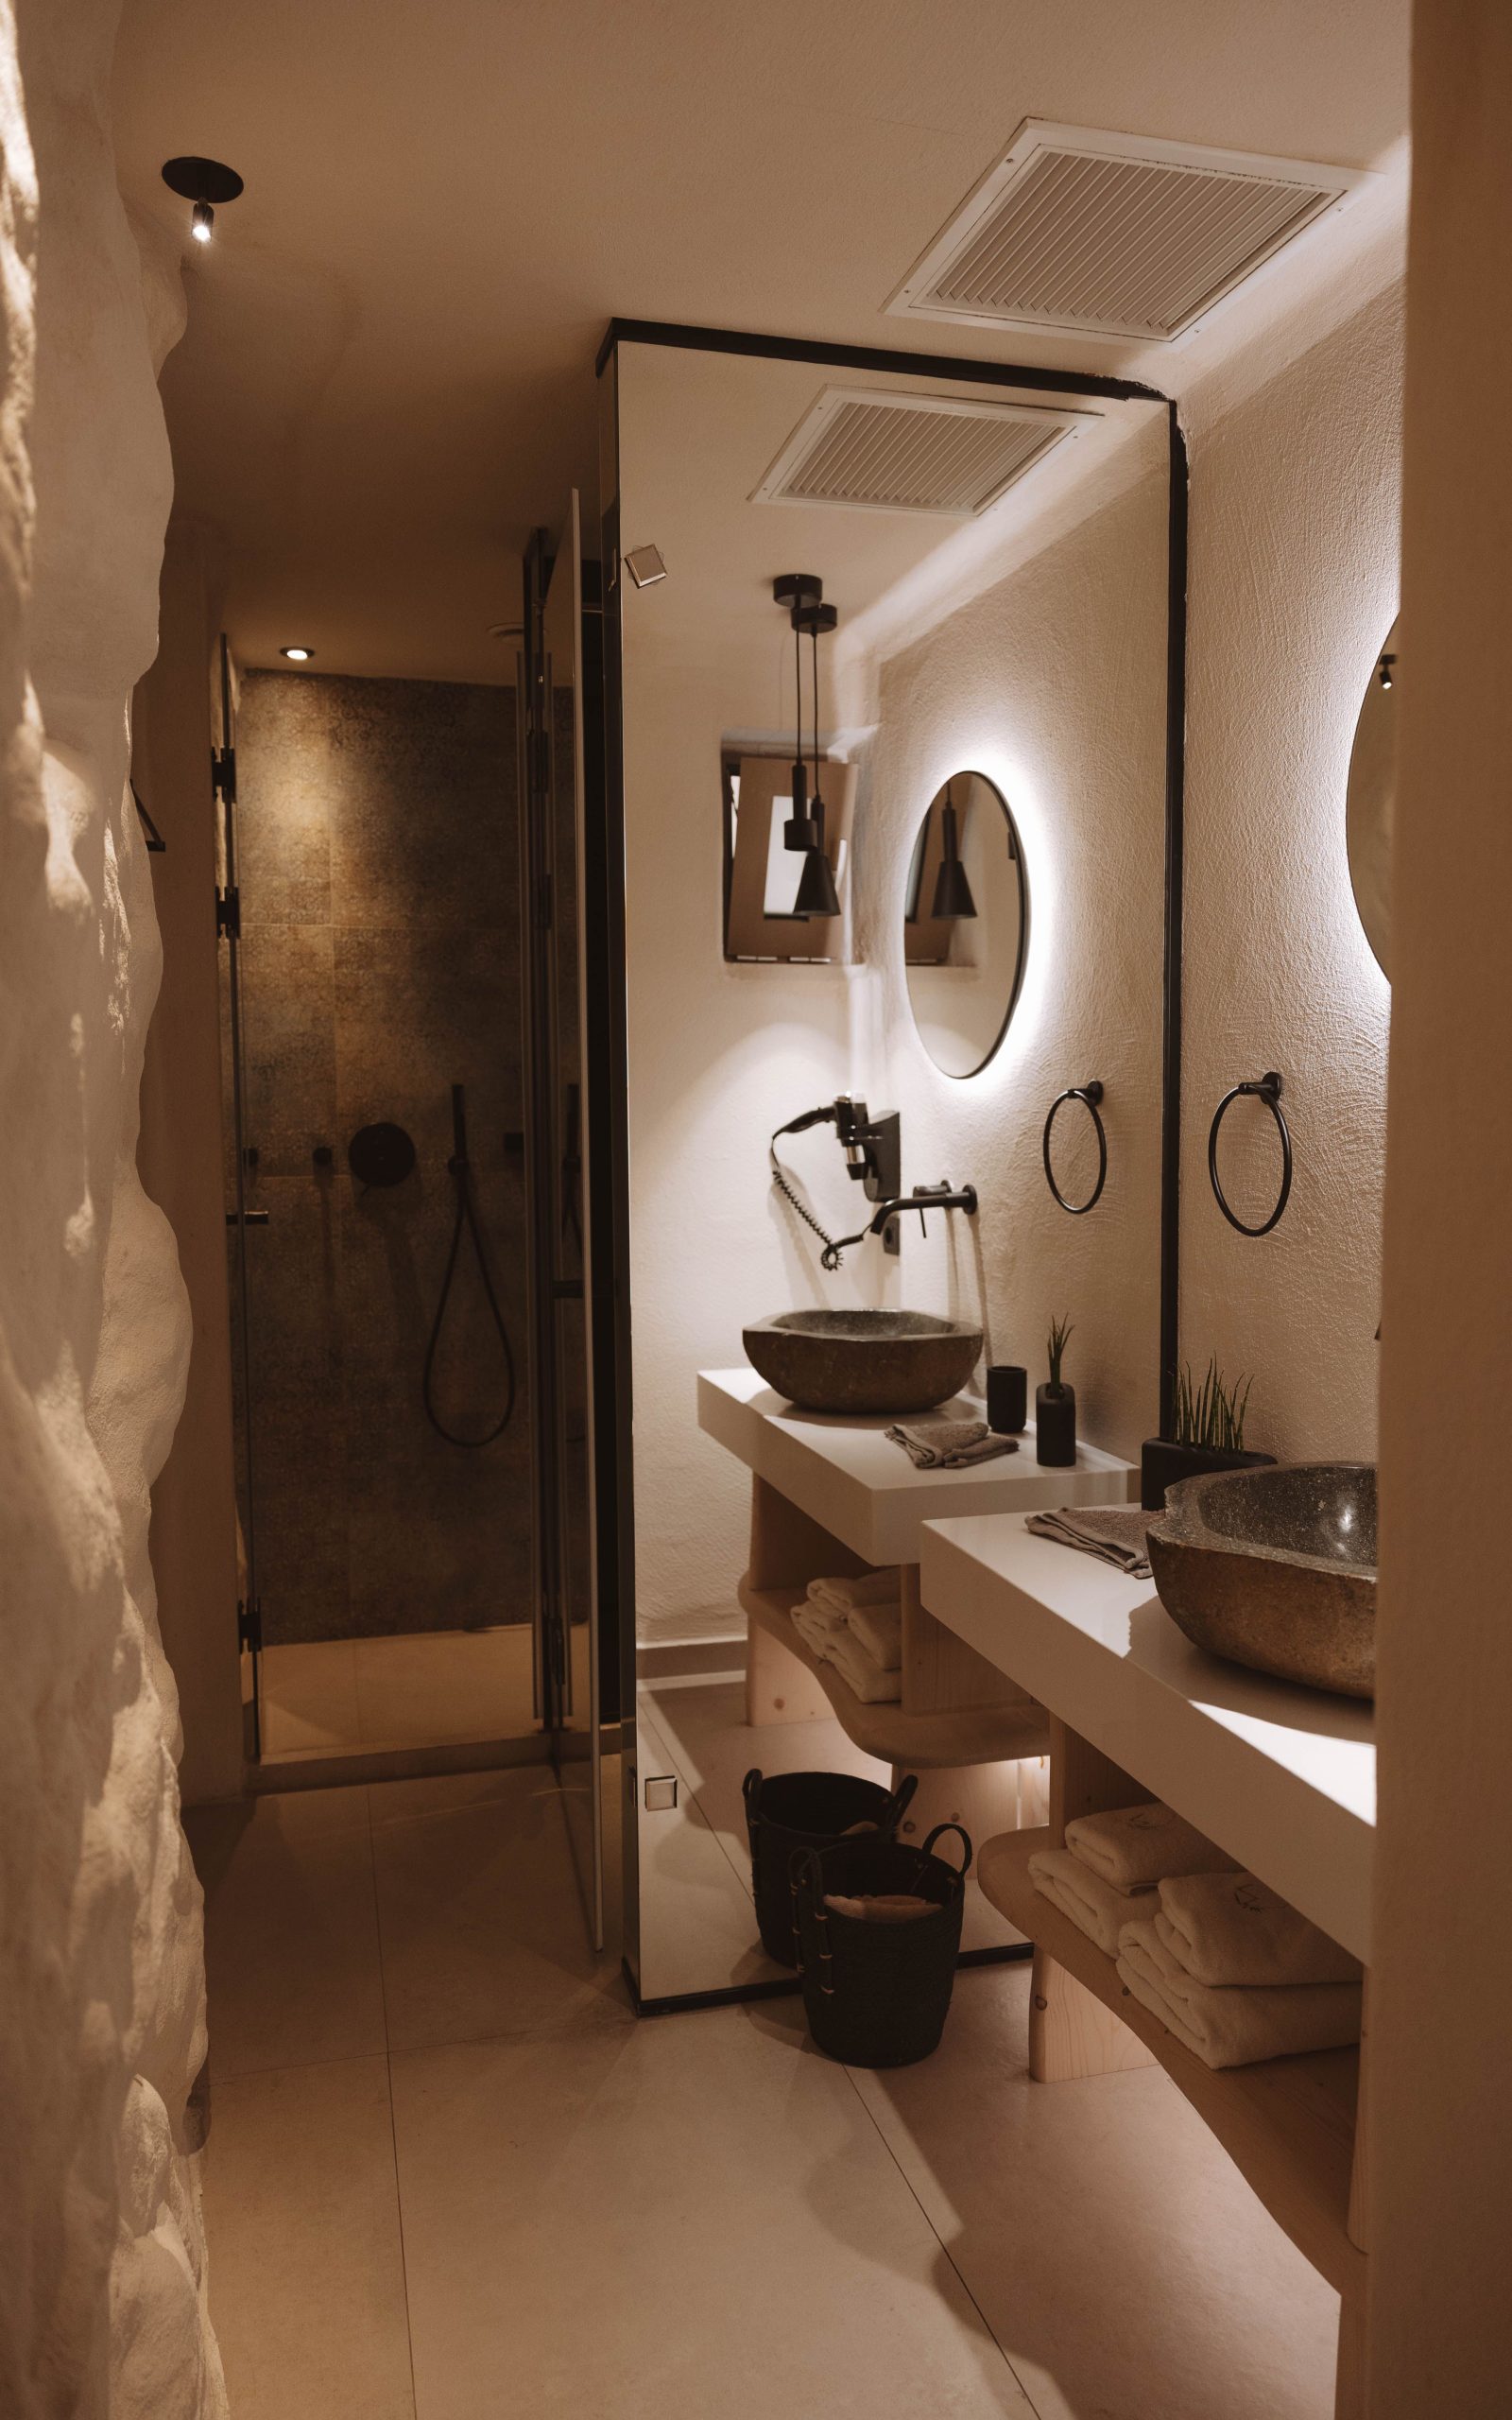
“You can get a similar textured wall finish with Roman clay or limewash.”
Here’s a mini-guide for applying it to a single accent wall:
- Prep: Clean the wall thoroughly and apply a specialized primer. Let dry completely. (Time: 2-3 hours)
- First Coat: Apply the Roman clay with a putty knife or trowel in wide, sweeping, and overlapping strokes from top to bottom. Don’t aim for perfection. (Time: 1-2 hours)
- Second Coat: Once the first coat is dry to the touch (about 1-4 hours), apply a second, thinner coat with the same technique to build depth. (Time: 1-2 hours)
- Burnish (Optional): For a smoother, more marble-like sheen, lightly sand with 400-grit sandpaper or burnish with your trowel at a low angle. (Time: 30 minutes)
Material Cost: Approximately $150-$250 for a 10×10 foot wall.
8. A Serene Neutral Bathroom with a Mosaic Tub Surround
This design succeeds by sticking to a very tight, monochromatic color palette and then introducing one moment of detailed pattern. The large-format light grey tiles on the floor and walls create a seamless, expansive feel, making the room appear larger than it is. The dark wood vanities provide a strong, grounding contrast without introducing a new color. The masterstroke is the mosaic tile band around the tub. It adds a touch of personality and visual interest exactly where you want a focal point, without overwhelming the calm, serene atmosphere.

“Thinking of a similar design?”
Run through this checklist first:
- Tile Tones: Do your main tile, mosaic tile, and countertop samples look harmonious in your bathroom’s specific light? Bring them home first!
- Grout Color: Will you match the grout to the main tile for a seamless look, or use a slightly contrasting grout to subtly highlight the tile pattern?
- Vanity Finish: Does the dark wood finish clash with any other woods in adjoining rooms or is it a consistent accent?
9. Frame a Nature View with a Modern Jacuzzi and Wood Paneling
that makes this entire bathroom work is the massive, uninterrupted glass window. Without it, you’d just have a nice tub in a dark room. But with the window, the space becomes a luxurious perch for observing nature. The dark, reflective countertop brilliantly mirrors the view, effectively bringing the outdoors in. The design wisely keeps all other elements simple—the clean lines of the tub, the uniform wood paneling—to avoid competing with the stunning scenery. It’s a masterclass in making the view the primary decorative element.

“While breathtaking, a large window right next to a tub has its challenges.”
You’ll be cleaning water spots off the inside of that glass constantly. Squeegee after every use is non-negotiable if you want to keep that view crystal clear. Also, consider the climate. A window this large can be a source of heat loss in the winter, potentially cooling your bathwater faster and raising your heating bill. Investing in high-quality, double- or triple-pane glass with a low-E coating is essential for energy efficiency.
10. An Earthy, Spa-Like Vibe with a Beige Tiled Built-In Tub
The calming, natural feel of this space is all about a balanced recipe: 70% earthy neutrals + 20% natural light and views + 10% color accent. The beige and brown tiles surrounding the tub make up the dominant, grounding base. The large window is the next crucial ingredient, flooding the space with light and a view of the green trees, which prevents the beige from feeling flat. The final touch is the pop of blue from the towels, a complementary color to the earthy browns and greens that adds just enough energy to keep the room from feeling sleepy.

“You can get this serene, earthy vibe on a much smaller budget.”
Look for budget-friendly ceramic tiles in beige or taupe from places like Floor & Decor, where prices can be as low as $1-$2 per square foot. Instead of a custom built-in, opt for a standard drop-in tub and build the tile surround yourself using cement board. A bamboo blind from Target or Walmart can replicate the window treatment for under $50. The key is sticking to that warm, neutral palette and bringing in a touch of blue with your towels and accessories.
11. Combine Organic Curves and Marble for an Elegant, Modern Bath
This bathroom feels so sophisticated because it combines soft curves with rich materials. The asymmetrical, sculptural shape of the freestanding tub is a gentle, organic form that feels calming to the eye. This softness is balanced by the quiet luxury of the light grey marble backsplash. The arched detail in the marble, topped with dark wood trim, adds an architectural element that feels both classic and modern. Finally, the gold-toned faucet acts as a piece of jewelry, adding a necessary touch of warmth and shine to the cool-toned palette.

“When installing a wall-mounted tub filler, the placement of the valve handle is just as important as the spout.”
For a clean, uncluttered look, place the handle a minimum of 8-10 inches away from the spout, either directly above it or to the side. This separation keeps the controls from looking cramped and turns them into a deliberate design feature. Ensure the final height and position are confirmed *after* you’ve selected your tub, as the tub’s rim height will dictate the ideal placement.
12. Make a Statement with a Stone Fireplace and Checkered Floors
It’s almost absurd to say, but the fireplace is, without a doubt, the one thing that defines this space. It completely redefines what a bathroom can be, turning it from a purely functional room into a luxurious, lounge-like retreat. It introduces texture, warmth (both literal and visual), and an undeniable sense of grandeur. The flickering flame reflected in the checkered floor and globular chandelier creates an atmosphere of pure indulgence. Every other element, from the freestanding tub to the dark wood vanity, serves to support this central, show-stopping feature.

“This is not an idea for the faint of heart or the small of space.”
This concept only works in an expansive primary bathroom, likely 200 square feet or more. You need enough volume to not only accommodate the fireplace feature itself (which can be 4-5 feet wide) but also to maintain safe, comfortable clearances around the tub, vanity, and walkways. A minimum ceiling height of 9 feet is also recommended to handle the grand scale of the stone and the large chandelier. For smaller spaces, see the compact layouts of Idea #18 or Idea #26.
13. Mix Warm Wood, White Tile, and a Pop of Blue-Green
This bathroom’s inviting look comes from a well-proportioned design recipe: 50% natural wood + 30% crisp white + 20% accent color. The wood plank ceiling and matching vanity create a warm, organic envelope. The white rectangular tiles on the wall provide a clean, bright canvas that bounces light around the room. The final, crucial ingredient is the splash of blue-green subway tile in the shower. It adds a serene, spa-like quality and prevents the wood-and-white combination from feeling too predictable. The gold accents are the finishing touch that ties it all together.

“A wood ceiling in a bathroom is gorgeous, but it demands proper ventilation.”
Without a high-powered and regularly used exhaust fan, the steam from your shower will cause moisture to accumulate on the wood, leading to potential warping, mildew, or discoloration over time. Ensure your fan is rated for the size of your room (or slightly larger) and that you run it for at least 20-30 minutes after every shower. Also, the wood should be sealed with a marine-grade varnish to protect it from humidity.
14. Create a Rustic Retreat with a Wood-Paneled Corner Jacuzzi
The power of this design lies in its commitment to a single material. By paneling the walls and the tub surround in the same light-toned wood, the room becomes a cozy, seamless cocoon. This repetition of material blurs the lines between the tub and the walls, making the space feel integrated and immersive, like a private sauna or a cabin retreat. The darker wood of the bath caddy provides a simple, effective point of contrast, breaking up the monochrome wood look just enough to add interest without disrupting the serene, rustic mood.

“You can get this wood-paneled look without the expense of custom carpentry.”
Several companies now offer peel-and-stick wood-look vinyl planks (like Stikwood or similar brands found on Amazon) that are designed for wall applications. For a corner tub area in a small bathroom, you could achieve this look for $300-$600 in materials. It gives you the visual warmth and texture of real wood but is often more resistant to moisture, making it a practical and budget-savvy choice for a bathroom environment.
15. A Functional Update with a Marble-Look Shower Surround
Let’s be honest: while practical, the combination of materials here feels a bit dated for 2026. The zigzag wallpaper, beige floor tiles, and marble-look acrylic wall panels all feel like they are from different design eras. The effect is functional, but not necessarily cohesive. It highlights a common pitfall: updating one element (like the shower surround) without considering how it relates to the existing floor and walls can lead to a disjointed look. For a more modern feel, a single, consistent wall and floor treatment would be more effective.

“If you’re installing grab bars (which is a fantastic idea for safety and accessibility at any age), don’t just screw them into the drywall or acrylic surround.”
Grab bars must be anchored directly into wall studs to be secure. Before you tile or install your surround, add solid wood blocking between the studs where you plan to place the bars. This gives you a solid base to drill into. Plan for one vertical bar at the tub’s entrance and a horizontal bar along the long wall, typically 33-36 inches above the floor.
16. An Eclectic Mix of Patterned Tiles and a Glass Vessel Sink
This bathroom works because it confidently breaks a few “rules.” It pairs two strong patterns—the small, busy square tiles on the wall and the wood-plank style tiles on the floor. The reason this doesn’t create chaos is that they are tonally similar, existing in the same neutral beige and gray family. The design then introduces a third texture: the ornate, traditional black metal base of the vanity, which is unexpectedly topped with an ultra-modern clear glass sink. This eclectic mix of traditional, modern, and rustic elements creates a quirky, personalized space that feels collected over time.

“Glass vessel sinks look incredibly chic, but they are prone to showing water spots, soap scum, and toothpaste residue more than their porcelain counterparts.”
You’ll need to be diligent about wiping it down after each use to keep it looking pristine. Use a simple glass cleaner and a soft cloth. Also, be mindful of hard water buildup, which can etch the glass over time. The ornate metal base can also be a bit tricky to clean around, with its scrolls and curves acting as dust traps.
17. Modern and Functional: A Grey and White Vanity with an Illuminated Mirror
The illuminated mirror is the key to this bathroom’s success. In a minimalist space with a neutral color palette, lighting can—and should—be a major design feature. This mirror provides bright, even, shadow-free illumination for tasks like makeup application or shaving, eliminating the need for traditional sconces. Bouncing off the grey textured wall, it also creates a soft ambient glow that makes the room feel more spacious and sophisticated. It merges function and form perfectly, proving that practical elements can also be the most stylish.
“Creating a textured wall like this can be a simple DIY project using textured or paintable wallpaper.”
Here’s the quick version:
- Measure & Cut: Measure your wall’s height and width. Cut your first strip of wallpaper, leaving 2 inches of excess at the top and bottom.
- Apply Adhesive: Depending on your paper type, either apply wallpaper paste to the wall (for non-pasted) or dip the paper in water (for pre-pasted).
- Hang & Smooth: Starting from a corner, hang the first strip, ensuring it’s perfectly vertical using a level. Smooth out any bubbles with a wallpaper brush, working from the center outwards.
- Match & Repeat: Line up the pattern of the next strip and hang it, making sure the seams are tight. Repeat across the wall.
- Trim: Once dry, use a sharp utility knife to trim the excess paper at the ceiling and baseboard.
Material Cost: $50-$150 for a single accent wall.
18. A Compact, Modern Look with Square Tiles and a Round Mirror
This tiny bathroom is a masterclass in using contrast to create visual interest. The entire space is built on the interplay of shapes and colors. The crisp, uniform grid of white square tiles creates a simple, bright canvas. Against this, the round black-framed mirror becomes a powerful focal point. The sharp, geometric tile is softened by the curve of the mirror. Similarly, the warm, organic wood of the floating vanity provides a beautiful contrast against the cool, graphic quality of the black faucet and mirror frame. Every piece has a counterpart, creating a balanced, dynamic composition. This is a much smaller space than say, Idea #1, but uses similar principles.

“A floating vanity is a small bathroom’s best friend.”
By lifting the cabinet off the floor, you create an uninterrupted line of sight to the back wall, which tricks the eye into seeing more space. This idea works beautifully in a powder room or a small full bath that is 30-40 square feet. The key is to keep the vanity proportional—a width of 24-30 inches is usually perfect. The large round mirror also helps to open up the space by reflecting light and creating a sense of depth.
19. Pack a Punch in a Powder Room with Geometric Floor Tiles
The geometric floor tile is everything here. In a small powder room with limited opportunity for decorative flair, the floor becomes the primary canvas for expression. The 3D cube pattern is bold, graphic, and architectural, creating a surprising sense of depth and energy. The rest of the room is wisely kept simple—white walls, a minimalist floating vanity, a simple round mirror—to allow the floor to be the undisputed star. Without this tile, the room would be perfectly pleasant, but utterly forgettable. It’s a powerful lesson in making one bold choice.

“A wall-mounted toilet is a game-changer for small bathrooms, but it requires planning.”
The water tank and carrier system are hidden inside the wall, so the wall needs to be at least 2×6 framing (instead of the standard 2×4) to accommodate it. This is a crucial detail to plan for *before* construction. The benefit is that it saves about 9-10 inches of floor space compared to a standard toilet, which is a massive gain in a tiny powder room. It also makes cleaning the floor underneath a breeze.
20. Use Terrazzo and Under-Cabinet Lighting in a Compact Space
This bathroom feels both modern and playful due to the clever use of terrazzo. By running the same light-colored terrazzo tile from the floor up onto the walls, the designer creates a seamless, unified space that feels larger and less cluttered. The varied flecks of color in the terrazzo add visual texture and personality without the need for busy patterns. The under-cabinet lighting on both the upper cabinet and the vanity is a brilliant touch, washing the walls with a soft glow and making the wooden elements appear to float.

“Love this look?”
Here’s a quick checklist before you commit to terrazzo tile:
- Scale of Flecks: Does the size of the aggregate (the colored flecks) in the tile feel appropriate for your room size? Larger flecks can overwhelm a tiny space.
- Lighting Plan: This look relies heavily on integrated lighting. Do you have a plan to run low-voltage wiring for under-cabinet light strips? Consult an electrician early.
- Seamless Grout: To get this continuous look, choose a grout color that closely matches the base color of the terrazzo. A contrasting grout line will break up the effect.
21. A Traditional Take with Light Blue Walls and a Damask Shower Curtain
While the light blue walls offer a classic, calming feel, the combination of elements here reads as more functional than fashion-forward for 2026. The dark, faux-granite countertop, beige shower tiles, and ornate mirror belong to a design style that was popular in the early 2000s. The printed shower curtain, while adding pattern, also visually shortens the room and can feel heavy. If you have a similar bathroom, a few simple swaps could modernize it significantly. For a more current take on a blue bathroom, check out the cool-toned elegance of Idea #2.
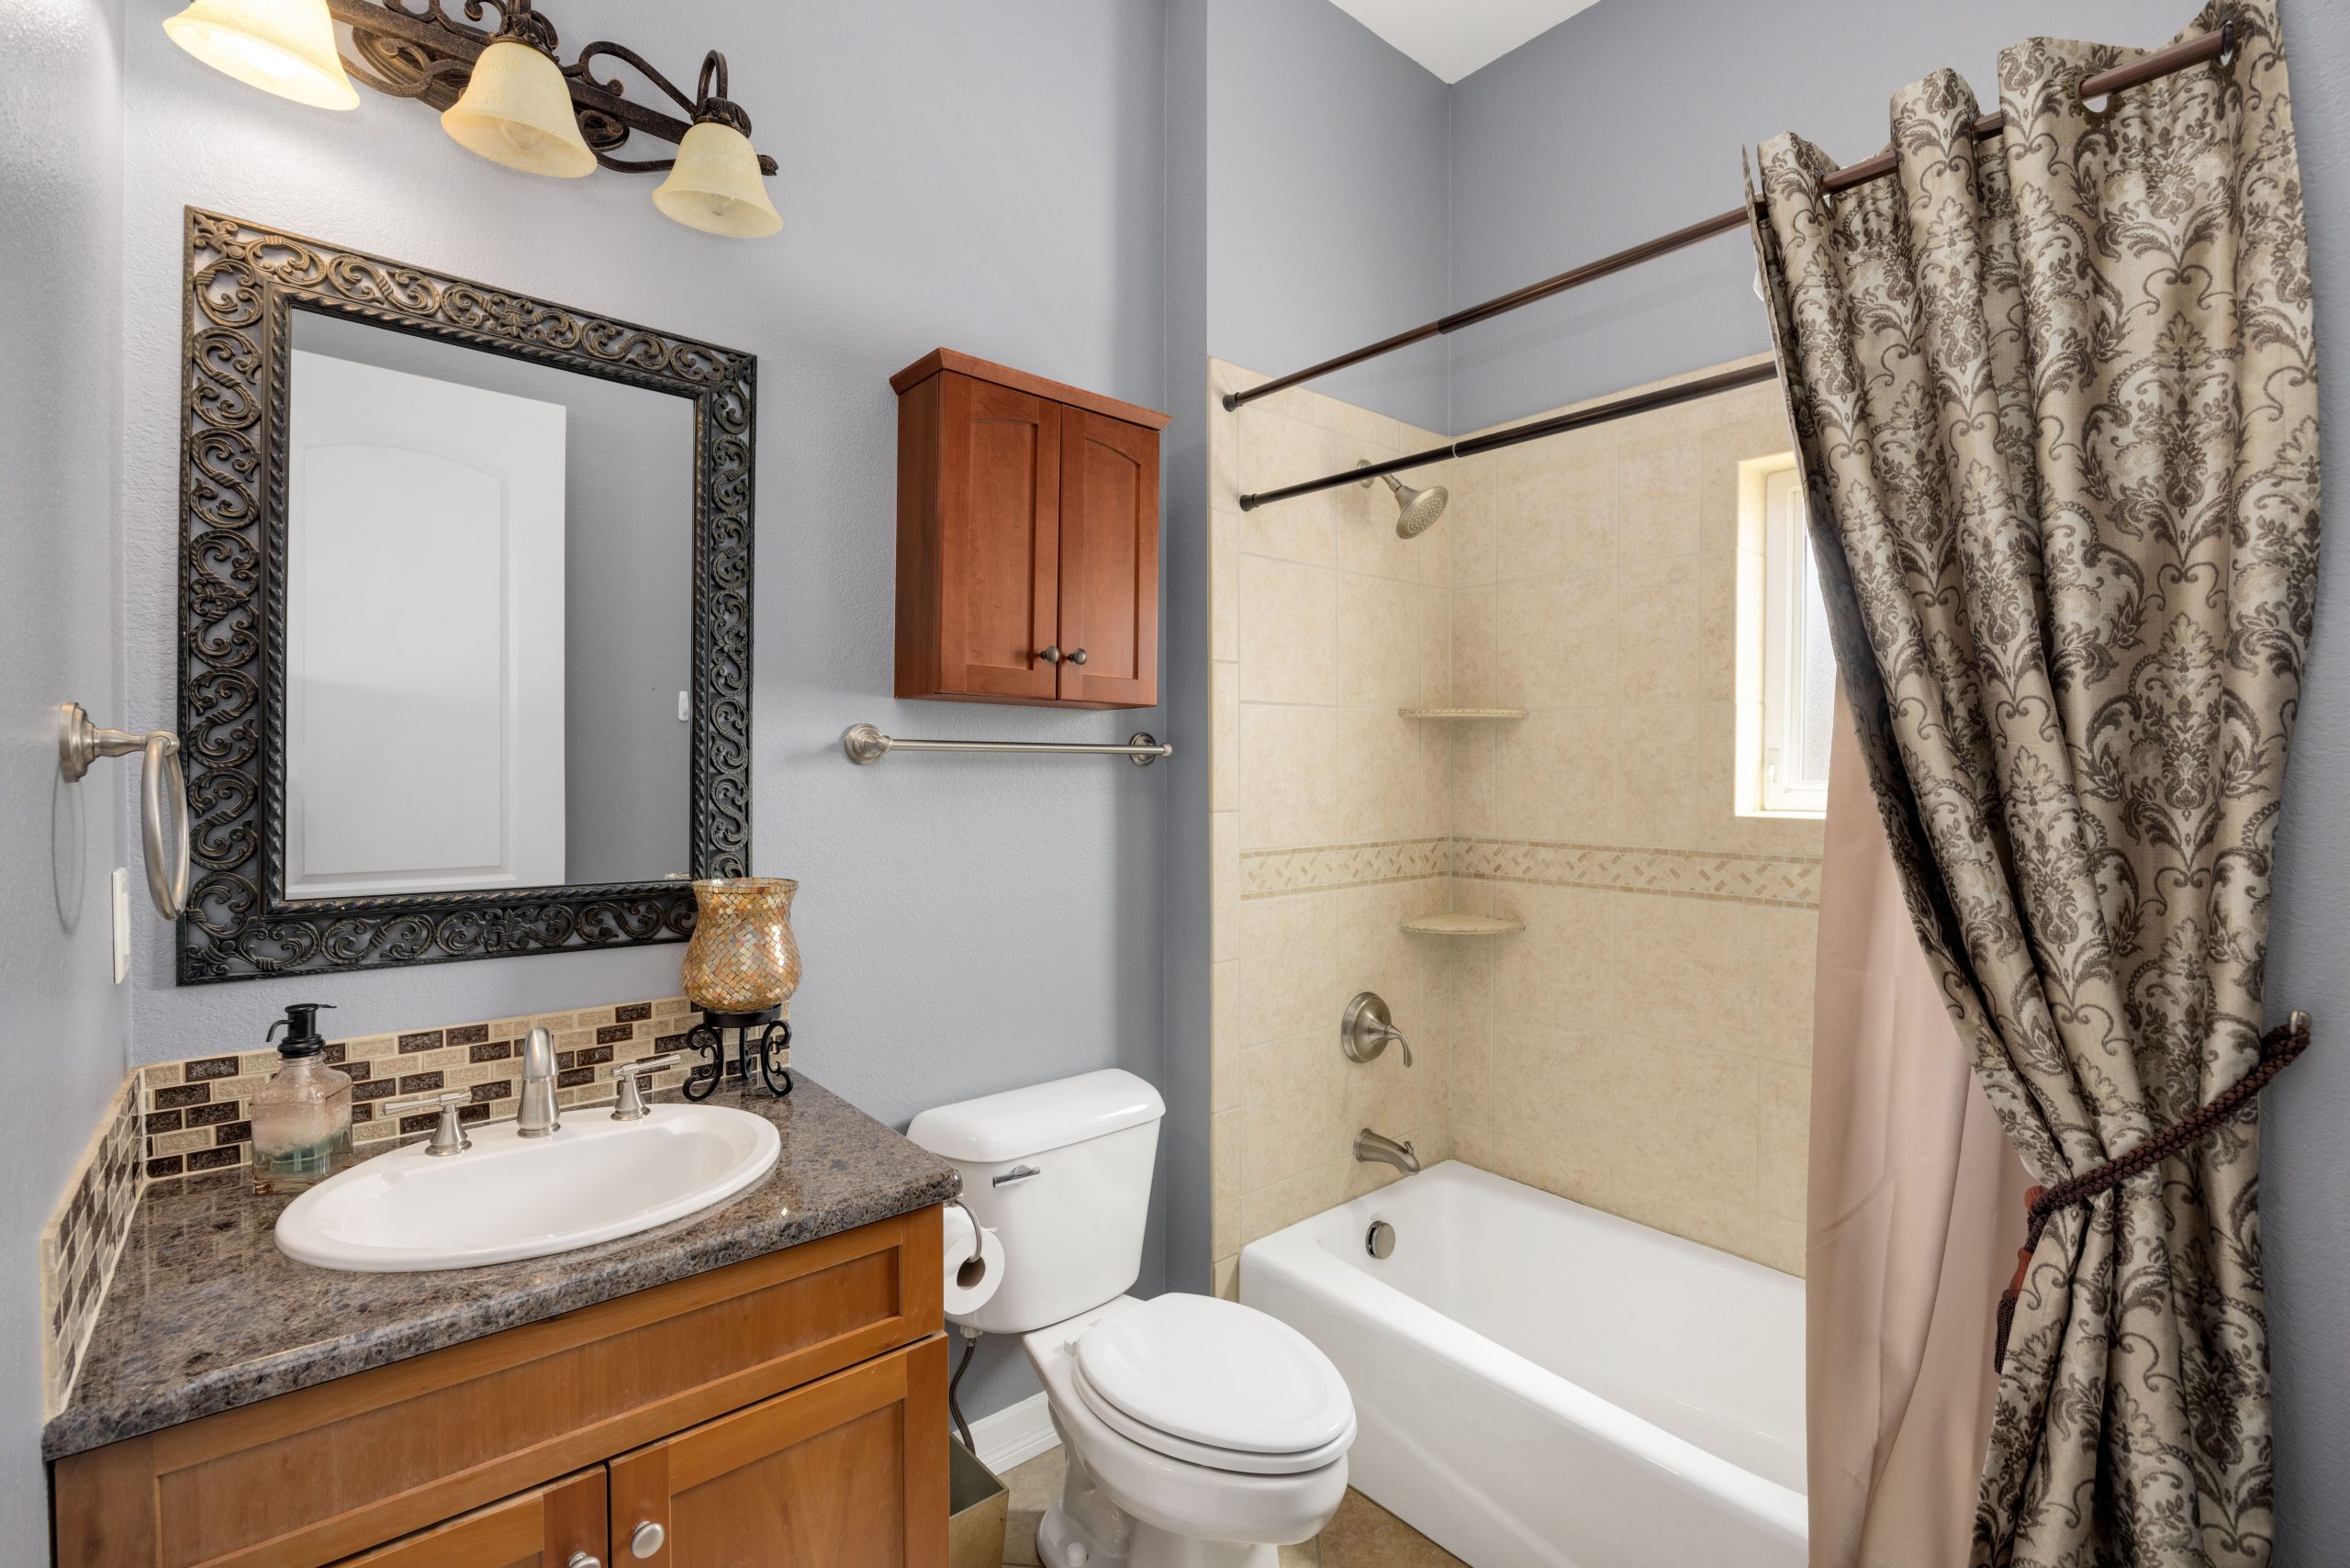
“You can easily update this look without a full remodel.”
Swap the ornate, dark mirror for a simpler model with a thin metal or wood frame from Target for around $80. Replace the patterned shower curtain with a crisp white, waffle-weave curtain and a curved shower rod to create a more spacious feel ($50). Finally, update the cabinet hardware with modern knobs or pulls in a brushed nickel or matte black finish ($30). These three small changes, for under $200, would instantly brighten and modernize the space.
22. Pair Sage Green Subway Tile with a Fluted Wood Vanity
This bathroom is a perfect snapshot of 2026 trends. Sage green has become the new go-to neutral—it’s calming, sophisticated, and connects to nature. Fluted or reeded wood cabinetry is also having a major moment, adding subtle texture and a high-end, custom feel. Finally, the return of warmer metals like brass and gold is in full swing. This look feels so current because it expertly combines these three dominant trends into one harmonious space. It has staying power because the individual elements—subway tile, wood, marble—are all timeless classics.

“The visual harmony here can be broken down into a simple equation: 60% color (the sage green tiles) + 30% texture (the fluted wood vanity) + 10% shine (the brass/gold fixtures and mirrors).”
The green provides the dominant mood. The wood texture adds warmth and dimension, preventing the color from feeling flat. The brass is the jewelry, adding the final touch of polish and light. You could swap the sage green for a deep navy or a warm terracotta and the formula would still work beautifully.
23. A Moody, Modern Mix of Black Stone, Gray Wood, and a Freestanding Tub
This bathroom design is a masterclass in texture. Instead of relying on color, it creates drama and interest by contrasting different materials. The black stone-effect tiles have a rough, tactile quality with dramatic white veining. This is juxtaposed with the smooth, linear pattern of the gray wood-look tiles on the floor and wall. The sleek, glossy white surface of the freestanding tub and vessel sink provide a moment of calm, reflective stillness amidst all the texture. It’s a sophisticated, high-contrast look that feels incredibly luxe and modern.

“A dark and moody design like this requires a certain amount of space and light to avoid feeling claustrophobic.”
This look is best suited for a medium to large bathroom, ideally 100 square feet or more, with at least one source of natural light. High ceilings (9+ feet) also help. The integrated LED lighting in the shelving and behind the mirror isn’t just a nice touch; it’s essential. It provides layers of light that highlight the different textures and prevent the dark walls from absorbing all the light in the room.
24. Design a Luxurious Walk-In Shower with Large-Scale Marble Tile
When using large-format marble tiles (like the 12×24 inch ones seen here), the key to a high-end look is minimizing grout lines and matching the veining. Use the smallest grout joint your tile allows (typically 1/16 or 1/8 inch) and choose a grout color that matches the primary color of the stone, not the veining. Before installation, lay out all your tiles on the floor and arrange them to create a continuous, natural flow in the veining from one tile to the next. This takes extra time but is the difference between a standard job and a showstopper.
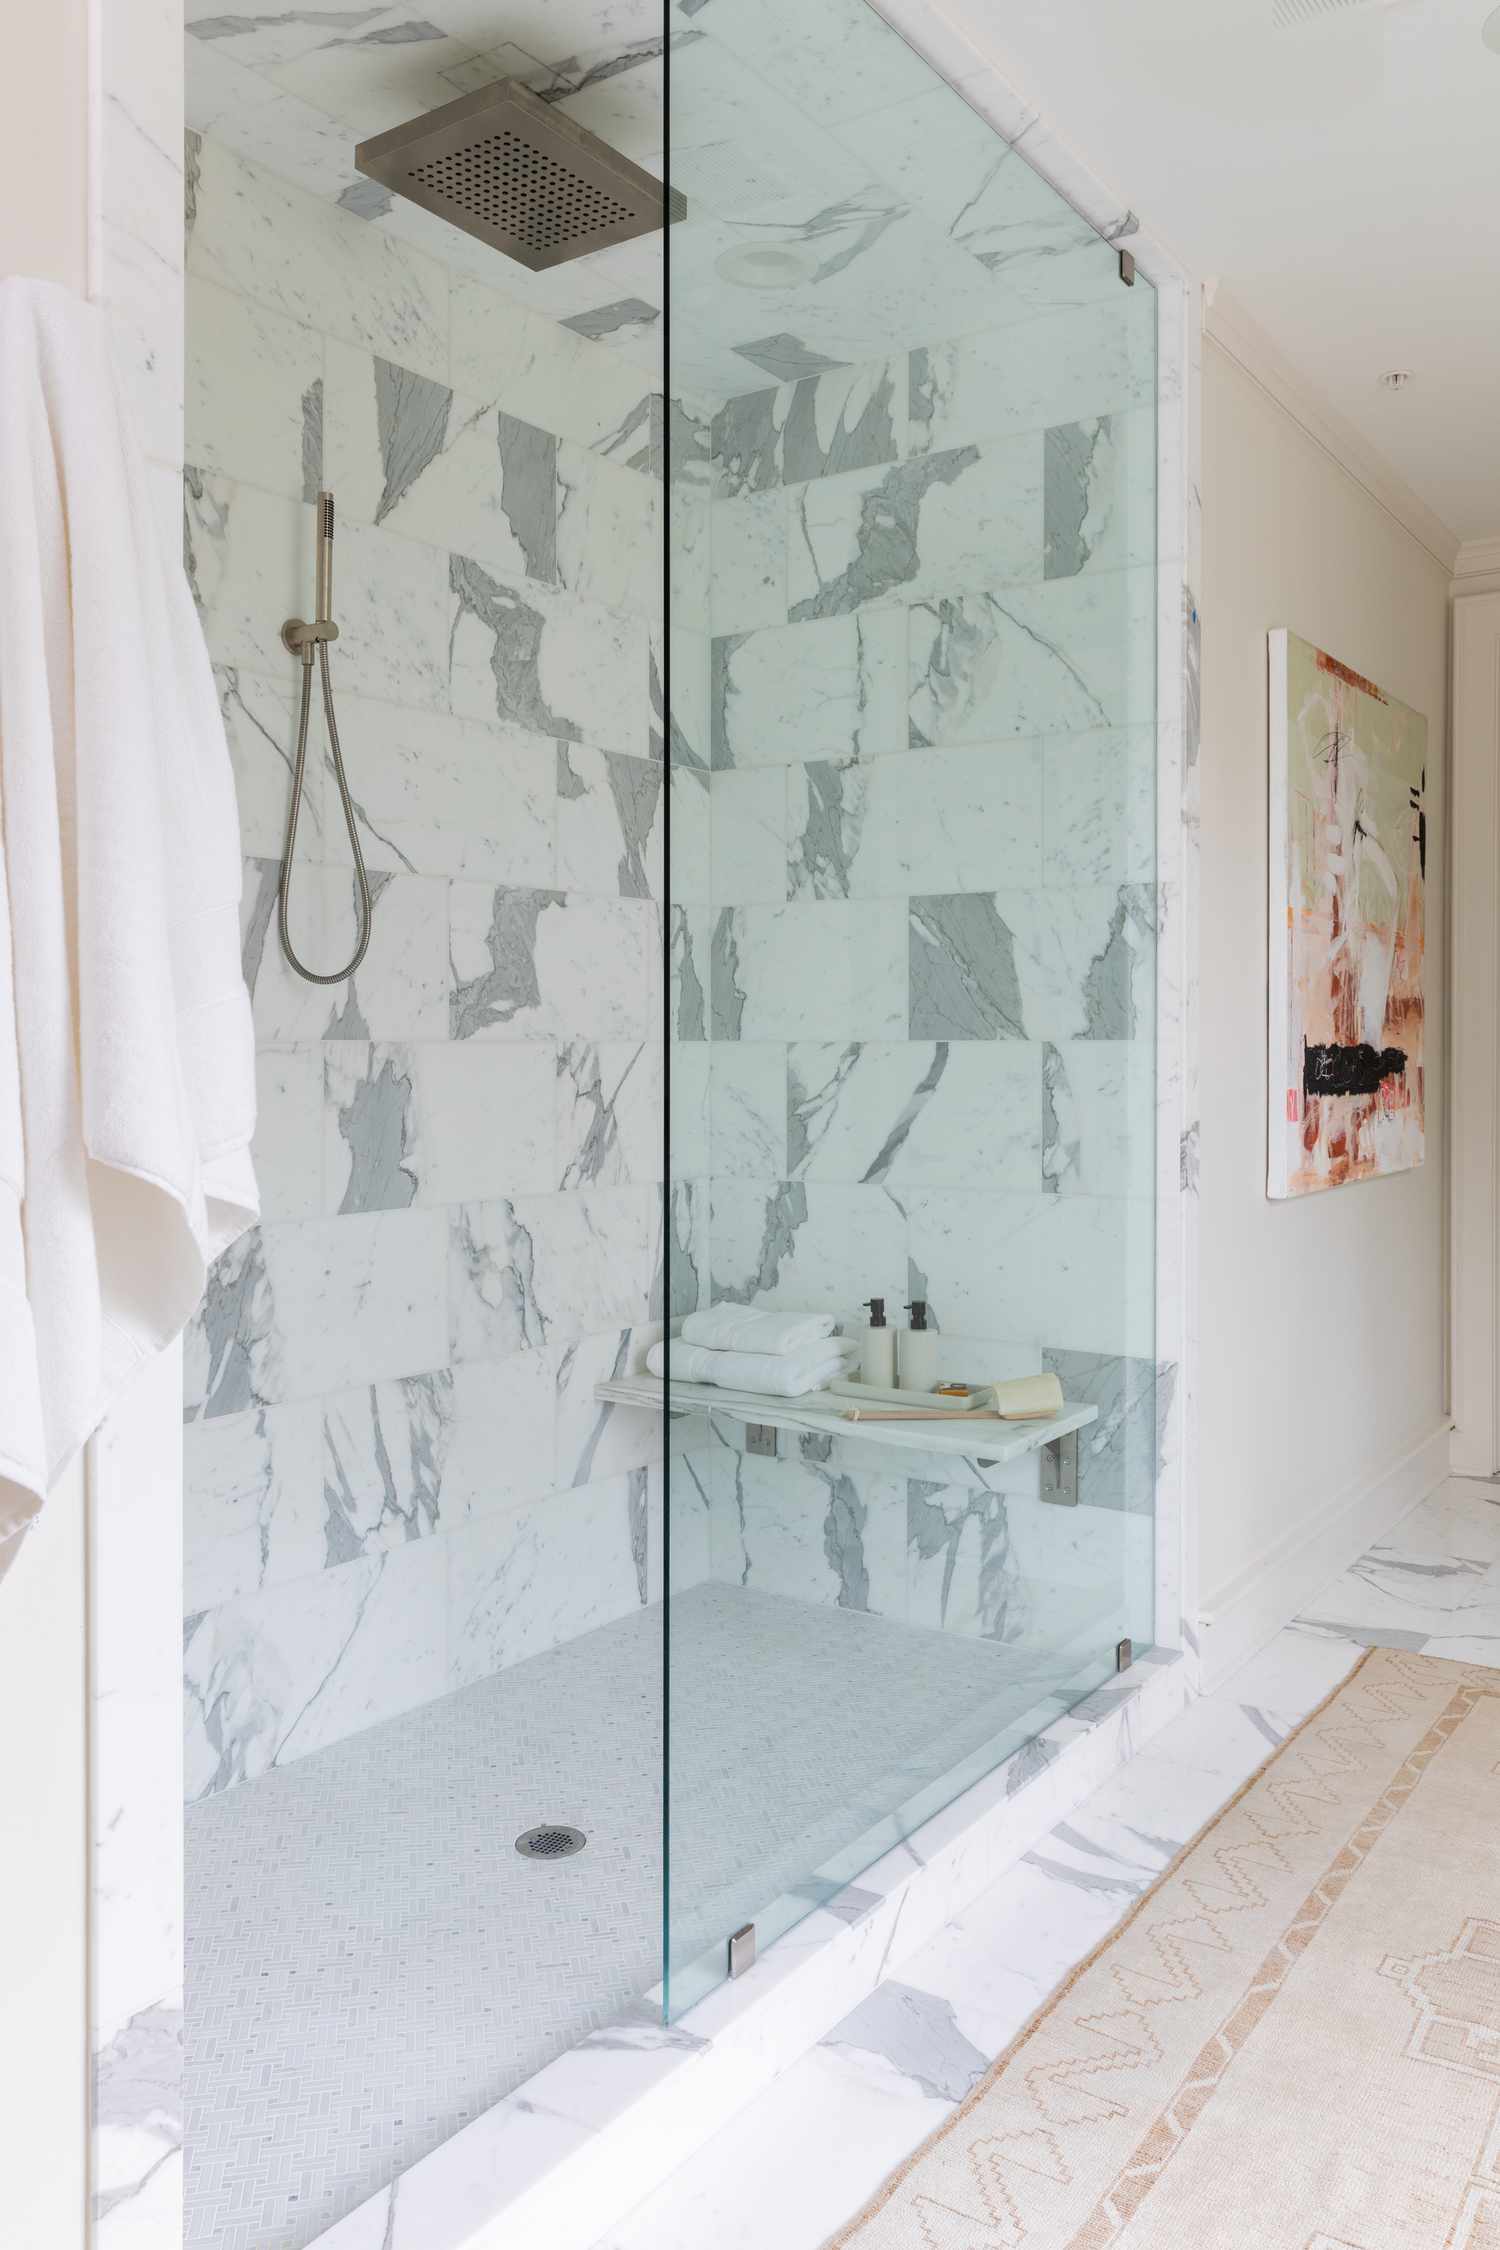
“Creating this spa-like shower is an investment in luxury.”
The cost is heavily dependent on whether you choose real marble or a high-quality porcelain look-alike, which can offer a similar vibe for less.
- Materials: Large-format marble-look porcelain tile & mosaic floor – $1,500-$3,500
- Glass: Custom frameless glass enclosure – $2,000-$4,000
- Fixtures: Rain shower head, handle, and a shower bench – $800-$2,000
- Labor: Professional tile and plumbing installation – $3,000-$6,000
- TOTAL: $7,300 – $15,500
Budget alternative: Use a more affordable ceramic subway tile for the walls and a pre-fabricated shower pan instead of a custom tile floor to bring the cost down by 40-60%.
25. A Practical Bath with a Beige Tub and Faux Marble Surround
This bathroom shows a common renovation scenario where different elements have been updated at different times, resulting in a slightly mismatched look. The beige acrylic tub feels like a holdover from the 90s, while the faux marble surround and wood-toned vanity are more recent, but still budget-grade, updates. The speckled gray countertop doesn’t quite connect with the warmer tones of the tub or vanity. While perfectly functional, this bathroom lacks a cohesive vision. To improve it, the first step would be to unify the color palette. This is a good example to compare with the more cohesive, though dated, look in Idea #15.

“If you’re on a tight budget, you don’t have to live with a dated beige tub.”
Tub and tile refinishing kits (from brands like Rust-Oleum) allow you to paint the acrylic or fiberglass surface a crisp, modern white. For about $50 and a weekend of work, you can dramatically change the look of the main element in the room. This single change would make the newer faux marble surround and the vanity feel much more integrated and intentional, giving the whole room a lift for very little money.
26. Breathe Life into a Small Bath with White Tile, Wood, and Greenery
The strategic use of greenery is the single element that elevates this simple bathroom. The white tile, dark floor, and chrome fixtures provide a clean, minimalist, and potentially sterile backdrop. But the introduction of living plants—both potted and hanging—completely changes the mood. They add organic shape, vibrant color, and a sense of life that makes the space feel fresh and personalized. The natural wood mirrors and planters complement the greenery, reinforcing the connection to nature. Remove the plants, and the room loses its soul.

“This design is tailor-made for extremely compact bathrooms, such as those found in apartments, campers, or small secondary baths (often under 30 square feet).”
The use of a wall-mounted sink is critical, as it opens up the floor space and makes the room feel less cramped. The square format of the wall and floor tiles also works well in a small room, creating a simple, easy-to-read grid. Just ensure you have some natural light, even from a small window, to keep those plants happy!
27. A Neutral Double Vanity with Mixed Metal Finishes
This bathroom successfully pulls off a mixed-metal design, which can be tricky. The secret? It establishes a dominant metal and uses the second as a subtle accent. Here, brushed nickel is the primary finish, seen on the faucets and towel rings. The brushed bronze of the shower door frame is the accent. It works because the two finishes are separated physically and have a similar “brushed” texture, which creates a link between them. The overall neutral palette of the room (light beige walls, white subway tile, grey floors) provides a calm backdrop that can handle the complexity of two different metals.

“If you want to mix metals in your bathroom, follow the “Rule of Two, Maybe Three.” Pick one dominant metal that will cover about 60-70% of your fixtures (like faucets and lighting).”
Then, choose one contrasting accent metal for the remaining elements (like cabinet hardware or mirror frames). For example, use matte black for your faucet and shower fixtures, and then use brass for your vanity pulls and mirror. A third metal is possible for a small decorative item, but proceed with caution to avoid a chaotic, garage-sale look.
28. A Bright, Traditional Bath with a Corner Tub and Teal Accents
Let’s talk about the corner tub. While it was a hallmark of luxurious primary bathrooms in the 1990s and early 2000s, it can feel dated in 2026. These tubs take up a significant amount of floor space and can be awkward to get in and out of. The large tiled deck surrounding it, while useful for holding products, also contributes to a bulky look. For a more modern approach to a luxurious bath, most homeowners are now opting for a sleek freestanding tub, like the one seen in Idea #2, which often uses space more efficiently.

“saving this bathroom from feeling completely stuck in the past is the artwork.”
The two framed abstract pieces, with their bold teal and gold strokes, inject a much-needed dose of modern color and energy. They pull the eye away from the dated silhouette of the corner tub and the beige-on-white palette. They also cleverly tie in the brass fixtures, making them feel more intentional. It’s a great example of how well-chosen, contemporary art can bridge the gap between old and new.
29. Create a Calm, Classic Look with Beige Tile and a Glass Block Window
The success of this calm and classic bathroom lies in its soft, low-contrast color palette. The beige rectangular tiles have a gentle variation in tone that adds subtle texture without being busy. The upper walls are painted a coordinating blue-grey that is tonally very similar to the beige, so the transition is soft and easy on the eyes. The brushed nickel fixtures blend quietly into this scheme. This creates a soothing, cohesive environment where no single element is shouting for attention, resulting in a space that feels genuinely relaxing and timeless.

“Glass block windows were a huge trend in the 80s and 90s, prized for their ability to provide privacy while letting in light.”
While you don’t see them as often in new construction today, they are starting to see a bit of a retro-revival. For 2026, designers are using them in more creative ways—as interior partition walls or in showers with a more industrial, grid-like feel. In this bathroom, the glass block feels like a classic feature, a nod to its era that still functions perfectly in providing privacy for the tub.
30. Combine a Veined Marble Backsplash with a Warm Wood Vanity
The showstopper here is undeniably the intricate marble backsplash. It’s not just a simple slab; it’s a beautifully shaped piece with a curved top and detailed edging that transforms it from a functional surface into a work of art. The way the grey veining flows across the white marble adds organic movement and a sense of luxury. It elevates the entire vanity, making the relatively simple wood cabinets and brass faucet feel much more grand and custom. This is a perfect example of investing in one high-impact material to define a space.

“A marble countertop and backsplash are timelessly elegant, but they are not indestructible.”
Marble is a relatively soft, porous stone, meaning it can etch and stain. Be very careful with acidic substances like lemon juice or certain cleaners, which can dull the polish. Always use coasters or trays for colored soaps or lotions. To keep it looking its best, the marble should be professionally sealed upon installation and then re-sealed every 1-2 years, depending on use. It’s a bit of a commitment, but worth it for the look.
31. An Elegant Powder Room with Grey Textured Wallpaper and Brass Accents
This small room feels incredibly luxe and well-designed because of its sophisticated layering. The grey wallpaper provides the foundational texture with its subtle, square pattern. On top of this, the grey vanity adds another layer in the same color family, but with a smooth, painted finish. The white marble countertop offers a bright contrast, while the light wood floor brings in warmth. The final, crucial layer is the metallic shine from the gold oval mirror and brass fixtures, which act as the room’s jewelry. It’s a rich, multi-layered design packed into a tiny footprint.
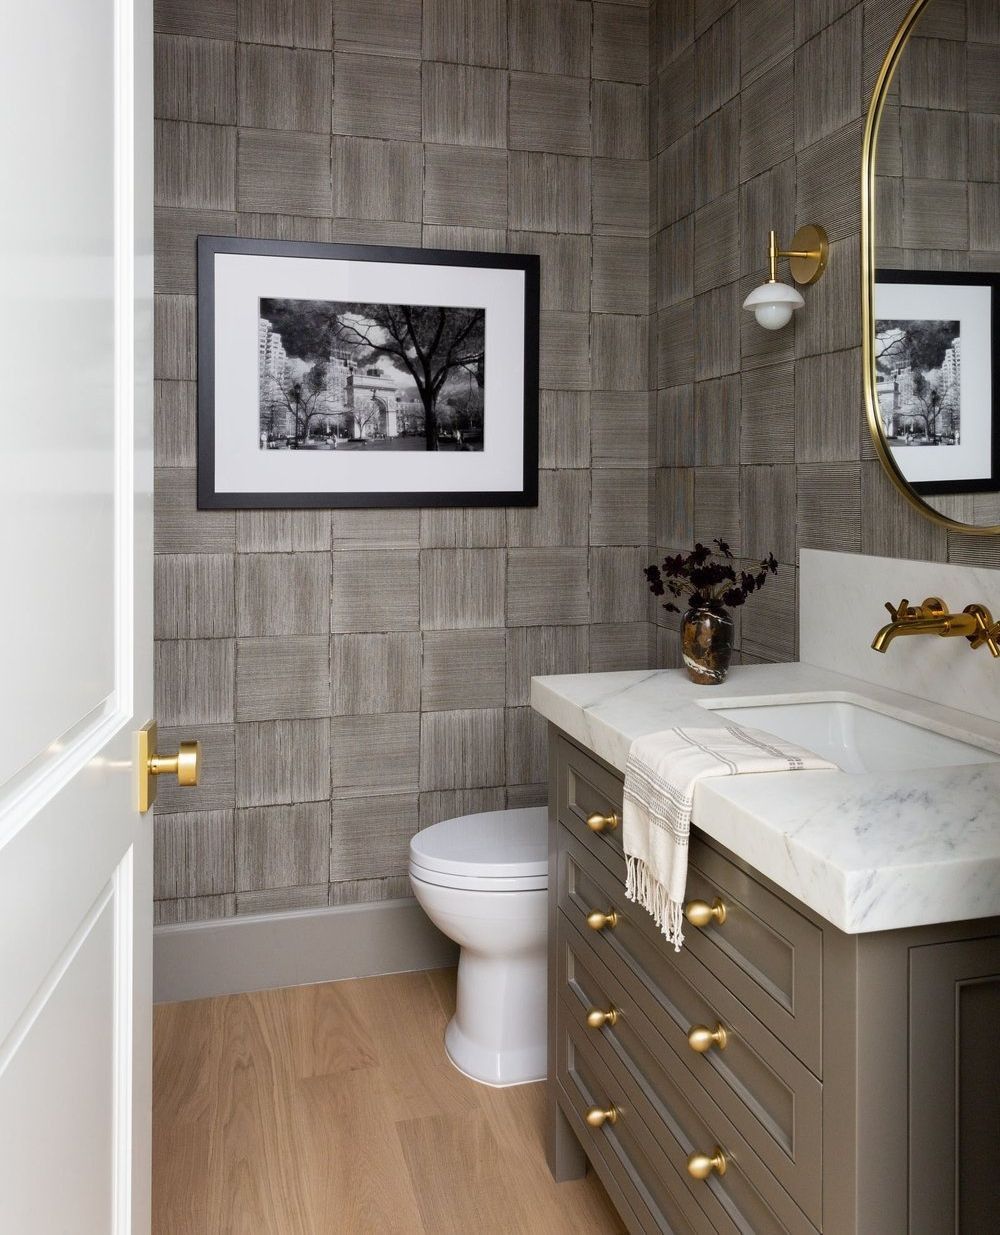
“Ready to create your own jewel-box powder room?”
Here’s what to check first:
- Wallpaper Type: Is the wallpaper you’ve chosen specifically rated for bathrooms? It needs to be vinyl or have a water-resistant coating to withstand humidity.
- Lighting: In a small, potentially dark room, a single sconce might not be enough. Is it a multi-bulb sconce? Is there an overhead light as well? Consider the total wattage needed.
- Faucet Finish: Will a brass or gold faucet show water spots easily? If you’re not a fan of constant wiping, consider a “brushed” or “satin” finish over a polished one.
Your Perfect Bathroom Is Waiting
That was a lot, we know! But hopefully, seeing these 31 distinct ideas has helped you zero in on what you truly love. Whether it’s the warmth of natural wood, the sleekness of modern tile, or the glamour of brass accents, your perfect bathroom is a combination of elements that feel right to you. Now, head back to your Pinterest board and start creating a new section for the ideas you’re *actually* going to use. Happy remodeling!