If your primary bathroom has been a source of low-key dread for longer than you’d like to admit, you’ve come to the right place. We sifted through hundreds of designs from top retailers and bespoke designers to find what truly works. We’re showing you how to get these looks everywhere from IKEA to high-end showrooms, with total project costs ranging from a savvy $5,000 refresh to a $50,000+ custom remodel. Inside, you’ll find 31 distinct ideas, covering everything from warm minimalism and modern spa-like layouts to moody, traditional designs with a twist. The trend for 2026 is clear: our bathrooms are becoming personal sanctuaries. It’s less about fleeting fads and more about creating a space that genuinely restores you. And stay until the end — we break down the most common mistakes that can ruin these looks.
📌 Save this to Pinterest for later — you’ll want to revisit these ideas.
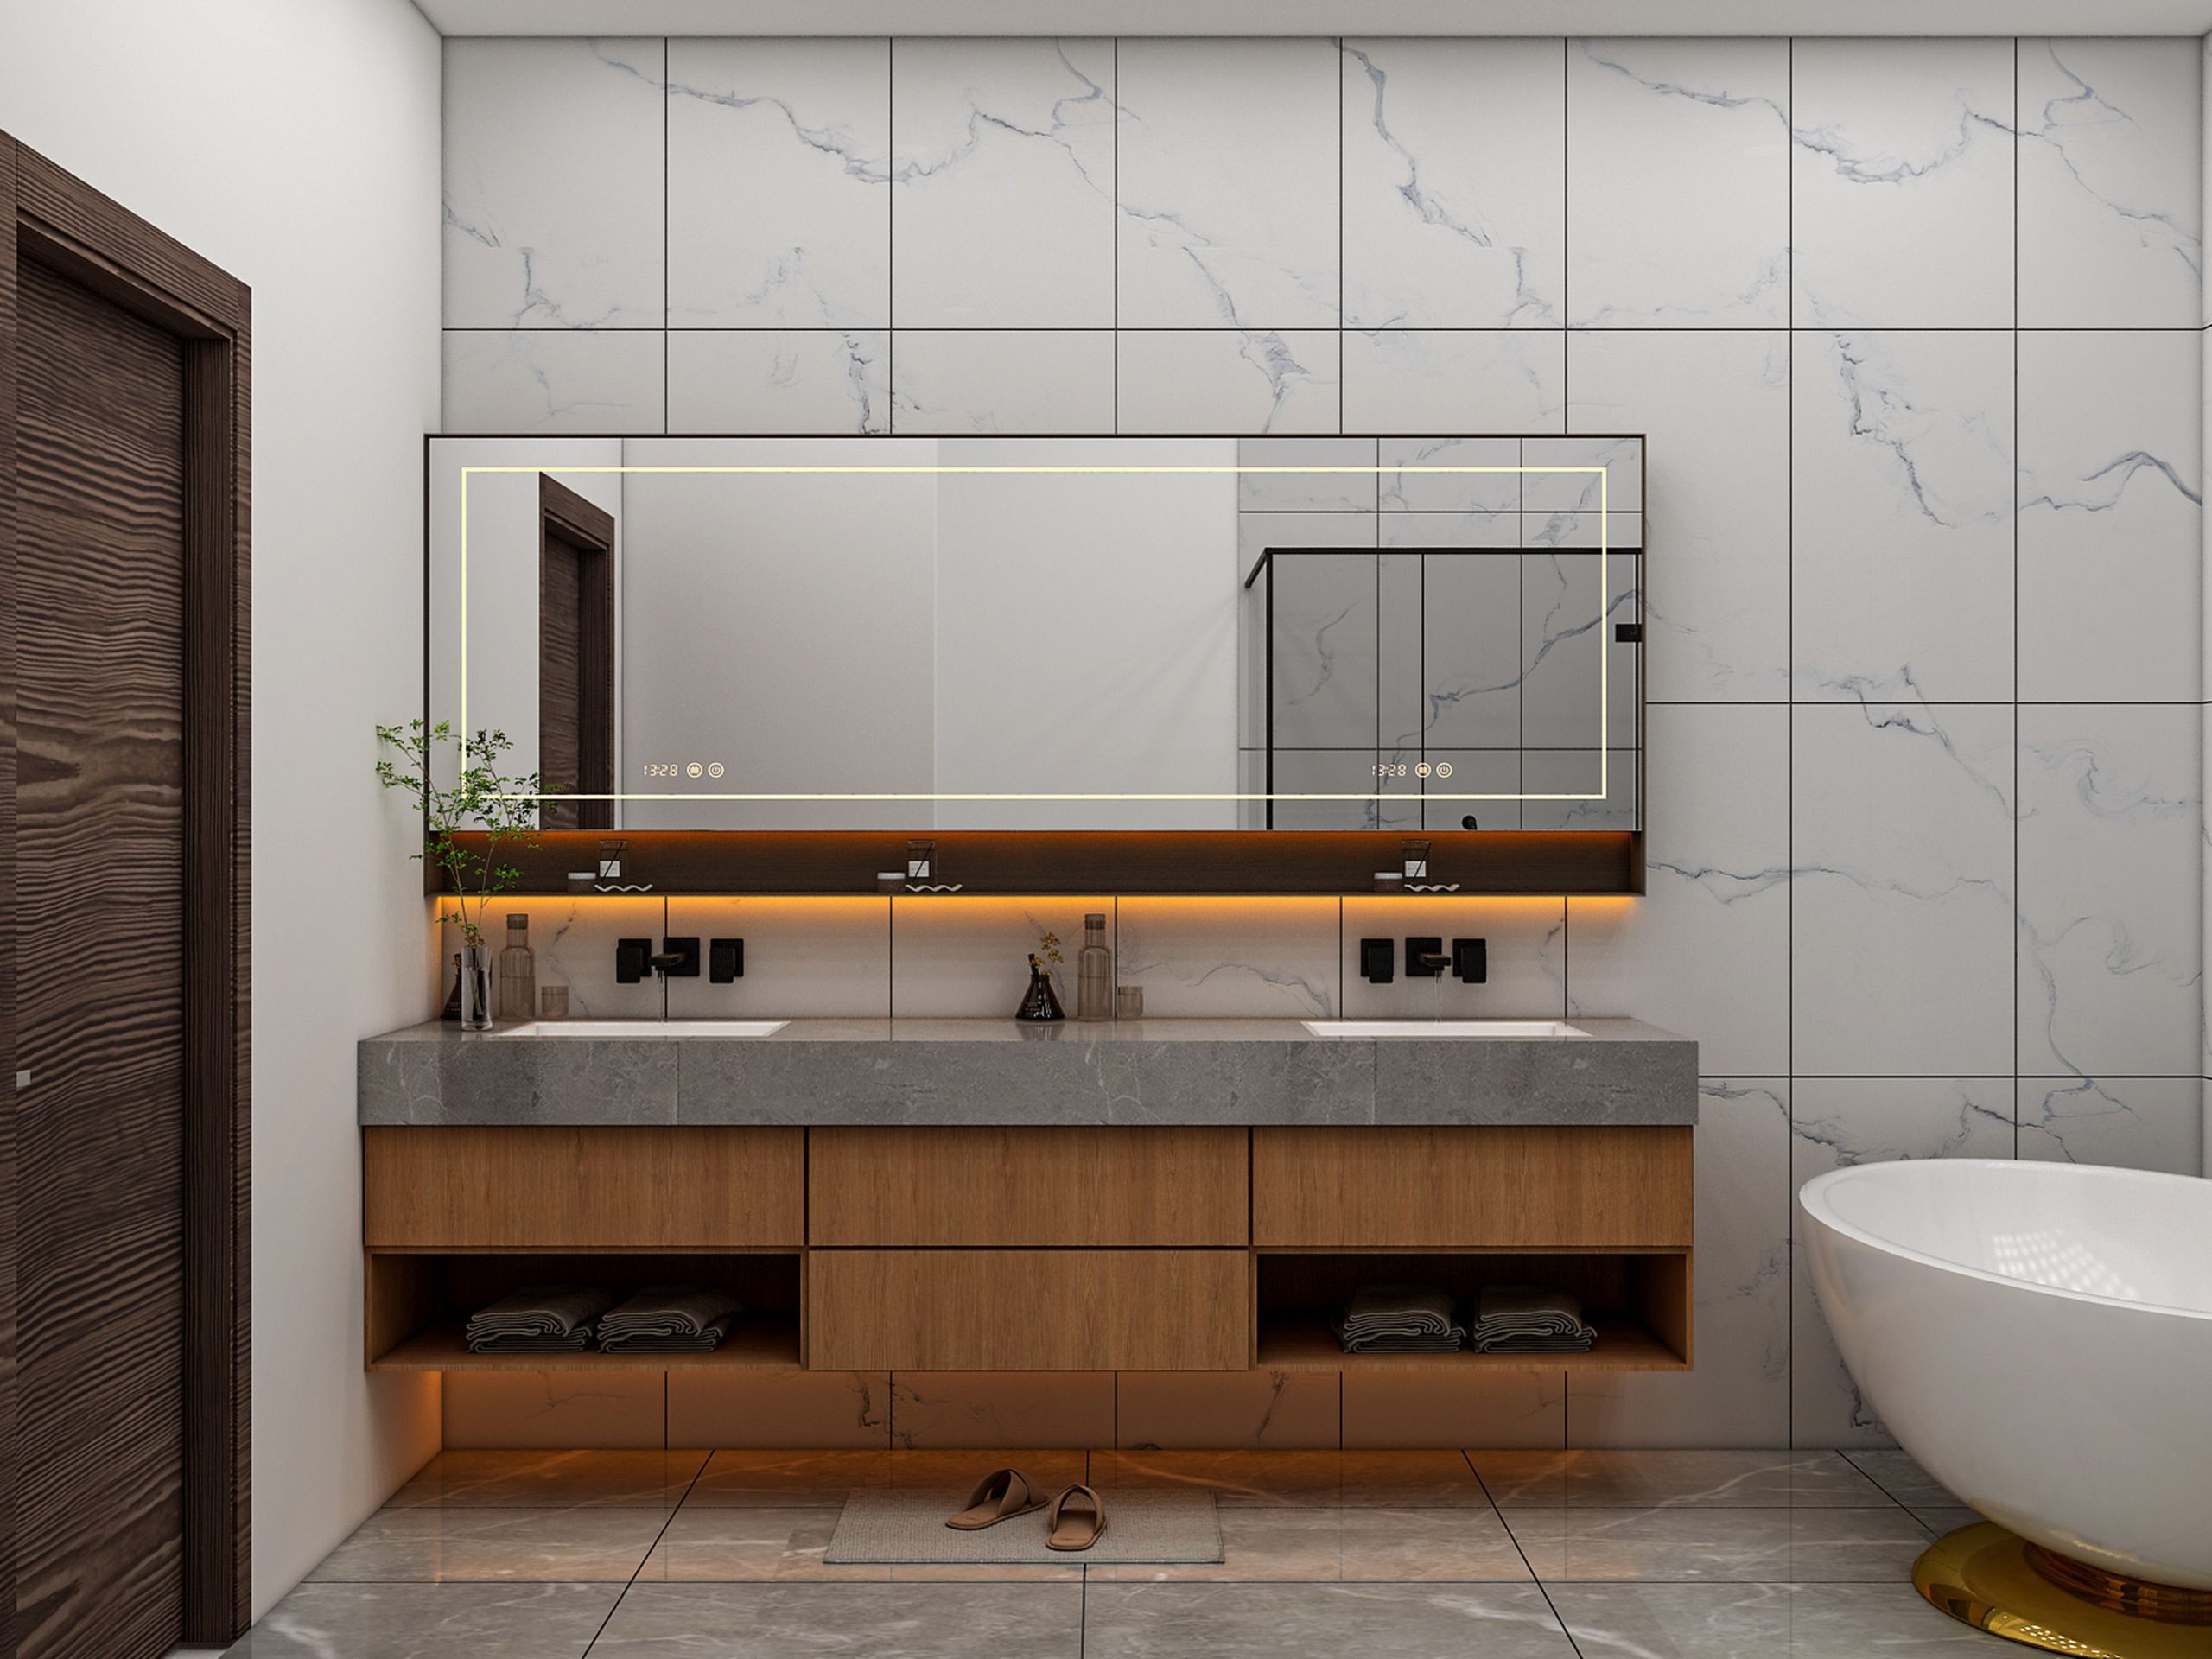
1. Modern Minimalism with an Arched Window and Light Marble
To recreate this bright, contemporary look, you’re investing in high-impact finishes and fixtures. The floating vanity and freestanding tub are key players in achieving that spacious, clean feeling. Here’s a potential cost outline:
“Main Furniture (Double floating vanity, faucets): $2,500 – $7,000
Bathtub (L-sha”
- Main Furniture (Double floating vanity, faucets): $2,500 – $7,000
- Bathtub (L-shaped freestanding): $3,000 – $8,000
- Tile (Marble-look porcelain for walls/floor): $4,000 – $10,000 (includes installation)
- Decor & Accessories (Geometric divider, curtains): $800 – $2,500
- TOTAL: $10,300 – $27,500
- Budget Alternative: Source a similar vanity from a big-box store, use a standard alcove tub, and choose a more affordable ceramic tile to get this look for 40-50% less.
This design’s success hinges on two principles: repetition and architectural framing. The clean, rectangular shapes of the vanity sinks are repeated in the geometric patterned divider, creating a subtle but satisfying rhythm. The large arched window acts as a powerful focal point, softening the sharp angles of the other elements. Its tall, curved shape draws the eye upward, making the ceiling feel higher and the entire room more grand and open. The sheer curtains diffuse light beautifully, wrapping the clean lines in a soft glow.
2. White & Gold Luxury with Classic Clawfoot Tub
When using a dominant metal like gold, consistency is your best friend, but nuance is what makes it look expensive. Don’t just match all your gold tones—mix the finishes. Combine a brushed gold faucet with polished gold cabinet hardware and an aged gold mirror frame. This subtle variation adds depth and keeps the space from feeling like a pre-packaged showroom set. For the ultimate pro touch, ensure your lighting fixtures also incorporate gold, but perhaps mixed with another material like glass or crystal to break it up.
“The single element that elevates this entire bathroom is the unwavering commitment to gold hardware.”
If you swapped the faucets, mirror frames, and light fixtures for chrome or black, the room would still be lovely, but it would lose its specific, luxurious personality. The gold provides a necessary warmth against the crisp white paneling and cool grey tones of the marble. It’s the unifying thread that turns a collection of nice elements into a truly cohesive and elegant design statement. It’s what makes you say “wow.”
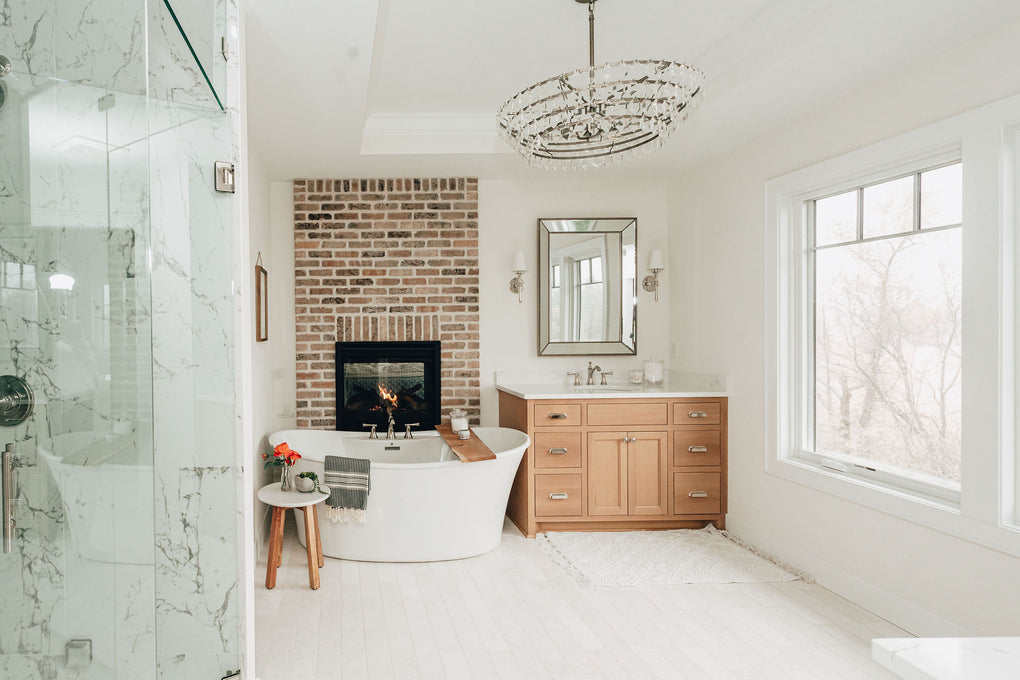
3. A Cozy Nook with a Fireplace and Soaking Tub
A fireplace in the bathroom is the absolute height of luxury, but let’s be practical. If you opt for a real wood-burning or even a gas fireplace, you need to consider ventilation requirements, which can be complex and expensive to install in a bathroom. You’ll also have to deal with cleaning soot (for wood) and annual safety inspections. An electric fireplace insert is a much more realistic option for most remodels. It gives you that cozy glow and even heat without any of the venting headaches or mess—a crucial consideration in a room that’s all about staying clean.

“The visual formula here is a masterclass in texture mixing.”
Think of it as: 40% smooth, hard surfaces (the white tub, marble tile, vanity countertop) + 30% rustic texture (the light brown brick fireplace) + 20% warm naturals (the light wood vanity) + 10% sparkle (the crystal chandelier and polished chrome fixtures). You could swap the brick for a rough-hewn stacked stone or change the wood tone to a darker walnut, and a similar balance of texture and warmth would still be achieved.
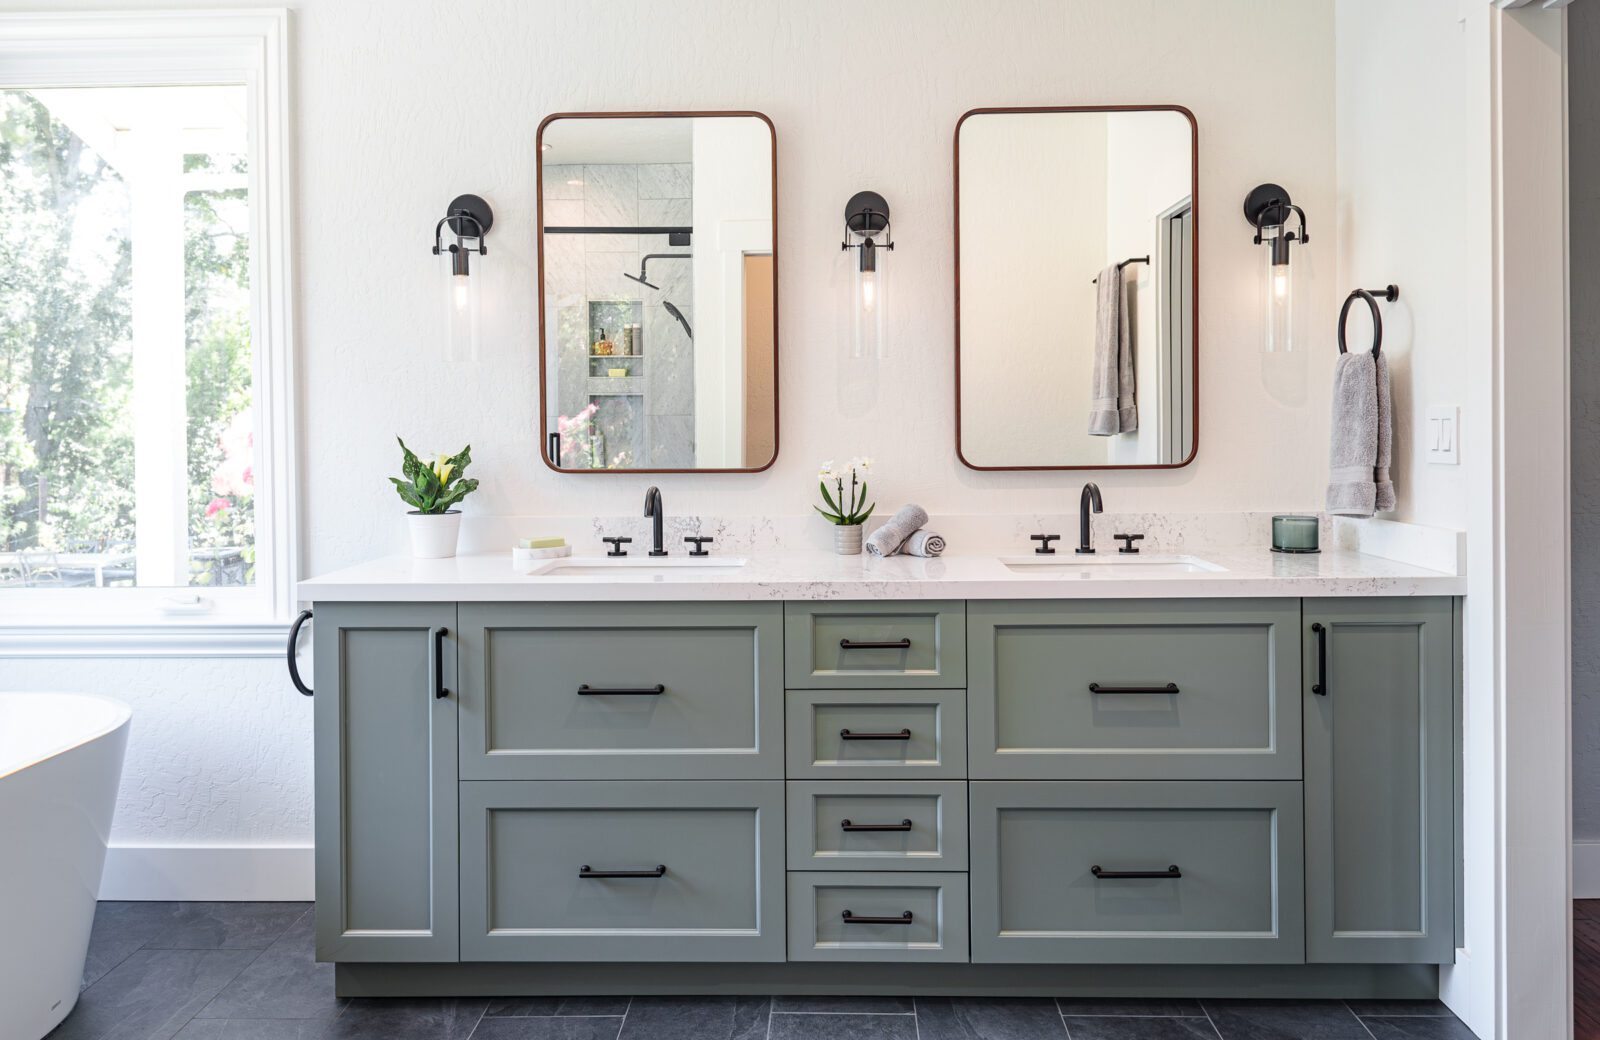
4. Sage Green Double Vanity with Dark Bronze Accents
Replacing cabinet hardware is one of the fastest, most satisfying bathroom updates. Here’s how to do it right:
“Time Estimate: 1-2 hours.”
Material Cost: $50 – $300.
Measure the distance between the screw holes on your existing handles. This is your “center-to-center” measurement. It’s critical for finding new hardware that fits without drilling new holes.
Unscrew the old handles from the inside of the drawers or doors.
Thoroughly clean the cabinet surface where the old hardware was.
Screw in your new hardware. If you’re switching from knobs to pulls, you will need to drill a second hole. Use a cabinet hardware jig to ensure perfect alignment.
Green is having more than just a moment—it’s become a new neutral. Specifically, this muted, earthy sage green is all over our Pinterest feeds because it hits the perfect balance between a pop of color and a calming, natural tone. It feels fresh and modern without being loud. Paired with the dark bronze fixtures, it leans into a sophisticated, slightly moody aesthetic that feels very current for 2026. This isn’t a fleeting trend; colors rooted in nature have serious staying power because they help us feel grounded in our homes. Compare this with the bold green in Idea #31, which uses a similar shade in a completely different way.
5. Modern Spa with Herringbone Floors and Travertine Walls
This look, with its freestanding tub and separate glass shower, demands a generous footprint. You’ll need a minimum of 120 square feet to avoid a cramped feeling, with at least 150 square feet being ideal to truly appreciate the open, spa-like atmosphere. Ceiling height should be at least 8 feet, but 9+ feet will better accommodate the vertical wall tiles and statement chandelier. For smaller spaces, consider the more compact yet equally stylish layout seen in Idea #12.
“Let’s talk tile.”
That gorgeous herringbone floor pattern is a stunner, but the extra diagonal cuts mean more labor, which translates to higher installation costs. The grout lines are also more numerous than with a simple large format tile. Opt for a darker, stain-resistant grout to make your life easier. As for the travertine-look walls, a high-quality porcelain tile is your best bet. It gives you the luxurious look of natural stone without the sealing requirements and susceptibility to etching from acidic bathroom products.
6. Sleek Bathroom with Taupe Stone and a Floating Wood Vanity
This design feels incredibly serene because of its masterful use of tone-on-tone color and clean horizontal lines. The light beige stone on the floor, bathtub surround, and countertop creates a seamless, monolithic envelope of color. This is then layered with the strong horizontal lines of the floating wood vanity and the wooden bench. This repetition of direction makes the room feel wider and more expansive. The dark-framed mirror and window frame add just enough dark punctuation to keep it from feeling washed out.
“The single element holding this entire minimalist design together is the floating vanity.”
By lifting the cabinetry off the floor, the design accomplishes two crucial things. First, it creates an unbroken sightline of the light beige stone flooring, which significantly enhances the sense of space. Second, it adds to the clean, uncluttered, and modern feeling of the room. A standard vanity that goes to the floor would feel much heavier and more traditional, completely changing the room’s light, airy character.
7. High-Contrast Earthy Marble Bathroom
When working with dramatic, large-scale patterned marble like this, the key is to let the stone be the star. Don’t introduce other patterns or complex colors. Notice how everything else is simple: a clean white tub, minimalist chrome fixtures, and a frameless glass shower. When you select your slabs, ask the stone yard to “bookmatch” them. This means two adjoining surfaces will mirror each other, creating an impressive, continuous pattern that looks incredibly high-end and intentional.
“A room with this much polished marble is stunning, but it’s also an echo chamber.”
The hard, reflective surfaces will amplify every sound. If you’re sensitive to noise, this might not be the serene escape you’re imagining. To mitigate this, you can introduce soft materials where possible: a plush bath mat, thick towels, and even a fabric-covered stool or bench if space allows. These small additions can make a big difference in absorbing sound and making the space feel a little softer and more intimate.
8. Espresso Vanity with a Striped Mosaic Accent Wall
This bathroom gets its balanced feel from a simple but effective visual recipe: 60% warm neutrals (the creamy beige walls and large-format brown-beige floor tiles) + 30% dark anchor (the deep espresso wood vanity) + 10% graphic punch (the vertical striped glass mosaic tile). The key is the accent tile. Because its colors are pulled directly from the rest of the palette (white, gray, brown), it adds energy and a focal point without creating chaos. It ties everything together.
“That espresso vanity and mosaic tile combo looks sharp, but it doesn’t have to break the bank.”
You can find a nearly identical look at a fraction of the custom price. Check out IKEA’s GODMORGON series for a similar dark wood-effect vanity, often for under $500. For the accent tile, browse online tile retailers like TileBar or Wayfair for glass mosaic sheets. You can often get the high-impact look for $15-$30 per square foot. Pairing these finds with a simple, large-format ceramic tile from Home Depot will give you this entire vibe for less.
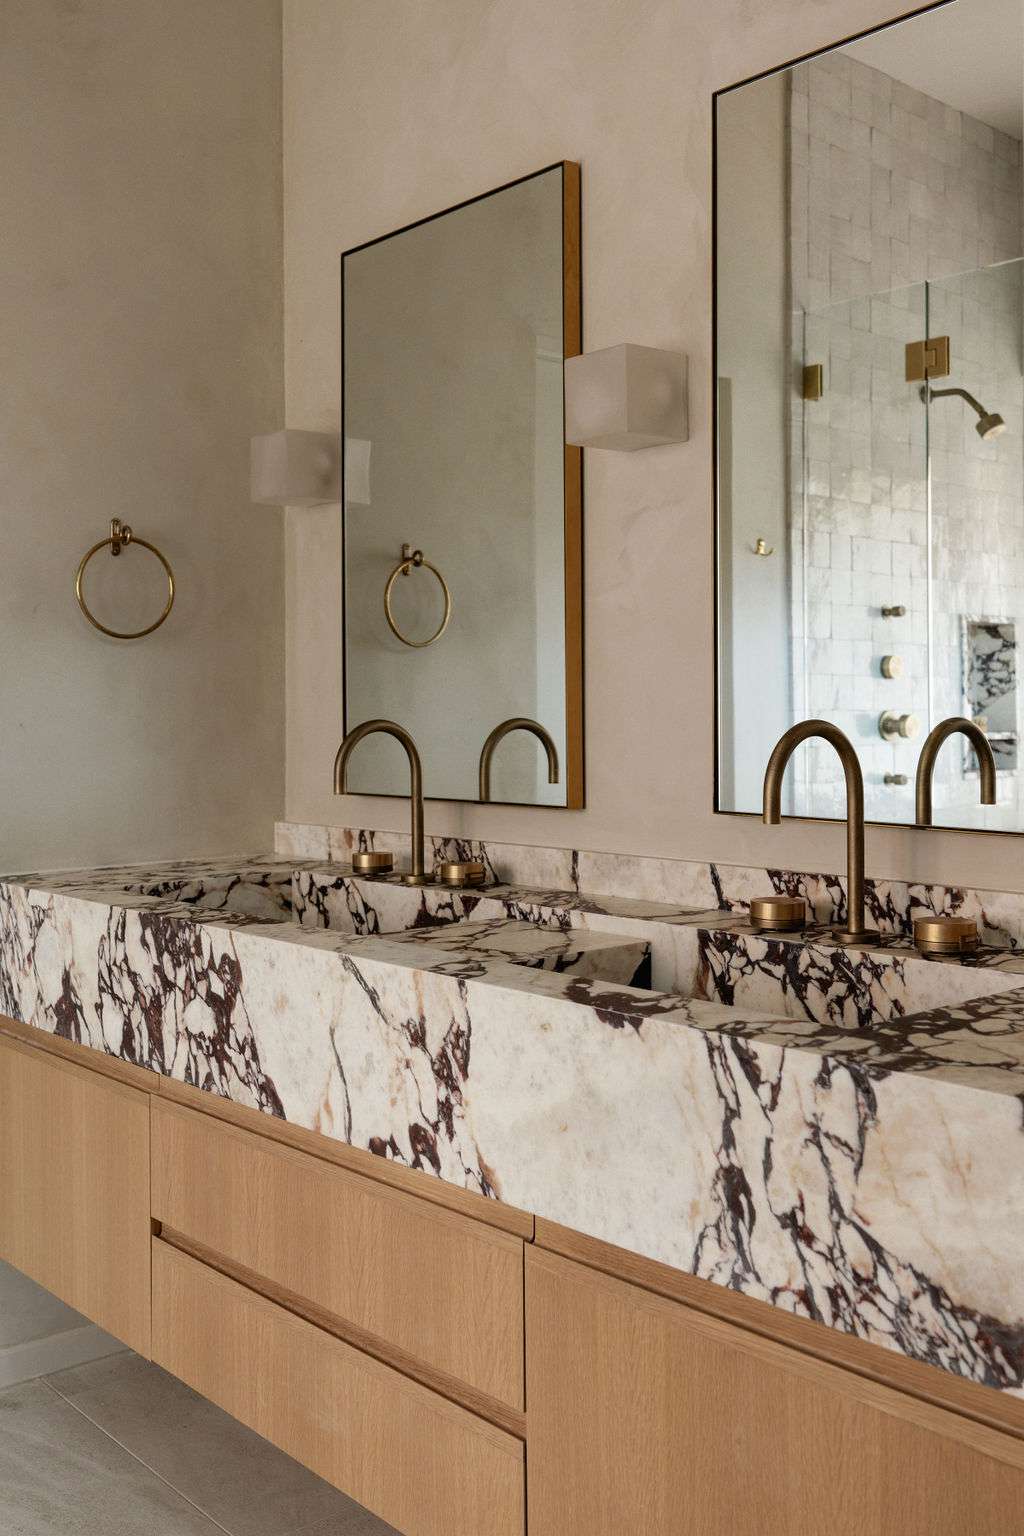
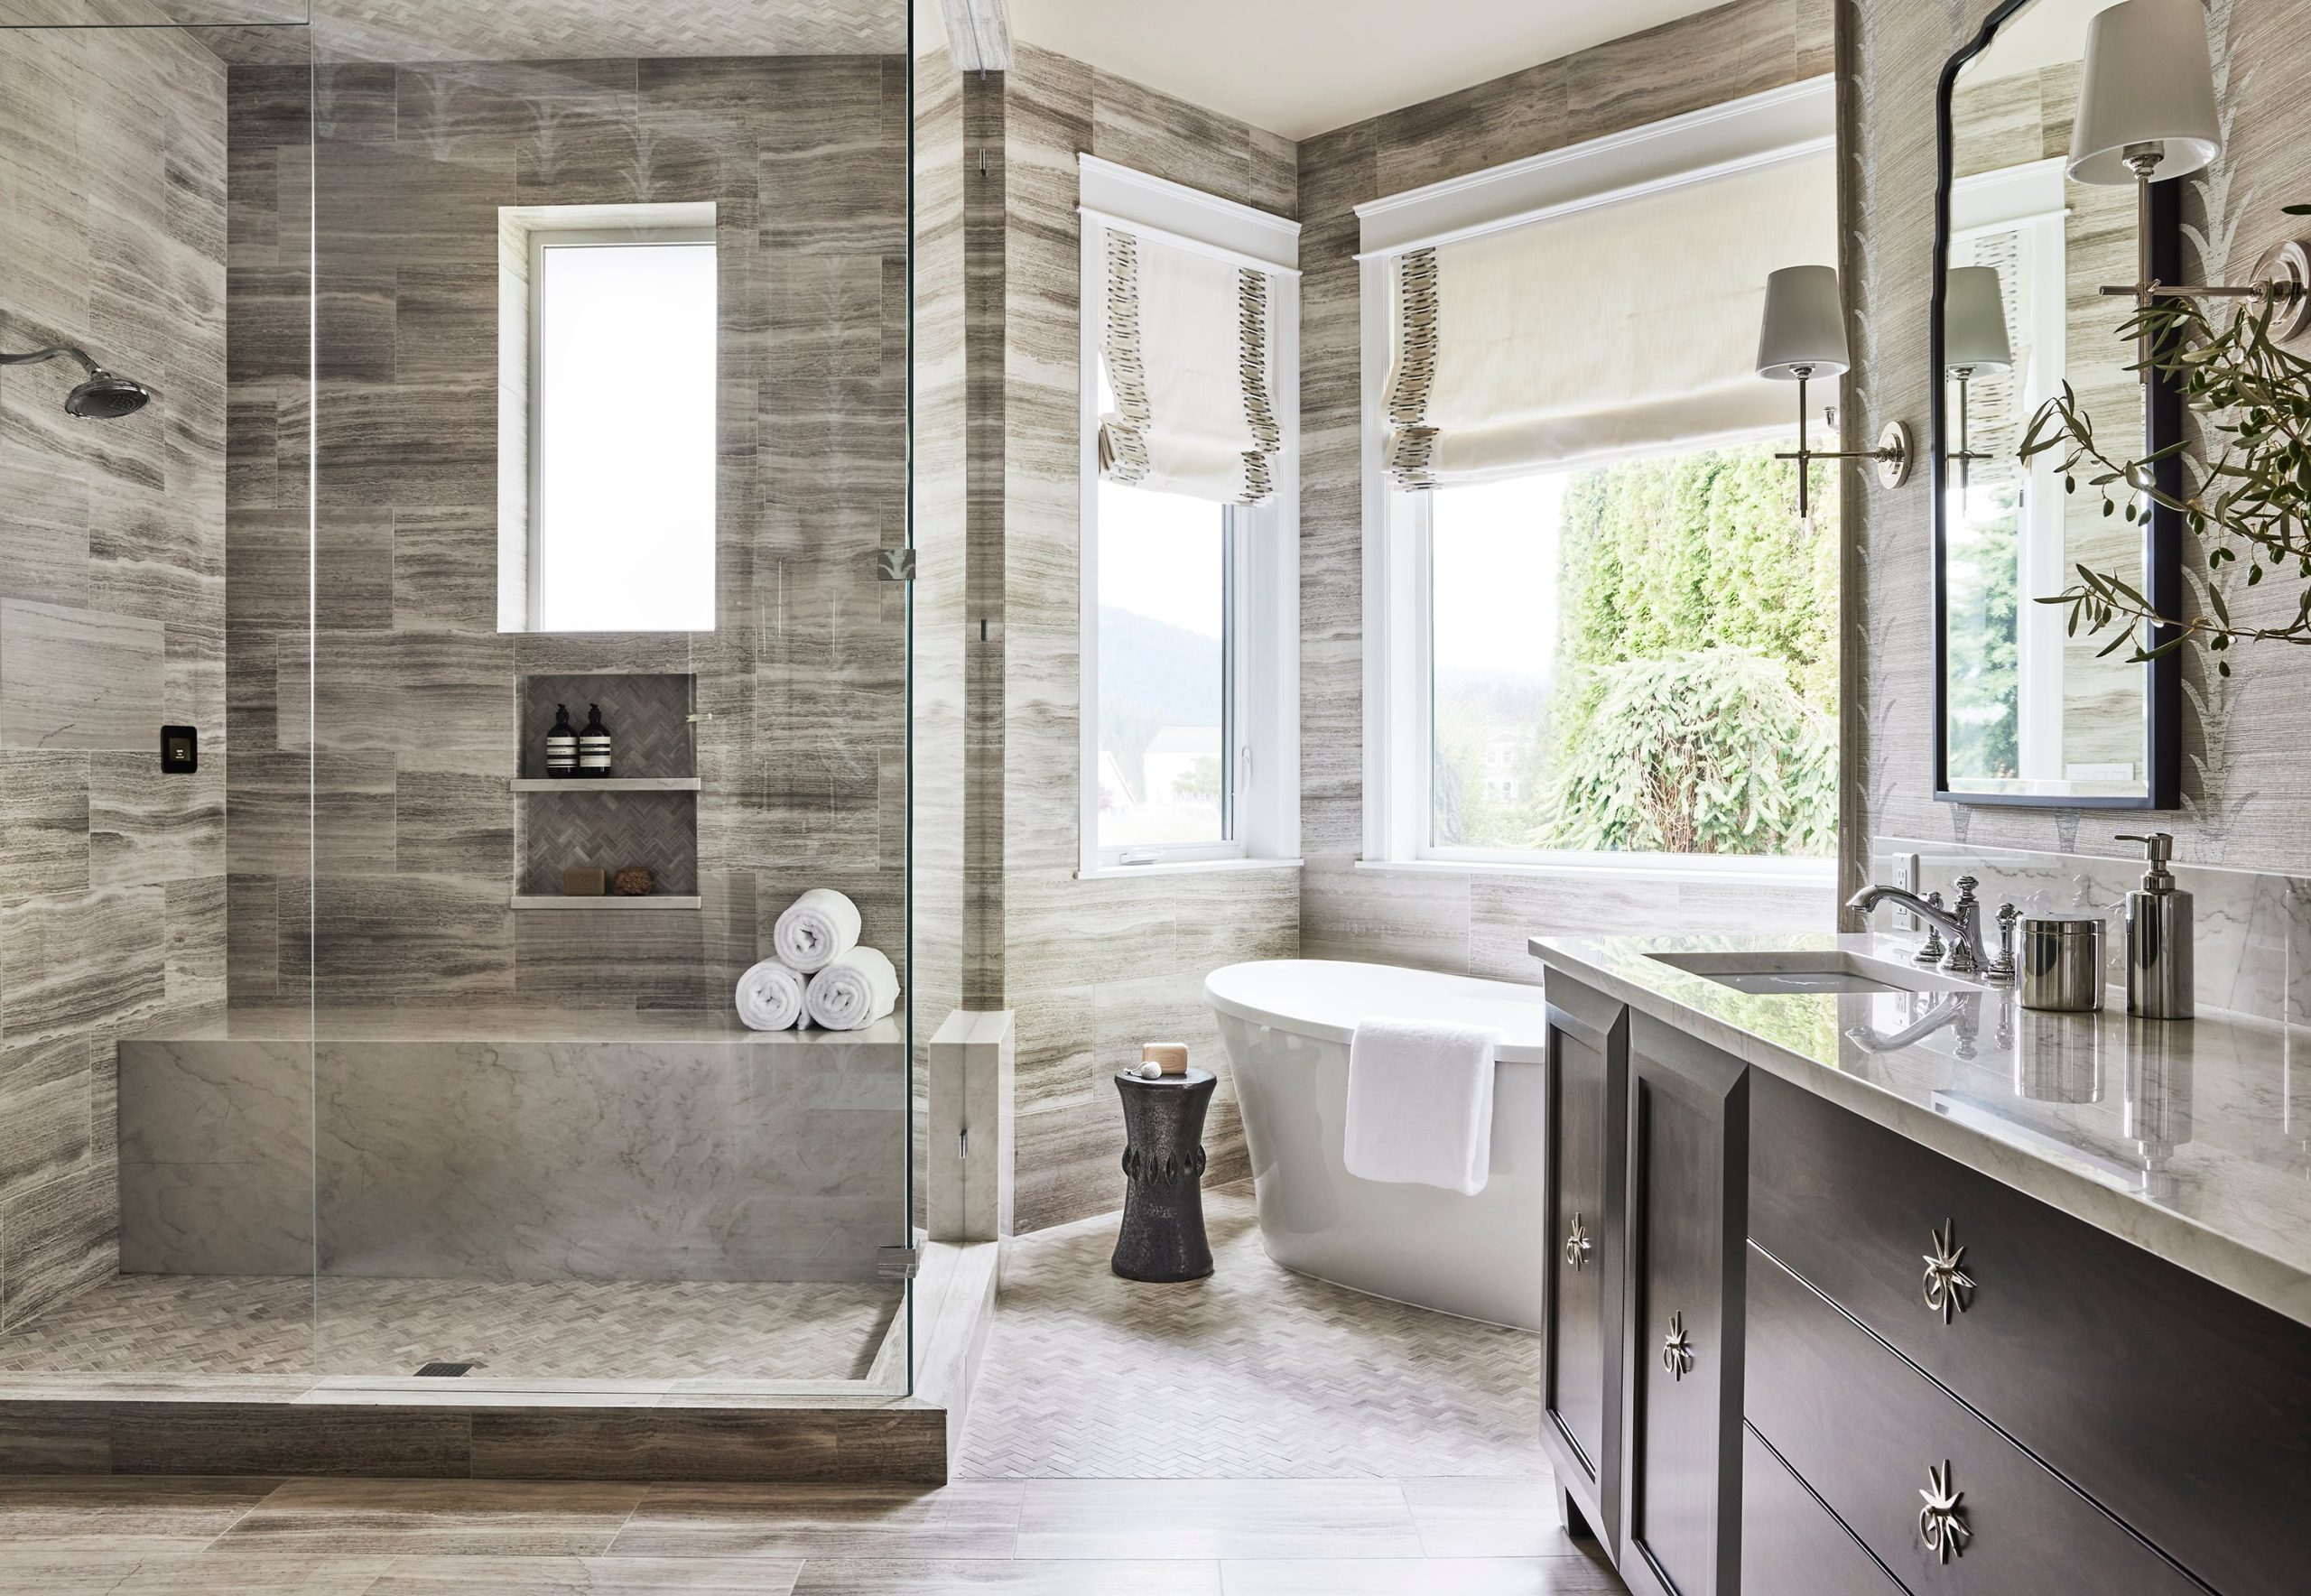
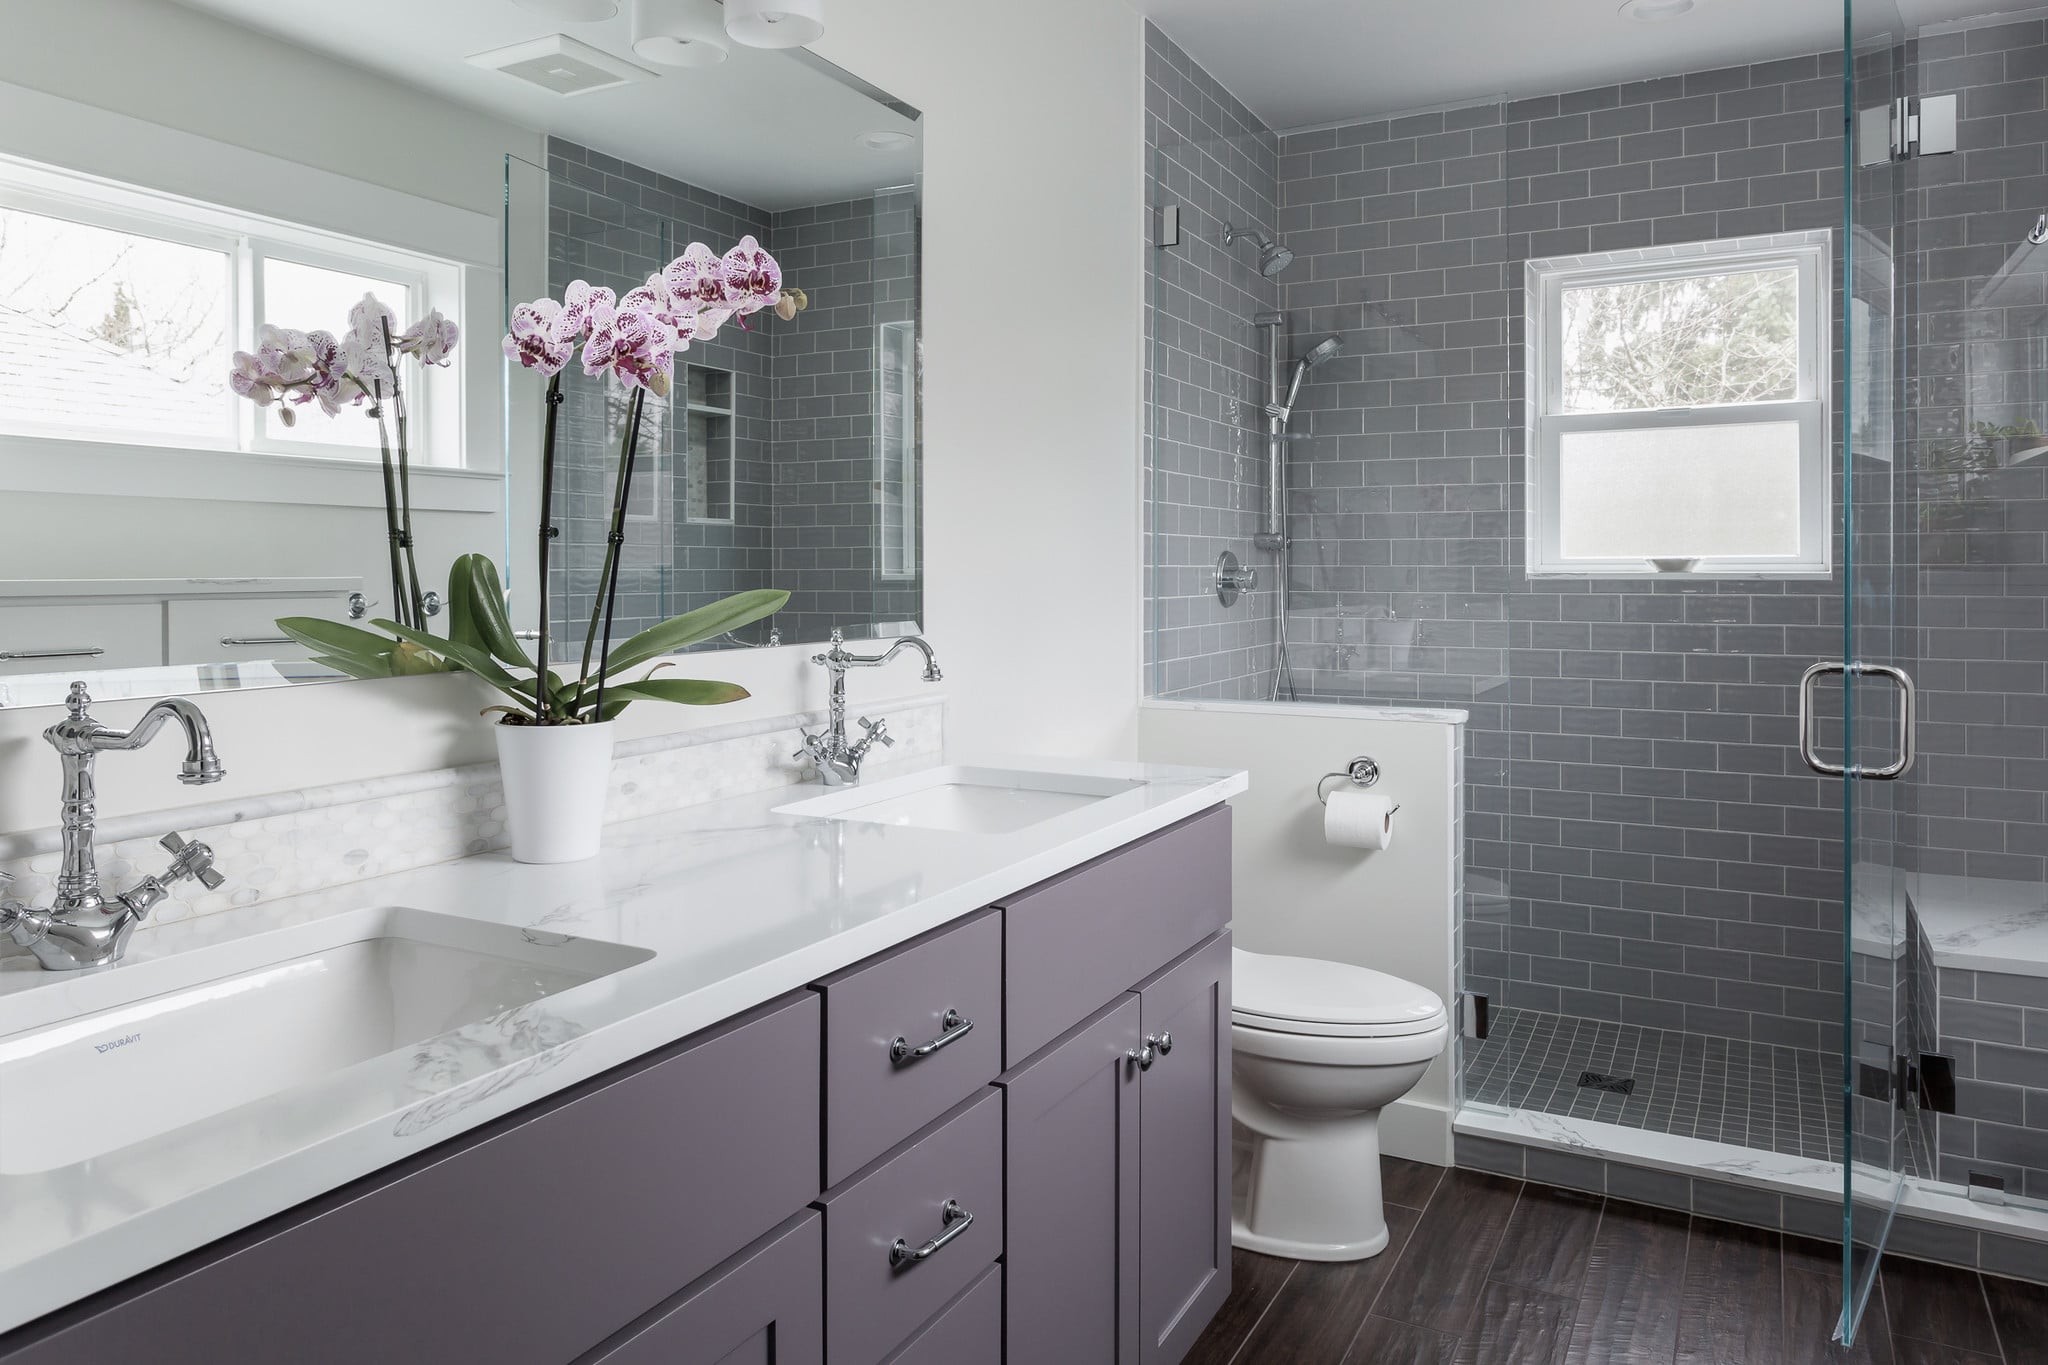
9. Symmetrical Gray and Marble Bathroom with a Central Tub
The calm, orderly feeling in this room is all thanks to symmetry. The central window and the bathtub below it create a strong axis line. Flanking this with two identical vanities, mirrors, and lighting setups creates a sense of balance and harmony that is inherently pleasing to the eye. It’s a classic layout for a reason—it just works. The brushed brass fixtures add a touch of warmth to the cool gray-and-white palette, preventing it from feeling sterile. Compare the effect of the brass here to the chrome in the similar palette of Idea #12.
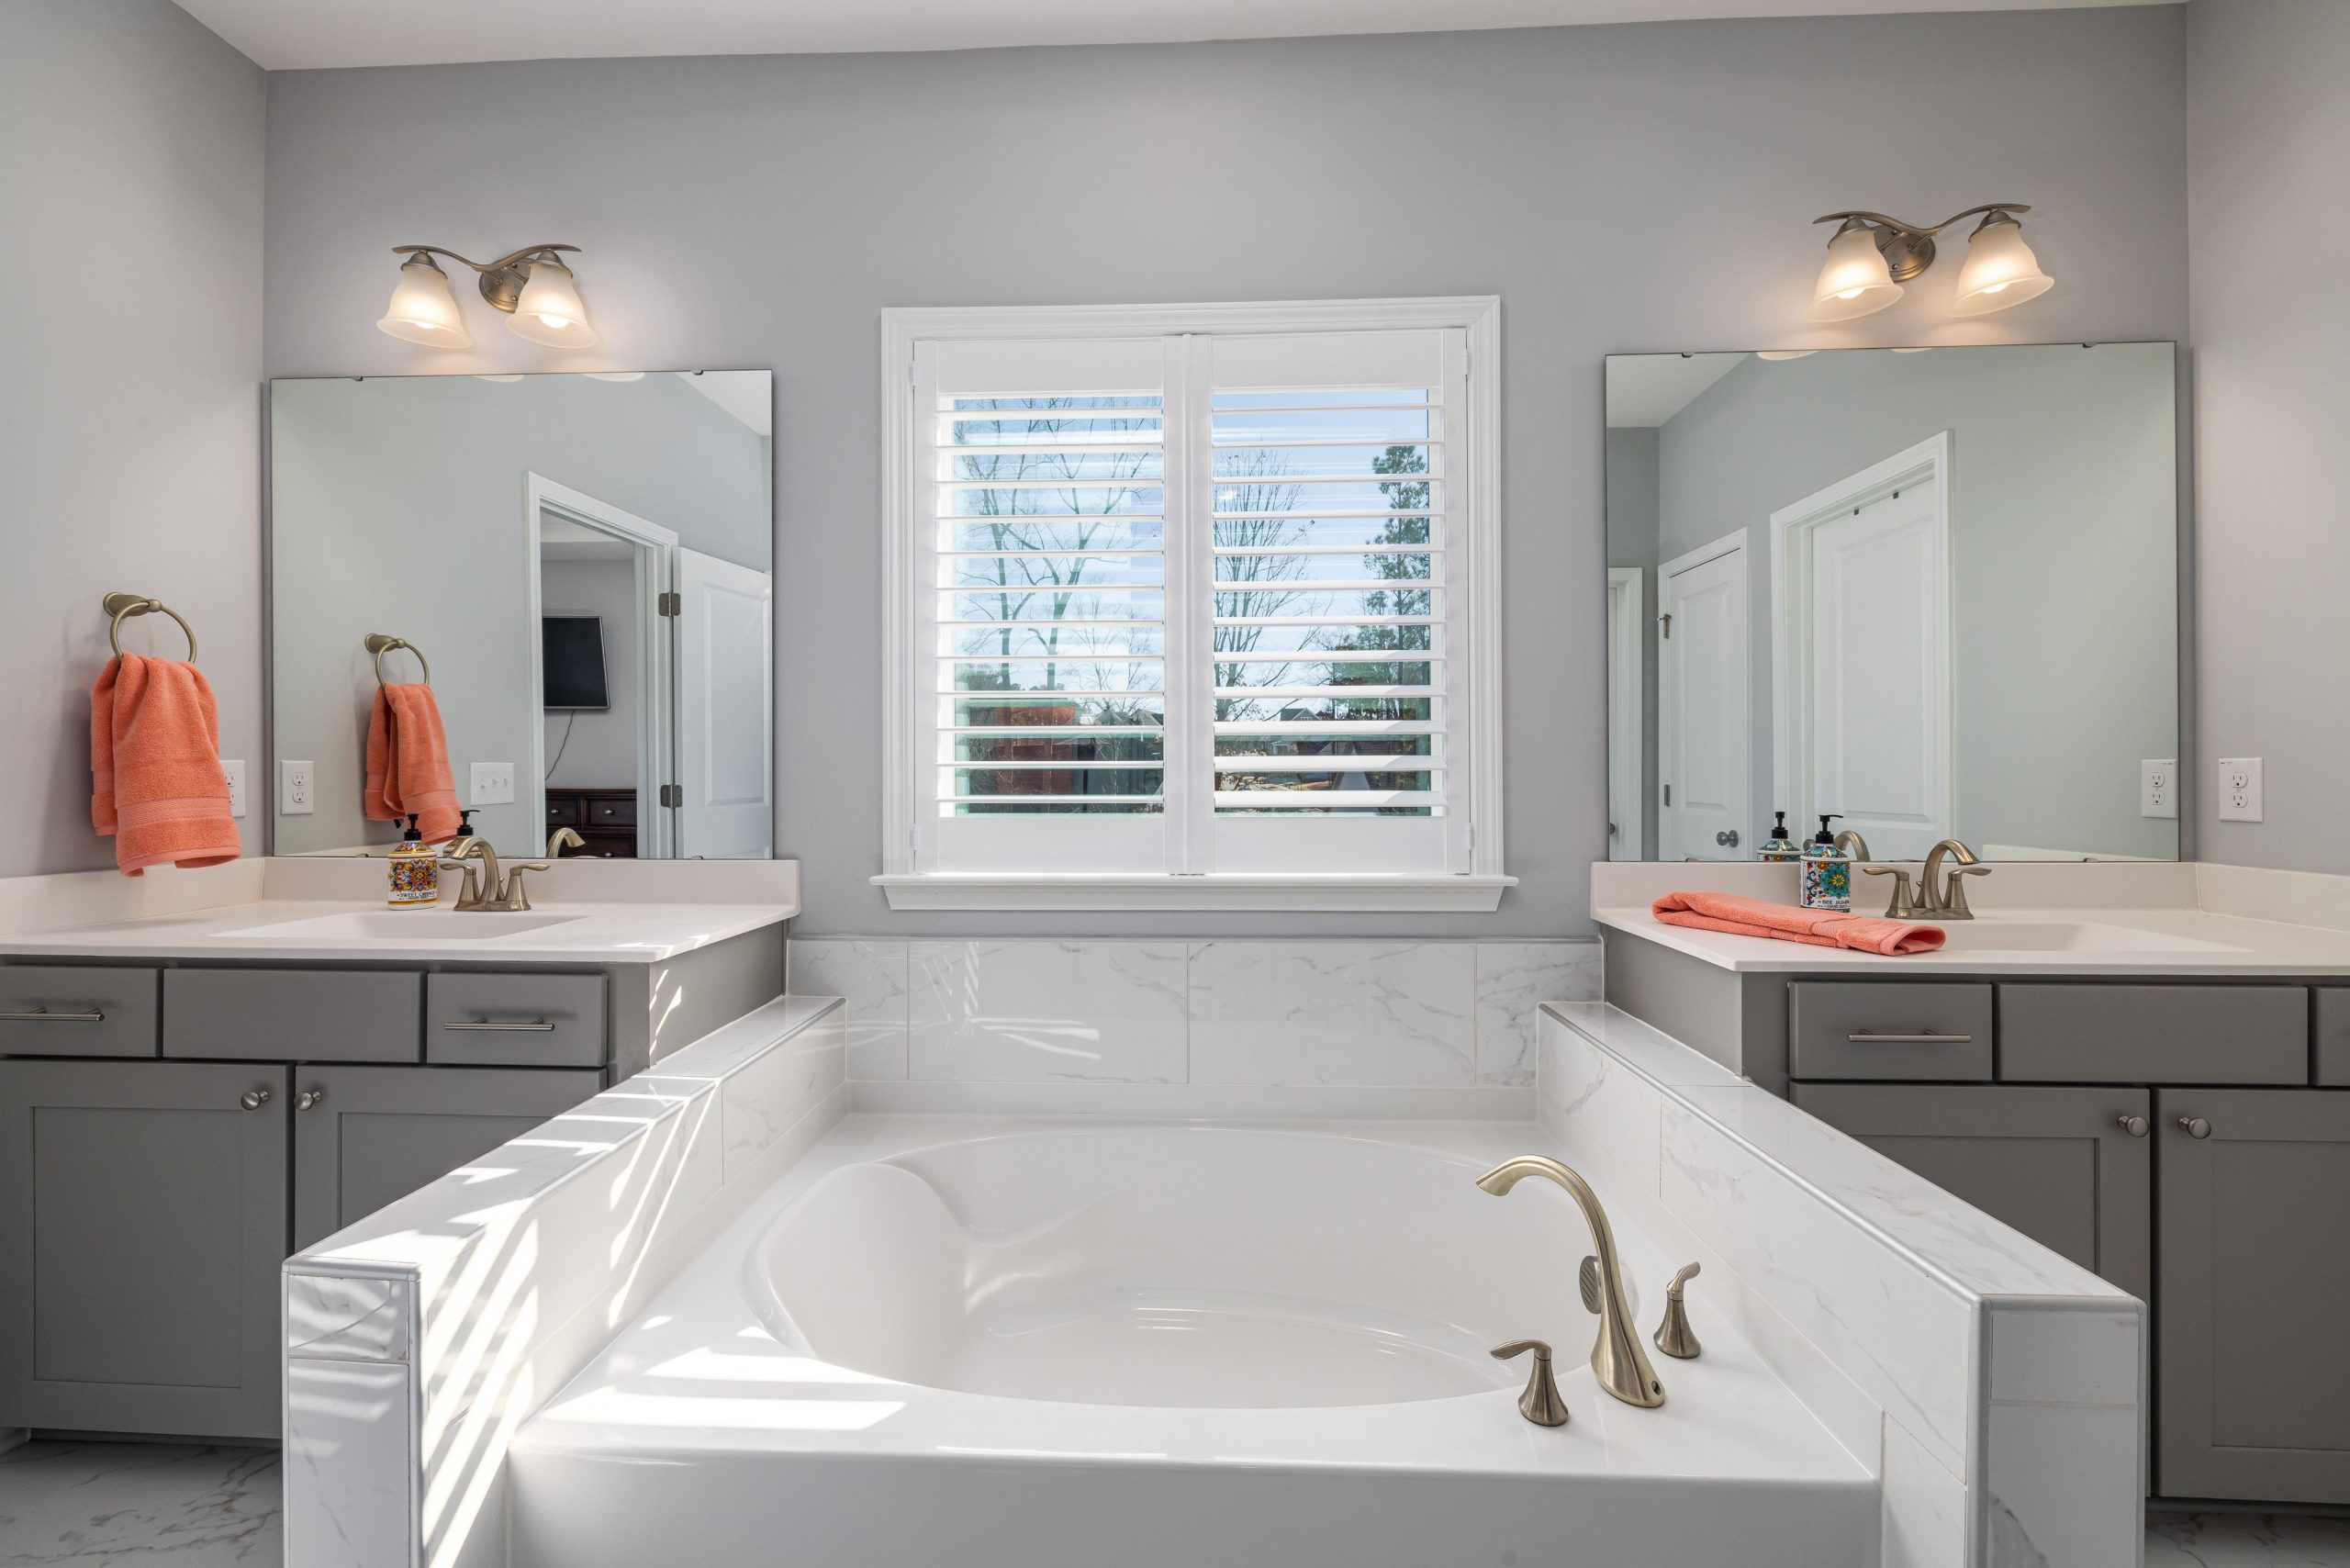
“Before you commit to this perfectly balanced layout, run through this checklist:”
Before you commit to this perfectly balanced layout, run through this checklist:
- Plumbing Check: Does your existing plumbing support two separate vanities and a central tub? Moving plumbing lines is a major expense, so know what you’re up against.
- Window Placement: Is your window truly centered? An off-center window will throw off the entire symmetrical concept.
- Clearance Measurement: Do you have at least 30 inches of clear floor space in front of each vanity and the bathtub to satisfy building codes and ensure comfortable movement?
10. High-Contrast Modern Bathroom with Gray Marble
The key to this room’s success is the bold, dark gray floor tile. It grounds the entire space. Without it, the light gray marble-look walls and white vanity could feel washed out and floaty. The dark floor provides a dramatic, high-contrast foundation that makes the lighter elements pop. It adds depth and a touch of sophisticated drama. If you were to switch to a light floor tile, the room would lose its edge and feel far less dynamic.
“This layout is a great solution for a standard rectangular bathroom, typically around 60-80 square feet (e.g., 8’x10’).”
Placing the vanity on one long wall and the tub/shower combination on the opposite long wall is a highly efficient use of space. It maintains a clear central pathway, making the room feel organized and larger than it is. This configuration works well with a standard 8-foot ceiling height. It’s a more attainable layout than the sprawling spa bathroom seen in Idea #5.
11. Curving Glass Shower with Flowing Neutral Tiles
What makes this space so visually compelling is the illusion of movement. The large-format tiles have a soft, layered pattern that resembles flowing water or geological strata. Running the same tile seamlessly from the floor up onto the walls creates a continuous, immersive environment. The gentle curve of the glass shower enclosure echoes this organic flow, breaking up the straight lines and adding a sculptural quality to the room. It’s a smart way to add a lot of personality while sticking to a simple, neutral palette.
“A curved glass shower door looks incredibly chic, but it’s a custom item and comes with a significantly higher price tag than a standard straight door.”
Replacement parts are also harder to find down the line. Furthermore, cleaning that curve can be more awkward than a flat pane of glass, especially where the curved panel meets the wall. Make sure you have a good squeegee with a flexible head to keep it looking pristine.
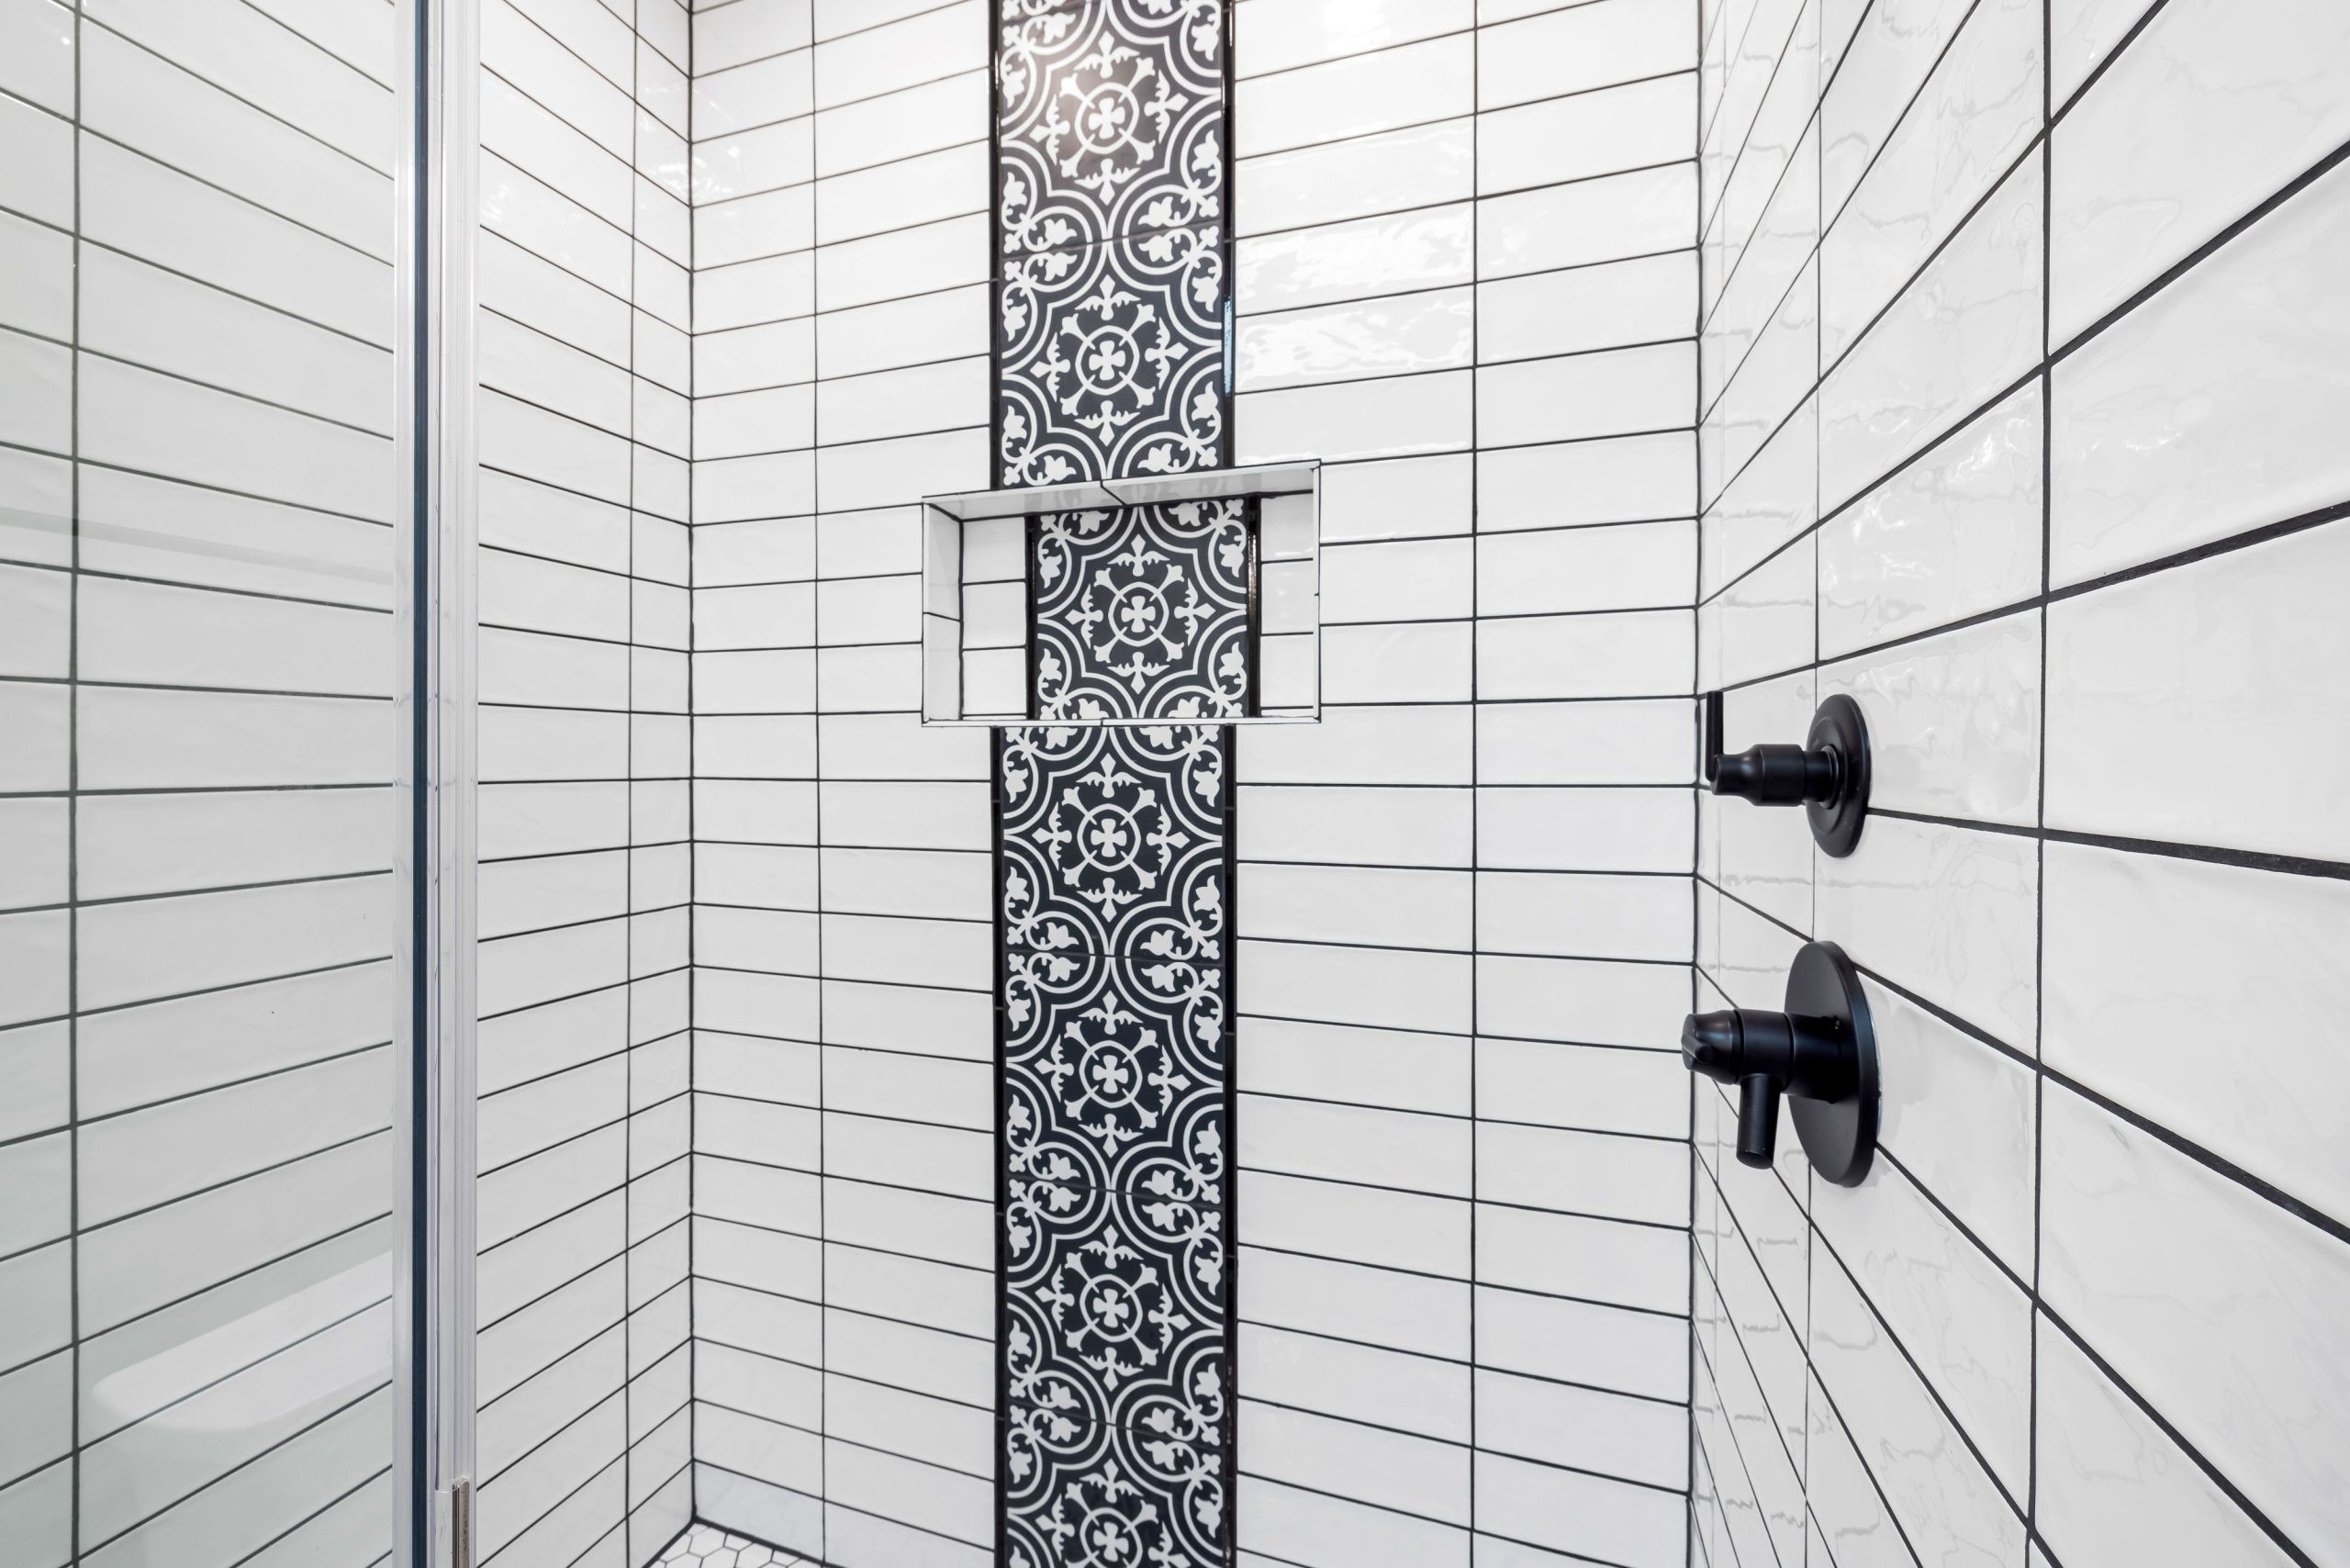
12. Modern Gray and White Marble Bathroom with Geometric Accent
An accent tile band is a fantastic way to add a custom touch to your shower without tiling the entire space in expensive material. The trick is proportion. For a standard 8-foot-high shower, a vertical accent band should be between 6 and 12 inches wide. A horizontal band, like the one shown here, looks best when it’s 4 to 8 inches tall and placed at eye level (typically 60-66 inches from the shower floor). This placement ensures it’s the first thing you see and not awkwardly hidden by your shoulders.
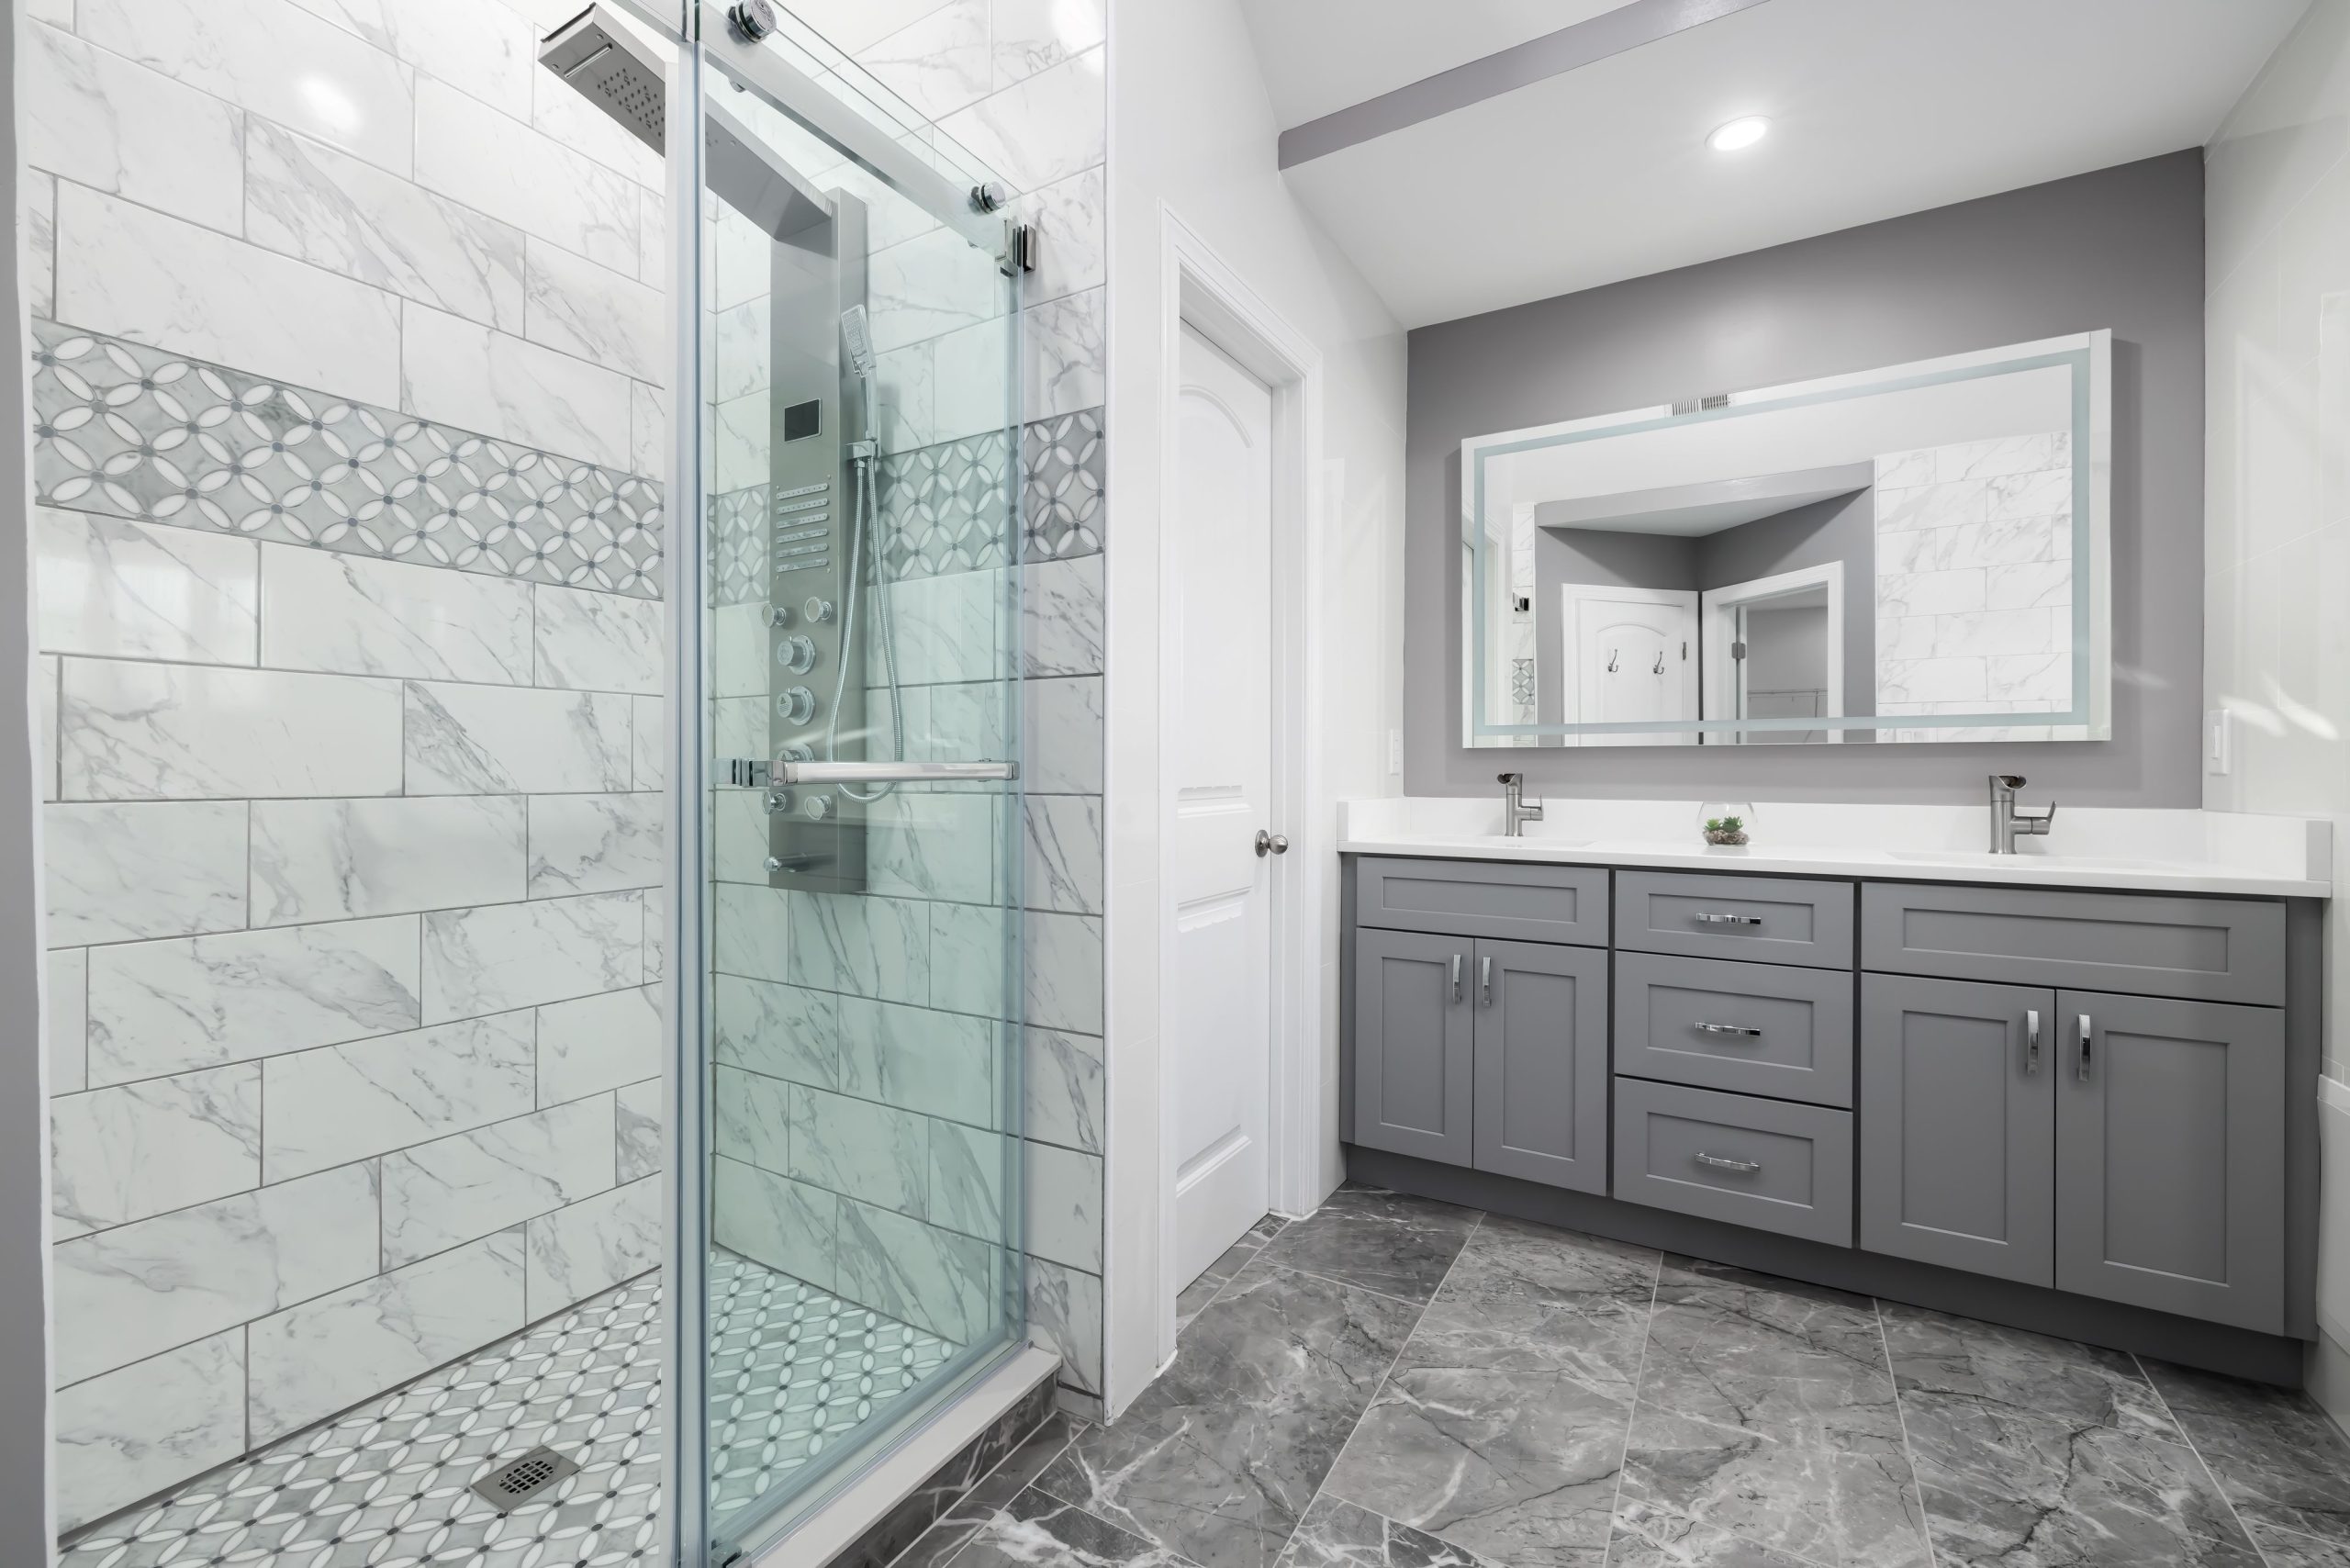
“Love the look but not the price of a full renovation?”
You can get this aesthetic on a shoestring budget. Start with a basic gray vanity from a big-box store like Lowe’s or Home Depot. For the shower, use simple white subway tile, which is incredibly affordable. Then, buy just a few square feet of a pricier geometric mosaic tile for the accent strip—you only need a small amount to make a big impact! Finish with a large, simple mirror from a store like Target or Wayfair; you can even add your own LED strip lighting aound the back for that backlit glow.
13. Midnight Blue Vertical Tiles with a Terrazzo Floor
The vertical orientation of the midnight blue subway tiles is the single most important decision in this design. If these tiles were laid horizontally in a traditional brick pattern, the look would be classic but much more conventional. By stacking them vertically, the design creates strong vertical lines that draw the eye upward, making the wall feel taller and the space more modern and graphic. It’s a simple switch that completely transforms the tile from a background material into a major design statement.
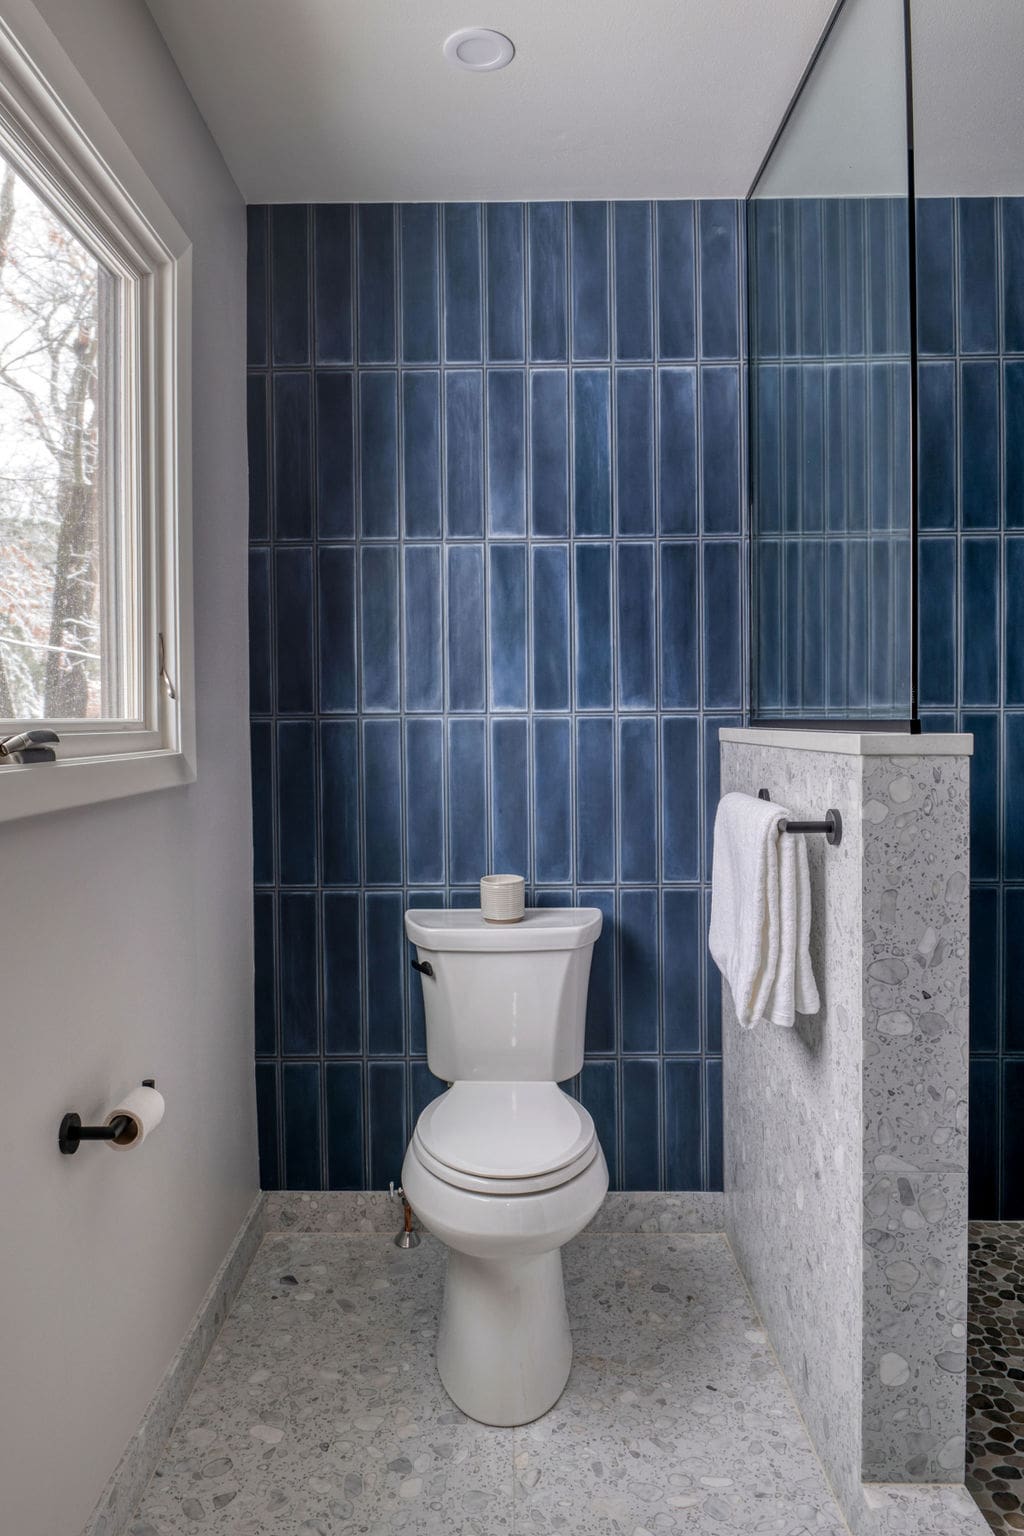
“This bathroom design is a masterclass in using contrast to create visual interest.”
The deep, saturated midnight blue of the glossy tiles provides a dramatic counterpoint to the matte, light gray terrazzo floor. The contrast isn’t just in color but also in finish (glossy vs. matte) and pattern (solid color vs. speckled). The clean white of the toilet and window trim acts as a neutral bridge, keeping the strong opposing elements from clashing. Finally, the matte black hardware adds a sharp, modern punctuation mark.
14. Modern Bathroom with White Honeycomb Tiles and a Dark Wood Vanity
Small honeycomb tiles create a fantastic texture, but the reality is more tiles mean more grout lines. And in a bathroom, grout is where dirt, mildew, and soap scum love to hang out. To keep this look fresh, you absolutely must opt for a high-performance, stain-resistant grout (epoxy or a premium urethane-based one). A medium-gray grout color, rather than white, will also be much more forgiving and will accentuate the honeycomb pattern beautifully without showing every speck of grime. Plan for a weekly spray-down with a pH-neutral cleaner.
“When tiling an entire room with a small, busy pattern like this, you need an element to ground the space and give the eye a place to rest.”
The dark wood vanity does exactly that. But the real pro move is the choice of mirror. Instead of a simple, modern frameless mirror that would blend in, the ornate bronze-toned frame adds a touch of vintage character and warmth. It’s an unexpected element that keeps the modern design from feeling too sterile or one-note. It proves that mixing styles can lead to a more interesting, personalized space.
15. Serene and Simple with a Light Wood Vanity and Backlit Mirror
This bathroom proves that you don’t need bold colors to make a statement. The formula is all about subtle texture and warmth: 50% soft neutrals (the light beige walls and white countertop), 30% natural texture (the warm wood vanity and mirror frame), 10% sleek modernism (the glass shower and chrome fixtures), and 10% sharp contrast (the matte black hardware). The backlit mirror provides a soft, ambient glow that highlights the warmth of the wood, a key part of the serene equation. It feels balanced and calm because no single element is screaming for attention.
“Backlit mirrors look incredibly sleek and provide beautiful, even lighting for your face.”
However, they are not a one-and-done lighting solution. They provide excellent *task* lighting but often fail to illuminate the entire bathroom adequately. You will still need a primary overhead light source (like recessed cans or a central fixture) for general ambient light. Relying solely on the mirror will leave the corners of your room—and especially your shower—feeling dark and gloomy.
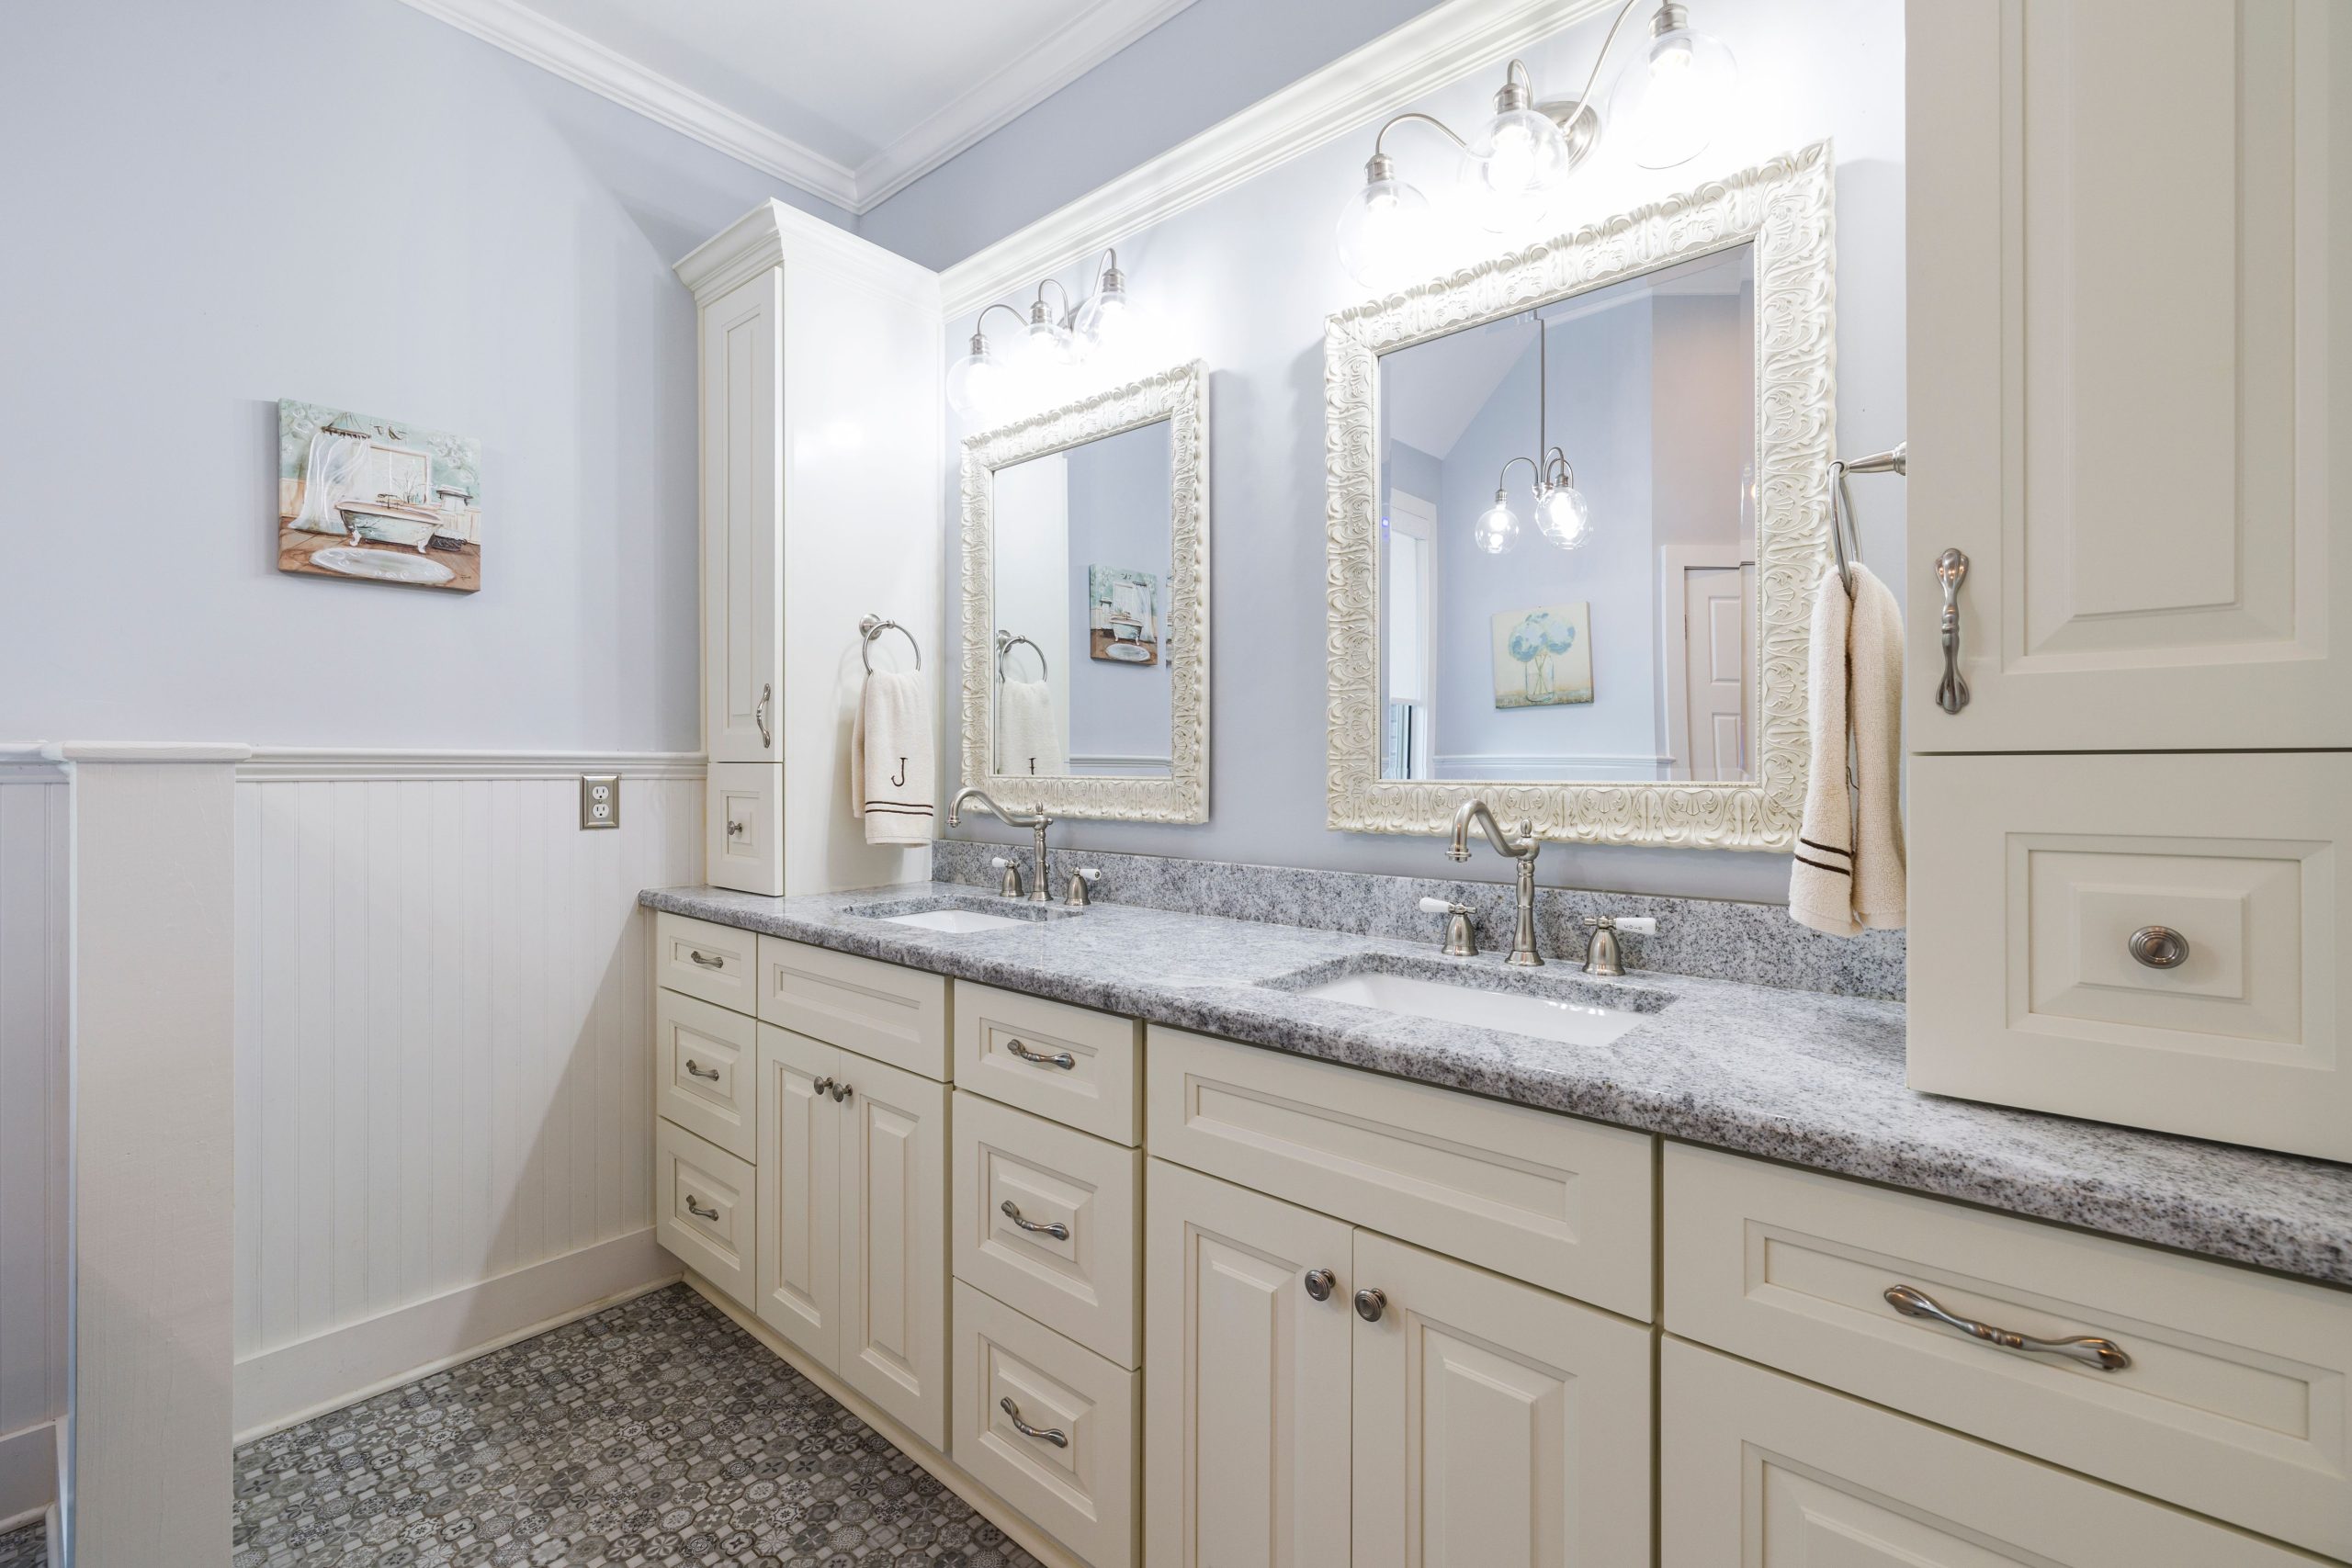
16. Modern Double Vanity with Light Gray Cabinets and Ornate Mirrors
You can absolutely achieve this chic, transitional look without a custom cabinet budget. Start with a stock light gray shaker vanity from a big-box store like Home Depot or Lowe’s—you can often find a 60-inch model for under $1,200, including the top. The real key to elevating the look is the mirrors. Search Facebook Marketplace, thrift stores, or antique shops for a pair of vintage mirrors with interesting frames. A can of dark gray chalk paint ($20) can unify them if they don’t match. Add some quality brushed nickel faucets ($150-$300 for a pair), and you’ve got the entire look for under $1,600.
“This design feels so polished because it skillfully mixes classic and contemporary elements.”
The shaker-style cabinets and the gray-and-white color palette are a timeless, popular choice. However, the ornate, dark-framed oval mirrors inject a dose of traditional elegance and personality. This deliberate contrast—clean, straight lines of the vanity versus the decorative curves of the mirrors—is what makes the design memorable. The simple, modern faucets act as a quiet mediator between the two styles.
17. Textured Stacked Stone Wall with Illuminated Floating Shelves
A stacked stone wall is a heavy-hitter, both visually and literally. Before you fall in love, check these boxes:
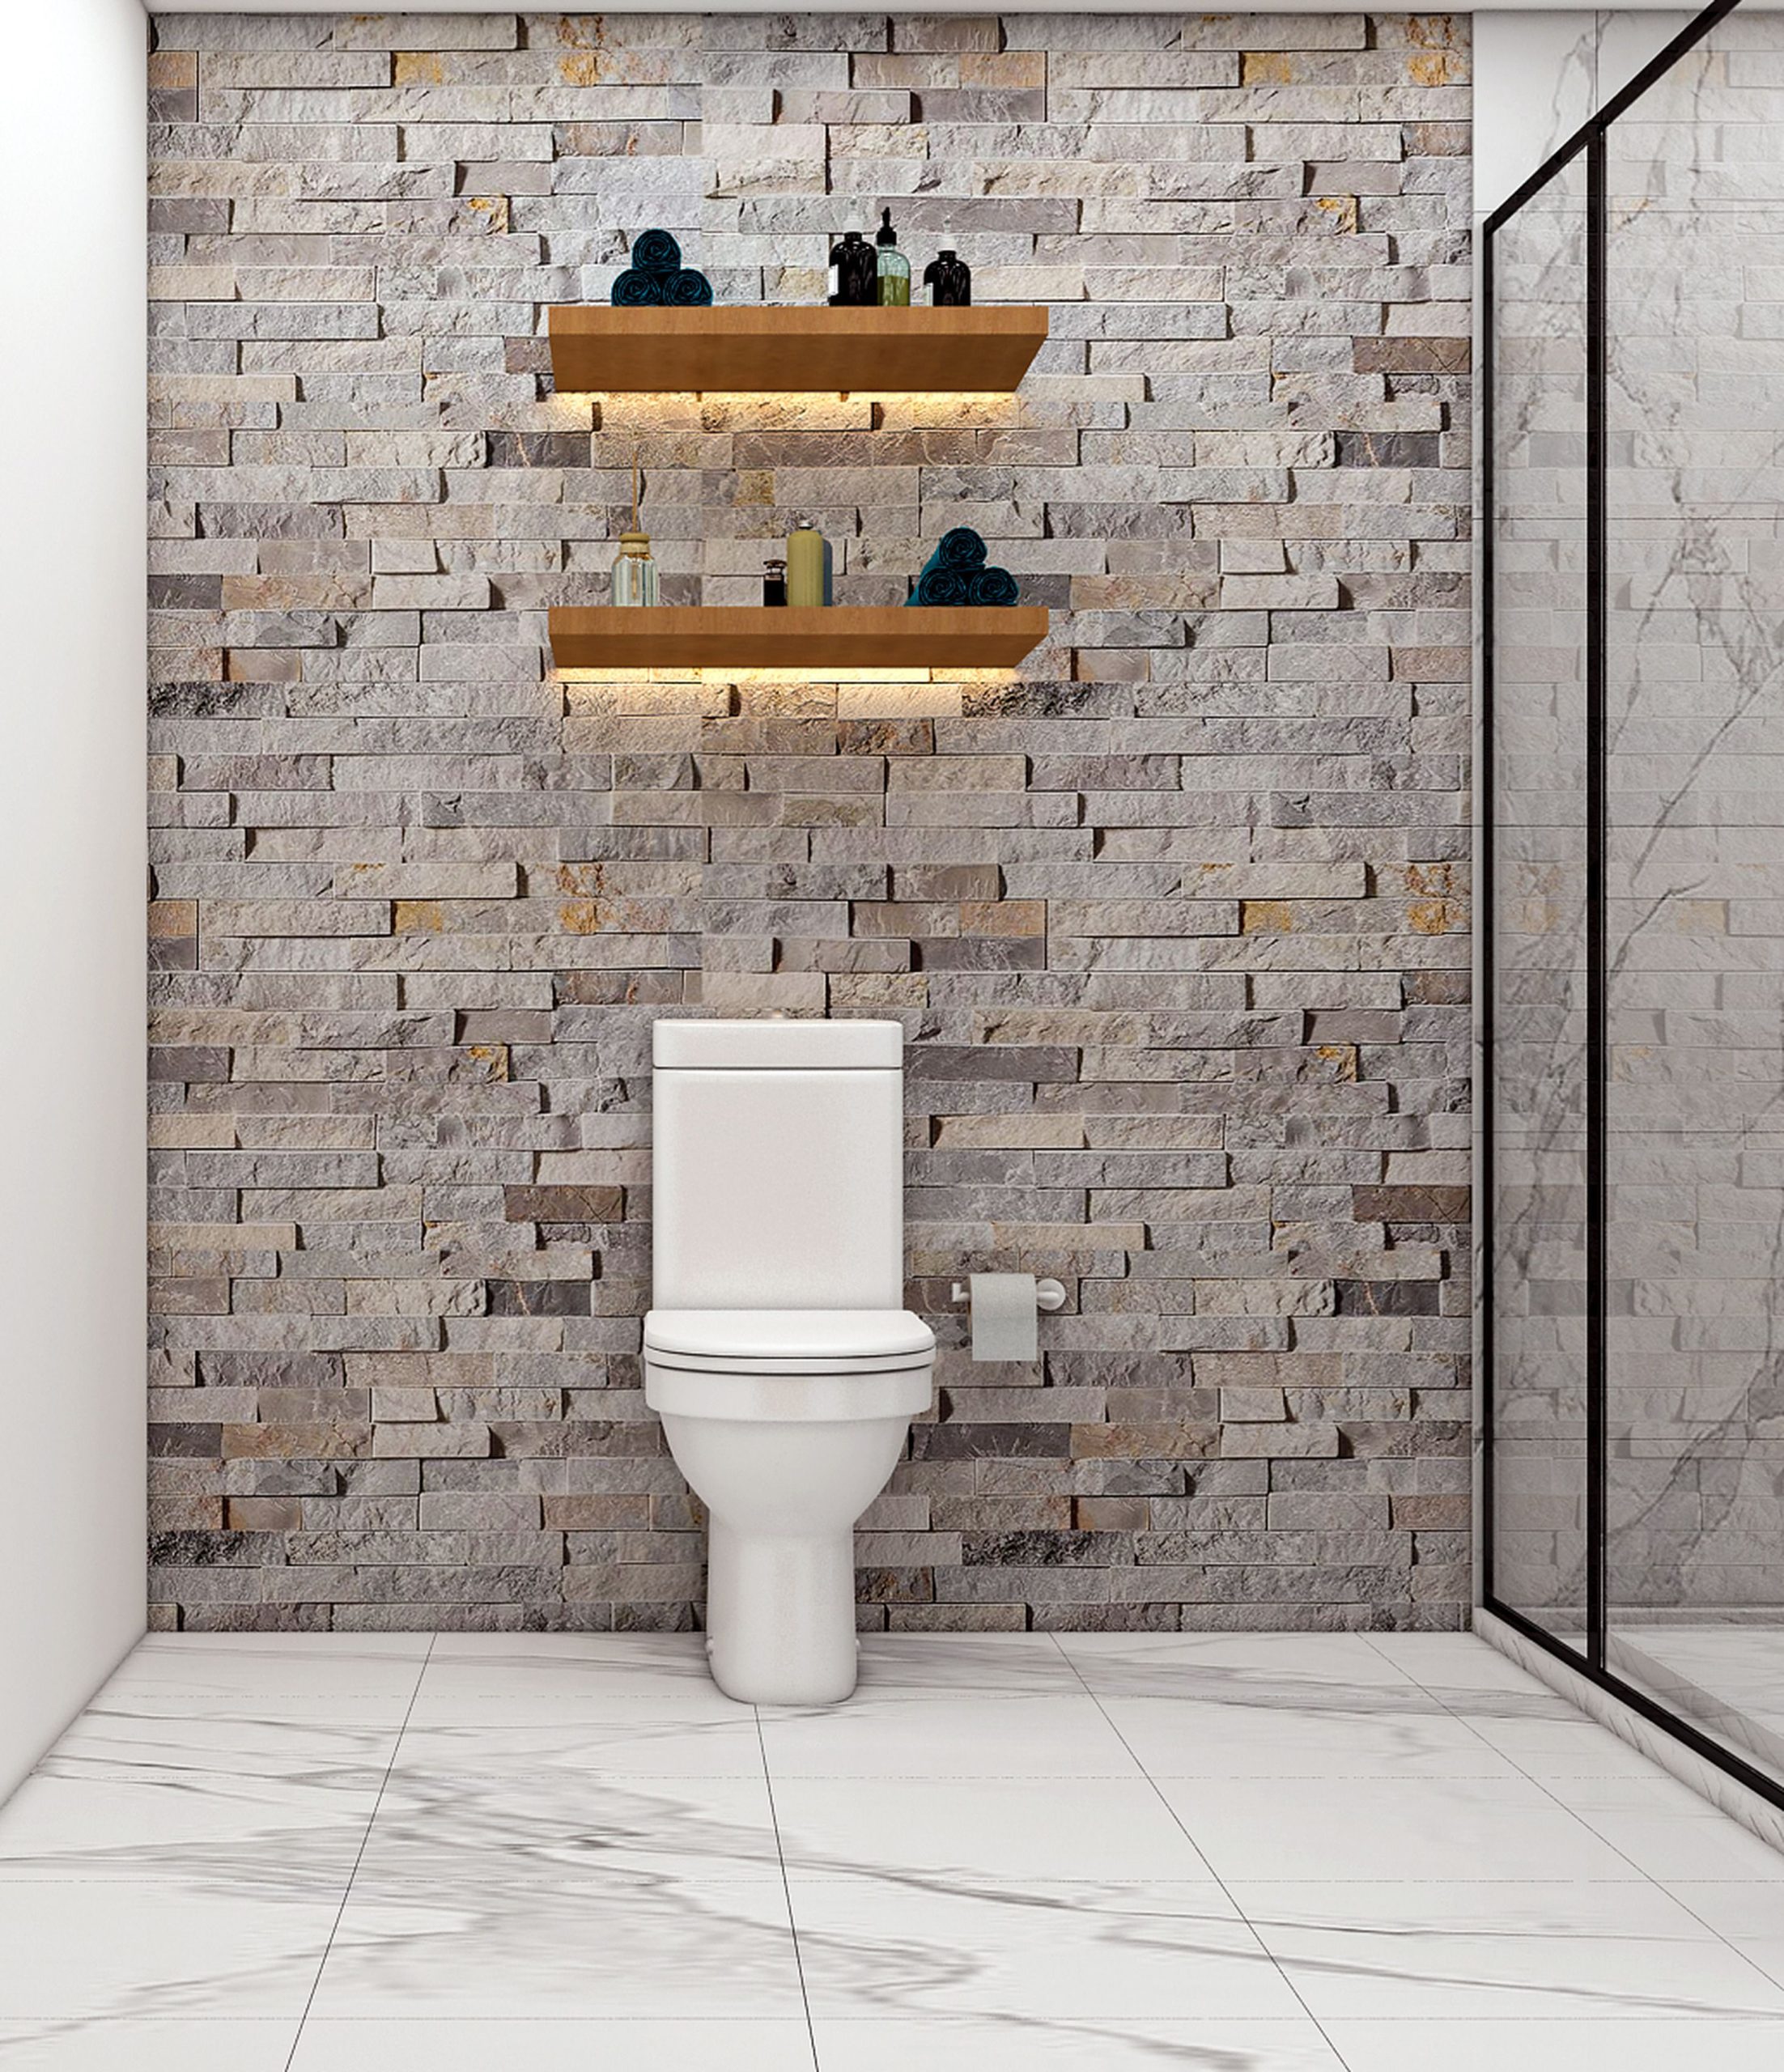
“Wall Structure: Is the wall you’re considering structurally sound enough to bear the weight of natural stone panels?”
Consult with a contractor. Tile versions are lighter but still require proper backer board.
Lighting Plan: To get that beautiful grazing light effect that highlights the texture, you need a plan for electricity. Where will the wiring for the shelf lights run? This needs to be decided before any stone goes up.
Cleaning Consideration: The rough, uneven surface of stacked stone can trap dust and moisture. Are you prepared for the extra cleaning diligence required, especially behind a toilet?
Installing floating shelves so they look seamless and can bear weight requires precision. Here’s a mini-guide for installing them on a standard wall (stone is a pro job!):
- Time: 2-3 hours. Cost: $50 – $200 per shelf.
- Use a stud finder to locate the wall studs where you plan to hang your shelf. Mark them clearly with a pencil.
- Position the shelf’s mounting bracket on the wall. Use a level to ensure it’s perfectly straight. Mark the drill holes over the stud locations.
- Drill pilot holes into the studs.
- Securely fasten the mounting bracket to the wall using the provided screws. It is crucial to anchor floating shelves into studs. Drywall anchors alone are not sufficient for heavy loads.
- Slide the outer shelf onto the bracket and secure it according to the manufacturer’s instructions.
18. Moody & Modern Bathroom with a Full-Width Window
The single element that defines this entire bathroom is the massive, full-width window. In a room dominated by dark gray stone and tile, the window acts as a huge source of natural light, preventing the space from feeling like a cave. It also provides the primary visual feature. The clean lines of the black blinds complement the minimalist aesthetic, while the view outside (even if it’s just sky and trees) brings a necessary touch of nature into the moody, man-made environment. The room would be claustrophobic without it.
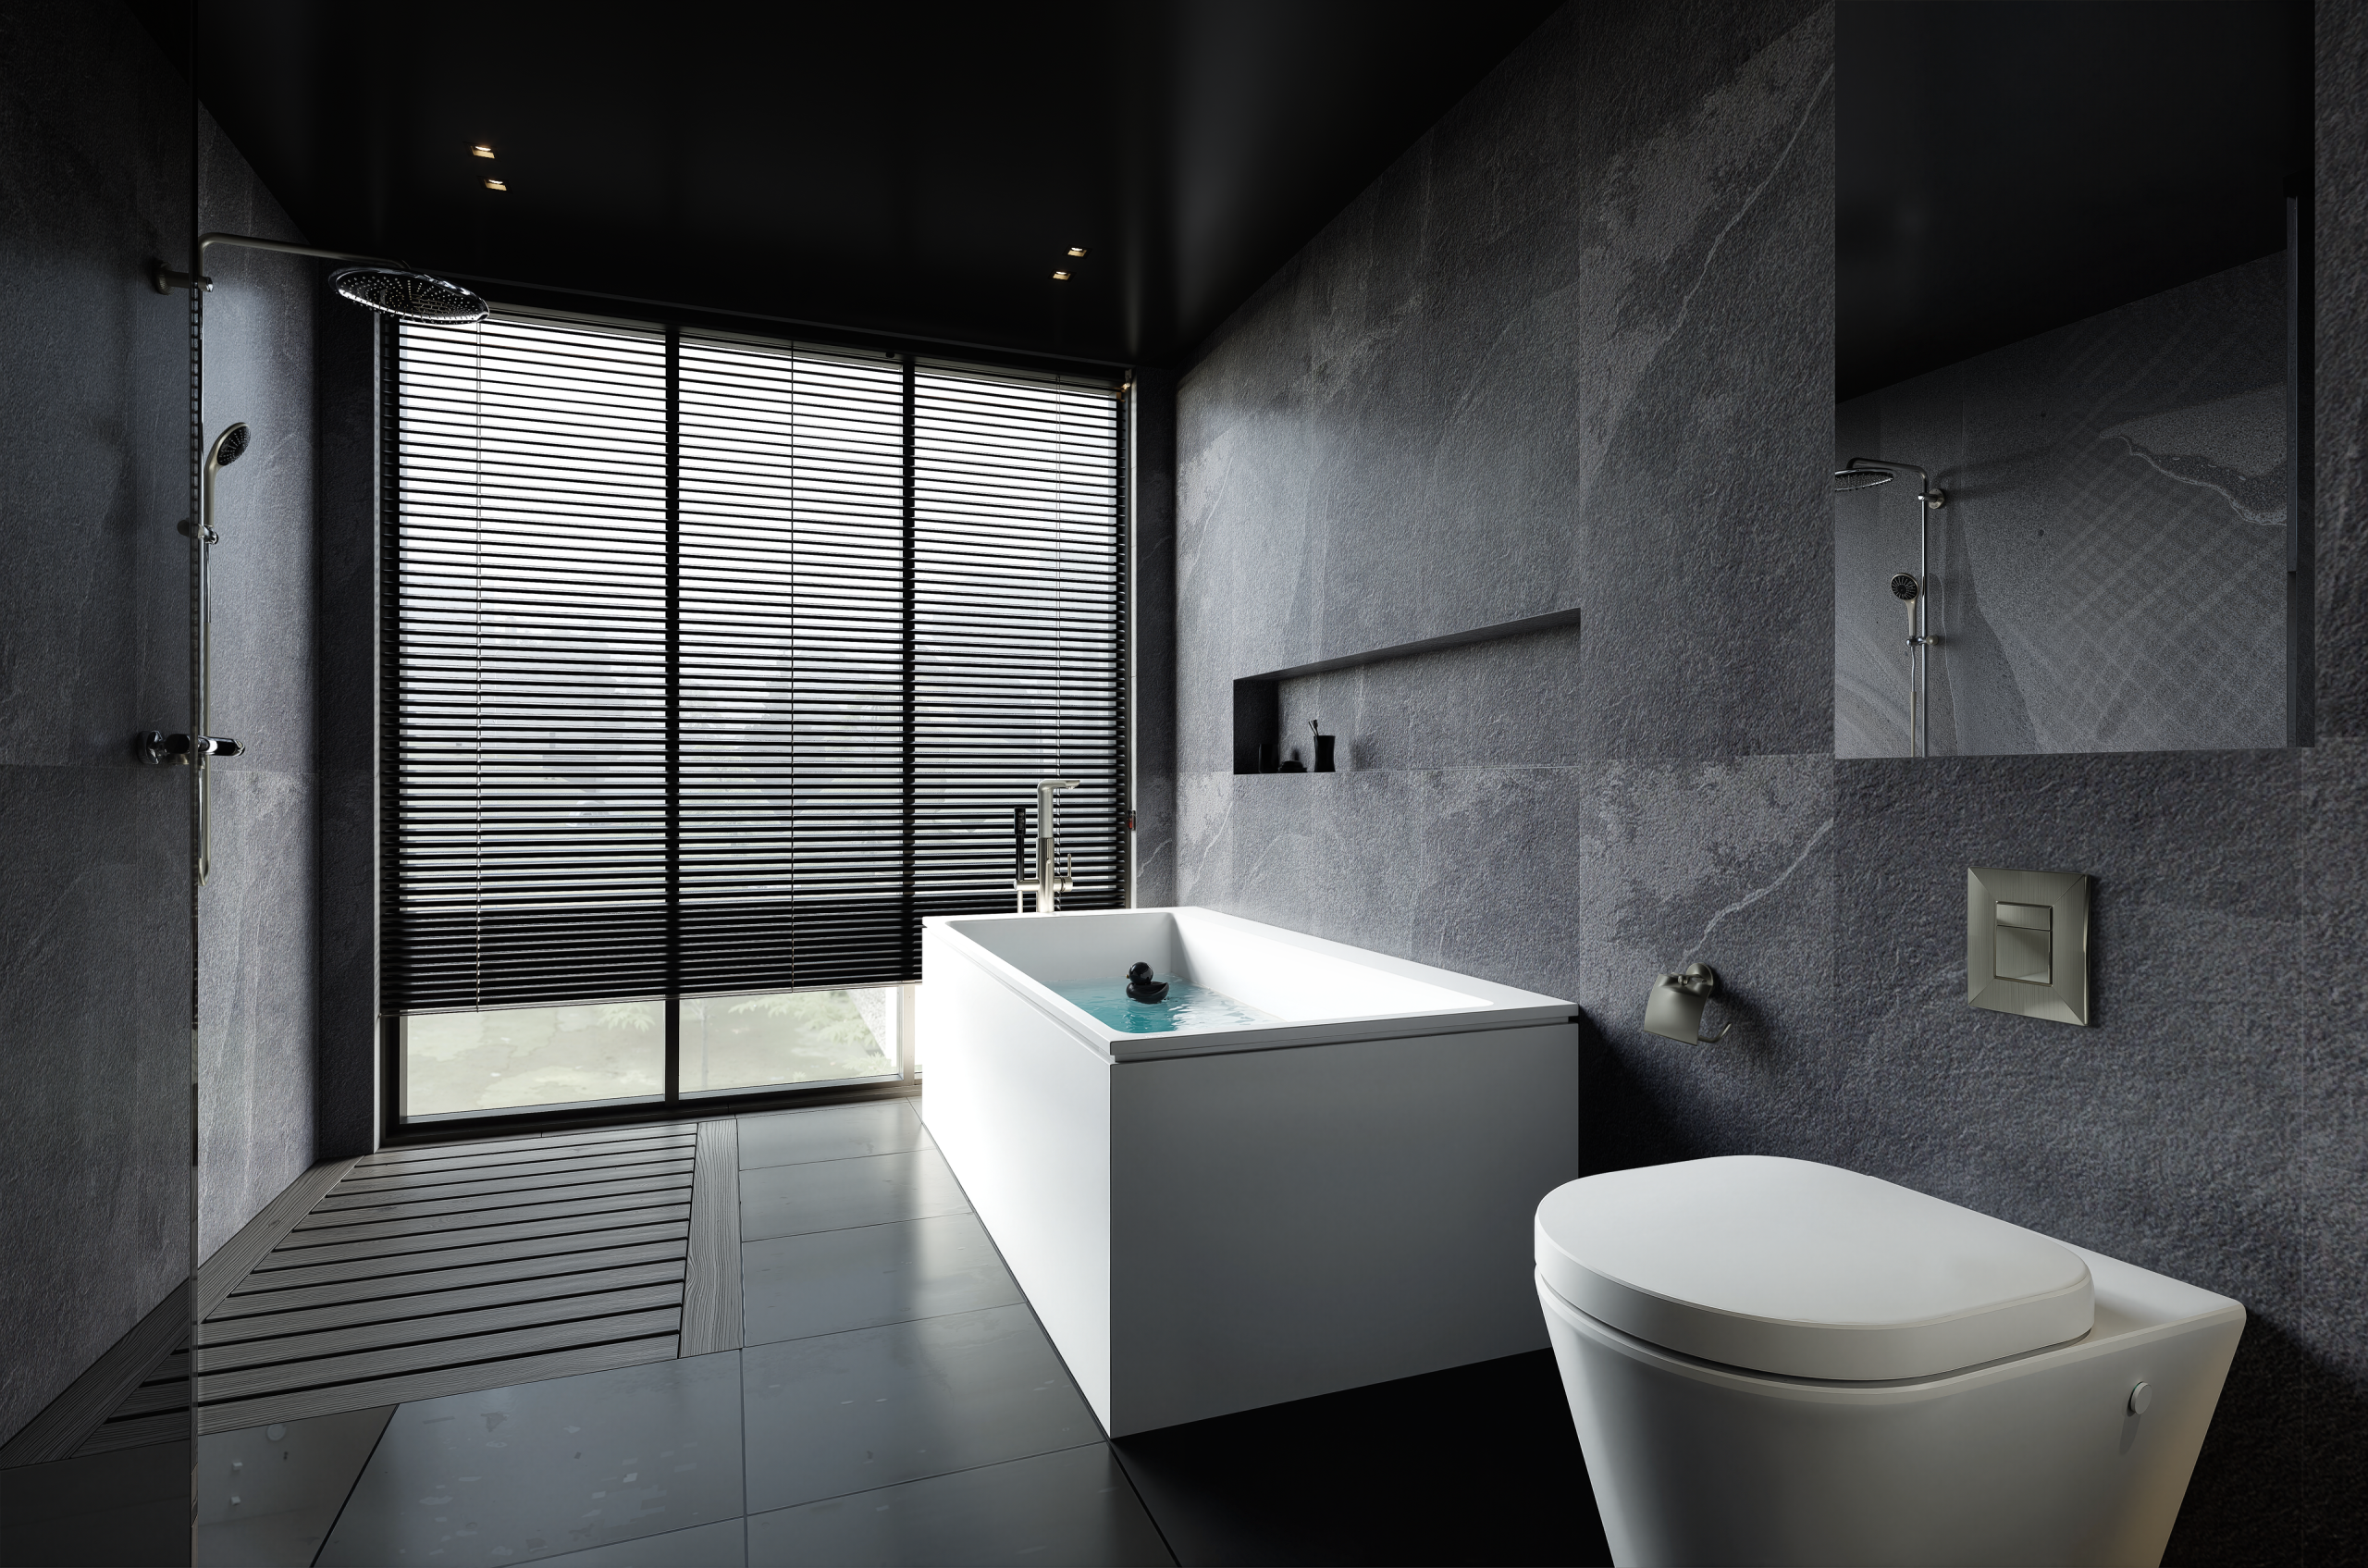
“A dark, moody bathroom like this can be incredibly sophisticated, but it requires one thing in abundance: light.”
The example works because of the giant window. If your bathroom is small or has limited natural light, going this dark on both the walls and floor can create a depressing, cave-like effect. You must compensate with a robust lighting plan: bright, dimmable overhead lights, excellent vanity lighting, and even accent lighting in niches or under cabinets to ensure the space feels intentionally dramatic, not just dark.
19. Minimalist Gray Terrazzo with Black Accents and Greenery
Terrazzo is back in a big way, but this isn’t your grandma’s polished stone. The 2026 version, as seen here, is often a high-quality porcelain tile that mimics the look of terrazzo. It’s popular because it provides pattern and texture in a very subtle, sophisticated way. It’s more interesting than plain gray tile but less busy than a dramatic marble. This modern interpretation, used on floors, walls, and even a vanity, creates a seamless, cohesive look that feels both minimalist and custom-made. It’s a quiet luxury.
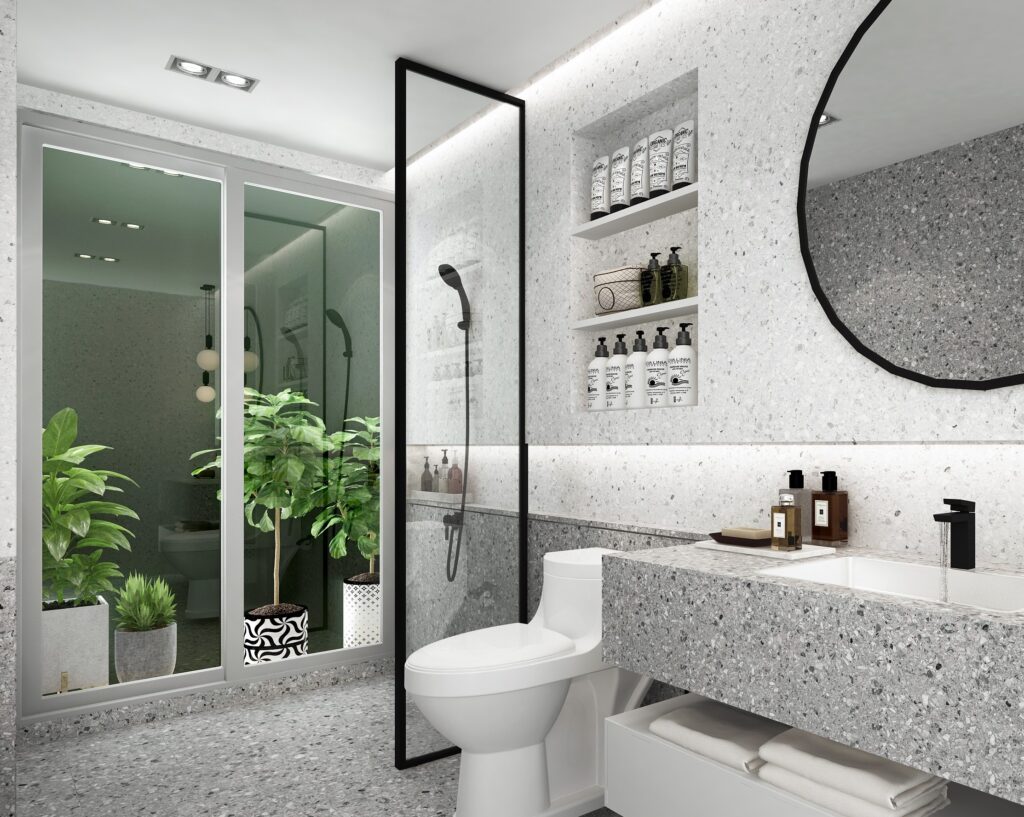
“This design’s fresh and clean aesthetic is achieved through a strict and simple color and shape palette.”
The foundation is uniform light gray terrazzo. Against this neutral backdrop, sharp black lines are introduced through the shower screen frame and the large, round mirror. This contrast is key. The circular shape of the mirror is a brilliant choice, as it breaks up the monotony of the rectangular tiles and straight lines, adding a softer, more dynamic focal point. The pops of vibrant green from the plants breathe life into the minimalist, mineral-heavy space.
20. Opulent Dark Tile Bathroom with an Ornate Gold Mirror
This bathroom’s luxurious, intimate vibe comes from a bold formula: 70% dark, textured surfaces (the basketweave mosaic tiles) + 20% reflective glamour (the gold-framed mirror and brass fixtures) + 10% classic elegance (the white and grey marble countertop). The dark tiles create a dramatic, enveloping mood, while the metallic elements bounce light around the space, creating warmth and sparkle. The marble serves as a necessary moment of brightness, providing a clean surface that balances the intensity of the walls.
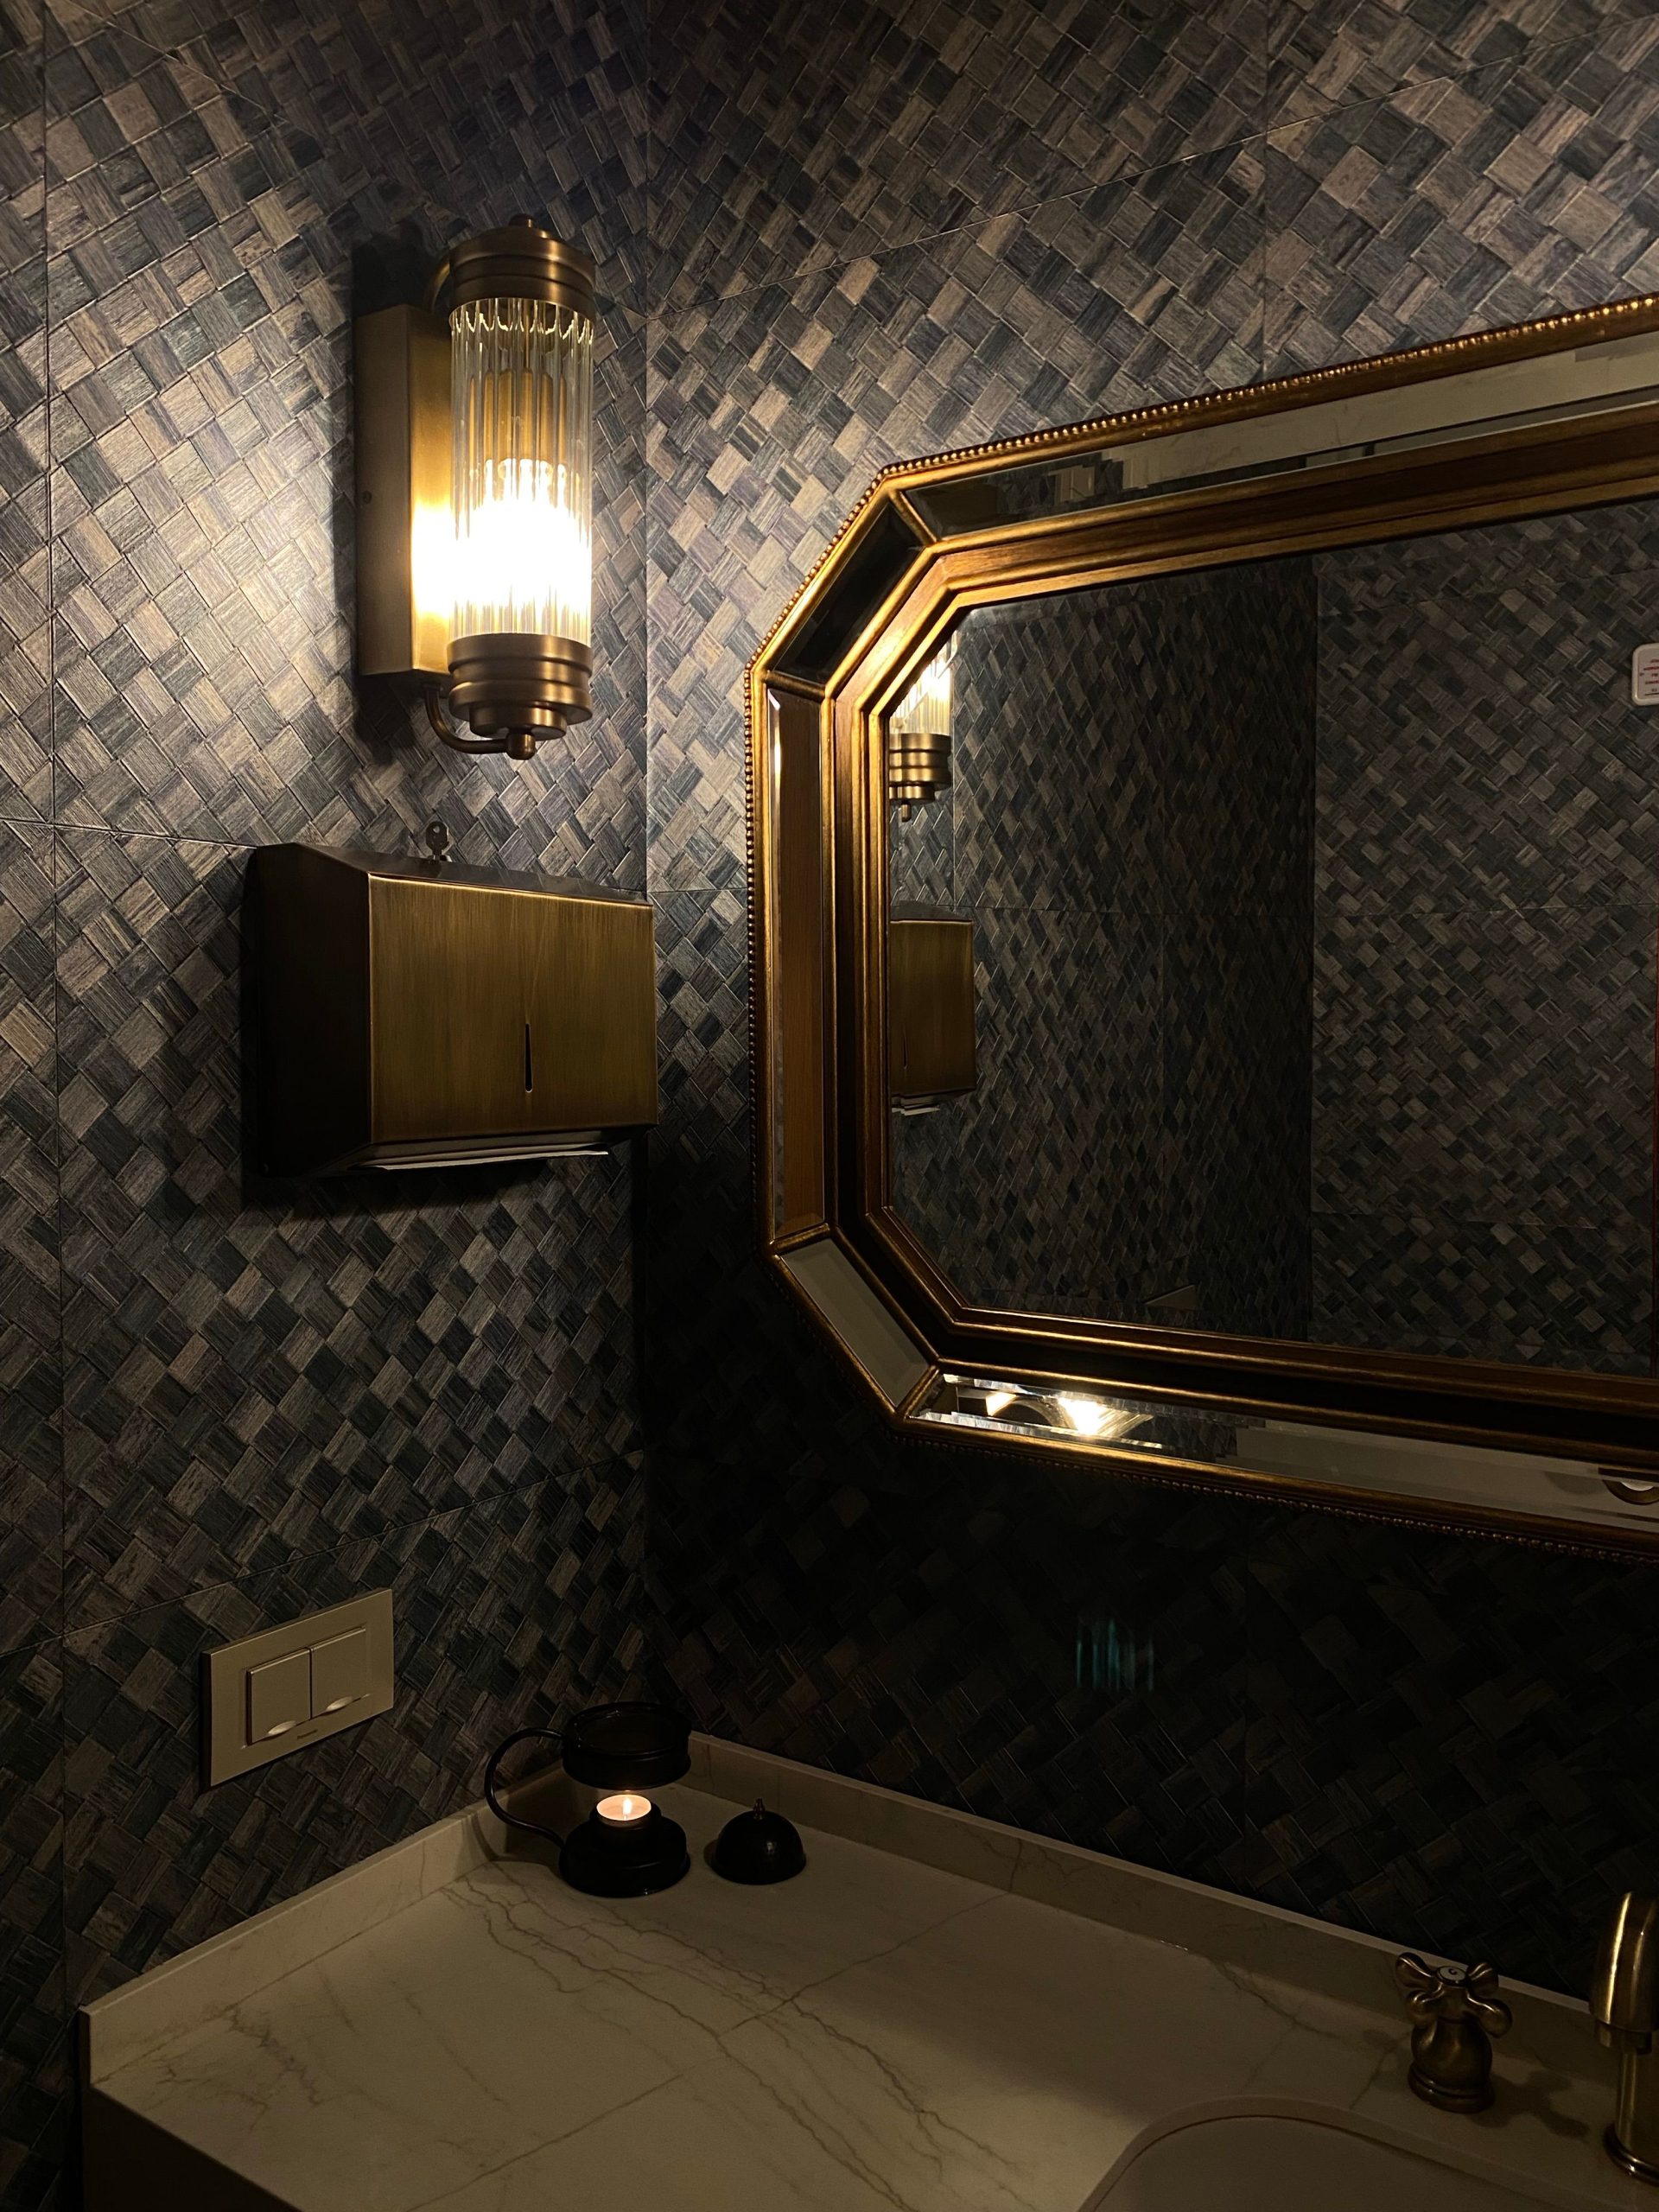
“When creating a dark, moody space, lighting is everything.”
You can’t just rely on an overhead light. The key is to create pools of warm light. Notice the wall sconce here—its fluted glass shade diffuses the light, casting a soft, warm glow rather than a harsh glare. To get this right, use multiple light sources: vanity sconces on a dimmer switch, perhaps a small, dramatic pendant, or even a picture light over a piece of art. Always choose bulbs in a warm white temperature (2700K-3000K) to enhance that cozy, opulent feeling. This is what separates a moody masterpiece from a gloomy basement.
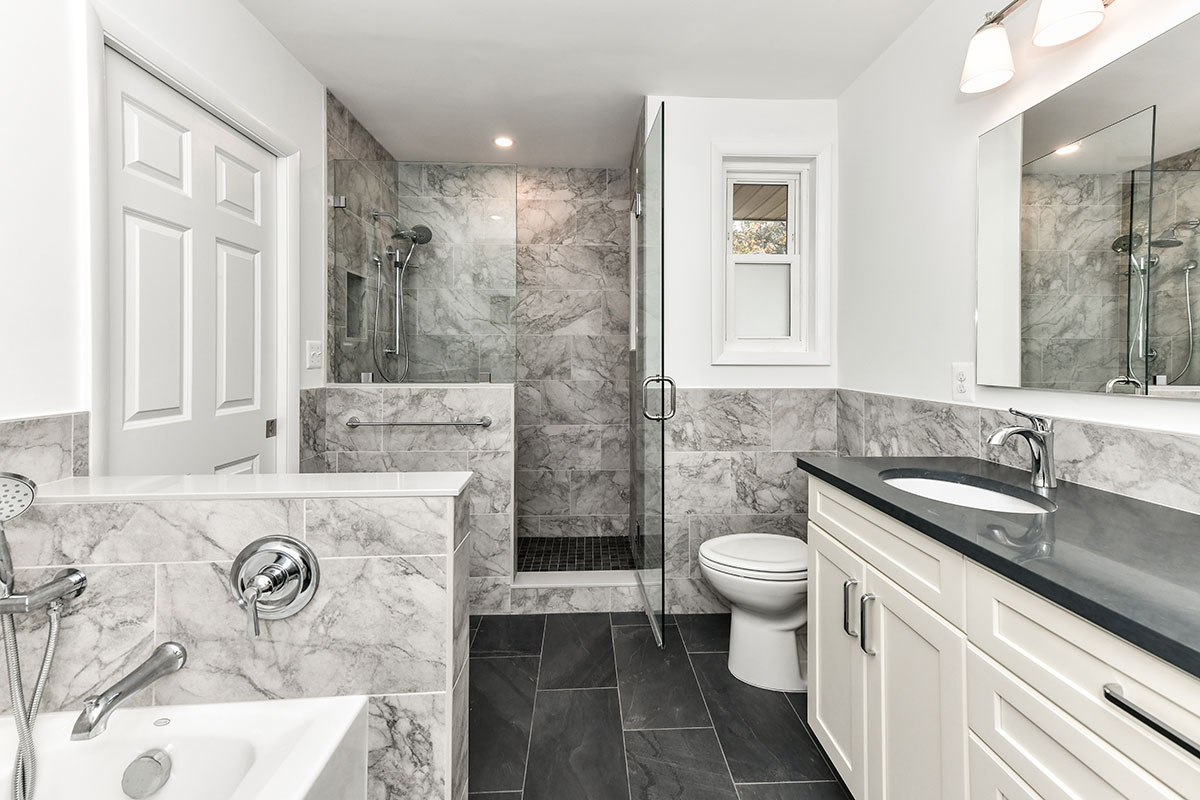
21. Clean & Simple Bathtub with Marble-Look and Wood-Look Tiles
This is a perfect example of achieving a modern, updated look on a practical budget. The key players here—marble-look ceramic wall tile, wood-patterned porcelain or vinyl panels for the tub apron, and a standard white alcove tub—are all widely available and cost-effective. You can find excellent ceramic tile that mimics marble for $3-$8 per square foot. The wood-look panels are a brilliant hack to add warmth and a custom feel without the expense or water-damage risk of real wood. Paired with a simple chrome fixture set, this entire setup can be achieved for a fraction of the cost of a freestanding tub and natural stone.
“While wood-patterned tiles or panels on the side of a built-in tub are a fantastic way to add warmth, be mindful of the transition points.”
The area where the tile floor meets the vertical tub panel and where that panel meets the top edge of the tub needs to be meticulously sealed with a high-quality, mold-resistant silicone caulk specifically designed for kitchens and baths. Check this caulking annually for any cracks or peeling, and re-apply as needed to prevent water from seeping into the structure behind and below the tub.
22. Illuminated Floating Vanity and Striking Gold-Base Tub
This bathroom feels so dramatic and high-tech because of its masterful use of layered lighting. There isn’t one single light source, but several that all serve a different purpose. The backlit smart mirror provides perfect, shadow-free task lighting for the vanity. The under-cabinet lighting on the floating vanity creates a warm glow that makes the unit appear to float, enhancing the sense of space. Finally, recessed ceiling lights provide the overall ambient illumination. This multi-layered approach creates depth, mood, and functionality.
“A glamorous setup with a floating double vanity and a separate freestanding tub requires significant space.”
For this layout, you’ll want a room that is at least 10 feet wide and 12 feet long (120 sq ft minimum). This allows for comfortable clearance around the tub (at least 24 inches on all sides) and ample standing room at the vanity. The floating vanity works best with ceilings that are 8 feet or higher, as the clearance underneath contributes to an airy, open feeling which is lost in a room with low ceilings.
23. Classic Light Blue and White Bathroom with Patterned Floor
This look is a perfect example of the “Transitional” style that remains so popular. It borrows the best from both traditional and contemporary design. The beadboard wainscoting, ornate mirror frames, and cabinet profiles are classic, but the clean lines of the rectangular sinks, the modern brushed nickel faucets, and the geometric patterned floor tile give it a fresh, updated feel. It’s a style that feels comfortable and familiar yet current. It’s a safe bet for resale value because it appeals to a very broad range of tastes—it’s the definition of a crowd-pleaser.
“Achieving this bright and charming look is incredibly budget-friendly.”
The key elements are paint and tile. A gallon of soft blue paint and a quart of crisp white semi-gloss for the beadboard will cost you under $100. Beadboard paneling itself is affordable and can even be a DIY project. The star is the patterned floor tile. Look for ceramic or porcelain versions at big-box stores; you can often find stylish geometric patterns for under $10 per square foot. Pair with a stock white vanity, and you have a high-end look for a low-end price.
24. Elegant Freestanding Tub with Deep Blue and Gold Bird Wallpaper
The single element that transforms this from a simple bathroom into a stunning, jewel-box space is the wallpaper. Without it, you have a white tub on a gray floor against a plain wall—functional, but forgettable. The deep blue and gold bird-patterned wallpaper adds drama, personality, and a sense of bespoke luxury. It serves as an art piece for the entire wall, creating a powerful focal point that everything else in the room serves to complement. It’s what gives the room its story.

“Wallpaper in a bathroom, especially near a tub or shower, requires careful consideration.”
You MUST use wallpaper specifically designed for high-humidity environments. These are often vinyl-coated or made of more robust materials. Even then, ensure your bathroom has excellent ventilation (a powerful, properly vented exhaust fan) to run during and after every shower. For a tub area like this, it’s also wise to install a short tile or stone backsplash (4-6 inches high) along the tub deck to protect the bottom edge of the paper from direct splashes.
25. High-Contrast Minimalism with a Floating Tub
This room’s powerful minimalist aesthetic comes from a strict adherence to a black, white, and wood palette. The large-format white marble-look tiles on the wall create a bright, expansive backdrop. This is dramatically contrasted by the dark rectangular floor tiles, which ground the space. The light wood vanity introduces a crucial element of warmth and natural texture, preventing the high-contrast design from feeling cold or sterile. Finally, the clean lines of the glass shower and freestanding tub keep the silhouette simple and uncluttered.
“This sleek, minimalist look can be achieved across various price points.”
Here’s a general idea:
- Vanity & Mirror (Light wood, backlit mirror): $1,500 – $4,500
- Bathtub (Modern freestanding): $2,000 – $6,000
- Shower (Glass enclosure, fixtures): $2,500 – $8,000
- Tile (Porcelain wall and floor): $3,000 – $9,000 (includes installation)
- TOTAL: $9,000 – $27,500
- Budget Alternative: Use a more affordable vanity from a retailer like Wayfair, opt for a standard tub, and choose budget-friendly ceramic tiles to capture this high-contrast vibe for around 40-60% less.
26. Sage Green Walls with a Dark Wood Vanity and Hexagon Floor
The success of this bathroom’s color scheme lies in its balanced formula of natural tones and graphic patterns. It breaks down to roughly: 40% soft, earthy color (the sage green walls), 30% warm organic material (the dark wood vanity), and 30% graphic black-and-white (the floor tiles, shower tiles, and accent mosaics). This combination works because the green and wood are calming, while the black-and-white elements add a crisp, modern edge without introducing another competing color. It feels both serene and visually interesting.
“A complex floor pattern can be a showstopper, but it’s not a decision to take lightly.”
Here’s a quick checklist:
- Room Size: Is your bathroom large enough for the pattern to be appreciated? In a tiny space, a busy pattern can feel chaotic and make the room look smaller. A simpler layout like in Idea #15 might be better.
- Grout Choice: Have you considered your grout color? A contrasting grout (like the dark gray/black used here) will emphasize the pattern, while a matching grout will make it more subtle.
- Layout Plan: How will the pattern terminate at the walls and vanity? An awkward, chopped-off tile can ruin the whole effect. Plan the layout starting from the center of the room.
27. Industrial Vanity with Exposed Bulb Lighting
This look is a masterclass in embracing raw, utilitarian materials and turning them into a design statement. The dark, mottled metal wall panels and exposed pipe lighting fixture are unapologetically industrial. This raw-ness is cleverly balanced by the clean, smooth, white ceramic of the vessel sinks and the classic shape of the chrome faucets. It’s this tension between the rough, unfinished elements and the polished, refined ones that makes the design so compelling and sophisticated. It feels edgy but intentional.
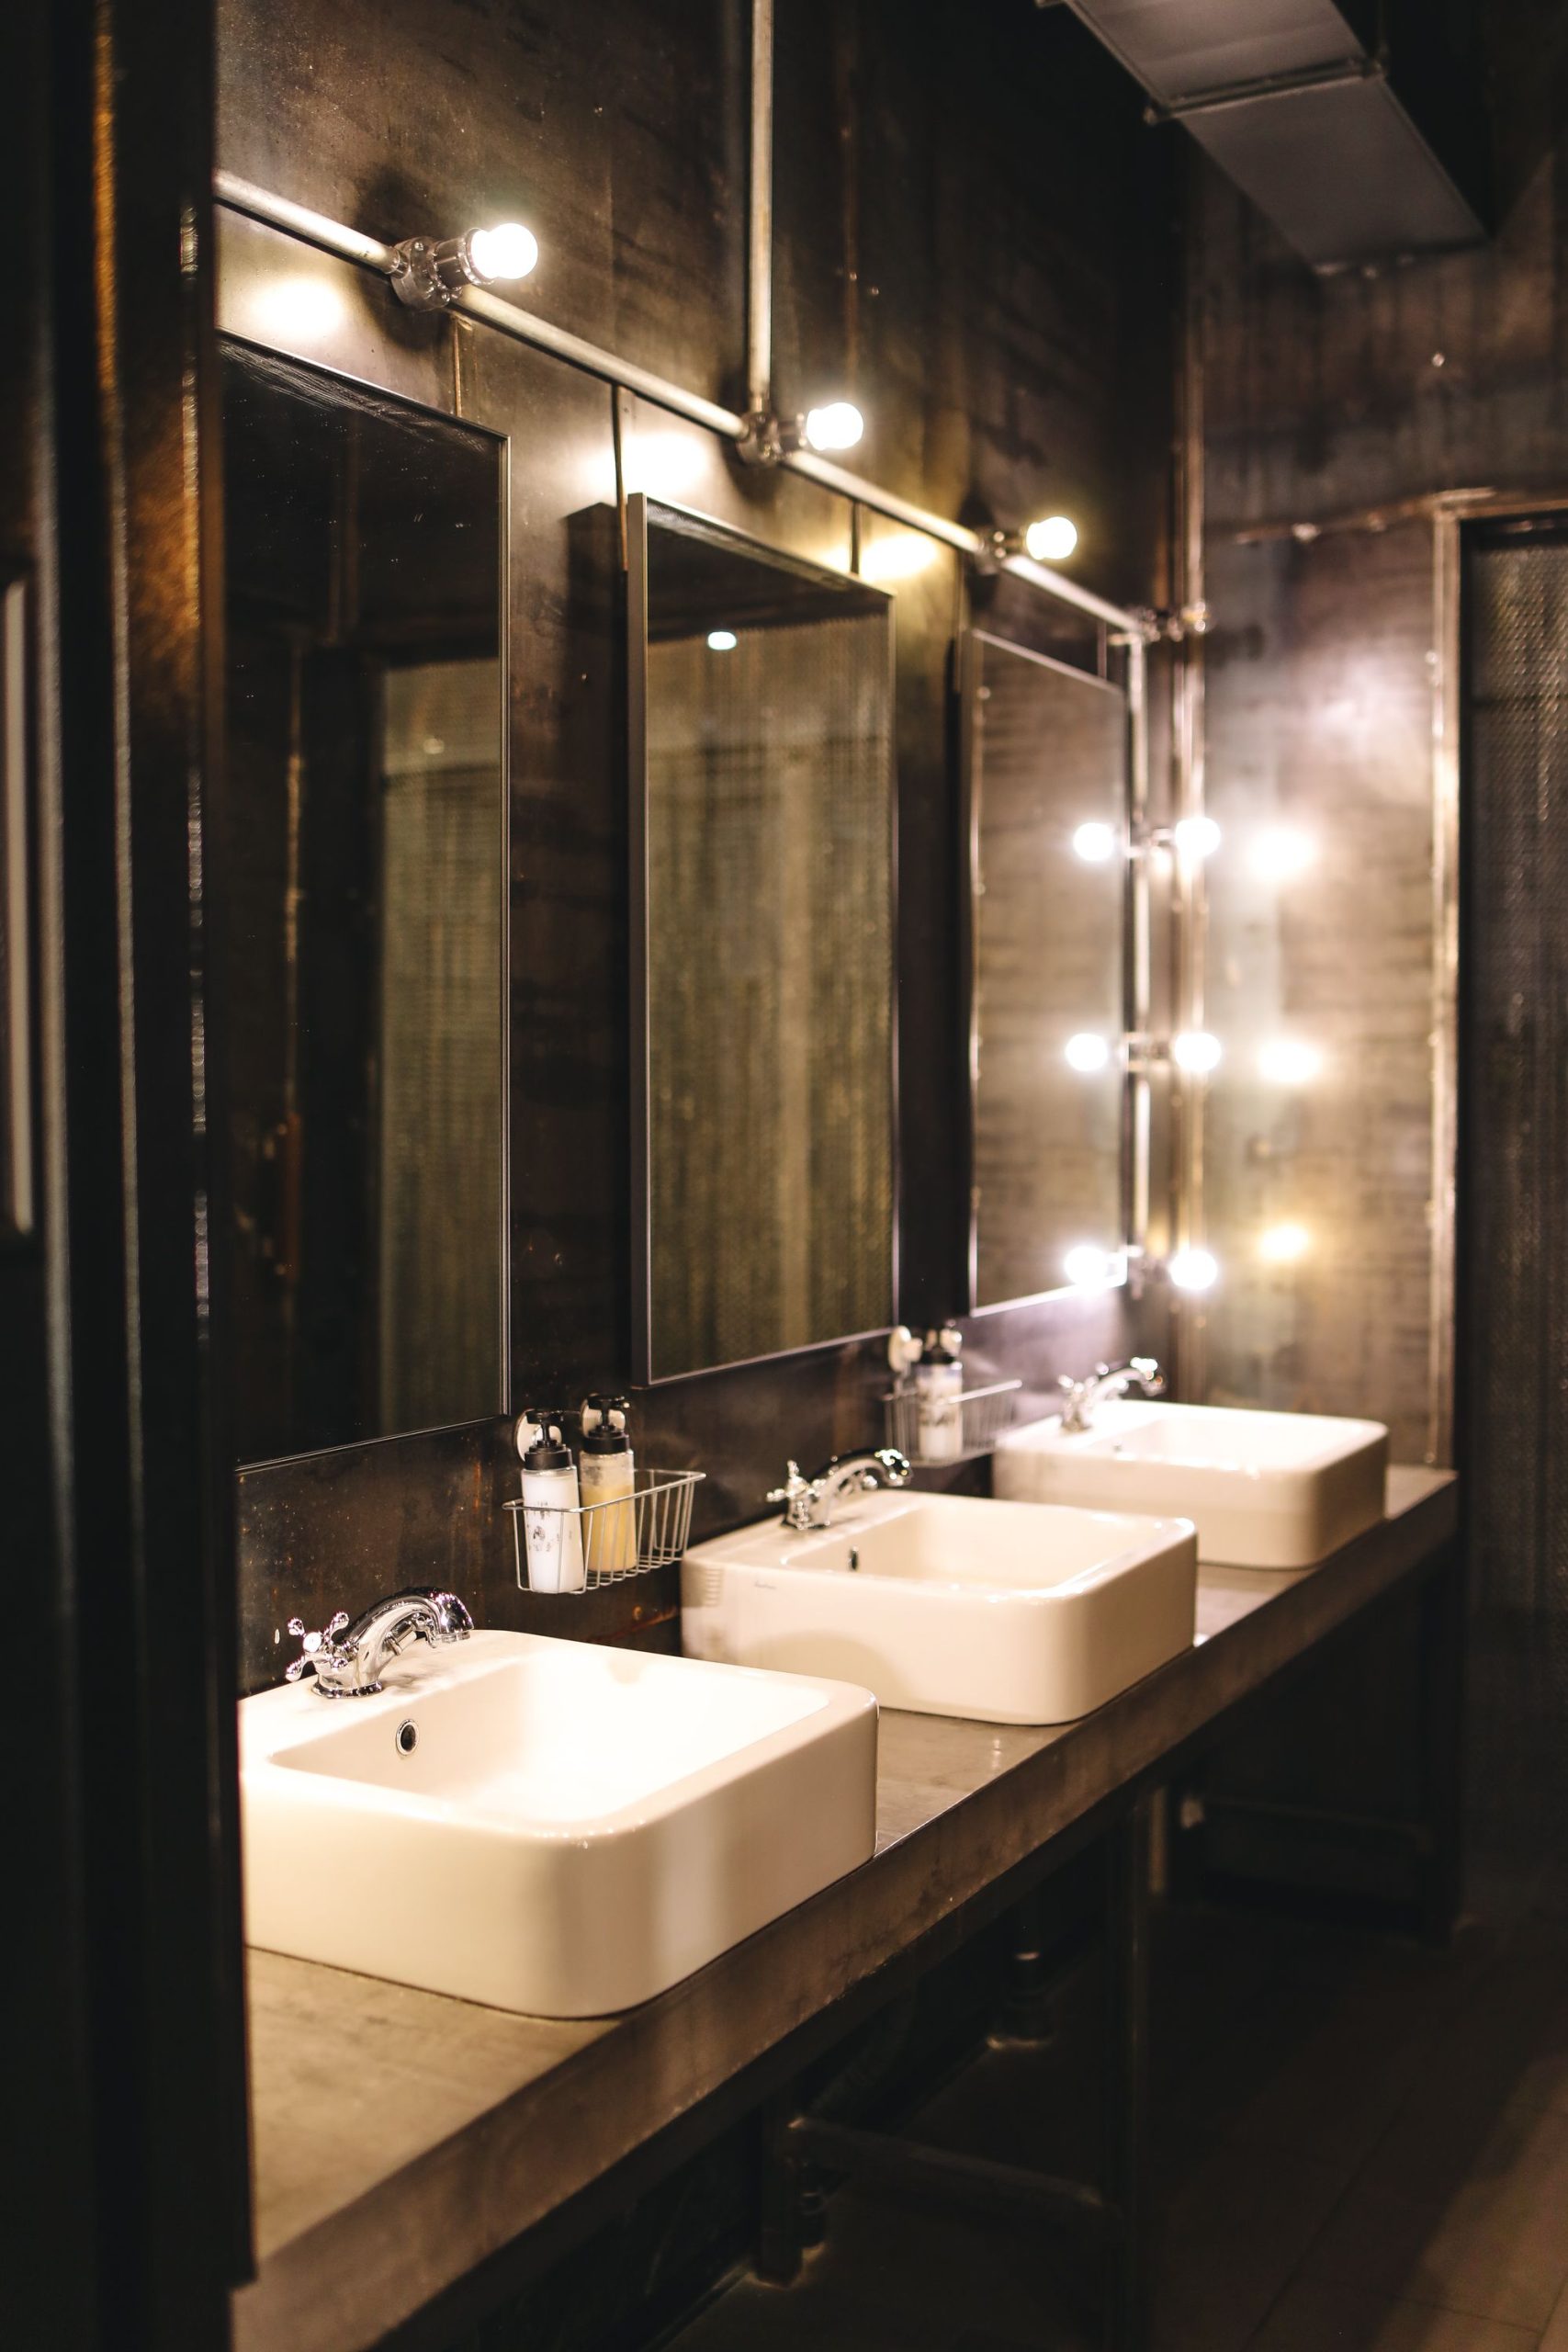
“The open, industrial aesthetic looks amazing, but it comes with a maintenance trade-off.”
Those exposed bulb fixtures are major dust collectors. Similarly, the open wire basket storage, while looking cool and airy, means all your toiletries are on display and can contribute to a cluttered look if not kept tidy. The dark metal walls will show water spots and fingerprints more readily than tile, requiring frequent wiping with a microfiber cloth to keep them looking sharp. This is a high-style, higher-maintenance choice.
28. Compact and Modern with Gray Tiles and Teal Accents
In a compact bathroom, every inch counts. This design uses several smart tricks to maximize the feeling of space. First, the wall-mounted toilet. By lifting the tank off the floor, it creates an unbroken floor line, which is a powerful visual trick to make a small room feel larger. Second, the large mirrored cabinet. It not only provides hidden storage but also bounces light around the room and reflects the space, creating an illusion of depth. When space is tight, think vertically and reflectively.
“This is an excellent design solution for a small or narrow bathroom, particularly one under 60 square feet.”
The layout, which places the tub, toilet, and sink all along one wall, is a common and highly effective way to maximize a long, rectangular space. It leaves a clear and functional corridor for movement. The use of a built-in tub with a shower is far more space-efficient than a separate tub and shower, which would be impossible in a room of this size. This design proves you don’t need a huge footprint to have a fully functional and stylish bathroom.
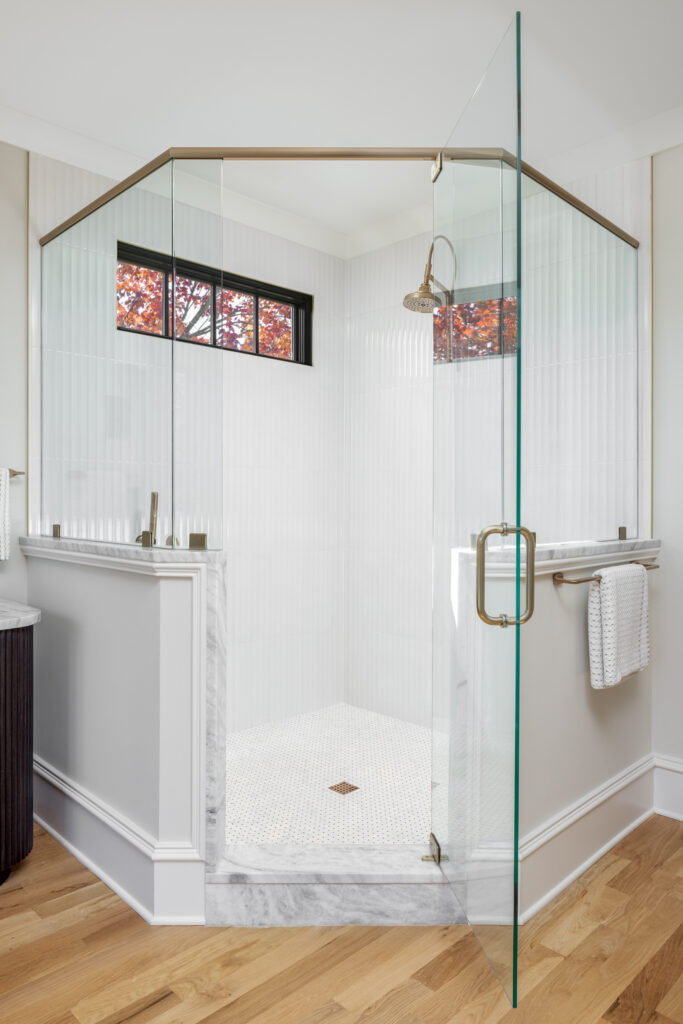
29. Bright Glass Shower with White Fluted Tiles and Brass Fixtures
The single element that gives this shower its unique, high-end character is the white fluted wall tile. Standard subway tile would have been fine, but the three-dimensional, reeded texture of the fluted tile takes it to another level. It plays with light and shadow, creating subtle vertical lines that add depth, texture, and a touch of Art Deco glamour. It’s a sensory detail that you not only see but can also feel, making the shower experience feel much more luxurious and custom.
30. Modern Bathroom with Gray Tiles and Purple Vanity
You might think a purple vanity would be a risky choice, but here it works beautifully because it adheres to a key color theory rule. The purple used is a dusty, grayed-out version of the color, not a vibrant, pure purple. This muted tone has the same cool undertones as the gray subway tile and the dark wood-look floor, so it feels like it belongs to the same color family. It provides a delightful pop of personality without clashing with the neutral surroundings. It’s a sophisticated, not shocking, use of color.
“If a custom purple vanity isn’t in the cards, you can easily get this look with a bit of DIY.”
Buy an unfinished wood or a simple white vanity from a home improvement store. Then, head to a quality paint store and find a sample of a dusty, grayish purple you love. With proper prep—a light sanding and a good primer—you can paint the vanity yourself in a weekend. This is a fantastic way to get a high-end, custom-color look for little more than the cost of a basic vanity and a can of paint.
31. Chic Bathroom with Swan Wallpaper and a Green Floating Vanity
When you have a bold, graphic wallpaper like this, the key is to not let other elements compete with it. Notice how the arched mirror has a simple, thin black frame that echoes the black in the swan pattern without adding more fuss. The green of the vanity is a solid block of color, and the countertop is plain white. The sconces are simple clear glass and brass. If the mirror were ornate or the countertop heavily veined, the whole look would feel chaotic. Let your statement piece make its statement, and have everything else play a supporting role. See how this compares to the more subdued use of green in Idea #4.
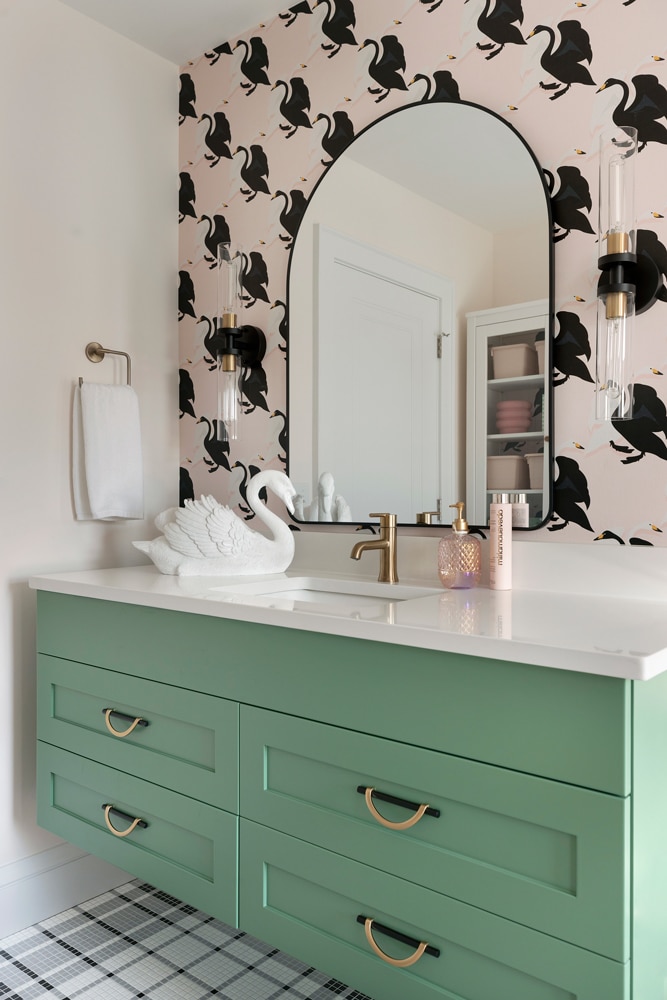
“Swapping out basic builder-grade vanity hardware for unique pulls is a power move.”
Here’s a quick guide:
- Time: Less than 30 minutes. Cost: $5 – $20 per pull.
- If your current drawers have single-hole knobs, you’re in luck. Just unscrew the old knob from inside the drawer.
- If you have pulls with two screws, measure the center-to-center distance before you buy new ones to avoid drilling.
- For these cup pulls, which require two screws, a hardware template is your best friend. It helps you mark the drill locations perfectly every time.
- Place the template, mark your holes, drill, and then screw in your new pulls from the back. It’s an instant upgrade!
Your Personal Sanctuary Awaits
Creating a primary bathroom you love is about more than just following trends; it’s about designing a space that makes your daily routines feel a little more special. Whether it’s a full remodel or a simple hardware swap, the perfect update is within reach. Take these ideas, check out your Pinterest boards, and start planning the sanctuary you deserve.