You know that feeling when you finally find the DIY decor project that looks exactly right for your space, only to realize the tutorial requires a woodshop and a trust fund? It’s a special kind of Pinterest-induced heartbreak. After filtering through hundreds of options across Dollar Tree, Michaels, and Hobby Lobby, we narrowed it down to 29 ideas that actually deliver high-impact style on a tiny budget. Inside, you’ll find 29 curated projects covering every major style from rustic farmhouse to modern and bright. We’re finding that in 2026, the desire for a personalized, unique home is intersecting with a need for budget-conscious solutions, making clever DIY the ultimate design power move. And stay until the end — we break down the most common mistakes that can ruin these looks.
📌 Save this to Pinterest for later — you’ll want to revisit these ideas.
1. Survey the Scene: Planning Your Holiday Haul
The sheer variety of holiday goodies hitting the shelves is a testament to one of my favorite trends: celebrating seasons enthusiastically without spending a fortune. People are craving that cozy, festive feeling more than ever, and stores have responded with surprisingly chic options—if you know what to look for. The key is to treat it like a treasure hunt. Woven baskets, classic gold and red ornaments, and simple garlands are the building blocks of a high-end look, all waiting in these aisles.
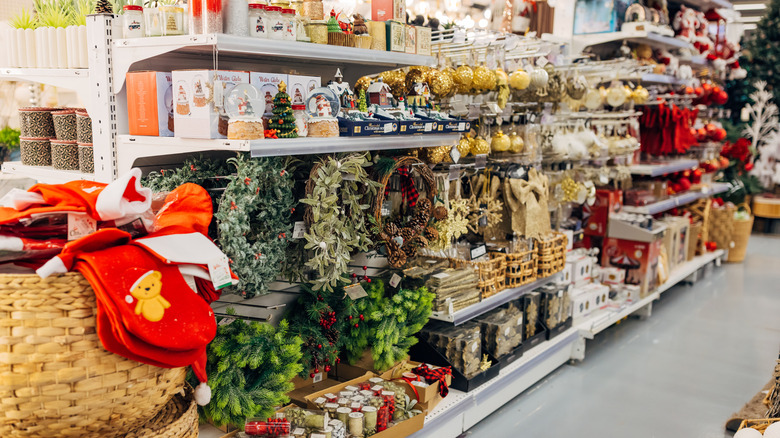
“Before you even grab a cart, a little prep work saves you from buying things you don’t need.”
A quick audit at home can make your shopping trip ruthlessly efficient. Measure Your Spaces: Know the exact length of your mantel, the height of your entryway table, and the width of the door you plan to hang a wreath on.Color Palette Check: Decide on your 2-3 main holiday colors before you shop. It keeps you focused and ensures everything works together.Inventory Existing Decor: Do you already have a box of ornaments? Great. Maybe you just need some new ribbon and filler items to make them feel fresh.
2. Craft a Whimsical Owl & Pumpkin Wreath for Fall
Assembling a wreath like this is a perfect weekend project that looks way more expensive than it is. The secret is layering textures for a lush, full look.
- Time: 45 minutes / Cost: Approx. $15
- Start with a basic grapevine or foam wreath form from the craft store.
- Use a hot glue gun to attach faux fabric flowers (in shades of orange and cream), covering about 80% of the form.
- Create a focal point by securing a charming burlap owl and a glittery pumpkin accent off-center.
- Fill in any gaps with smaller elements like faux leaves or a wooden acorn.
- Attach a loop of twine or ribbon to the back for hanging.

“The visual harmony here is all about a balanced recipe.”
Think of it as 60% Soft Florals (the cream and orange flowers) + 30% Rustic Texture (the burlap owl and woody acorn) + 10% Sparkle (the glitter on the pumpkin and acorn). You could easily swap the owl for a small bird or the pumpkin for faux apples, and as long as you keep that 60/30/10 ratio of textures, the enchanting, cozy vibe will remain.
3. Style a Luxe Holiday Mantel with Gold, Plaid, and Poinsettias
This arrangement feels so classic and warm because it masterfully mixes scale and texture. The oversized, ornate gold ornament acts as a stunning anchor piece, its metallic sheen contrasting beautifully with the rough, earthy texture of the brick fireplace. The plaid bow introduces a touch of pattern and tradition, connecting the gold to the festive red of the poinsettias. Stacking the plant on decorative gift boxes is a clever designer trick to add height and create visual layers, making the whole display feel more dynamic and full.

“The single most important element here is the large-scale gold ornament.”
If you took it away, you’d be left with a nice but fairly standard holiday plant display. The ornament is what adds the drama, the hint of luxury, and a strong focal point. Its exaggerated size is unexpected and turns a simple collection of festive items into a deliberate, styled moment. It proves that sometimes, one great, bold piece is all you need to make everything else sing.
4. Embrace a “More is More” Christmas Tree aesthetic
To get that professionally decorated, ultra-full look, the secret is wired ribbon. Buy it in wide spools (2.5 inches or more). Don’t just wrap it around the tree. Instead, cut it into 12-16 inch strips, pinch one end, and tuck it deep into the branches. Create a billow and tuck the other end in. By using dozens of these individual pieces, you can fill gaps and create cascading effects that look incredibly lush. Start with the ribbon before you hang your most precious ornaments.

“Let’s be honest: a tree this heavily decorated is a commitment.”
It can take hours, even a full day, to get it just right. It also requires a *ton* of ornaments, which can get chaotic if you don’t stick to a loose color story. A tree this dense might also not be the best choice for homes with curious toddlers or cats who see it as the ultimate climbing toy. The teardown in January is also a significant project. But for that jaw-dropping holiday look? It’s worth it.
5. Create an Eclectic Faux Succulent and Terrarium Display
The beauty of a display like this is its longevity with minimal effort. Faux succulents have gotten incredibly realistic. The main task is dusting. About once a month, use a soft paintbrush or a can of compressed air to clean the leaves and crevices where dust collects. If you place them in a spot with intense, direct sunlight, the colors can fade over a year or two. To prevent this, rotate their position every few months or keep them in bright, indirect light. That’s it—no watering, no soil, no stress.

“You can get this entire look for under $20.”
The key is shopping smart. Dollar Tree is your first stop for faux succulents, twine, and even the glass sphere terrariums (they often have them in the craft or floral section). For the cloche and ceramic pieces like the swan planter, check out thrift stores or Facebook Marketplace. Someone is always getting rid of wedding decor, and glass cloches are a common item. You don’t need to buy it all at a home decor store.
6. Arrange Cheerful Aqua Glass Jars with Simple Greenery
This simple arrangement works so well because of the power of repetition and subtle variation. Your eye doesn’t just see one jar; it sees a collection. Using jars of the same color family (aqua and green) creates a cohesive look, while the slight differences in shape and texture add interest. The choice of tiny white blossoms and leaves is also key—it’s delicate and doesn’t overwhelm the beautiful colors of the glass itself. It’s a lesson in how grouping small, inexpensive items can create a much larger visual impact.

“An idea this delicate is all about context.”
It’s perfect for a narrow space where it won’t get lost. Think a bathroom vanity, a small floating shelf in a bedroom, or a kitchen window ledge. It requires a surface at least 12 inches wide to accommodate the tray. Because the elements are small, this wouldn’t work as a centerpiece for a large dining table; it would just look dwarfed. It’s a small-scale moment of joy, perfect for spaces up to about 100 square feet. Compare this to the much larger centerpiece in Idea #16.
7. Style a Spring Tray with a Neutral Palette and Blue Eggs
that makes this entire setup feel intentional and chic is the light wood round tray. Without it, you would just have a few decorative items sitting randomly on an ottoman. The tray corrals everything—the vase, the egg dish, the bunny—into a single, cohesive vignette. It defines the space and transforms a collection of objects into a purposeful centerpiece. It’s the quiet hero of the entire design, providing a solid foundation and a warm, natural texture that grounds the all-white elements.

“When creating a “tray-scape” like this, always follow the rule of three, and vary the heights.”
Notice the tall flowering branches, the medium-height compote dish, and the low ceramic bunny. This creates a visually pleasing triangle and stops the arrangement from feeling flat and boring. For a 15-18 inch round tray, aim for your tallest object to be around 12-15 inches high.
8. Assemble a Rustic Farmhouse “Home” Vignette
This cozy farmhouse look follows a simple formula: 50% Distressed White + 30% Natural Wood & Greenery + 20% Graphic Pattern. The distressed candle holders provide the main color and texture. The wooden surface and faux succulents bring in the natural, organic element that is crucial for the farmhouse vibe. Finally, the gray and white plaid sign adds a crisp, graphic touch that keeps it from feeling too rustic. You could swap the plaid for stripes or a simple black and white text art, and the formula would still hold true.
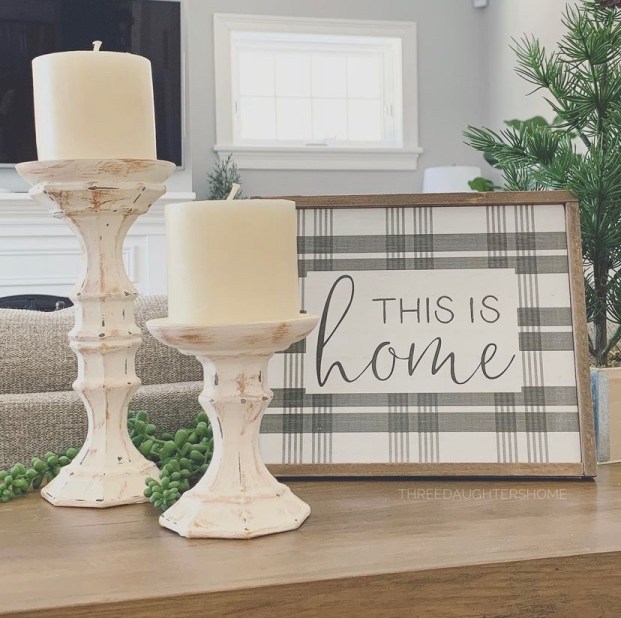
“While pillar candles in wooden holders are beautiful, let’s be practical.”
If you plan to actually light them, never leave them unattended. And be prepared for wax drips on the holders and the surface below. For a truly worry-free version of this look, use high-quality flameless LED pillar candles. You get all the ambiance with zero fire risk or messy cleanup. It’s the perfect solution for households with kids, pets, or anyone who wants to set it and forget it.
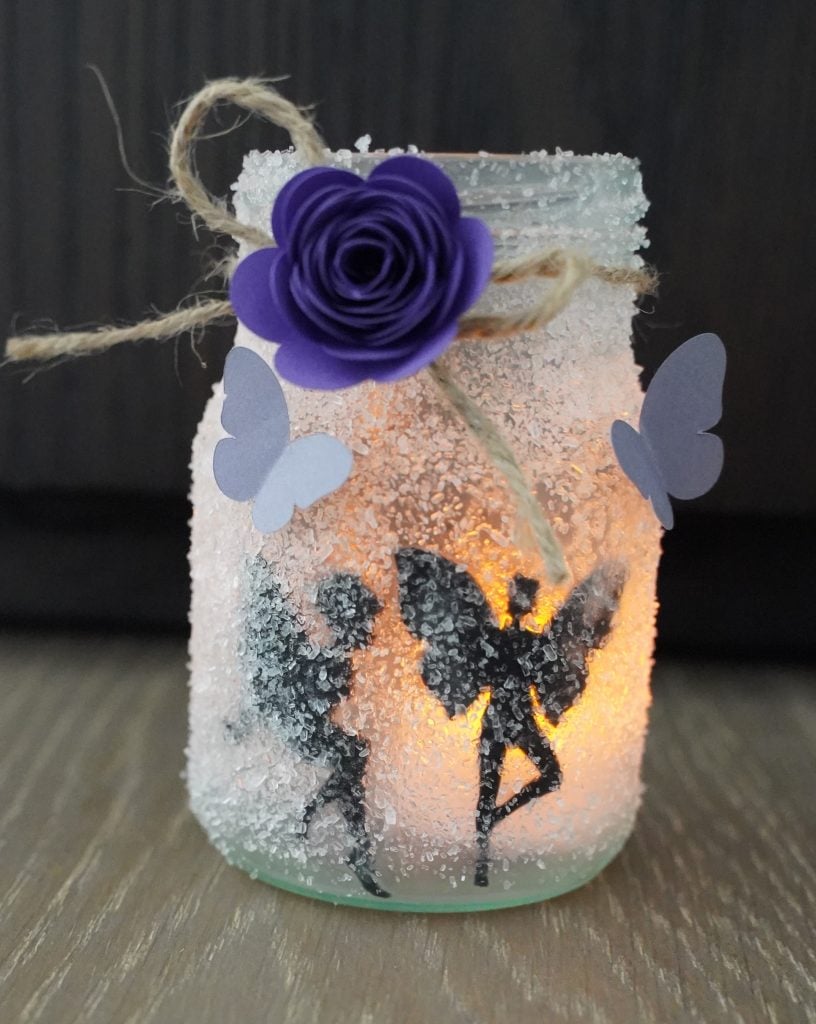
9. Create a Whimsical Winter Wonderland with a Pink Gingerbread House
This little scene is pure magic because it commits to a tight, dreamy color palette. The pale pink, iridescent white, and soft metallics create a cohesive and ethereal winter mood. It’s not the traditional red and green, which makes it feel fresh and unexpected. The use of varied heights—the bottle brush tree, the gingerbread house, and the snow globe—draws the eye around the display. Finally, the scattering of faux snow and fairy lights adds texture and a layer of sparkle that brings the whole miniature world to life.

“You can DIY a similar pink gingerbread house using a plain cardboard or ceramic house from Dollar Tree as your base.”
Paint it with a pale pink craft paint. For the “icing,” use white puffy paint or spackle applied with a piping bag for a 3D effect. The iridescent shimmer can come from a light dusting of glitter or a pearlescent craft paint. This is a fantastic way to get a custom, whimsical look for just a few dollars, compared to buying a pre-decorated one for $25 or more.
10. Design Shabby Chic Pumpkins with Lace and Pom-Poms
This project is a lovely way to give cheap foam pumpkins a high-end, shabby-chic makeover. It’s all about texture and delicate details.
- Time: 30 minutes / Cost: Approx. $10
- Start with a plain white or cream-colored foam pumpkin from the dollar store.
- Cut a piece of wide lace fabric large enough to wrap around the pumpkin. Secure it tightly with a hot glue gun at the base and stem.
- Glue a string of mini cream-colored pom-poms around the top, near the stem, to hide the fabric edge.
- Embellish further by gluing on a few small fabric flowers.
- Leave the original plastic stem or cover it with twine for a more rustic look.

“These are fabric-and-glue creations, so they won’t handle moisture well.”
They are strictly for indoor use. Store them carefully after the season is over, ideally wrapped in tissue paper in a hard-sided box, to prevent the lace from snagging and the pom-poms from getting crushed. A light dusting with a soft brush before and after storage is all the cleaning they need. Avoid placing them in direct sunlight for long periods, as the fabric and glue can yellow over time.
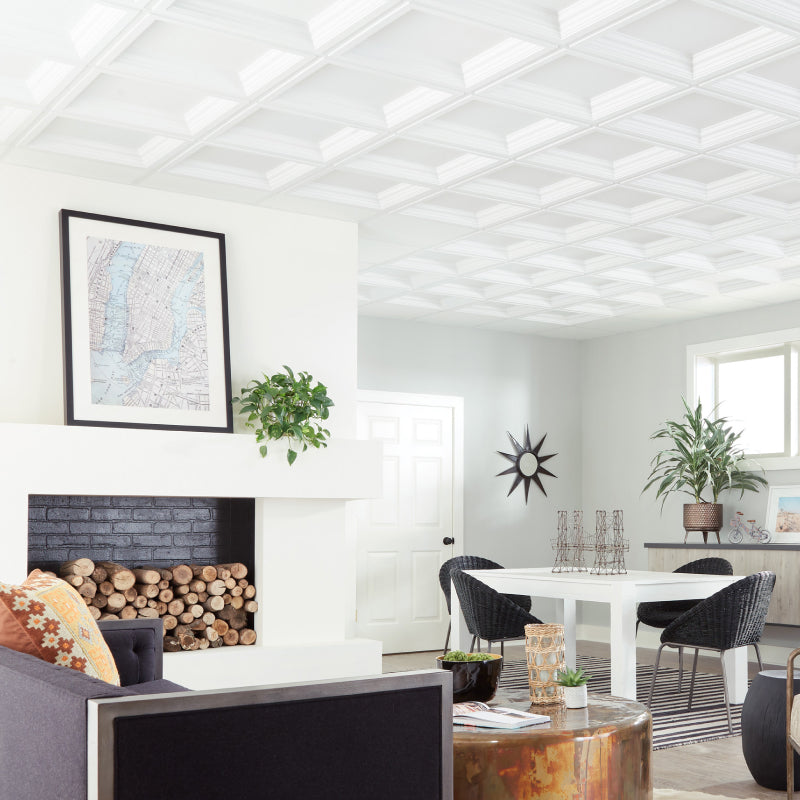
11. Achieve an Organized, Modern Kitchen with a DIY Shelving Unit
The single element that pulls this whole kitchen together is the dark gray accent wall. Without it, the white cabinets and light wood counters could feel a bit flat. The dark wall creates depth, contrast, and a focal point for the dining area. It makes the white and wood shelving unit pop, turning simple storage into a deliberate design feature. It’s a perfect example of how a gallon of paint is often the most transformative tool in a designer’s kit, anchoring the space and giving it a sophisticated edge.

“An open shelving unit like this works best in a kitchen or dining area with at least 8-foot ceilings to avoid feeling cramped.”
The unit itself needs a dedicated wall space of about 3-4 feet in width. This idea is fantastic for apartments or smaller homes where you need to combine kitchen and dining functions. The open shelves provide storage without the visual bulk of upper cabinets, making the entire room feel larger and more airy. For a much smaller-scale storage idea, look at the project in Idea #14.
12. Set Up a Festive Window Ledge with Florals and Candlelight
This display feels so elegant because it expertly mixes metals and light sources. Combining a silver mercury glass urn with gold candle holders is a chic, modern choice that prevents the setup from feeling too matchy-matchy. The variation in light—the tall, steady flame of the taper candles and the softer, contained glow of the votives in hurricane lamps—creates a rich, layered ambiance. The colorful flowers tie everything together, their warm tones reflecting beautifully in the metallic surfaces.

“When creating a floral arrangement for a specific vessel, like this silver urn, use the “grid trick.” Create a grid across the top of the urn opening with clear floral tape.”
This gives you a structure to work with. Start by adding your greenery to the outer sections of the grid, creating a base. Then, add your largest “focal” flowers to the center. Finally, fill in the gaps with your smaller, more colorful blooms. The grid keeps everything in place and helps you achieve that full, rounded shape.
13. Organize Your Life with a Colorful Basket Utility Cart
A rolling cart like this is a fantastic, flexible storage solution, but be mindful of weight limits. The plastic baskets are great for yarn, kids’ toys, or bathroom supplies, but they can bow or crack if overloaded with heavy items like books or canned goods. Also, while the wheels offer mobility, they can be a hazard on uneven floors or around small children. It’s best to use this as a stationary organization hub that you only move occasionally for cleaning.

“The playful energy of this cart comes from a confident use of color.”
You can recreate this look by following a simple formula: 40% Cool Color (the blue baskets) + 40% Bright Accent (the lime green baskets) + 20% Neutral Frame (the white metal and black handles). You could swap the palette to be 40% pink, 40% orange, and 20% white for a warmer look, or go monochrome with different shades of gray and black for a more sophisticated feel. The key is the strong, balanced color blocking.
14. DIY a Glam Vanity Station with Golden Crate Shelving
This chic and functional vanity setup is surprisingly affordable to assemble. The beauty is in elevating simple storage crates into something that looks custom and luxe.
- Main Furniture: Golden crates ($5 each at Dollar Tree, need 8-10), white chair (check thrift stores, $20-40)
- Lighting: Small vanity mirror with lights ($25-50 online)
- Decor/Accessories: Marble-pattern contact paper ($5), furry pillow ($10-15)
- Budget Alternative: Skip the chair and use it as floor-to-ceiling storage. Get a similar look for 50% less by using regular plastic crates and spray painting them gold.
- TOTAL: $80 – $140

“Assembling the golden crate tower is quick and requires no tools, just some zip ties for stability.Time: 1 hour / Cost: Approx.”
$55 (for a 10-crate unit)First, decide on your configuration. A 2×5 stack is a great starting point.Lay out your crates on the floor in the desired shape.Use small, clear zip ties to connect the crates where they touch—side-to-side and top-to-bottom.Once connected, stand the unit up against the wall. For added safety, use a small bracket to secure the top of the unit to the wall.Cut sheets of marble-patterned contact paper or foam board to fit the bottom of each crate for a solid, stylish surface.
15. Create a Cozy Porch Corner with a Rattan Chair and Lush Plants
This little corner is the definition of cozy, and it all comes down to layering textures. You have the smooth, woven rattan of the chair, the nubby texture of the woven mat, the incredibly soft and fluffy white throw, and the crisp cotton of the patterned pillow. This tactile variety is what makes the space feel so rich and inviting. The smooth, cool metal of the brass planter and the organic shapes of the leaves add even more contrast. It’s a masterclass in making a small space feel luxurious through touchable surfaces.
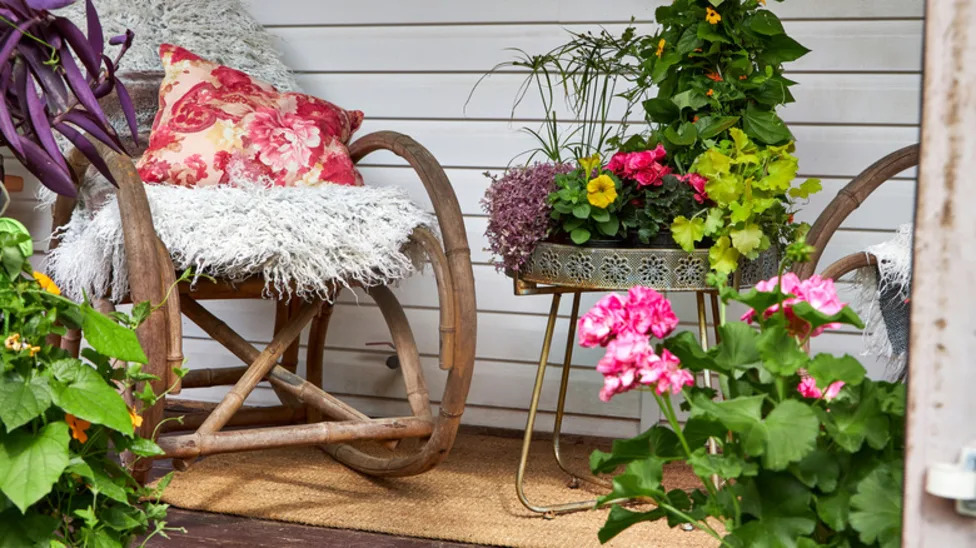
“While every element is lovely, the brass plant stand is the real star.”
It does more than just hold plants; it adds a touch of metallic warmth and vintage character. The intricate cutouts add a layer of detail and shadow play. If you replaced it with a simple terracotta pot on the ground, the scene would lose its height, its sparkle, and its sense of curated style. The planter elevates the entire arrangement from a simple chair with plants to a thoughtfully designed outdoor vignette.
16. Set a Rustic Summer Table with a Lemon and Floral Centerpiece
A trick to make a centerpiece feel truly integrated with the table setting is to pull colors from it directly onto the plates. Notice how the bright yellow of the lemons in the centerpiece is echoed in the placesettings. You can do this with napkins, water glasses, or even a small sprig of greenery from the arrangement placed on each plate. This repetition of color creates a cohesive, intentional look that makes the whole table feel professionally styled.

“Creating this fresh, rustic tablescape is very budget-friendly, especially when ”
Creating this fresh, rustic tablescape is very budget-friendly, especially when you lean on Dollar Tree for the core components.
- Main Furniture: Use your existing table.
- Dinnerware: White plates ($1.25 each), gold-rimmed glasses ($1.25 each), gold plastic cutlery (set for $1.25)
- Textiles: Woven placemats ($1.25 each)
- Decor/Accessories: Wooden box (craft store, $5-10), faux lemons & flowers ($10-15 total), pillar candles ($1.25 each)
- Budget Alternative: Forage for greenery from your own yard and use a simple glass vase you already own instead of the wooden box.
- TOTAL: $45 – $65 (for a 4-person setting)
17. Craft a Coastal Vibe with a Navy Pebble Tile Niche
That stunning navy pebble tile backdrop is a peel-and-stick product, making this a surprisingly easy and renter-friendly update.
- Time: 30 minutes / Cost: Approx. $10-20
- Thoroughly clean and dry the back wall of the cabinet niche.
- Measure the height and width of the space.
- Cut your sheet of peel-and-stick pebble tile to size with a sharp utility knife. It’s easiest to cut the mesh backing between the pebbles.
- Peel off the paper backing, carefully align the tile sheet at the top, and press it firmly into place, smoothing it down from the center outwards to remove air bubbles.
- For the candle jars, simply fill the bottom of three mason jars with small pebbles and place a white candle inside.

“While peel-and-stick tile is a game-changer, it has its limits.”
In a bathroom or kitchen niche that gets a lot of steam or moisture, the adhesive can fail over time. This project is best for a dry area like a hallway built-in or a living room cabinet. Also, the “pebble” texture means the surface isn’t flat, which can make it tricky to clean. A quick wipe with a damp cloth is fine, but it will collect dust more than a smooth surface.
18. DIY Elegant Glass Cloches from Inverted Wine Glasses
The secret to making this project look expensive is the handle. Instead of just placing a glass sphere on an inverted glass, you need to add a “finial.” You can find ornate drawer pulls or cabinet knobs at craft stores or home improvement stores for just a few dollars. Use a strong adhesive like E6000 to glue the knob to the top of the glass sphere. This small detail is what transforms it from a clever craft into a piece that looks like it came from a high-end decor boutique.

“This works because it plays with shape and expectation.”
We expect to see a wine glass sitting on its base, but here it’s flipped, creating an elegant pedestal. The repetition of spheres—the main cloche, the finial on top—is pleasing to the eye. The use of clear glass keeps it light and airy, while the metallic gold band adds a necessary touch of warmth and glamour. It feels balanced, symmetrical, and just a little bit surprising, which is the hallmark of great design.
19. Create Moody Ambiance with Dripping Wax Taper Candles
that gives this scene its enchanting, almost gothic romance is the abundant wax drippings. Without them, it’s just candles in bottles. With them, it tells a story of time, of warmth, of many cozy evenings. The cascading, organic shapes of the hardened wax add incredible texture and a sense of history to the arrangement. It’s what transforms simple, everyday objects into something deeply atmospheric and beautiful. You simply can’t get this look with flameless candles.

“As beautiful as this is, it’s a glorious mess waiting to happen.”
You absolutely *must* place the bottles on a heat-proof, protected surface. A metal tray, a ceramic platter, or a stone slab will work. Do not do this directly on a wooden table unless you want to spend hours scraping off wax. Be aware of drafts in the room, as they can cause the candles to burn unevenly and drip even more unpredictably. And of course, never, ever leave lit candles unattended.
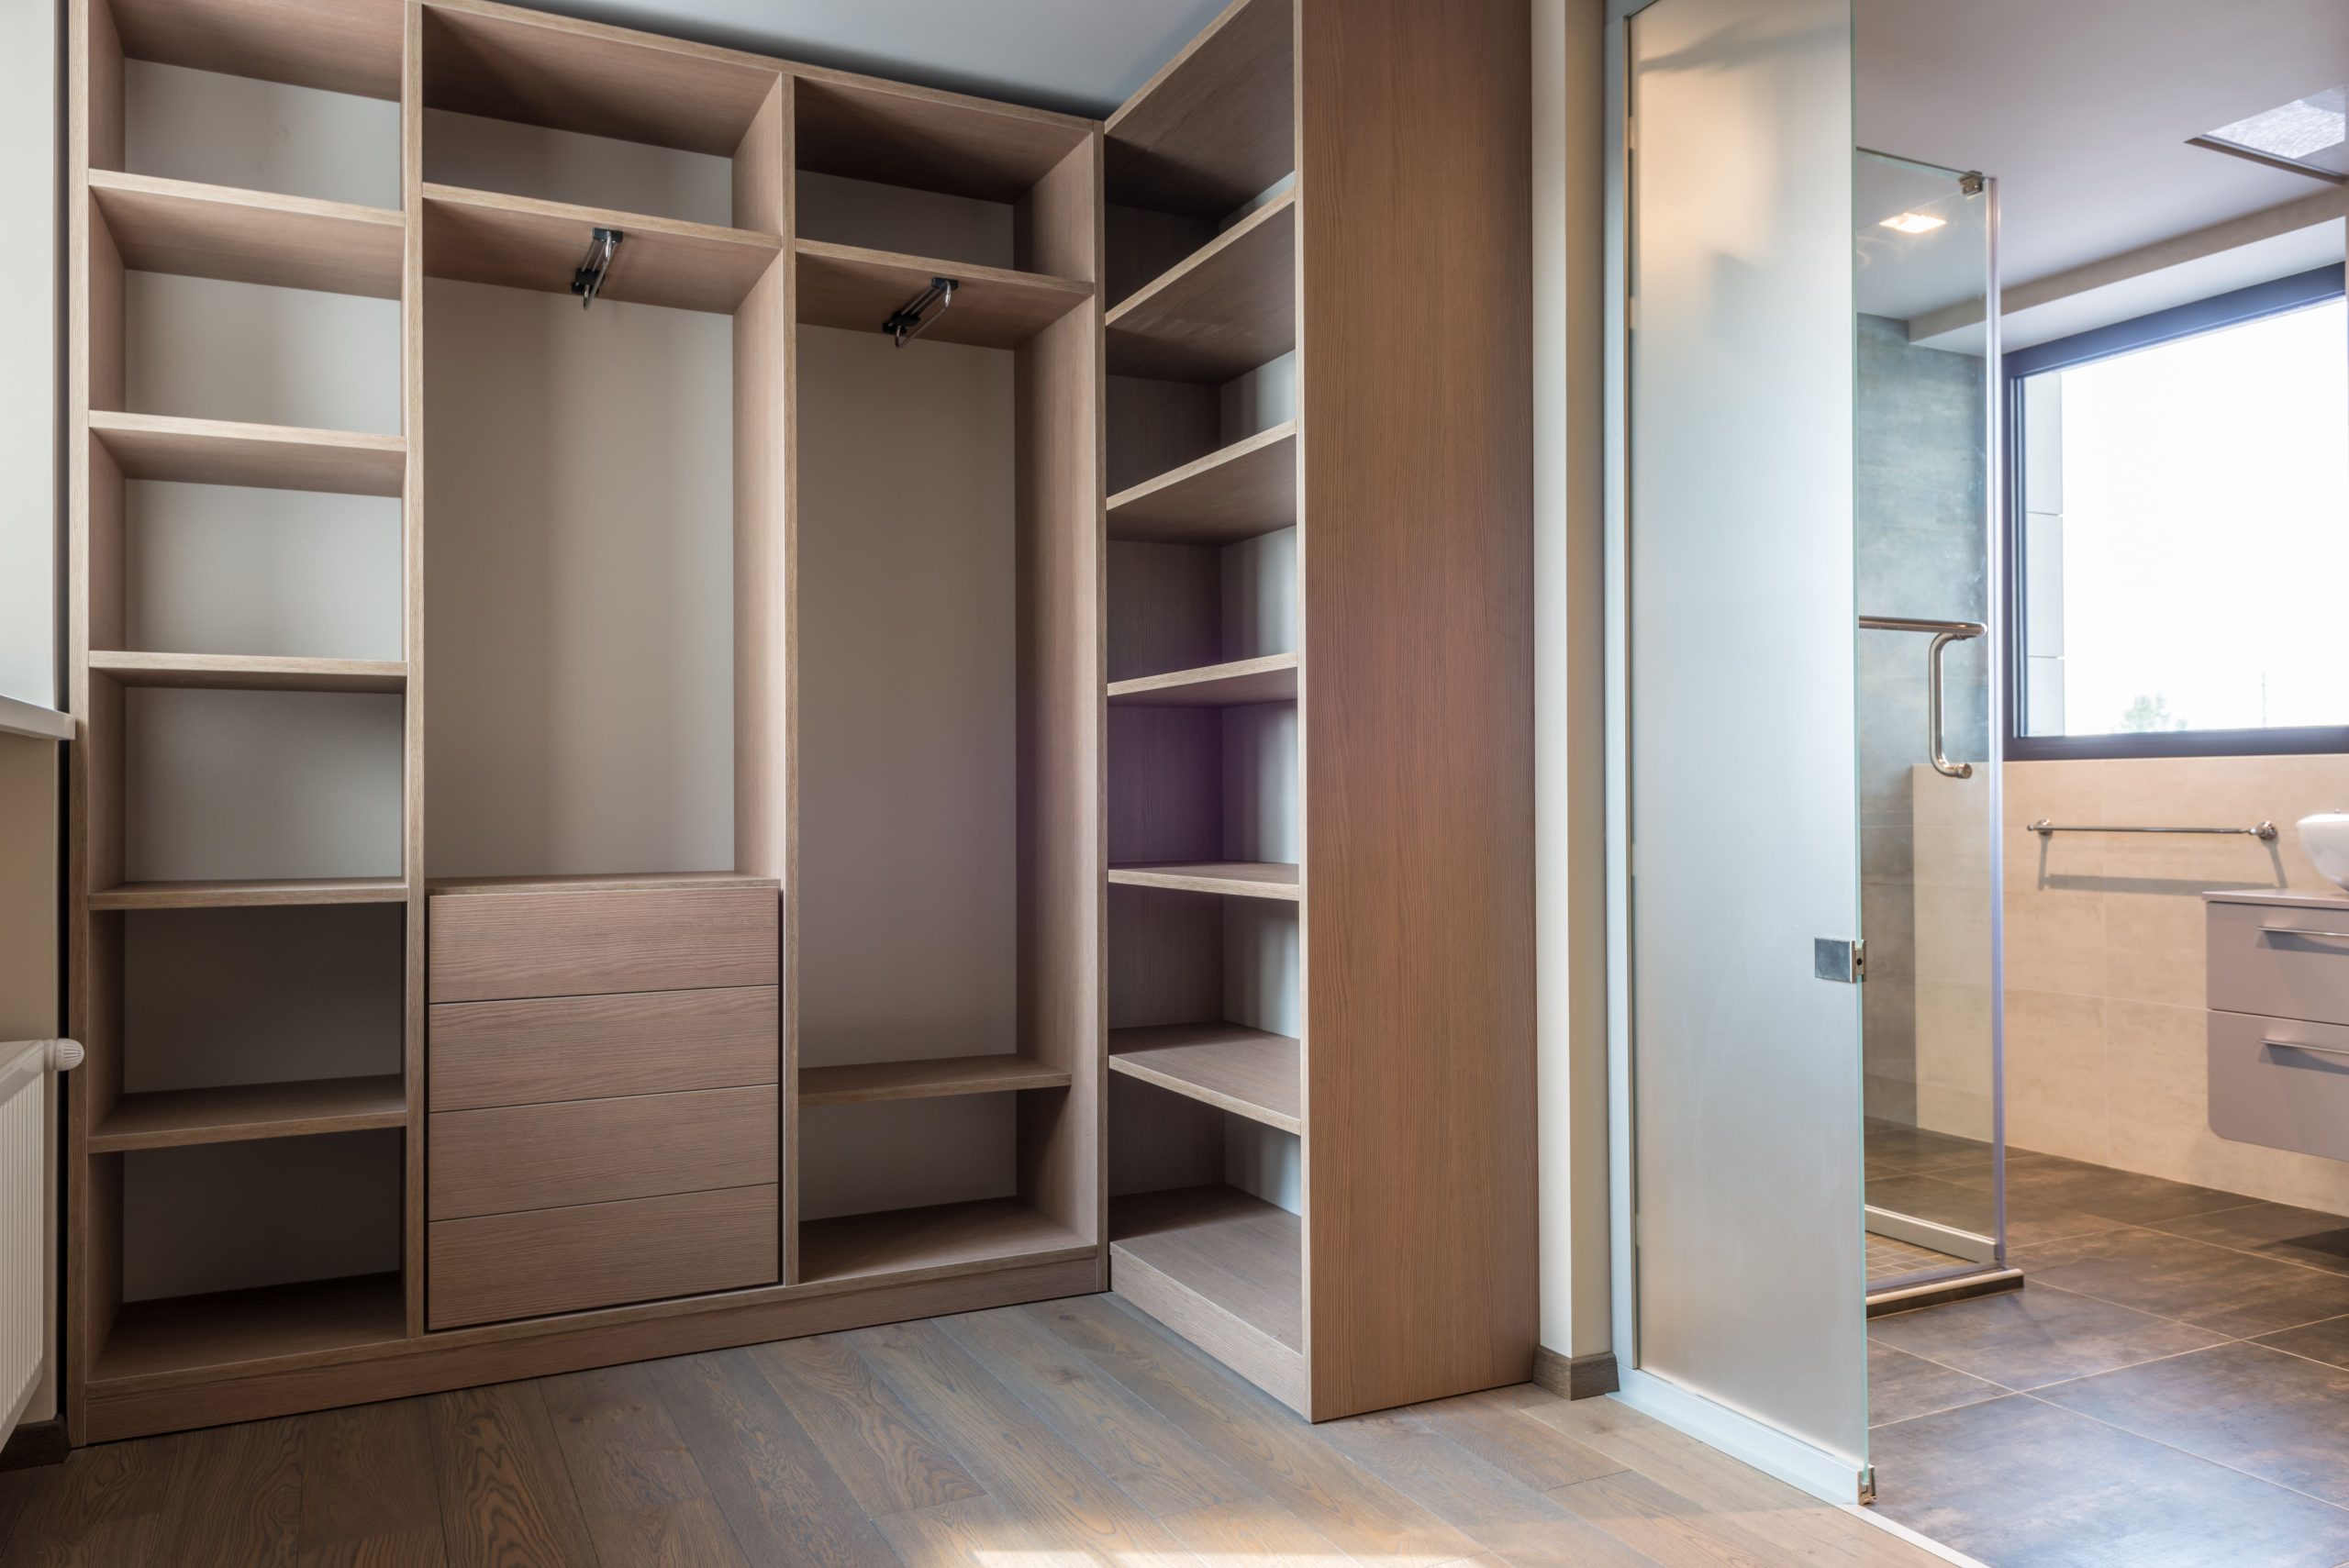
20. Conquer Drawer Chaos with Smart Dividers
This is the organizational dream, and it works because of one key principle: compartment-alization. Instead of one large, chaotic space, the drawer is broken down into small, single-purpose zones. The dark gray dividers create the main structure, and the smaller white trays subdivide it even further. This ensures everything has a designated home, from cotton swabs to rolled towels. Your brain can easily process where to find things and, just as importantly, where to put them back. The clean, contrasting color scheme of white and gray also reduces visual clutter.

“You don’t need to buy a fancy custom drawer system.”
Some of the best dividers are things you can find at Dollar Tree. Look in the kitchen section for utensil trays, in the office supply aisle for shallow plastic bins, and even in the food storage section for small rectangular containers. You can mix and match these cheap pieces to create a custom configuration that fits your drawer perfectly. A roll of non-slip shelf liner on the bottom will stop them from sliding around.
21. Craft Delicate Spring Decor with Eggshell Candles
Making these little eggshell candles is a delicate but rewarding process, perfect for a spring or Easter display.
- Time: 1 hour (plus wax cooling time) / Cost: Approx. $8
- Carefully crack an egg at the top third, empty the contents, and gently wash the shell.
- Melt soy wax flakes in a microwave-safe container. Add a few drops of essential oil if you like.
- Place a small candle wick with a metal base inside the empty eggshell. Use a clothespin laid across the top to hold the wick straight.
- Carefully pour the melted wax into the eggshell. Let it cool completely until solid.
- Arrange your finished candles in an egg carton with other natural elements like quail eggs and dried flowers.

“This rustic, natural look is a beautiful balance of textures.”
It follows a simple recipe: 70% Natural & Rustic (the egg carton, shells, straw, and wood surface) + 20% Delicate & Light (the white cherry blossoms) + 10% Speckled Pattern (the quail eggs and feathers). This combination of rough, soft, and patterned elements is what makes it feel so organic and visually interesting. You could swap the cherry blossoms for baby’s breath and it would have the same effect.
22. Design a Romantic Glitter and Lace Heart Pillow
The single most important element here is the pom-pom trim. It’s the detail that elevates the pillow from a simple heart shape into something truly special and finished. It provides a soft, textural border that defines the shape and gives it a charming, handcrafted quality. Without the trim, the edges would look unfinished, but with it, the entire piece feels more substantial and thoughtfully designed. It’s a small detail that makes a huge impact.

“This design is a study in contrasts, which is why it’s so visually appealing.”
You have the contrast between the delicate, sheer lace and the dark, solid fabric underneath it, which makes the glittery pattern pop. There’s also the wonderful textural contrast between the rustic, weathered wood surface and the soft, plush pillow. It’s the interplay of hard and soft, rough and smooth, dark and light that creates a dynamic and romantic feel.
23. Assemble a Classic Christmas Centerpiece with Red Taper Candles
This timeless holiday centerpiece can be assembled almost entirely from dollar store finds, making it an incredibly high-impact, low-cost project.
- Main Components: Red taper candles (2 for $1.25), glass taper holders ($1.25 each)
- Greenery: Faux pine garland or wreath ($5-8 at a craft store, or use clippings from a Dollar Tree garland)
- Accents: Bag of faux red berries ($1.25), bag of pinecones ($1.25)
- Budget Alternative: Forage for real pinecones and greenery from your yard for free.
- TOTAL: $11 – $15

“This type of centerpiece is perfect for a standard rectangular dining table or a round table that seats 4-6 people.”
The arrangement shown is about 18-24 inches in diameter. For a much longer dining table, you could create two of these arrangements or use a long garland down the center with the candles interspersed. For a small bistro table, use just one or two candles with a smaller ring of greens to keep it in scale. Compare this to the much more sprawling centerpiece in Idea #28.
24. Craft a Pair of Spooky-Cute Witch Hat Gnome Wreaths
These wreaths are so charming because they cleverly imply a character without showing one. The witch hat combined with the round “nose” instantly creates the impression of a whimsical gnome, sparking the imagination. The vibrant orange leaves provide a powerful color contrast against the dark wood siding and the black hats, making the wreaths pop. The natural, rustic texture of the woven branches provides the perfect base, grounding the more playful elements in an autumnal feel.

“When hanging wreaths on a textured or dark surface like this grooved wood siding, use a dark-colored ribbon or wire for hanging that will blend in with the background.”
A clear adhesive hook or a dark magnetic hook (for metal doors) will also work. The goal is to make the hanging mechanism disappear so the wreath itself is the star, floating against the surface as if by magic. A white or brightly colored hanger would distract from the spooky, whimsical effect.
25. Make a Vibrant Autumnal Door Swag with Mesh Ribbon
The element that gives this door swag its professional, bountiful look is the cluster of multi-textured ribbons. The combination of wide, airy orange mesh with the tighter weave of the burlap-textured ribbon creates a full, dynamic base. Without this generous ribbon work, the leaves and other accents would feel sparse. The ribbon is the foundation that provides the volume and color punch, making the whole arrangement feel substantial and welcoming from a distance.

“A word of caution about using mesh ribbon outdoors: it can and will trap water.”
If your front door is exposed to rain, a swag like this can become a heavy, soggy mess that takes forever to dry. This type of decor is best suited for a door that is well-protected by a covered porch or a deep overhang. If your door is exposed, consider using outdoor-rated ribbons and ensure the entire piece can drain easily.
26. Assemble a Sweet Mother’s Day Gift Basket
The irresistible charm of this gift set comes down to a simple formula: 50% Thoughtful Gifts + 30% Lush Florals + 20% Cohesive Color. The gifts (prosecco, truffles, cupcakes) are the core of the message. The bouquet of vibrant pink roses adds a touch of luxury and natural beauty. And the master stroke is the color coordination—the fuchsia and baby pink are repeated in the roses, the packaging, the shredded paper, and the cupcake hearts, tying everything together into one visually stunning package.

“This works as a beautiful photo and a heartfelt gift because it engages multiple senses.”
You have the visual appeal of the bright colors and beautiful flowers, the implied taste of the cupcakes and prosecco, and the texture of the wicker basket and soft rose petals. It’s not just a collection of items; it’s a curated experience. The arrangement on the light wood floor also feels candid and personal, as if someone has just laid out their heartfelt presents with care.
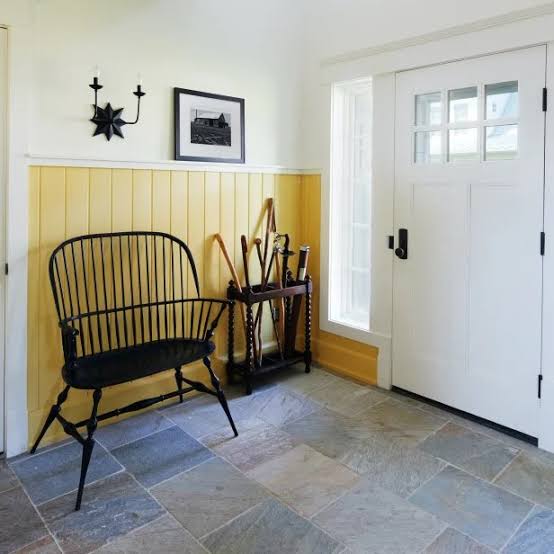
27. Create a Cozy Patriotic Patio with Simple Touches
The secret to making holiday-themed decor feel chic and not cheesy is to mix it with plenty of sophisticated neutrals. Notice how the red, white, and blue napkins are the only explicitly patriotic items. They’re surrounded by a dark wood table, classic black and white buffalo check pillows, and the warm glow of candlelight. This balance makes the patriotic colors feel like a deliberate accent, not an overwhelming theme. Use the 80/20 rule: 80% timeless, neutral decor and 20% seasonal, thematic accents.

“Before you commit to a cozy outdoor evening, do a quick check to ensure maximum comfort.Check the Forecast: Is there a chance of wind or a sudden shower?”
Have a plan to move things indoors or under cover quickly.Light Source Plan: Do your tea lights have a deep enough container, like these mason jars, to stay lit if a breeze picks up? A few strategically placed citronella candles can also do double duty for light and bug control.Comfort Check: Are the chairs comfortable for a long sit? Adding pillows and throws, like the ones shown here, makes a huge difference.
28. Style a Long Dining Table with Multiple Floral Centerpieces
A single centerpiece on a long table can feel lost and lonely. This arrangement works beautifully because it uses repetition. Placing several smaller, identical vases down the length of the table creates a sense of rhythm and abundance. It draws the eye along the entire table and ensures that every guest has a view of the flowers. The subtle gradient of color, shifting from pinks to yellows, adds a layer of visual interest and sophistication that a single, uniform arrangement might lack. For a less formal look, the rustic lemon centerpiece in Idea #16 offers a great alternative.

“This multiple-centerpiece approach is specifically for long rectangular or oval dining tables—those designed to seat eight or more people (typically 78 inches or longer).”
On a smaller table, this would look crowded and cluttered. The key is to have enough “breathing room” between each vase, at least 18-24 inches, so it doesn’t feel like a floral jungle. The vases themselves should be low enough that guests can easily see and talk to each other across the table.
29. Add Rustic Charm with a Floral Heart on a Wooden Crate
that makes this piece feel truly special is the layering of wood textures. You don’t just have the heart on the crate. There’s a middle layer—the gray-washed slats—that provides a clean, square frame for the heart. This layer creates separation and contrast between the intricate floral pattern and the rough, aged wood of the crate. It’s a thoughtful detail that adds depth and makes the whole composition look more deliberate and professionally crafted.

“This design is a perfect equation for rustic charm: 50% Aged, Rustic Wood (the crate) + 30% Painted, Clean Wood (the gray slats) + 20% Colorful Pattern (the floral heart).”
This formula provides a perfect balance of textures and finishes. You could easily swap the floral heart for a nautical pattern, a geometric design, or even a simple painted word, and as long as you maintain that ratio of aged wood, painted wood, and a pop of pattern, you’ll achieve the same charming, rustic effect.
Your Most Stylish Home is One You Make Yourself
Remember, the goal isn’t to perfectly replicate these ideas—it’s to use them as a starting point for your own creativity. Your home should tell your story, and nothing does that better than a piece you’ve made with your own hands. Now go forth and craft something beautiful!
Ready for more inspiration? Head over to Pinterest and start creating a board for your next project.