You know that feeling when you find the perfect DIY mosaic garden idea on Pinterest, but it feels too complicated to actually pull off? We’ve been there. That’s why we dug through hundreds of real-world examples to find designs that are not just beautiful, but achievable. We looked at everything from big box stores to specialty craft suppliers to find inspiration that works for real gardens and real budgets.
Inside, you’ll find 31 incredible mosaic ideas, from intricate pebble pathways and artistic wall panels to charmingly decorated planters and furniture. We’re covering everything from beginner-friendly stepping stones to statement-making patio floors. These ideas are trending right now because they tap into the desire for unique, handmade elements that tell a story—transforming a generic backyard into a truly personal oasis. And stay until the end — we break down the most common mistakes that can ruin these projects. 📌 Pin this guide for later — your future self will thank you when it’s time to start creating.
1. Lay a Winding Path with a Colorful Geometric Mosaic Runner
This design is so effective because of the beautiful tension between the wild, lush plantings and the structured, man-made path. The gentle curve leads your eye forward, creating a sense of journey and discovery. What makes it special is the ‘runner’ of vibrant mosaic tiles; it acts like a jewel, elevating the simple brown pavers from purely functional to a central design feature. The contrast in color and texture against the green foliage is what gives the whole scene its energy.
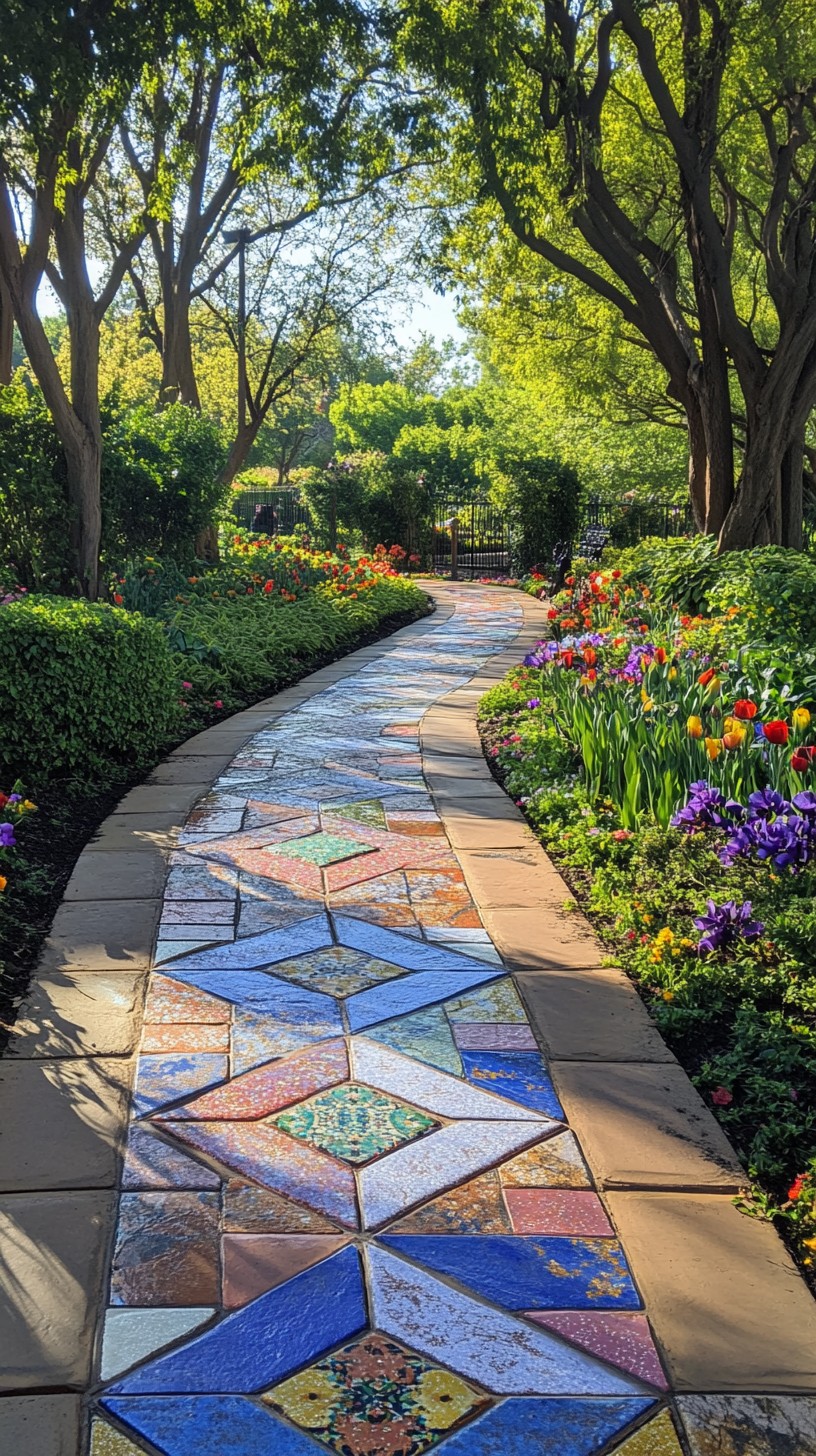
“When laying a curved path, getting a smooth, natural-looking arc is the hardest part.”
The professional trick is to lay out a garden hose on the ground first, adjusting it until you get the perfect sweep. Don’t eyeball it! Once you’re happy with the shape, use a can of spray marking paint to trace along the hose. This gives you an exact line to follow for digging and laying your edging, ensuring your final path flows beautifully instead of looking jerky or awkward.
2. Frame a Courtyard Entrance with Ornate Blue and White Mosaic Walls
This look is a masterclass in balancing ornate details with natural textures. Let’s call the formula: 50% Historic Detail (the carved stone arch and distressed doors) + 30% Bold Pattern (the blue and white mosaic walls) + 20% Organic Softness (the rattan chairs and lush potted plants). The key is that the intricate patterns are grounded by the simple, woven texture of the chairs and the whitewashed stone. If you were to use ornate metal furniture instead, the space could easily feel too busy and museum-like.
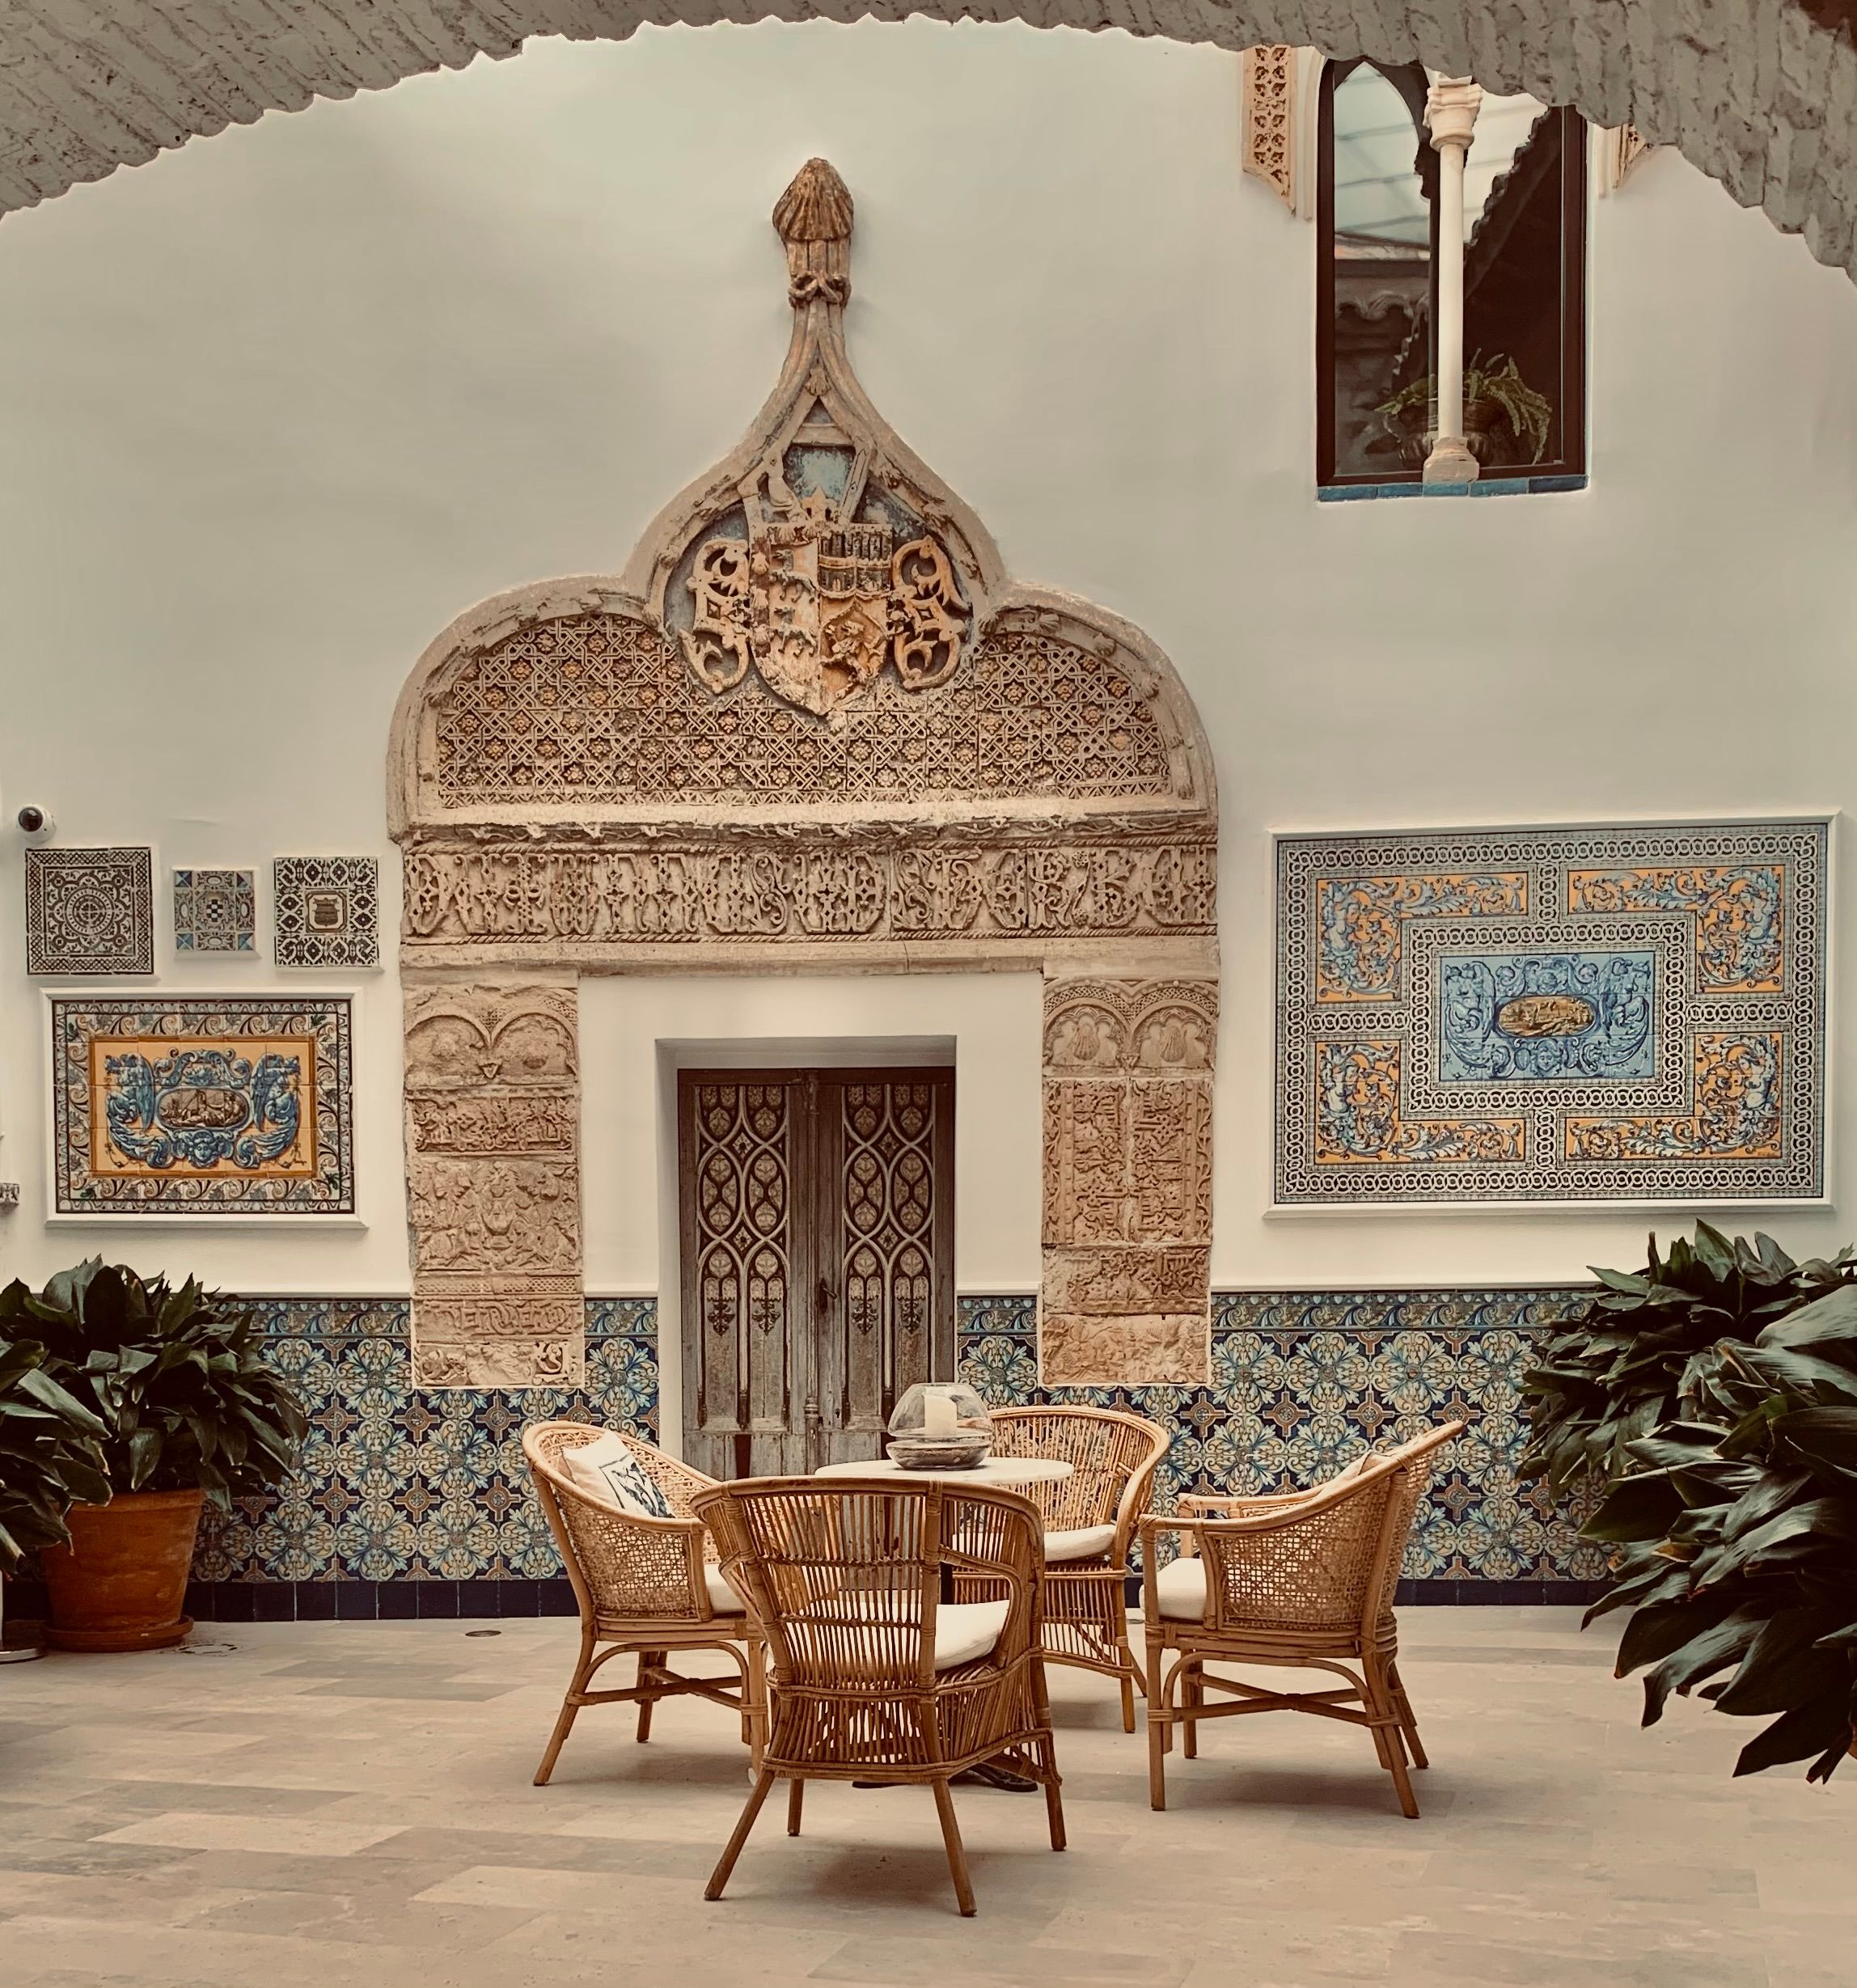
“Let’s be honest: a full tile wall like this is a major undertaking.”
Beyond the significant cost and installation time, you have to consider the upkeep. Cleaning outdoor grout, especially in a climate with any humidity, is a recurring chore to prevent mildew. Also, this is a very specific, powerful style statement. Before you commit, ask yourself if you’ll still love this bold pattern in five years. A more flexible alternative might be to use large, framed mosaic panels like in Idea #3, which can be swapped out more easily.
3. Create a Bold Focal Point with a Stylized Floral Mosaic Panel
The power of this idea comes down to one thing: contrast. It’s the dynamic interplay between the bright, fiery colors of the floral mosaic and the dark, moody blue-and-black background that makes it pop. This high contrast is what gives the piece its graphic, bold energy. If the background were lighter, the red and yellow petals would lose their punch. The entire composition is built around this dramatic color choice, making it feel deliberate and impactful on the plain, light-colored wall.
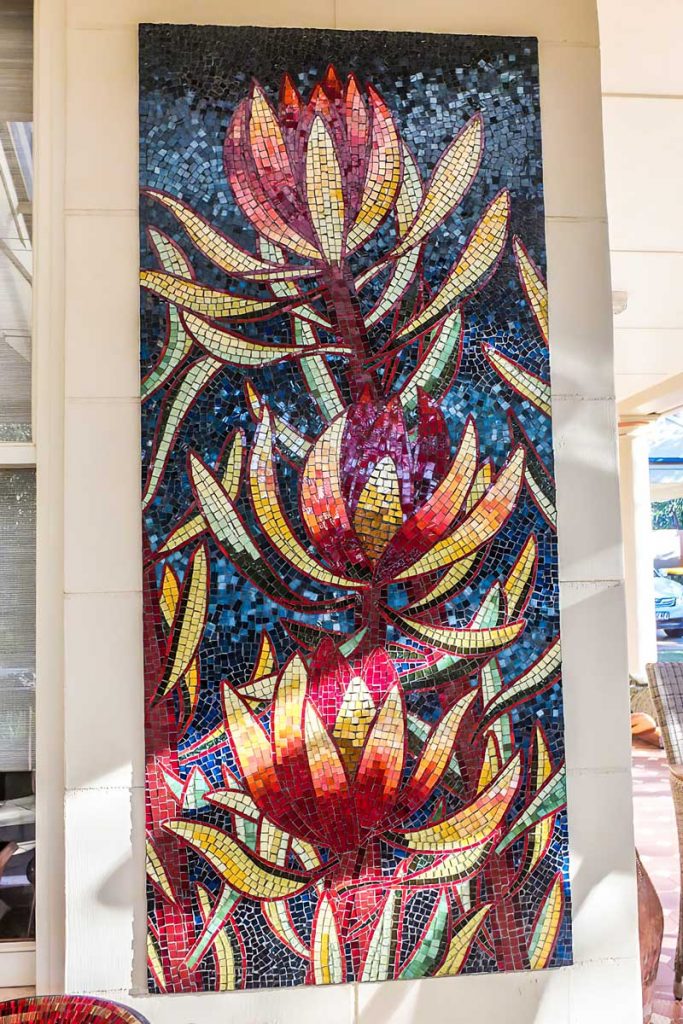
“A custom mosaic panel can be pricey, but you can get this high-impact look for a fraction of the cost.”
Start with an exterior-grade plywood sheet from a hardware store (around $40). Paint it with a durable dark blue or black exterior paint. Then, hunt for ceramic plates and tiles in bright reds and yellows at thrift stores. Carefully break them (wear safety glasses!) and arrange the pieces into your own stylized floral design using strong outdoor adhesive. Grout, seal it, and you’ve got a custom art piece for under $100.
4. Define a Garden with a Curved Southwestern Mosaic Wall
A curved mosaic bench or wall is fantastic for carving out a ‘room’ within a larger garden. This idea shines in a space that’s at least 20 by 20 feet, where the curve has room to feel generous and inviting. For smaller spaces, like a narrow side yard or a patio under 150 sq. ft., a full wall like this can feel bulky. Instead, adapt the concept by creating a single, large curved planter (about 3-4 feet long) with the same mosaic treatment. You’ll get all the artistic flair without sacrificing precious floor space.
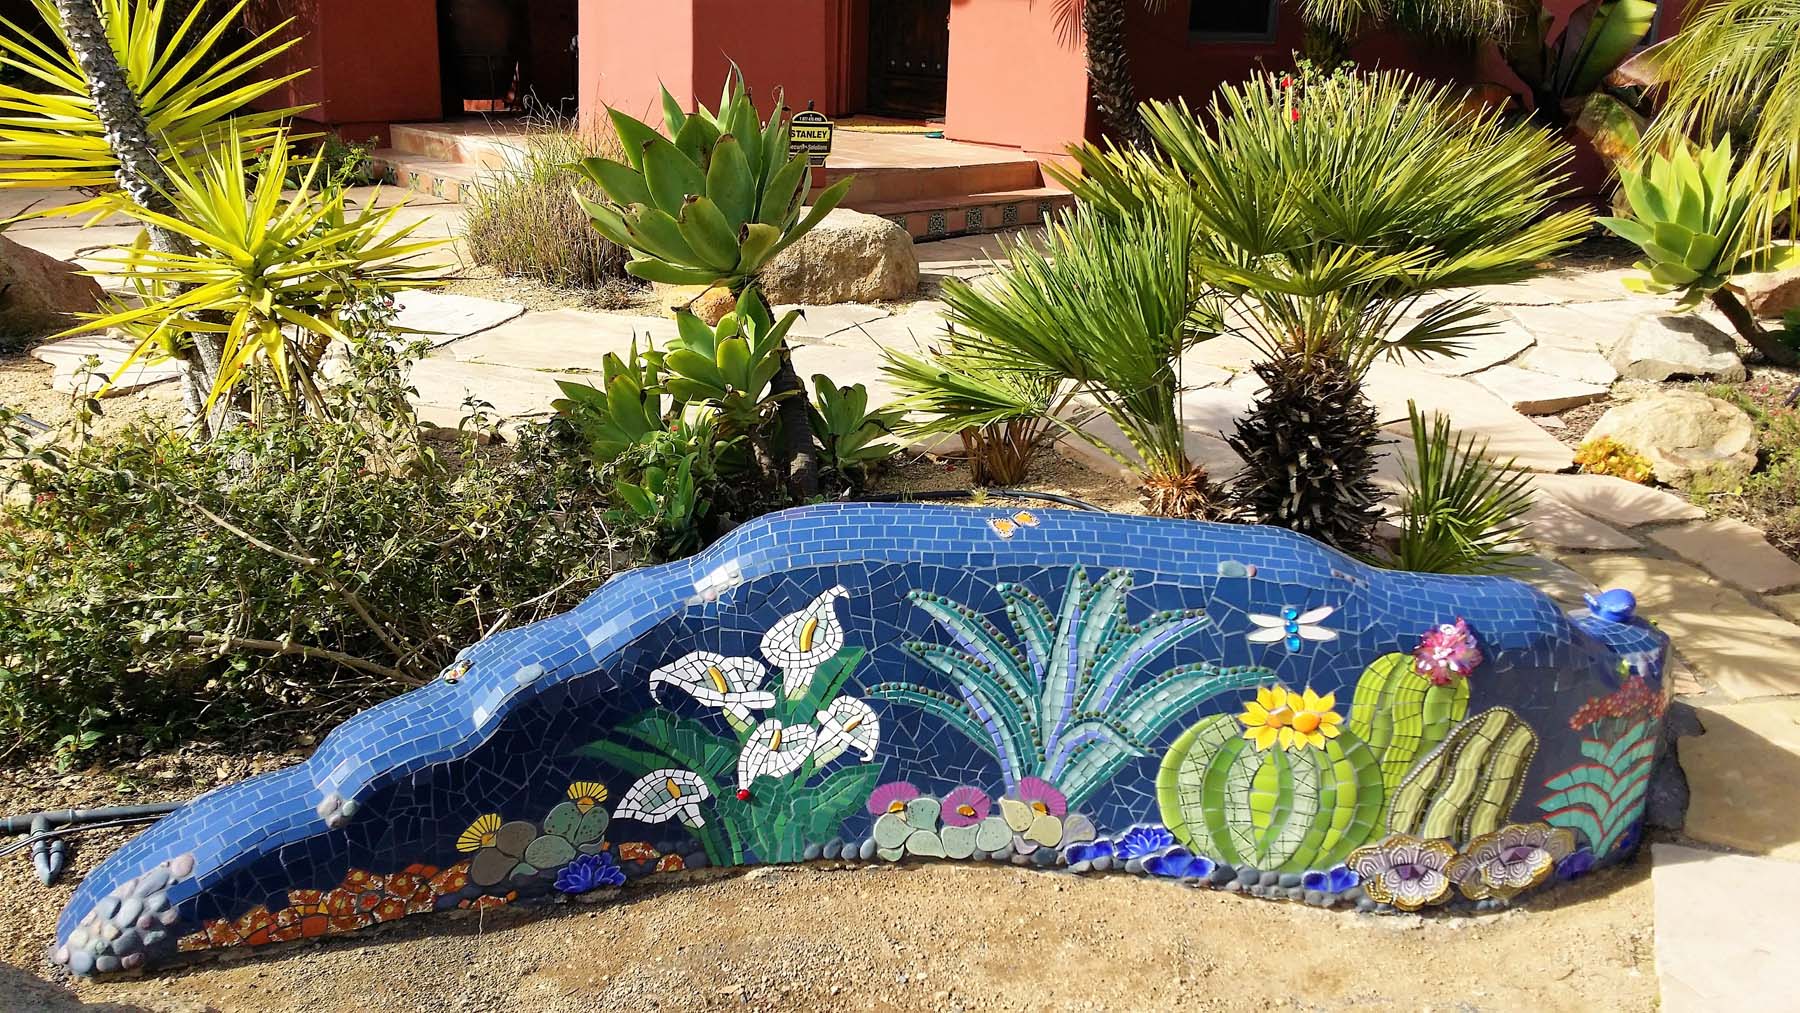
“Before you even buy a single tile, there are a few things to lock down for a project of this scale.”
This isn’t a weekend whim; it’s a permanent landscape feature.First, source all your tiles, especially the large quantity needed for the dark blue background. Running out of a specific color midway through is a project-killing nightmare.If you live in a climate with frost, you absolutely must pour a concrete footing that extends below the frost line to prevent the wall from heaving and cracking.Finally, confirm the final location gets enough sun to make the bench a pleasant place to sit, and that the design complements the surrounding plants you plan to use.
5. Add Whimsy with a Marine-Themed Mosaic Garden Table
This little bistro set is so charming because it commits fully to its whimsical theme. The design works by pairing a highly detailed, colorful mosaic top with a simple, classic wrought iron base. The playful marine life theme—fish, seahorses, shells—is fun and unexpected in a garden setting, creating a delightful surprise. The slight rusting on the white base adds a layer of rustic, found-object character that keeps it from looking too new or mass-produced. It feels like a piece with a story.
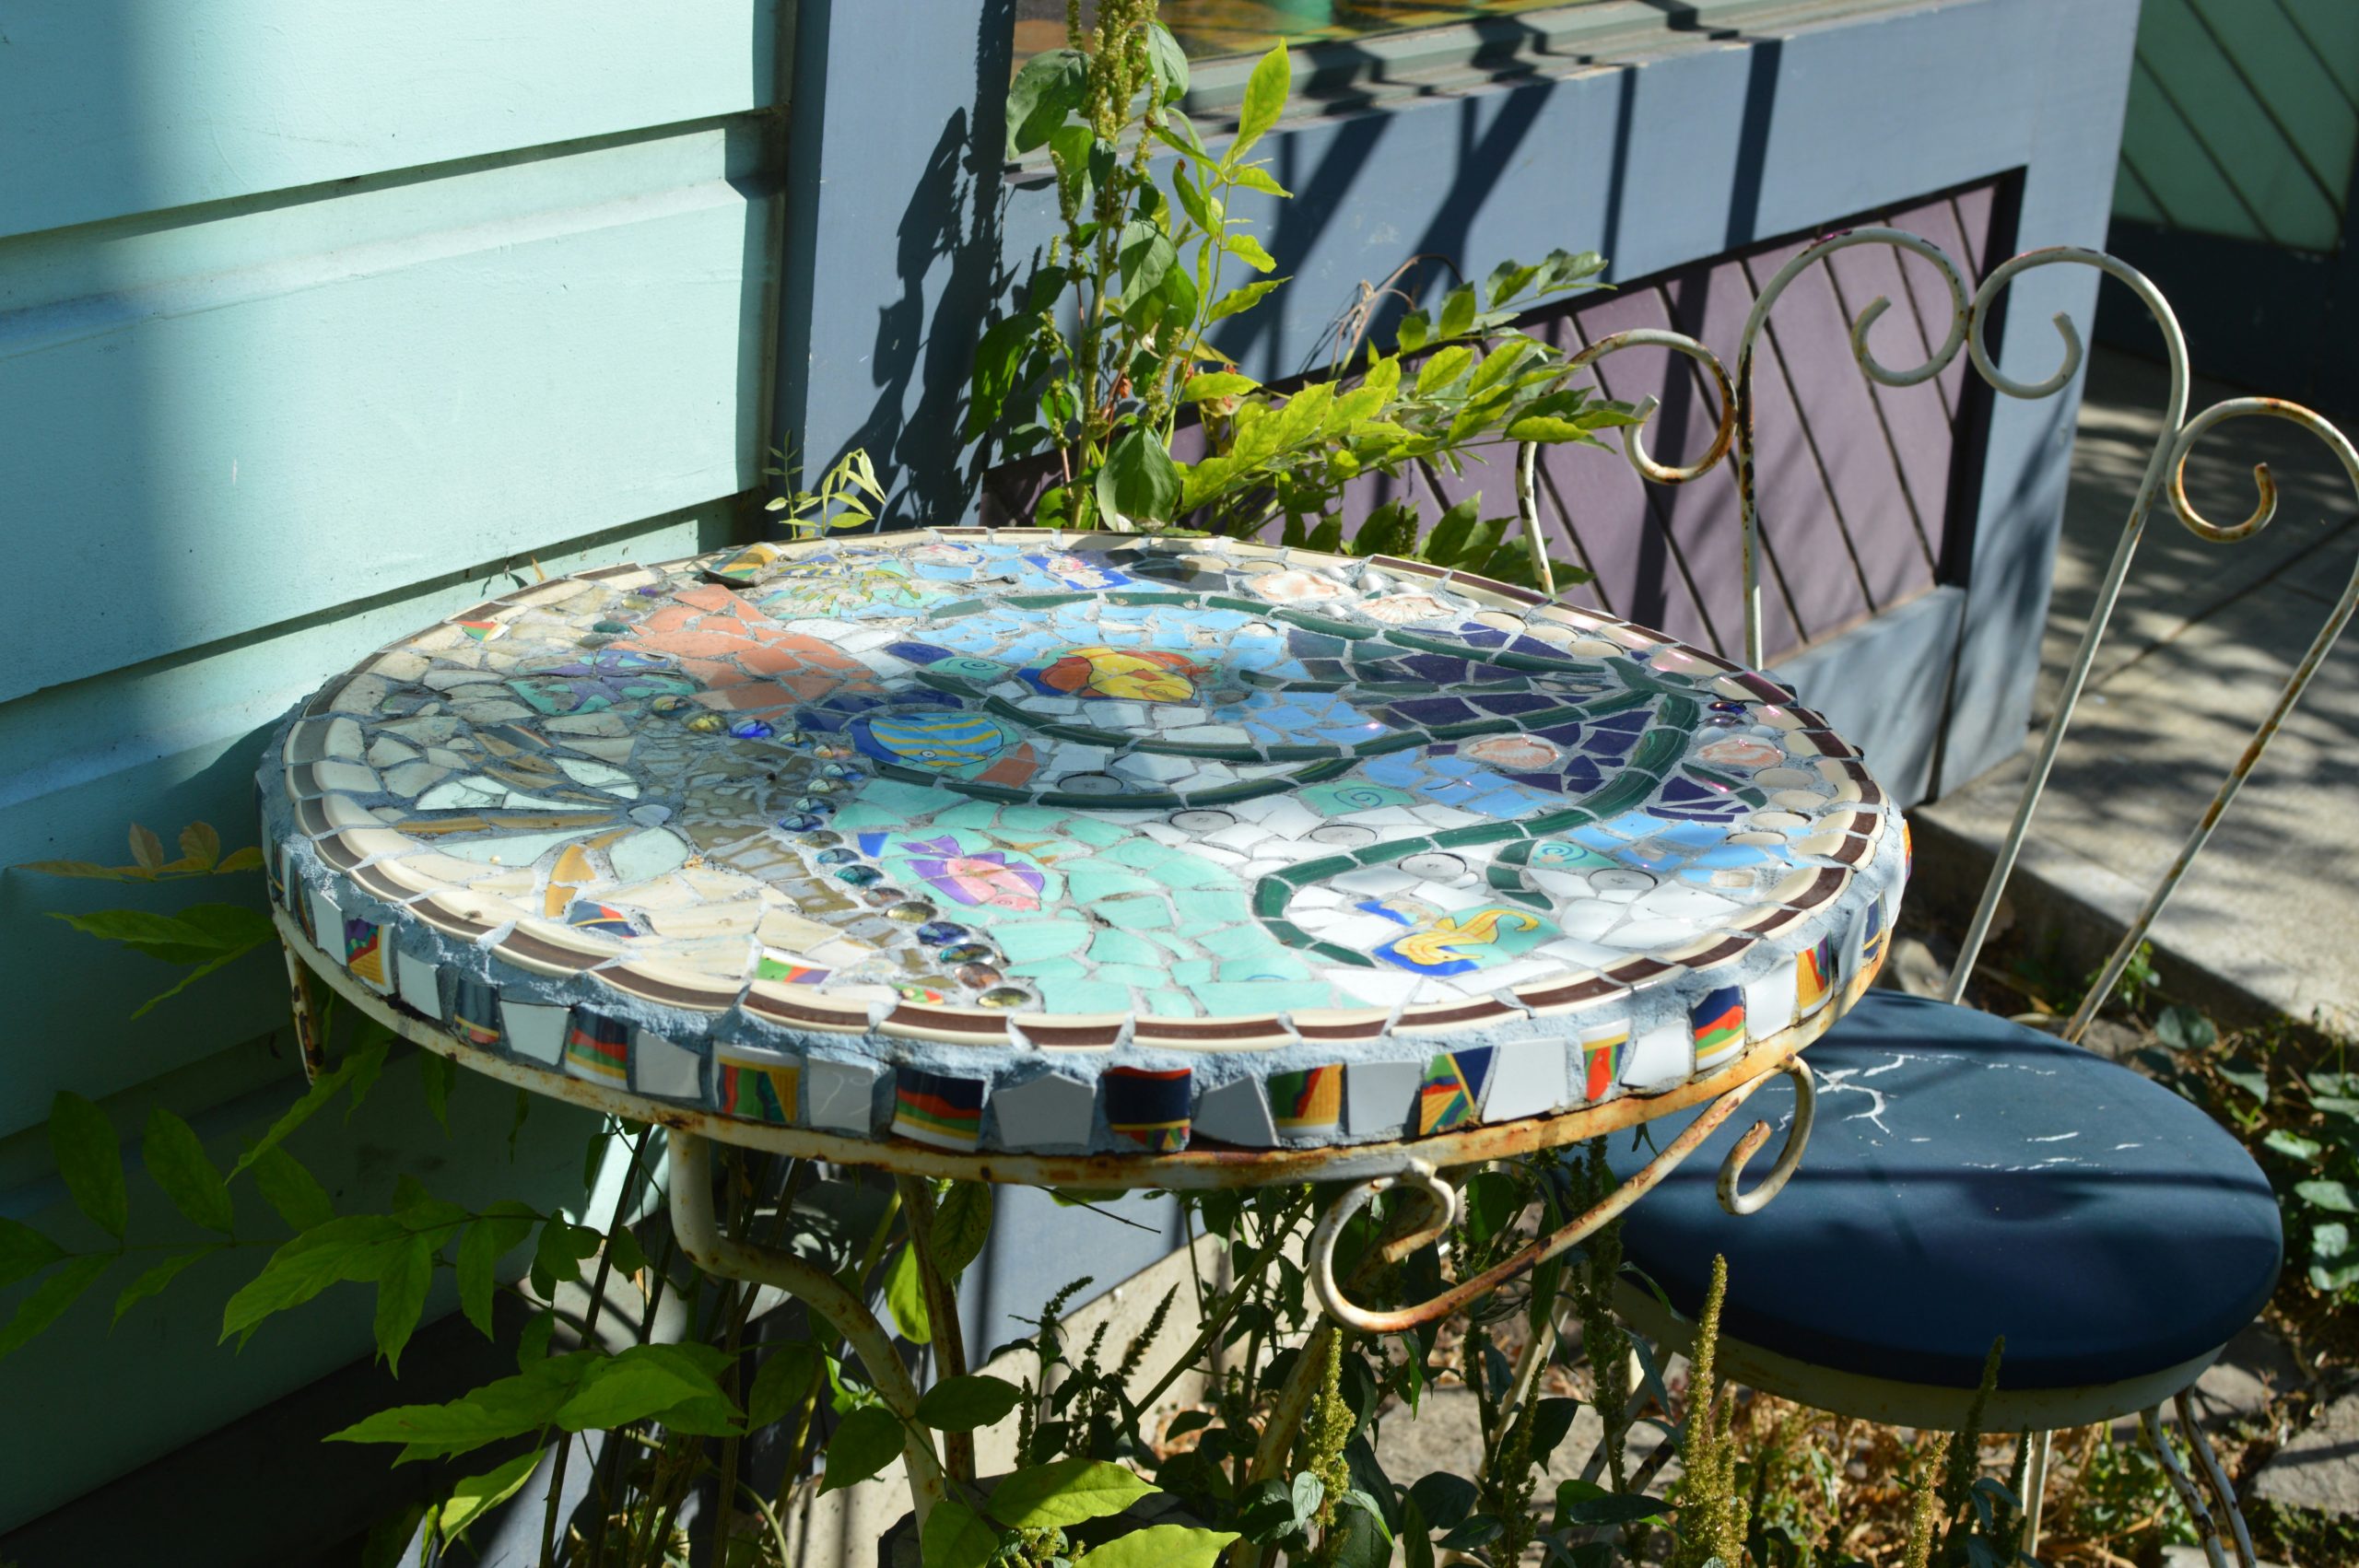
“A mosaic table living outdoors needs a bit of care.”
The main enemy is water. If water seeps into the grout, it can freeze and expand in the winter, popping tiles loose. Make sure the grout is sealed with a high-quality outdoor sealant at least once a year. The wrought iron base, especially one that’s already showing rust, will continue to corrode. To slow this down, you can sand the rusty spots and apply a rust-inhibiting paint, or just embrace the patina as part of its rustic charm.
6. Create a Rustic Grotto with a Mosaic Bistro Set and Stone Wall
The success of this scene hinges entirely on the rough, stacked stone wall. It provides the perfect textured, neutral backdrop that makes the detailed mosaics on the table and chairs pop. Without the wall, the bistro set would just be a nice set of furniture on the ground. With the wall, it creates a specific destination—a cozy, rustic little grotto. It’s a powerful lesson in how a background surface can completely define the mood of a space and elevate the objects in front of it.
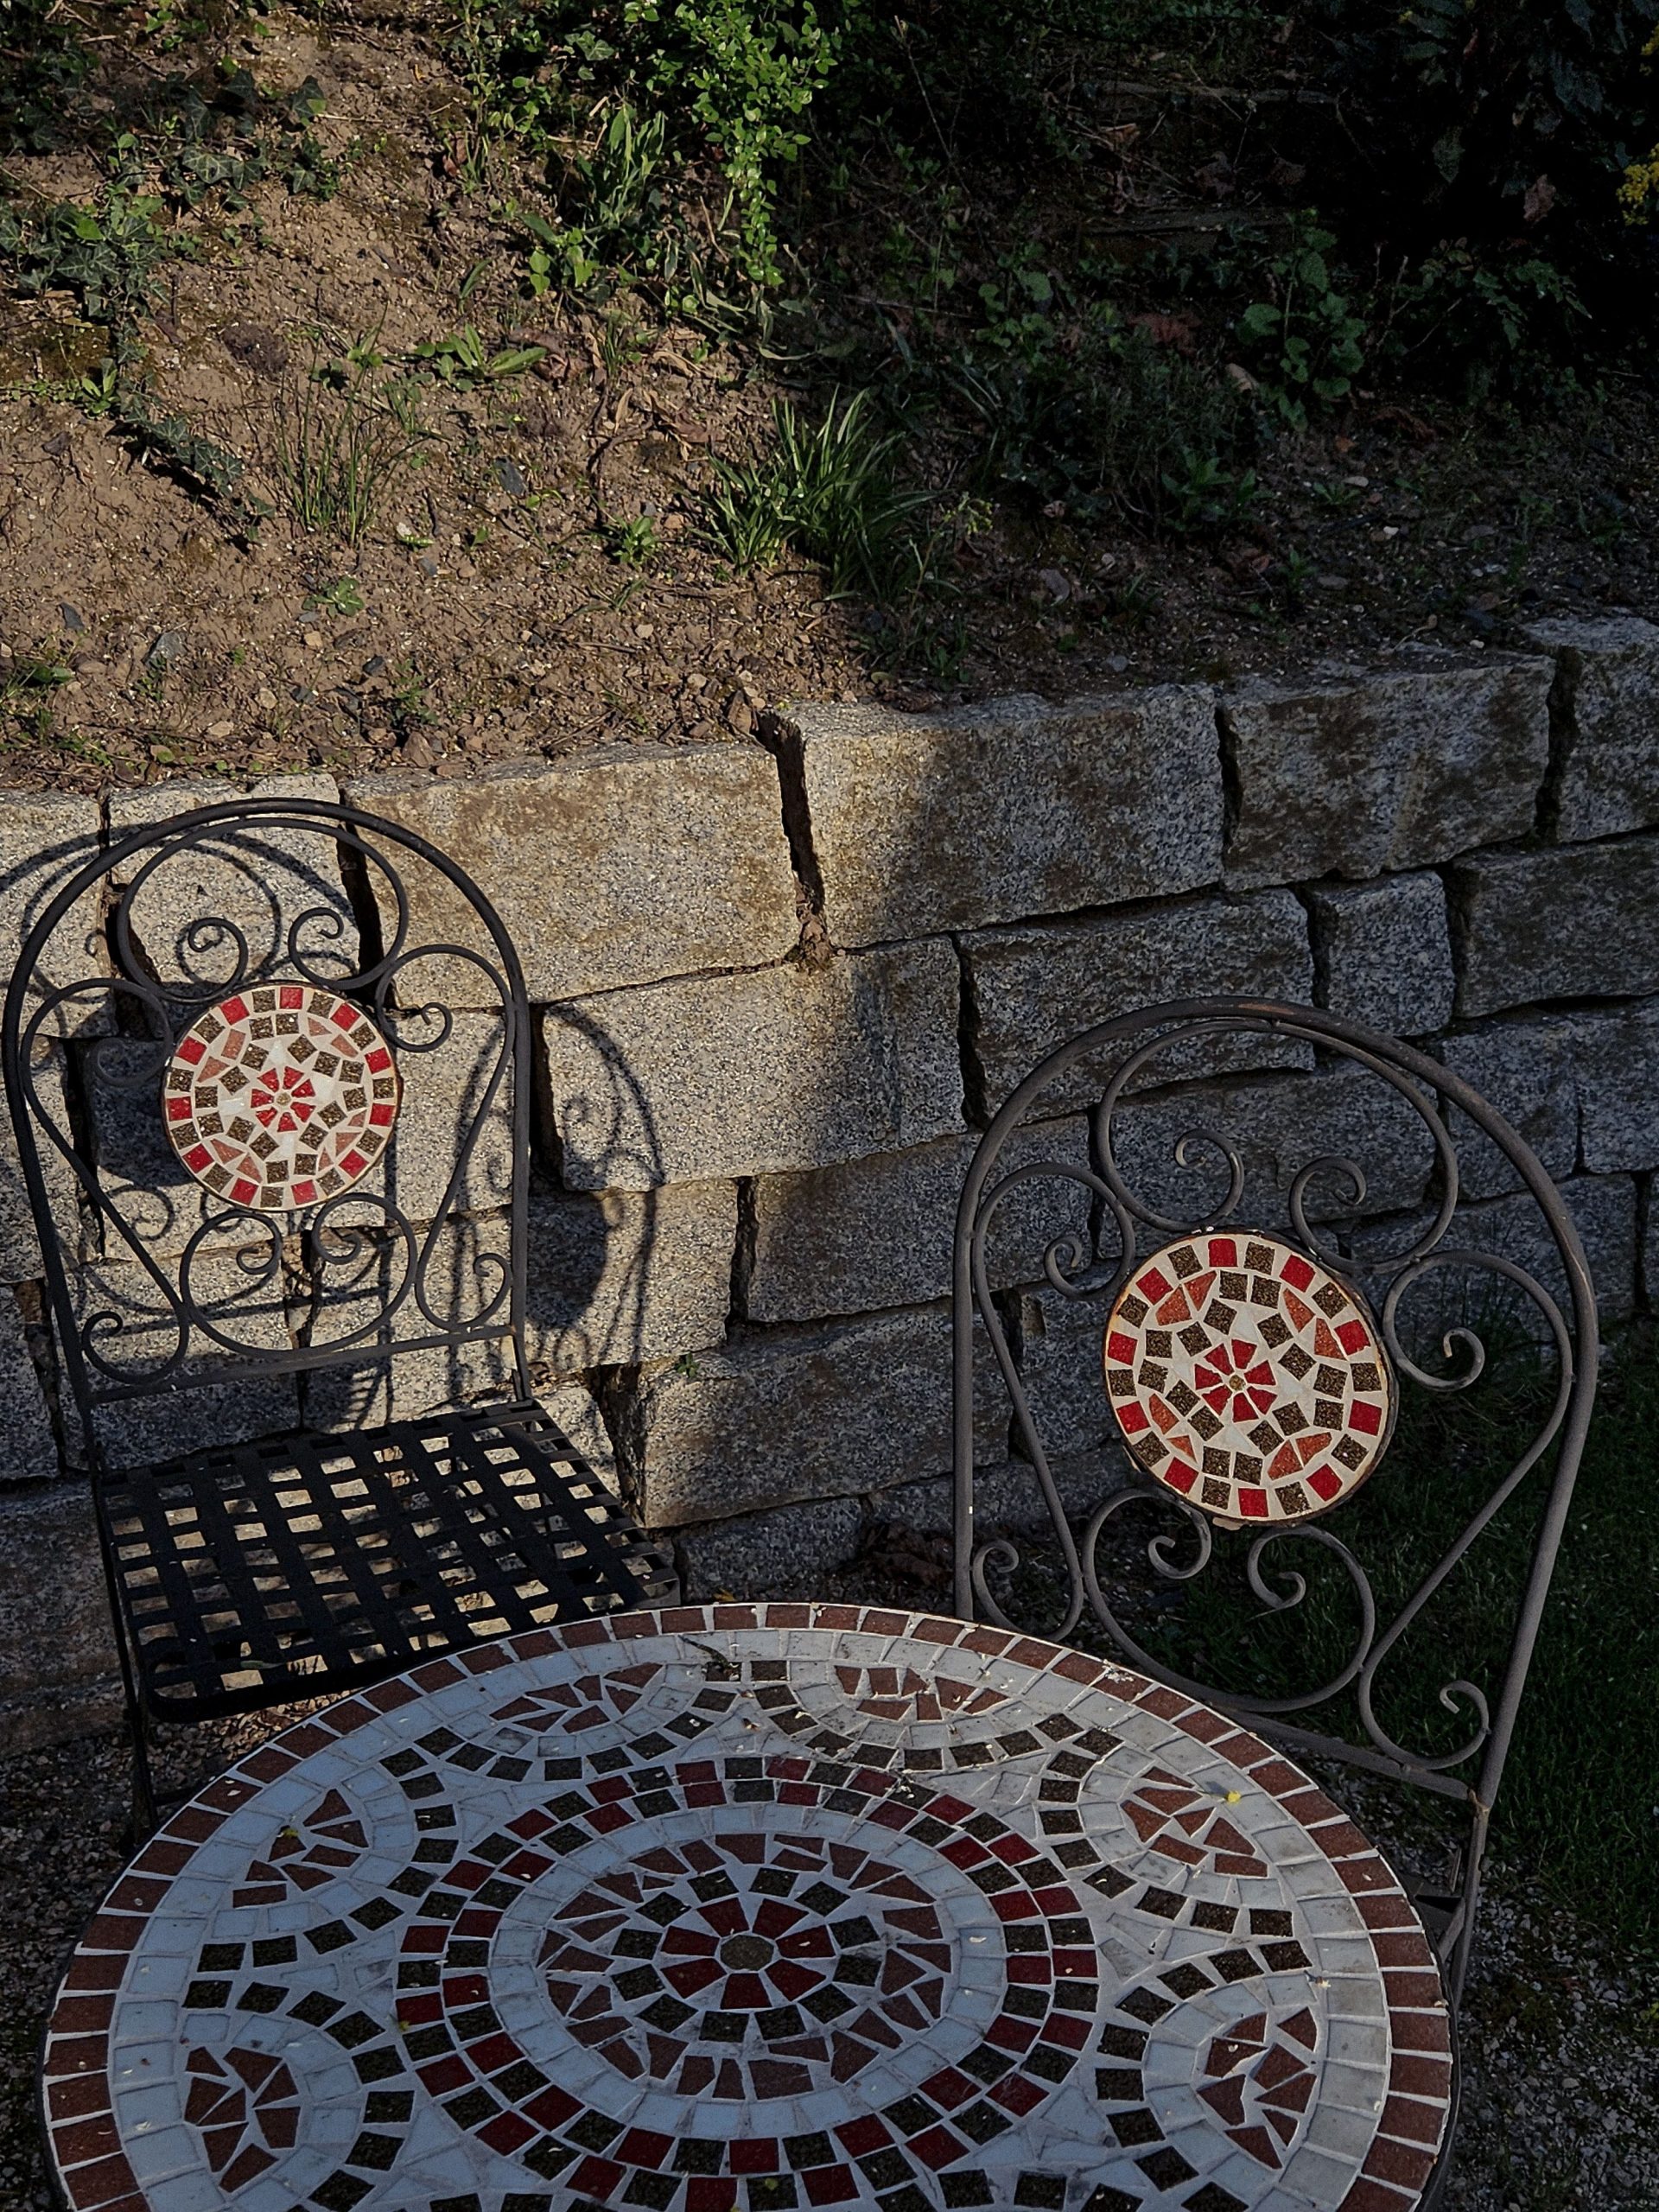
“While this looks like a romantic spot for a morning coffee, let’s talk comfort.”
Wrought iron chairs, even with a mosaic backrest, are notoriously unforgiving for long sits. If you plan to use a set like this for more than 15 minutes at a time, you absolutely need to invest in good-quality outdoor cushions for the seat and possibly the back. Also, the uneven surface of a mosaic tabletop can make wine glasses or small plates a bit wobbly. It’s more for atmosphere than for a full, formal meal.
7. Craft an Organic Wavy Path with Mixed River Pebbles
When creating a pebble mosaic path, the secret to a professional look is sorting your stones meticulously *before* you start setting them. Separate them not just by color (dark grey, white, brown) but also by size and shape (flat, round, oblong). For the wavy lines, use your flattest, most uniform pebbles placed on their narrow edge. This creates a crisp, defined line. Fill the larger sections with the more rounded, irregular stones. This pre-sorting is tedious, but it’s the difference between a muddled mess and a clear, artistic pattern.
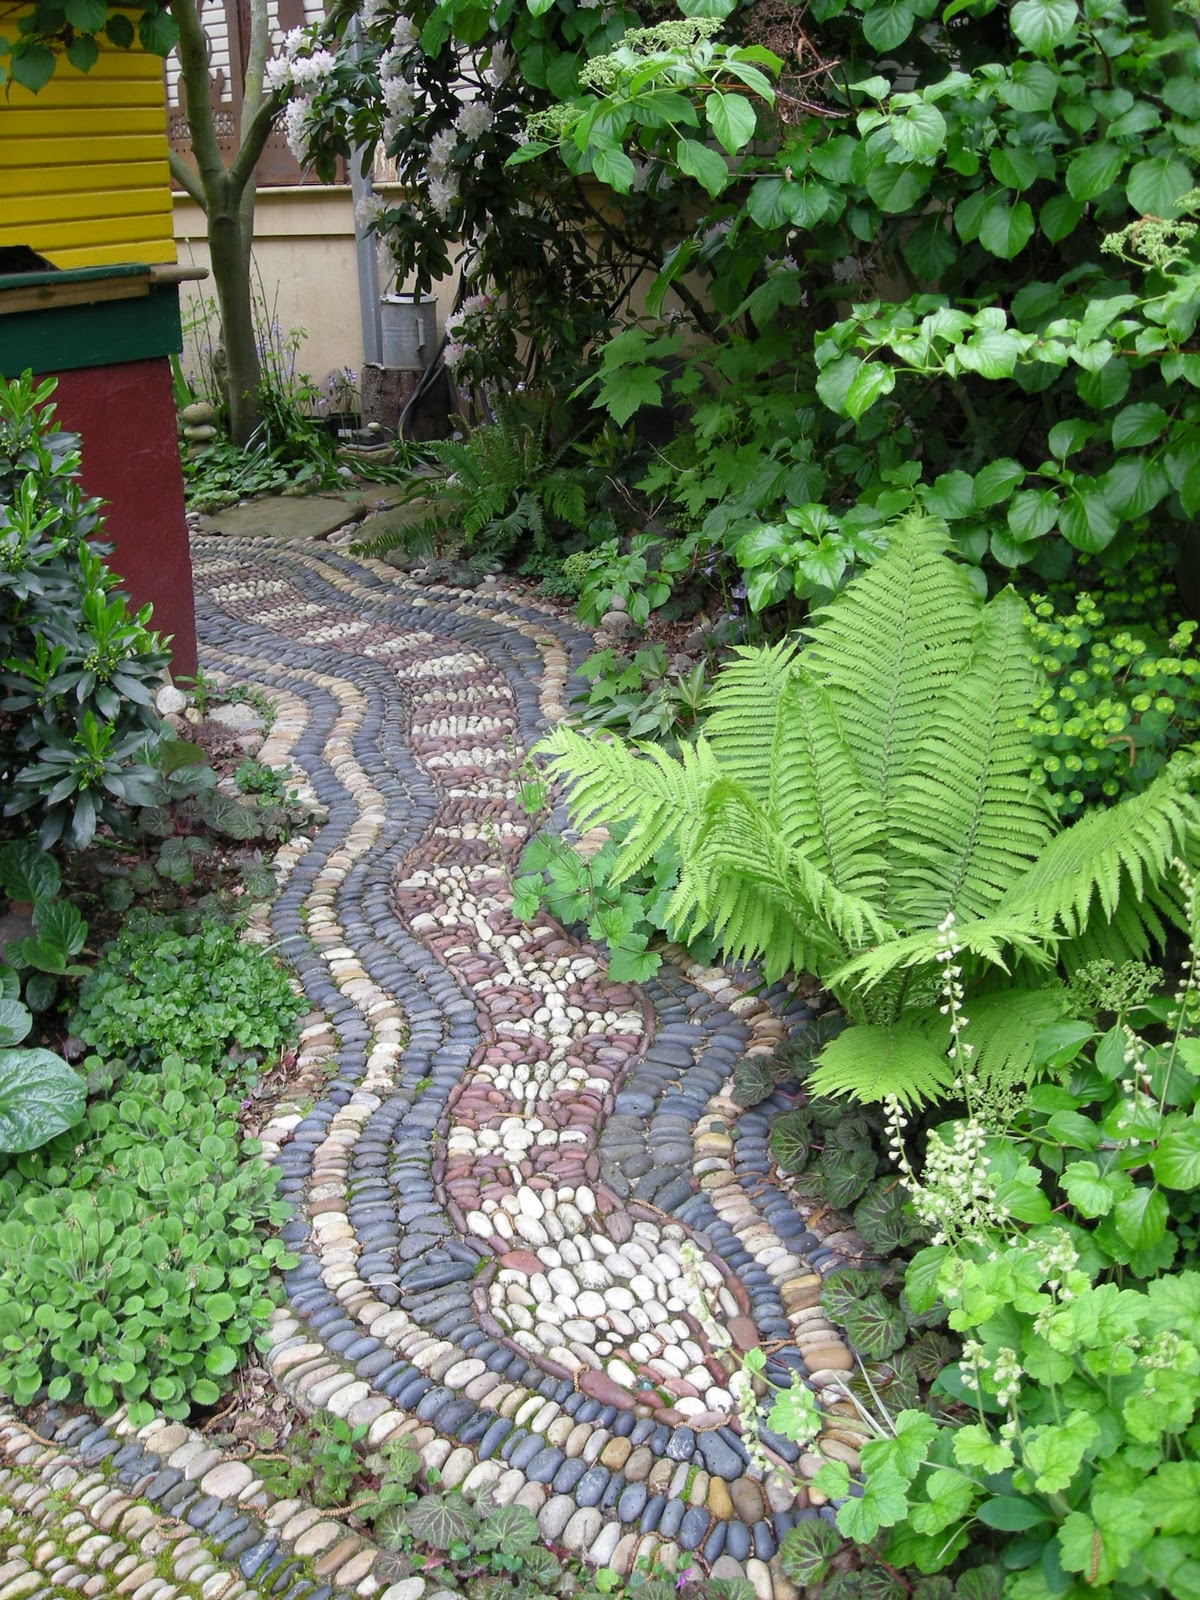
“We’re seeing a huge move toward biophilic design—the practice of connecting with nature through our homes—and this pebble path is a perfect example.”
People are tired of sterile concrete and are craving more organic, textural materials in their gardens. A pebble mosaic feels grounded and ancient, connecting the garden to natural elements like a riverbed. It’s a trend with major staying power because it’s rooted in a fundamental human desire for natural beauty, not a fleeting aesthetic.
8. Mix Pavers and Mosaics for a Playful, Numbered Garden Path
This charmingly eclectic path follows a simple but effective formula: 70% Rustic Base + 30% Playful Accents. The ‘Rustic Base’ consists of the irregular grey stone pavers and the weathered red brick retaining walls, which ground the space in a timeless, earthy feel. The ‘Playful Accents’ are the bright, numbered mosaic tiles and the decorative blue ceramic pots. This balance is key; it allows the colorful elements to shine without overwhelming the senses. It’s a garden path, not a theme park ride.
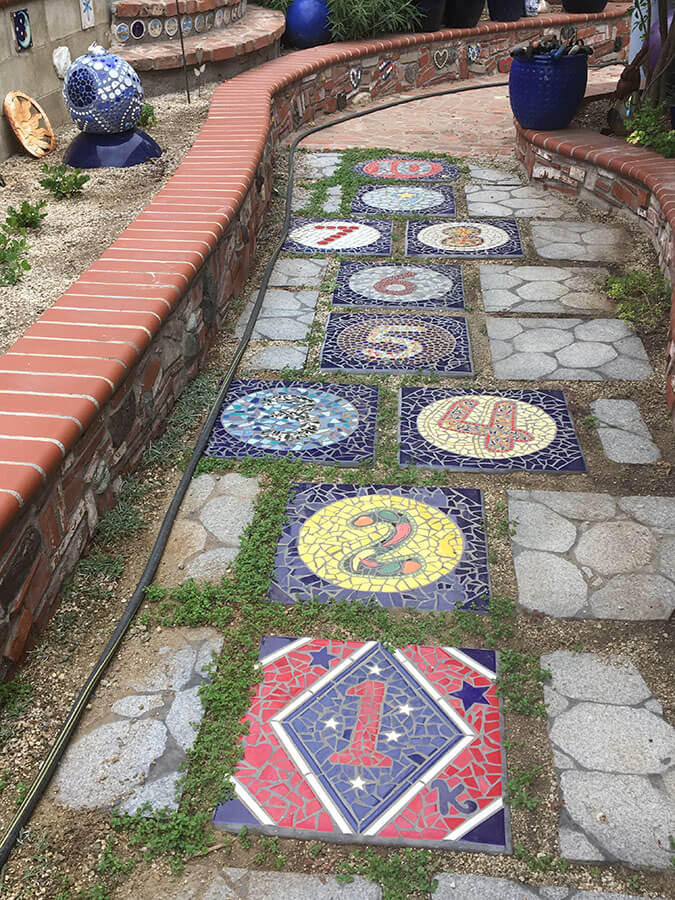
“You don’t need custom tiles to get this look.”
You can create your own numbered stepping stones for about $15 each. Buy plain square concrete pavers from a hardware store. Find house numbers and colorful tile remnants at a creative reuse store or online. Arrange your design, use a strong tile adhesive to attach the pieces to the paver, and then fill the gaps with outdoor grout. It’s a fantastic beginner project and a great way to add a personal touch to your garden path. Compare this to the more uniform path in Idea #1 to see two different approaches.
9. Build an Eclectic Path with Brick Edging and Handmade Stepping Stones
Want to make your own mosaic stepping stone? It’s easier than you think. This project takes about 3-4 hours of active time, plus drying time. Cost: ~$25 per stone.
- Start with a 12×12 inch concrete paver and a bag of tile adhesive.
- Arrange your broken tile pieces, bottle caps, or sea glass into a design on the dry paver first. Take a photo so you remember the layout.
- Working in small sections, apply adhesive to the paver with a putty knife and press your pieces firmly into place.
- Let the adhesive cure for 24 hours.
- Mix outdoor-grade grout and apply it over the whole surface, pressing it into all the cracks.
- After 20-30 minutes, use a damp sponge to wipe the excess grout off the face of the tiles. Let it cure fully for 72 hours before placing in the garden.
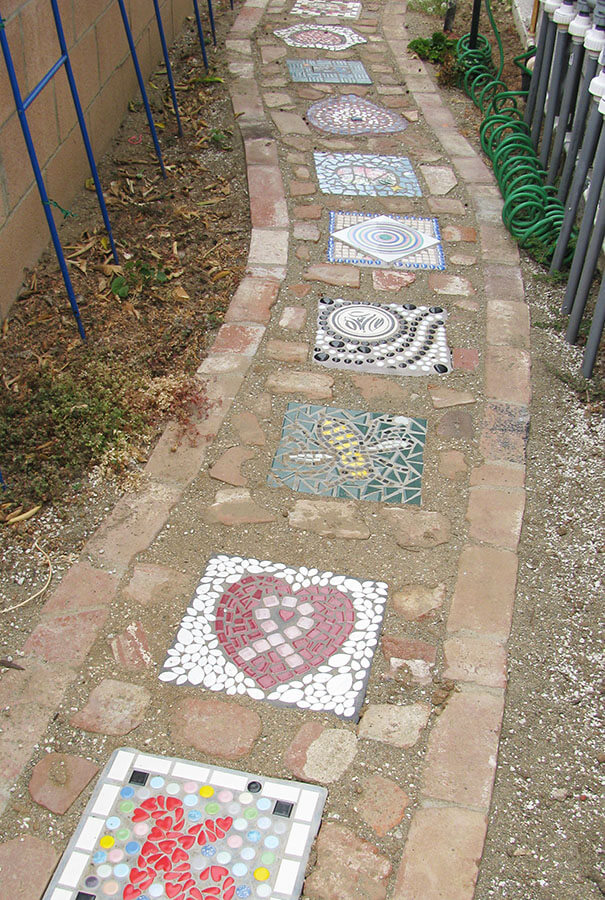
“The beauty of this path lies in its unapologetically handmade and personal quality.”
It’s not trying to be perfect. The combination of different shapes (square and hexagonal stones), various patterns (hearts, butterflies, abstract swirls), and the simple red brick and gravel materials creates a feeling of joy and creativity. It works because it feels collected and evolved over time, like a scrapbook of small, beautiful projects. This is the opposite of a sterile, professionally installed hardscape; it’s a path with a personality.
10. Decorate a Garden Stone with a Sunburst Mosaic and Dragonfly Accent
The single element that makes this piece magical is the silver metal dragonfly appliqué. The glass mosaic sunburst is beautiful on its own, but the addition of the three-dimensional, metallic dragonfly introduces a different material and texture. It creates a moment of surprise and whimsy, elevating the project from a simple mosaic stone to a small, narrative art piece. It’s that unexpected little detail that catches the eye and makes you smile.
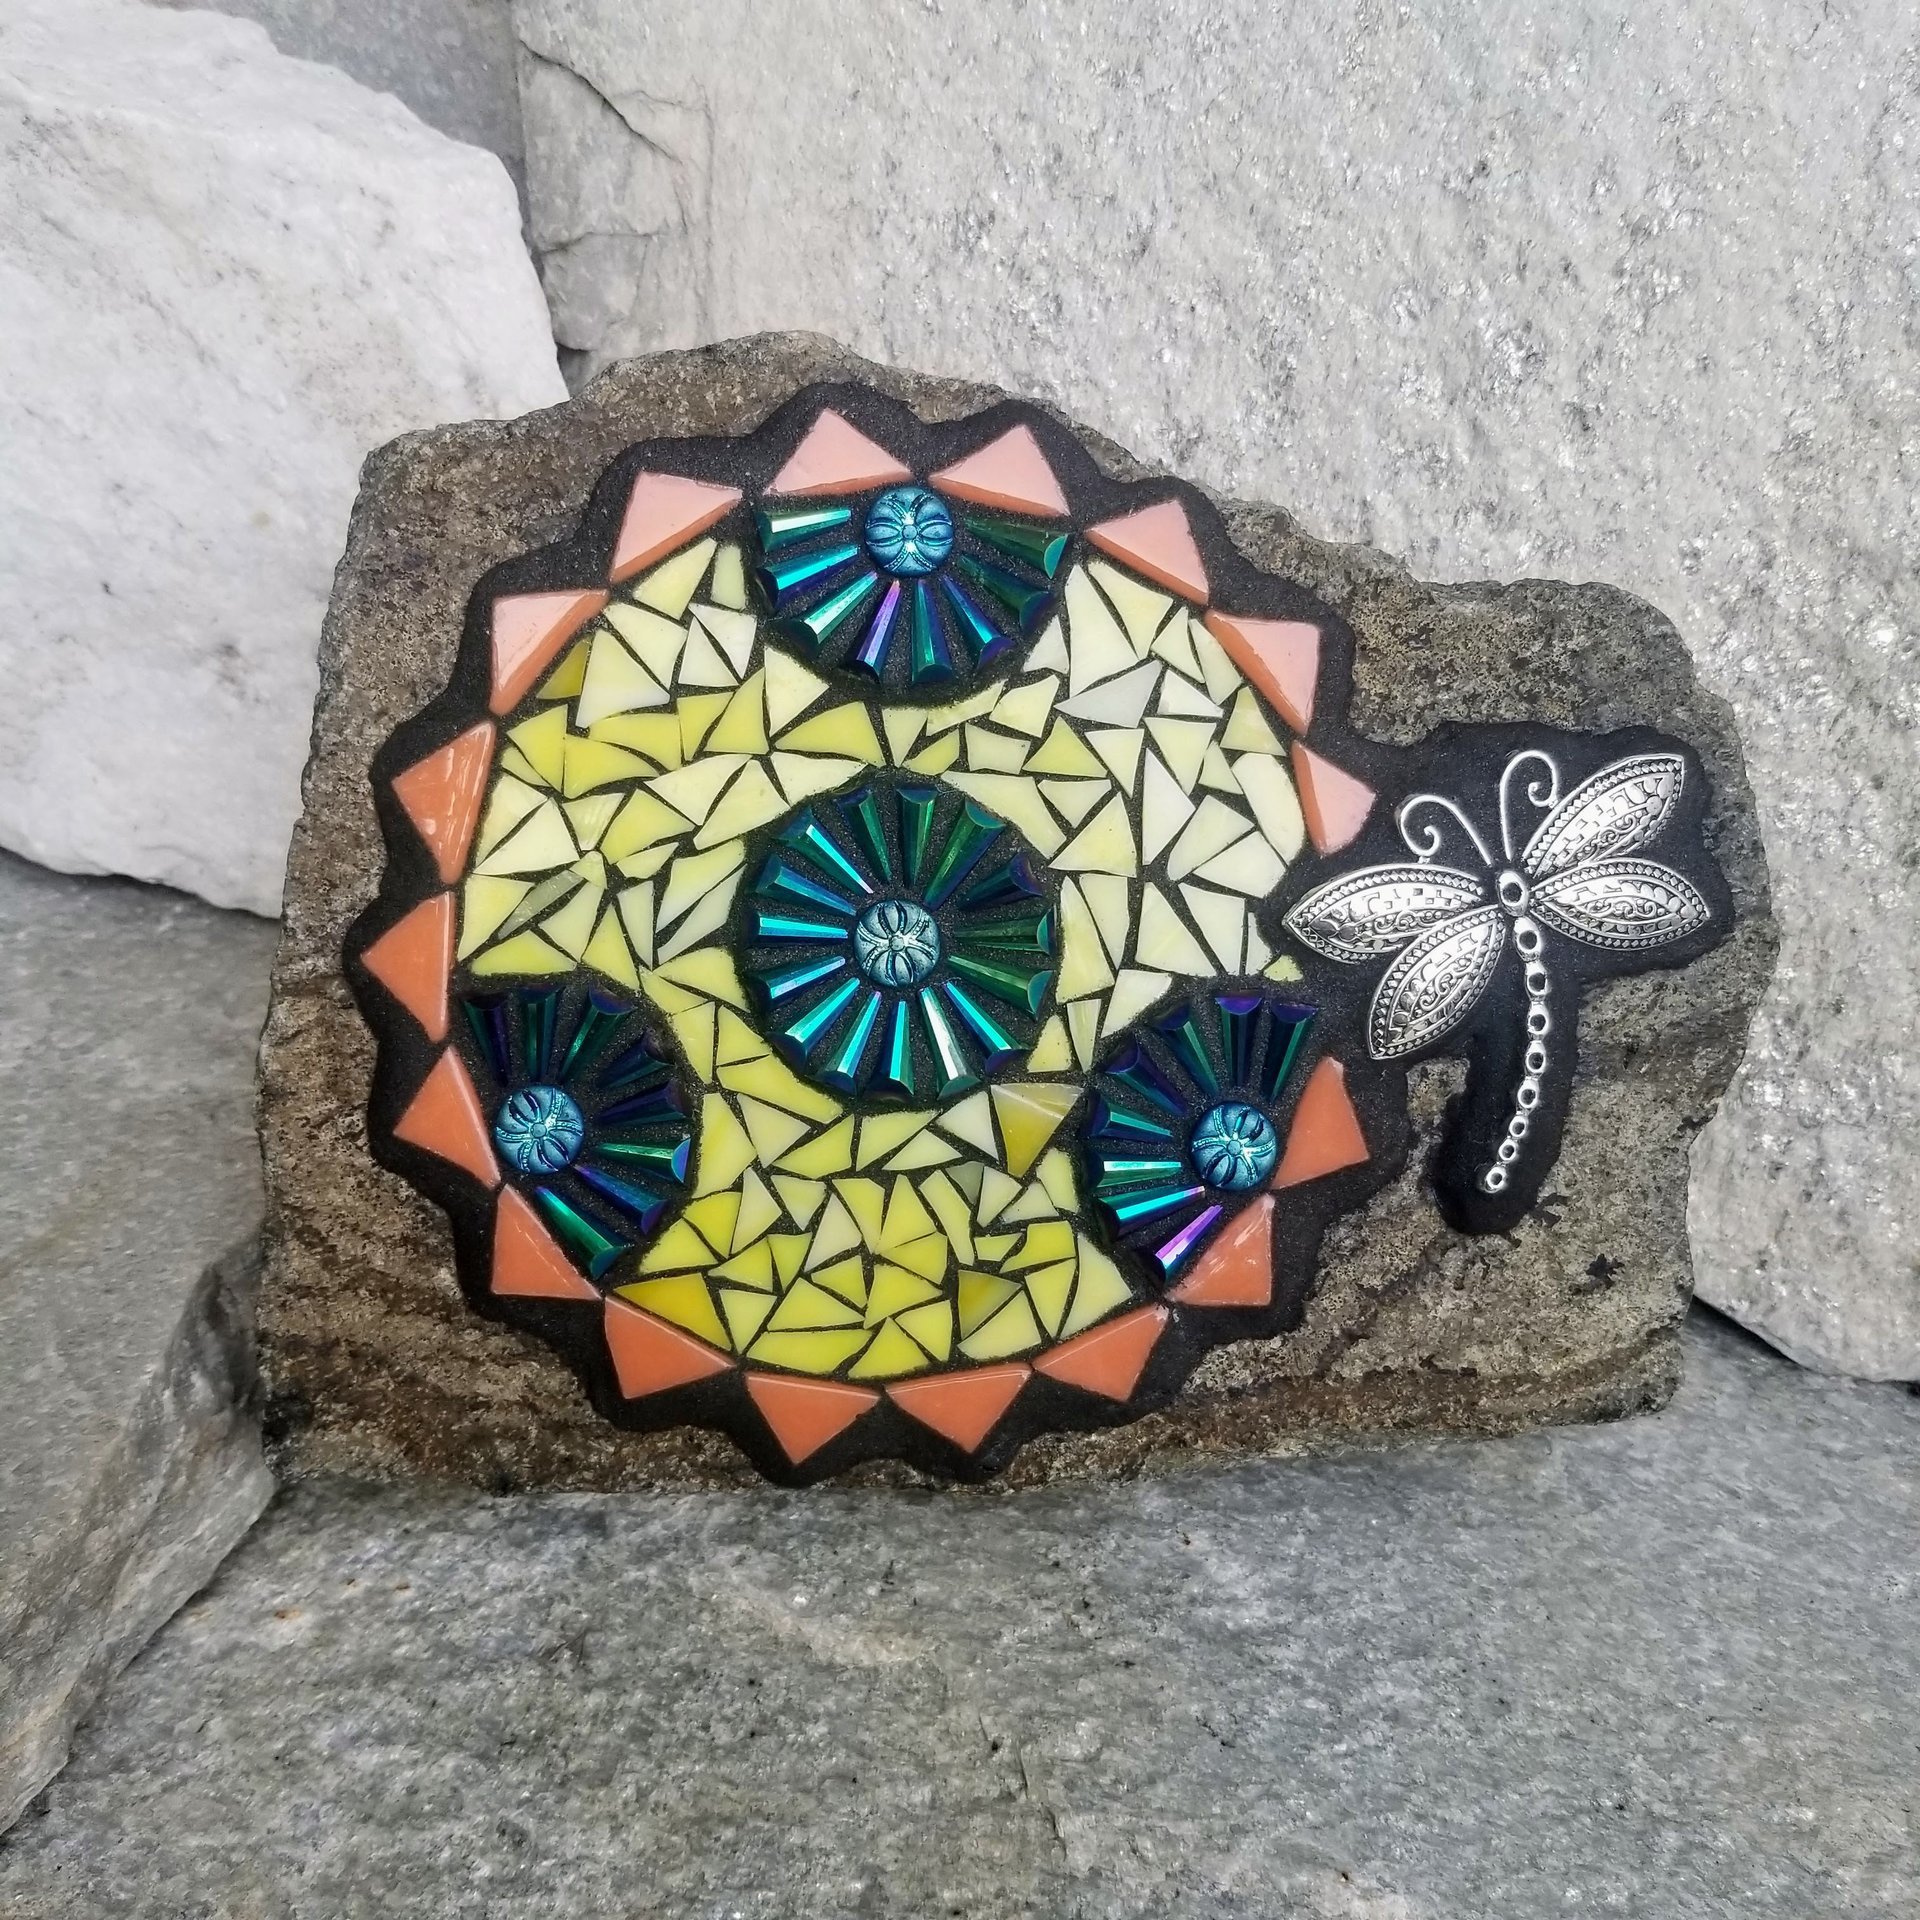
“Recreating this single decorative stone is a perfect entry-level DIY project with a low budget.”
You can find everything you need at a craft store or online.Natural River Stone: $5 – $15 (or free if you find one!)Glass Tiles: $15 – $25 (for a variety pack of colors)Metal Appliqué (Dragonfly): $5 – $10Outdoor Adhesive & Black Grout: $20 – $30TOTAL: $45 – $80Budget alternative: Forage for a flat stone in your yard. Use broken pieces from a single colorful plate from a thrift store ($2) and skip the metal appliqué for a total cost under $30.
11. Transform a Garden Wall with Large-Scale Glass Mosaic Art
This is a maximalist’s dream. A full-wall mosaic works best on a long, continuous surface, like a retaining wall or the side of a garage, at least 15-20 feet long. The key is to have enough space for the organic, sprawling shapes to feel unconstrained. In a small, enclosed patio, this much pattern and color could feel chaotic and overwhelming. If your space is limited, take this concept and scale it down to a single, large panel (like a 4×8 foot piece of cement board) as seen in Idea #3, mounted to the wall. This gives you the artistic impact without consuming the entire space.
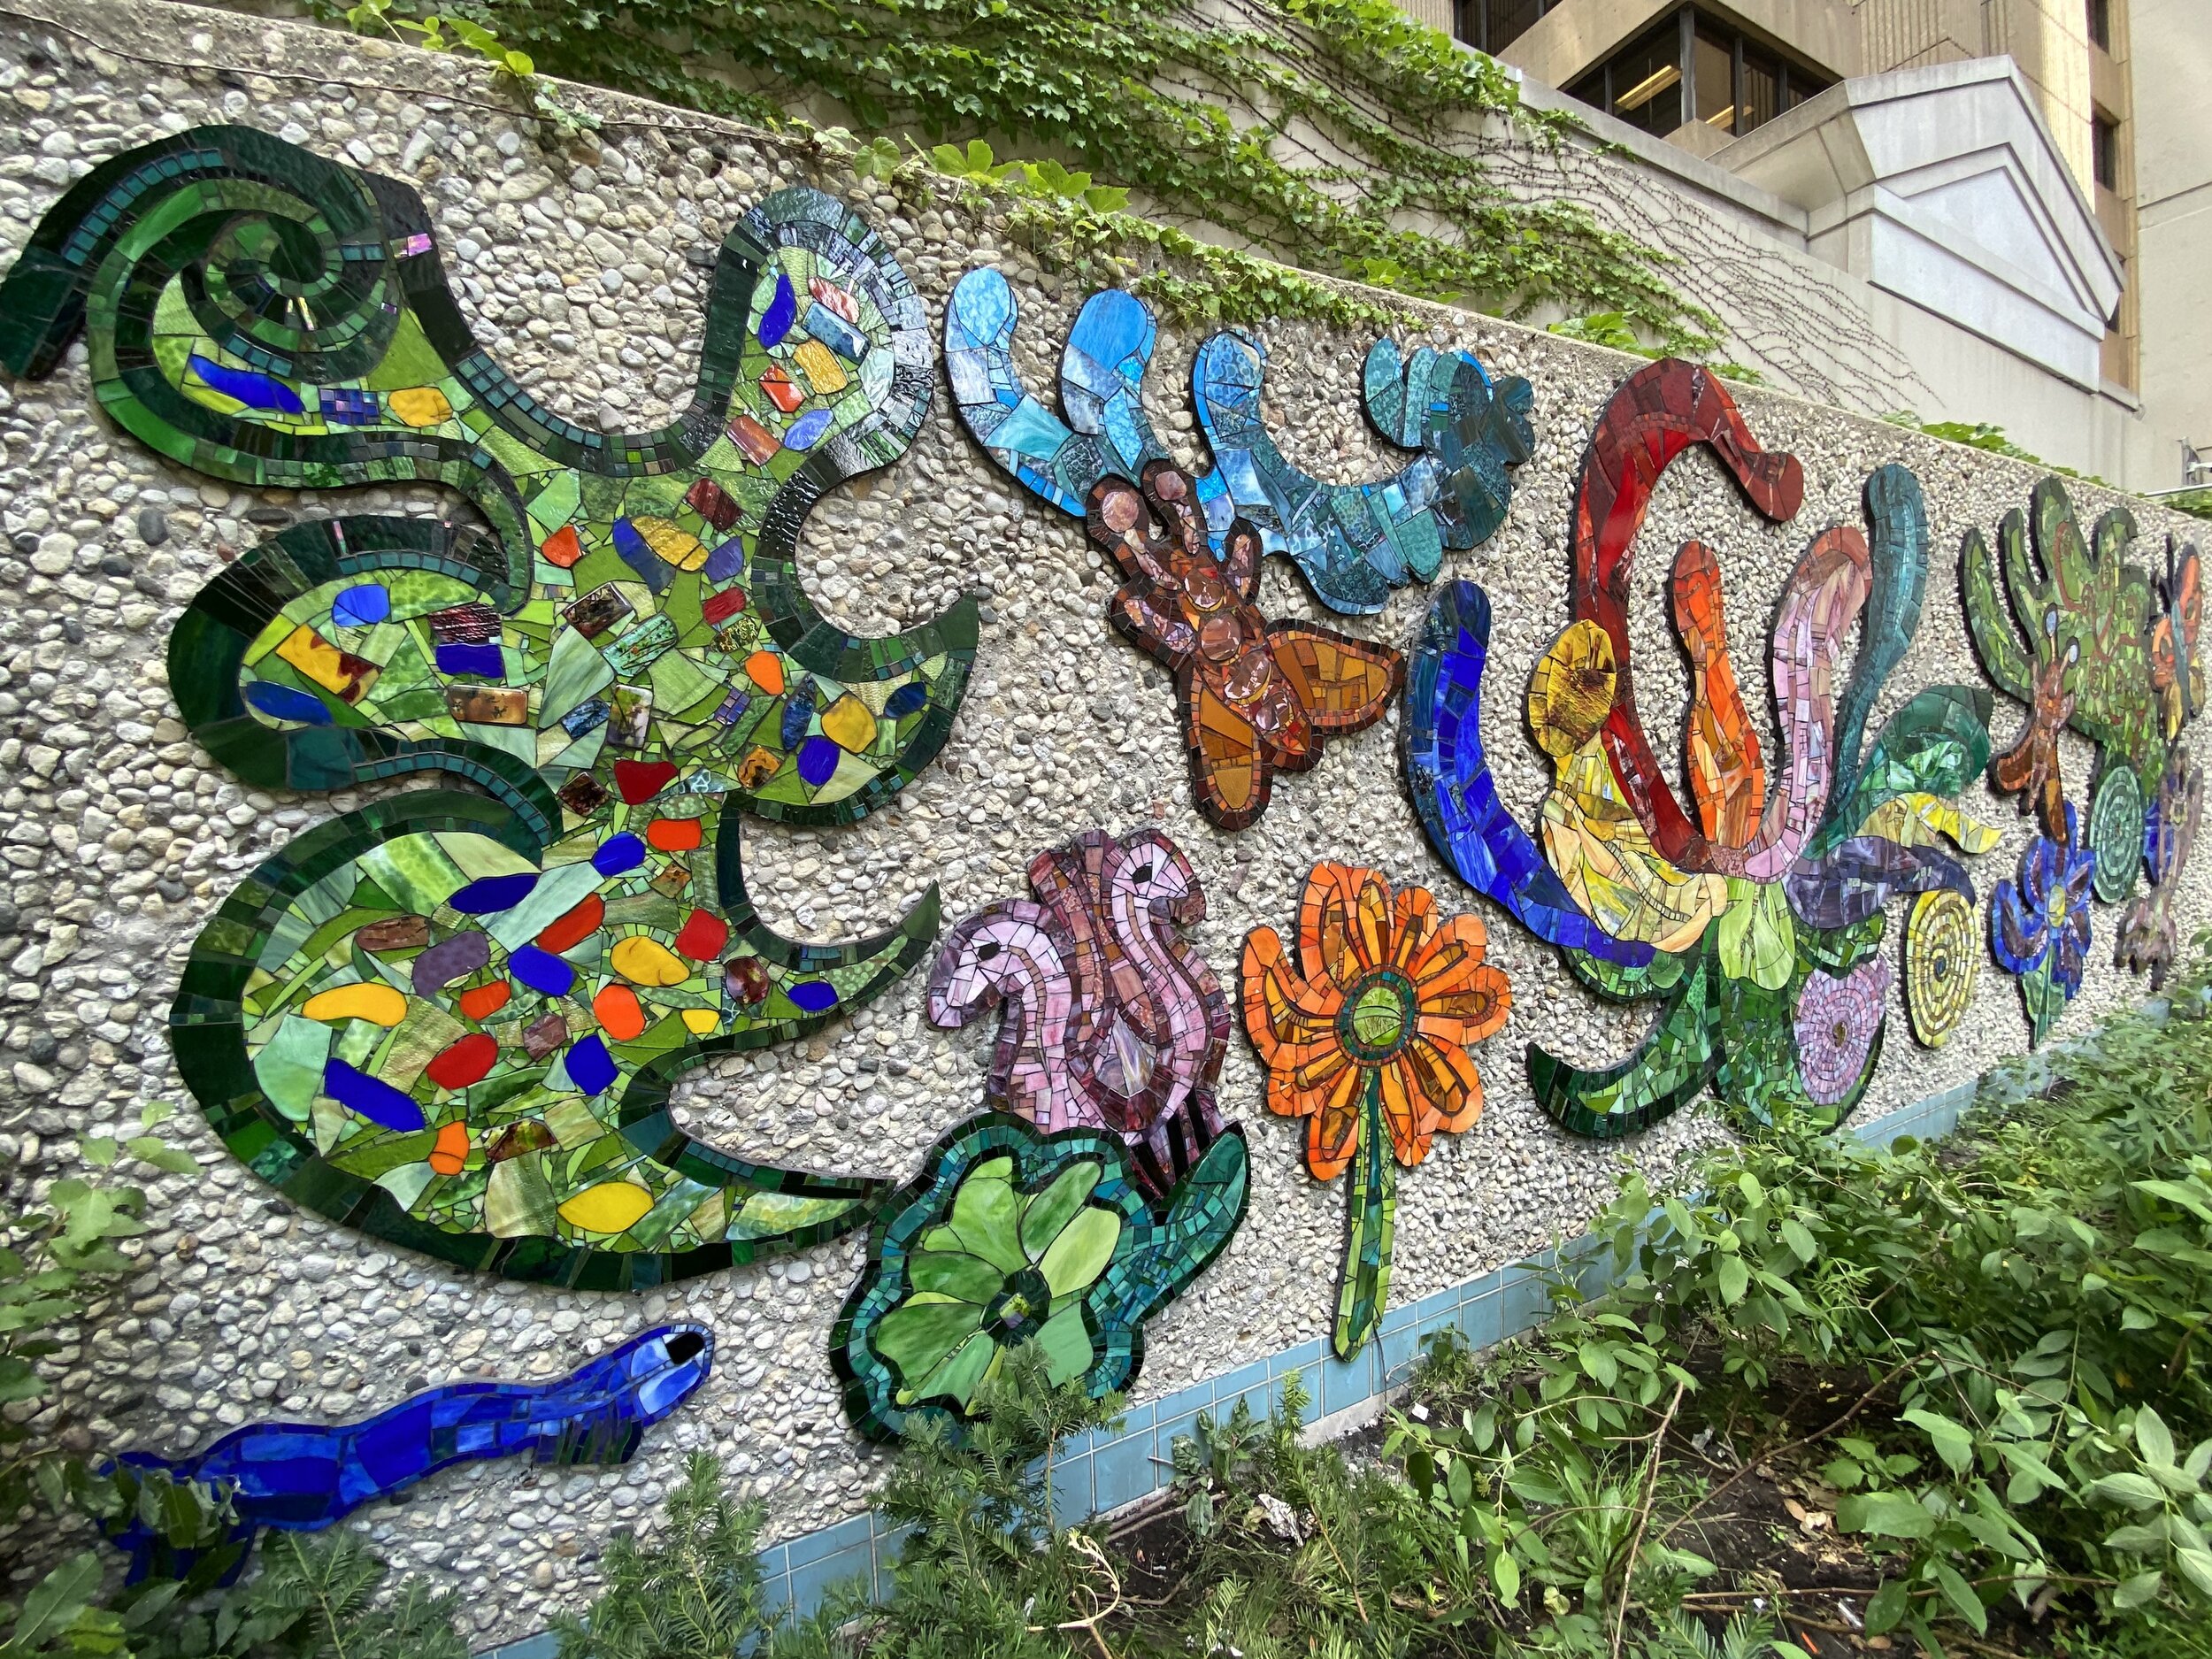
“A mosaic wall of this magnitude is not a DIY project for the faint of heart.”
The sheer volume of tile cutting, placing, and grouting is immense. But the biggest reality check is the surface preparation. Applying this directly to a crumbling or uneven wall is a recipe for disaster. The pebble-dash texture seen here provides an excellent ‘key’ for the adhesive to grip. If you have a smooth concrete or stucco wall, you’ll likely need to install a wire lath first to ensure the mosaics don’t eventually delaminate and fall off. This is a structural project as much as it is an artistic one.
12. Brighten a Wall with a Framed Mosaic Panel of Butterflies and Flowers
This piece is pure joy, and it works because it uses a simple, effective color strategy. The background is a consistent field of green mosaic tiles, which makes the brighter elements—the yellow butterflies and multi-colored flowers—pop right off the surface. The golden-toned frame adds a touch of polish and warmth, coordinating beautifully with the yellow tiles. By leaning it against the wall instead of mounting it permanently, it feels casual and adaptable, like a piece of art that can be moved with the seasons.
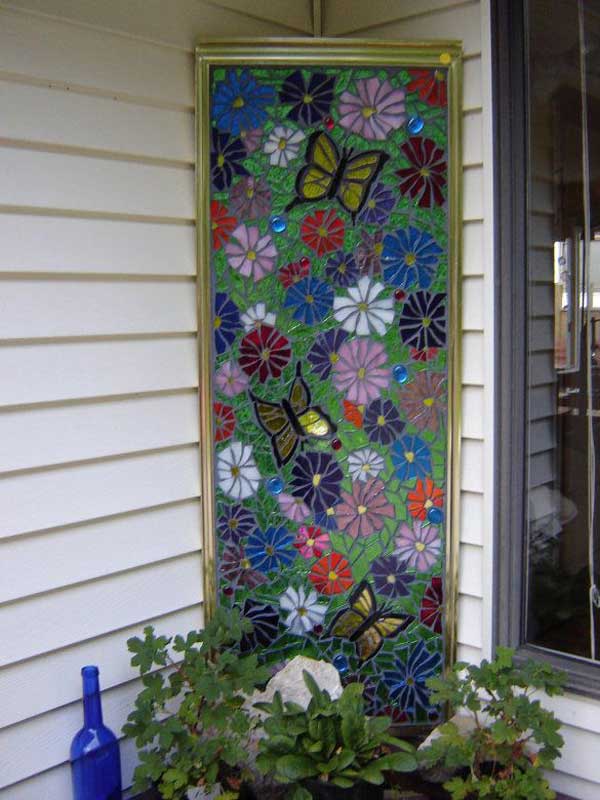
“When creating a mosaic with distinct figures like these butterflies, the outline is everything.”
Before you even glue a piece down, use a permanent marker to draw your design directly onto the substrate. Then, begin by laying the outline tiles for your figures first. Use your most defined, straight-edged tile pieces for this. Once the outlines are set, you can fill in the shapes and the background more freely. This ensures your butterflies look like butterflies, not colorful blobs.
13. Capture a Garden Scene in a Long, Rectangular Mosaic Panel
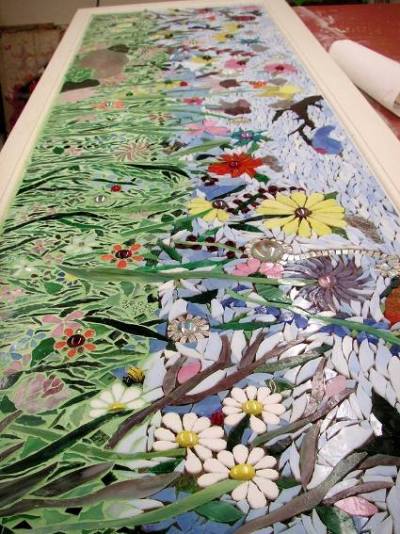
This vibrant panel follows a classic landscape art composition, translated into tile. The formula is approximately: 60% Lush Greenery (the various shades of green forming the grass and foliage) + 30% Floral Pops (the red, yellow, and white flowers) + 10% Sky and Details (the light blue background and tiny bee). This distribution mimics a real garden, with a dominant base of green that allows the colorful flowers to stand out as focal points without competing with each other.
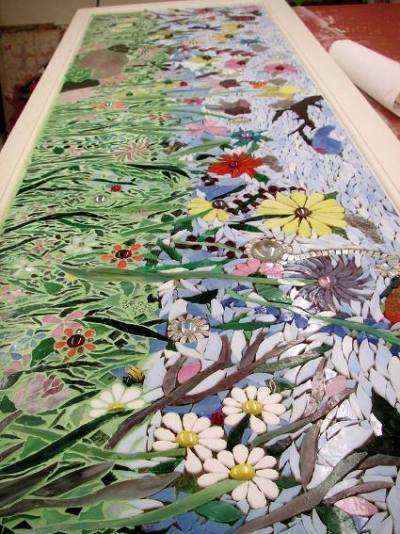
“that brings this entire piece to life is the tiny mosaic bee.”
It’s a minuscule detail in a large panel, but it’s transformative. Without it, you have a pretty, static picture of flowers. With the bee, you have a story—a moment in a living garden. It adds a sense of action, scale, and narrative. It’s proof that sometimes the smallest, most thoughtful element can have the biggest impact on the overall feeling of a piece of art.
14. Craft a Large Fish Mosaic with Vibrant, Overlapping Glass Scales
Creating that beautiful, iridescent fish scale effect is all about layering. Time: 5-8 hours. Cost: $75-$150, depending on glass.
- Start with a fish-shaped base made of wood or cement board. Draw the scale pattern on it as a guide.
- Begin tiling at the tail and work your way towards the head. This ensures the scales overlap correctly.
- For each row, apply a thin layer of tile adhesive. Place your first scale.
- Place the next tile so it slightly overlaps the previous one, just like a real fish scale. Use mirrored and special iridescent tiles sparingly for maximum impact.
- Continue row by row, letting each row set slightly before starting the next.
- Once all scales are on and the adhesive is cured, carefully apply grout, making sure to push it into all the gaps under the overlaps.
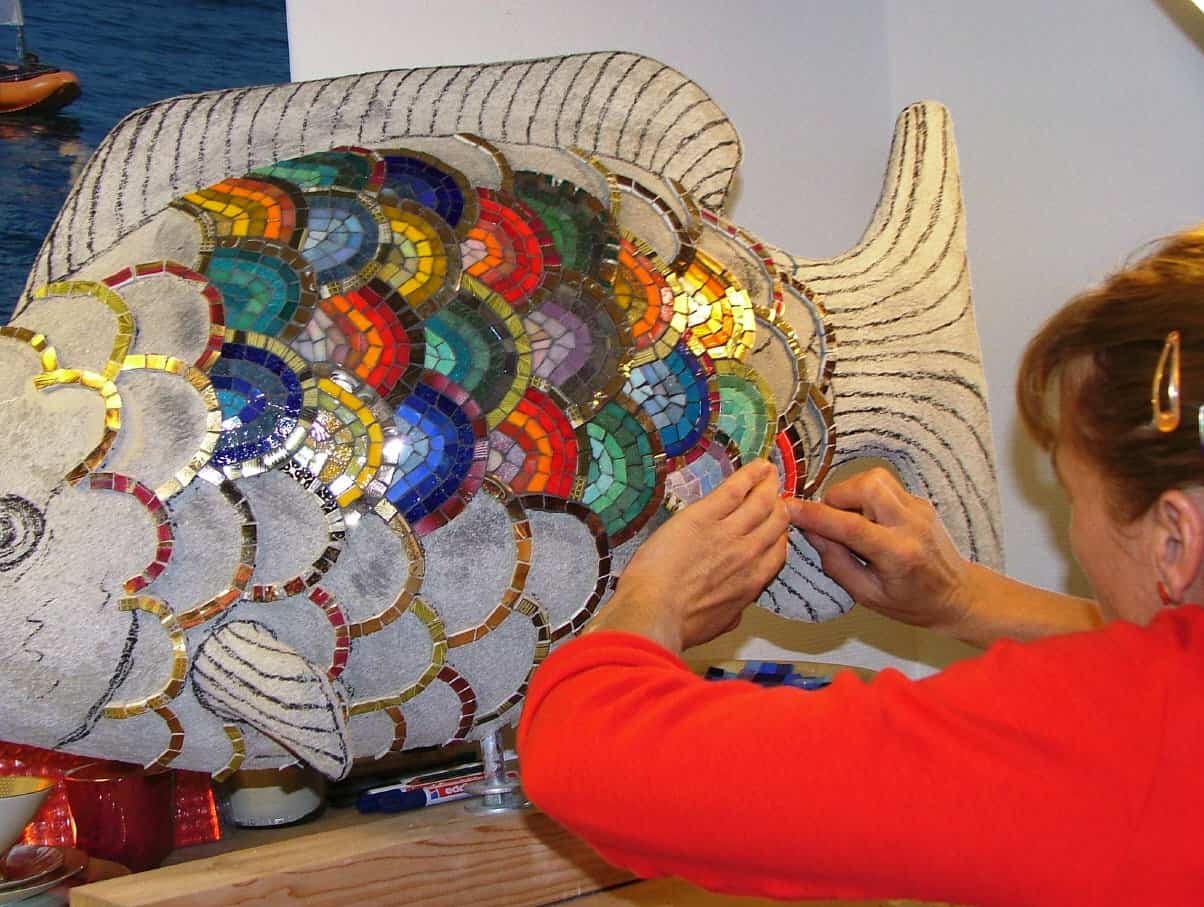
“Don’t want to invest in hundreds of custom glass tiles?”
Hit the thrift store! Look for colorful ceramic or porcelain plates, especially ones with iridescent or metallic details. You can also find old costume jewelry with colorful gems. Carefully break the plates and use a tile nipper to shape the pieces into rough scale shapes. The varied patterns and finishes from different plates will create a wonderfully eclectic, upcycled version of this high-end look for a fraction of the cost.
15. Showcase a Bonsai Tree in a Floral Mosaic Garden Planter
This is a perfect pairing of art and nature. The planter and the bonsai tree work so well together because they are both highly decorative, yet they don’t compete. The organic, free-flowing floral mosaic on the pot provides a beautiful contrast to the highly structured, meticulously pruned layers of the bonsai tree. The planter is colorful and chaotic, while the tree is serene and controlled. It’s this juxtaposition of wildness and discipline that makes the combination so visually compelling.
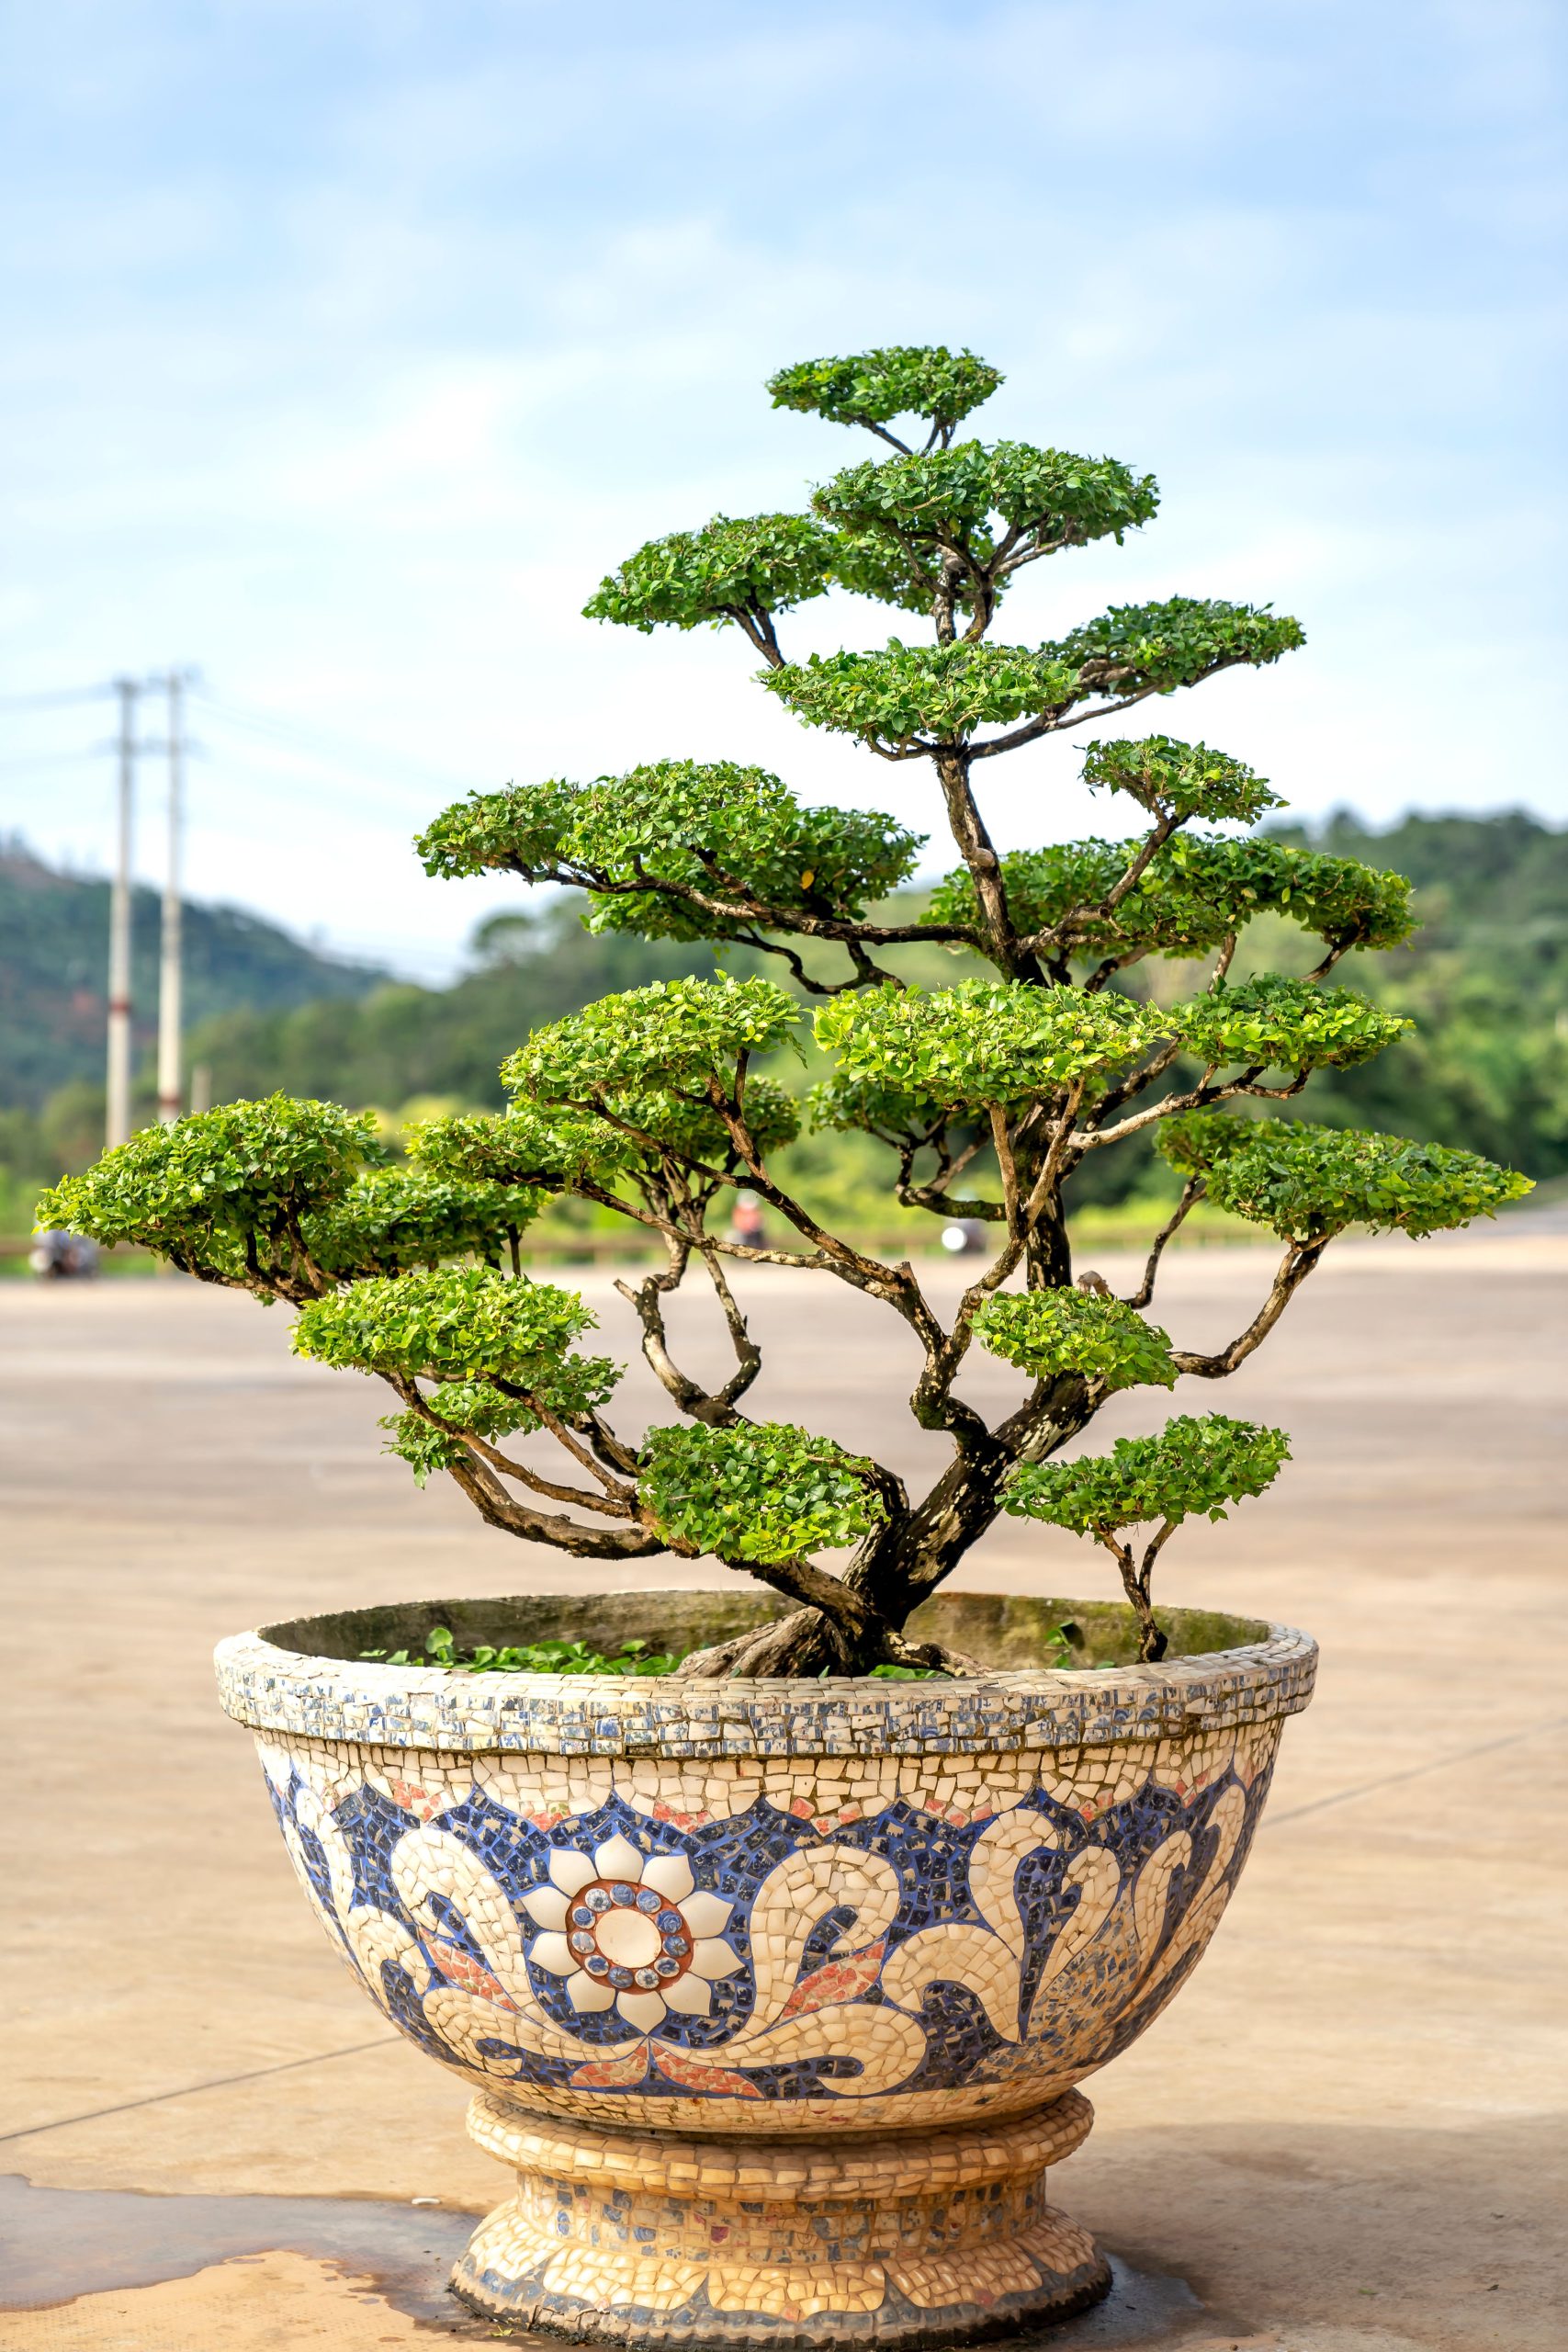
“A mosaic-covered terra cotta or ceramic planter requires one crucial care step to survive the winter in a cold climate: it must be kept dry.”
If the porous ceramic pot and grout lines absorb water and then freeze, the expansion of the ice will crack the pot and dislodge your beautiful tile work. At the end of the growing season, either bring the entire planter into a garage or shed, or at the very least, tip it on its side and cover it with a tarp to ensure it stays completely dry until spring.
16. Design a Rustic Tabletop with Patterned Broken Ceramic Tiles
This style, known as ‘trencadís’ mosaic, is having a huge resurgence. Popularized by Catalan architect Antoni Gaudí, it embodies a spirit of creative reuse and finding beauty in broken things. In 2026, as people push back against mass-produced perfection, this artisanal, upcycled aesthetic feels incredibly relevant. It’s sustainable, it’s personal, and it celebrates imperfection. Each piece of broken tile has a history, and combining them creates a new story that is totally unique to your home. It’s a style with soul.
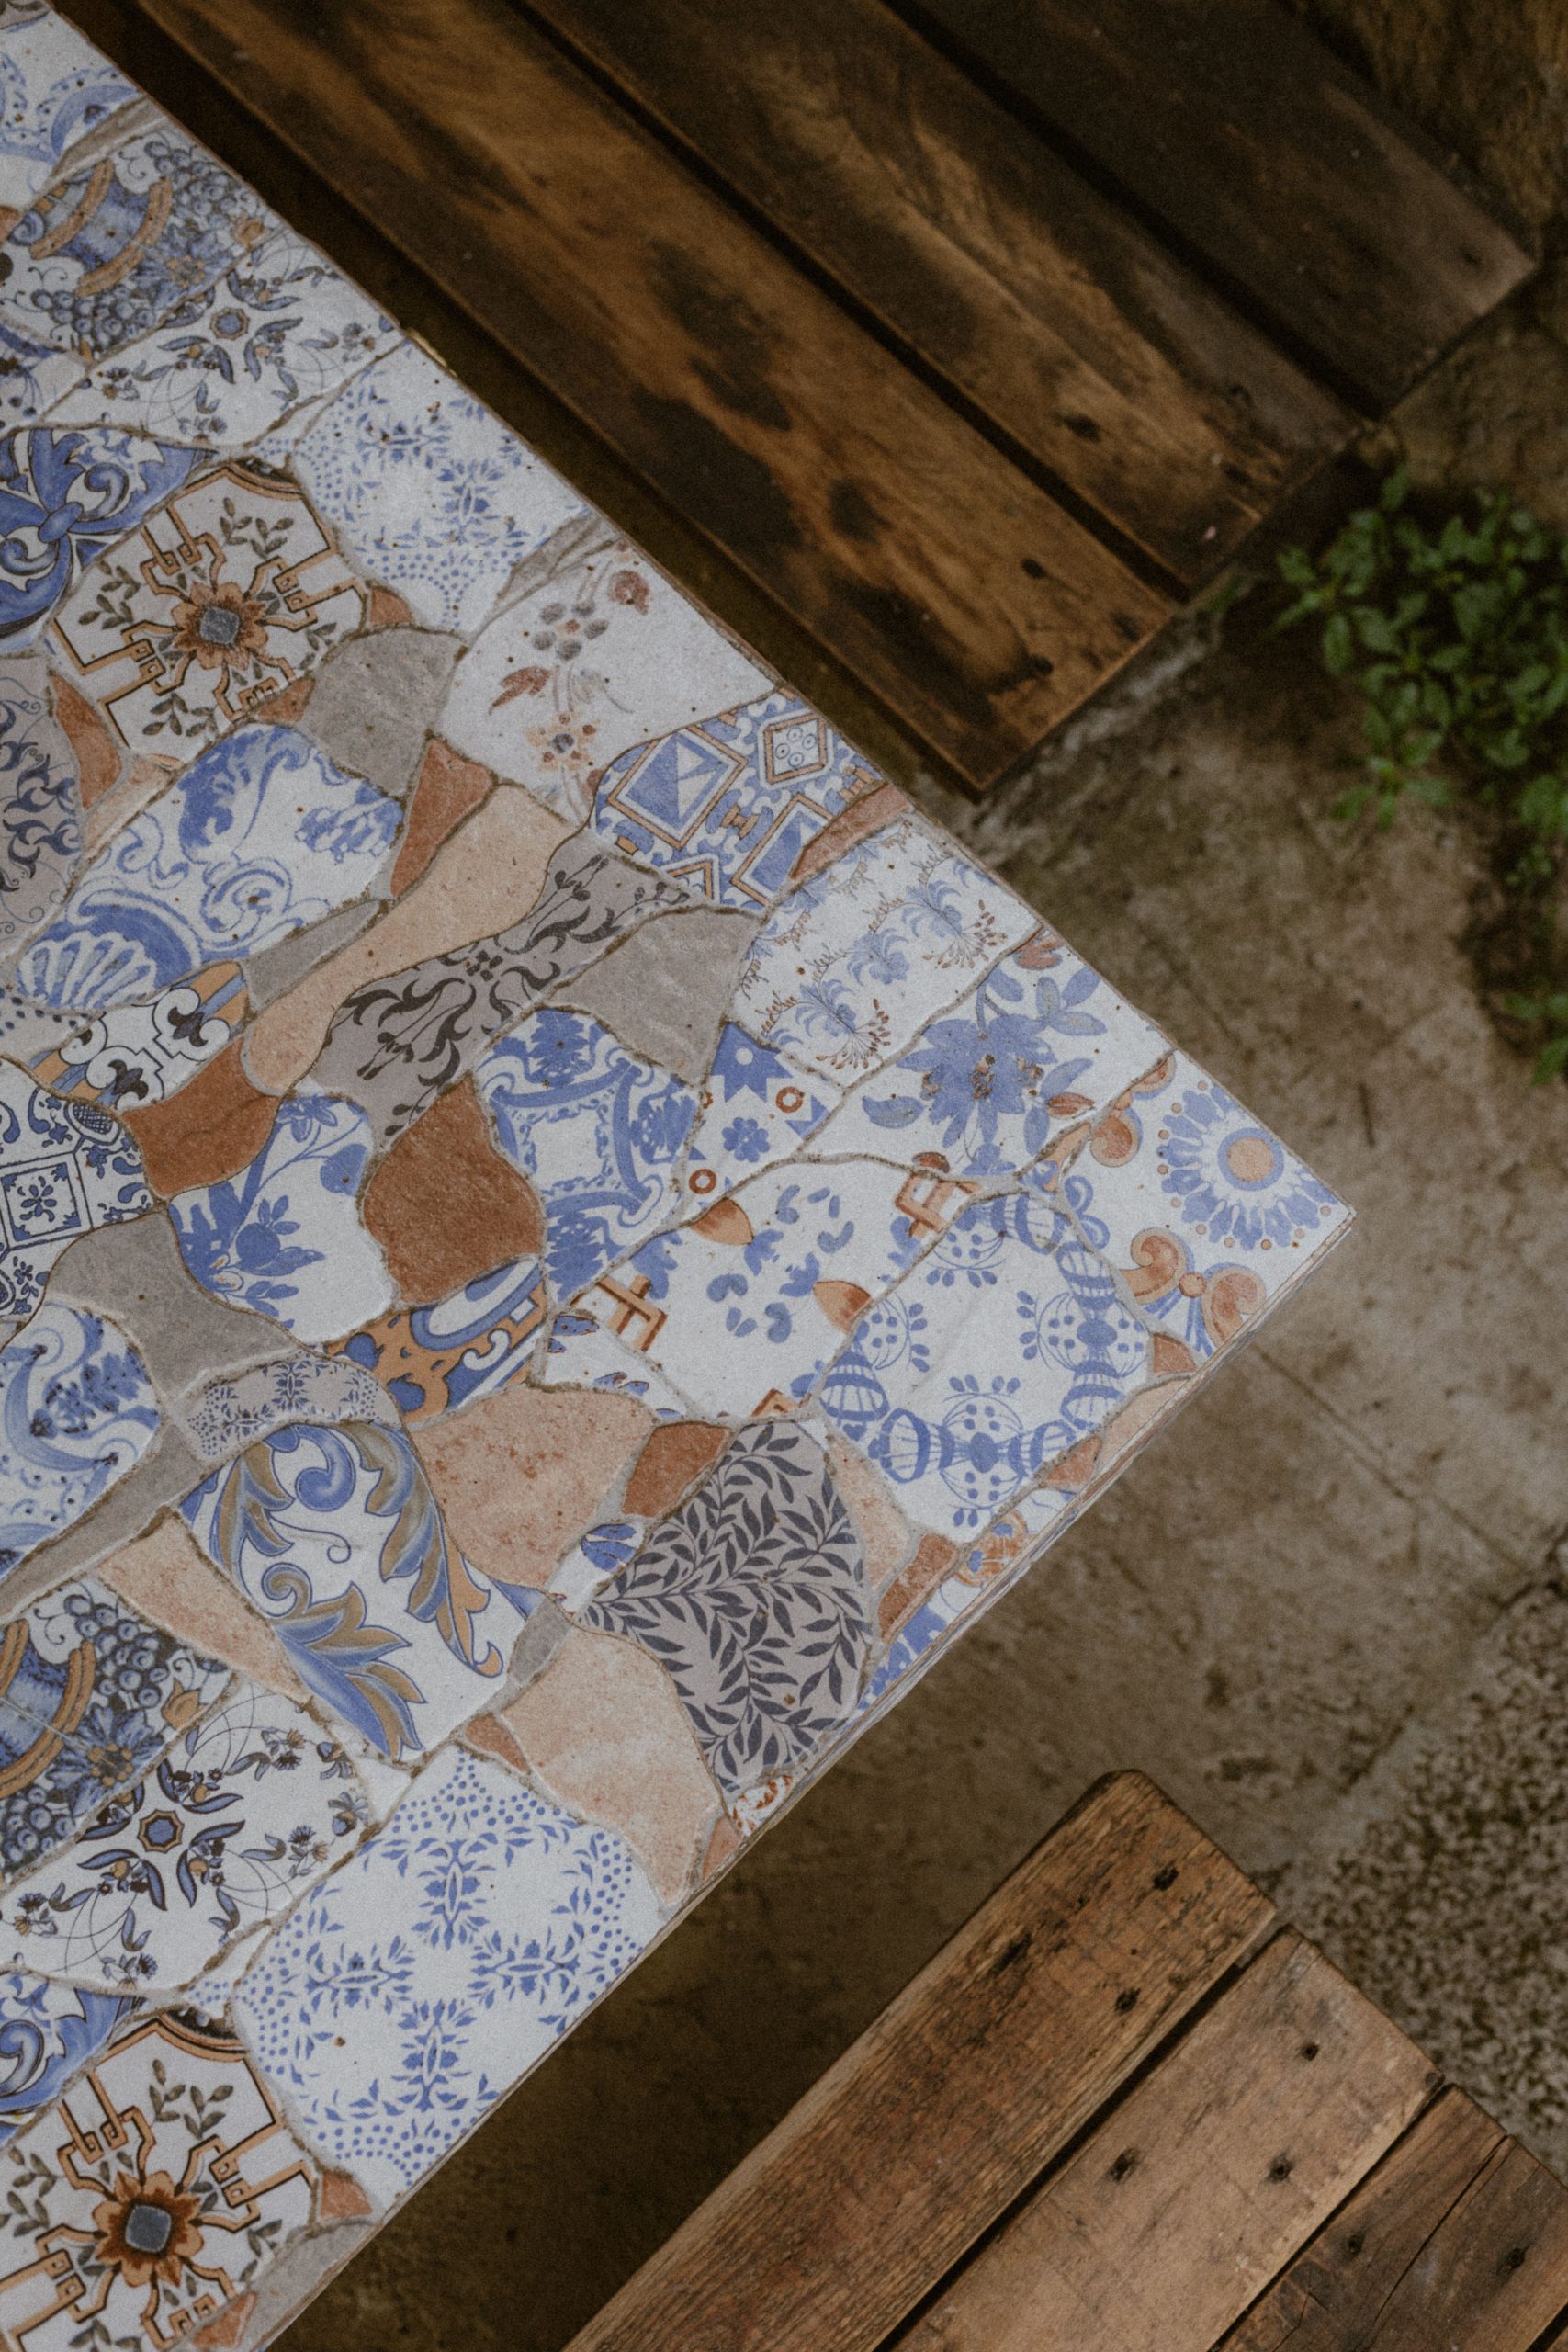
“This project is all about the tiles, so plan ahead before you start gluing.”
Don’t just start with a random pile of broken ceramics.Gather more tiles than you think you’ll need. Look for a mix of patterns and solids, but try to stick to a cohesive color palette (like the blues, whites, and terracotta here).Decide on your grout color in advance. A light grout like this makes the tile patterns pop, while a dark grout would unify the pieces more. This choice dramatically affects the final look.Do a ‘dry run’ by arranging your main tile pieces on the tabletop without adhesive to ensure you like the overall composition and flow.
17. Adorn Terracotta Planters with Cheerful Mosaic Tiles
The secret to making mosaic planters look polished is to pay attention to the top rim. Before you start on the body of the pot, carefully tile the top lip with your smallest, most uniform pieces of tile. This creates a clean, finished edge that makes the whole project look more professional. Trying to wrap larger, irregular pieces over that curved edge will look messy and unfinished. Start with the rim, then move to the main body of the pot for a crisp, intentional result.
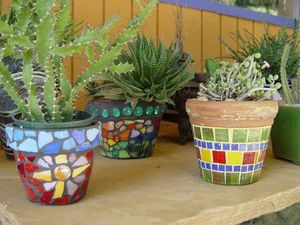
“You don’t need to buy new tiles for this.”
This is the perfect project for using up leftovers from other tiling jobs or for giving broken items a new life. A single chipped coffee mug or a cracked dinner plate from a thrift store can provide enough material to decorate a small succulent pot. Just be sure to use a tile nipper to create pieces that are small enough to conform to the pot’s curve. It’s a fantastic, low-cost way to add a burst of color and personality to your patio or windowsill.
18. Stage a Framed Garden Mosaic Panel with a Bird and Floral Design
This idea works so well because it’s a ‘garden within a garden.’ The mosaic panel depicts a vibrant, idealized nature scene, and then it’s placed within a real, living garden. This layering creates depth and a touch of surrealism. The crisp white frame is crucial; it acts like a window, clearly separating the art from the reality behind it. The composition is also smart, with the reddish pavers in the foreground, the art in the mid-ground, and the lush plants in the background, creating a full, rich scene.
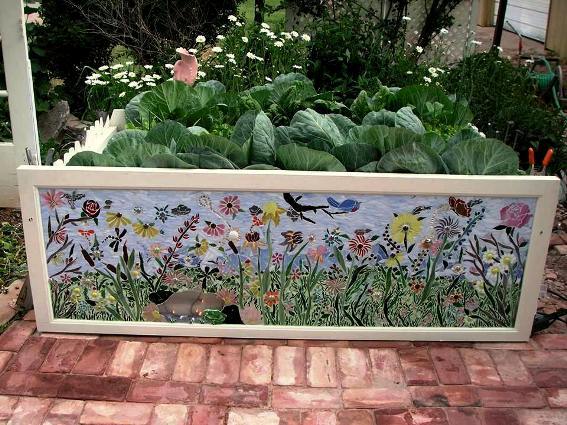
“The white frame is the single most important element that makes this a success.”
Without it, the colorful mosaic would bleed visually into the colorful plants behind it, creating a confusing jumble of shapes and colors. The frame provides a clean, defining border. It says, ‘This is a piece of art.’ It gives the eye a place to rest and separates the intentional, crafted nature of the mosaic from the wild, organic nature of the garden. It is the key to the entire composition’s clarity.
19. Set a Mood with a Wrought Iron Bistro Set and Mosaic Accents
A bistro set like this is a small-space champion. It’s perfectly proportioned for a narrow balcony, a small patio, or a tiny corner of a larger garden. The round table and visually lightweight chairs (typically 24-30 inches in diameter for the table) take up minimal physical and visual space. This setup would feel lost in a large, open yard, but in a compact area of 50 sq. ft. or less, it creates an intimate and purposeful destination. It’s about creating a ‘moment’ rather than furnishing a large zone.
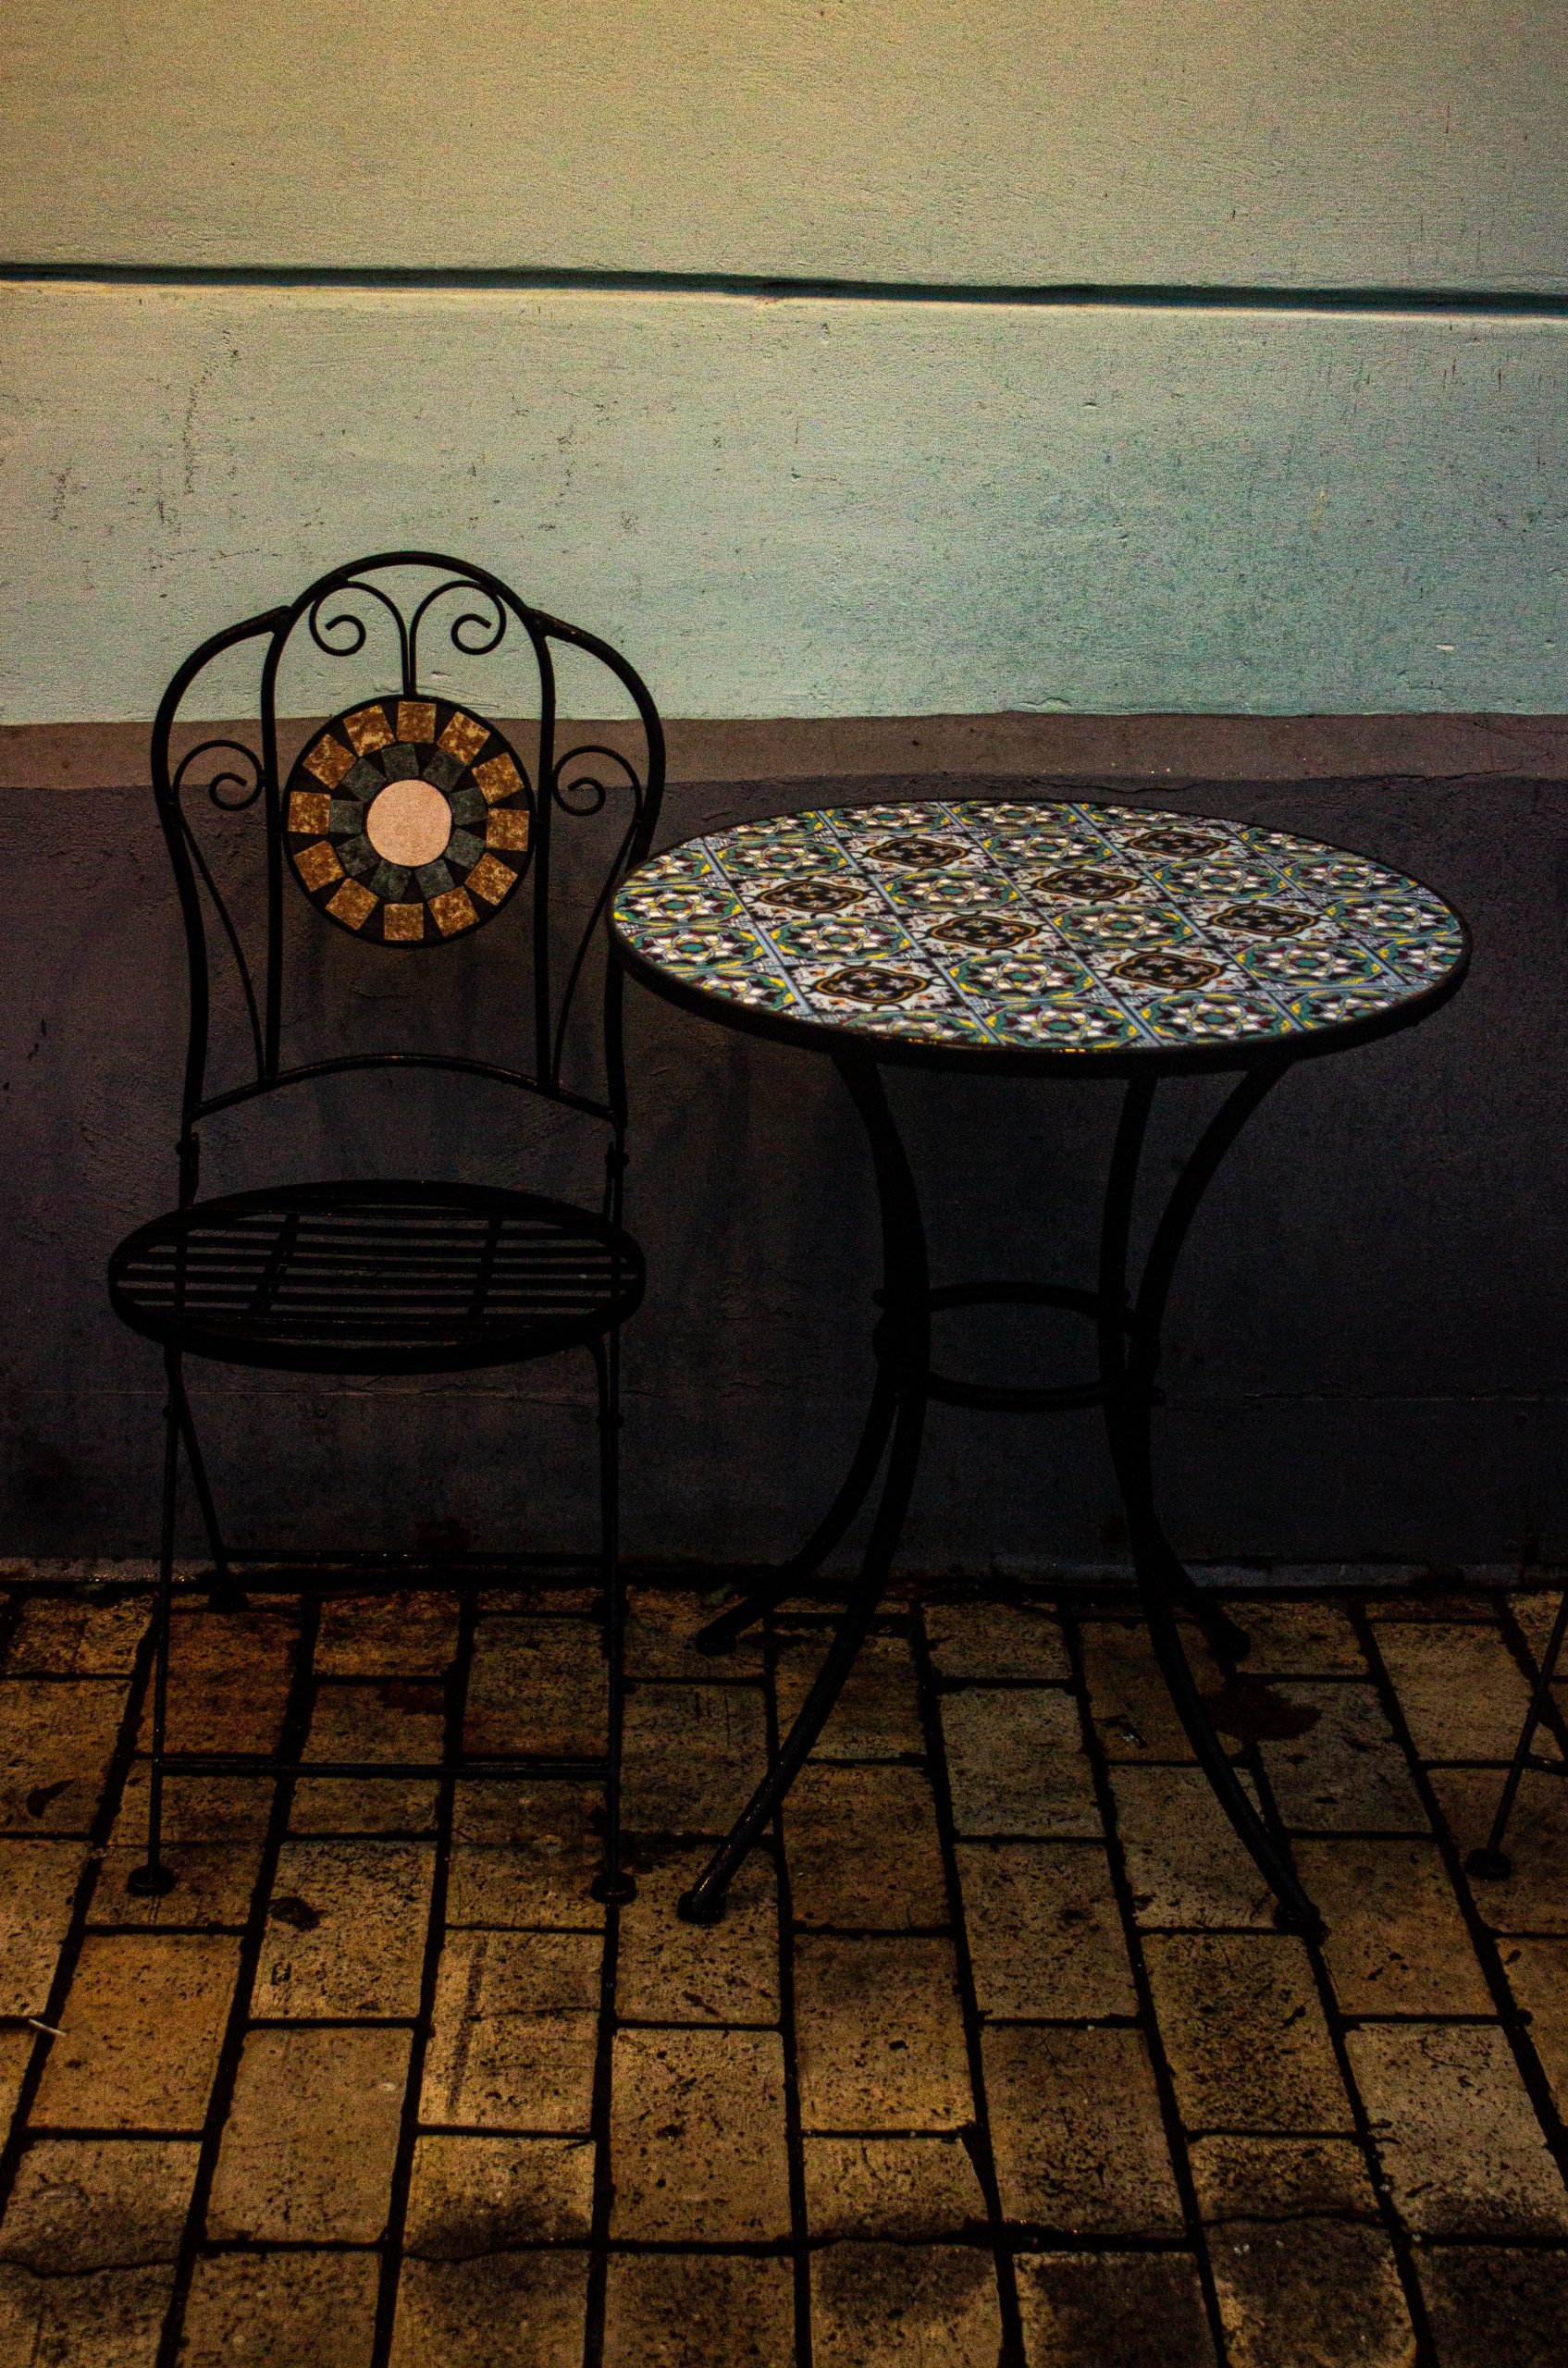
“The moody, rustic charm here is all about texture and restraint.”
The formula is: 50% Raw Texture (the two-toned stucco wall and paved floor) + 30% Sculptural Form (the black wrought iron scrollwork) + 20% Artistic Detail (the multi-colored mosaic inserts). Notice how the mosaic is used as an accent, not the main feature. If the entire table and chairs were covered in mosaic, it would lose its sophisticated, rustic feel and become much more whimsical, like the table in Idea #5.
20. Design a Circular Pebble Mosaic Patio with an Ornate Centerpiece
A full pebble mosaic patio is a significant landscape investment, primarily in labor. While the materials themselves are relatively inexpensive, the time required is enormous.
- Pebbles/River Rock: $500 – $1,200 (for a 10-foot diameter circle)
- Mortar/Concrete Base: $300 – $600
- Labor: This is the big one. A professional might charge $4,000 – $8,000 for the intricate setting. DIY is ‘free’ but expect it to take several weeks of dedicated work.
- TOTAL (Pro-installed): $4,800 – $9,800+
Budget alternative: Create a much smaller (3-4 foot) mosaic circle as a central medallion and surround it with simple pavers or gravel for 80% less.
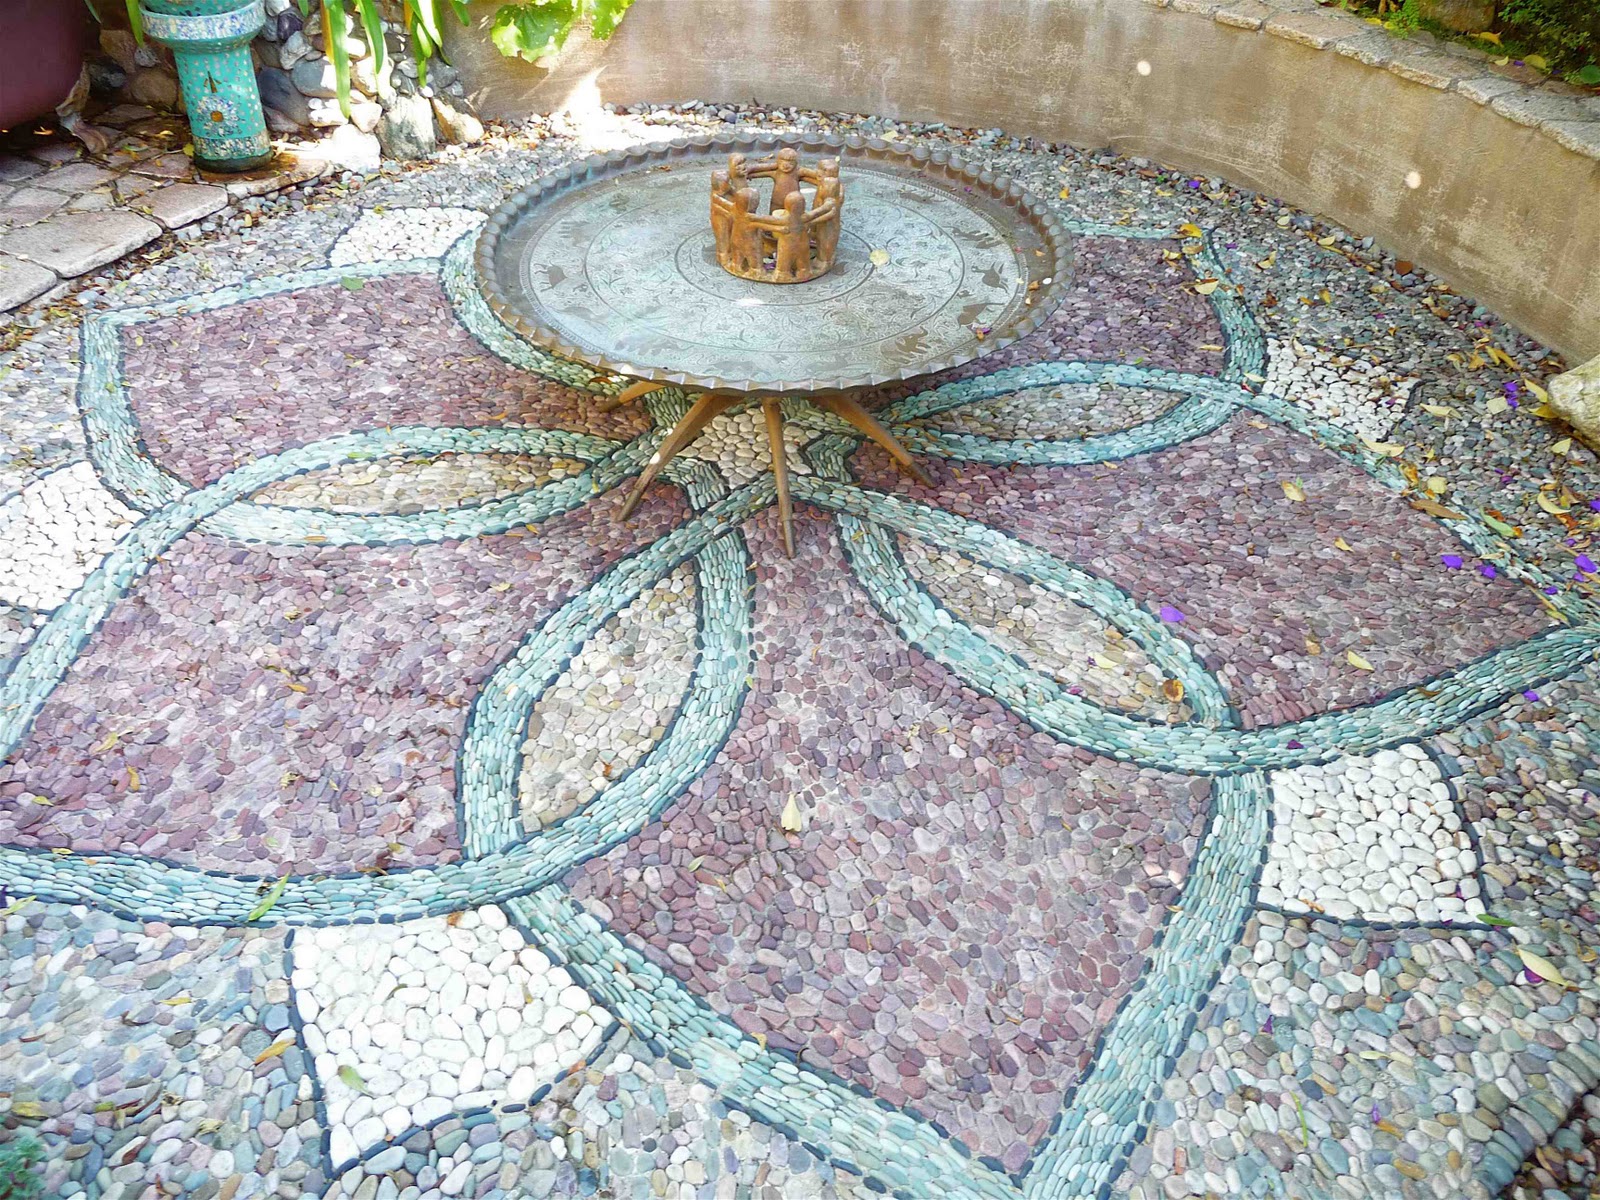
“Okay, real talk.”
A pebble mosaic surface is beautiful, but it is NOT comfortable to walk on in bare feet. The uneven texture can be tough on sensitive soles. It’s also not the best surface for furniture with narrow legs, which can get caught in the gaps between stones. This type of patio is best suited for an area that’s more of a visual feature, or where you’ll be using substantial, stable furniture like the tripod table shown. For a high-traffic dining area, a smoother surface is far more practical.
21. Accessorize a Gravel Path with Eclectic Mosaic Stepping Stones
This garden path feels so personal and collected because it confidently mixes materials and styles. You have the soft texture of gravel, the hard edge of brick, the smooth surface of the concrete bench, and the rough-hewn stone of the planter. The mosaic stepping stones act as the unifying element, threading pops of color and pattern throughout the diverse textures. It works because it doesn’t try to be one single style; it embraces an eclectic, ‘more is more’ philosophy that feels joyful and authentic. The similar path in Idea #9 uses sand instead of gravel for a softer look.
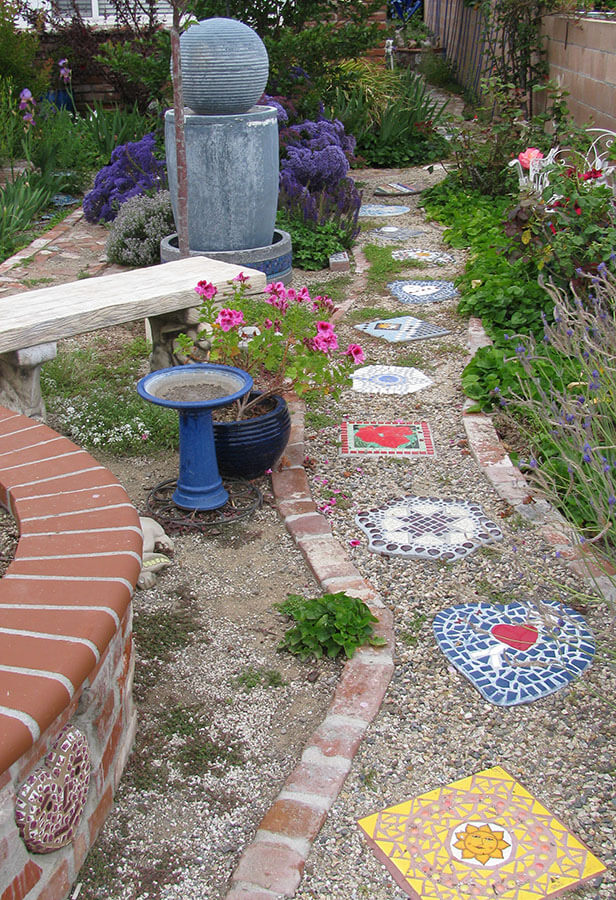
“A gravel path is one of the most budget-friendly ways to create a walkway in your garden.”
Pavers and concrete can cost a fortune, but you can create a path like this for a couple hundred dollars. Use affordable reddish-brown bricks for the edging (often available for free on Facebook Marketplace) and fill with pea gravel (about $50-$70 per ton). The real savings come from making the stepping stones yourself, as detailed in Idea #9’s How-To Brief, using leftover tiles or broken dishware.
22. Lay a Winding Floral Mosaic Pathway with Terracotta Borders
The single element that makes this pathway so breathtaking is its sense of movement. The design isn’t just a static pattern; the swirling motifs and curving lines of the flowers and stems create a powerful visual flow that pulls your eye along the winding path. It feels alive and energetic. The use of fragmented tiles, rather than perfect squares, enhances this organic feeling, mimicking the beautiful chaos of a wildflower meadow. It’s a masterclass in using pattern to create dynamism.
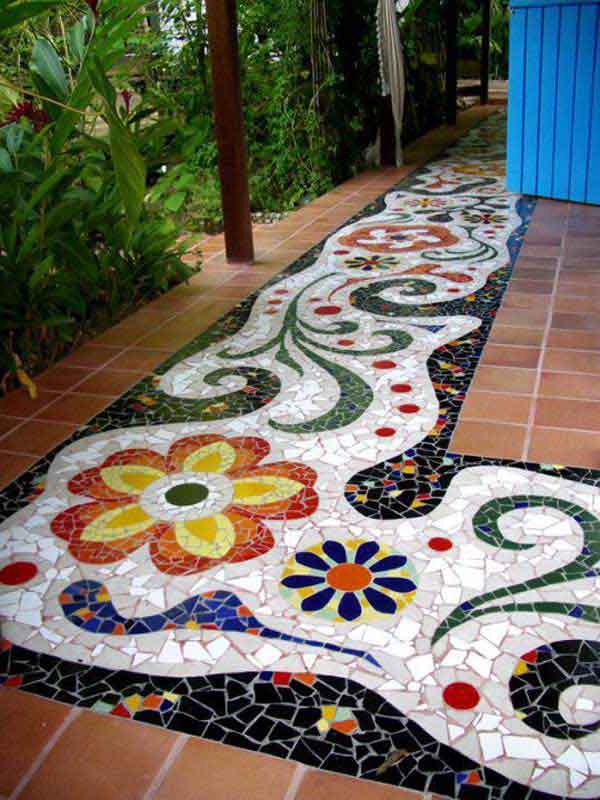
“A white-grouted path outdoors is a bold choice.”
Be prepared for it to never look this pristine again after the first winter. White grout will show every speck of dirt, every fallen leaf stain, and is prone to mildew in damp or shady areas. To keep it looking its best, you’ll need to scrub it with an oxygen-based bleach cleaner several times a year and plan on resealing it annually. For a lower-maintenance version of this look, opt for a medium-gray or tan grout instead of white.
23. Upcycle a Bistro Set with a Circular Marine-Themed Mosaic
This charmingly aged look is a careful balance of new and old, playful and rustic. Here’s the formula: 40% Whimsical Art (the colorful fish and shell mosaic) + 40% Aged Patina (the rusted white metal base) + 20% Bold Color Pop (the dark blue chair seat and light teal wall). The rust is key here; it gives the set a sense of history and keeps the playful mosaic from feeling too childish. It feels like a treasured piece that has been enjoying the sea air for years.
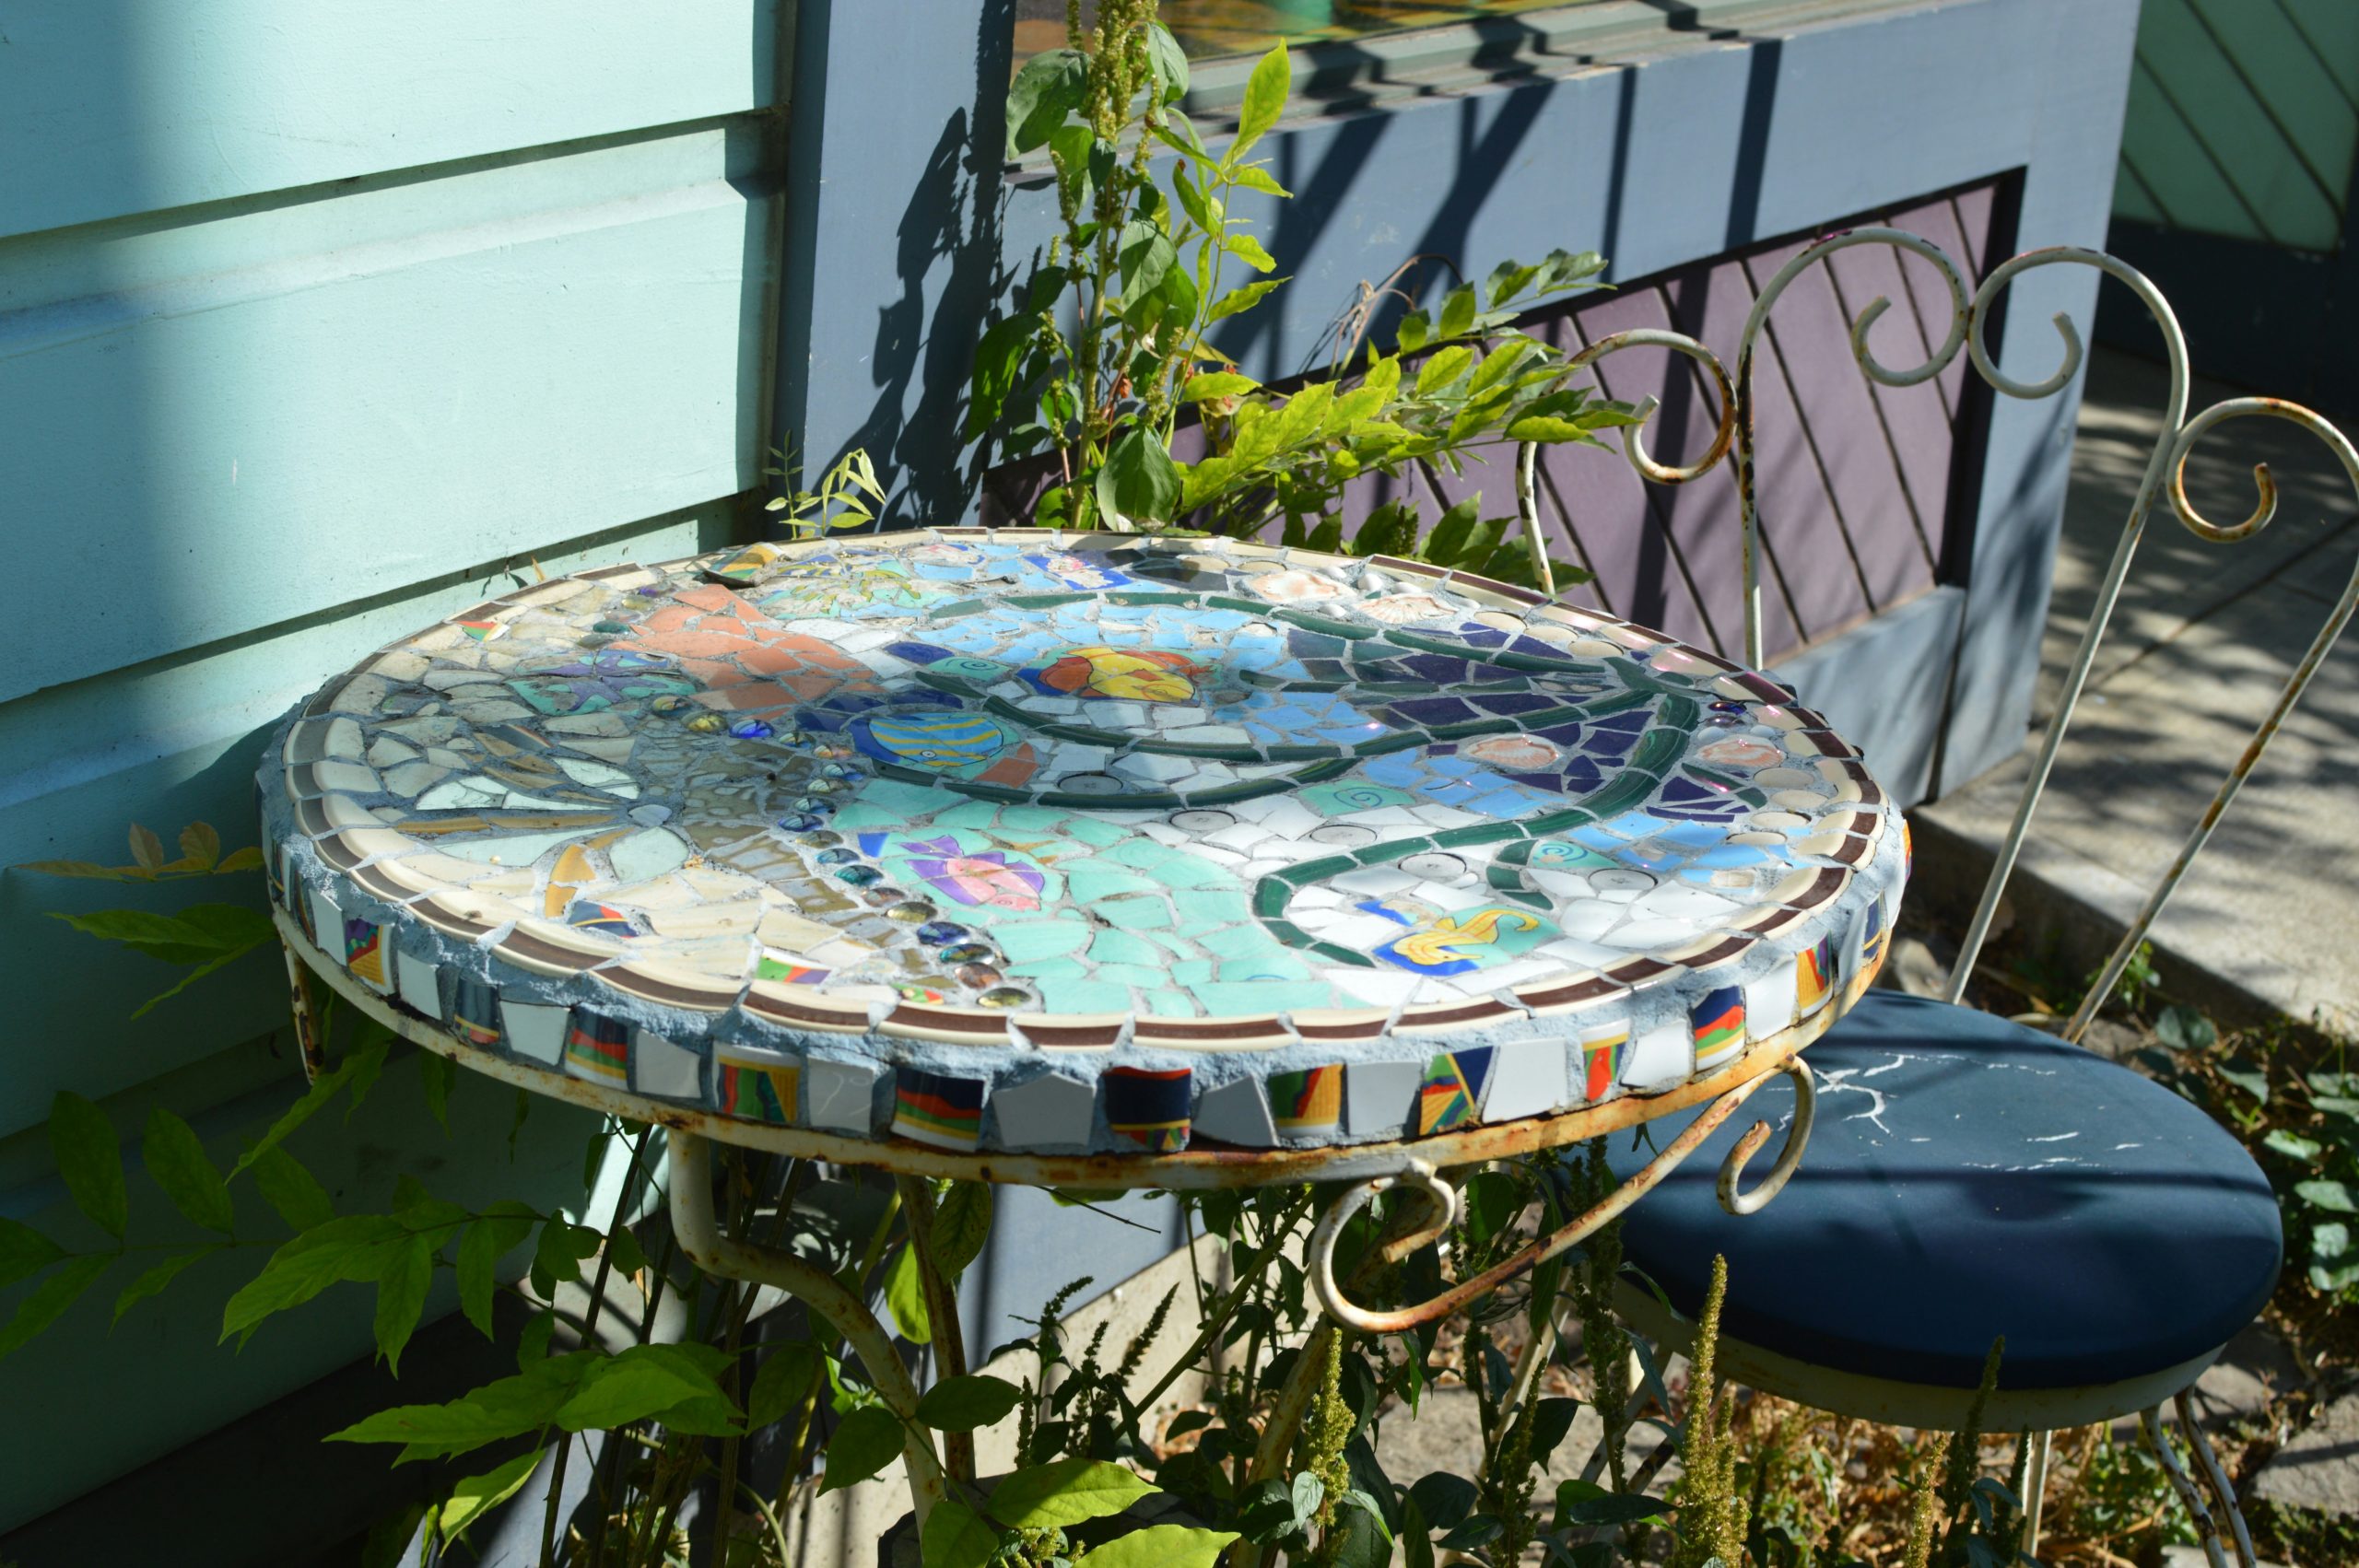
“While we love the rusty, aged look, there’s a point where it becomes a structural problem.”
Significant rust on a wrought iron or steel table base, especially at the joints or feet, can compromise its stability. Before you buy a vintage set or let your own get ‘perfectly’ rusty, give it a good shake. If it wobbles, it might be time for some serious restoration (sanding down to bare metal and repainting with a rust-inhibiting paint) rather than just admiring the patina.
24. Craft an Outdoor Table with a Broken Ceramic Tile Mosaic Top
Ready to make your own ‘trencadís’ tabletop? It’s a fantastic weekend project. Time: 4-6 hours + drying time. Cost: $50-$90.
- Find a sturdy metal-frame outdoor table. If the top is slick, sand it to create some ‘tooth’ for the adhesive to grip.
- Gather your broken ceramic tiles. Wear safety glasses and wrap tiles in an old towel before hitting them with a hammer to contain the shards.
- Arrange the larger pieces first to create a pleasing composition, then fill in the gaps with smaller bits.
- Working in sections, apply outdoor tile adhesive and press your pieces in. Aim for relatively even spacing.
- Let it cure for 24 hours, then apply your choice of outdoor grout over the entire surface.
- After about 20 minutes, wipe the excess grout off the tile surfaces with a damp sponge. Let it cure for 3 days before use.
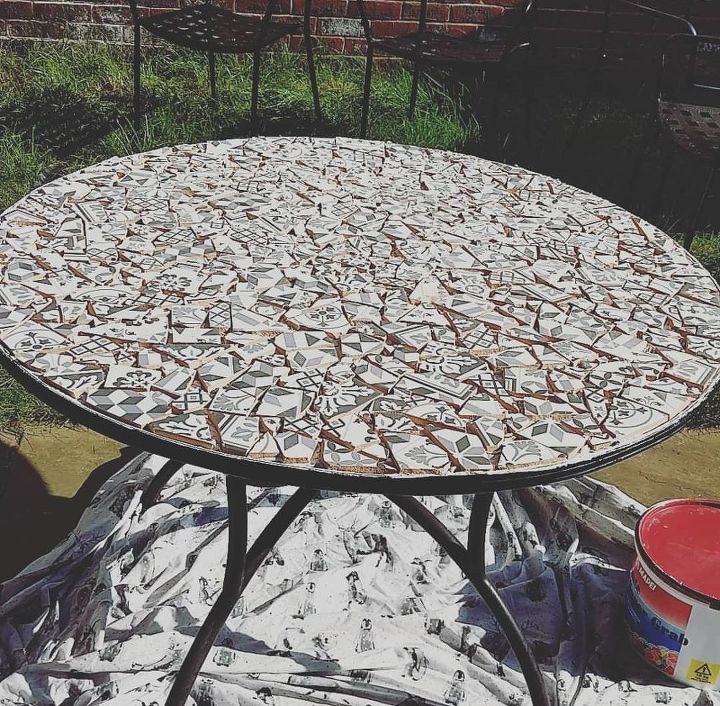
“When you’re creating a mosaic from broken tiles with varied patterns, the result can easily look chaotic.”
The pro trick to keep it looking cohesive is to stick to a strict color palette. Notice how this piece primarily uses white, grey, and brown. Even though the patterns are all different, the limited color story ties them all together. Before you start smashing plates, pull a palette of 2-3 main colors and stick to it for a result that looks curated, not crazy.
25. Create a Serene Garden Path with Pebble Mosaic Spirals and Florals
This pathway feels so tranquil because it’s made entirely of materials that feel like they belong by a stream. The use of different colored river stones, the dark gray mortar that mimics damp earth, and the placement right next to actual water and lush foliage create a completely harmonious and integrated design. The spiral and floral patterns, while man-made, are rendered in such a natural, organic way that they feel like they could have been formed by the river itself. It’s a perfect fusion of artistry and nature.
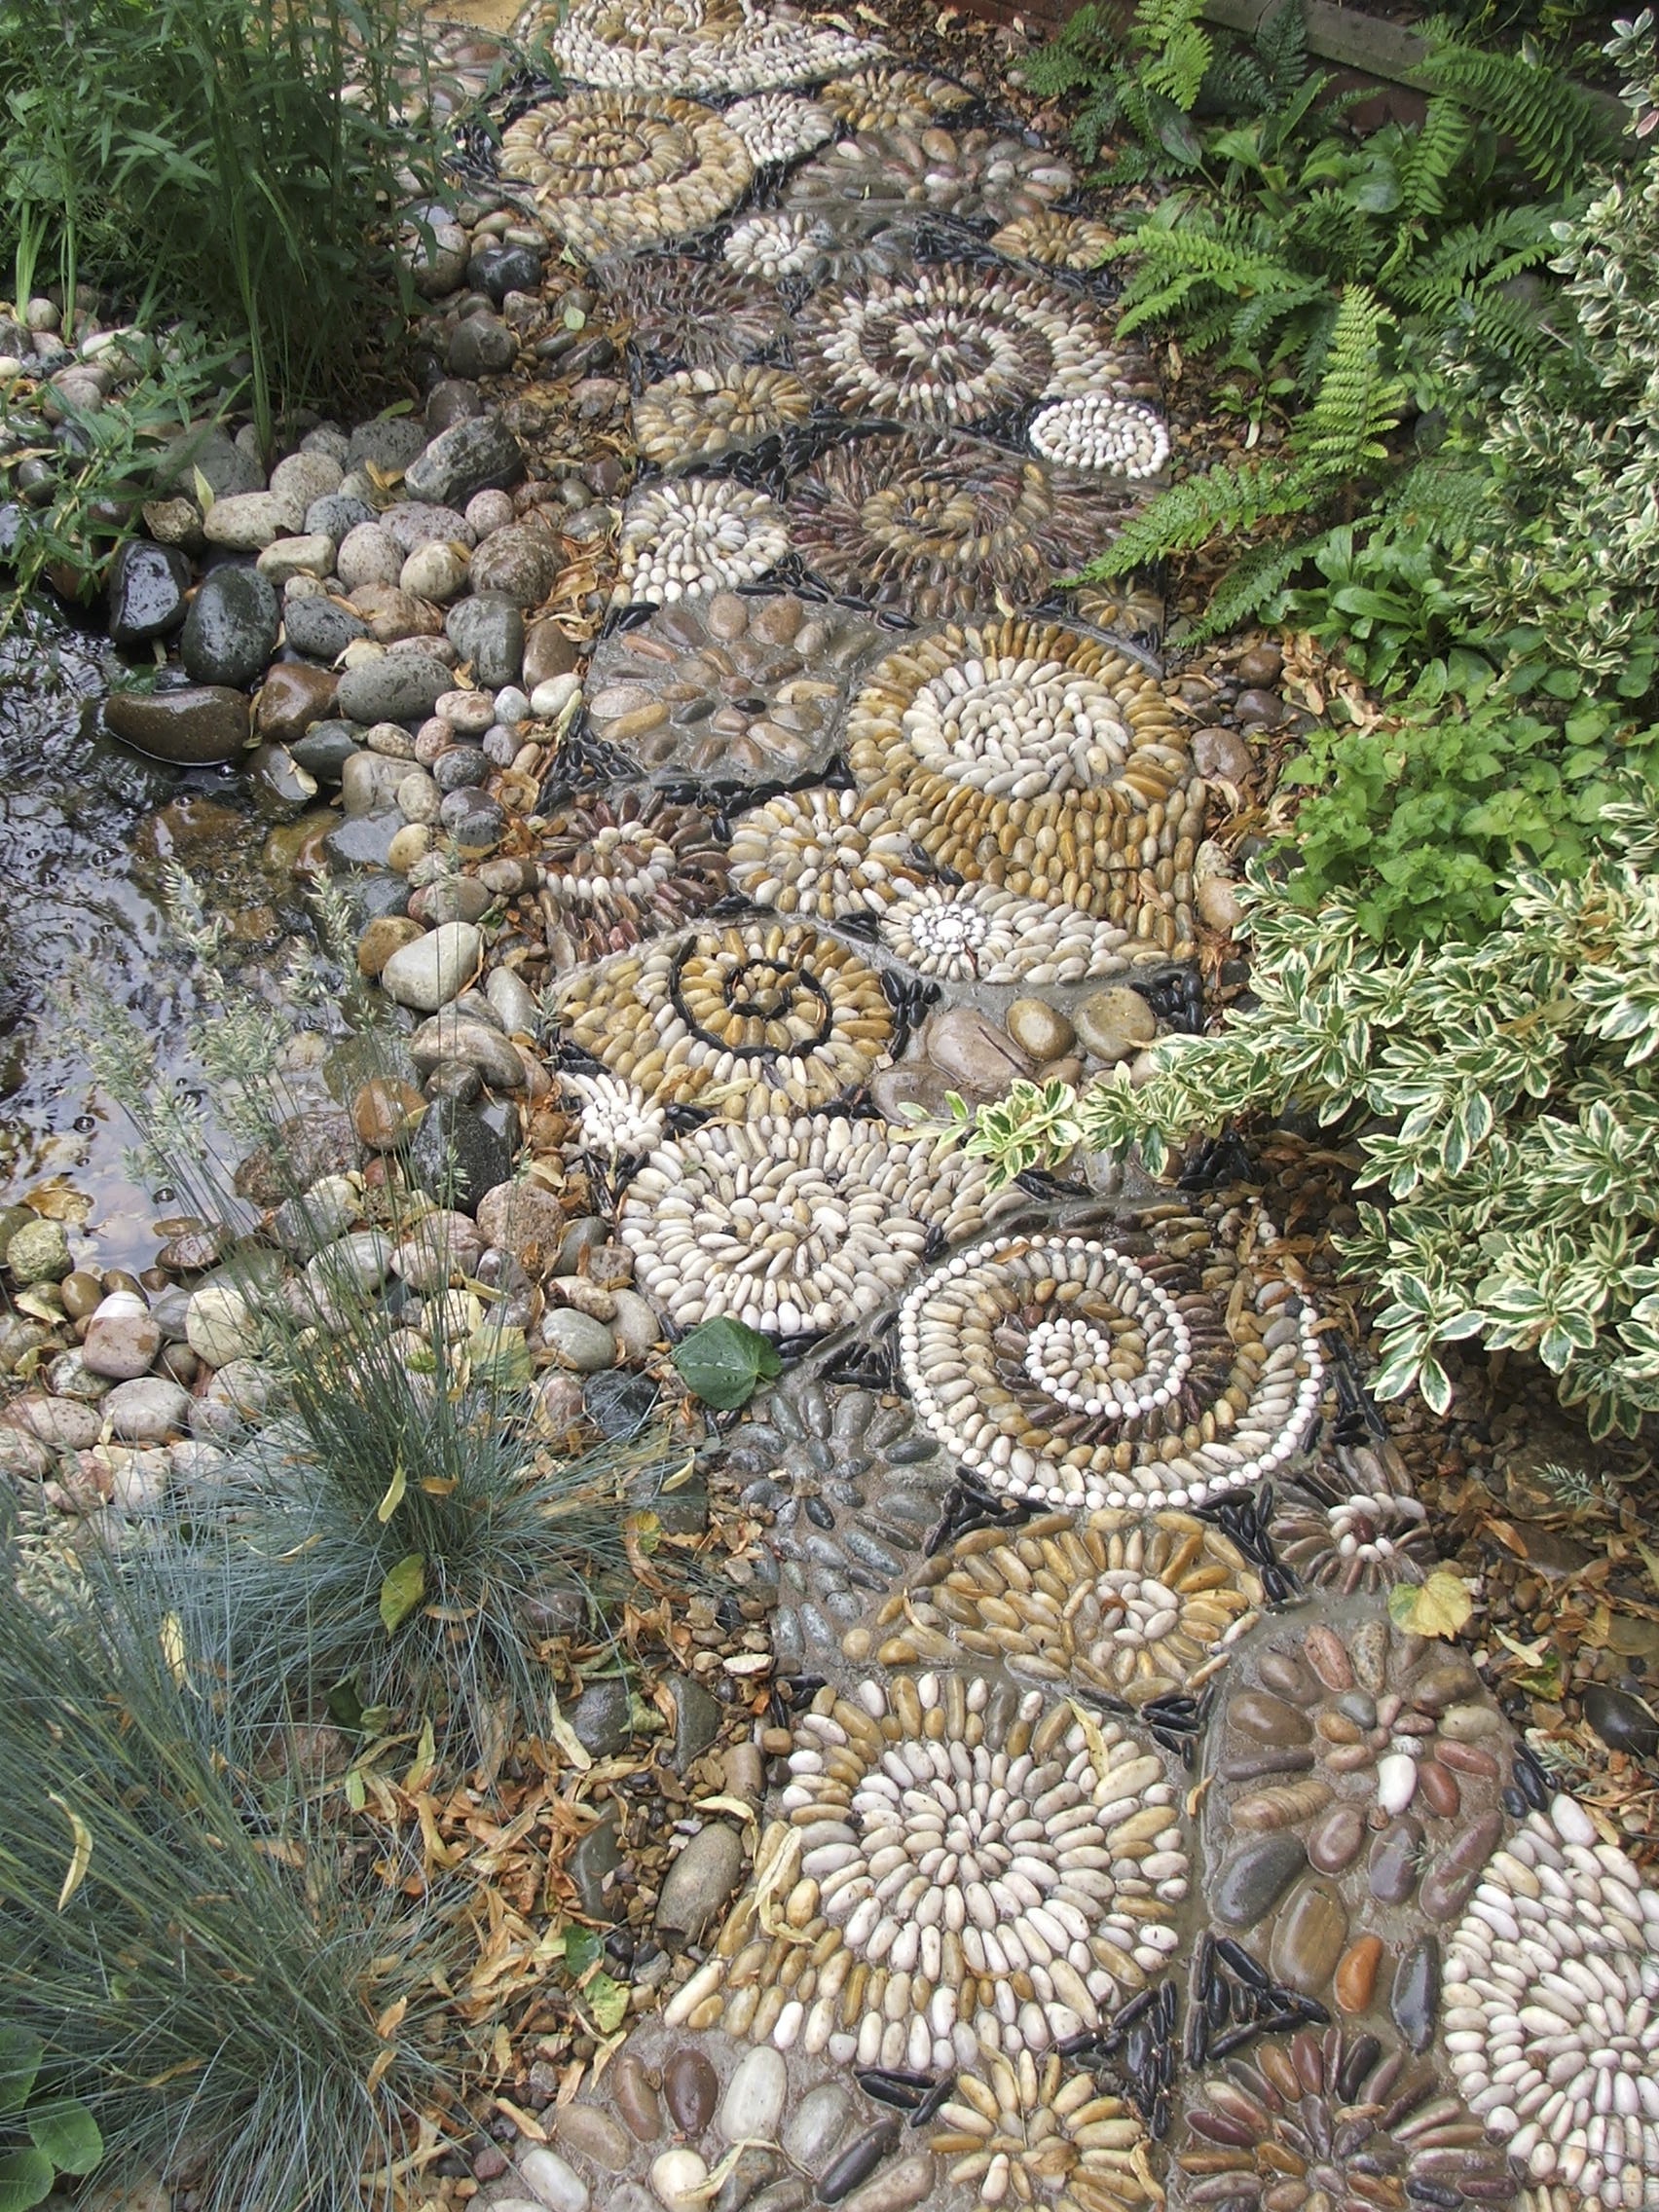
“This type of intricate, nature-inspired craft is a direct response to our increasingly digital lives.”
People are craving tactile, hands-on activities and want to feel a connection to the earth. A pebble mosaic project is the antithesis of scrolling on a phone. It’s slow, meditative, and requires you to engage directly with natural materials. This trend isn’t just about the final look; it’s about the grounding, mindful process of creating it. It’s a form of garden therapy.
26. Add Playful Accents with Circular Mosaic Stepping Stones
Making your own stepping stones is one of the most affordable ways to get into garden mosaics. You can buy circular paver molds online for about $20, or simply use old plastic plant saucers as molds. A bag of concrete mix is about $10. The decorative tiles can be leftovers, thrift store finds, or dollar store glass gems. For less than $50, you can create a whole set of unique, personalized stepping stones like the carrot or abstract blue-and-white ones shown here.
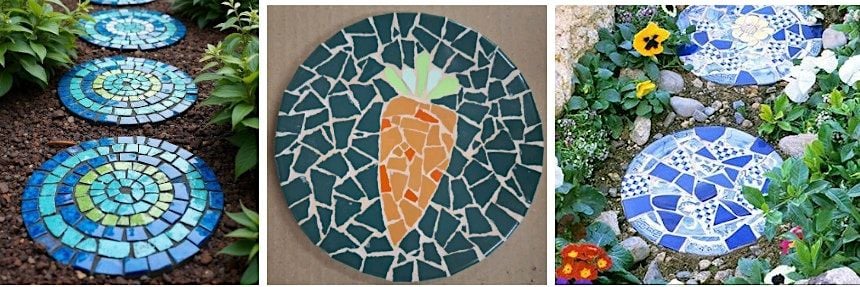
“Mosaic stepping stones are the perfect solution for adding color and personality to small or awkward garden spaces where a full path won’t fit.”
They are ideal for creating an informal walkway through a flower bed, across a small patch of lawn, or on a narrow balcony. Because they are individual units, you can place them as close together or as far apart as you need, adapting the ‘path’ to fit your specific space. They provide all the charm of a mosaic path, like Idea #22, but with ultimate flexibility.
27. Animate Your Garden with Vibrant Mosaic Stair Risers
The key to a successful stair riser project is using the right materials. Your stairs are high-traffic and exposed to the elements. You must use a high-performance, polymer-modified thin-set mortar, not a generic tile adhesive. This provides the flexibility and strength needed to handle temperature changes and the slight vibrations from being walked on. For grout, choose an epoxy or high-performance cementitious grout and seal it thoroughly to prevent water intrusion, which is the number one enemy of outdoor mosaics.
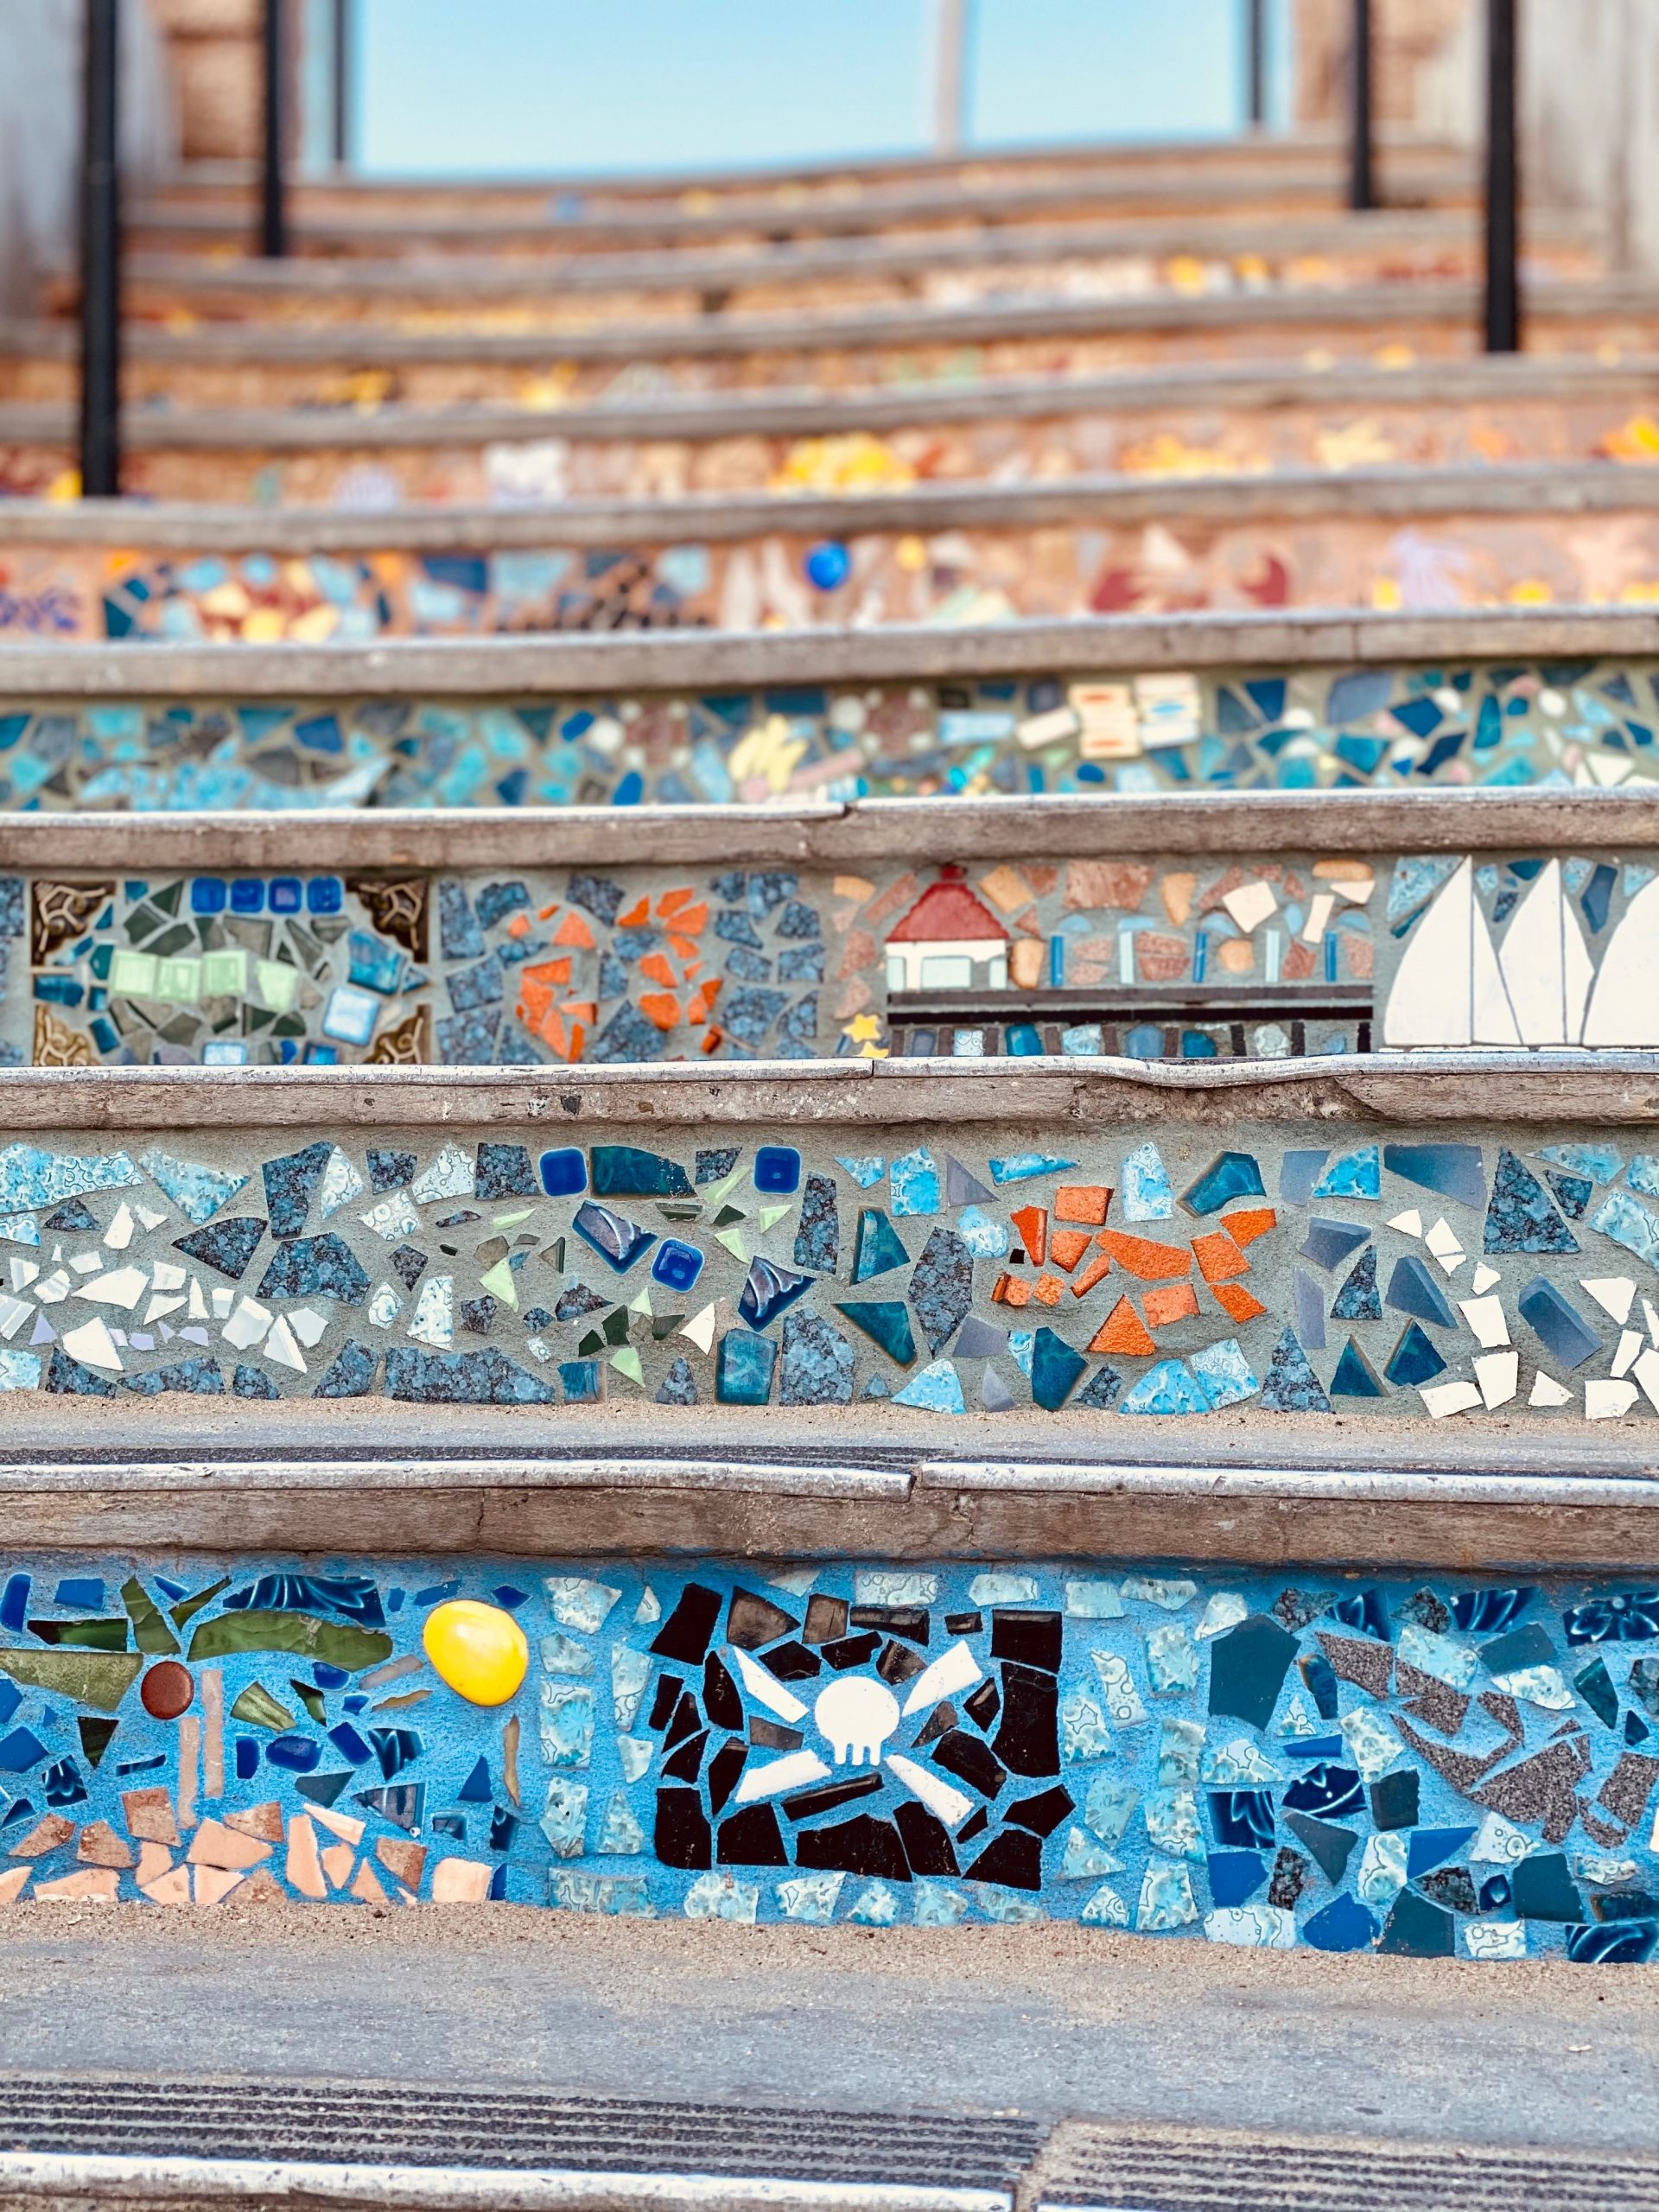
“This is an incredibly fun and high-impact project, but you need to go in with your eyes open.”
This is a very permanent design choice. Removing tile and mortar from concrete stairs down the line is a brutal, dusty, and difficult job. Make sure you are absolutely in love with your design and color choices before you begin. If you’re hesitant, test out the idea first by creating mosaic designs on thin cement backer boards cut to the size of your risers and mounting them temporarily.
28. Design a Whimsical Path with Abstract Figures and Patterned Tiles
This wonderfully chaotic path works because it follows a ‘controlled chaos’ formula. Let’s break it down: 50% Random Field (the mix of irregular, multi-colored ceramic pieces) + 30% Defining Borders (the red tile fragments that outline the abstract figure and path edges) + 20% Curious Details (the embedded square accent tiles with drawings). The red borders are crucial; they give structure to the randomness and guide the eye. The small patterned tiles are like little treasures to be discovered as you walk.
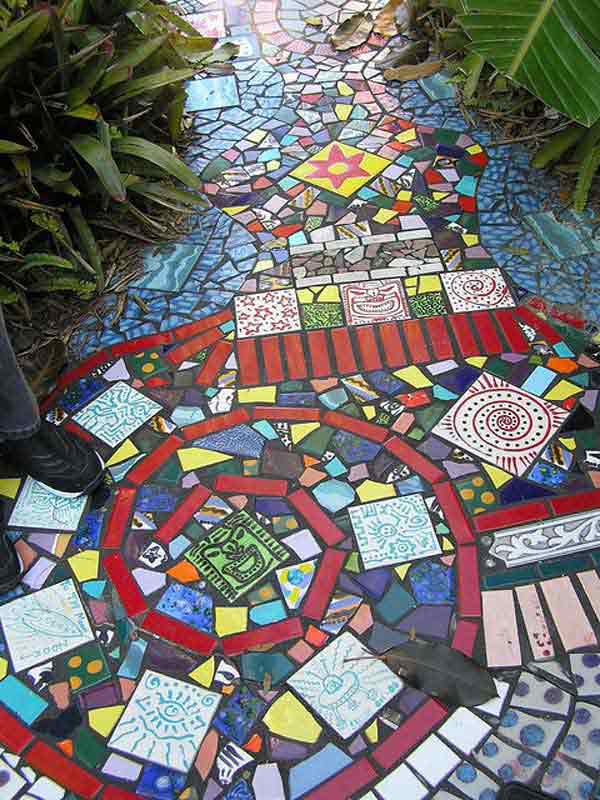
“A ‘memory path’ like this, incorporating meaningful tiles and objects, is a beautiful project.”
But you need to check your materials before you embed them forever in concrete.Make sure any ceramic tiles are frost-proof if you live in a cold climate. Non-frost-proof tiles will absorb water, freeze, and shatter.Test your accent tiles for durability. A tile with a painted-on design might fade or wear away quickly under foot traffic and sun exposure.Avoid embedding materials that will rust (unless you want that look) or decay, like untreated wood. Stick to glass, ceramic, and stone for longevity.
29. Craft a Decorative Gazing Ball with Blue and Green Mosaic Tiles
Making a mosaic gazing ball is a perfect weekend project. Time: 3-5 hours + drying. Cost: $40-$70.
- Start with a smooth foam or glass sphere from a craft store. Lightly sand the surface to help the adhesive stick.
- Choose small, lightweight glass or plastic tiles (tesserae). Heavy ceramic tiles will slide off the curved surface.
- Begin by applying a ring of tile adhesive and placing your first row of tiles around the middle (the ‘equator’) of the sphere. This provides a stable base to work from.
- Work outwards from the equator, row by row, towards the top and bottom poles.
- Let the adhesive cure fully, then apply a flexible, sanded grout, pushing it into all the crevices.
- After 20 minutes, clean the excess grout off with a damp cloth and let it cure for 72 hours before placing it outdoors.
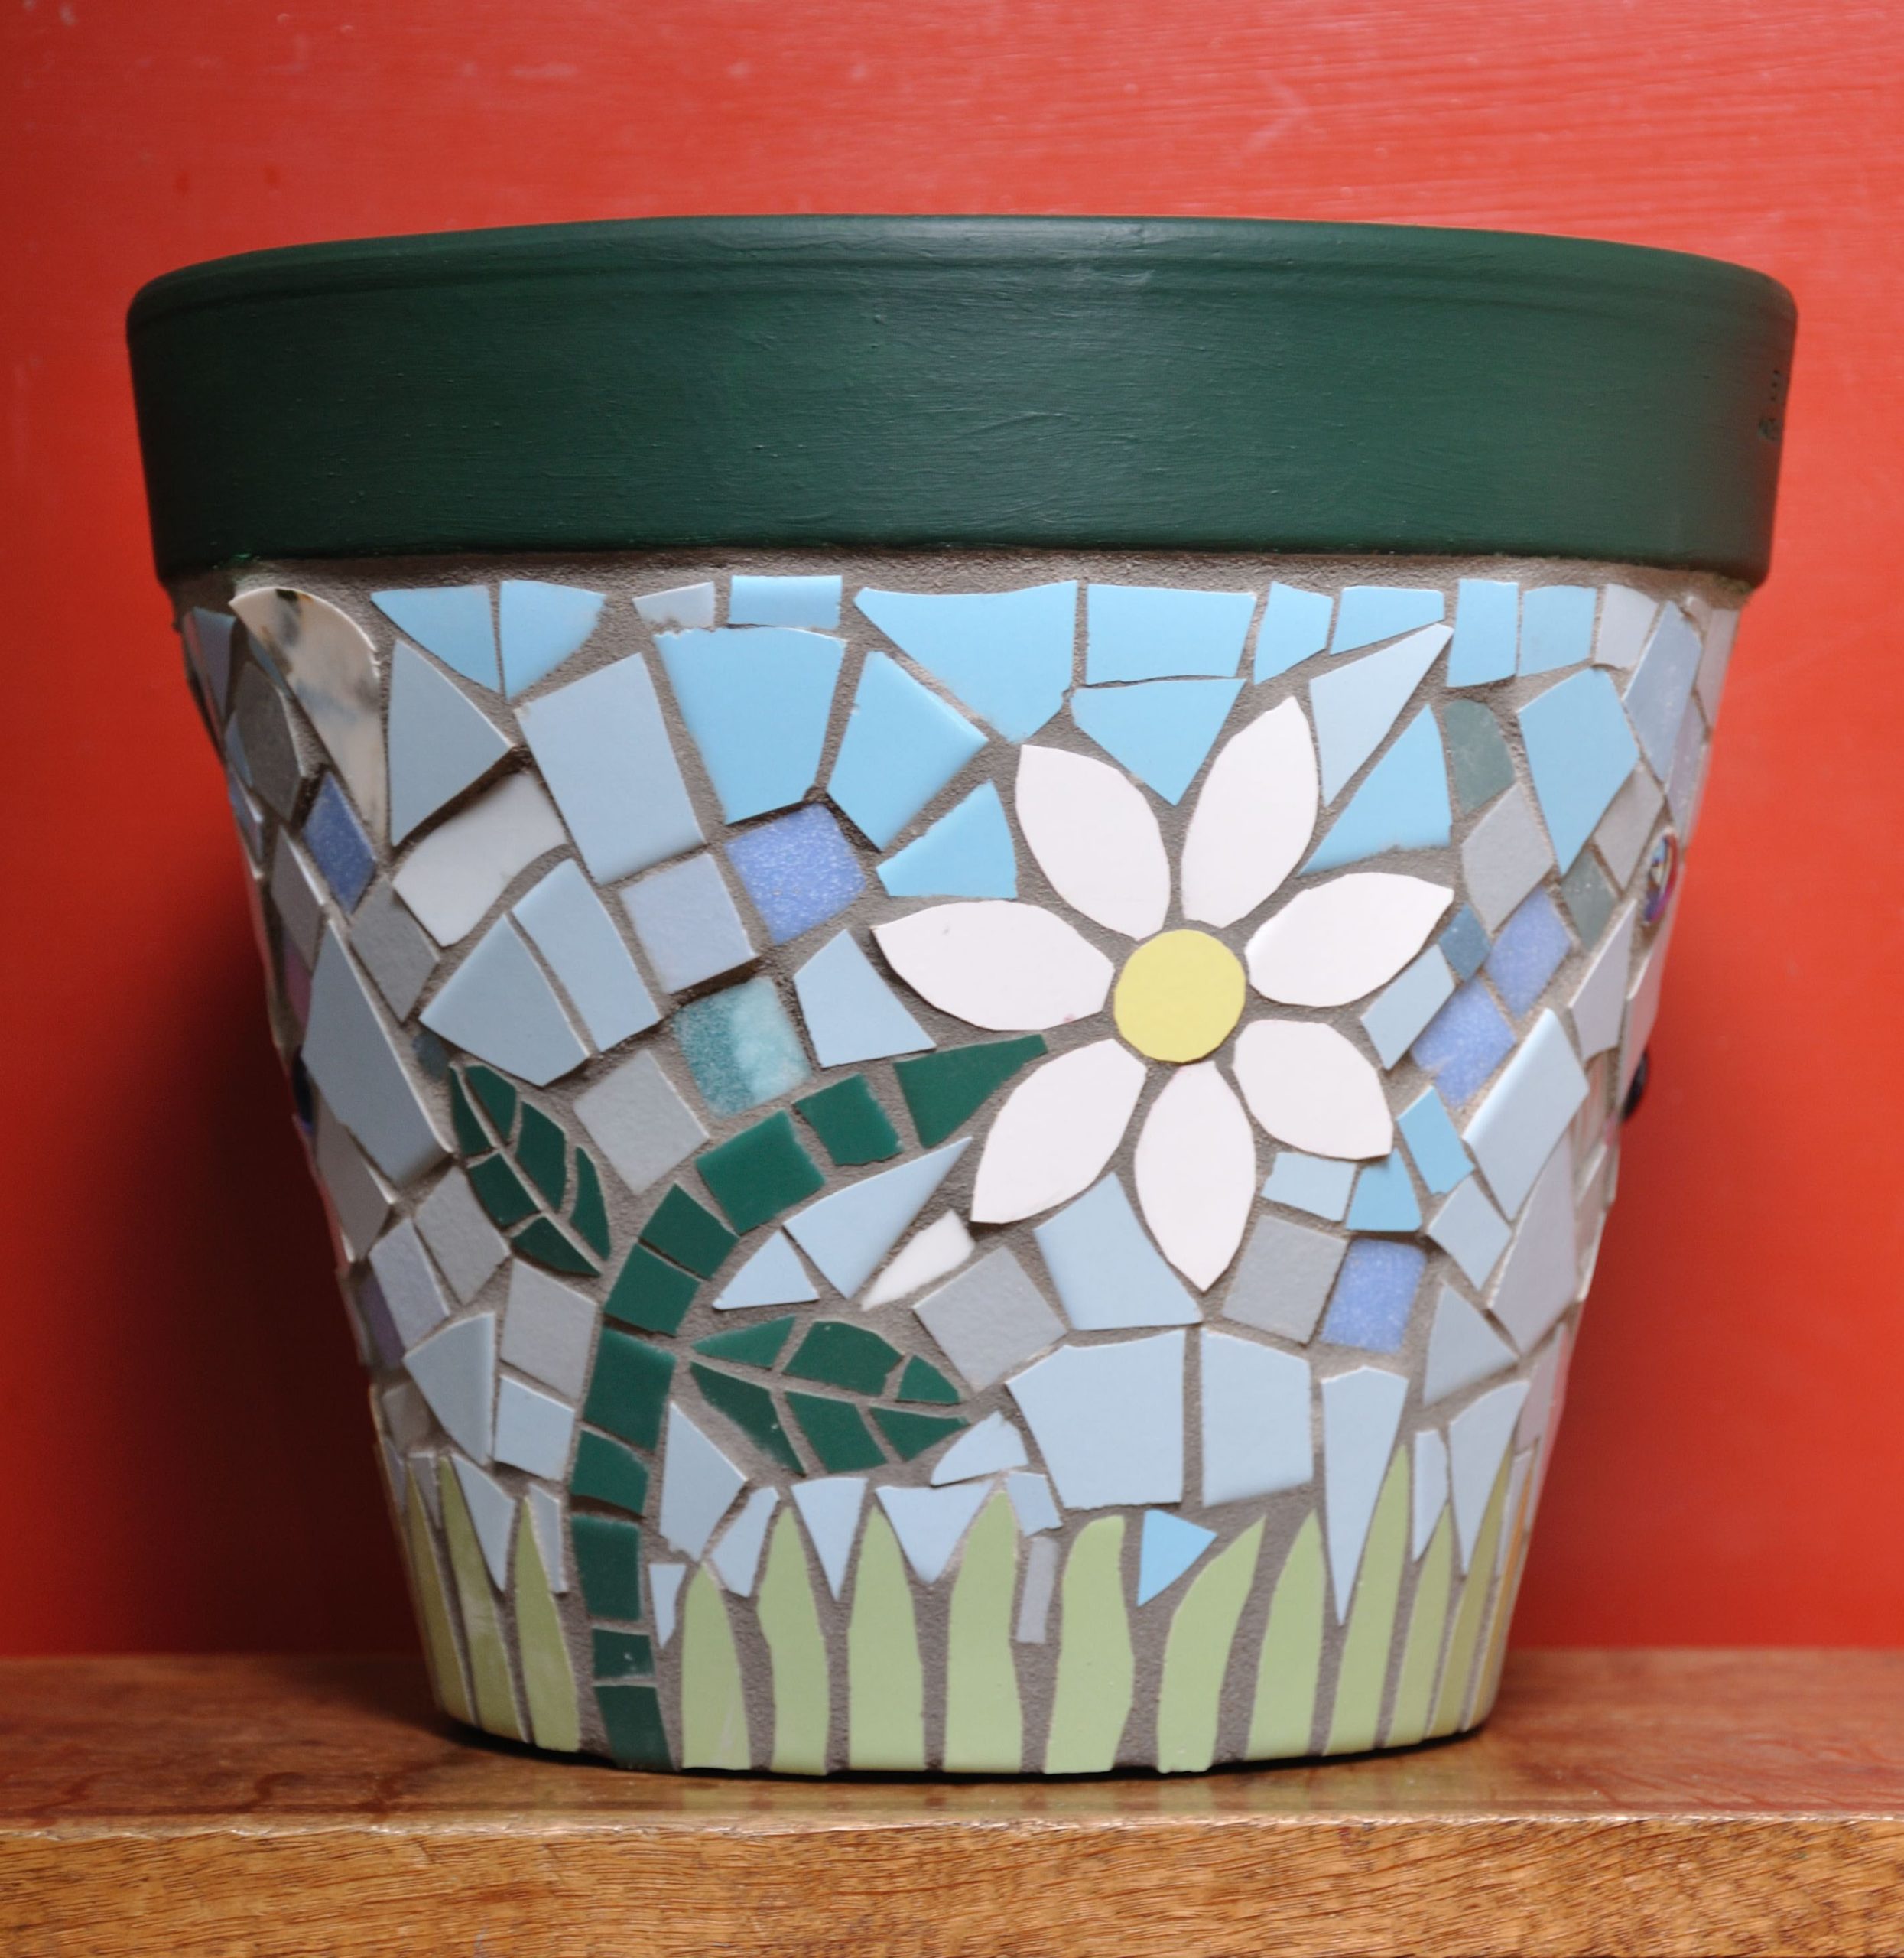
“This gazing ball is so captivating because of its color palette and finish.”
The mix of deep blues, turquoise, and emerald green is reminiscent of water and nature, making it a perfect fit for a garden. The use of some glossy or iridescent tiles catches the light and creates a sense of movement as you walk past it. The swirling, abstract pattern is also key; a rigid geometric pattern would feel too stiff on a spherical form. The organic flow of the design complements the ball’s perfect shape.
30. Dot a Pebble Path with Colorful Swirling Mosaic Stepping Stones
When placing stepping stones in a pebble or gravel path, the goal is to make them look settled and permanent, not like they’re just sitting on top. After you’ve laid your path, dig out a shallow area for each stone that is slightly deeper than the stone itself. Place the stone in the depression and use a rubber mallet to gently tap it down until it’s perfectly level with or just a fraction of an inch above the surrounding pebbles. Then, brush the pebbles back around the edge for a seamless, professional look.
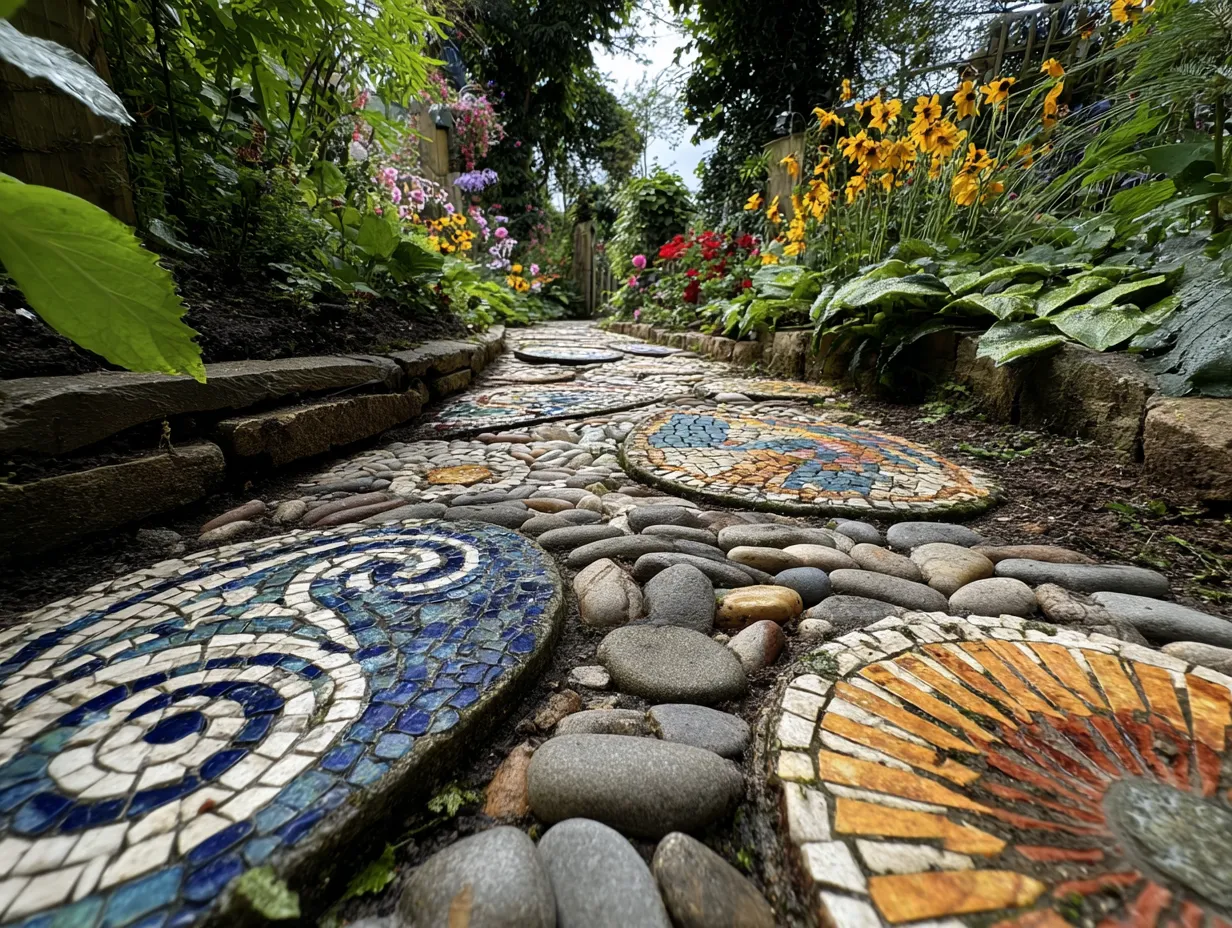
“The single thing that makes this path so successful is the vibrant, joyful color of the mosaic stones.”
The surrounding path is a neutral canvas of earthy grey pebbles and natural stone borders, and the plants are primarily green. This muted backdrop allows the bright orange and deep blue of the mosaics to become brilliant focal points. They are like punctuation marks in the garden, drawing your eye and adding a dose of pure, unadulterated color that brings the whole scene to life.
31. Create a Patio with a Central Fire Pit and Radiating Mosaic Pavers
A complex, multi-material patio like this is a high-end landscaping project. The cost comes from the skilled labor required for the intricate cuts and layout.
- Pavers & Bricks: $1,500 – $3,000 (for a 15-foot diameter patio, depending on material quality)
- Fire Pit Kit: $400 – $1,500
- Gravel Base & Sand: $300 – $500
- Labor: $5,000 – $10,000+ for a professional hardscape crew to execute the complex radial pattern.
- TOTAL (Pro-installed): $7,200 – $15,000+
Budget alternative: Build the fire pit and surround it with a simple circle of standard red bricks, then fill the rest of the patio with affordable pea gravel for a similar vibe at 80-90% less cost.
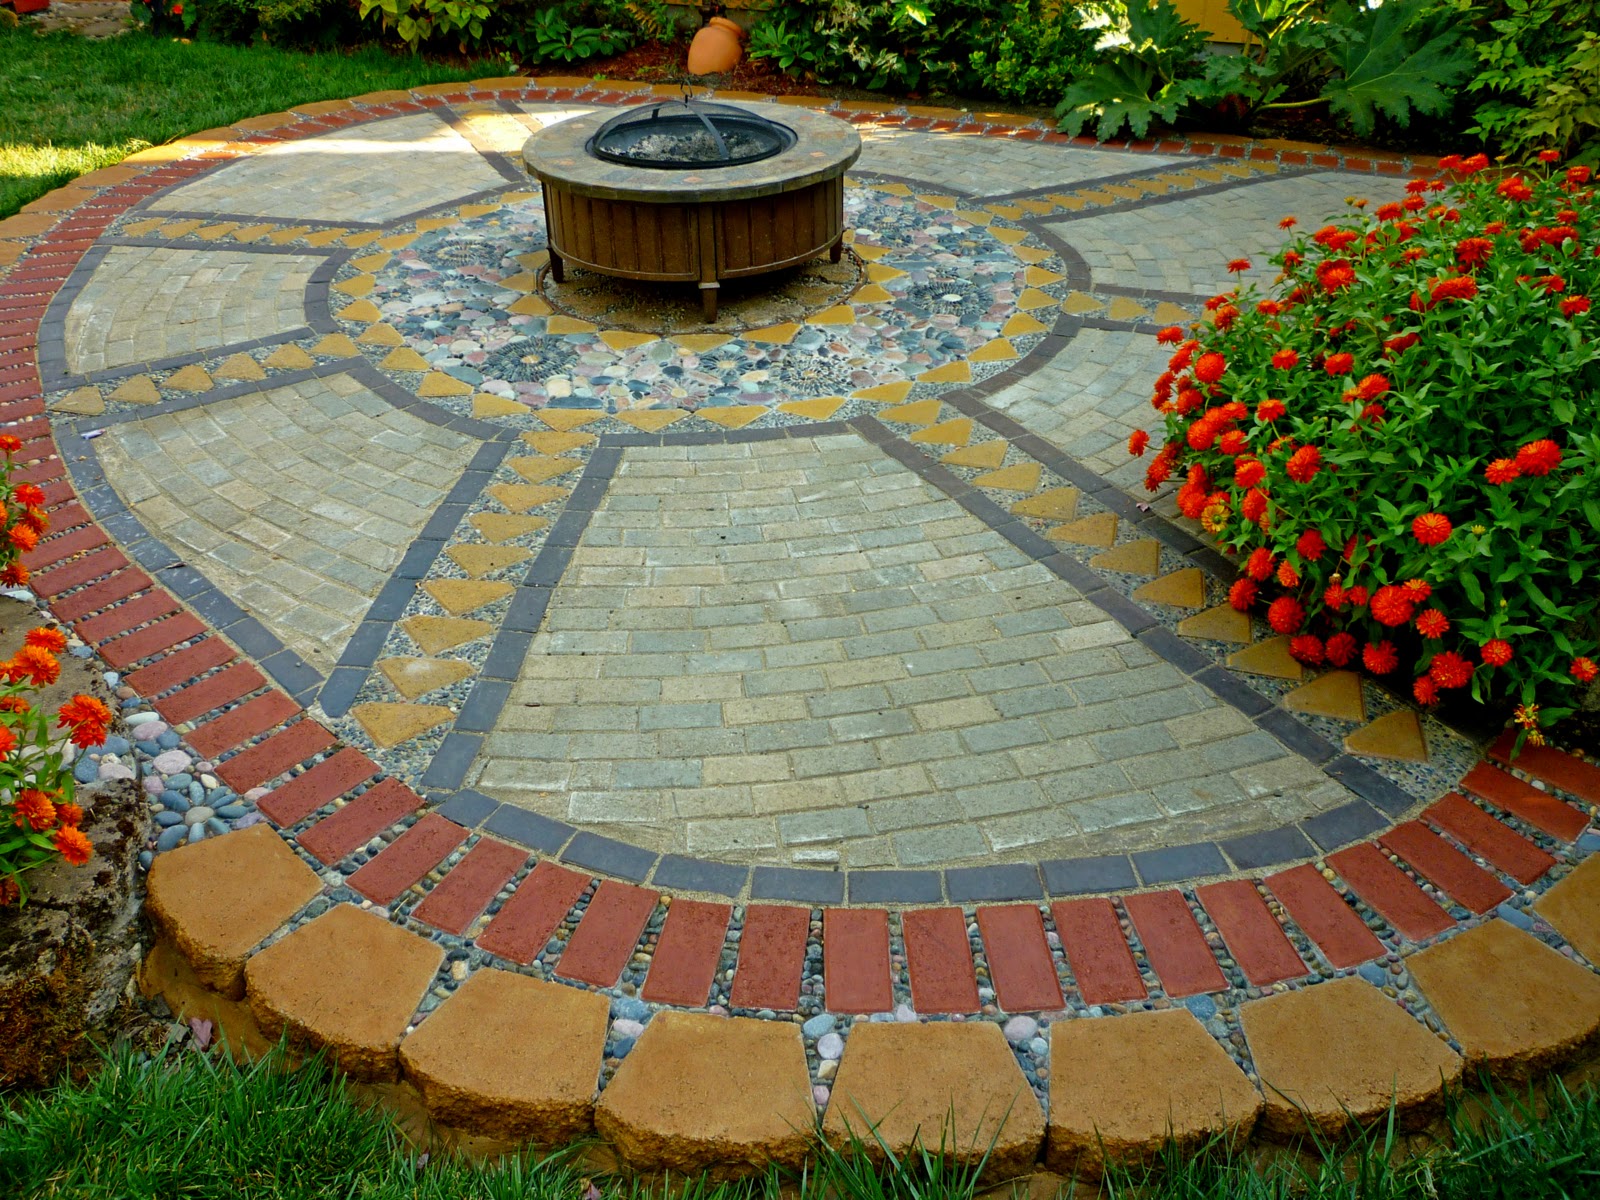
“This is a grand statement piece that needs room to shine.”
This idea is best for a large, open backyard where the patio can be a central feature. You’ll need a minimum clear diameter of 20-25 feet to truly appreciate the radiating sunburst pattern. In a smaller yard, the design would feel cramped and truncated, losing its expansive effect. For smaller spaces, consider a simple circular patio with a decorative mosaic medallion in the center, rather than trying to execute this complex, large-scale pattern.
Your Garden’s Next Masterpiece Awaits
Whether you’re starting with a single stepping stone or planning a full patio overhaul, the beauty of mosaic is its infinite possibility for personalization. We hope these ideas have sparked your imagination and given you the confidence to start breaking some tiles (in a good way!). Pick a project, gather your materials, and begin the meditative process of creating something truly unique for your outdoor space.
Don’t forget to save your favorite ideas to your garden board on Pinterest. When you’re ready to make your mark, you’ll know just where to find the inspiration.