You know that feeling when you finally find the cabinet makeover look that’s exactly right for your space, but have no idea how to pull it off? We’ve been there. After filtering through hundreds of options across Target, IKEA, and Facebook Marketplace, we narrowed it down to 30 ideas that actually deliver. In this guide, we’re showing you everything from sleek Modern kitchens and cozy Farmhouse bathrooms to bold Eclectic designs. With the ‘upcycled luxury’ trend still going strong in 2026, giving your existing cabinets a new lease on life is smarter—and more stylish—than ever. And stay until the end — we break down the most common mistakes that can ruin these looks.
📌 Save this to Pinterest for later — you’ll want to revisit these ideas.
1. Integrated Light Blue Cabinetry for a Seamless Bedroom Workspace
Style Math: The success of this serene space lies in a carefully balanced formula: 60% calming light blue + 30% soft neutrals + 10% metallic shimmer. The light blue of the shaker-style cabinetry serves as the dominant, soothing base. It’s balanced by the expansive off-white textured wallpaper and light wood-look flooring, which prevent the color from overwhelming the room. The final 10% comes from the subtle silver accents in the cabinet pulls and the geometric pendant light, adding a touch of modern polish without creating visual noise. You could swap the silver for soft brass to warm it up, or change the blue to a muted sage green while keeping the same harmonious ratios.

“Designer Tip: When creating a fully integrated wall unit like this, precision is everything.”
To ensure a custom, built-in look, measure your wall from floor to ceiling and wall to wall. Then, subtract 1/2 inch from both the total height and width measurements. This small gap provides crucial wiggle room for installation, allowing you to slide the units into place without scraping the walls or ceiling. The remaining gap can then be perfectly concealed with a thin piece of trim or a bead of caulk for a truly seamless finish.
2. Dark Blue Shaker Cabinets with a Striking Geometric Backsplash
What Makes It Work: This kitchen is a masterclass in contrast and repetition. The deep, moody navy of the shaker cabinets creates a dramatic and elegant foundation, which is powerfully offset by the bright white countertops. But the real star is the geometric tile backsplash. It introduces a playful pattern that grabs the eye and adds a layer of personality. This pattern is subtly echoed in the clean lines of the shaker doors and the integrated bookshelf on the island, creating a sense of rhythm and cohesion throughout the space. The warm gold hardware acts as jewelry, preventing the cool tones from feeling too sterile.

“Get This Look For Less: You don’t need a custom cabinetry budget to achieve this high-contrast elegance.”
Start with IKEA’s AXSTAD cabinet fronts in their matte blue finish. For the backsplash, check out online tile retailers like Wayfair or Floor & Decor for similar geometric patterns, which can often be found for under $10 per square foot. Hunt for brass-toned hardware on Amazon or at Target—you can find stylish pulls and knobs for a fraction of the designer price. A laminate countertop with a subtle marble effect will give you the look of stone without the cost.
3. Timeless Elegance with Light Maple Cabinetry and Dark Stone Counters
The One Thing: The rich, consistent hue of the maple wood cabinetry is what gives this kitchen its unshakable, traditional appeal. While other elements are classic—the stainless appliances, the dark countertops—the sheer amount of warm, fine-grained wood provides an enveloping sense of quality and permanence. If you replaced the maple with painted white or gray cabinets, the entire feel of the room would shift from established and stately to something more modern and less grounded. It’s the wood that tells a story of craftsmanship and timeless style.
“Maintenance Reality: While maple is a durable hardwood, cabinetry of this style requires specific care to keep it looking its best.”
The thousands of linear feet of trim and raised panel details are notorious dust collectors. Plan for a weekly dusting with a microfiber cloth. Be mindful of grease and food splatters, which should be wiped immediately with a damp cloth and mild soap, then dried. Avoid harsh chemical cleaners, as they can strip the finish over time. About once a year, you may want to use a wood-specific cleaner and polish to restore its luster and protect the surface from drying out.
4. A Two-Tone Kitchen with Natural Wood Lowers and Crisp White Uppers
Real Talk: A white marble waterfall countertop is a showstopper, but let’s be honest about what it’s like to live with. Marble is a natural stone, which means it’s porous and relatively soft. Spilling red wine, lemon juice, or even coffee and not wiping it up immediately will likely lead to a permanent stain or etch mark. This gives the surface a
5. Light Wood Cabinets Paired with a Classic White Subway Tile Wall
Trending Context: This look leans heavily into the enduring

6. White Shaker Cabinets with Dark Hardware and a Beadboard Island
How-To Brief: Add character to a plain island with beadboard paneling. Here’s a quick guide. Time: 2-3 hours. Cost: $40-$80.
- Measure each side of your island you want to cover.
- Cut your beadboard panels to size using a circular saw or jigsaw. You may need to cut out openings for outlets.
- Apply a strong construction adhesive (like Liquid Nails) in a zig-zag pattern to the back of the panel.
- Press the panel firmly onto the island side, ensuring it’s level.
- Secure the panel by driving a few finishing nails along the top, bottom, and edges.
- Fill nail holes with wood putty, sand smooth, and then caulk the seams before painting to match your trim or cabinets.
“Designer Tip: The key to making classic white shaker cabinets feel fresh is in the hardware.”
The combination of dark, round knobs on the doors and coordinating cup pulls on the drawers adds a touch of vintage, farmhouse charm that prevents the kitchen from feeling cookie-cutter. When mixing hardware styles, stick to a single finish (in this case, matte black) for a cohesive look. For drawers wider than 24 inches, consider using two cup pulls for better balance and functionality. This is a simple detail that makes a huge difference. Compare this hardware strategy with the brass bars in Idea #23.
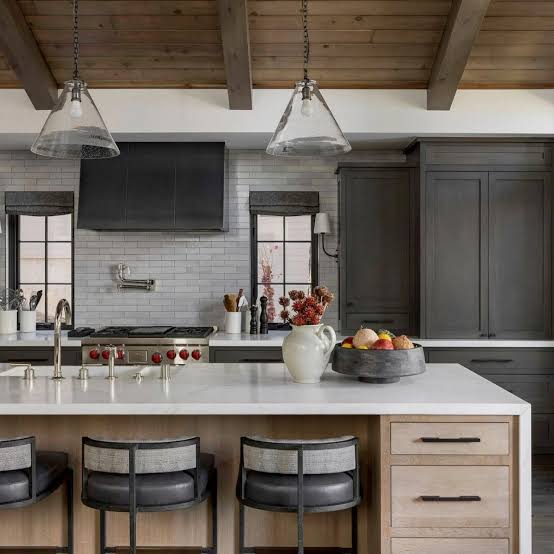
7. A Moody, Modern Kitchen with Matte Black and Rich Wood Panels
What Makes It Work: This kitchen’s stunning look is all about texture and tone. The ultra-matte finish of the black flat-panel cabinets absorbs light, creating a velvety, almost soft appearance. This is brilliantly contrasted with the rich, warm grain of the full-height wooden veneer panels, preventing the black from feeling cold or oppressive. The heavy white veining in the black marble island and floor tiles ties the light and dark elements together, creating a cohesive yet dramatic statement. The entire design feels like a carefully composed piece of abstract art.
“Scale Guide: A design this dark and dramatic needs space and light to breathe.”
This look is best suited for larger kitchens, ideally with a minimum of 150 square feet and ceiling heights of 9 feet or more. Ample natural light from large windows or skylights is almost non-negotiable to prevent the room from feeling like a cave. If your space is smaller, you can get a similar vibe by using the black cabinets on the lower level only, and keeping the walls and upper cabinets bright white, as seen in Idea #29.
8. Warm and Traditional: White Shaker Cabinets with a Brown Tiled Backsplash
Real Talk: While this kitchen is perfectly functional, the combination of brown square tiles, dark granite, and dark wood floors can make the space feel dated by 2026 standards. The mosaic tile accent, a popular feature in the early 2000s, particularly anchors the design in a specific era. If you’re inheriting a similar kitchen, the quickest way to modernize it is by replacing the backsplash. A simple, light-colored subway or zellige tile would instantly lift the entire room and make the existing cabinets and countertops feel more current.
“Get This Look For Less: If you appreciate the traditional, warm aesthetic but are on a tight budget, this is one of the more achievable styles.”
White shaker cabinets are widely available and affordable from places like The Home Depot or Lowe’s. You can often find granite or laminate countertops with a similar dark brown pattern for a very reasonable price, especially in pre-fabricated sizes. Simple square ceramic tiles for the backsplash are one of the most budget-friendly options on the market, often costing just a few dollars per square foot. It’s a workhorse style that prioritizes durability over fleeting trends.
9. Eclectic Kitchen with Wood-Framed Cabinets and a Checkerboard Floor
The One Thing: The custom-look, wood-framed cabinets with matte black inserts are the undeniable heart of this kitchen’s unique personality. This isn’t an off-the-shelf solution. It’s a deliberate design choice that feels both rustic and modern at the same time. The wood framing brings in natural warmth, while the flat black panels provide a graphic punch that ties in with the bold floor. Removing this element would turn a memorable, eclectic space into a much more standard-issue kitchen with a cool floor.

10. A Renter-Friendly Refresh with Peel-and-Stick Finishes
How-To Brief: Give your cabinets a non-permanent facelift with removable vinyl or wallpaper. Time: 3-4 hours. Cost: $50-$150.
- First, thoroughly clean your cabinet doors and frames with a degreasing cleaner. This step is critical for good adhesion.
- Unscrew the cabinet doors from their hinges and remove all hardware. Lay them on a flat surface.
- Measure one door, and cut your peel-and-stick material about one inch wider and longer than the door.
- Peel back a few inches of the backing paper and align the edge carefully. Slowly smooth the material down with a squeegee, working from the center out to push out air bubbles.
- Wrap the excess material around the edges and trim with a craft knife for a clean finish.
- Use a pin to poke any remaining bubbles and smooth them out. Re-install hardware and doors.
“Real Talk: While peel-and-stick cabinet coverings are a fantastic rental-friendly solution, the final result is heavily dependent on the quality of the product and your patience during application.”
Cheaper, thinner vinyls can look plasticky, tear easily, and are more prone to bubbling. Look for thicker, textured options that are marketed specifically for furniture or countertops. Always test the product on a small, inconspicuous area first (like the back of a cabinet door) to ensure it removes cleanly without damaging the underlying surface. Your landlord will thank you.
11. Cozy Kitchen with Dark Green Cabinets and Butcher Block Countertops
Budget Breakdown: Here’s an estimate to get this cozy, natural kitchen look.
- Cabinet Paint & Supplies: $150 – $300 (for high-quality cabinet enamel)
- Butcher Block Countertops: $800 – $2,000 (depending on wood species and size)
- Cabinet Hardware: $100 – $250
- Backsplash Tile: $200 – $500 (for simple subway tile)
- Rug & Decor: $150 – $400
- TOTAL: $1,400 – $3,450
- Budget alternative: Use a laminate countertop with a butcher block look-alike finish to save $500-$1,500.
“What Makes It Work: This kitchen feels so inviting because of its expert use of natural colors and textures.”
The deep, forest green of the cabinets grounds the space and evokes a sense of calm and nature. This is perfectly complemented by the warm, organic texture of the light wood countertops. The simple silver hardware and white subway tile backsplash act as quiet supporting characters, allowing the green and wood to be the stars. Finally, the black and white geometric rug adds a pop of graphic interest that keeps the room from feeling too traditional, while the living plants scattered throughout reinforce the natural, earthy vibe.
12. Traditional Dark Wood Cabinets with Bright White Contrast
Designer Tip: When working with dark, heavy wood cabinets from a previous era, the single most effective way to lighten the room is to maximize contrast. Notice how the bright white countertops, white tiled backsplash, and even the white louvered doors over the window work together to bounce light around the room. If the countertops were also dark, the space would feel significantly more somber and enclosed. If a full countertop replacement isn’t in the budget, consider painting the walls a crisp white and using a light-colored runner on the floor to break up the expanses of wood.
“Real Talk: These raised-panel, dark-stained cabinets, while high quality, can be challenging to integrate into a more modern 2026 aesthetic.”
The specific arch detail on the upper doors strongly dates them to the 1990s and early 2000s. Painting them is a popular option, but it’s a labor-intensive job that requires meticulous prep work (sanding, priming) to cover the dark stain and wood grain effectively. If you’re not prepared for a multi-day DIY project, you might consider professional spray painting, which can be costly but yields a more durable, factory-like finish.
13. Eclectic Charm with Green Slat Cabinets and a Patterned Tile Backsplash
The One Thing: The patterned ceramic tile backsplash is the absolute soul of this kitchen. It’s a riot of color and pattern that exudes personality and handmade charm. Without it, you’d have a nice set of green and white cabinets. With it, you have a story. It acts as a bridge, pulling together the green, white, and warm wood tones into a cohesive, joyful whole. It’s a perfect example of how one bold choice can elevate an entire design from simple to unforgettable. This is a far cry from the sleek marble backsplash in Idea #17, showing the incredible range of backsplashes.
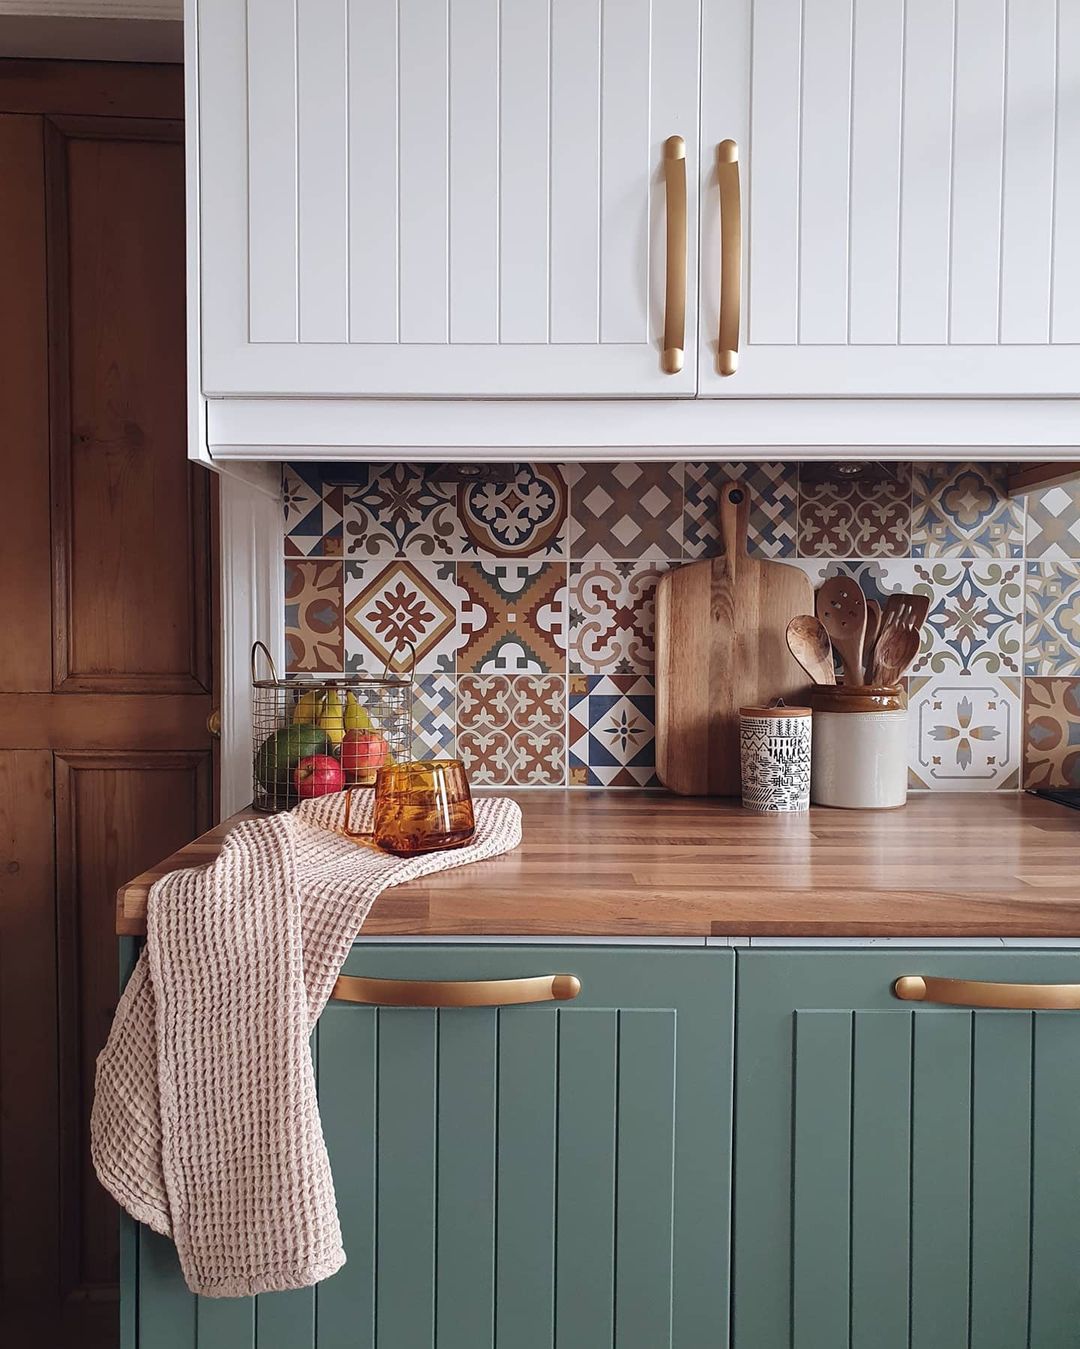
“Style Math: The vibrant energy here comes from a simple but effective recipe: 50% bold pattern + 30% natural texture + 20% clean color.”
The backsplash is the hero, providing the pattern and diverse color palette. The natural texture comes from the warm butcher block countertop and various wooden accessories. The clean color is delivered by the vertical slat cabinets in solid green and white, which provides a calm resting place for the eyes amidst the busy tile. The brass D-ring pulls add just the right amount of metallic warmth to finish the look.
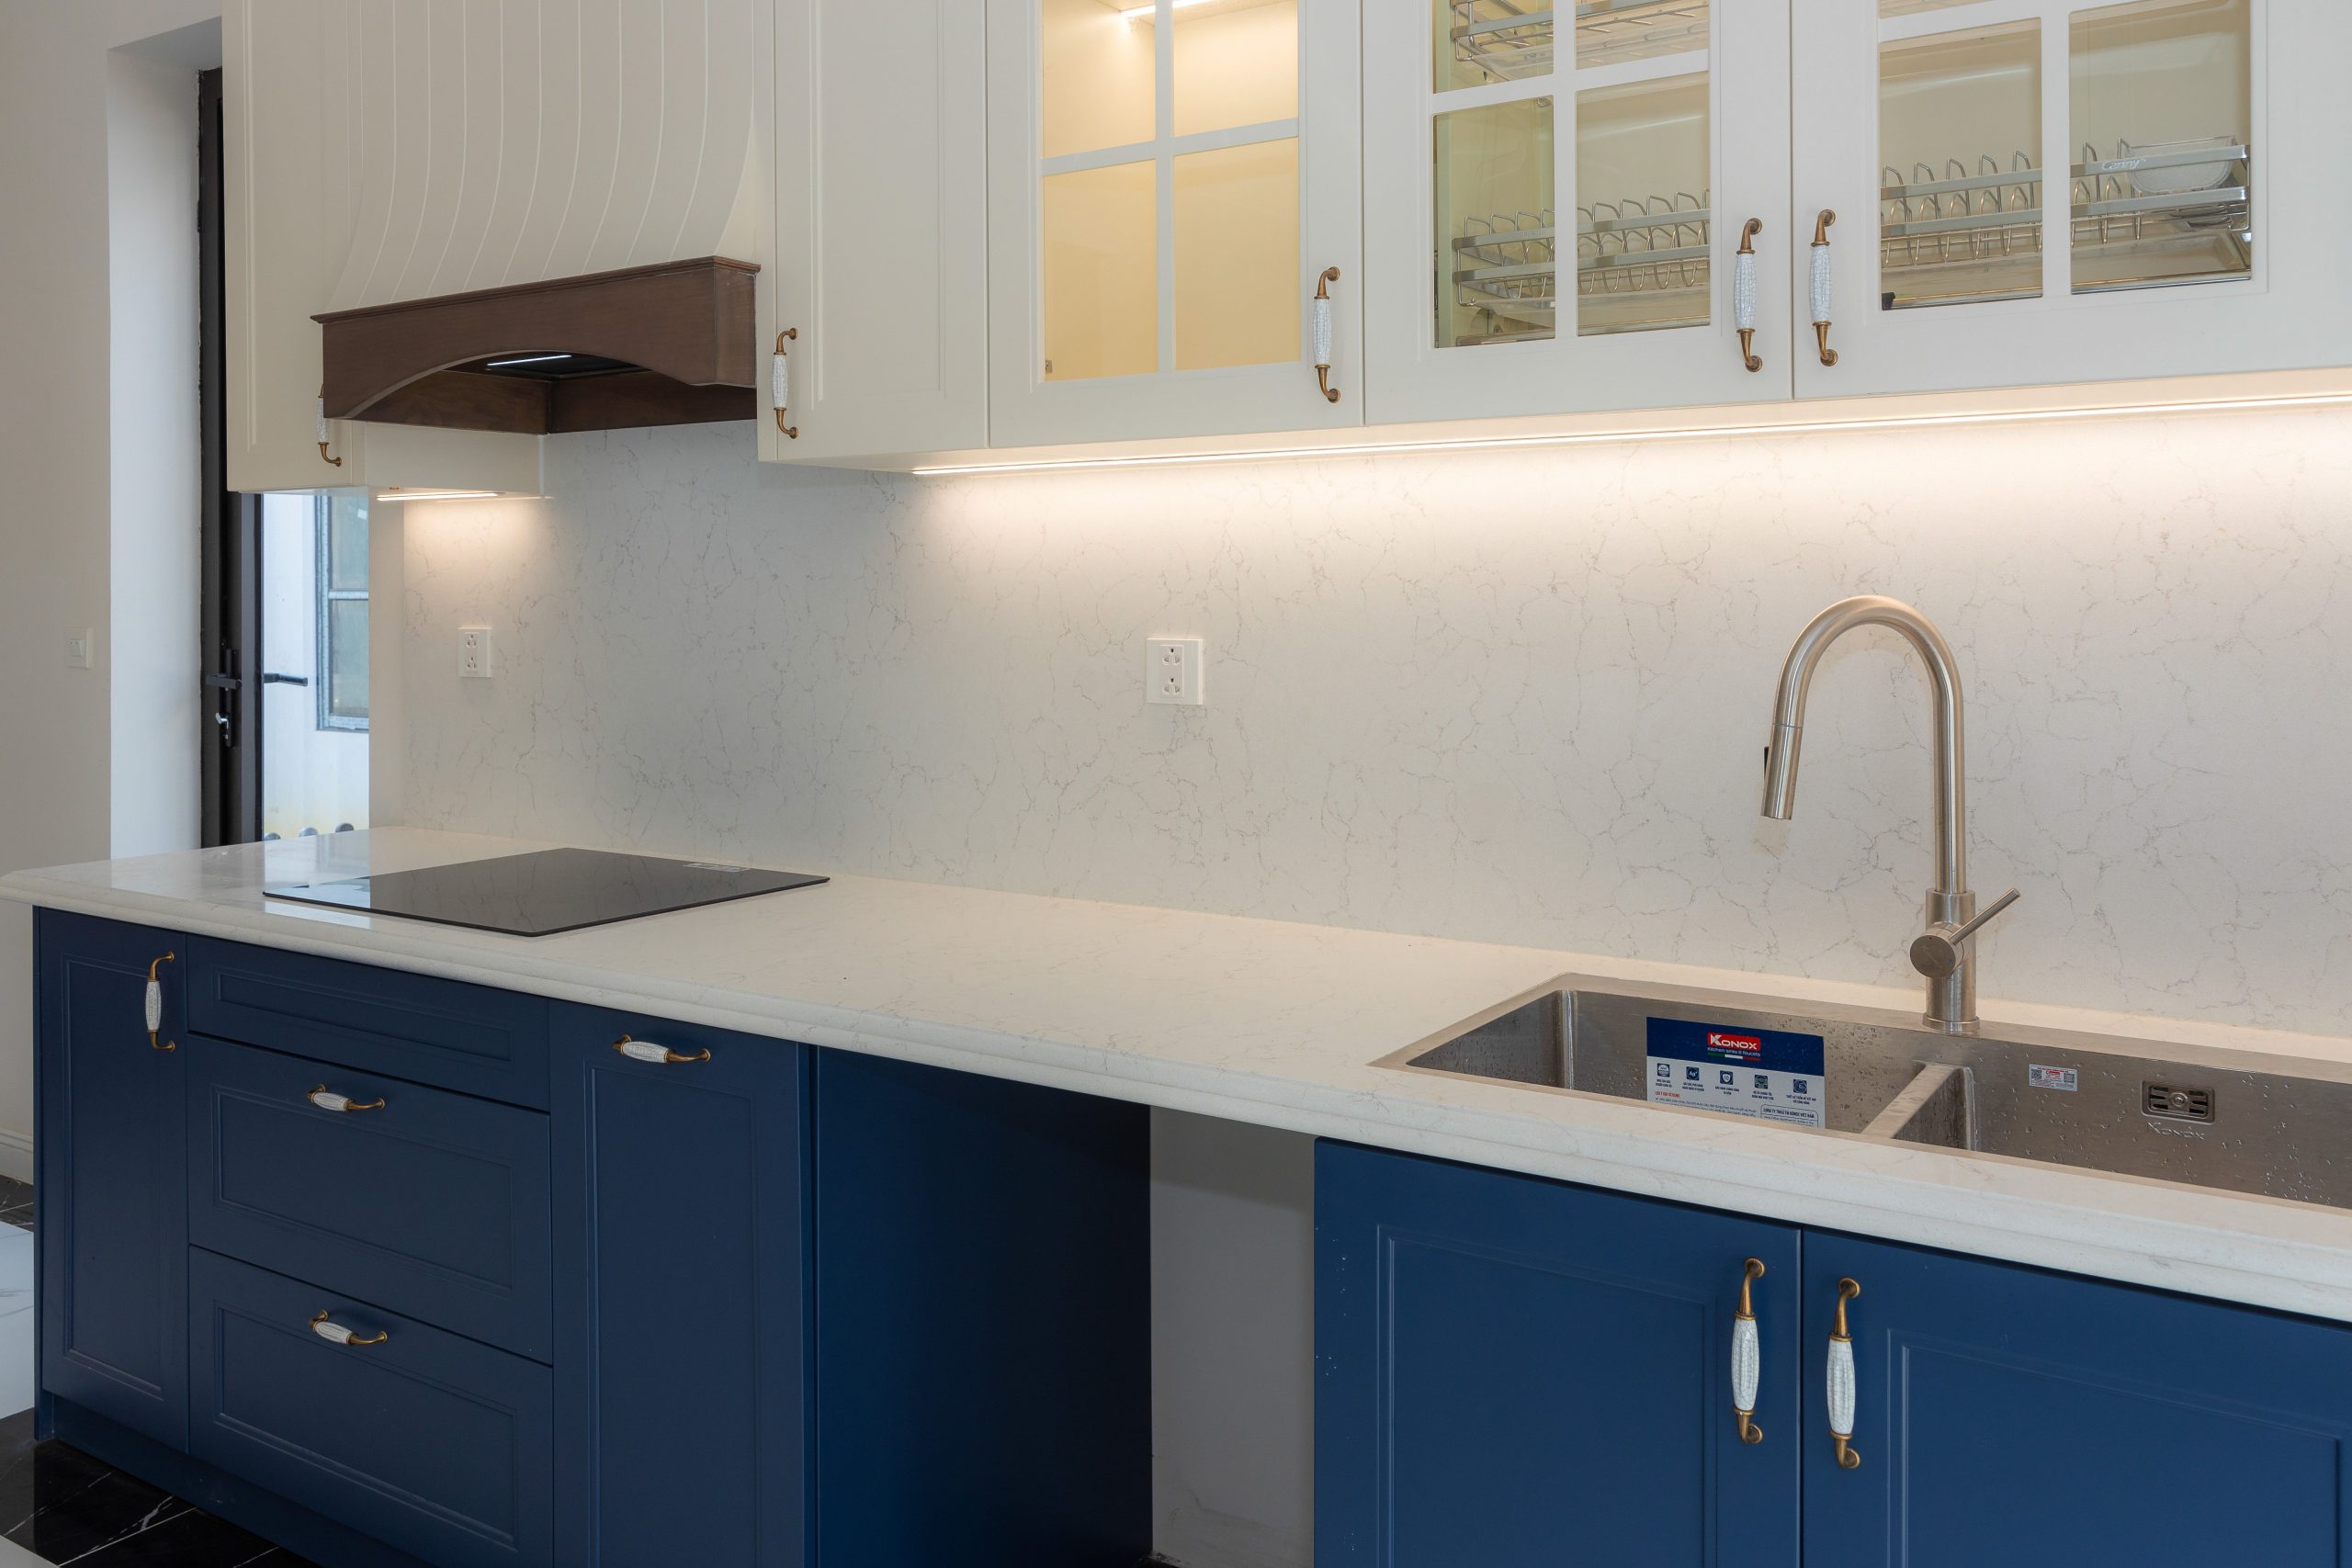
14. A Classic Navy and White Kitchen with Decorative Hardware
What Makes It Work: This kitchen proves that a classic color combination can still feel fresh and modern. The two-tone approach, with crisp white uppers and grounded navy lowers, creates a visual sense of spaciousness while maintaining a strong anchor. The use of white quartz for both the countertops and the backsplash unifies the space and provides a clean, seamless canvas. The final, crucial detail is the hardware. The ornate brass and white ceramic pulls are a decorative choice that adds a touch of bespoke elegance, preventing the classic scheme from feeling generic.
15. Light Grey Shaker Cabinets with Gold Pulls and a Wood Countertop
Trending Context: This look perfectly captures the “soft modern” trend that’s dominating Pinterest feeds. It takes the clean lines of modern design (the shaker cabinets, the simple color palette) and warms them up with organic and decorative elements. The light wood countertop adds natural texture, while the ornate gold hardware feels like jewelry for the cabinets, adding a touch of glamour and personality. It’s a move away from the stark, cold minimalism of the past towards a more livable, inviting version of contemporary style.
16. Airy and Organic: Open Shelving with Brass and Wood Tones
The One Thing: The open wooden shelving is the single element that defines this kitchen’s breezy, curated aesthetic. By removing upper cabinets and replacing them with simple birch-toned shelves on elegant brass brackets, the entire space feels lighter, more open, and more personal. It forces a level of curation, turning everyday dishes and glassware into a key part of the decor. This is a storage choice that is entirely about a lifestyle—one that is organized, uncluttered, and finds beauty in everyday objects. Compare the feel of this to the closed upper cabinets in Idea #19.
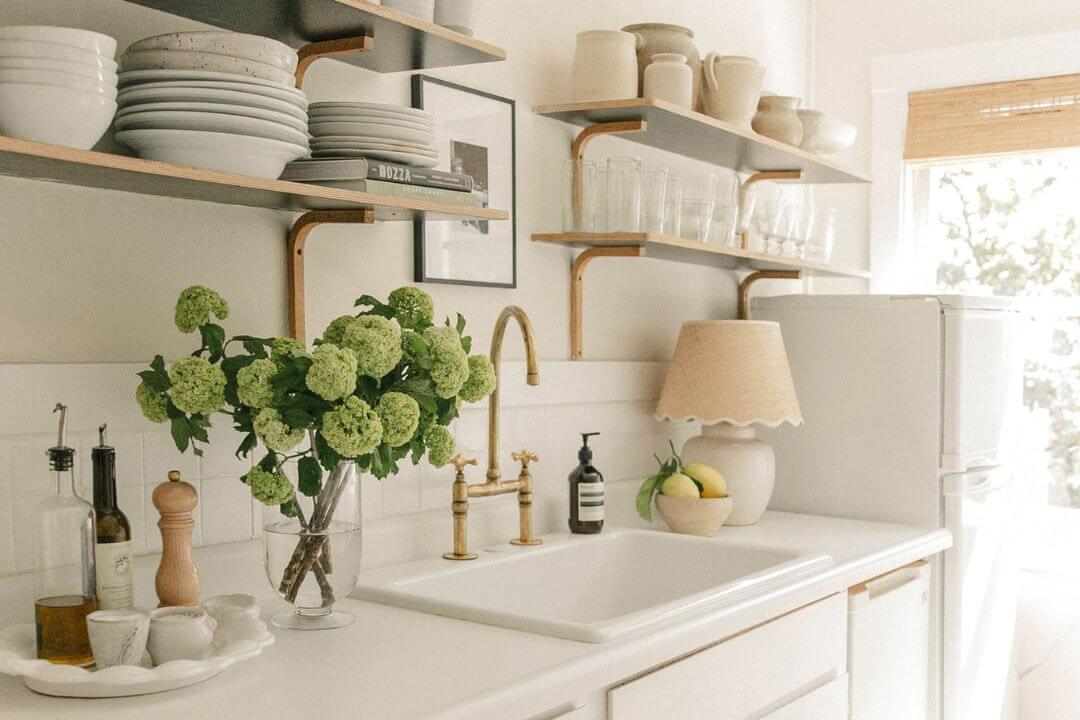
“Real Talk: Living with open shelving requires honesty about your lifestyle.”
Everything on these shelves is permanently on display. If you have mismatched, chipped mugs or a chaotic collection of plastic cups, this look will quickly turn from artfully curated to simply cluttered. It also requires more frequent cleaning, as the shelves and their contents are exposed to dust and cooking grease. If you love the look but not the maintenance, consider just one or two floating shelves for decorative items, while keeping the bulk of your dishware behind closed doors.
17. High-Contrast White Shakers with a Black Marble-Look Backsplash
What Makes It Work: The power of this design comes from its bold and unapologetic contrast. The clean, bright white of the shaker cabinets provides a perfect, simple frame for the dramatic star of the show: the black marble-look backsplash and countertop. The material is carried up the wall, creating a seamless and impactful slab of pattern and dark color. The minimal hardware—subtle white ceramic knobs—is a clever choice, as it refuses to compete for attention. The sleek chrome faucet adds a final touch of modern polish. It’s a lesson in making a big statement with just a few, well-chosen elements.
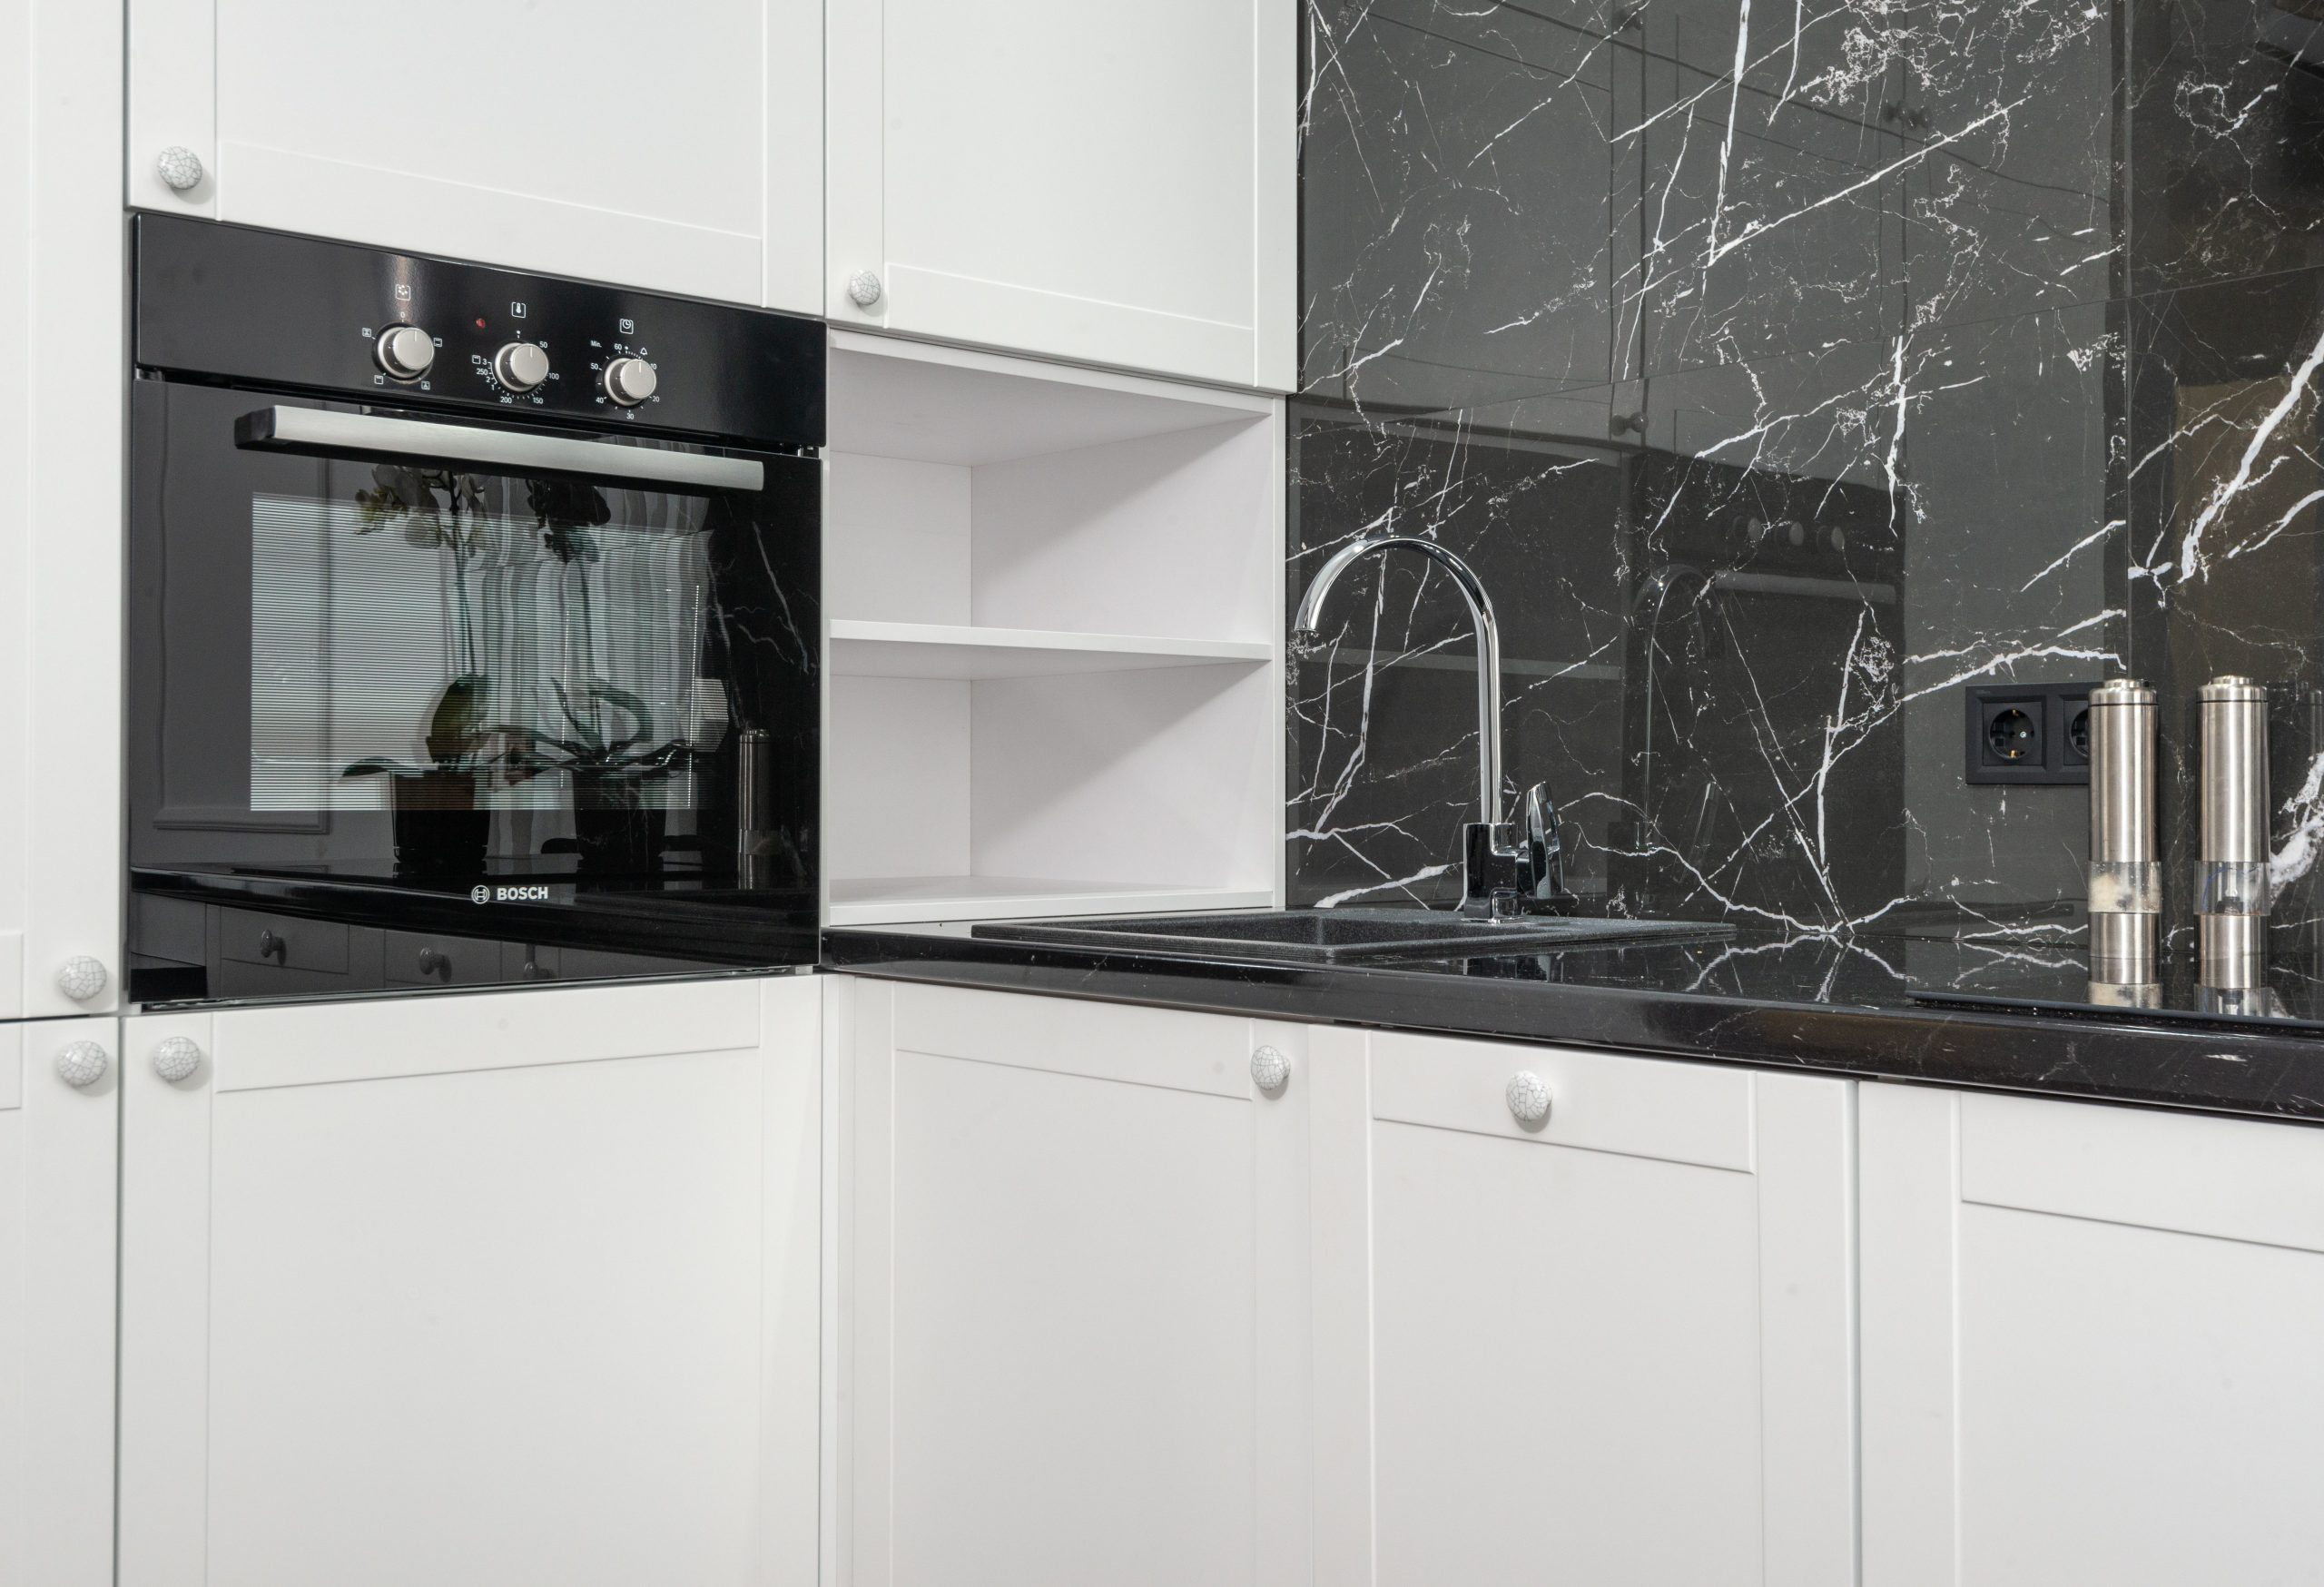
“Get This Look For Less: That stunning black marble look doesn’t have to come with a stunning price tag.”
Large-format porcelain tiles that mimic the look of veined marble can provide a nearly identical visual for a fraction of the cost of a solid slab. Even more affordable is a high-pressure laminate countertop with a quality marble print, like those from Formica or Wilsonart. Paired with classic, affordable white shaker cabinets from a big-box store, this high-end, dramatic look can be achieved on a surprisingly reasonable budget.
18. Modern Kitchen with Black Base Cabinets and Open Wood Shelving
Designer Tip: One of the smartest ways to use dark cabinets without overwhelming a space is to keep them on the lower level only. By using black base cabinets, you create a strong, grounding anchor for the room. Then, by keeping the walls white and using open wooden shelving instead of upper cabinets, the room remains bright, airy, and open. This ‘tuxedo’ kitchen approach gives you the drama of a dark color without sacrificing the feeling of spaciousness. The open shelving also offers a chance to add warmth and personality with curated dishware and decor.
“Scale Guide: This design is incredibly versatile and works well in kitchens of various sizes.”
In a smaller kitchen (under 120 sq ft), the lack of upper cabinets can make the space feel significantly larger than it is. In a larger kitchen, it creates a relaxed, cafe-like atmosphere. The key is ceiling height. This look works best with ceilings that are at least 8 feet high, providing enough vertical space for the open shelves to feel intentional and not cramped against the countertop. It’s a more open and airy alternative to the floor-to-ceiling dark cabinets in Idea #7.
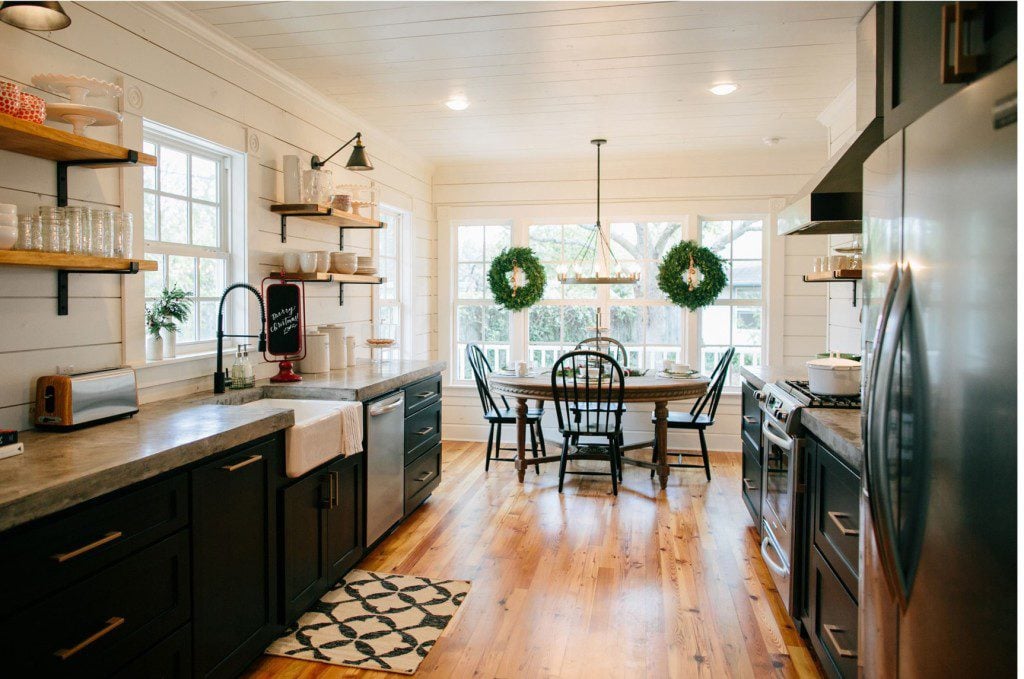
19. Farmhouse Charm with White Shaker Cabinets and Black Cup Pulls
What Makes It Work: This design perfectly illustrates the modern farmhouse aesthetic by balancing clean lines with rustic touches. The white shaker cabinets provide a timeless and bright backdrop, a hallmark of the style. The visual interest comes from the high-contrast hardware: assertive black cup pulls on the drawers. This choice adds a vintage, utilitarian feel that prevents the white from becoming boring. The final layering of the black countertop and the cozy, light wood riser on top creates a composition of textures that feels both clean and lived-in.
“How-To Brief: Create a simple wood riser to add height and organization to your countertop.”
Time: 1 hour. Cost: $15-$30.
Purchase a standard pine or whitewood board (e.g., a 1×6) from a hardware store.
Decide on the length of your riser (18-24 inches is a good start) and cut the board.
Cut two small pieces from the same board, about 4 inches long, to act as the feet.
Sand all pieces smooth, paying attention to the edges.
Attach the feet to the underside of the long board at each end using wood glue and a couple of finishing nails.
Finish with a food-safe stain, wax, or oil to protect the wood from moisture.
20. A Classic Bathroom with Twin Dark Wood Vanities and Marble Tops
Budget Breakdown: Recreating this elegant, classic bathroom look comes with a significant range in cost.
- Dark Wood Vanities (x2): $1,500 – $5,000+ (depending on custom vs. stock)
- Marble Countertops (x2): $1,000 – $4,000
- Faucets & Plumbing: $500 – $1,500
- Floor Tile: $800 – $2,500 (materials for a medium-sized bathroom)
- Freestanding Tub: $1,500 – $4,000+
- TOTAL: $5,300 – $17,000+
- Budget alternative: Find all-in-one vanities with tops included from retailers like Wayfair or Signature Hardware and use a high-quality LVT floor tile instead of ceramic to achieve a similar look for 40% less.
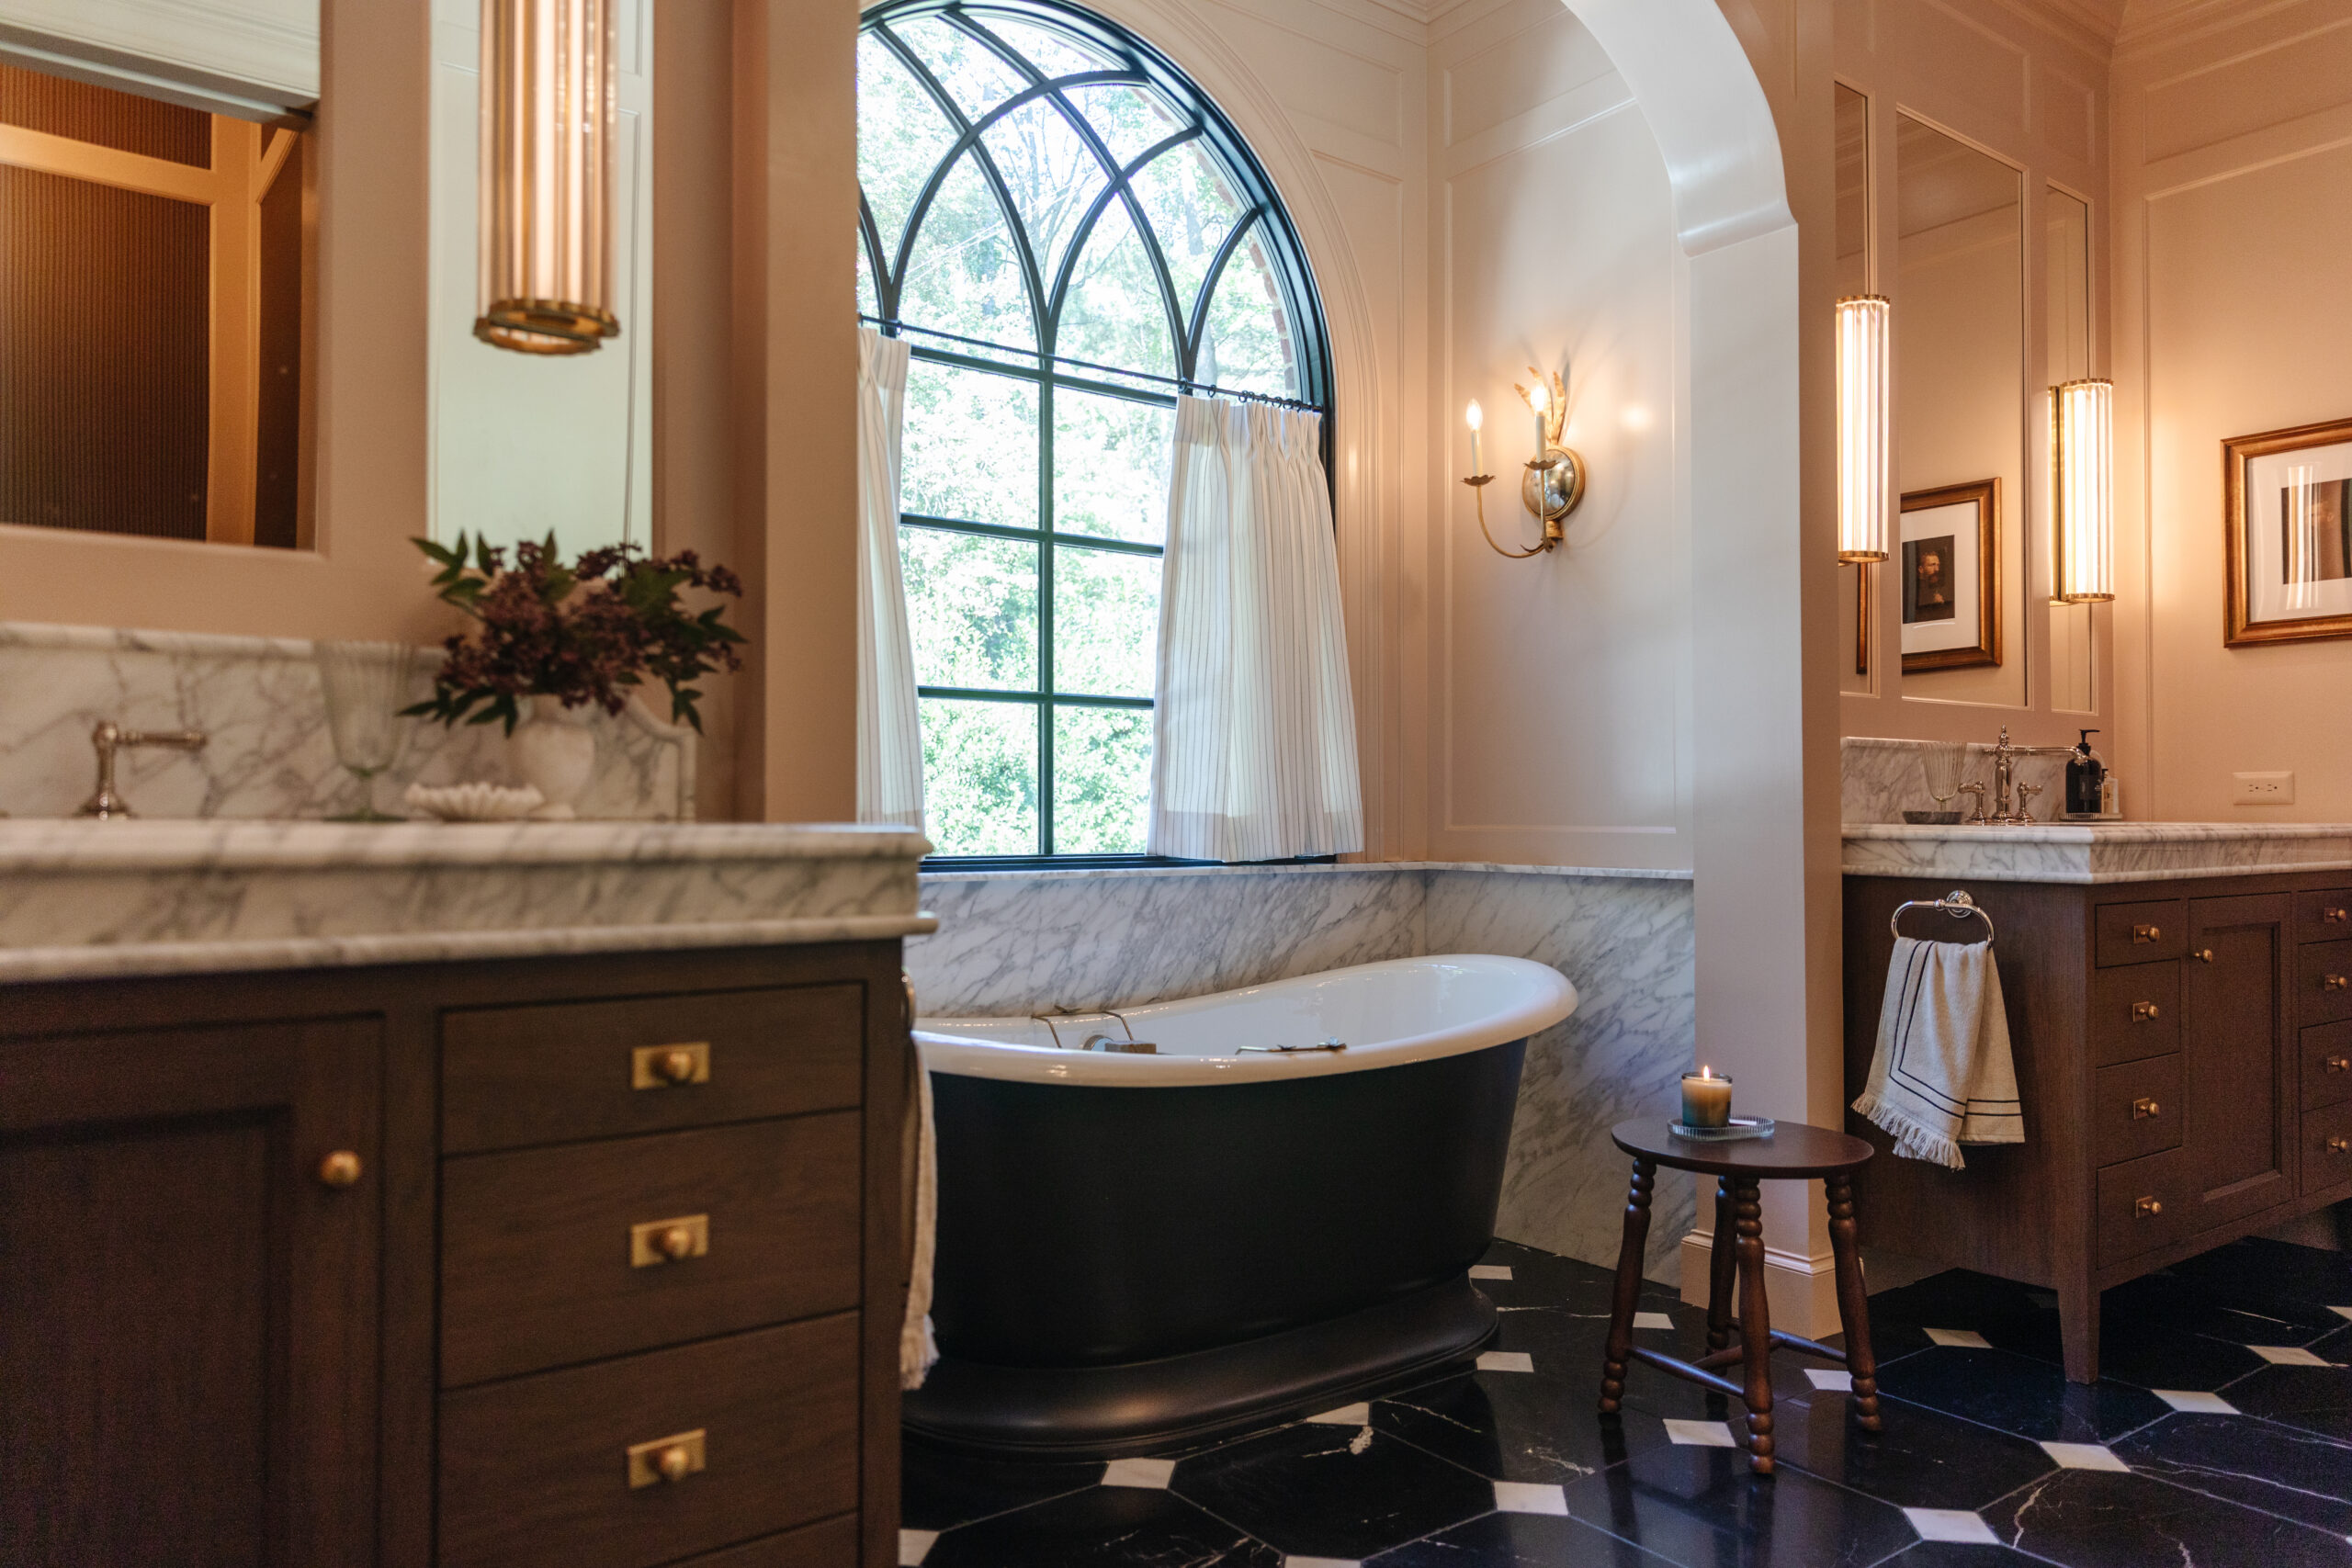
“Scale Guide: A dual vanity setup like this is a luxury that requires significant space.”
To comfortably fit two vanities (typically 30-36 inches wide each) with adequate clearance between them and on either side, you need a wall that is at least 10-12 feet long. The freestanding tub also requires a generous footprint, typically a space at least 6 feet long by 4 feet wide to allow for comfortable access and cleaning. This entire look is best suited for a primary bathroom in a larger home, generally one that is 100 square feet or more.
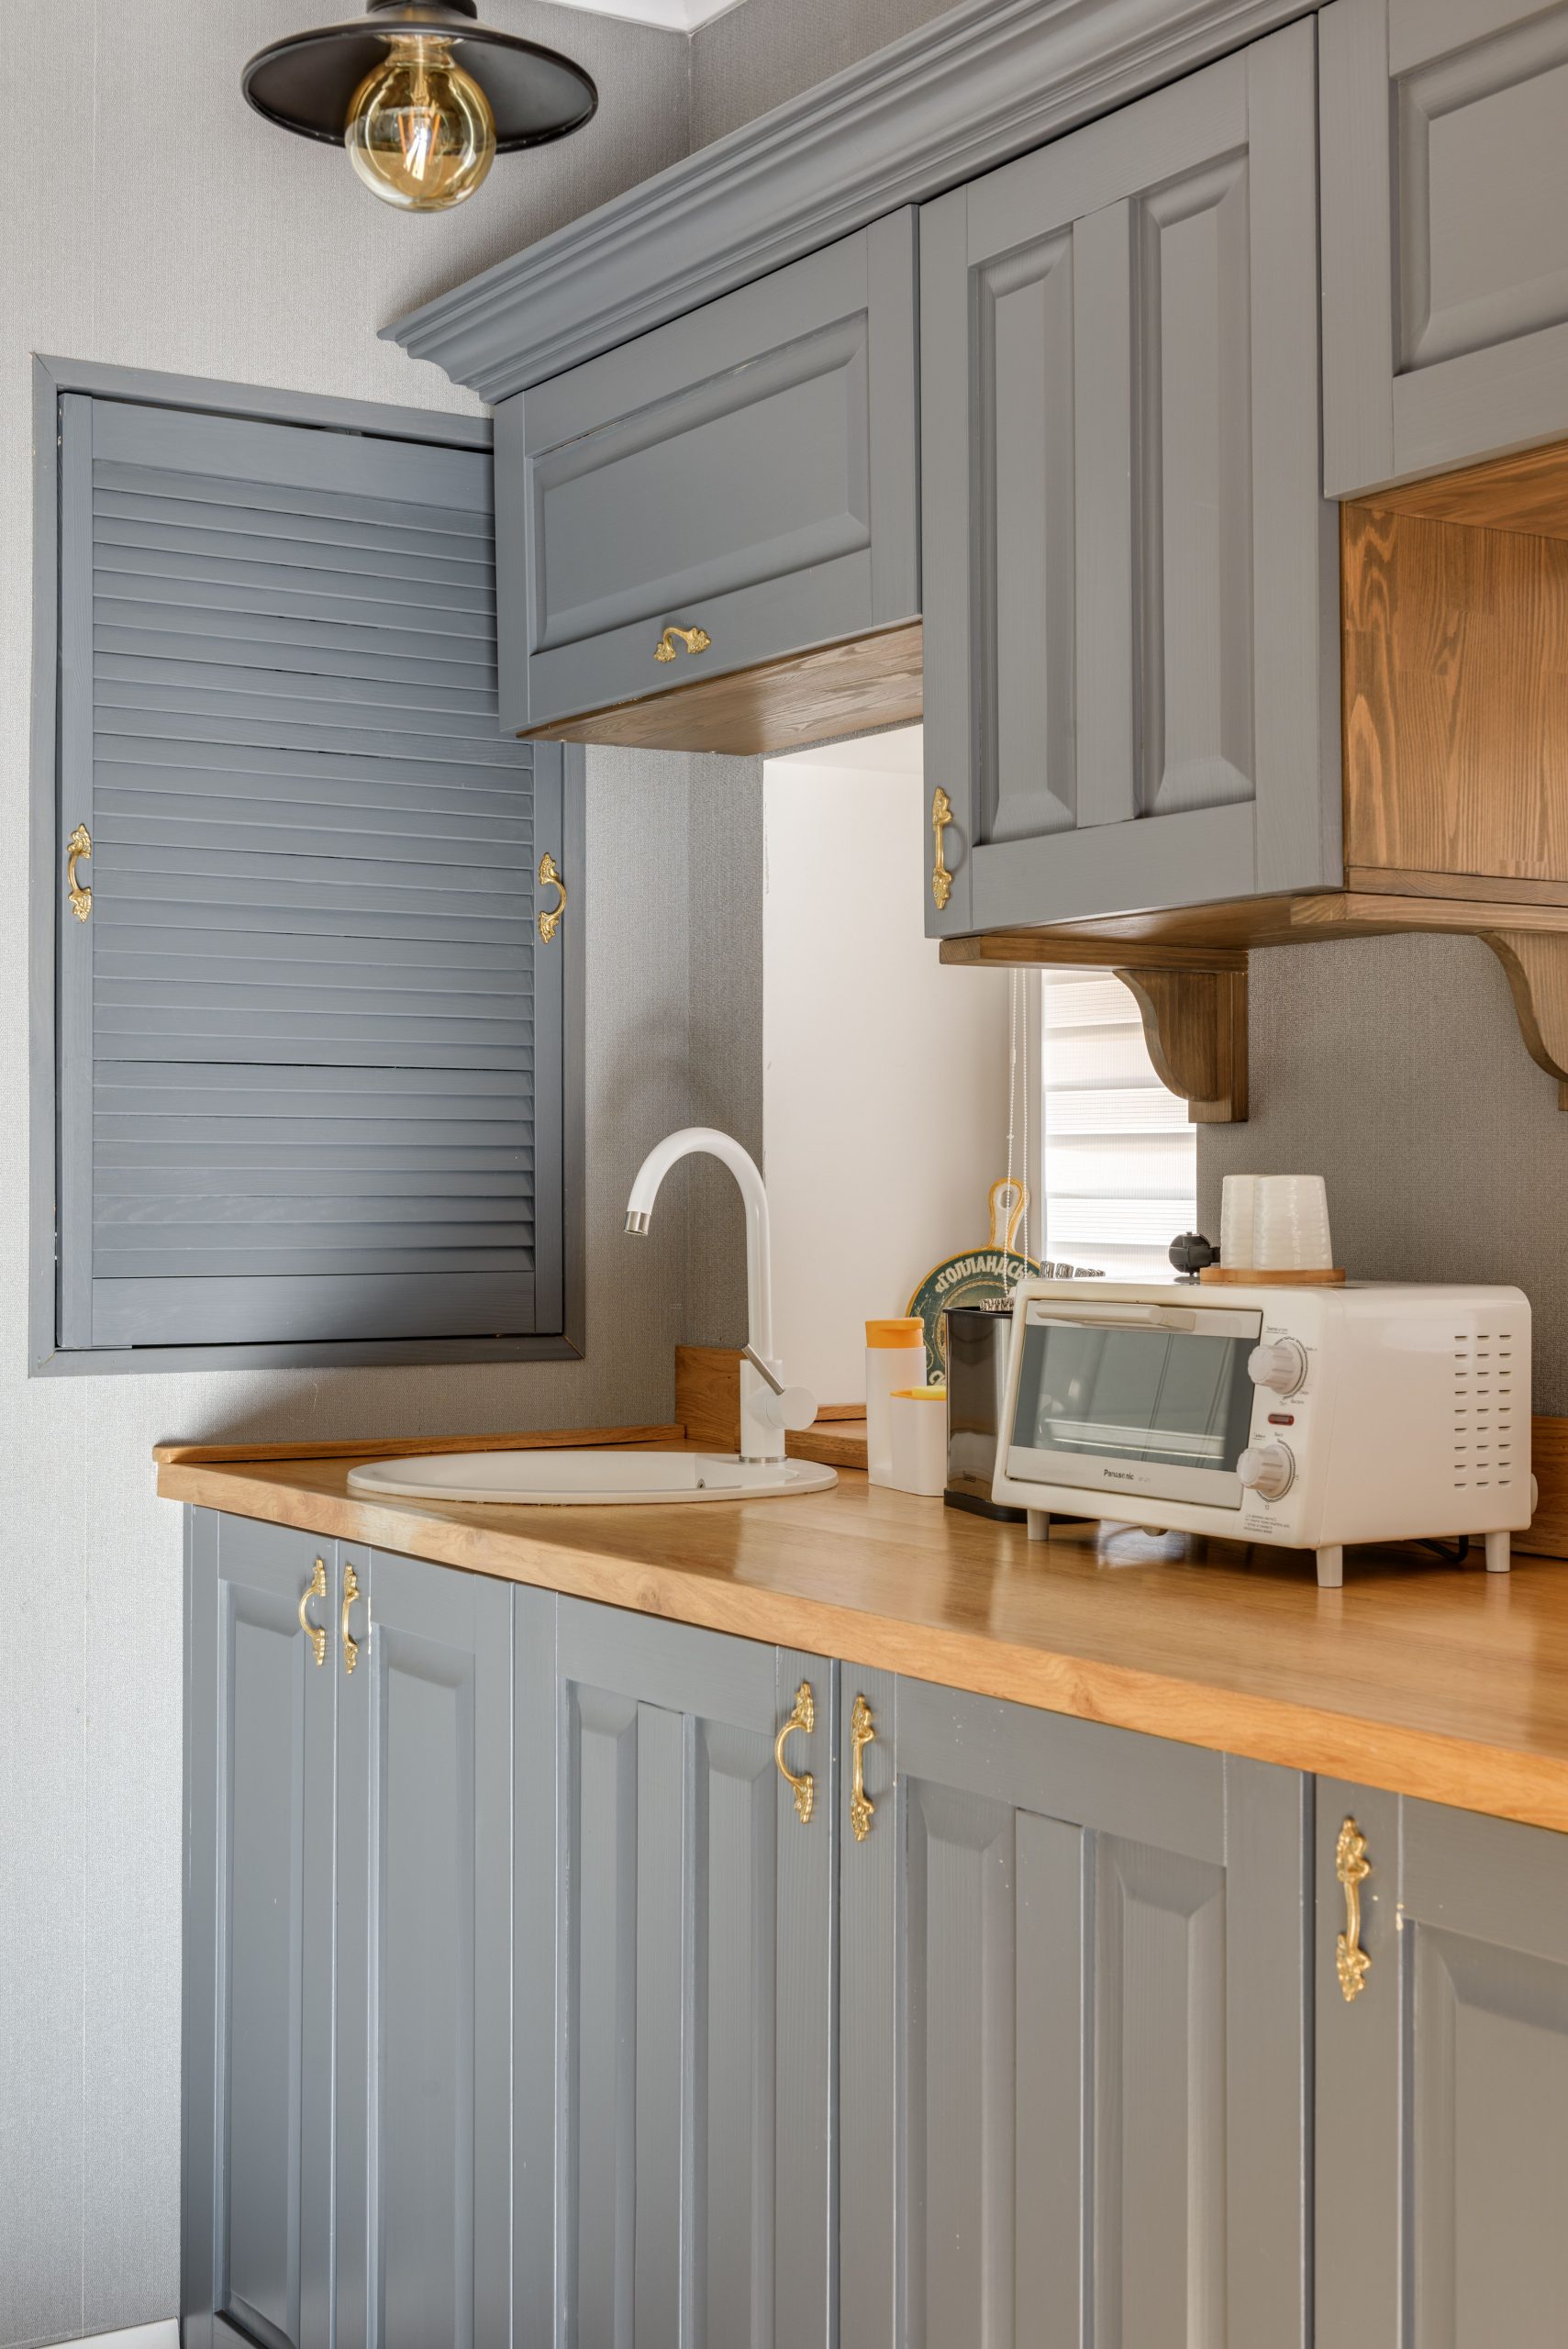
21. The Power of Black: A Guide to Refacing Your Cabinets
Designer Tip: If you love the idea of black cabinets but are worried about the commitment of painting, consider refacing. Refacing involves replacing your existing cabinet doors and drawer fronts with new ones and applying a matching veneer to the cabinet boxes. This can be a great DIY project if you have standard-sized cabinets. For a sleek, modern look like the one hinted at here, opt for flat-panel or ‘slab’ doors in a matte black finish. This creates a bold, contemporary statement that feels both dramatic and sophisticated. It’s a great way to get a completely new look without the mess of tearing out entire cabinet boxes.
“Trending Context: Black kitchens have been trending for several years, and they show no sign of slowing down.”
For 2026, the look is less about rustic farmhouse black and more about a sleek, architectural style. Think matte finishes, clean lines, and minimal hardware. It reflects a broader design shift towards creating homes that feel more dramatic, personal, and less afraid of bold choices. Pairing black cabinets with warm wood tones or metallic accents keeps the look from feeling too cold and ensures it has staying power beyond the current trend cycle.
22. Understated Warmth with Beige Flat-Panel Vanities and Brass Hardware
What Makes It Work: This bathroom achieves a serene, spa-like feel through its commitment to a tight, warm neutral palette. The light beige of the flat-panel cabinets provides a soft, unobtrusive base. The key is the consistent use of gold/brass throughout—on the drawer pulls, the knobs, and the faucets. This repetition of a warm metallic finish adds a touch of quiet luxury and unites the space. The large-format floor tiles with subtle veining add a hint of texture without introducing any busy patterns, reinforcing the overall sense of calm and understated elegance.
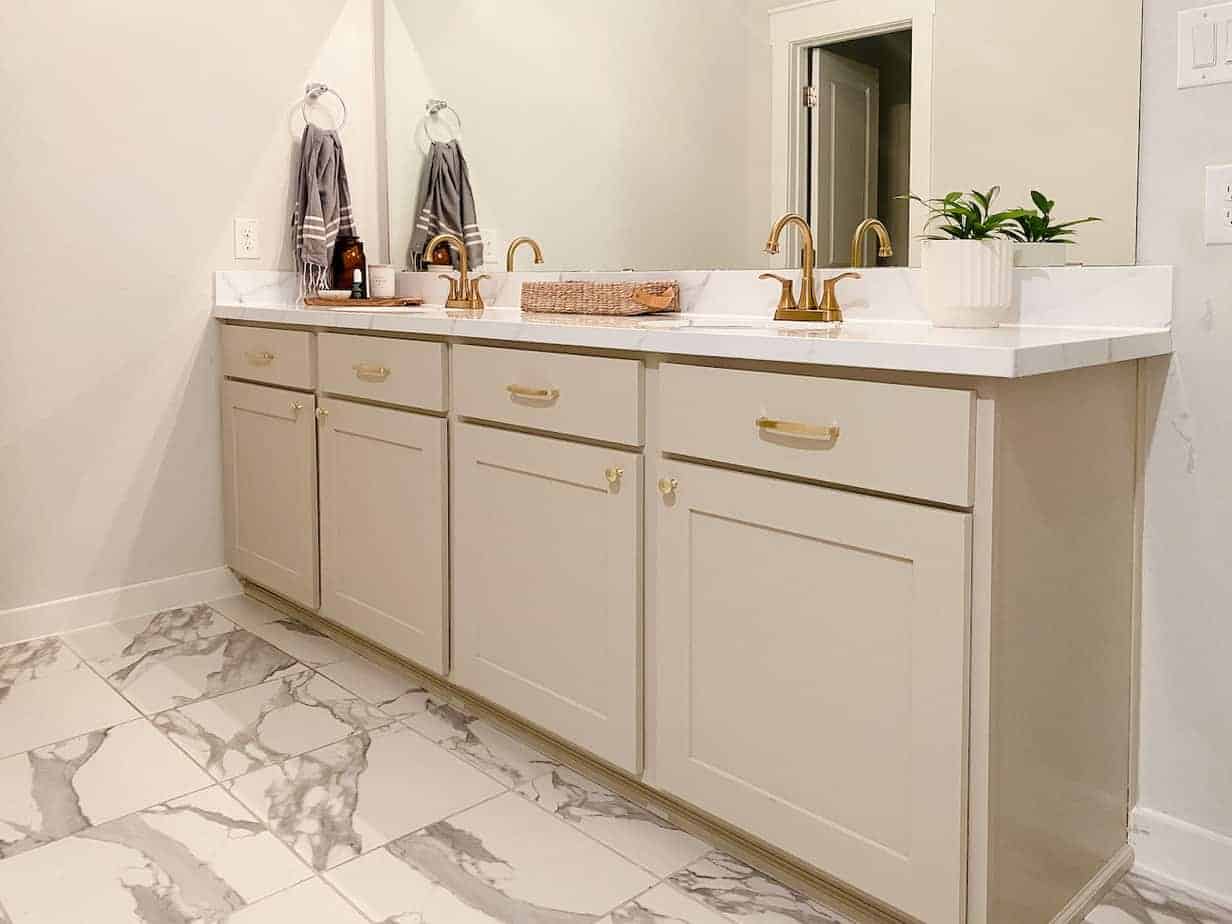
“Maintenance Reality: A light-colored vanity in a high-traffic bathroom requires some mindfulness.”
The beige surface will show makeup smudges, water spots, and dust more readily than a darker wood tone would. Plan on a quick wipe-down with a damp microfiber cloth every few days. The flat-panel design is a huge advantage here, as there are no detailed grooves or corners to trap grime. Polished brass or gold faucets look beautiful but will show water spots and fingerprints; a quick buff with a dry cloth after use will keep them looking pristine.
23. Modern and Bright with White Flat-Panel Cabinets and Brass Bar Pulls
Style Math: This clean, modern look is built on a simple yet effective formula: 70% crisp white + 20% warm wood + 10% gleaming brass. The white flat-panel cabinets and light-colored kitchenware create a bright, expansive base. The butcher block countertop and open shelving add a crucial layer of natural warmth and texture, preventing the white from feeling sterile. The brass bar pulls and shelf brackets are the finishing touch, injecting a shot of modern glamour and tying the whole look together. The pop of mint green from the toaster is a wildcard that adds a playful personality.

“The One Thing: The brass bar pulls are the critical element that elevates this design.”
On their own, white slab-front cabinets and a butcher block counter are a simple, almost Scandinavian combination. But the addition of the long, geometric brass pulls transforms the look into something more polished, intentional, and on-trend. They add a graphic quality and a touch of warmth that resonates with the wood tones, proving that hardware is never just a minor detail—it’s the jewelry that completes the outfit. Notice how different these feel from the ornate gold pulls in Idea #15.
24. A Clean Look with White Shakers and a Herringbone Backsplash
What Makes It Work: This kitchen feels clean and cohesive because it sticks to a simple palette but introduces interest through pattern and texture. The white shaker cabinets and stainless steel appliances create a classic, neutral canvas. The interest comes from the backsplash, where wood planks are laid in a herringbone pattern. This adds a subtle sense of movement and sophistication without adding a new color. The speckled granite countertop works as a bridge, its beige and brown tones picking up the warmth of the floor and the backsplash, tying everything together.
“Designer Tip: When using a countertop with a busy pattern, like this speckled granite, it’s wise to keep the backsplash simple in color but interesting in pattern.”
A herringbone, chevron, or stacked bond pattern using a single-color tile (or wood, in this case) adds texture and a high-end feel without clashing with the countertop. If you were to pair a busy granite with a busy mosaic tile, the two patterns would fight for attention and create visual chaos. Choose one hero—either the counter or the backsplash—and let the other play a supporting role.
25. A Cheerful Kitchen with Teal Lower Cabinets and Cream Uppers
Get This Look For Less: A colorful two-tone kitchen is surprisingly budget-friendly to achieve, as it relies more on creative paint choices than expensive materials. You can easily update existing cabinets with this look. A gallon of high-quality teal cabinet paint for the lowers and a gallon of cream for the uppers will cost around $150-$200 total. White subway tile for the backsplash is famously affordable. A laminate countertop in a light grey or white from IKEA or Home Depot and new silver bar pulls from Amazon can complete the transformation for a few hundred dollars more. The patterned rug can be a low-cost find from Target or Wayfair.
“Style Math: This happy, inviting kitchen follows a charming formula: 50% playful color + 40% calming neutral + 10% graphic pattern.”
The teal lower cabinets provide the main dose of personality. This is balanced by a healthy amount of calming neutrals in the cream upper cabinets, white subway tile, and light grey countertop. The final 10% comes from the vibrant, red-toned patterned rug, which adds a layer of cozy texture and a final, unexpected color story that makes the whole room feel collected and personal.
26. Sleek and Minimalist: Dark Gray Cabinets with Integrated Lighting
The One Thing: The integrated under-cabinet lighting is the crucial element that makes this minimalist design work. Without it, the dark gray upper cabinets would blend into the gray backsplash, and the countertop would be left in shadow, making the space feel dark and drab. The continuous strip of light not only provides essential task lighting but also creates a beautiful, warm glow that highlights the clean lines of the design. It visually separates the upper cabinets from the countertop, adding depth and dimension to what could otherwise be a flat, monotone space.
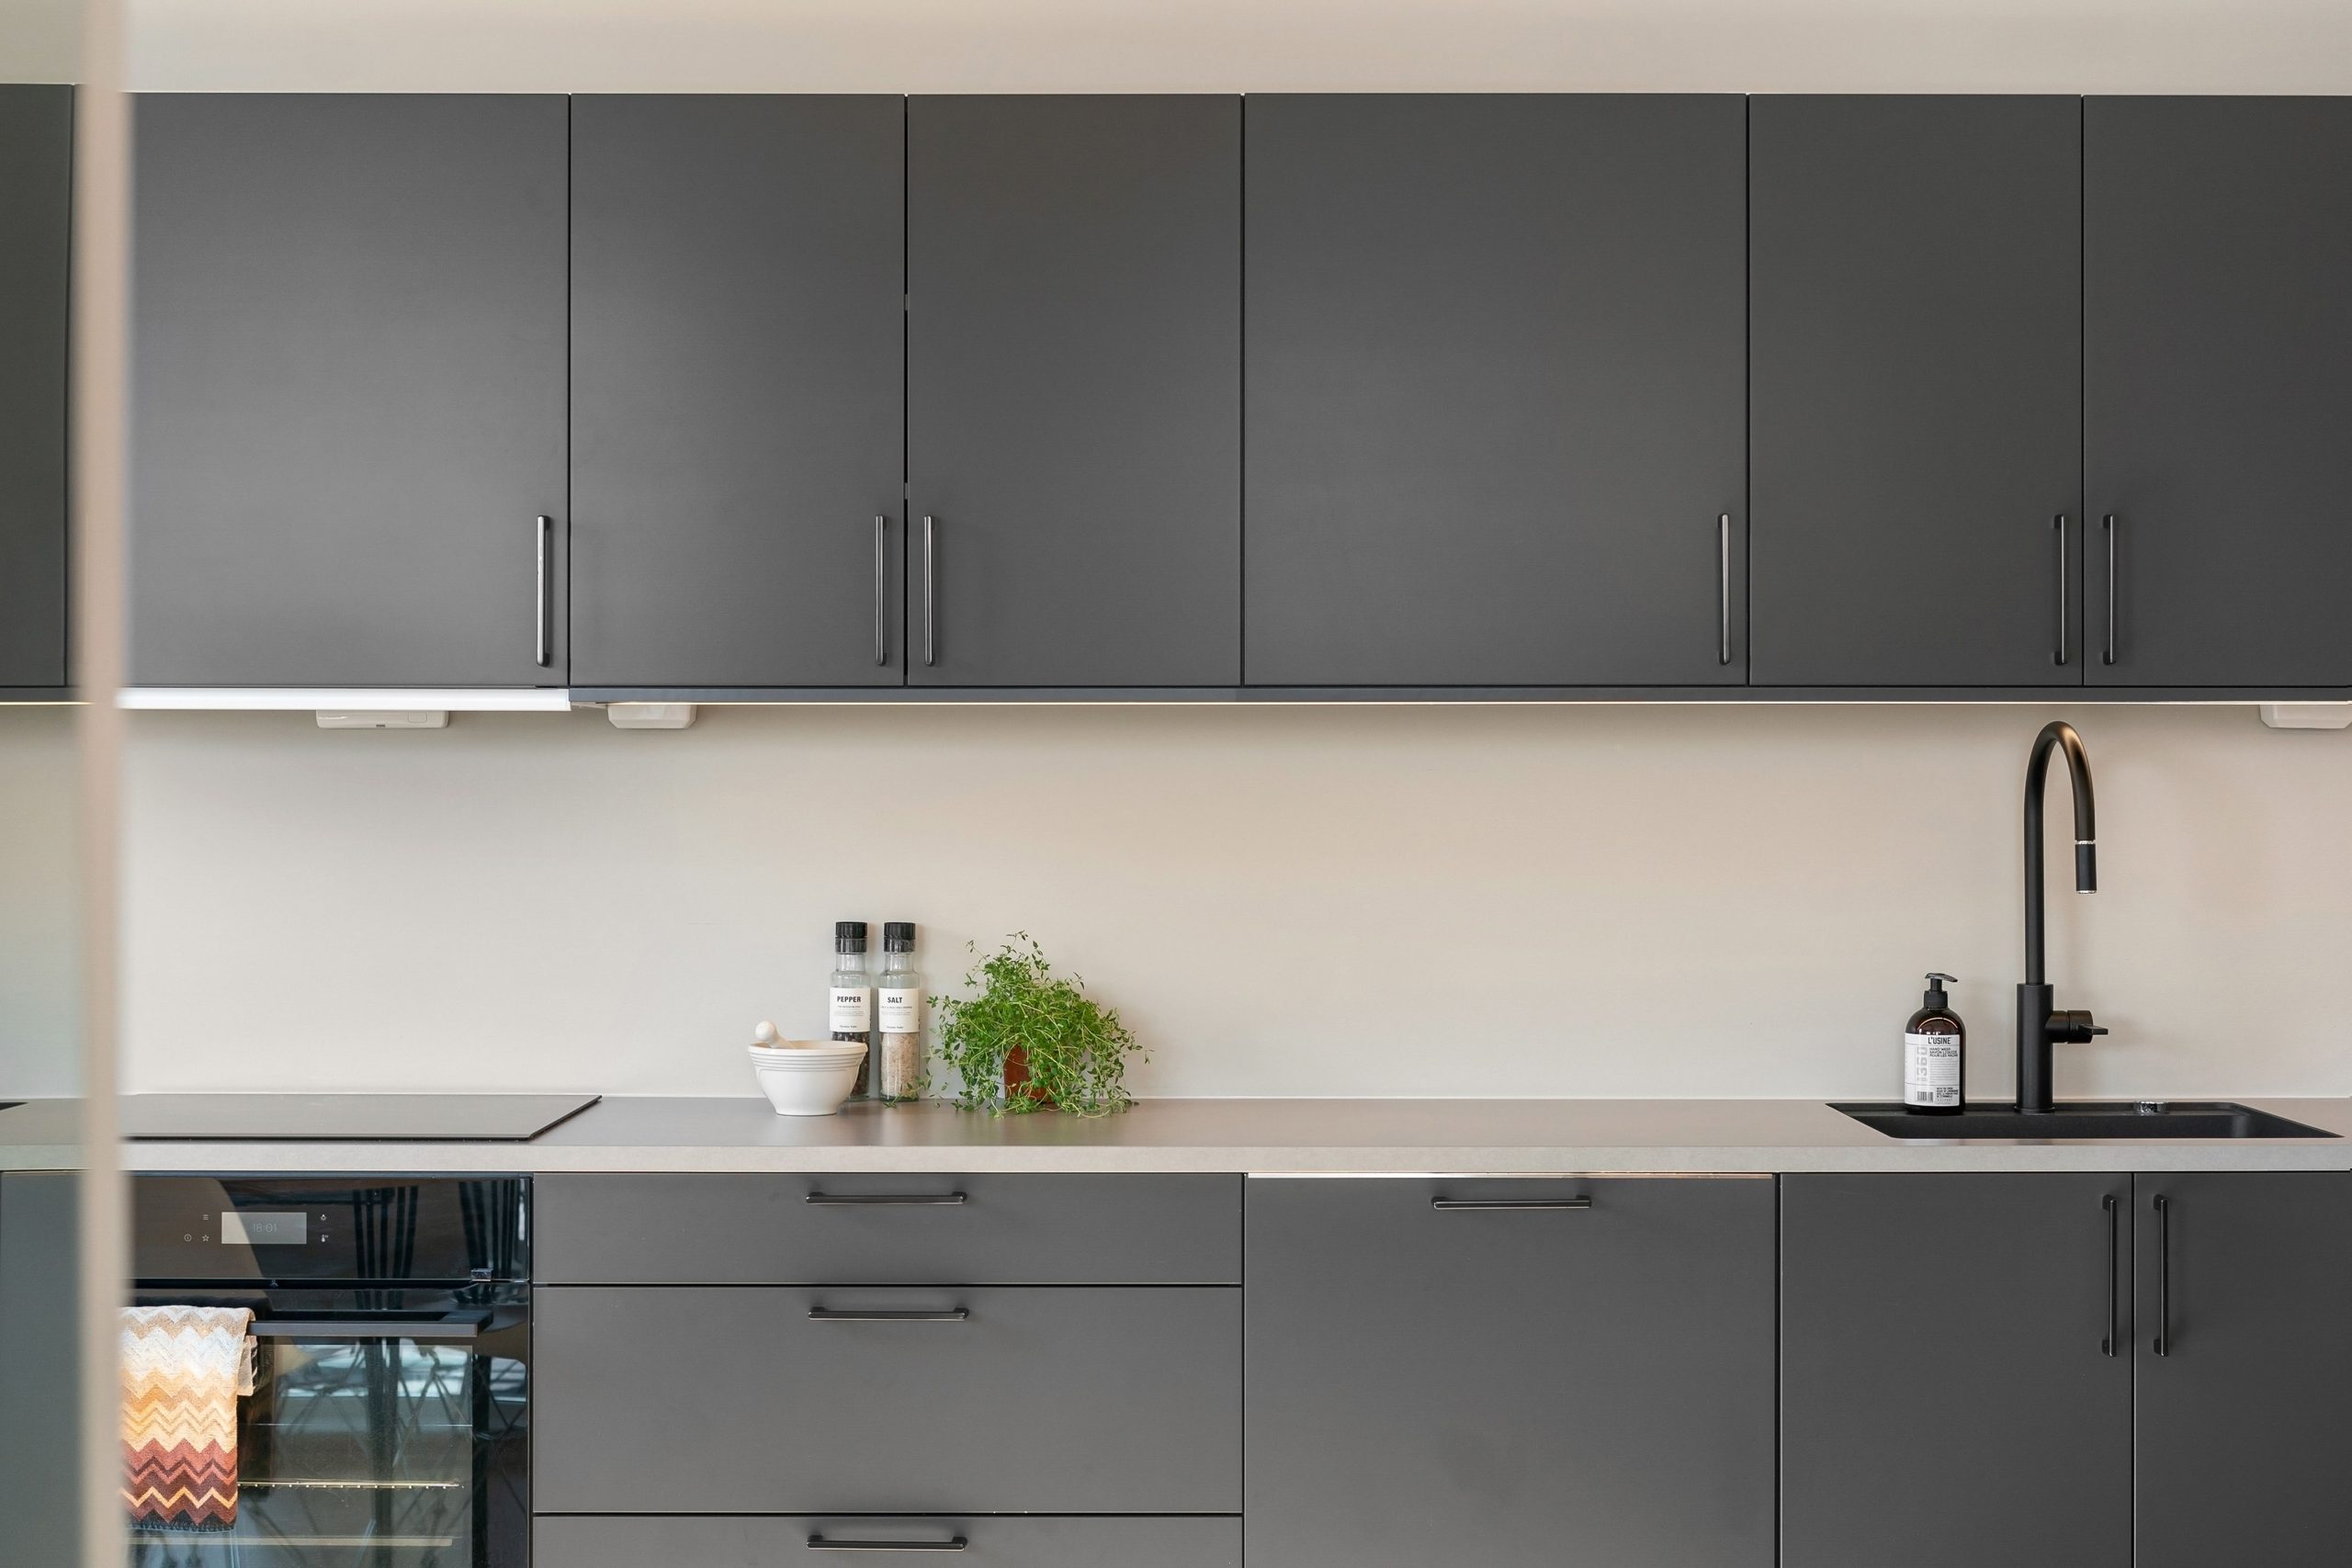
“How-To Brief: Installing under-cabinet LED strip lighting is a game-changer.”
Time: 1-2 hours. Cost: $50-$150.
Choose your lighting: Opt for a plug-in or hardwired LED tape kit. A warm white color temperature (2700K-3000K) is usually best for kitchens.
Measure and cut: Measure the length of your cabinets and cut the LED tape at the designated cut marks.
Prep the surface: Clean the underside of your cabinets thoroughly to ensure the adhesive will stick.
Mount the lights: For a professional look, mount the strip on the inside of the front cabinet frame, so the light shines down and back, not directly into your eyes. Most strips have a peel-and-stick backing.
Connect to power: Hide the wires by running them behind or inside cabinets and connect to your power source. Use wire clips to keep everything neat.
27. Deep Green Shaker Cabinets with Fluted Glass and Gold Hardware
What Makes It Work: This kitchen is a masterclass in layering. It starts with a classic, elegant base: deep green shaker cabinets and a timeless white subway tile backsplash. The magic happens with the addition of carefully chosen textures and finishes. The fluted glass on the upper cabinet doors adds a vintage, diffused texture that partially obscures the contents while still feeling light. The warm gold of the hardware provides a perfect, jewelry-like accent against the cool green. Finally, the natural oak open shelving injects an organic, rustic element that keeps the overall look from feeling too formal.
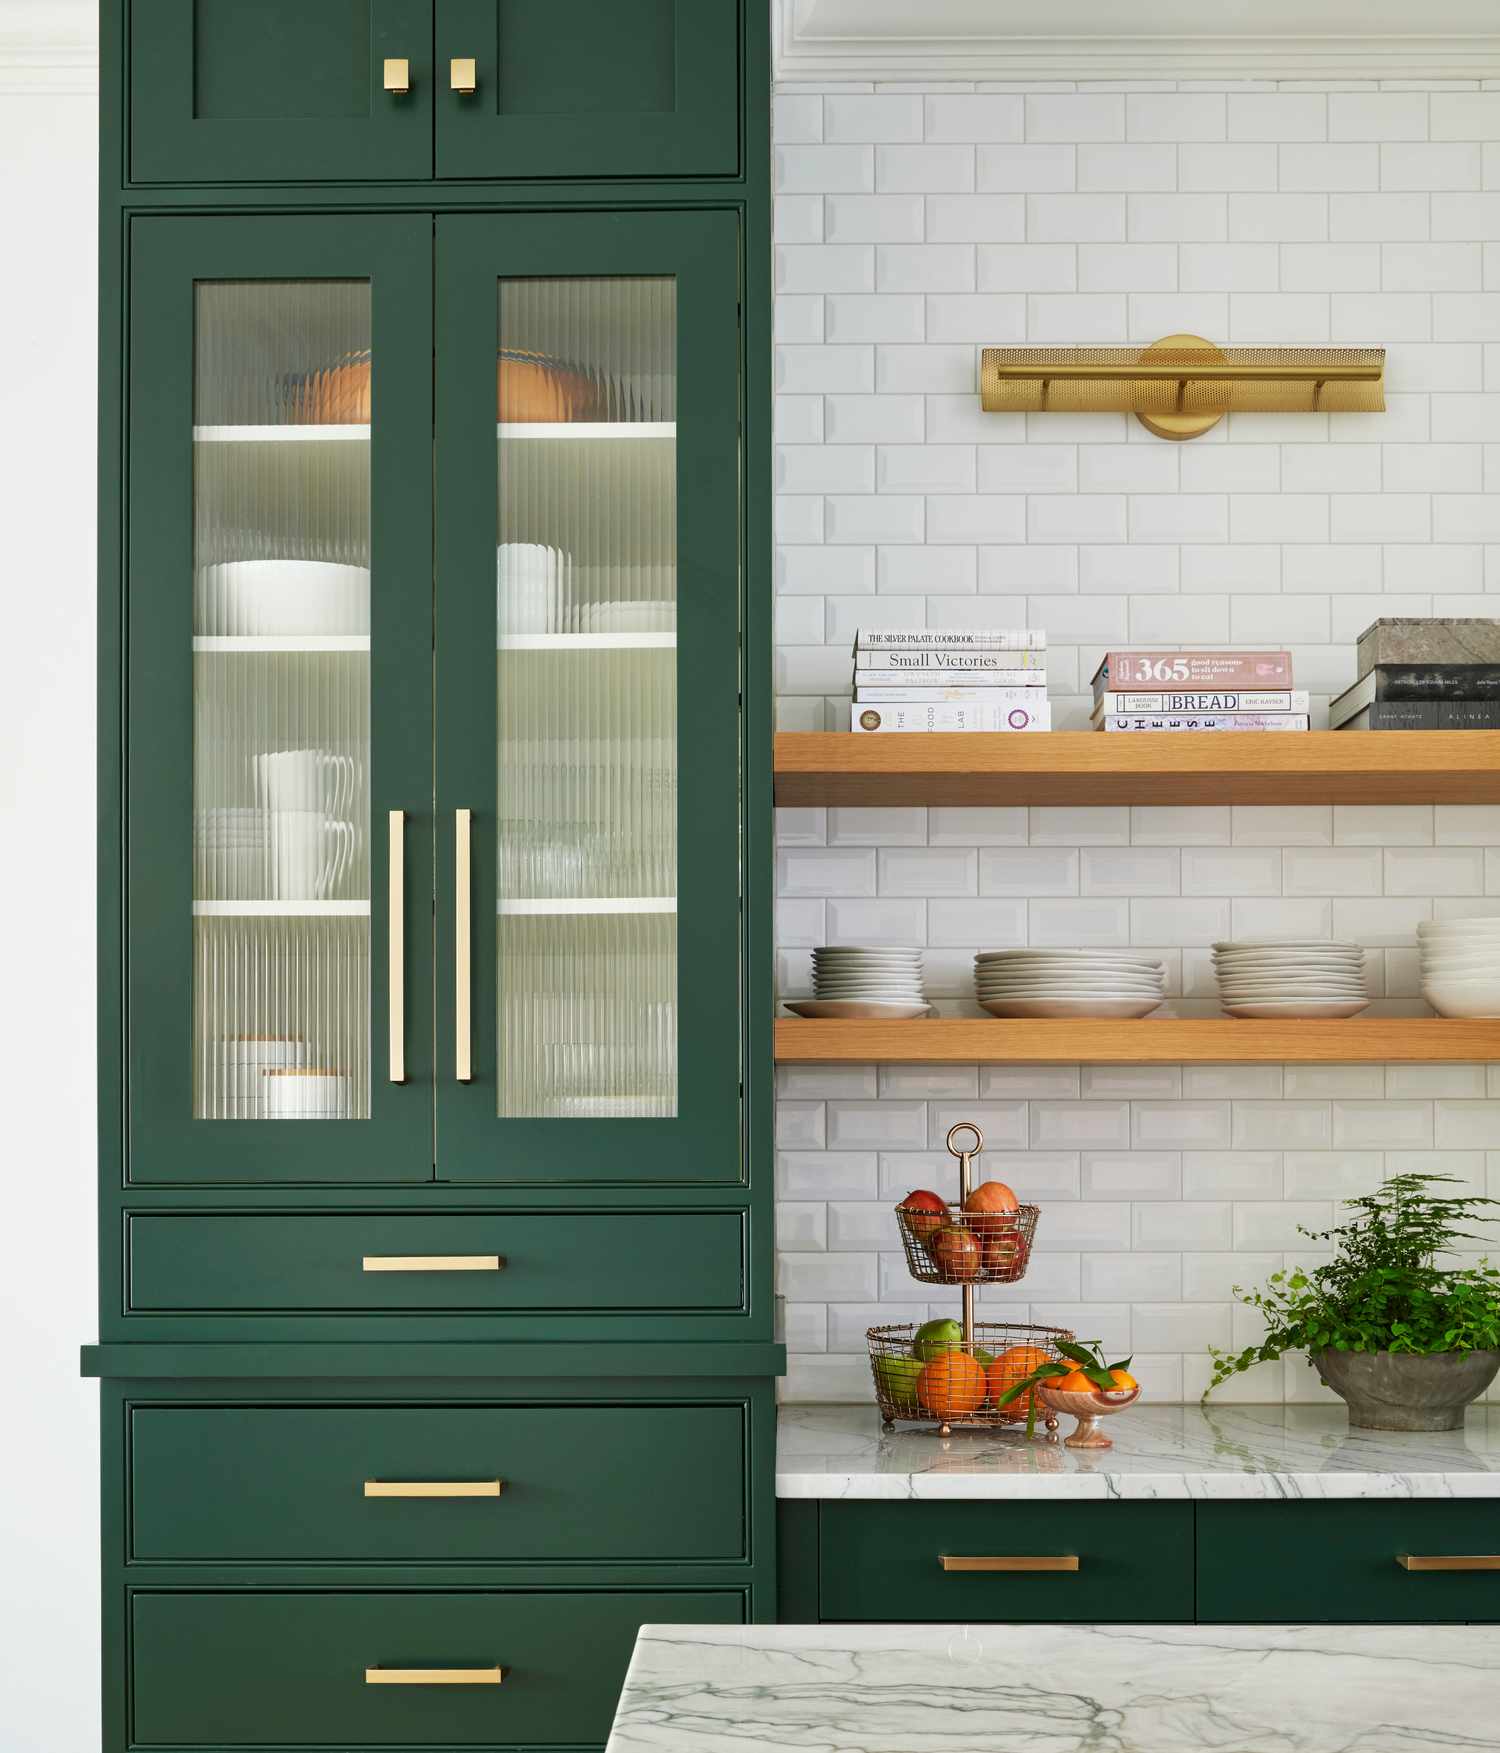
“Before You Start Checklist: Ready for a similar transformation?”
Go through this list first.
Green Tone Test: Have you tested at least three different green paint swatches in your actual kitchen? A green can look dramatically different in morning light versus afternoon light.
Glass Cabinet Contents: What will you store in the fluted glass cabinets? While the glass is obscuring, a messy jumble of mismatched items will still look chaotic. Plan to store coordinated dishware or glassware here.
Mixed Metals Plan: The gold hardware looks great, but what about your faucet and appliances? Decide if you are committing to all gold, or if you will be mixing metals (e.g., gold hardware with a stainless steel faucet), and ensure the combination feels intentional.
28. Warm Traditional Cream Cabinets with Etched Glass Details
Designer Tip: If you have traditional cabinets with decorative glass inserts, under-cabinet lighting is not just a functional choice, it’s an aesthetic necessity. The lighting turns these cabinets into beautiful display cases, highlighting the etched pattern and the items you have inside. For an even more high-end touch, consider adding small LED puck lights inside the glass-fronted cabinets as well. This creates a layered lighting scheme that adds incredible depth and warmth to the kitchen in the evenings, making the space feel cozy and luxurious.

“Get This Look For Less: To get the feeling of decorative etched glass without the cost of custom doors, you can use a window film.”
There are many high-quality peel-and-stick films available that mimic the look of etched, frosted, or patterned glass. Simply remove your existing plain glass inserts, apply the film directly to the glass, and reinstall them. It’s an inexpensive, reversible project that can add a significant amount of character to standard glass-front cabinets. This is a perfect weekend DIY that gives you a custom look for under $50.
29. A Rustic Modern Farmhouse with Black Cabinets and Shiplap Walls
Style Math: This inviting space perfectly balances rustic and modern with this formula: 50% rustic texture + 40% clean modern lines + 10% natural greenery. The rustic texture comes from the white shiplap walls, open wooden shelves, and hardwood flooring. The clean, modern lines are provided by the simple black base cabinets, concrete countertops, and black metal shelf brackets. The final touch is the greenery in the windows, which breathes life into the neutral palette and connects the indoor space with the outdoors, enhancing the rustic, homey feel.
30. An Eclectic Farmhouse Kitchen with Mixed Wood and Teal Cabinets
The One Thing: The distressed teal cabinetry is the single element that gives this kitchen its unique personality and saves it from being just another rustic kitchen. The unexpected pop of weathered color adds a playful, eclectic energy and serves as a bold focal point. While the natural wood cabinets and cream island are lovely, they are classic farmhouse elements. It’s the confidence of the teal that tells you the homeowner isn’t afraid of color and has a story to tell. It’s a brave choice that pays off in charm and character.
“What Makes It Work: This look succeeds because it confidently breaks the rules.”
Instead of a single cabinet finish, it uses three: natural wood, distressed teal, and painted cream. The design is held together by a few key consistencies. The speckled granite countertop is used throughout, creating a unifying surface. The hardware style is relatively consistent, and the appliances are all stainless steel, providing a modern through-line. The overall effect is a space that feels collected over time rather than designed all at once, which is the heart of true eclectic style.
Your Ultimate Cabinet Glow-Up Starts Now
Now that you’re armed with 30 distinct ideas, from simple paint jobs to full-on transformations, the perfect cabinet makeover is within reach. Pick the look that speaks to you, trust your gut, and get ready to create a space you truly love. Don’t forget to share your amazing before-and-afters on Pinterest!