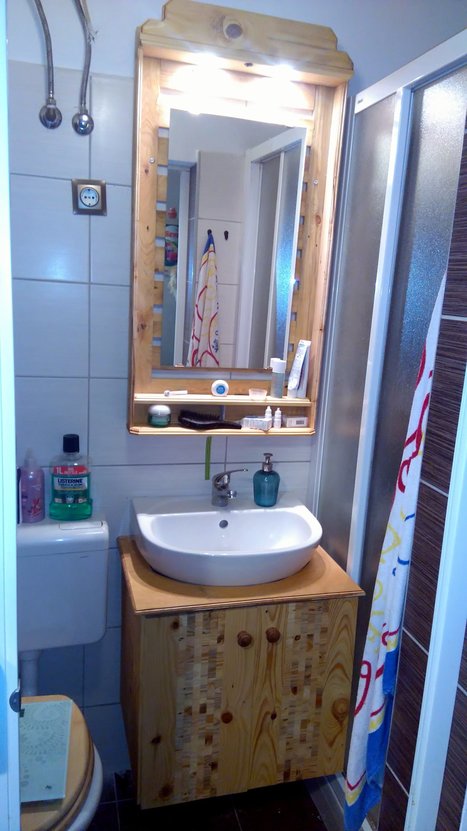
You know that feeling? You’ve scrolled through a hundred photos of rustic bathrooms, saving pallet project ideas that look *almost* right, but something’s missing. You’re ready for a change that feels personal, handcrafted, and doesn’t require a second mortgage. After filtering through hundreds of real-home projects, we narrowed it down to 31 ideas that actually deliver. From simple shelves to full-blown vanities, these looks prove you can get high-end style on a DIY budget. And stay until the end—we break down the most common mistakes that can ruin these looks. 📌 Save this to Pinterest for later—you’ll want to revisit these ideas.
1. Eclectic Bathroom with Antique Sewing Machine Vanity
This look is a masterclass in creative contrast. The success here comes from pairing unexpected elements: the industrial, spindly black cast iron of the antique sewing machine base with the warm, organic feel of the wood countertop and reddish-brown vessel sink. This isn’t just a vanity; it’s a story piece. The bold horizontal stripes of the cream and wood-grain tile add a modern, graphic quality that keeps the antique piece from feeling dated. It’s the tension between old and new, hard and soft, that makes it unforgettable.
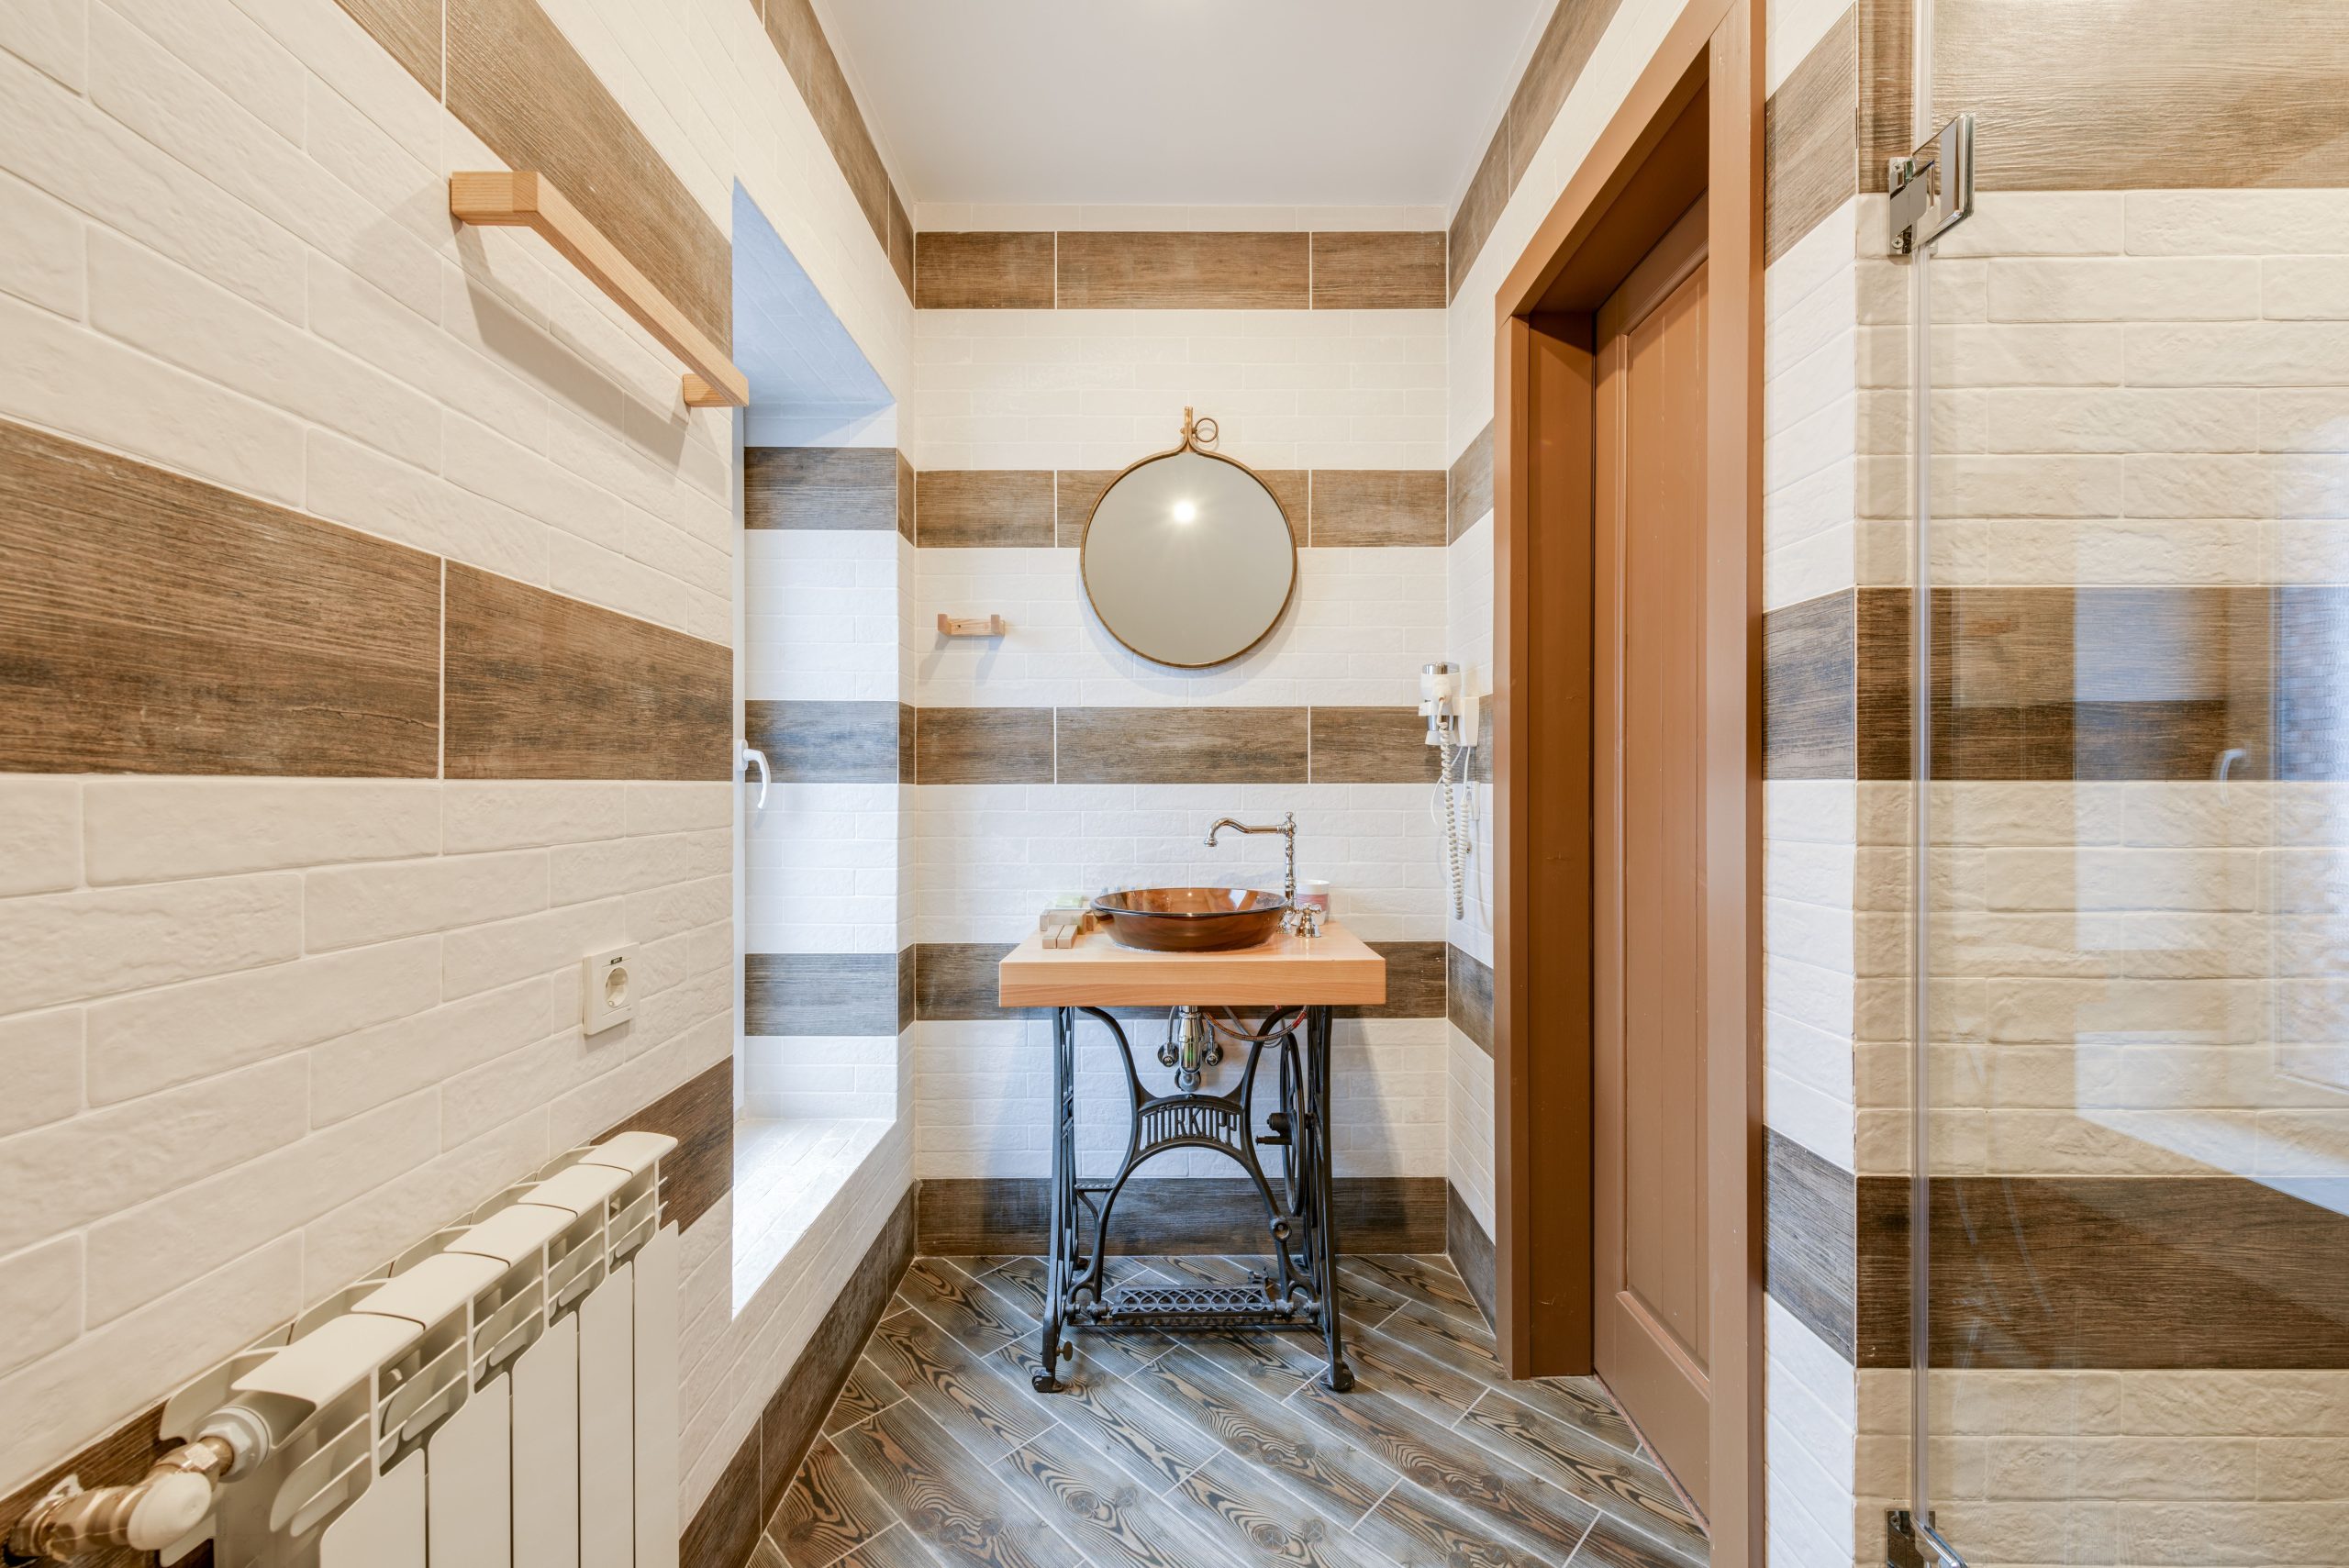
“A vessel sink looks incredible, but let’s be honest about the daily reality.”
They can be splash-prone, especially with a faucet that isn’t perfectly matched in height and projection. You’ll be wiping down that beautiful wood countertop more often than you would with a standard undermount sink. Also, the lack of built-in storage means you need a separate plan for stashing away extra toilet paper, cleaning supplies, and all the un-photogenic bathroom necessities. This look is best for a powder room or a main bath where storage is already handled elsewhere.
2. DIY Organizer from Staggered Pallet Wood Planks
You can create this practical, rustic organizer in an afternoon. It’s a perfect first-time pallet project.
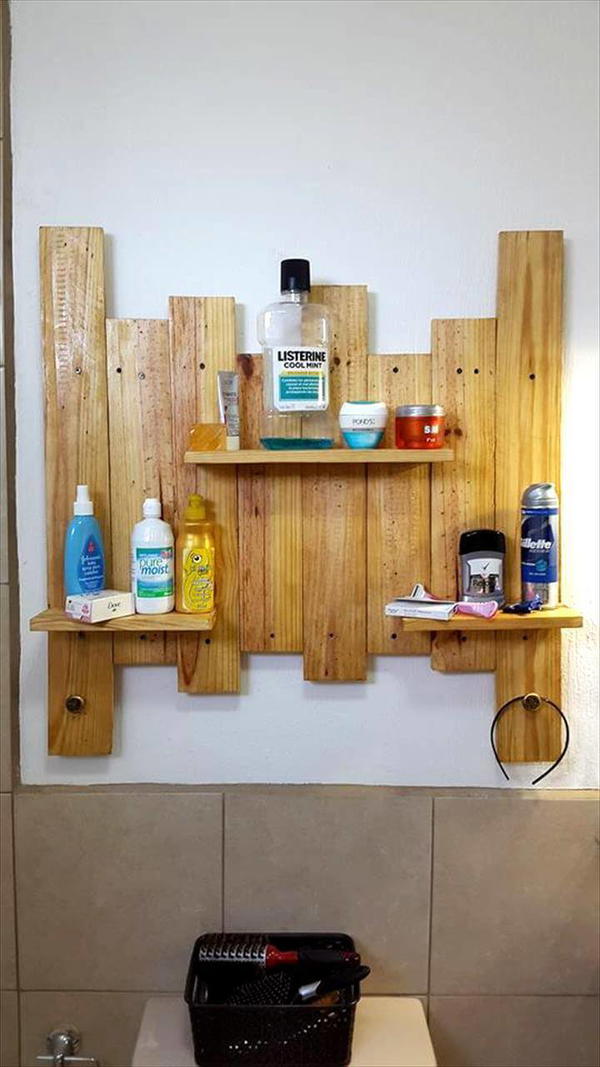
“Time: 2-3 hours.”
Cost: Approx. $20-30.Disassemble & Sand: Carefully pry apart a clean pallet. Sand down 4-5 planks until they are smooth to the touch, especially the edges, to avoid splinters.Cut & Arrange: Cut the planks to staggered lengths (e.g., 24″, 20″, 18″, 22″). Arrange them vertically on the floor to get a layout you like.Build the Backing: Use two thinner wood strips to screw across the back of your arranged planks, holding them together as one solid piece.Attach Shelves: Cut 3 small pieces for your shelves. Use wood glue and screws from the back to attach them securely to the vertical planks.Mount & Seal: Secure the entire unit to the wall using heavy-duty wall anchors. Finish with a clear, water-resistant sealant to protect the wood from bathroom moisture.
The most critical step for any wood project in a bathroom is sealing it properly. Don’t just use any old varnish. Go for a marine-grade polyurethane or a spar urethane. These are specifically designed for boats and outdoor furniture, meaning they create a much more durable, waterproof barrier against the constant humidity and splashes of a bathroom environment. Apply a minimum of three thin coats, lightly sanding with 220-grit sandpaper between each coat (after it’s fully dry) for a super smooth, protected finish.
3. Minimalist Light Wood Vanity and Matching Mirror
The formula for this clean, bright look is beautifully simple. Think of it as 60% neutral foundation + 30% natural material + 10% functional detail. The white square tiles and white vessel sink make up the neutral base, creating a bright canvas. The light natural wood of the vanity and mirror frame provides the 30% of warmth and texture, preventing the space from feeling sterile. The final 10% comes from the chrome faucet and the integrated light strip—small, functional elements that add a touch of polish without creating clutter.
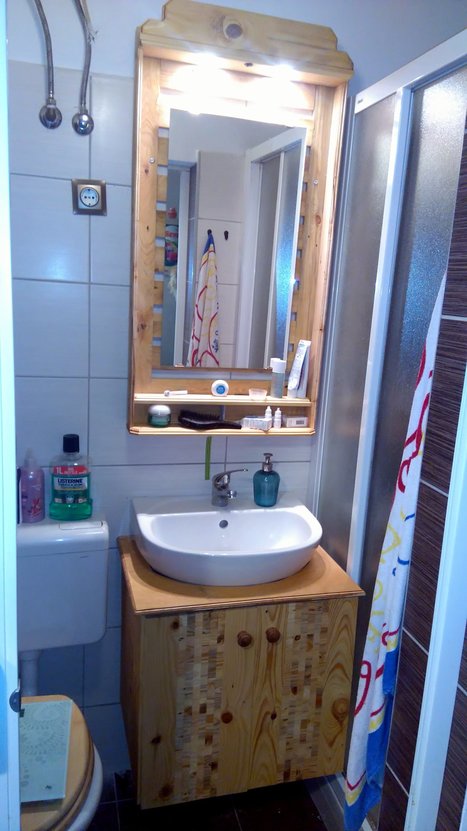
“This kind of compact, floating vanity design is a lifesaver in small bathrooms or powder rooms.”
It works best in a space that is at least 4 feet wide to allow for comfortable use of the sink without feeling cramped. The ideal room size would be around 30-50 square feet. Because the vanity is wall-mounted and open underneath, it creates the illusion of more floor space, making the entire room feel larger. It’s a much better choice for tight quarters than a bulky, floor-standing cabinet. For a larger bathroom, consider the double vanity approach shown in Idea #28.
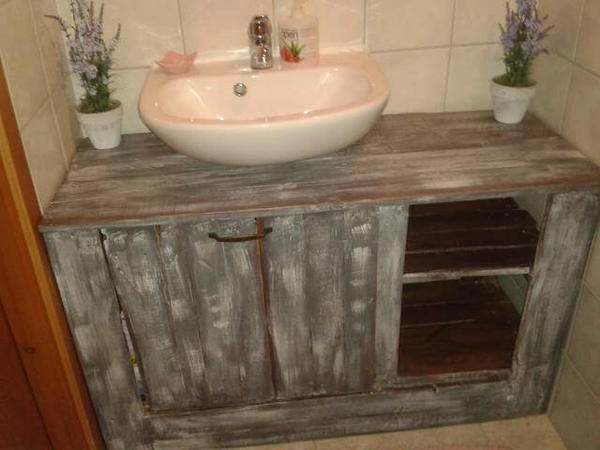
4. Weathered Gray Wood Vanity with Open Shelving
Recreating this charmingly rustic vanity is very achievable on a budget, especially if you’re willing to DIY the cabinet.
“Main Furniture (DIY Vanity): $50 – $150 (for pallets, lumber, hardware)Sink & Fa”
- Main Furniture (DIY Vanity): $50 – $150 (for pallets, lumber, hardware)
- Sink & Faucet: $100 – $250
- Decor/Accessories (Plants, etc.): $20 – $40
- Wall Treatment (Beige Tiles): $80 – $200 (for a small backsplash area)
- TOTAL: $250 – $640
Budget alternative: Find a used, dated wooden cabinet on Facebook Marketplace for under $50. Remove the doors from one side to create open shelving, then use a paint and distressing technique to get the weathered gray finish for about $30 in supplies.
That beautiful, distressed wood finish requires a bit of care to keep it looking good. The rough texture and crevices that give it character are also perfect little traps for dust, hairspray residue, and makeup powder. You’ll want to give it a weekly wipe-down with a soft, damp microfiber cloth. For deeper cleaning, use a soft-bristled brush to get into the grain. Most importantly, ensure it’s sealed with a matte or satin water-based polycrylic. A gloss finish would ruin the weathered look, but an unsealed surface is a disaster waiting to happen in a humid bathroom.
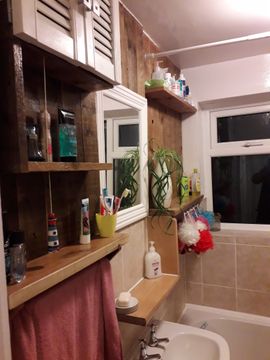
5. Bathroom Featuring a Vertical Pallet Wood Accent Wall
The single element holding this entire design together is the vertical wood planking. Take it away, and you have a fairly standard bathroom with beige tiles and a white sink. The wood wall instantly injects a massive dose of warmth, texture, and rustic character. It serves as a rich, organic backdrop that makes the simple white mirror and sink pop. The vertical orientation is also a smart choice, drawing the eye upward and making the ceiling feel higher than it is. It’s the design move that transforms the room from functional to memorable.
“A full wood wall in a bathroom is a gorgeous statement, but you have to go into it with your eyes open.”
Moisture is the enemy. Even with a good fan, this is not a great idea for a small, poorly ventilated bathroom where steam lingers. Every single plank must be sealed on all six sides—front, back, and all four edges—*before* it’s installed. If you only seal the front, moisture can still get in from behind and cause warping, swelling, or even mold growth between the planks and the drywall. This isn’t a weekend whim; it’s a project that requires meticulous prep work.
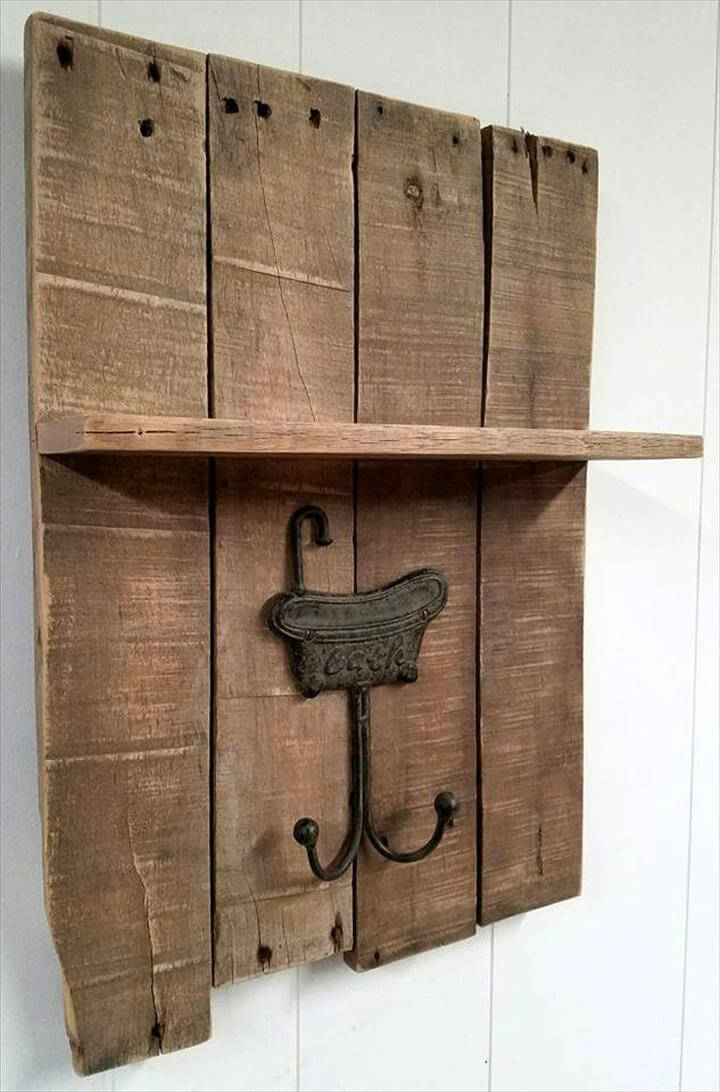
6. Rustic Shelf with a Vintage ‘BATH’ Hook
You don’t need a full renovation to add rustic charm. This simple shelf-and-hook combo delivers a huge style impact for pocket change. You can build this entire piece for under $25. Grab a single weathered board from a disassembled pallet (often free on marketplace sites). Find a decorative hook at Hobby Lobby or on Amazon for about $10-$15. A handful of screws and 30 minutes of your time is all it takes. It’s the perfect project for using up scrap wood and adding personality to a blank wall without committing to a major change.
“This little vignette is successful because of its focused simplicity.”
It’s not trying to be a major storage solution; it’s a decorative accent that happens to be useful. The dark metal of the quirky bathtub-shaped hook creates a strong point of contrast against the weathered wood and the crisp white paneled wall. This contrast is what draws your eye and makes the piece stand out. The texture of the rough wood against the smooth, painted wall adds another layer of interest. It’s a small moment, but it’s packed with character.
7. DIY Pallet Vanity with a Black-Framed Mirror
This look nails the rustic-industrial formula. Let’s break it down: 50% Rustic Texture + 30% Modern Industrial + 20% Clean Neutral. The pallet wood vanity is the undeniable rustic hero. The black-framed mirror and industrial sconces with their clean lines and dark finish bring in the modern, edgy element. Finally, the white integrated sink countertop and chrome faucet provide the clean, neutral base that ties it all together and keeps the look from feeling too heavy or theme-y. You could swap the black for brass to warm it up, and the formula would still work.
“When flanking a mirror with sconces, placement is everything.”
A common mistake is to mount them too high or too wide, which creates unflattering, shadowy light. The ideal height for the center of the light source is right at eye level, which is typically 60-66 inches from the floor. As for width, place them just a few inches to the side of the mirror’s edge, roughly 36-40 inches apart. This ensures the light casts evenly across your face, which is exactly what you want at a vanity.
8. Distressed Grey Pallet Wood Mirror with Blue Backlighting
Adding backlighting to a DIY mirror is easier than it looks and creates a high-end, custom feel.
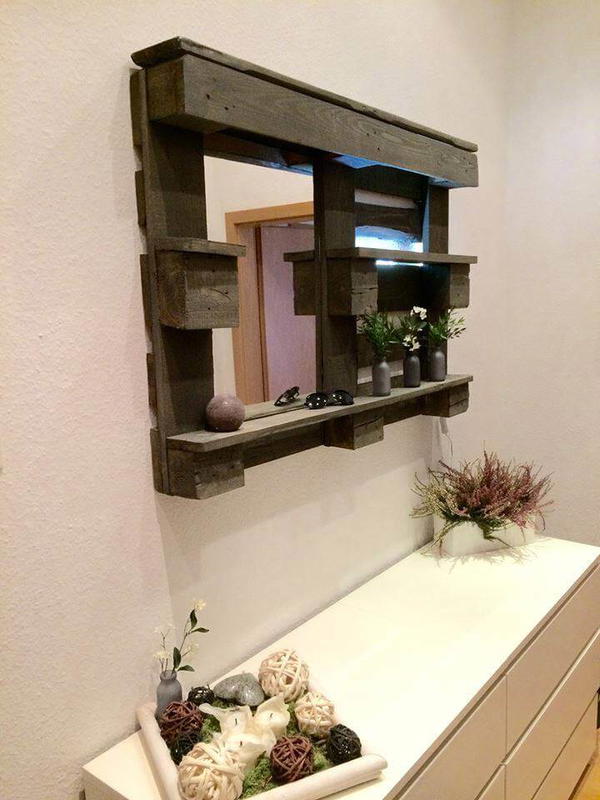
“Time: 1.5 hours.”
Cost: $25-50.Build your frame: Construct the pallet wood frame around your mirror, ensuring you have a recessed area or a lip on the back.Purchase LED Strip Lights: Buy a peel-and-stick LED light strip kit online. Choose a color-changing (RGB) or single-color option. Make sure it’s USB-powered or has a low-profile plug.Apply the Lights: Clean the back surface of the mirror frame thoroughly. Peel the backing off the LED strip and carefully apply it around the perimeter of the frame, about an inch from the outer edge.Manage the Cord: Drill a small, discreet hole or notch to run the power cord through. Plan where your cord will go to be least visible.Mount and Enjoy: Hang your mirror, plug it in, and use the remote to set the mood with your new glow.
We’re seeing a huge trend towards ‘functional ambiance,’ where lighting isn’t just for seeing—it’s for setting a mood. The cool blue glow behind this mirror is a perfect example. It transforms a simple, rustic object into a piece of art and adds a layer of depth and sophistication. This is part of a larger cultural shift away from stark, overhead-only lighting towards layered, dimmable, and even colorful light sources that allow us to customize our environment based on time of day or desired feeling. It’s less about pure utility and more about creating an experience.
9. Small Bathroom with a Mixed-Tone Wooden Plank Wall
An accent wall like this works surprisingly well in a small bathroom, provided you keep the other elements simple. This idea is best for a powder room or a narrow guest bath, around 25-45 square feet. In a tiny space, cladding all four walls in wood could feel claustrophobic, but using it on a single feature wall adds depth and character without visually shrinking the room. The key is balancing the heavy texture of the wood with the smooth, light surfaces of the beige tiles and white fixtures. Compare this to Idea #5, which uses a similar wall treatment in a slightly larger space.
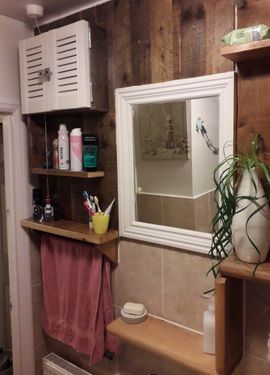
“While the wooden wall is the main event, the most clever choice here is the simple, white-framed mirror.”
In a room with so much texture and visual information from the mixed-wood planks, a fussy or ornate mirror would have been a mistake. The clean, solid white frame acts as a visual resting place. It pops against the wood, defines the vanity area, and connects with the other white elements in the room (like the louvered cabinet and sink), bringing a sense of cohesion to the rustic look.
10. Raw Wood Pallet Vanity with Matte Black Fixtures
When using raw, slatted pallets for a vanity top, a standard undermount sink is a no-go. The solution, as seen here, is a solid-surface countertop that sits directly on top of the pallet base. This gives you a seamless, waterproof surface that’s easy to clean and allows for a clean undermount sink installation. Ask your local countertop supplier for remnants or offcuts of Corian, quartz, or another solid surface material. You can often get a small piece for a vanity project at a fraction of the full-slab price. It’s the perfect way to get a high-end look on a DIY base.
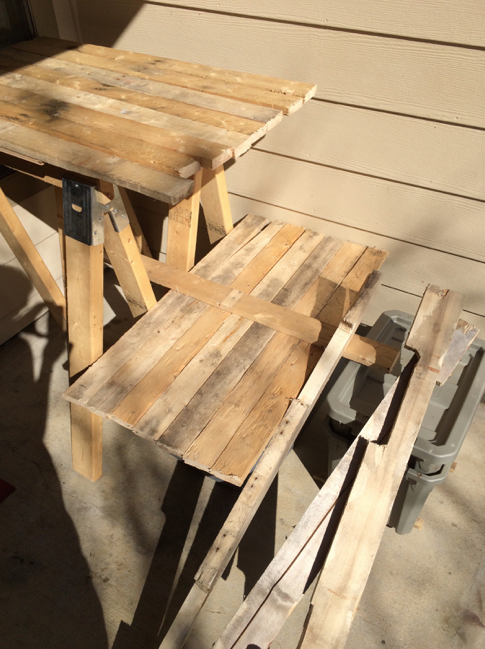
“The power of this design lies in its bold color and material blocking.”
You have three distinct horizontal zones: the light wood-look floor, the raw, textural wood of the double-stacked pallets, and the crisp, clean white of the countertop. This clear separation is punctuated by the strong vertical and circular shapes of the matte black fixtures and mirror. The black acts like punctuation, drawing your eye and adding a graphic, industrial edge that keeps the rustic wood from feeling too country. It’s a confident, uncluttered composition. The style is similar to Idea #7, but with a more minimalist execution.
11. Simple Pallet Vanity with Bamboo Wall Decal
Before you commit to a DIY pallet vanity, run through this quick checklist:
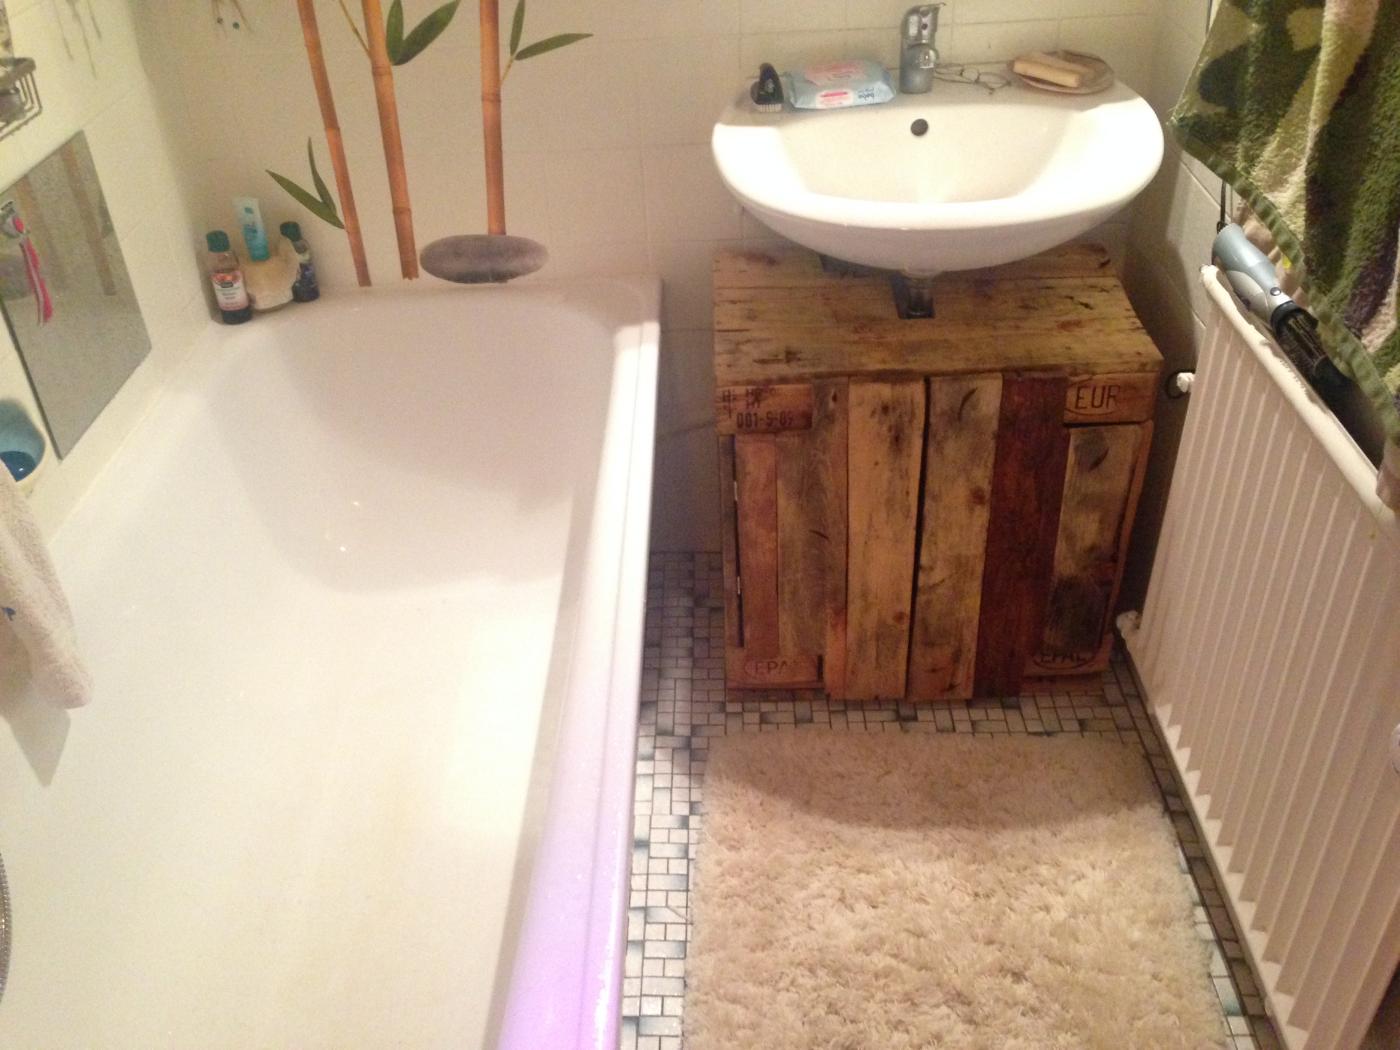
“Check the Pallet Stamp: Look for a stamp that says ‘HT’.”
This means the wood was heat-treated, not chemically treated with pesticides, making it safe for indoor use. Avoid any pallets stamped ‘MB’ (Methyl Bromide).Measure Your Sink: If you’re using an existing sink, measure its depth and the location of the drainpipe. You need to ensure the pallet slats won’t interfere with the plumbing.Plan for an Uneven Surface: Pallet wood is rarely perfectly flat. Are you placing a vessel sink on top (which is more forgiving) or do you need to add a separate, level top surface?Confirm Your Floor is Level: A wobbly vanity is no one’s friend. Check your floor with a level first; you may need to add adjustable feet to the pallet base.
This entire look is a testament to budget-friendly creativity. The pallet vanity is practically free if you can source a safe, heat-treated pallet. A simple ceramic sink can be found for under $100. The real star of the show for budget impact is the bamboo wall decal. For less than $30 online, it creates a huge visual statement that looks like custom tile work from a distance. It’s a brilliant way to add personality and a theme to a plain white-tiled bathroom without the cost and labor of retiling.
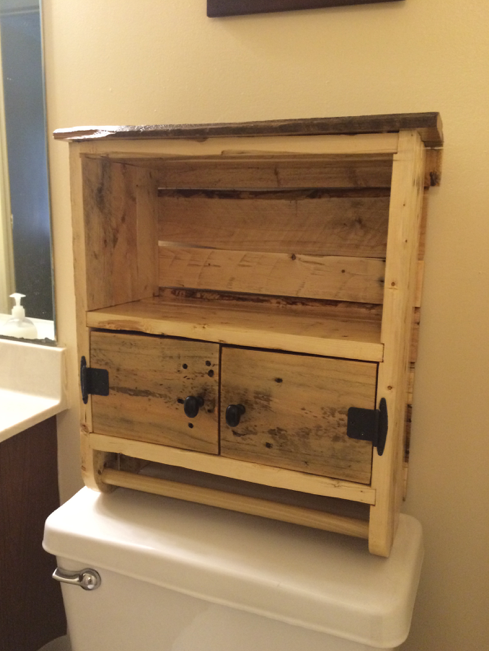
12. Rustic Pine Medicine Cabinet with Towel Bar
A solid wood piece like this pine cabinet needs a little TLC to survive in a bathroom. Even with a good finish, check it every six months for any signs of wear, especially around the bottom edges and joints where moisture can creep in. If the finish looks dull or feels tacky, it’s time for a light sanding and a fresh coat of sealant. Don’t use harsh chemical cleaners on it; a simple wipe with a damp cloth is all it needs. The silver hooks might tarnish over time depending on the metal, but a quick polish will bring them right back.
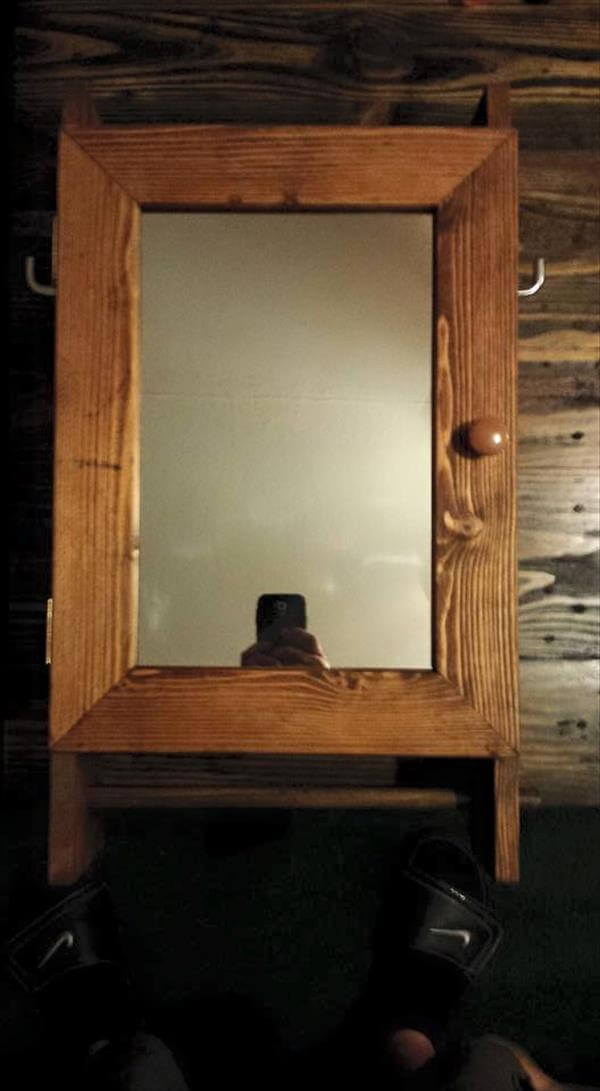
“This corner achieves a cozy, cabin-like feel through a smart balance of textures.”
The formula is roughly: 50% dark, moody texture + 40% warm, natural texture + 10% reflective shine. The dark, horizontally paneled wall provides the moody, enveloping base. The lighter, knotted pine of the medicine cabinet offers a warm, rustic counterpoint. The final 10% comes from the mirror and the silver hooks, which bounce a bit of light around and prevent the wood-on-wood look from feeling too flat or heavy. It’s a simple but effective recipe for rustic warmth.
13. Recessed Bathtub with Mixed Wood Plank Accent Wall
What makes this design so compelling is that single, bold red plank. In a sea of rustic neutrals—white, brown, gray, and natural wood tones—the splash of bright red is completely unexpected. It’s a jolt of energy and personality. If you were to remove it, the wall would still be a nice, rustic feature. But with the red plank, it becomes a piece of art. It proves that you don’t need a lot of color to make a huge impact; you just need to place it strategically and with confidence.
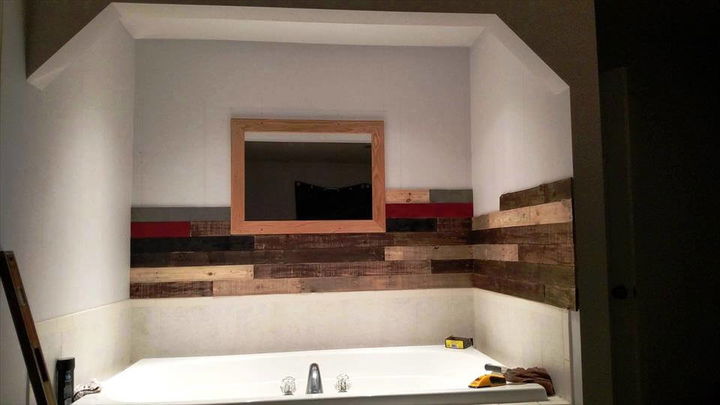
“A wood accent wall right next to a bathtub is a high-stakes design choice.”
Sealing is not optional; it’s mandatory for survival. Every single one of those beautiful, varied planks needs multiple coats of marine-grade varnish on all sides before installation. Pay special attention to the area where the wood meets the tub surround—that joint needs to be meticulously caulked with a high-quality, mold-resistant silicone meant for kitchens and baths. Any gap is an invitation for water to seep behind the wall, leading to rot and mold you won’t see until it’s a huge problem. You might want to get tips from Mistake #1 on how to properly treat wood.
14. DIY Pallet Vanity in a Simple Tiled Bathroom
This is a fantastic example of a functional, no-frills bathroom update on a shoestring budget. The vanity is the star, and it’s practically free.
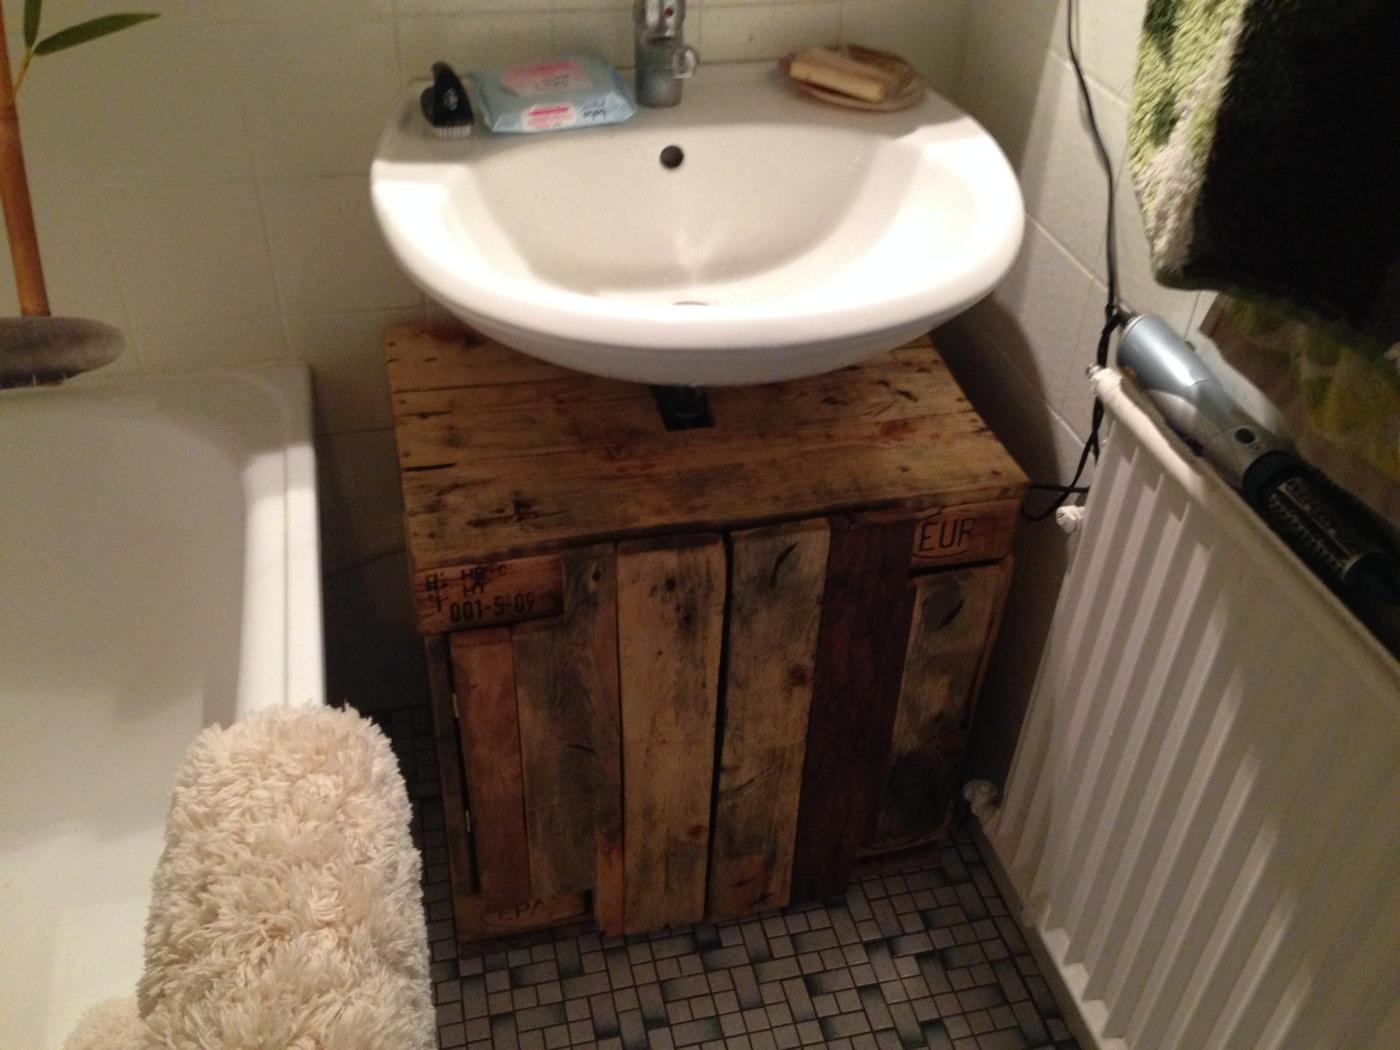
“Main Furniture (DIY Pallet Vanity): $0 – $30 (if you have to buy a pallet)Sink &”
- Main Furniture (DIY Pallet Vanity): $0 – $30 (if you have to buy a pallet)
- Sink & Faucet: $100 – $250
- Textiles (Bath Mat, Towels): $30 – $60
- Accessories: $20 – $40
- TOTAL: $150 – $380
Budget alternative: The whole look IS the budget alternative! To save even more, look for a second-hand sink and faucet at a Habitat for Humanity ReStore. You can often find perfectly good fixtures for under $50.
Mounting a sink on a pallet vanity requires a bit of planning to make sure it’s secure and the plumbing fits.
- Time: 1-2 hours. Cost: $10 (for hardware).
- Reinforce the Top: Pallet top decks can be flimsy. Screw a solid piece of 3/4″ plywood under the top slats where the sink will sit to provide a stable base.
- Trace and Cut: Place your sink upside down on the vanity top and trace the outline of the drain hole. Use a hole saw or jigsaw to carefully cut the opening for the drain assembly.
- Dry Fit Plumbing: Before you permanently attach the sink, do a dry fit of the p-trap and drain lines to ensure they don’t interfere with the pallet’s center support blocks. You may need to notch a block to make it fit.
- Seal and Secure: Apply a thick bead of silicone caulk around the drain hole on the top of the vanity. Set the sink in place, install the drain assembly, and let the silicone cure completely.
15. Dark Wood Storage Caddies on a Distressed White Shelf
Small caddies and trays are one of a designer’s secret weapons for fighting clutter. Instead of having a dozen little bottles and jars scattered across a shelf, grouping them in a caddy instantly makes the collection look intentional and organized. It’s a visual trick that contains the chaos. Use one for morning skincare, one for evening, or one for dental care. It makes the shelf look styled rather than just messy, and it has the practical benefit of being able to grab the whole caddy and bring it to the sink when you need it.
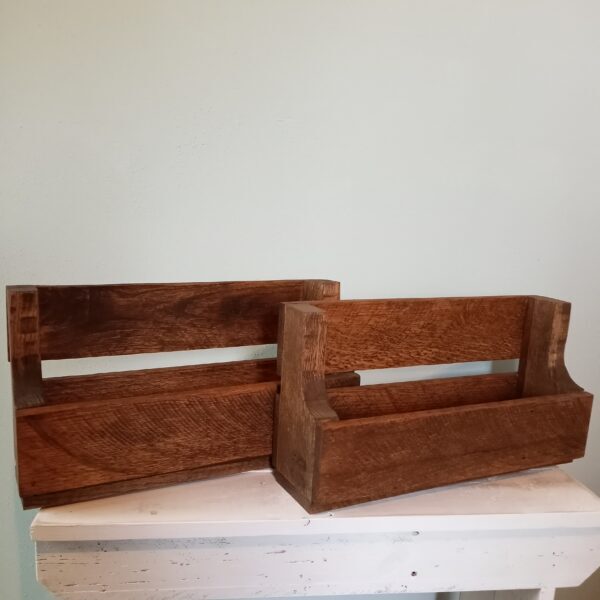
“This simple arrangement works because it follows the ‘rule of three’ and uses effective contrast.”
The two dark caddies and the white shelf create a visually pleasing group of three main objects. The strong contrast between the dark stained wood of the caddies and the distressed white shelf makes both elements stand out. Furthermore, the contrast between the rough, handcrafted caddies and the smooth, pale blue-green wall adds textural interest. It’s a small, quiet moment that feels curated and calm.
16. Integrated Pallet Wood Vanity and Mirror Unit
The standout feature here is the integration of the mirror and shelving into one cohesive unit made from the same dark-stained pallet wood as the vanity. This is what elevates the project from a simple DIY vanity to a custom-looking, built-in feature. It creates a complete, intentional ‘vanity zone’. By using the same material for both the horizontal (vanity) and vertical (mirror unit) elements, the design feels grounded, unified, and much more substantial than if they were two separate pieces.
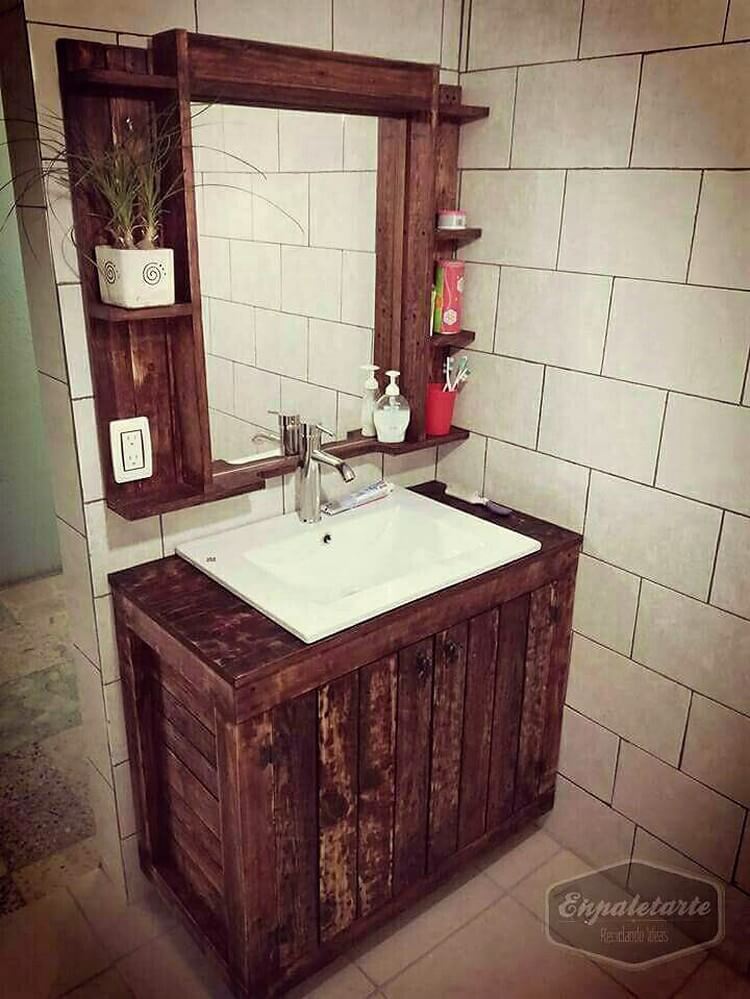
“A combined vanity and mirror unit like this is perfect for making a statement in a medium-sized bathroom, ideally one with at least 6-8 feet of wall space to dedicate to the feature.”
The minimum width for the unit itself should be about 36 inches to not feel cramped. It’s a great solution for a bathroom that lacks architectural interest, as it creates a strong focal point all on its own. However, in a very small bathroom (under 40 sq ft), the bulk of the matching wood frame could feel overwhelming. In that case, a simple framed mirror like in Idea #19 would be a better choice.
17. Rope-Suspended Dark Wood Ladder Shelves
This shelving unit is so charming because it plays with visual tension. The dark, solid wood of the ladder shelves feels heavy and substantial, but the rope suspension makes it appear to be floating lightly on the wall. It’s a delightful contradiction. The natural, rustic texture of the rope also contrasts beautifully with the smooth, painted wall and the clean lines of the shelves. This combination of heavy and light, rough and smooth, creates a dynamic and engaging piece that is far more interesting than a standard bracketed shelf.
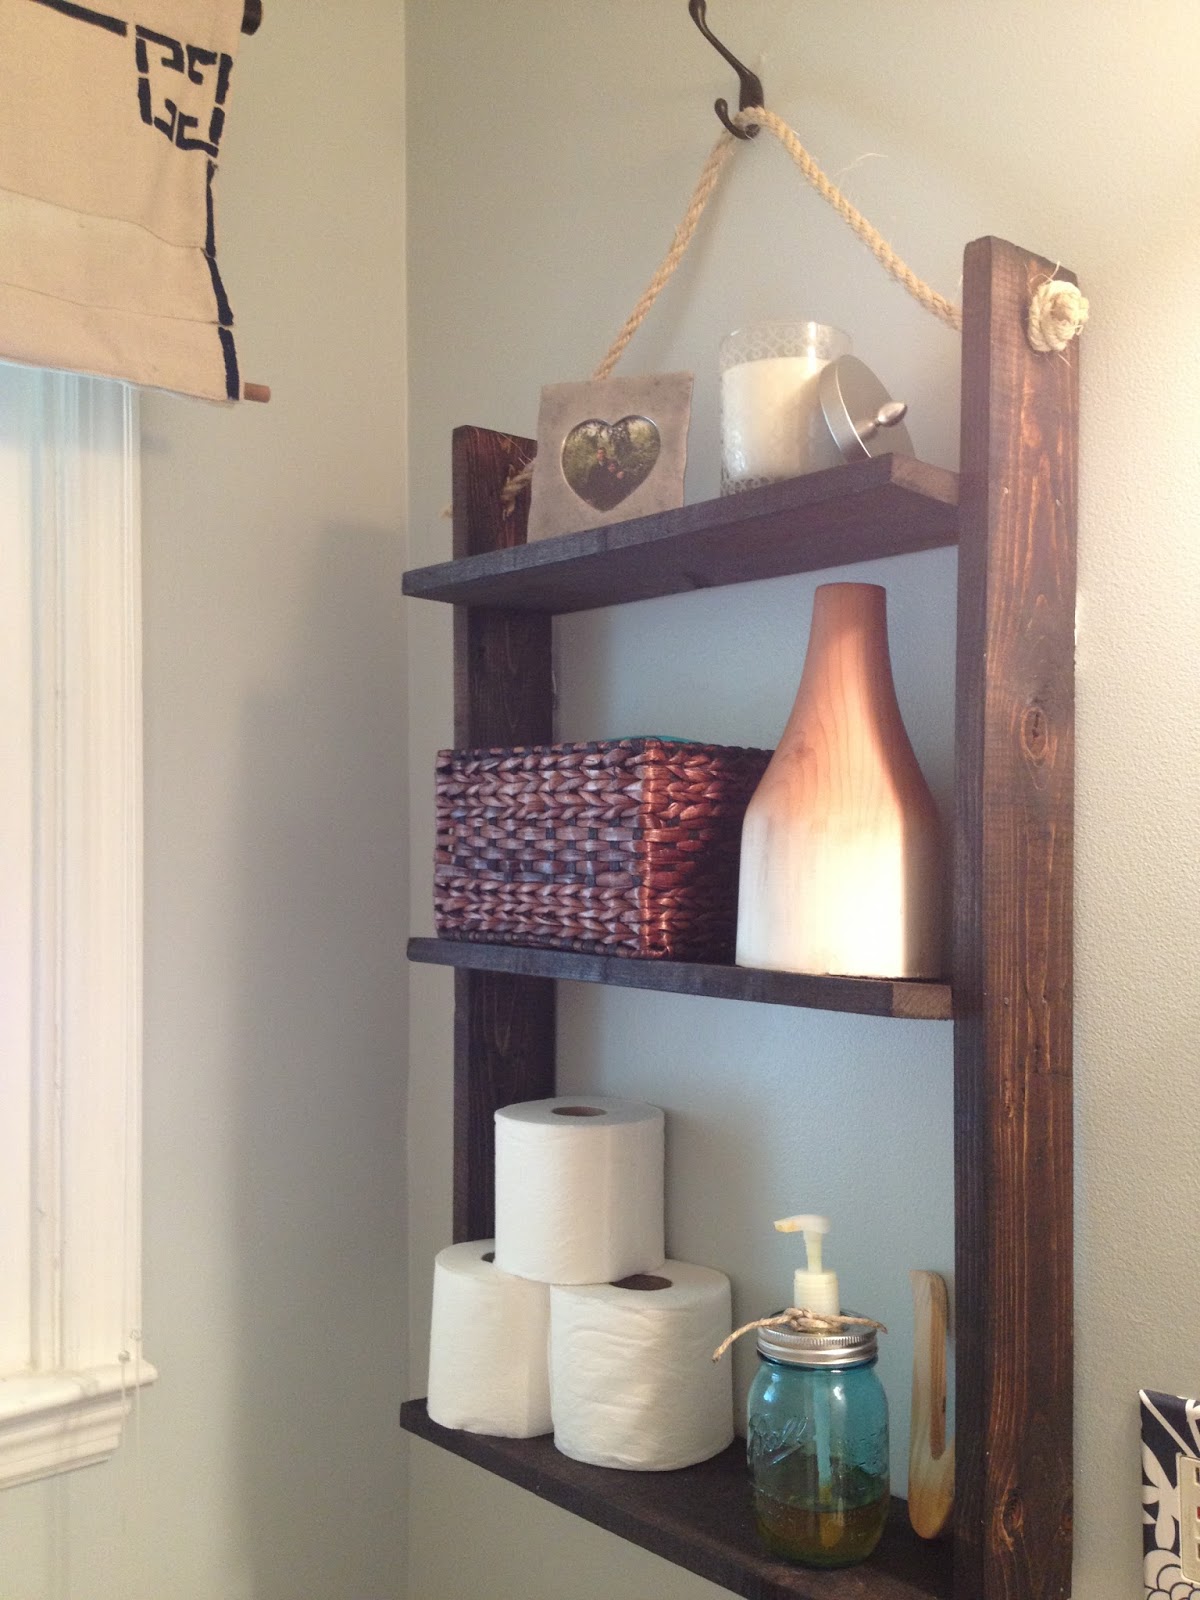
“You can get this look for next to nothing.”
This is a classic scrap wood project. All you need are a few lengths of 1×3 or 1×4 lumber, which you can often get for free or cheap from the cull lumber bin at a home improvement store. Stain them with any dark wood stain you have on hand. The rope is the most ‘expensive’ part, and you can get a good length of thick, natural fiber rope from a hardware store for about $10-$15. A decorative wall hook will run you another $5-$10. All in, you can easily build this stylish storage for under $30.
18. Distressed Wood Cabinet with Mini Sliding Barn Doors
The mini barn door hardware seen here is a direct descendant of the massive modern farmhouse trend that dominated Pinterest for years. While the huge, room-dividing barn doors are starting to feel a bit dated in 2026, these smaller-scale versions on furniture and cabinets are having a major moment. They offer the same rustic-industrial vibe but in a more practical, less overwhelming package. It’s a nod to the trend that feels fresh and functional, adding character and mechanical interest to a simple storage piece without taking over the whole room.
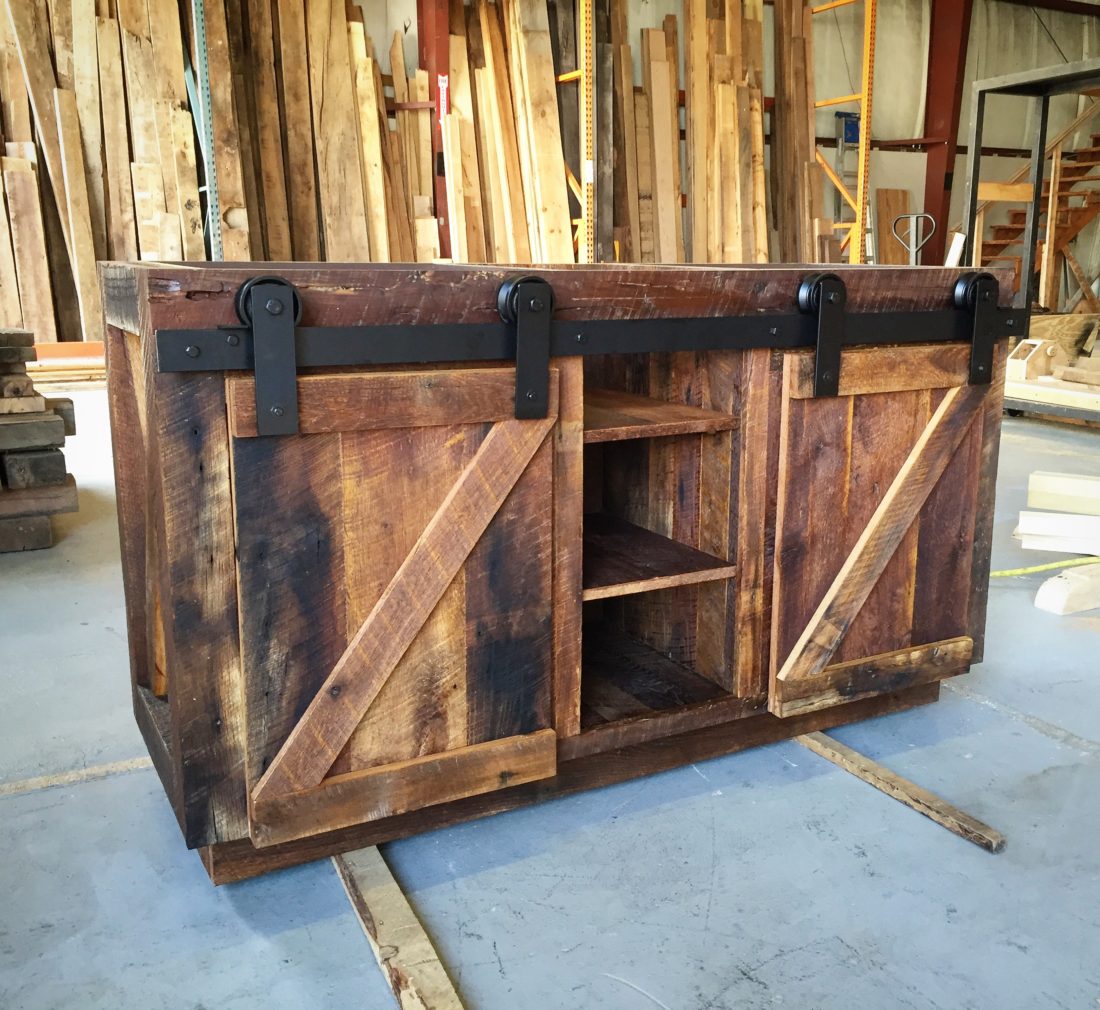
“When installing mini barn door hardware on a cabinet, the most common mistake is not leaving enough clearance.”
Remember that the doors slide *in front* of the cabinet opening, not inside it. You need to account for the width of the doors themselves. For this design to work, the total length of your track must be at least twice the width of one door, plus an inch or two for wiggle room. Also, ensure the cabinet you’re mounting it on is deep enough that the sliding doors don’t bang into your faucet handles or overhang the countertop edge.
19. Rustic Wood Vanity with Circular Black Mirror
This is a perfect recipe for a clean, modern rustic look: 50% Natural Texture + 40% Crisp White + 10% Graphic Black. The light brown wood vanity and woven basket provide the warm, natural textures that ground the space. The white subway tile and rectangular sink create a bright, clean backdrop that makes up the majority of the visual space. The final, crucial 10% comes from the circular black mirror and gooseneck faucet. These black elements act as sharp, graphic accents that cut through the softness and add a modern, sophisticated edge.
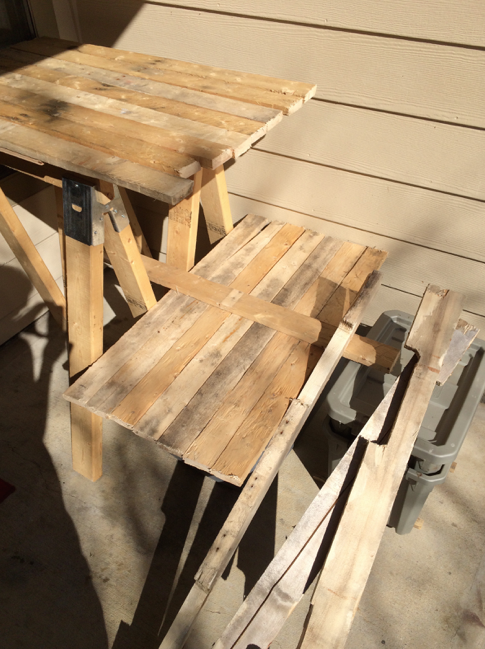
“An open vanity like this looks effortlessly chic and airy in photos, but it requires you to be a very tidy person.”
There is nowhere to hide clutter. Your extra toothpaste, cleaning supplies, and contact lens solution will all be on display unless you have a separate closet or use curated, attractive storage baskets like the one shown. If you’re someone who tends to leave things out on the counter, an open vanity will quickly become a source of visual stress rather than serene style. Be honest with yourself about your habits before committing to this look.
20. Reclaimed Pallet Wood Walls with Painted Accents
The genius of this wall treatment is its fearless use of random color. While most reclaimed wood walls stick to natural tones, the inclusion of planks painted with pops of red, black, and blue adds a layer of playful, folksy character. It keeps the rustic look from taking itself too seriously. The variety in color and texture makes the wall feel like a collage of stories and history, which is far more interesting than a uniform finish. The look is perfectly balanced by the simple white tile and tub, which prevent the busy walls from overwhelming the space.
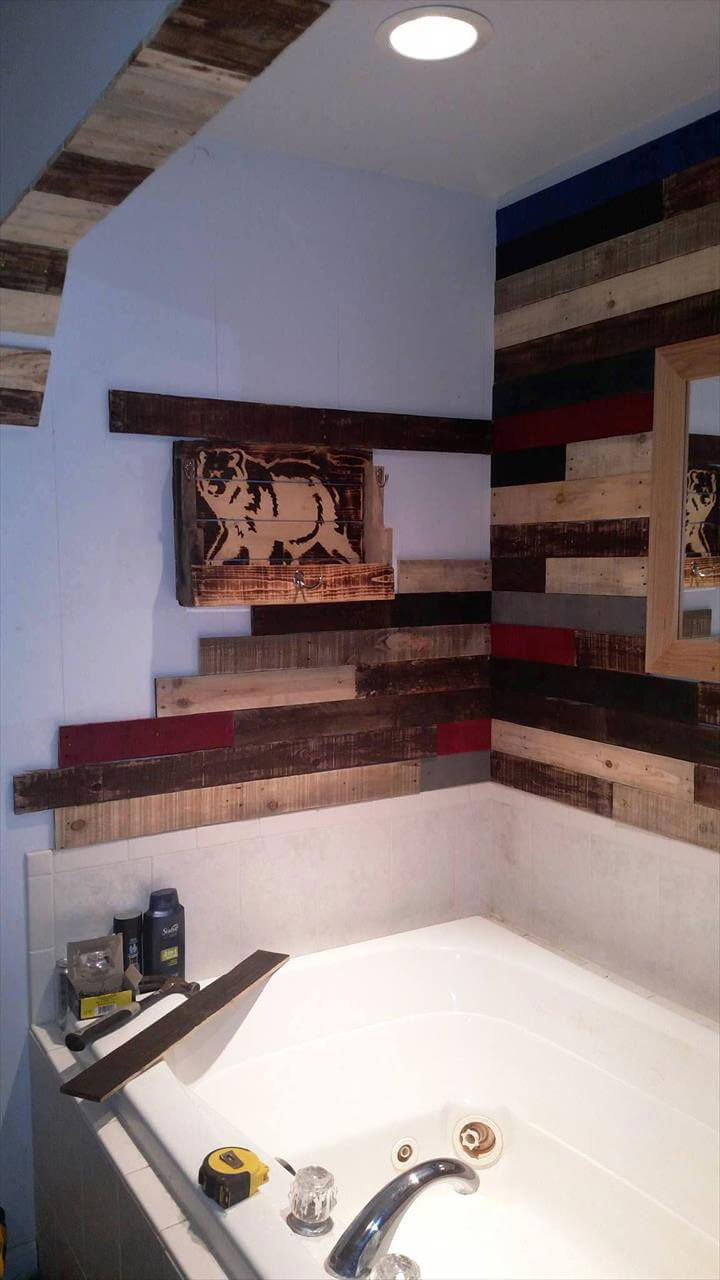
“You can create a custom bear art piece like this yourself with a stencil and som”
You can create a custom bear art piece like this yourself with a stencil and some paint.
- Time: 1 hour. Cost: $15.
- Find a Silhouette: Search online for a simple ‘bear silhouette’ vector graphic. Print it out on heavy cardstock.
- Create the Stencil: Carefully cut out the bear shape from the cardstock using a craft knife to create your stencil.
- Prepare the Wood: Find a nice piece of scrap wood and make sure it’s clean and dry.
- Position and Paint: Use painter’s tape to hold your stencil firmly in place on the wood. Use a stencil brush or a small foam roller to dab acrylic craft paint inside the stencil. Use very little paint on the brush to prevent bleeding under the stencil.
- Reveal and Finish: Apply a second coat if needed. Once dry, carefully peel off the stencil. Finish with a clear matte spray sealant.
21. Dark Wood Ladder Towel Rack Holding Grey Towels
Why spend $50-$100 on a store-bought towel rack when you can make this for less than $15? This is the ultimate scrap wood project. All you need are two longer pieces for the sides and 2-3 shorter pieces for the ‘rungs’. You can find these in the cull lumber pile at Home Depot for a dollar or two. A small can of dark stain costs about $8, and a bit of thick rope is another $5. It’s a 30-minute project that adds a ton of functional, rustic style for the price of a fancy coffee. A similar design is shown in Idea #17, but used for shelving.
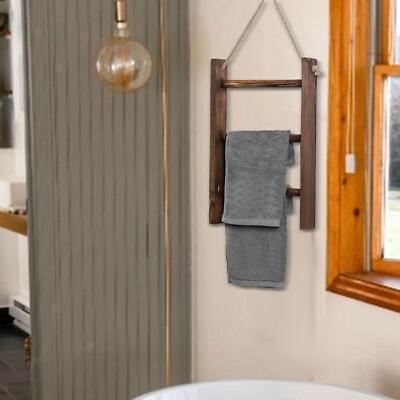
“The single element that makes this piece feel special and not just like a plain towel rack is the rope hanger.”
It’s a small detail, but it’s crucial. It adds a nautical, handcrafted touch that elevates the simple wooden ladder. The texture and natural color of the rope provide a perfect organic contrast to the dark-stained wood and the smooth wall behind it. Without the rope, it’s just a ladder leaning against a wall; with the rope, it’s a deliberate, decorative piece.
22. Wood-Paneled Bathroom with a Classic Pedestal Sink
This tiny bathroom feels cozy, not cramped, thanks to a clever play on materials and orientation. Here’s what makes it work:
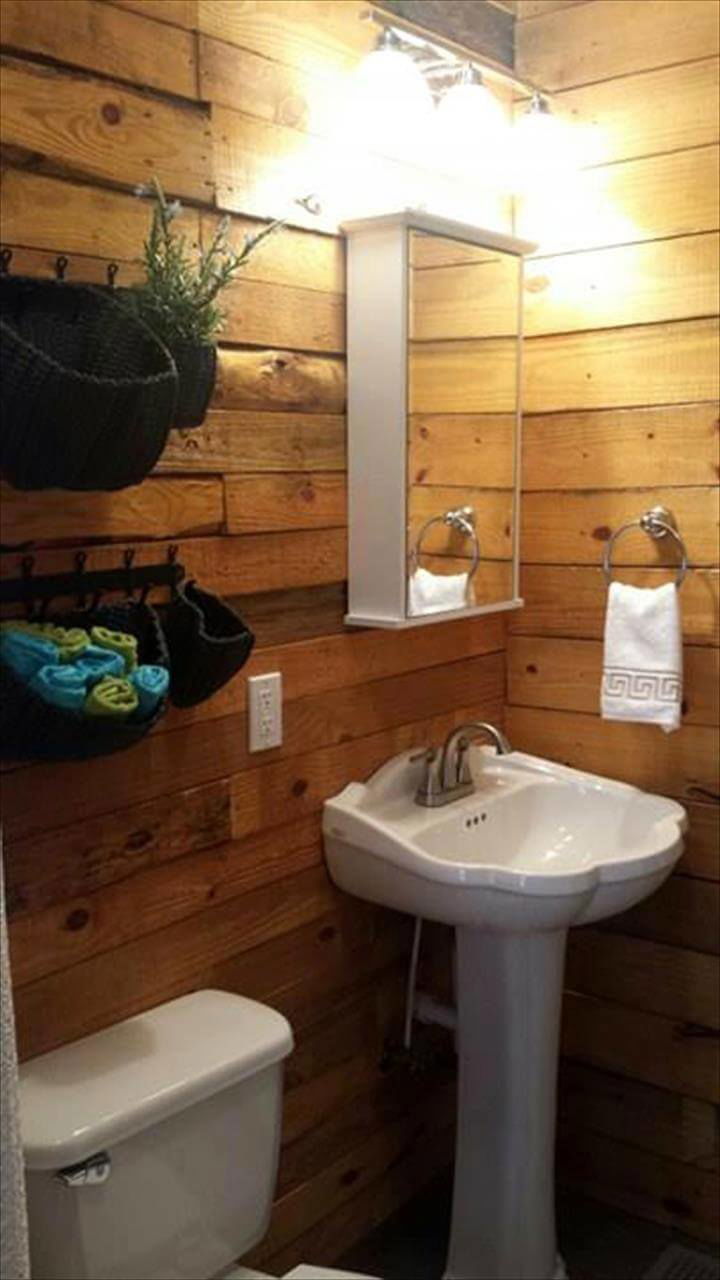
“Horizontal Lines: The horizontal wood plank walls make the narrow space feel wider than it actually is.”
It’s a classic visual trick that draws the eye from side to side.Material Contrast: The warm, rustic texture of the natural wood is perfectly balanced by the smooth, cool, classic shape of the white pedestal sink and mirrored cabinet. This prevents the wood from becoming overwhelming.Smart Storage: Instead of a bulky cabinet, the use of slim woven hanging baskets for storage adds texture and function without taking up any floor space.
When working with a pedestal sink, which offers zero counter space, you have to get creative with storage. A mirrored medicine cabinet is non-negotiable for hiding daily essentials. Beyond that, think vertically. Use wall-mounted solutions like the hanging baskets seen here, or install a narrow shelf or two above the toilet. A small stool or cart next to the sink can also work as a landing spot for items you’re currently using. The key is to keep things off the floor and use the wall space effectively.
23. Reclaimed Wood Vanity with Hairpin Legs and Red Wire Baskets
This vanity is a perfect example of the Mid-Century Rustic formula: 60% Rustic Wood + 30% Modernist Shape + 10% Pop of Color. The reclaimed wood plank top is the heart of the rustic feel. The slim, black metal hairpin legs provide the iconic Mid-Century Modern silhouette, making the heavy top feel light and airy. The final touch, the bright red wire baskets, adds a playful, industrial pop of color that keeps the whole thing from taking itself too seriously. It’s a fun, eclectic mix that feels totally custom.
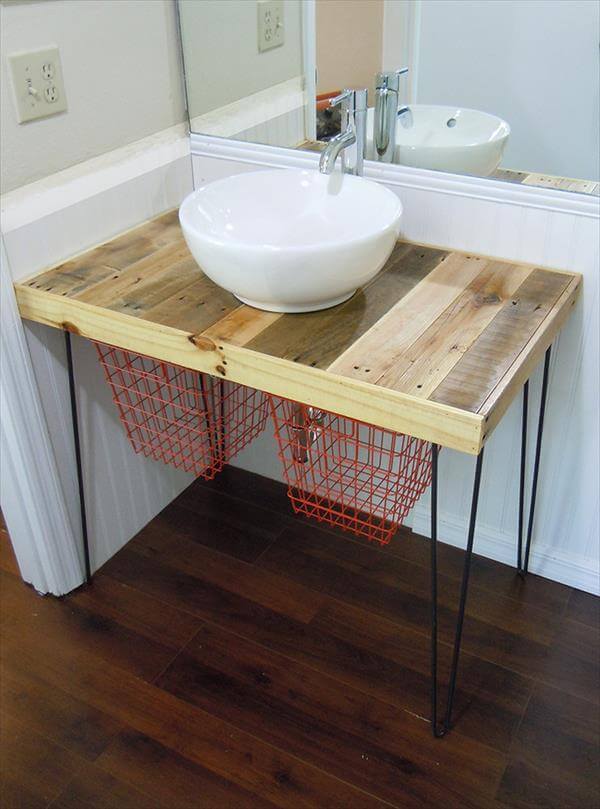
“Hairpin legs look fantastic, but they offer zero lateral stability on their own.”
For a vanity that holds a heavy sink and will be leaned on daily, you must attach it securely to the wall. The legs will support the vertical weight, but the vanity top needs to be anchored to the wall studs using L-brackets or a hidden wood cleat screwed into the wall. Without this step, the whole vanity will be wobbly and unstable, posing a real risk of tipping or pulling away from the plumbing connections. This isn’t an optional step. A similar, more grounded approach can be seen in Idea #4.
24. Wall-Mounted Pallet Shelf with Entryway Essentials
This is the quintessential ‘free-ninety-nine’ DIY project that looks like it came from a trendy boutique. A single, clean pallet can be sourced for free from many local businesses (just ask first!) or marketplace sites. A handful of hooks from a hardware store will set you back about $10-$15. The rest is just elbow grease—a bit of sanding and a few screws. It’s a project that delivers maximum style and organization for minimal cost, perfect for an entryway, mudroom, or even a bathroom wall to hang towels and store toiletries.
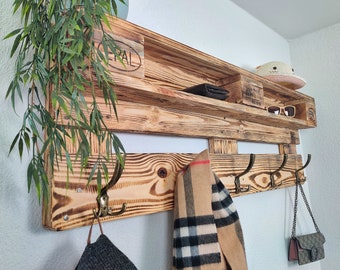
“This simple shelf works so well because it perfectly understands its purpose: to be a ‘drop zone’.”
It’s not meant for heavy storage; it’s a designated spot for the things you grab on your way out the door. The design reflects this with its open, accessible structure. The top shelf is for items you can toss, like a wallet and keys. The hooks are for things you can hang, like a scarf and bags. It’s visually light and doesn’t take up any floor space, making it ideal for small entryways. The natural wood against the plain white wall adds warmth without clutter.
25. Handmade Wooden Vanity with Dual Stone Sinks
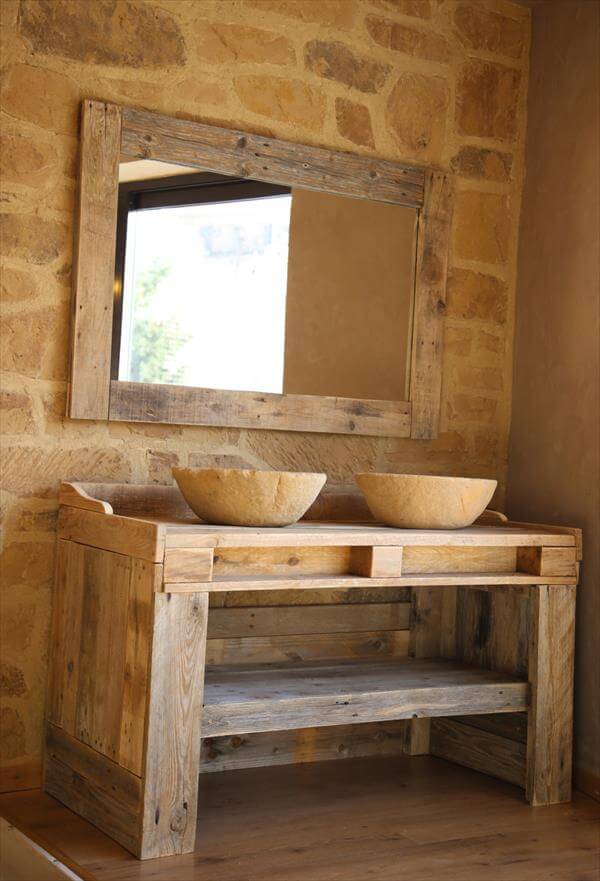
The undeniable stars of this bathroom are the dual carved stone vessel sinks. They are the element that elevates the room from simply ‘rustic’ to ‘organic luxury’. While the reclaimed wood vanity and stone wall are beautiful, they act as the supporting cast. The sinks provide a focal point with their unique texture, substantial presence, and earthy, sculptural quality. Removing them would fundamentally change the character of the space, losing that raw, elemental feeling that makes it so special. They are proof that fixtures can be art.
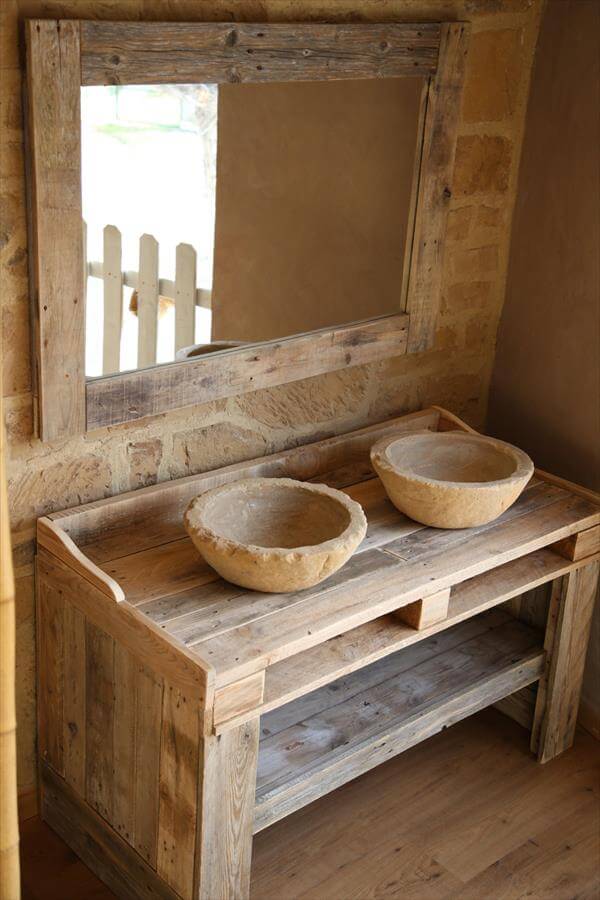
“A natural, unsealed stone sink requires more mindful maintenance than a standard ceramic one.”
Stone is porous, which means it can stain. Be vigilant about wiping up spills from things like makeup, toothpaste with coloring, or hair dye immediately. Clean it regularly with a pH-neutral stone cleaner, not with acidic or abrasive bathroom cleaners which can etch the surface. To keep it looking its best and prevent staining, you’ll need to seal it every 6-12 months with a quality penetrating stone sealer. It’s a 30-minute job that will protect your beautiful investment for years.
26. Distressed White Plank Vanity with Black Ring Pulls
This modern farmhouse look follows a strict but effective formula: 70% Bright White + 20% Graphic Black + 10% Warmth. The distressed white vanity and smooth white countertop create a bright, expansive base. The bold, matte black hardware—hinges, ring pulls, faucet, and mirror frame—provides the strong, graphic contrast that defines the style. The final 10% is the warm wood flooring, which adds just enough organic texture and warmth to keep the black-and-white scheme from feeling too cold or stark.
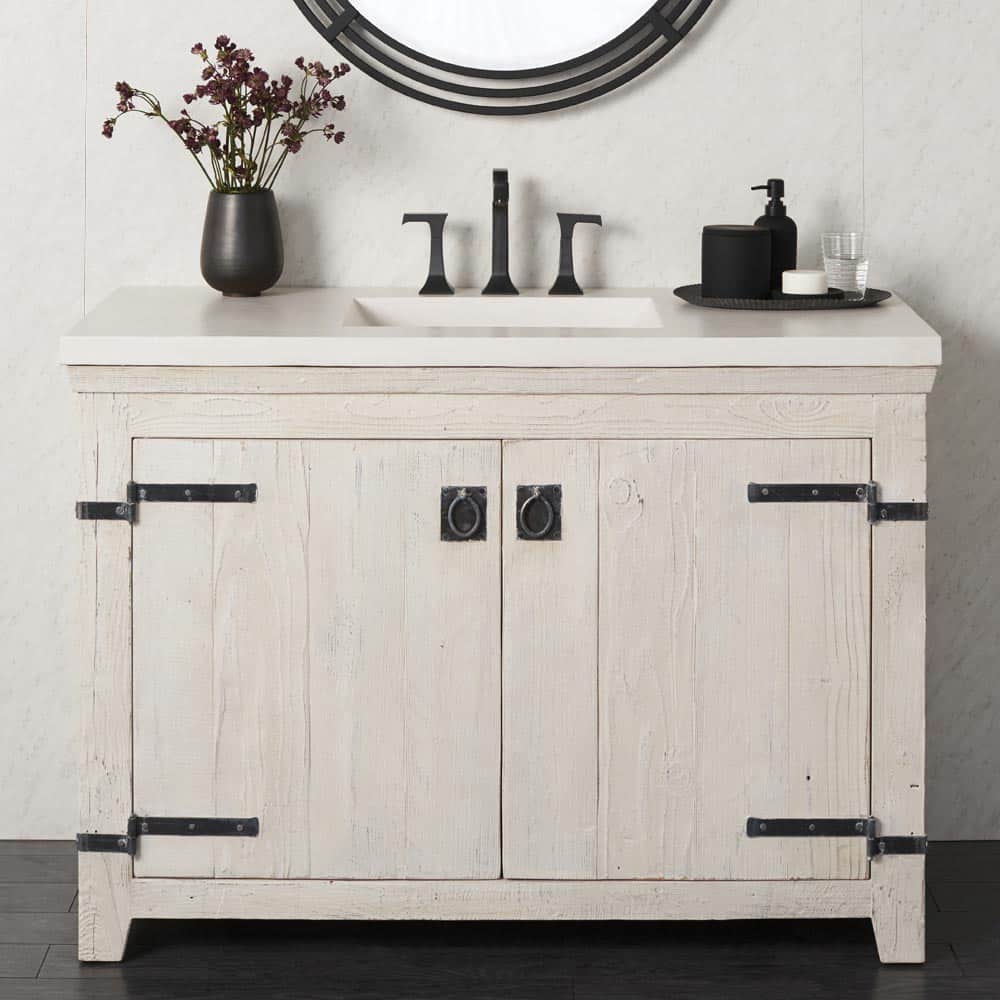
“This design is all about confident contrast.”
The chunky, rustic texture of the distressed white wood planks is placed directly against the sleek, modern lines of the matte black faucet and the smooth white countertop. It’s a juxtaposition that creates immediate visual interest. The repetition of the black metal—from the hinges to the pulls to the faucet to the mirror—creates a visual rhythm that ties the whole vanity area together. It feels cohesive and intentional because the key elements are repeated with confidence.
27. Rustic Vanity with White Vessel Sink in a Log Cabin
The single most important choice in this design is the modern, white oval vessel sink. In a room completely enveloped by warm, rustic wood—log walls, a weathered vanity, diagonal paneling—the sink acts as a crucial point of relief. Its clean lines, smooth surface, and bright white color provide a stark, modern contrast that prevents the space from becoming a monotonous, wood-on-wood cliché. It’s the element that bridges the gap between rustic cabin and contemporary living, making the whole space feel updated and fresh.
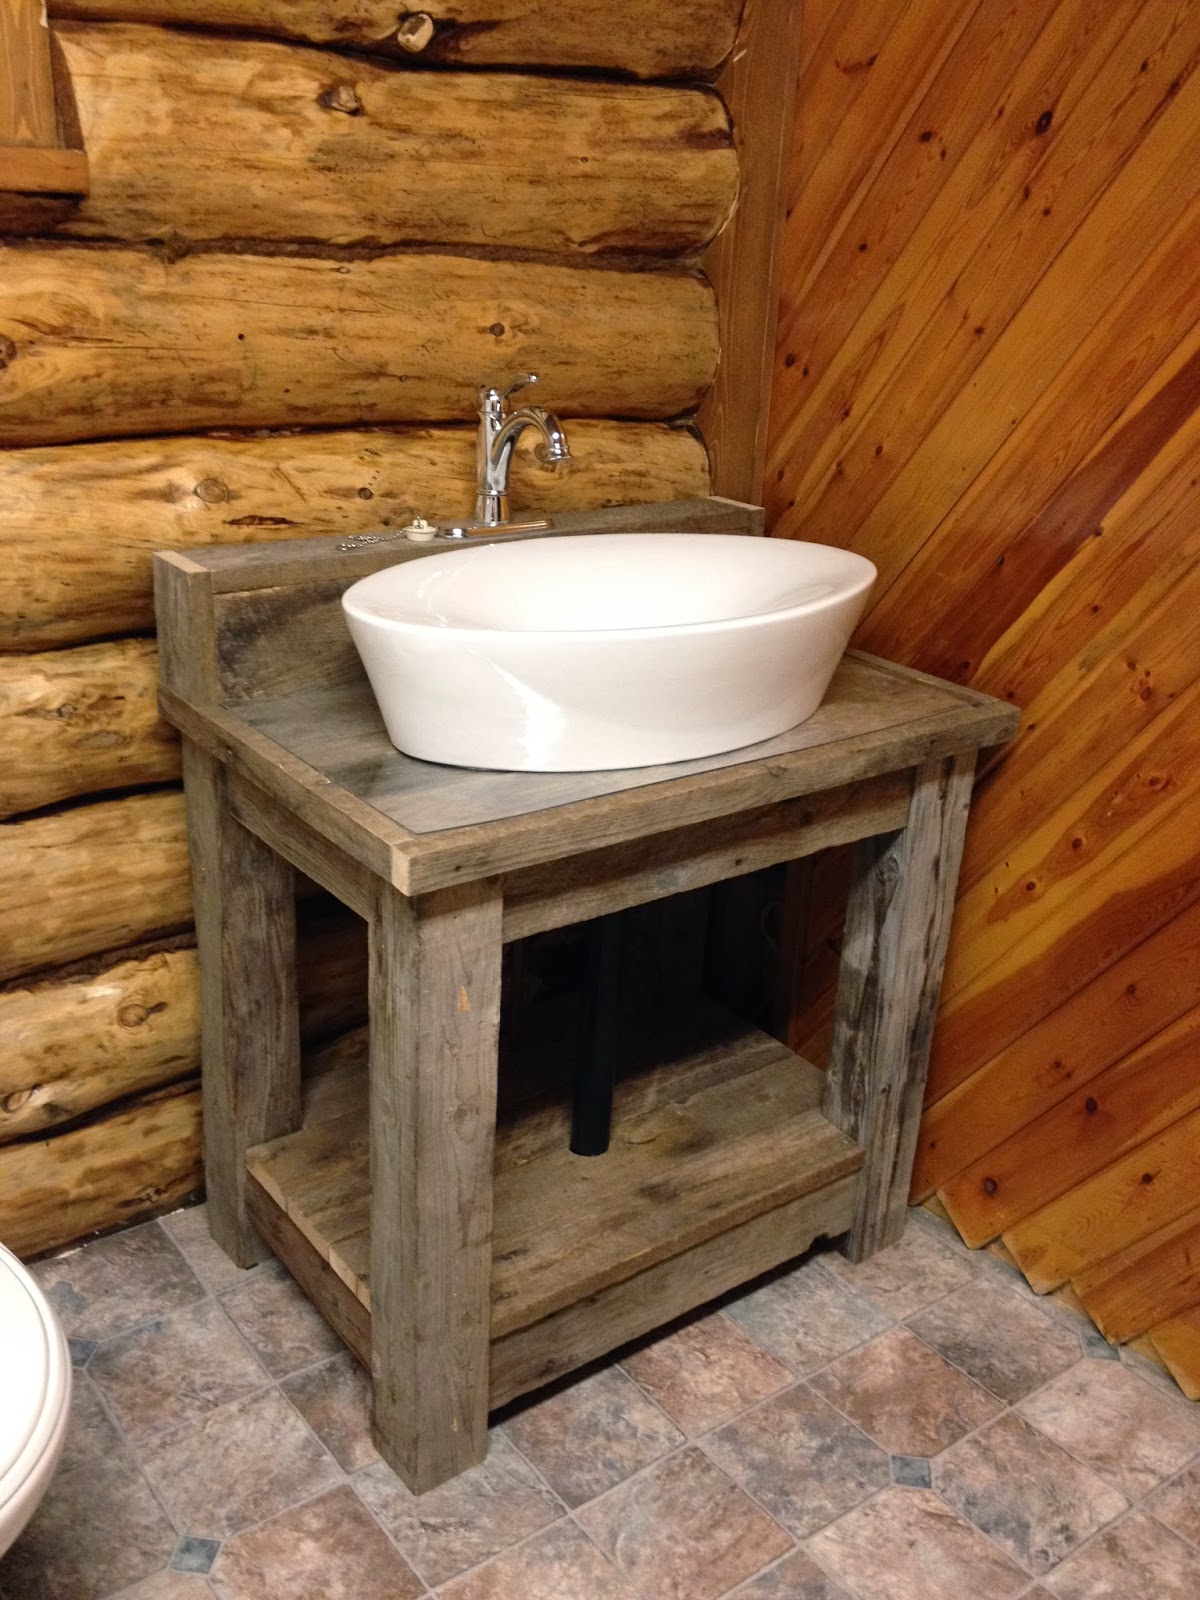
“An open vanity like this looks great but offers zero concealed storage.”
Before you fall in love with this look, you need a brutally honest plan for where you’ll store everything that isn’t pretty. Where will the toilet bowl cleaner, the extra rolls of toilet paper, the first aid kit, and the economy-sized bottle of mouthwash live? If you don’t have a nearby linen closet or another cabinet, you’ll need to invest in some very attractive baskets or boxes for that lower shelf, or your serene rustic vibe will quickly be torpedoed by clutter.
28. Spacious Double Vanity with Textured Stone Sinks
Achieving this serene, spa-like rustic look is an investment, primarily due to the sinks and fixtures. This is a higher-end interpretation of the pallet project theme.
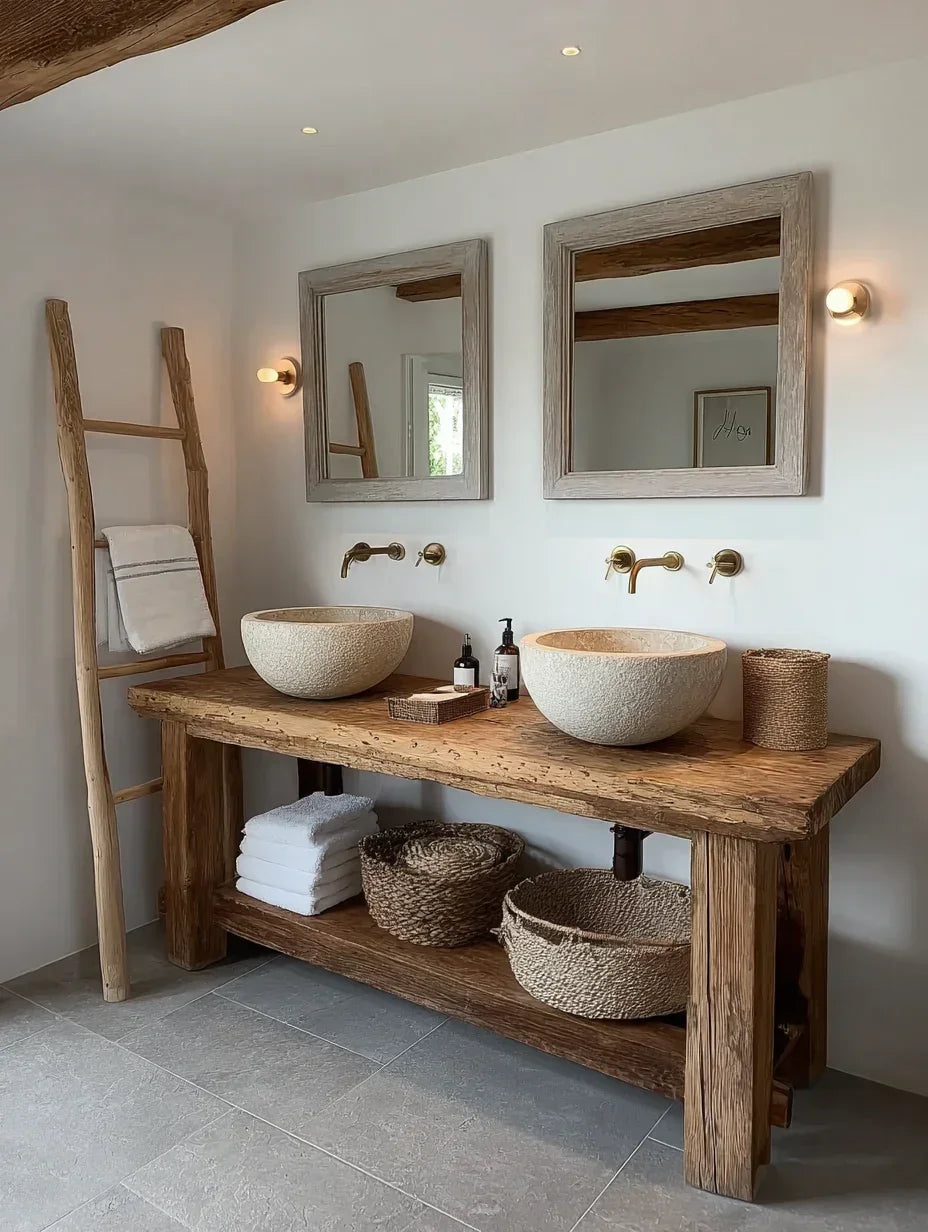
“Main Furniture (DIY Reclaimed Wood Vanity): $150 – $400Sinks & Faucets (2 sets):”
- Main Furniture (DIY Reclaimed Wood Vanity): $150 – $400
- Sinks & Faucets (2 sets): $800 – $2000+ (stone sinks and wall-mount brass faucets are pricey)
- Lighting (2 Sconces): $200 – $500
- Mirrors (2): $150 – $400
- Decor (Ladder, Baskets): $100 – $250
- TOTAL: $1,400 – $3,550+
Budget alternative: Keep the DIY vanity base. Swap the stone sinks for more affordable ceramic vessel sinks ($100-$150 each) and choose deck-mounted chrome faucets instead of wall-mounted brass. This alone can save you over $1000. This is a great comparison to the single vanity version in Idea #25.
A grand double vanity like this needs room to breathe. You’ll want a wall that is at least 72 inches (6 feet) long to comfortably fit the two sinks, with enough counter space in between and on the sides. The ideal room size would be a primary bathroom of at least 100-120 square feet. Trying to cram a double vanity into a smaller space is a common mistake that leads to a cramped, uncomfortable experience where two people can’t actually use the sinks at the same time without bumping elbows. For smaller spaces, a single, more impactful vanity like Idea #27 is a better choice.
29. Two-Tiered Pallet Wall Shelf with Towel Slot
You can build this handy little shelf in under an hour with scraps from a single pallet.
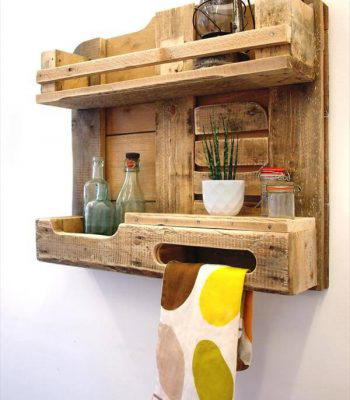
“Time: 45 minutes.”
Cost: Nearly free.Select Your Pieces: You’ll need two main back pieces of equal length and three shorter pieces for the shelves/towel holder.Assemble the Frame: Lay the two back pieces on the ground. Position the top shelf piece across the top and screw it in from the back.Create the Towel Slot: Position the middle shelf piece a few inches below the top one. Place the bottom piece about an inch below that, creating a narrow slot. Screw both in from the back. The gap is your towel holder.Sand Everything: Vigorously sand all surfaces and edges to remove any splinters and rough spots.Seal and Mount: Apply a water-resistant sealant. Once dry, mount to the wall with screws and anchors.
The feature that makes this little shelf so clever and specifically designed for a bathroom is the integrated towel slot. It’s a simple design choice—just a small gap between two horizontal slats—but it’s brilliant. It turns a generic shelf into a purpose-built bathroom accessory. It’s more thoughtful and custom-feeling than just adding a hook. This small detail shows that the piece was designed with its function in mind, which is the hallmark of great DIY.
30. Custom Pallet Slat Vanity with Dual Vessel Sinks
This design succeeds by thoughtfully mixing patterns and textures within a tight color palette. The vertical lines of the reclaimed wood slats on the vanity base create a nice rhythm. This is contrasted by the busy, small-scale pattern of the light green wall tiles. The entire composition is then grounded by the bold, large-scale green and white diamond pattern on the floor. It works because the scales of the patterns are so different, and they are all unified by the shared color scheme of wood tones, greens, and white. It feels layered and interesting, not chaotic.
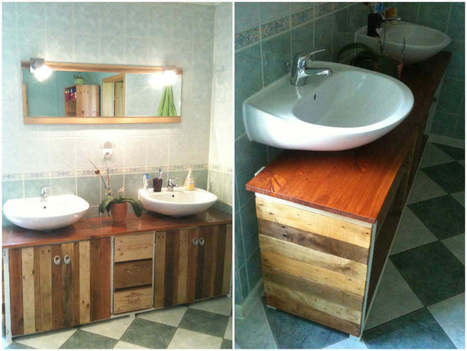
“A bathroom with this much wood and tile grout requires a specific cleaning routine.”
The rich wooden countertop around the sinks will need to be wiped dry after every use to prevent water spots and potential damage to the finish over time. The grout lines on both the floor and the patterned wall tiles are prime areas for mildew growth. Plan on scrubbing the grout with a specialized cleaner or a vinegar-water solution at least once a month to keep it looking fresh and clean. The vanity’s vertical slats will also collect dust and need regular wiping.
31. Rustic Bathtub Surround with Multicolored Wood Planks
This look taps directly into the ‘cabin-core’ aesthetic that’s been gaining steam on Pinterest as a reaction against years of minimalist white and grey interiors. People are craving spaces that feel cozy, personal, and connected to nature. The use of multicolored, reclaimed wood—complete with imperfections—and rustic motifs like the stenciled bear speaks to a desire for authenticity and a handcrafted feel. It’s less about perfection and more about creating a warm, enveloping retreat that feels like a vacation getaway, even in a suburban home.
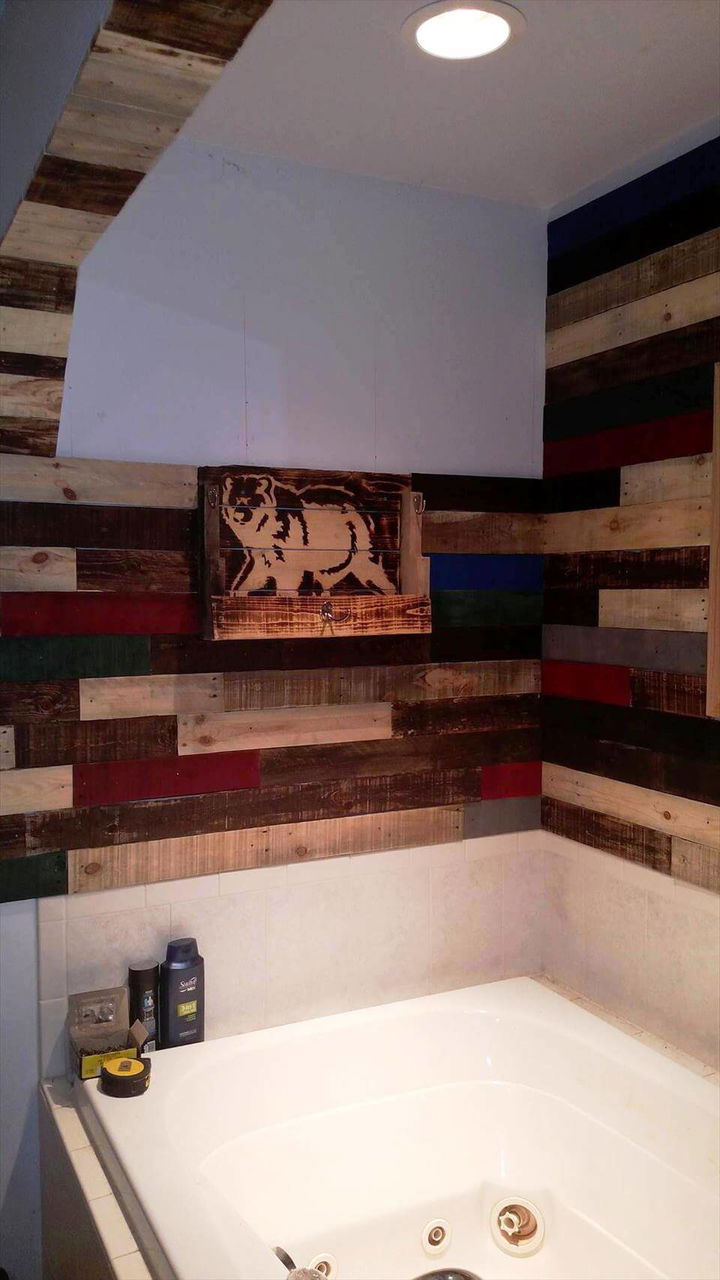
“While a wood accent wall above a tub looks amazing, you must be realistic about its interaction with water.”
This design works because there’s a significant white tile border between the tub deck and where the wood begins. This is not a look for a shower-tub combo. It’s only suitable for a bathtub that’s primarily used for soaking. Even then, splashes are inevitable. The wood must be impeccably sealed with marine varnish, and the caulk line where the tile meets the wood has to be flawless and inspected regularly for any gaps or cracks where moisture could penetrate.
Your Rustic Bathroom Story Starts Now
Hopefully, these real-world examples have sparked some ideas and given you the confidence to start your own project. Remember, you don’t need a massive budget or a complete overhaul to create a space that feels personal and stylish. Even a small, handmade shelf can completely change the feel of your bathroom. So go on, take a look at your Pinterest board, pick one idea, and make it your own.