You know that feeling when you finally find the one outdoor kitchen that looks exactly right for your backyard? That’s what this guide is for. In 2026, it’s all about creating a true ‘second living room’ outdoors—a trend driven by our collective desire for more functional, beautiful entertaining spaces right at home. We’ve done the deep dive for you, filtering through hundreds of designs to bring you the best of the best.
This guide is packed with 32 distinct outdoor kitchen patio ideas, covering everything from sleek modern setups to cozy rustic retreats. And stay until the end — we break down the most common mistakes that can ruin these looks. (Note: This article may contain affiliate links, which means we may earn a small commission if you make a purchase.)
📌 Save this to Pinterest for later — you’ll want to revisit these ideas.
1. A Serene Patio Kitchen with a Steaming Hot Tub
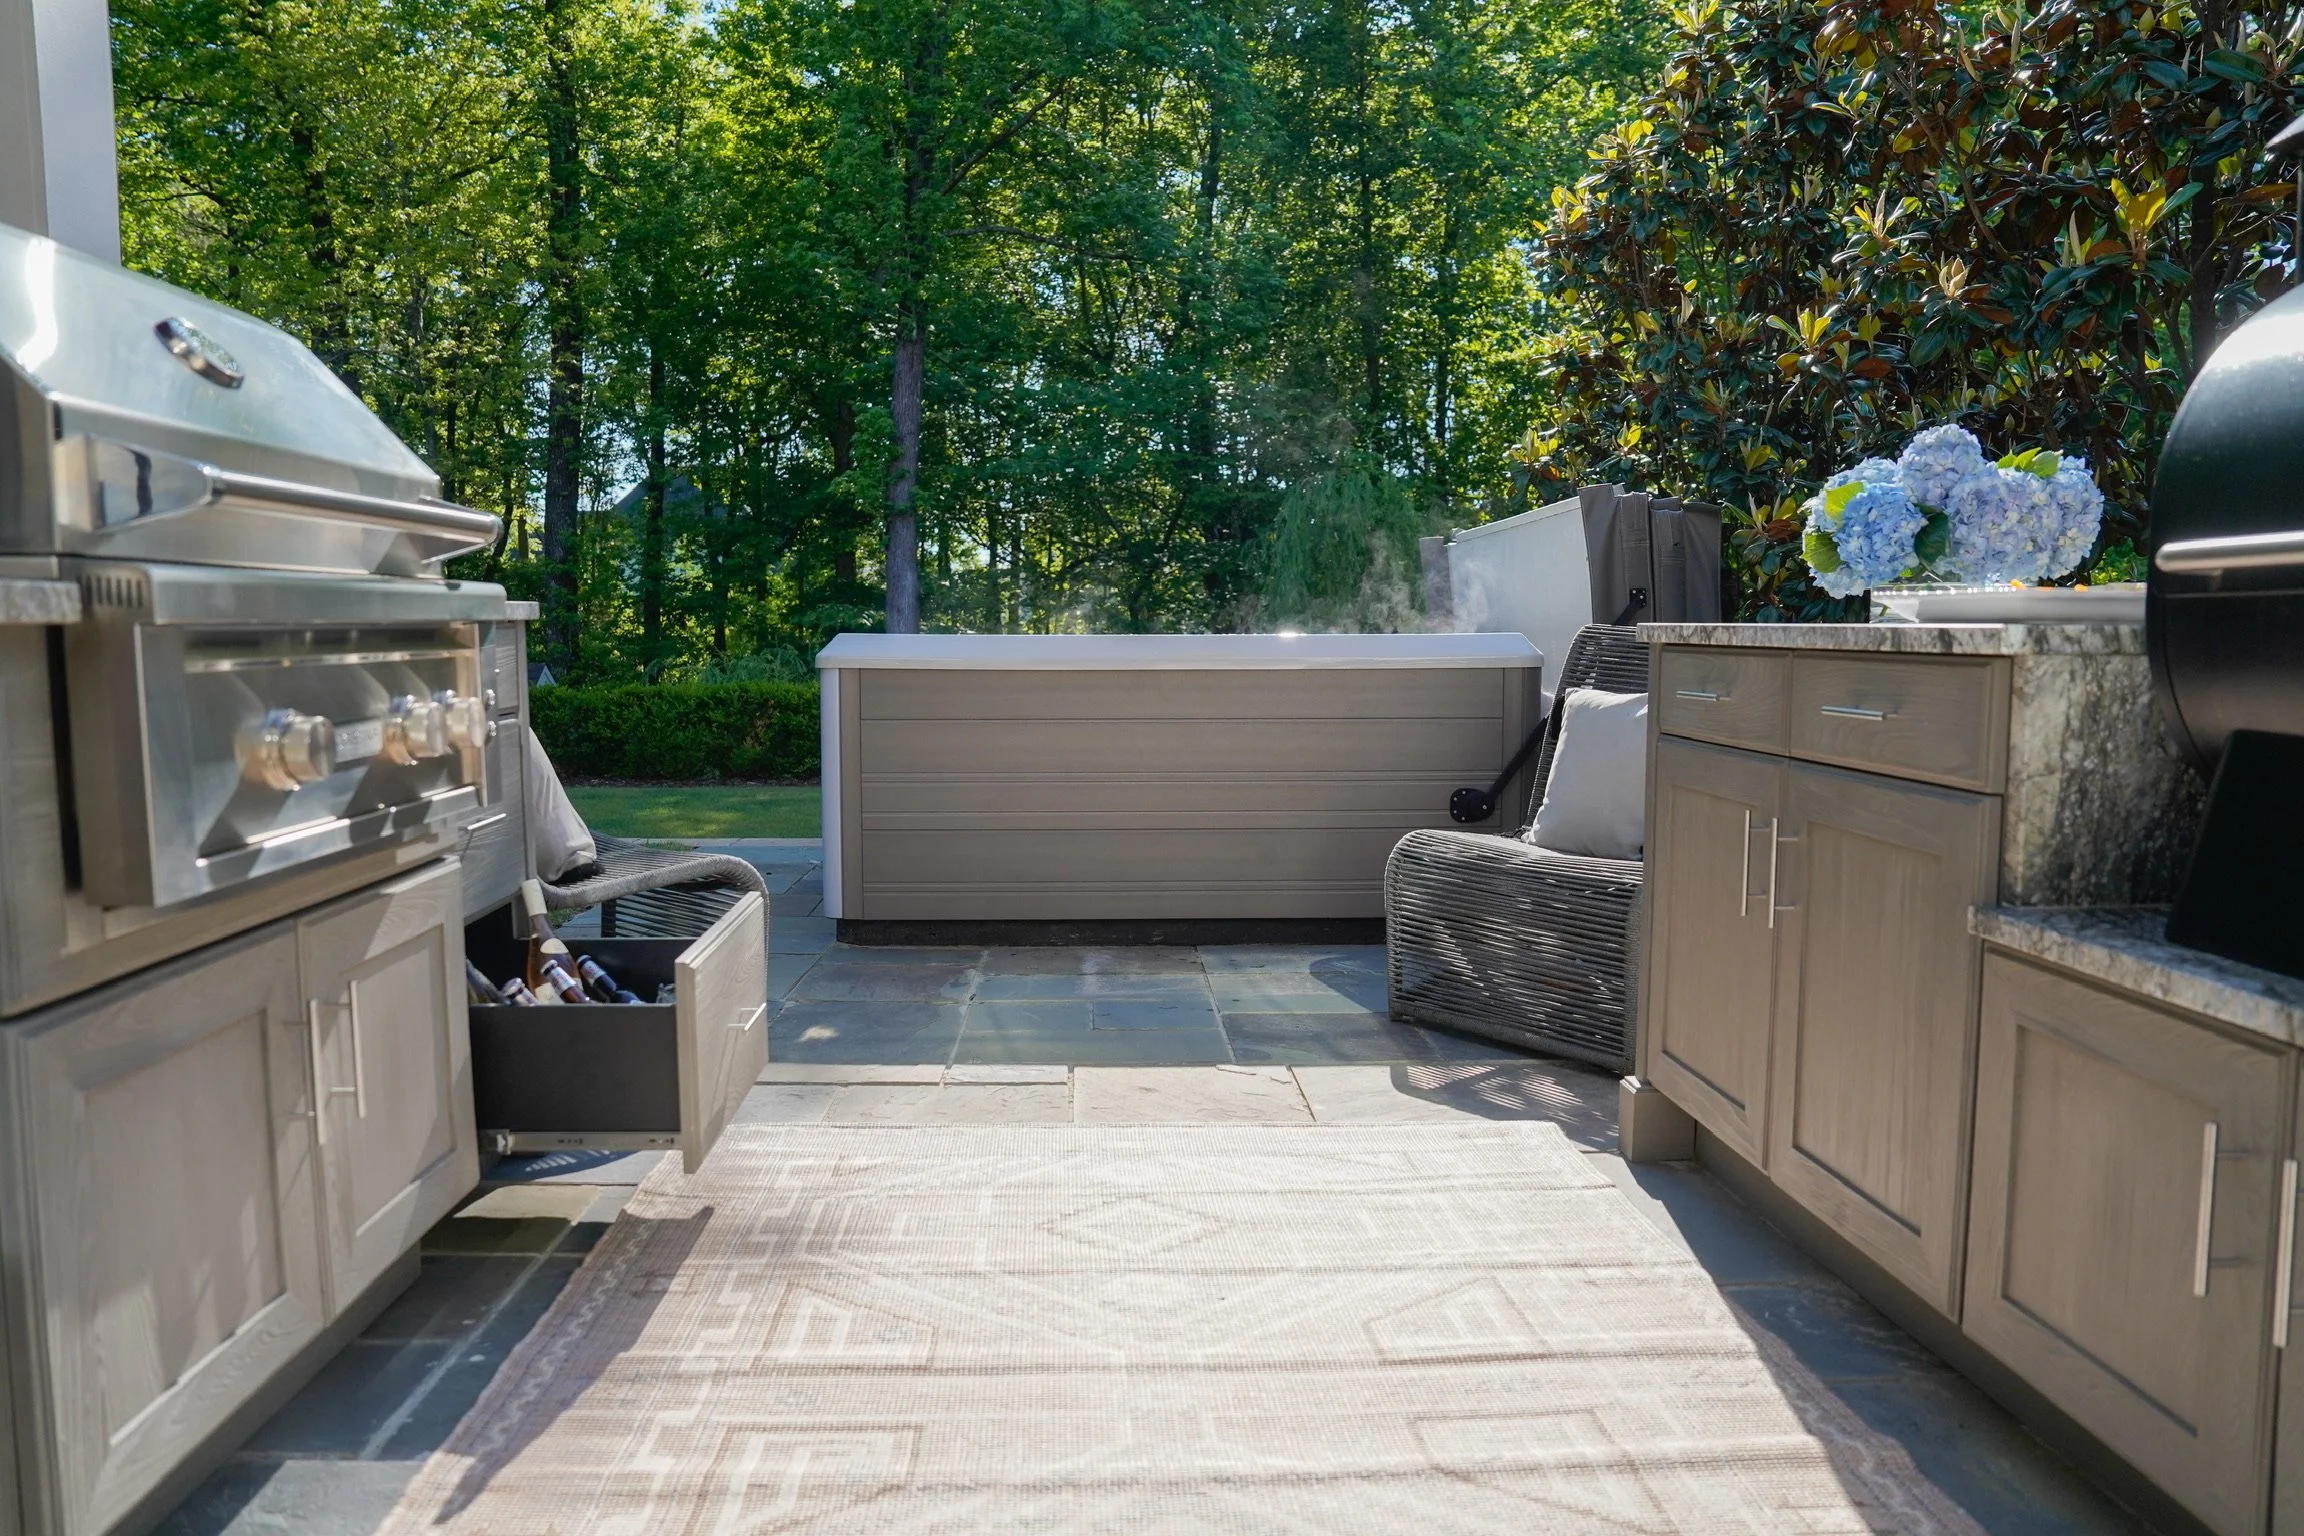
“This design brilliantly zones the patio into distinct areas for cooking and relaxation without building a single wall.”
The light grey wood cabinetry of the kitchen area feels clean and modern, while the adjacent hot tub, framed by lush greenery and hydrangeas, creates a dedicated spa-like escape. The patterned outdoor rug under the lounge chairs helps define the seating zone, making the entire space feel cohesive yet multi-functional. It’s the thoughtful layout that allows for both lively entertaining and quiet moments of serenity.
A hot tub is an amazing feature, but be honest about the upkeep. You’re signing up for regular water testing, chemical balancing, and filter cleaning—at least weekly. It will also add to your utility bills, both for heating the water and running the pump. Before you commit, get quotes for the electrical work required, as most hot tubs need a dedicated 220-240V circuit, which can be a significant hidden cost. Also, consider local regulations regarding safety fencing, especially if you have kids or pets.
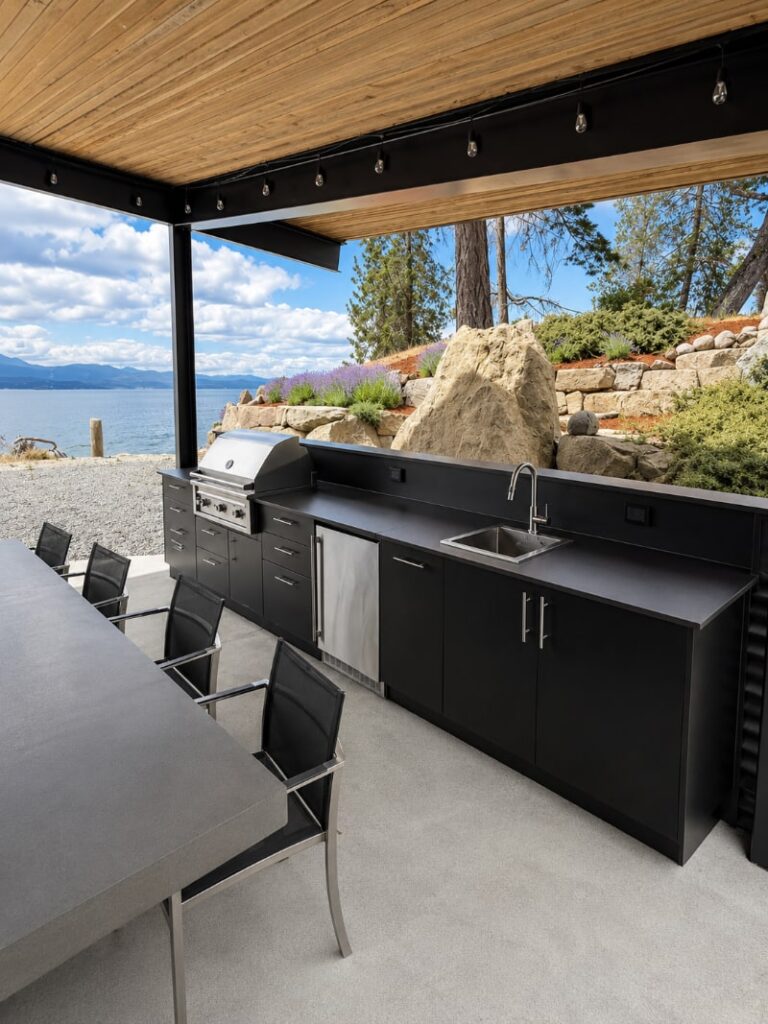
2. Sleek Matte Black Outdoor Kitchen Overlooking a Lake
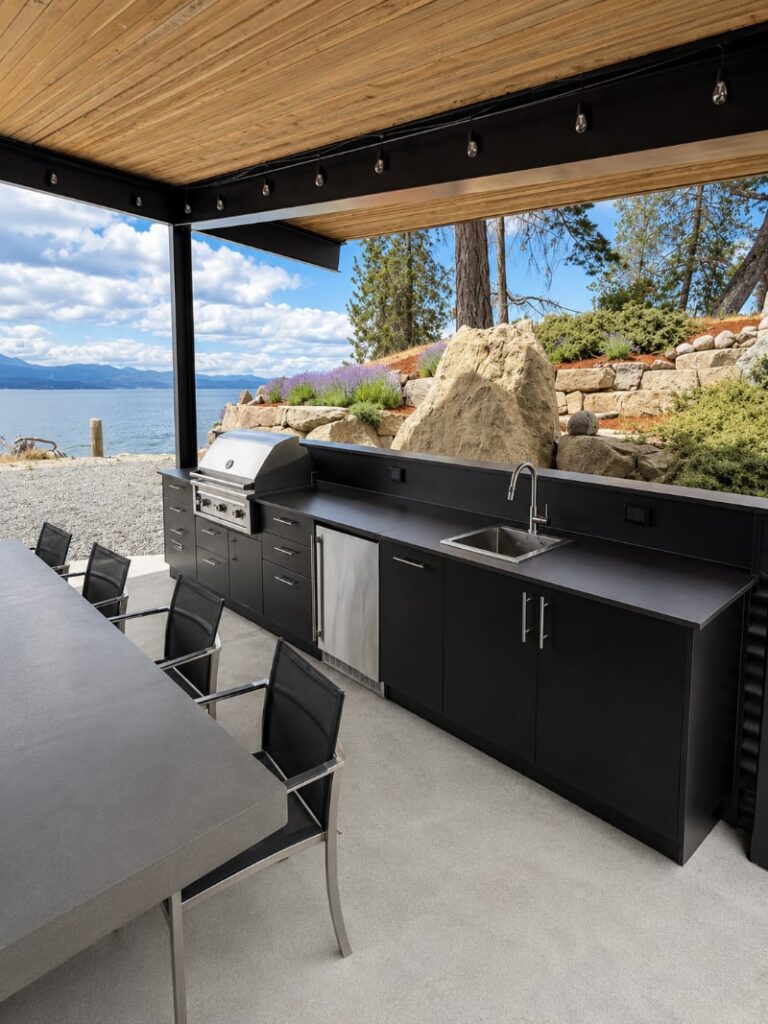
“When using a dominant dark color like matte black, texture is everything.”
Notice how the sleekness of the cabinetry is balanced by the natural grain of the wooden slatted ceiling and the subtle texture of the concrete-style dining table. To prevent a black kitchen from feeling like a void, ensure you have plenty of warm, layered lighting. The overhead string lights here are crucial; they add a soft, inviting glow that reflects beautifully off the stainless steel appliances and prevents the space from feeling cold or intimidating at night.
The visual recipe here is a lesson in modern minimalism. Think: 60% matte black surfaces (cabinetry, chairs) + 25% natural textures (wood ceiling, scenic view) + 15% metallic and industrial accents (stainless steel grill, sink, grey dining table). If you wanted to change the vibe, you could swap the matte black for a deep navy or forest green. The key is to keep the high-contrast formula, pairing your dominant dark color with the warmth of wood and the clean lines of metal for a balanced, sophisticated look.
3. Seamless Indoor-Outdoor Flow with a Marble Waterfall Island
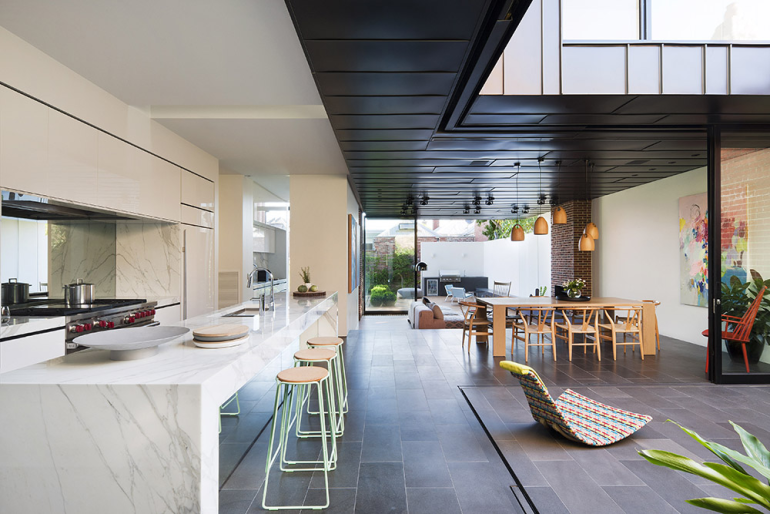
“The single most important element in this space is the continuous dark grey floor tile.”
It flows uninterrupted from the indoor kitchen to the outdoor patio, visually erasing the boundary between inside and out. Without this flooring choice, the two areas would feel separate. With it, the entire space becomes one large, cohesive entertaining zone. This trick makes both the kitchen and the patio feel significantly larger and more integrated, creating that coveted indoor-outdoor lifestyle so many of us are after.
This kind of seamless transition works best in homes where you can create a wide opening, typically 12 feet or more, using large sliding or bifold doors. The effect is most dramatic with a minimum ceiling height of 9 feet to enhance the sense of openness. For this to feel truly expansive, your indoor kitchen/dining area should be at least 15 feet deep, and the adjoining patio should have a minimum depth of 10 feet. Anything smaller might make the transition feel more like a doorway than a unified space.
4. A Rustic Covered Patio with a Stone Fireplace and Pergola
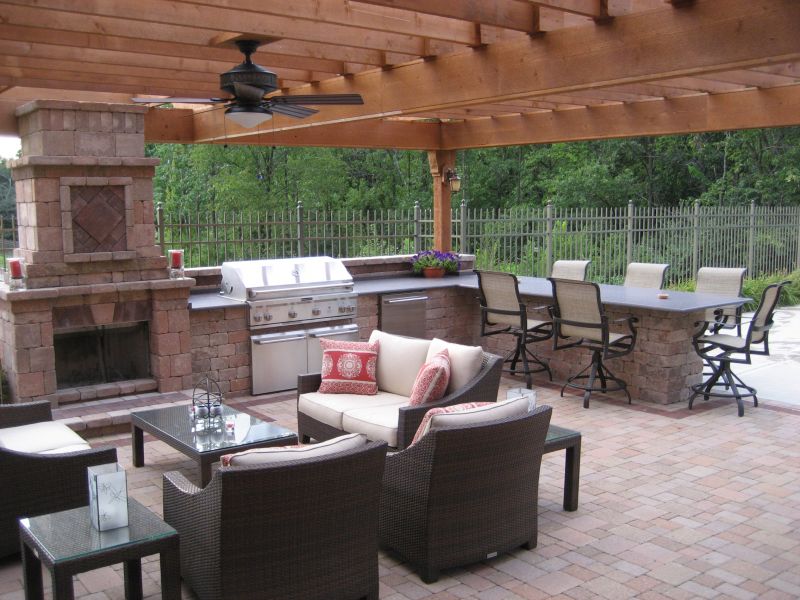
“Recreating this substantial stone-and-wood setup is a significant investment.”
Here’s a rough estimate for a professionally installed project:
- Main Structure (Pergola & Roof): $8,000 – $15,000
- Stone Fireplace & Kitchen Island Masonry: $10,000 – $20,000
- Appliances (Grill, etc.): $2,000 – $5,000
- Furniture & Decor (Wicker set, stools): $2,500 – $4,500
- Paver Flooring: $3,000 – $6,000
- TOTAL: $25,500 – $50,500
Budget alternative: Use a pre-fabricated pergola kit, a fire pit instead of a fireplace, and a standalone grill. Source wicker furniture from Target or Facebook Marketplace to get a similar vibe for around $9,000 – $15,000.
Get that cozy, layered pergola look in a weekend. Time: 4-6 hours. Cost: $100-$300.
- Start with a clean pergola structure. Pressure wash it if needed.
- Measure the interior sections of your pergola’s roof. Purchase outdoor-rated string lights with enough length to swag gracefully across the beams, not pull tightly.
- Install screw hooks on the inside faces of the pergola beams every 3-4 feet. Make sure they’re deep enough to be secure.
- Drape the string lights from hook to hook, allowing for a gentle ‘U’ shape between each point. This looks more relaxed than a straight line.
- Secure the plug end near your outdoor power source. Use an outdoor-rated extension cord if necessary.
5. Luxurious Curved Stone Bar Flanking a Pool with Waterfalls
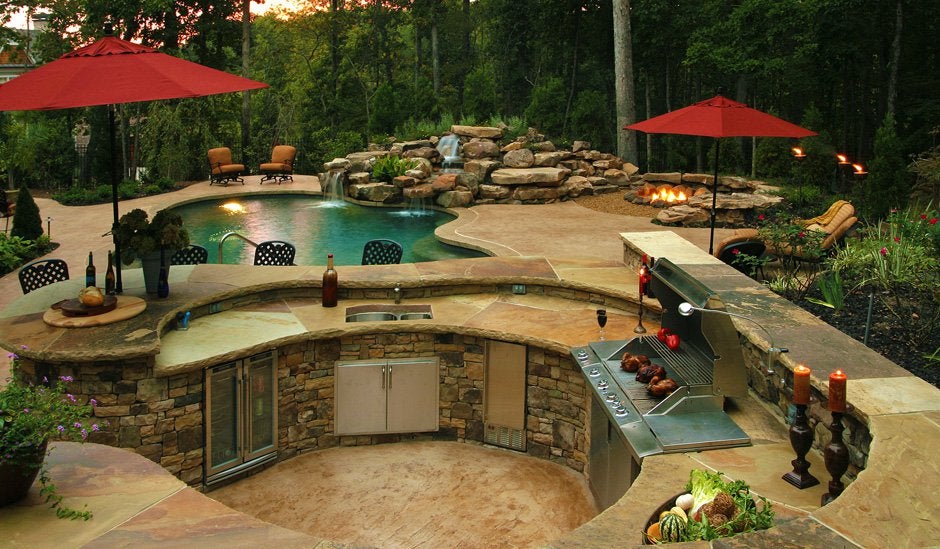
“The genius of this design lies in its use of curves.”
The large, semicircular stone kitchen island gracefully wraps around the patio, creating a natural and inviting hub for socializing. This organic shape softens the hardscaping and mirrors the naturalistic forms of the rock waterfall in the pool. The repetition of curves makes the entire backyard feel harmonious and less rigid. The pop of the bright red umbrellas adds a playful energy and a necessary focal point in a sea of neutral stone and blue water. It feels less like a backyard and more like a private resort.
A natural stone kitchen is gorgeous, but it’s not ‘set it and forget it’. The stone veneer will need to be sealed every 2-3 years to prevent staining from grease, wine, or acidic foods. The grout between the stones can also be a trap for dirt and mildew, requiring a good scrub once a season. Similarly, a rock waterfall feature in a pool looks amazing but can encourage algae growth in its crevices and potentially increase water evaporation. Be prepared for a little extra brushing and chemical monitoring to keep it pristine. For a simpler alternative, see the stacked stone in Idea #10.
6. Modern Outdoor Kitchen with Horizontal Wood Slat Cabinetry
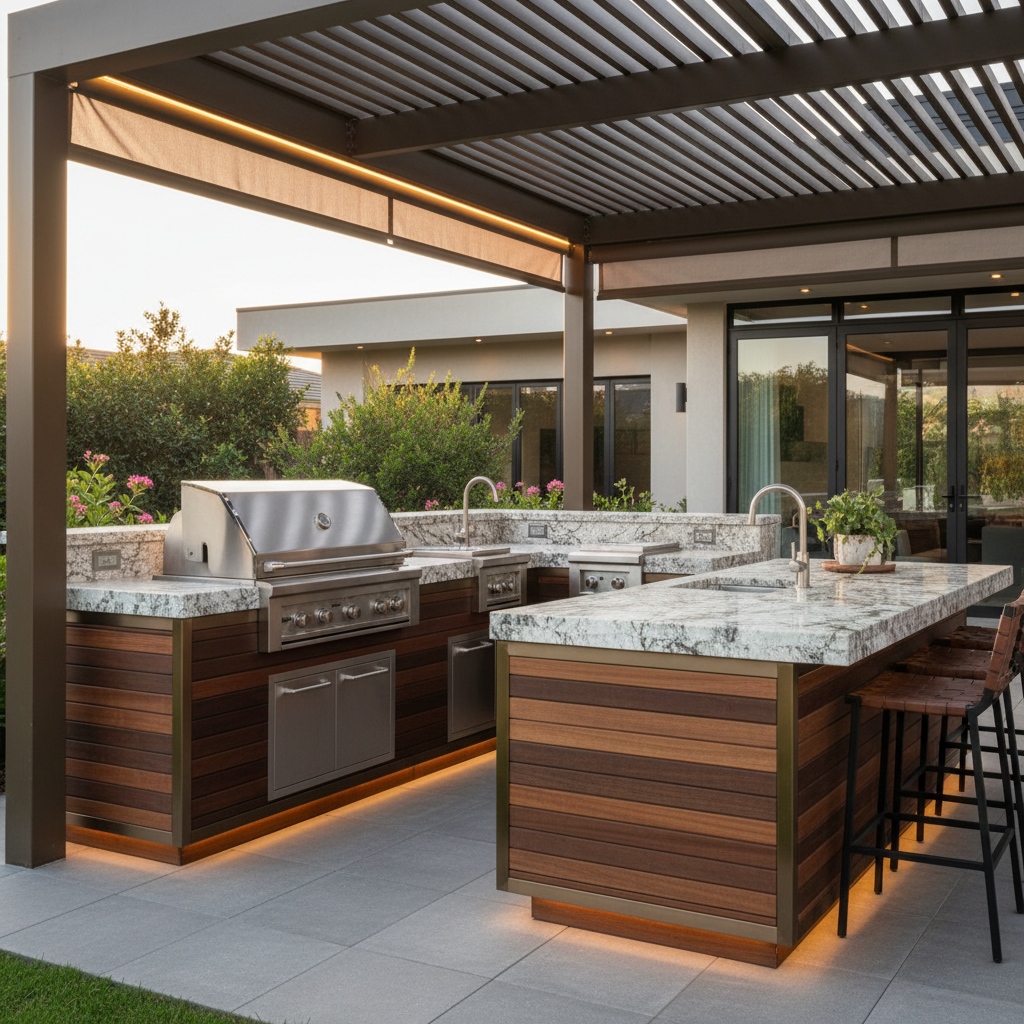
“To keep a wood-slat design looking sleek and not busy, maintain a consistent slat width and spacing.”
Here, the horizontal lines of the wood cabinetry draw the eye outward, making the space feel wider. A crucial detail is the integrated under-cabinet lighting. This not only provides essential task lighting for the countertop but also highlights the rich texture of the wood at night, turning the entire kitchen island into a beautiful feature. Aim for a warm white LED strip (2700K-3000K) for an inviting glow rather than a harsh, blue-toned light.
You don’t need custom cabinetry to achieve this style. Start with a basic outdoor kitchen frame kit (around $800-$1500 online). Instead of expensive Ipe wood, use pressure-treated pine or cedar slats, which you can stain to your desired color (Material cost: $300-$500). For the countertop, look for a large-format porcelain paver from a big-box store instead of a custom-poured stone slab. Find minimalist metal barstools from IKEA or Target for under $100 each. The whole setup could be DIY’d for under $3,000 if you’re handy.
7. Creating Evening Ambiance with an Illuminated Stone Kitchen
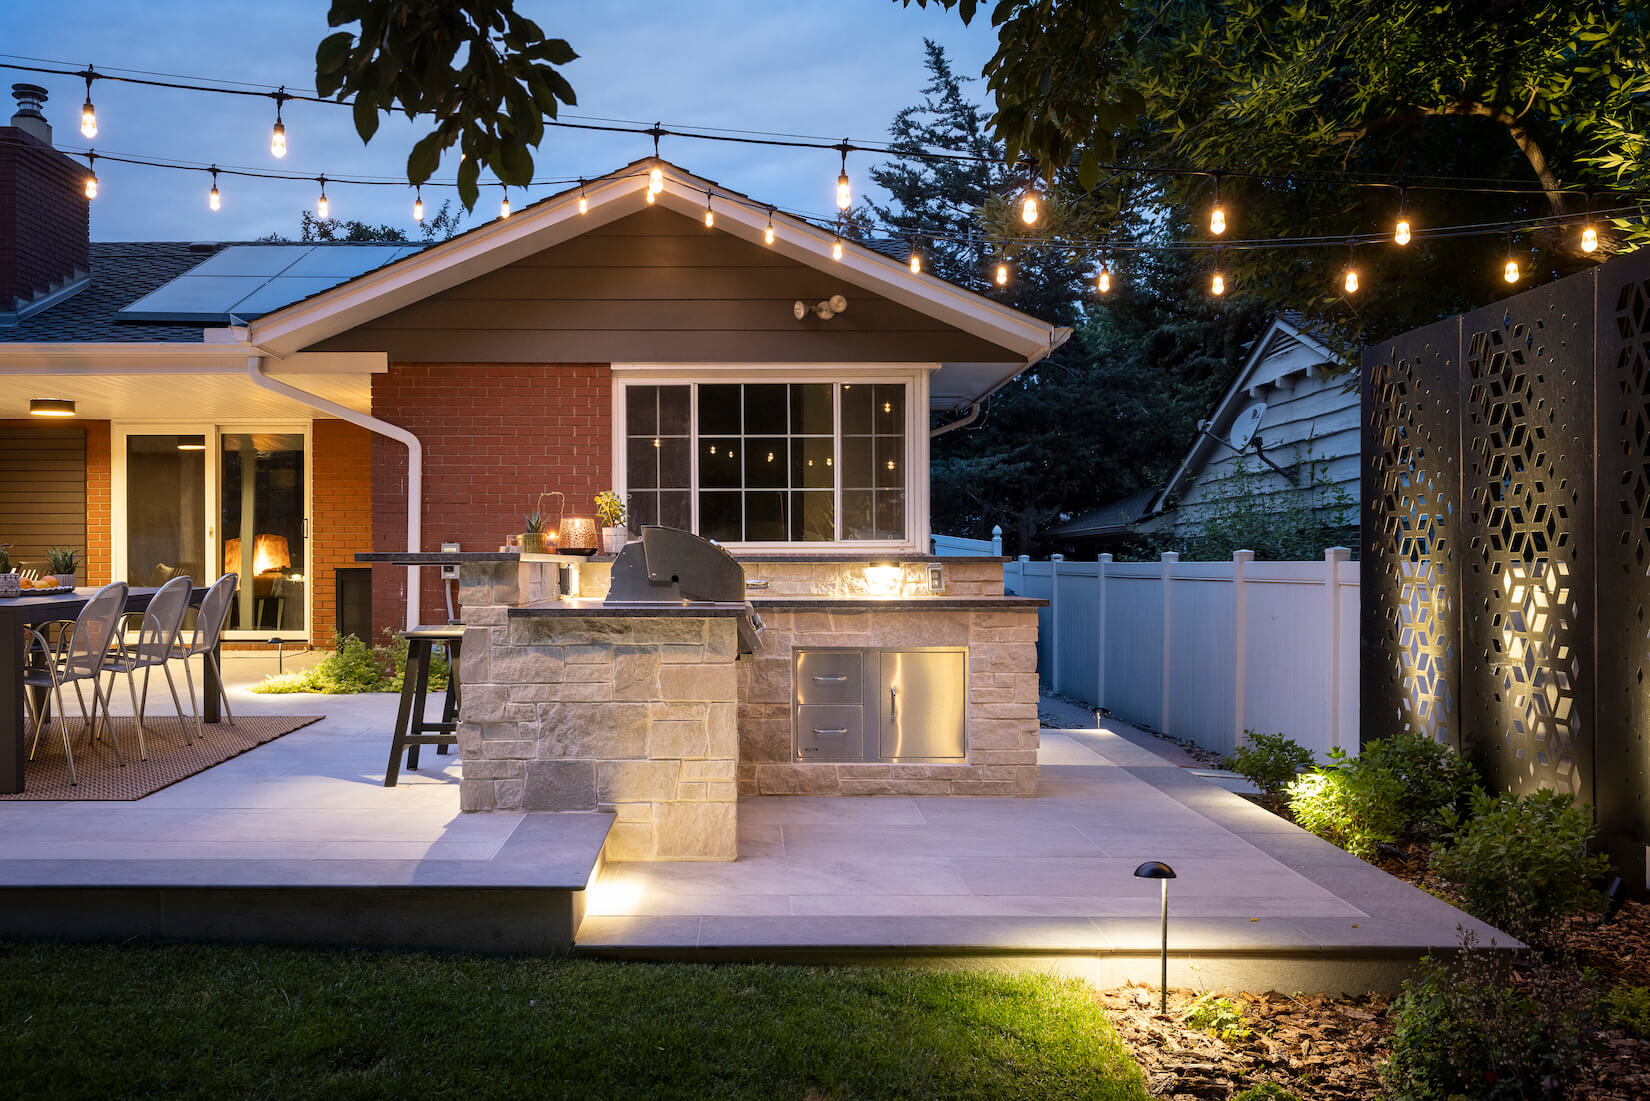
“Achieve a layered lighting scheme for your patio.”
Time: 1 day. Cost: $400-$900 (for a contractor or advanced DIY).
- Ambient Layer: Start with overhead string lights. These provide the main, soft, general illumination. Choose warm white, dimmable bulbs for flexibility.
- Task Layer: Install low-voltage hardscape lights directly under the countertop lip of your kitchen island. This illuminates the front of the stone and provides light for anyone standing there, without creating glare.
- Accent Layer: Use small, adjustable spotlights aimed at key features like the decorative privacy screen or a beautiful plant. This creates depth and visual interest.
- Safety Layer: Integrate LED strip lights into stair risers or along the edge of the patio. This is critical for preventing trips and defining the space’s boundaries after dark.
It’s all about the lighting. Take away the layers of warm light—the overhead string lights, the under-counter glow, the step lights—and this is just a nice patio. But with the lighting, it becomes magical. It’s what transforms a functional cooking space into an inviting outdoor room you want to linger in long after dinner is over. The lighting scheme here is doing more work than any other single design element to create that cozy, high-end, evening-ready atmosphere. This is proof that your lighting budget is just as important as your grill budget.
8. A Grand Covered Kitchen with Rustic Stone Pillars
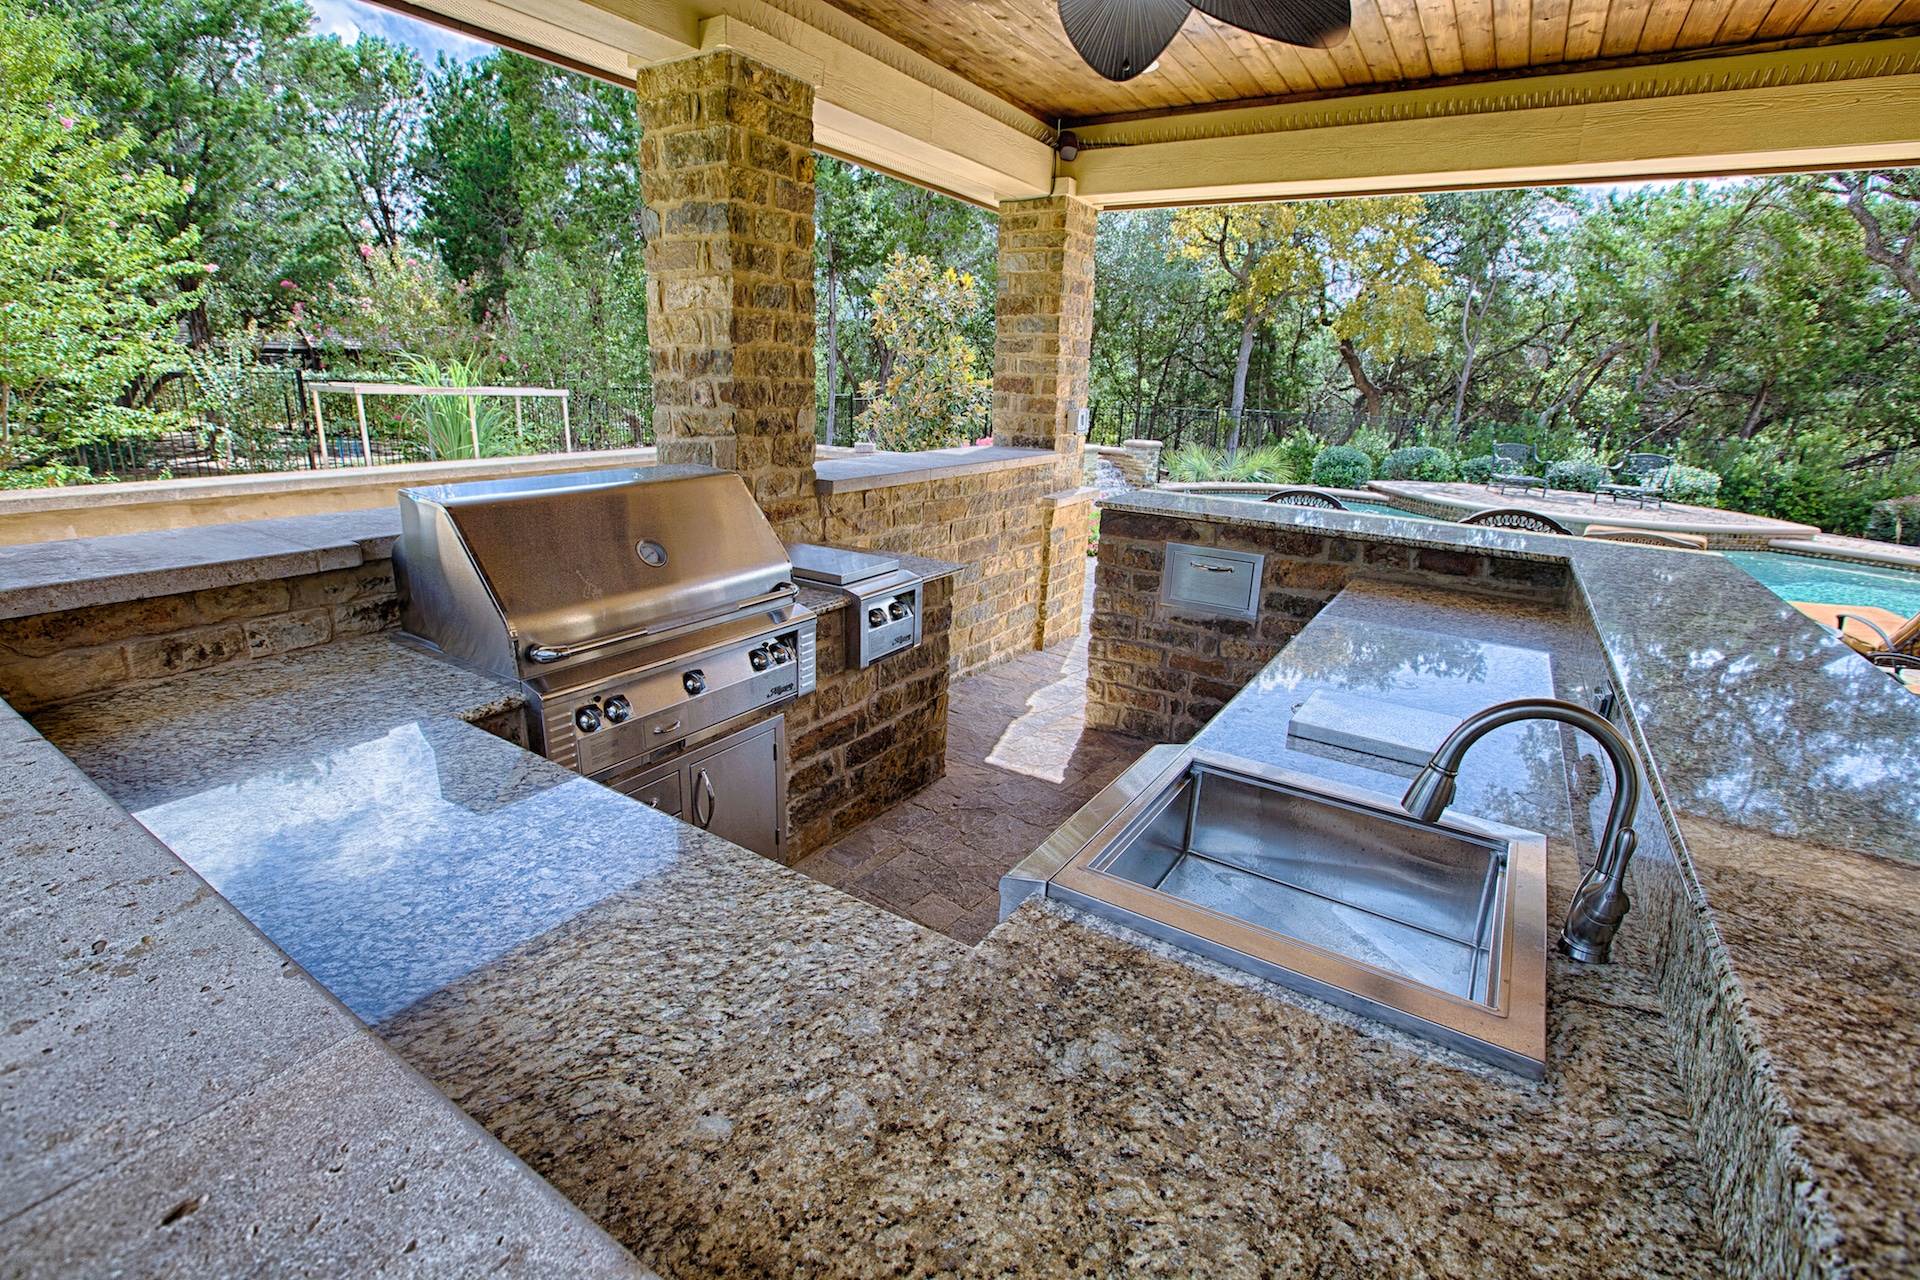
“This look is a perfect blend of rugged and refined.”
The formula is: 50% Rustic Elements (chunky stone pillars, wood-paneled ceiling) + 30% Sleek Finishes (polished granite countertops, stainless steel appliances) + 20% Open Airiness (high ceiling, no walls). The warmth and texture of the stone and wood keep the space from feeling like a sterile commercial kitchen, while the gleam of the granite and steel add a touch of modern luxury. It’s a balance that feels substantial and permanent, yet comfortable and welcoming.
Those gorgeous, beefy stone pillars are incredibly heavy. This isn’t a feature you can add to an existing concrete slab patio. A structure like this requires significant concrete footings that go deep into the ground to support the weight of both the pillars and the roof. You’ll need an engineer or a very experienced contractor to design and pour these foundations correctly. Trying to cut corners here could lead to major structural failure down the line. Budget for substantial foundation work from the very beginning.
9. Glossy Dark Gray Cabinets and Crisp White Countertops
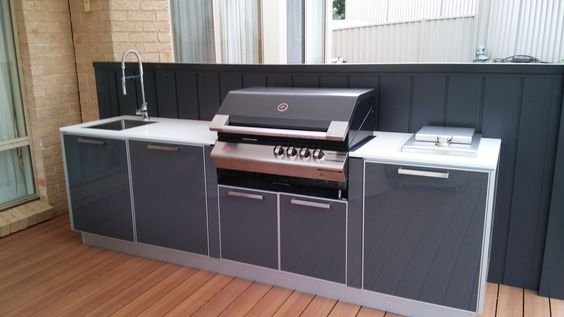
“High-gloss finishes, especially in dark colors like this gray, look incredibly sharp and modern…”
when they’re clean. Be prepared for them to show every single fingerprint, smudge, and speck of dust. If you’re a meticulous cleaner, go for it. If not, you might find yourself constantly wiping them down. A great compromise is a satin or matte finish, which offers a similar modern look with significantly more forgiveness. The clean white countertops are also stunning but will show every crumb and spill, so quick cleanup is key.
To successfully pull off a high-contrast palette like this, stick to a limited number of materials. This kitchen works because it focuses on three main textures: the glossy gray cabinets, the matte white countertop, and the warm wood-plank flooring. The stainless steel acts as a neutral accent. Adding another competing finish—like a busy backsplash tile or a different color of metal—would dilute the clean, powerful statement this combination makes. When your color story is this bold, simplicity in materials is your best friend.
10. Expansive Stone Kitchen and Pergola with Integrated Lighting
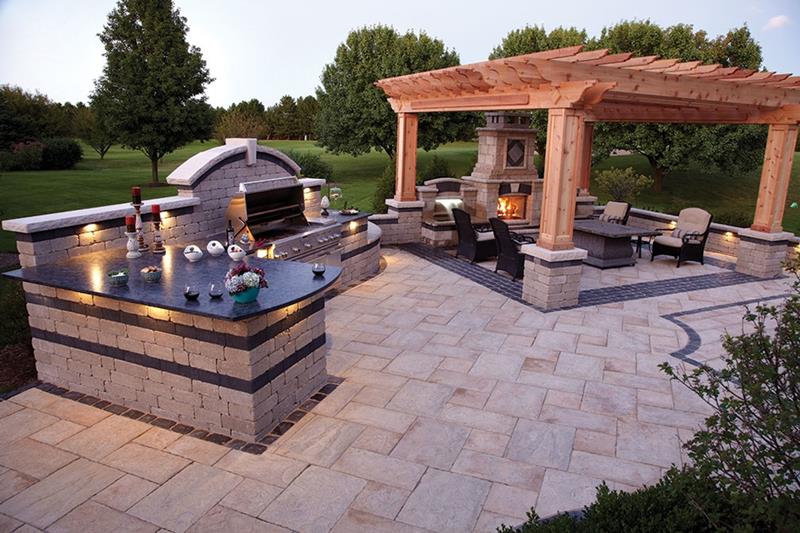
“A multi-zone design like this requires a generous footprint.”
To accommodate the kitchen island, a separate seating area under the pergola, and comfortable walkways between them, you’ll need a patio space that’s at least 25 feet wide and 18 feet deep. The pergola itself should be a minimum of 12×12 feet to comfortably house a fireplace and seating without feeling cramped. This is a design for a substantial backyard, not a narrow side yard. Compare this to the more intimate scale of the patio in Idea #4.
This luxurious, multi-zone patio is a major construction project. The costs reflect the extensive stonework, custom woodwork, and integrated systems.
- Wood Pergola (Large, Custom): $15,000 – $25,000
- Stacked Stone (Fireplace, Kitchen Island): $12,000 – $22,000
- Appliances & Lighting (Grill, Under-Counter Lights): $3,500 – $7,000
- Countertops (Dark Stone Slab): $4,000 – $8,000
- Paver Patio Flooring: $5,000 – $9,000
- TOTAL: $39,500 – $71,000
Budget alternative: Use a smaller, pre-fab pergola kit, cultured stone veneer (which is lighter and cheaper to install), and a standalone grill to capture the essence for $15,000 – $25,000.
11. A Covered Stone Kitchen with a Green Egg and Wooden Dining Set
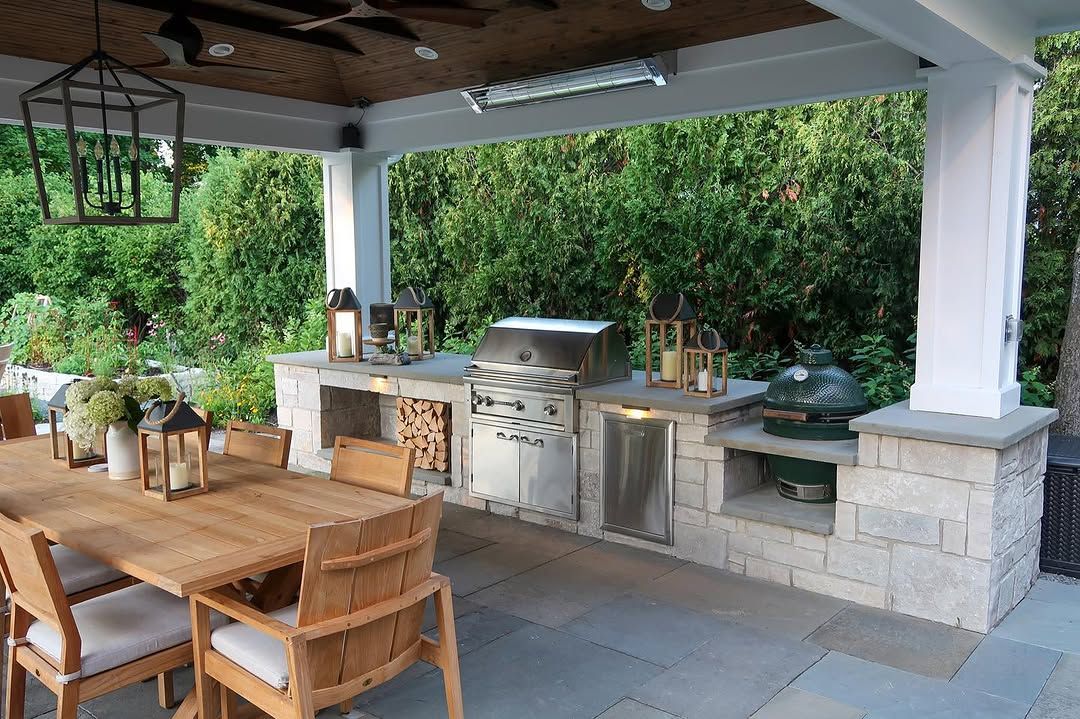
“This space feels so inviting because it successfully merges rustic charm with clean, modern lines.”
The light gray stone veneer on the kitchen counter provides texture and an earthy feel, but its clean, rectangular form keeps it from looking dated. This is beautifully contrasted with the warm, smooth wood of the large dining table and the dark wood-paneled ceiling. The pop of emerald from the ceramic grill adds a necessary splash of color and personality, acting as a functional art piece. The geometric pendant light reinforces the modern edge.
The inclusion of a Kamado-style ceramic grill (like this Big Green Egg) is a huge trend for 2026. Homeowners are moving beyond simple gas grills and embracing more versatile cooking methods like smoking, baking, and slow-roasting outdoors. Designing a dedicated, built-in spot for a ceramic cooker shows a commitment to serious outdoor cooking. It signals that the outdoor kitchen isn’t just for flipping burgers; it’s a true extension of the indoor culinary space, ready for more ambitious recipes and all-day cooking projects.
12. A Multi-Tiered Stone Patio with a Bold Orange Shade Sail
Before You Start Checklist
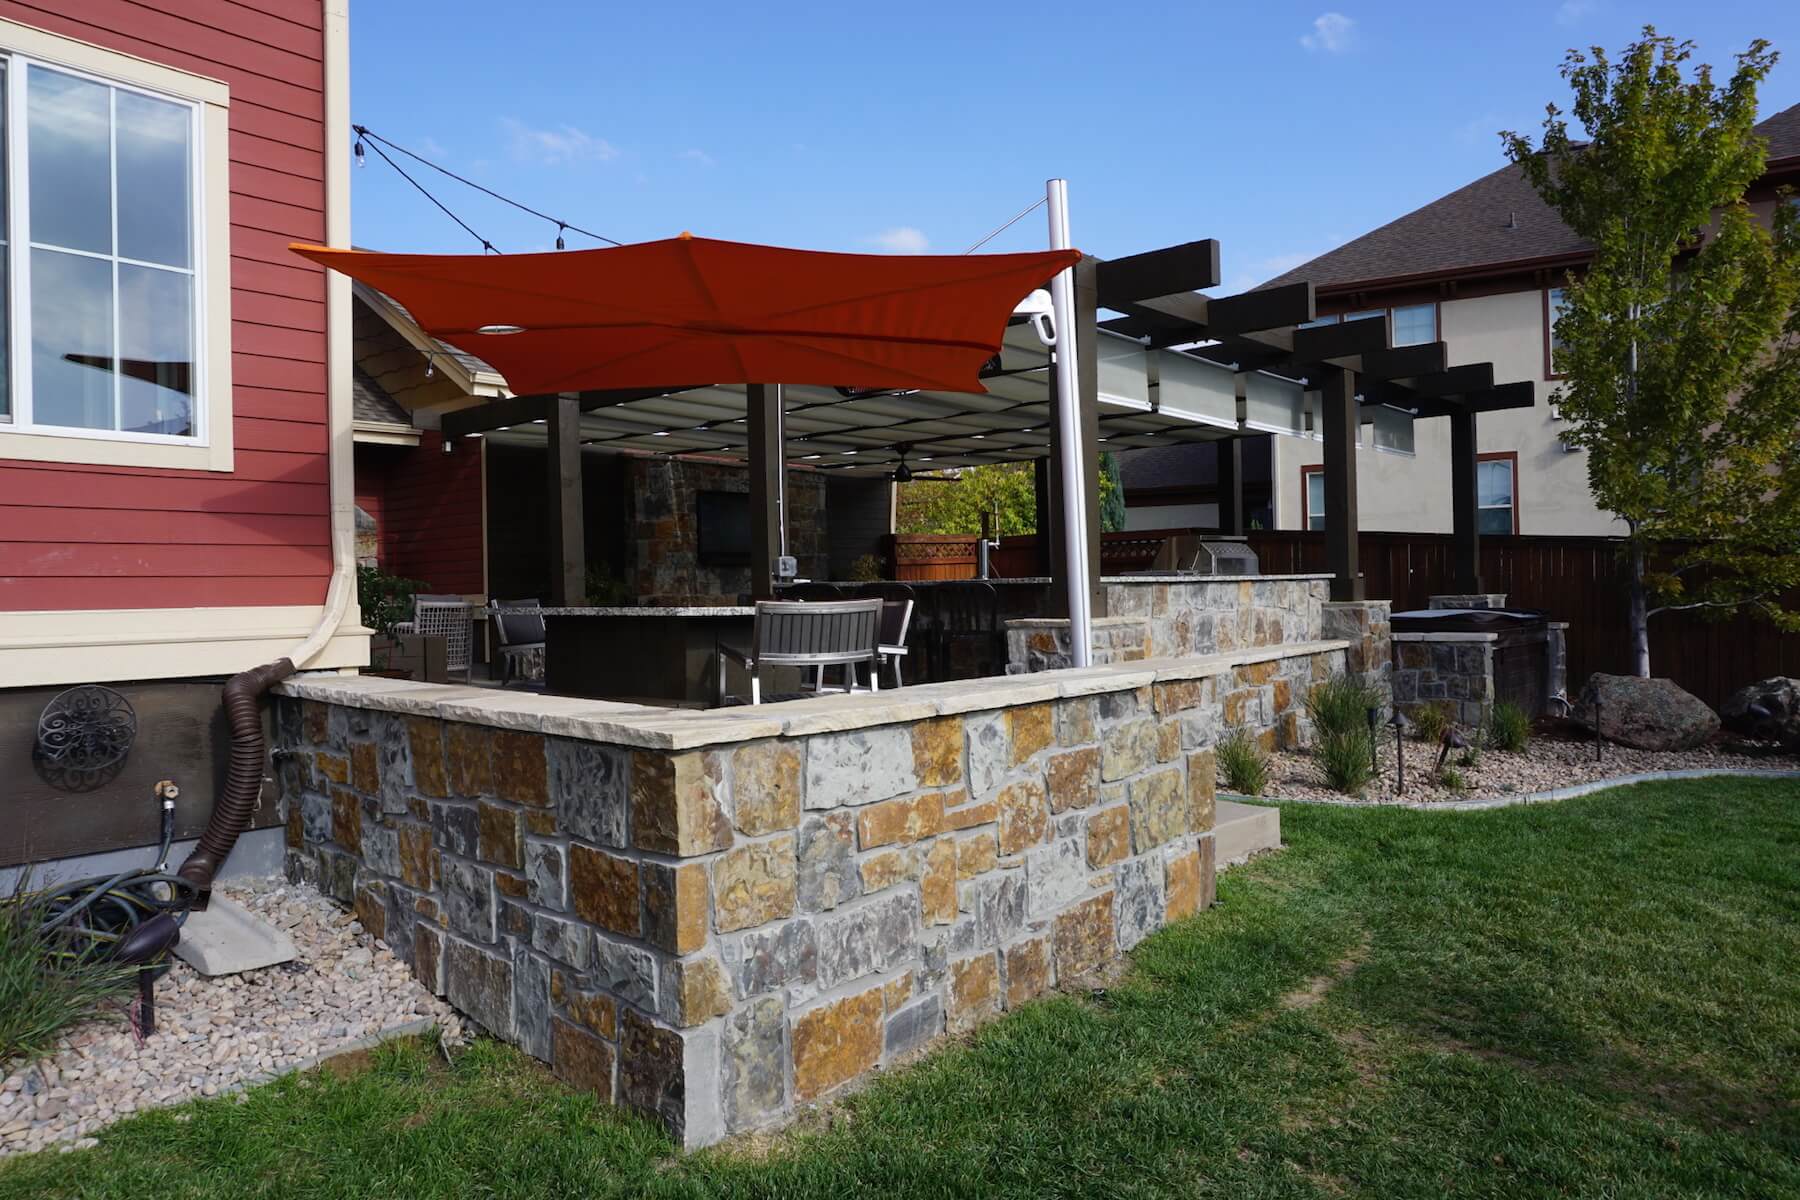
“A tiered patio and shade sail require careful planning.”
Tick these boxes first:
- Measure Your Slope: Do you have a natural slope to work with? Building retaining walls on a flat yard is possible but much more expensive. Measure the total drop in elevation across the area.
- Check Sun Path: Track where the sun is at different times of the day. A shade sail is most effective when positioned to block the harshest afternoon sun. Where will the shadows fall at 5 PM?
- Verify Anchor Points: A shade sail needs extremely strong anchor points to handle wind load. Do you have structurally sound walls or can you install deep-set steel posts (usually 4×4 or larger) in concrete footings?
- Plan for Drainage: Water needs to go somewhere. Ensure your tiered design includes proper drainage to prevent water from pooling on the lower levels or eroding the base of your walls.
The bright orange shade sail is the heart of this design. Without it, you’d have a perfectly nice, functional, multi-level stone patio. But the sail injects a massive dose of personality, energy, and modern style. It’s a sculptural element that provides practical shade while also serving as the primary color accent and focal point. It proves that a single, bold choice can completely define the character of an outdoor space and elevate it from ordinary to unforgettable.
13. Minimalist Concrete Island with Integrated Grill and Bar Seating
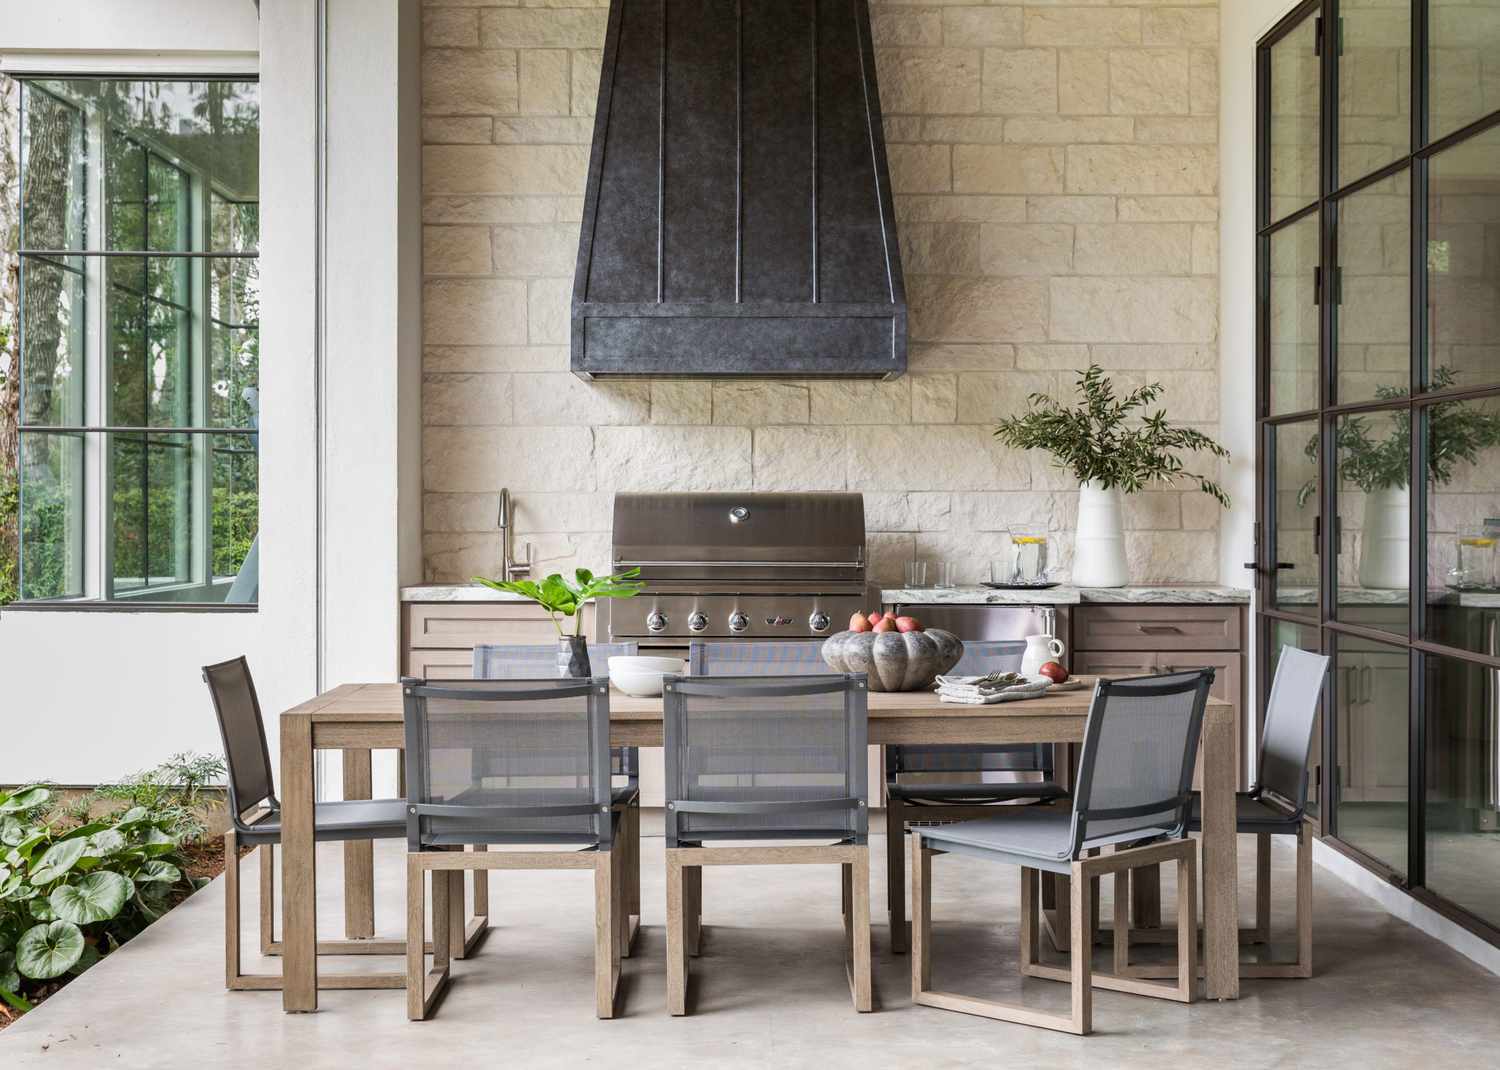
“This look is the definition of contemporary cool.”
The formula is approximately: 70% Monochromatic Industrial Materials (charcoal gray concrete, stainless steel) + 20% Natural Wood Warmth (slatted pergola, dining set) + 10% Softness (beige cushions, ambient lighting). The overwhelming use of cool gray and metal creates a sleek, professional look, while the strategically placed wood elements prevent it from feeling too sterile or cold. The balance is sophisticated and feels very high-end, like a boutique hotel rooftop bar.
Poured-in-place concrete countertops are stunning but not invincible. They are porous by nature and must be sealed properly and regularly (at least once a year) to resist stains from things like oil, red wine, and acidic foods. They can also develop hairline cracks over time as they settle and cure—many designers consider this part of their industrial charm, but if you’re a perfectionist, it might drive you crazy. Be sure to discuss the sealant type and potential for cracking with your contractor before you commit.
14. A Simple Built-In Grill Station with a Lush Garden Backdrop
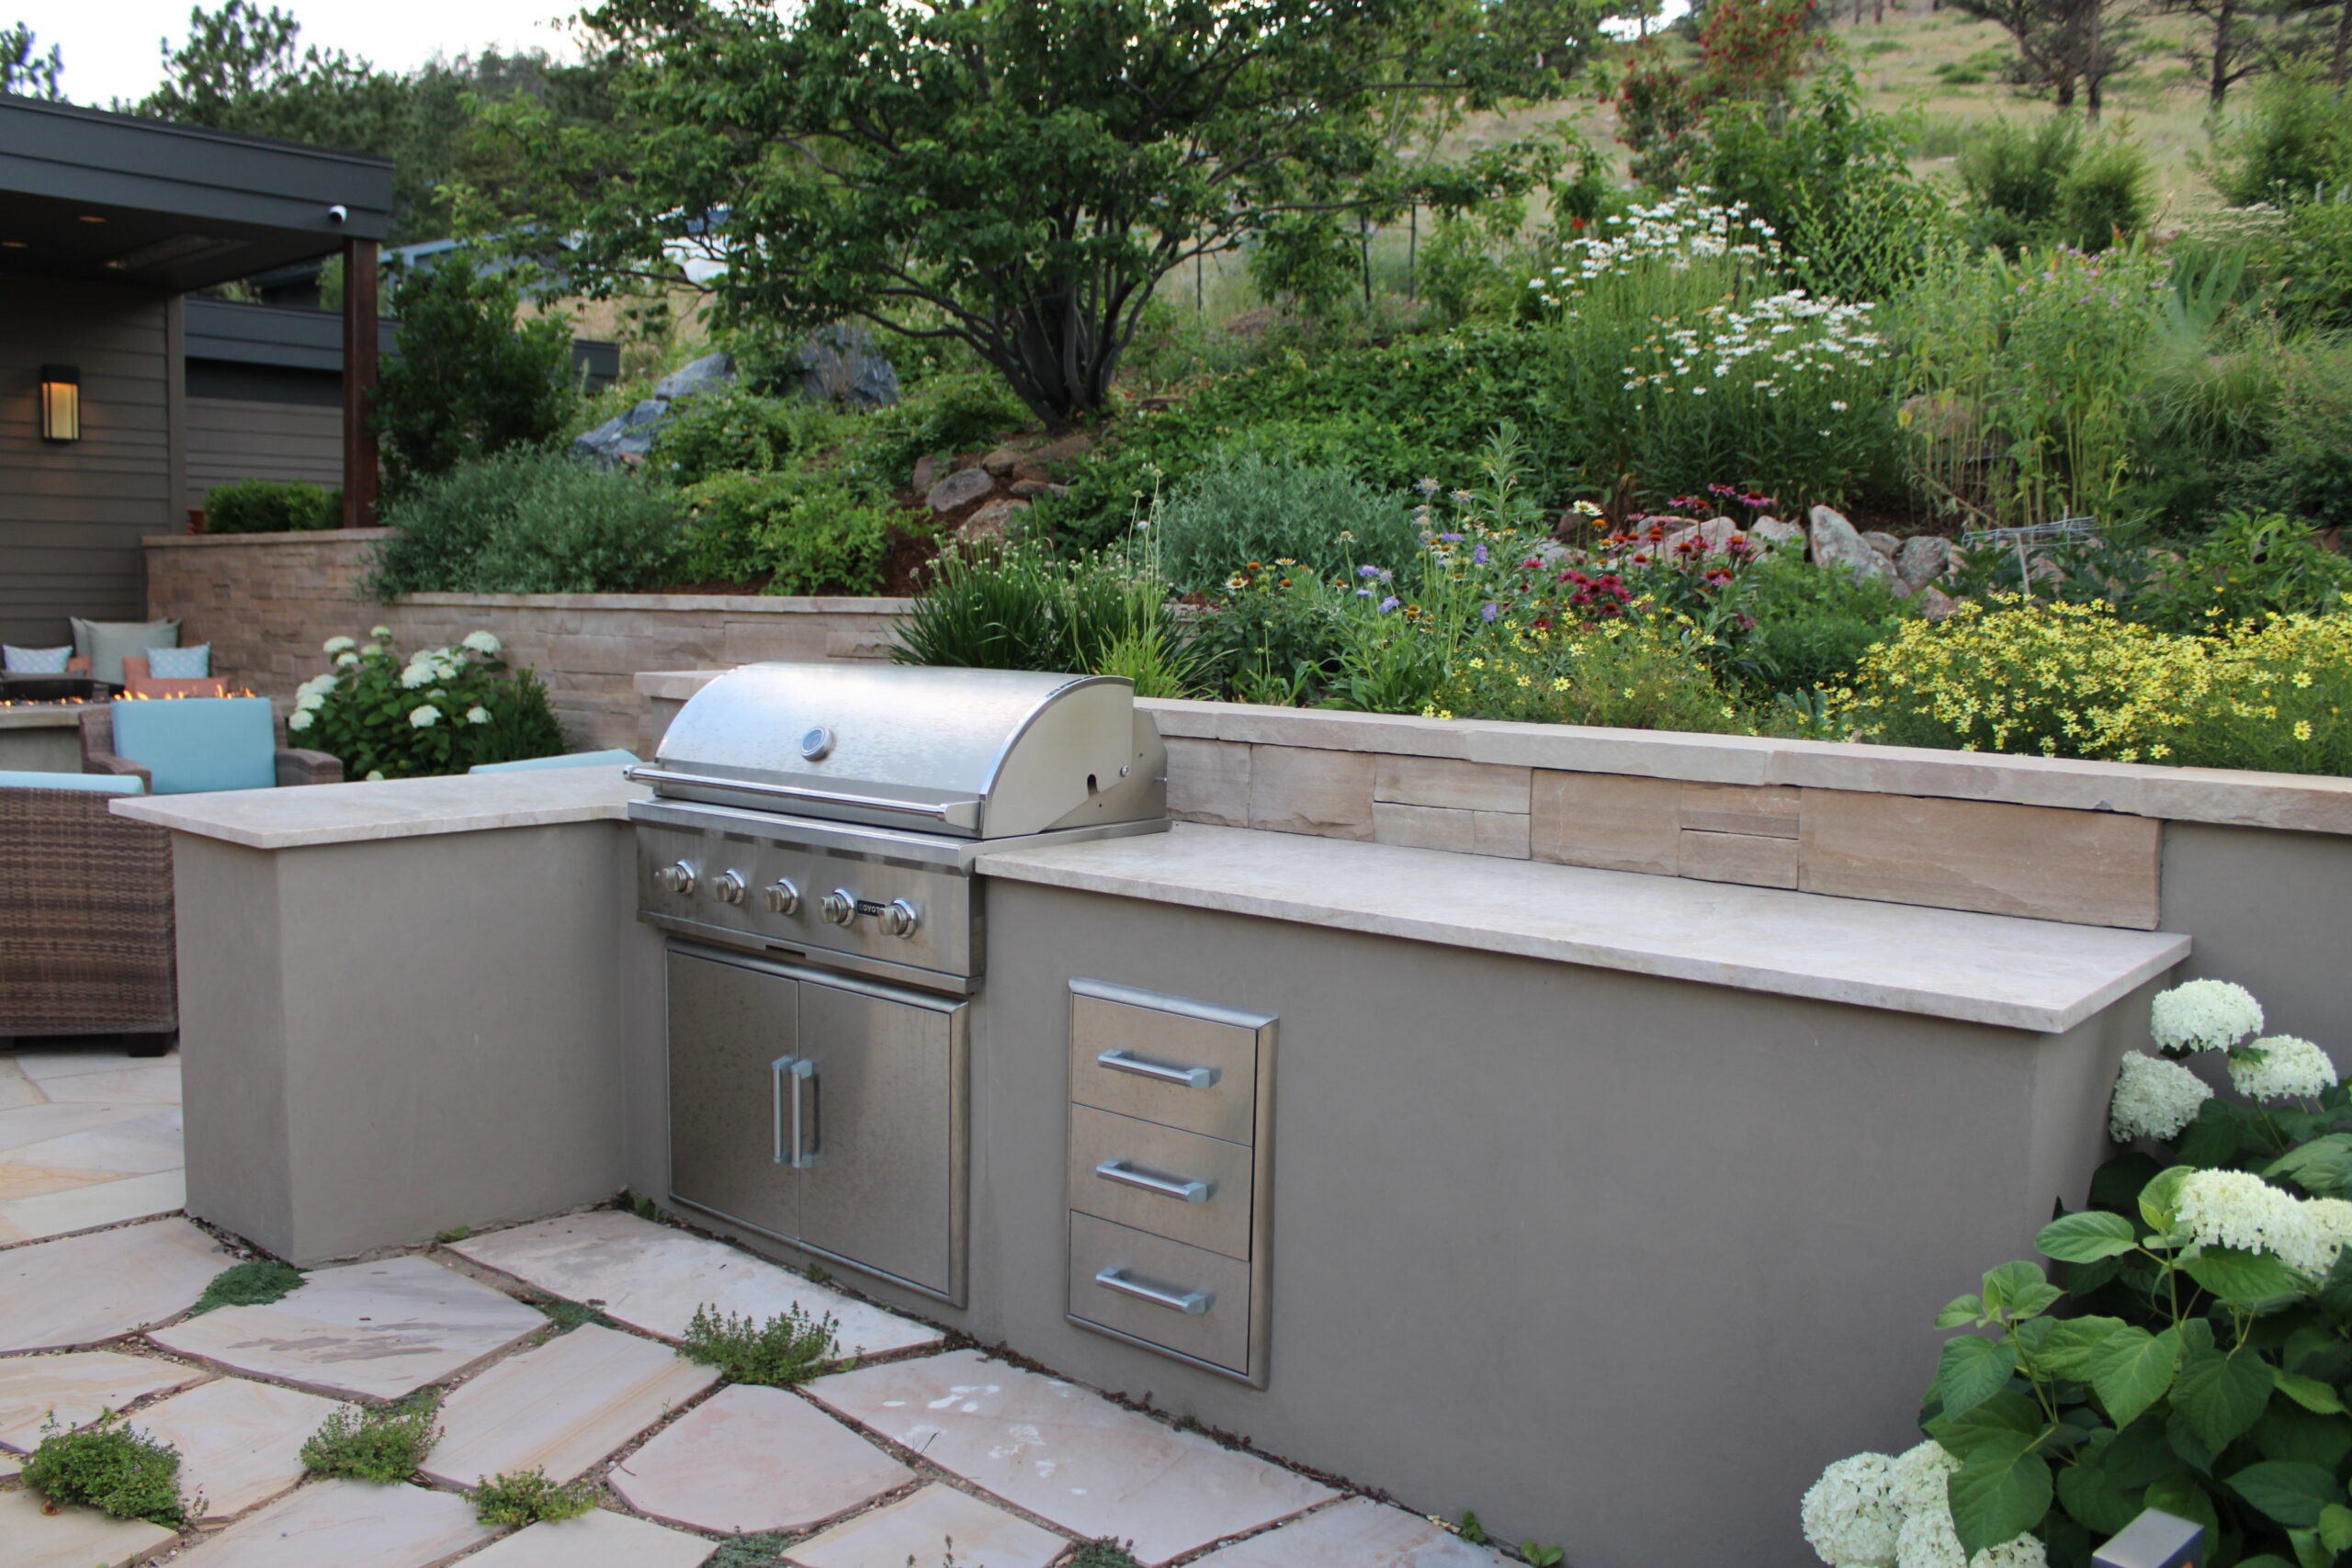
“This is a perfect example of an effective, budget-conscious built-in.”
Instead of a massive, L-shaped island, this is a simple linear station that provides everything you need. You can build the base from concrete blocks and cover it with an affordable stucco finish (Total materials: $400-$700). The real savings come from opting for a high-quality drop-in grill head instead of a full grill unit, and using pre-fabricated stainless steel access doors and drawers. A local stone yard may have remnant pieces for the countertop at a steep discount. This entire setup can be achieved for $3,000-$5,000.
This design’s success comes from its simplicity and integration with the landscape. The clean lines of the gray stucco base and the light stone countertop create a functional, unobtrusive cooking station. It doesn’t try to be the star of the show. Instead, it serves as a quiet, handsome foreground element that allows the beautifully tiered, lush green garden and stacked stone retaining wall behind it to be the real focal point. It’s a smart design that understands when to support the scenery rather than compete with it.
15. Contemporary Covered Barbecue Station with Dark Cabinetry
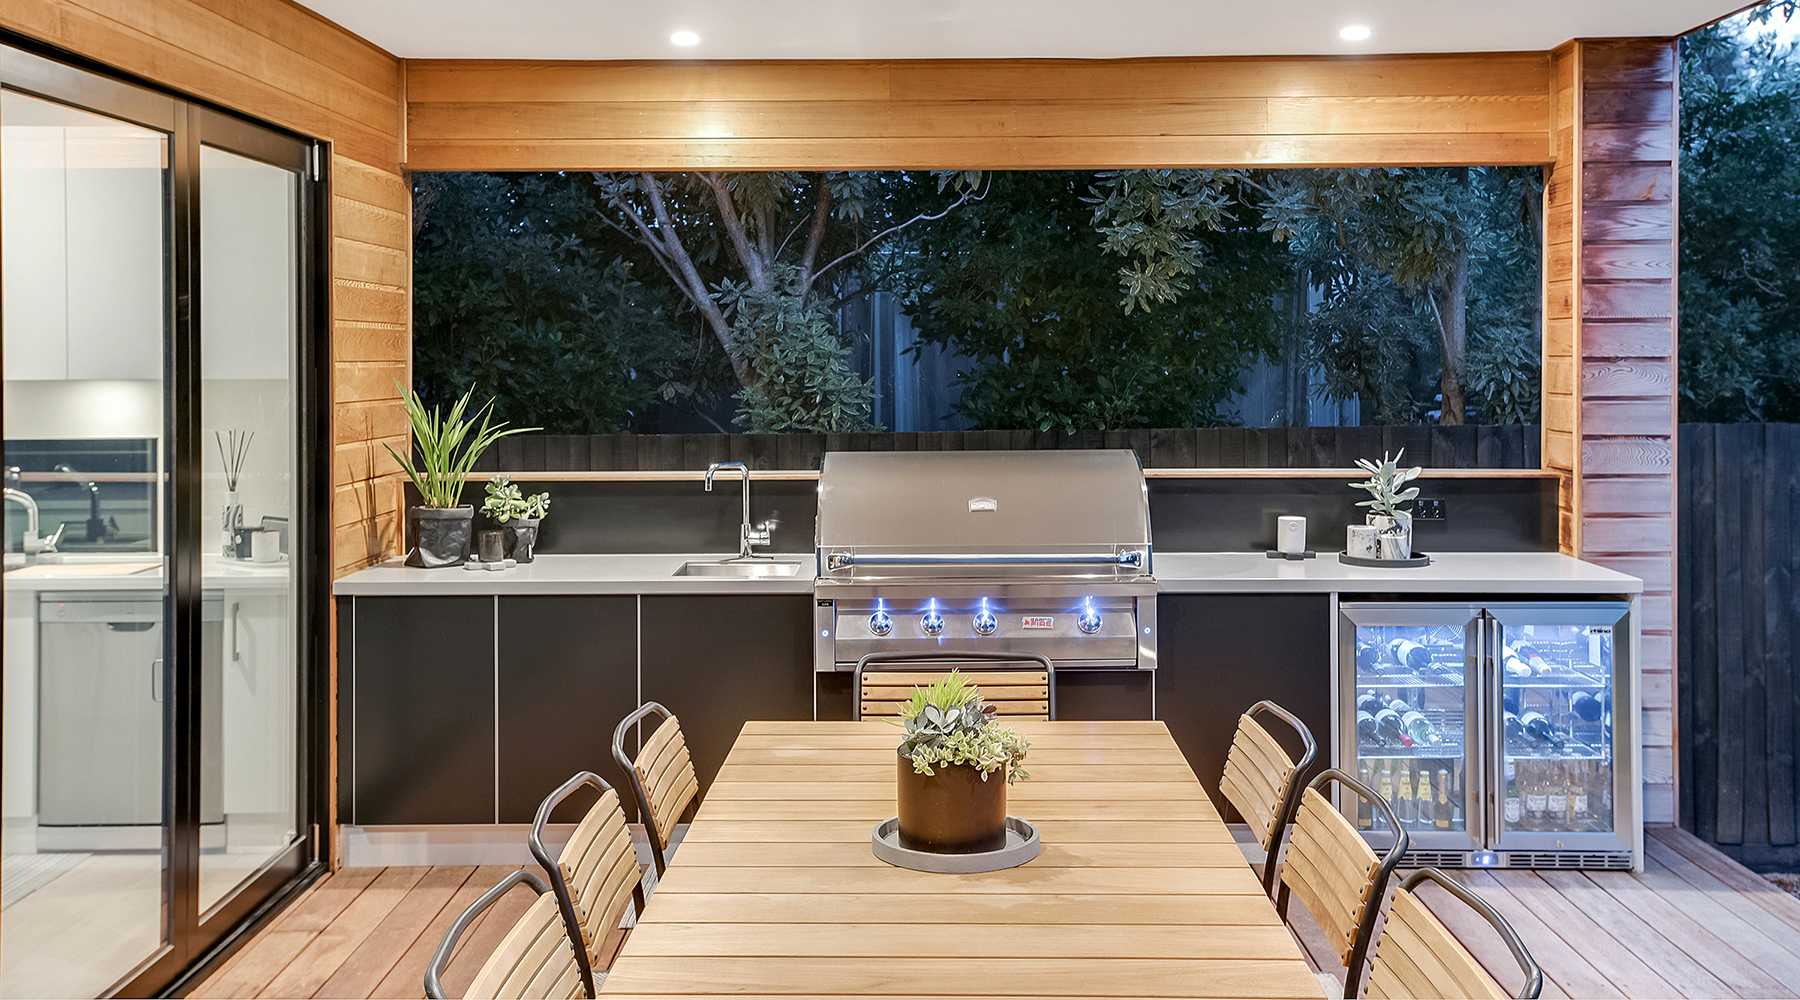
“When designing a covered outdoor kitchen, pay close attention to the ceiling.”
Here, the choice to run the horizontal wood paneling from the eaves down onto the back wall of the cooking station creates a seamless, integrated look. It makes the kitchen feel like it was built with the house, not added on later. The recessed lighting is also key—it’s spaced evenly to provide consistent, task-oriented light across the entire counter without any dark spots, which is crucial for evening cooking and prep.
A linear kitchen under an eave like this is a fantastic space-saver for smaller or narrower patios. The kitchen itself only needs about 2.5 to 3 feet of depth. To comfortably fit the kitchen and an adjacent dining area as shown, your patio should have a minimum depth of 12-14 feet. This allows for the kitchen, a 4-foot walkway, and a 6-foot zone for the dining table and chairs. The length of the kitchen can be scaled to your needs, but a good starting point for a grill, fridge, and prep space is about 10 feet long.
16. Minimalist Gray Modular Kitchen with a Wooden Bar Extension
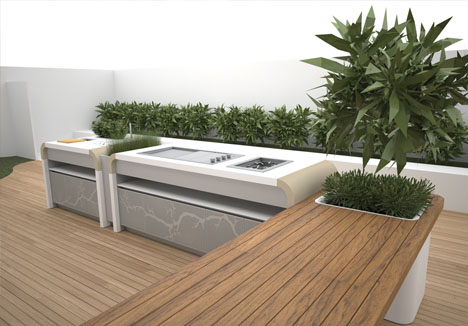
“The integrated slatted wooden bar is the absolute standout feature here.”
It transforms the setup from a simple, sterile cooking station into a warm and social hub. The wood’s warmth provides a beautiful organic contrast to the cool, smooth gray of the modular units and the white countertops. The built-in planter is a genius touch that brings life and softness right into the structure. This bar extension is what makes the design feel inviting, unique, and thoughtfully composed. Compare this minimalist look to the more rugged style of Idea #28.
Create your own built-in planter for an outdoor counter. Time: 2 hours. Cost: $50-$150.
- Choose your location. You’ll need to cut a hole in your countertop, so this is a permanent decision!
- Use a jigsaw with the appropriate blade for your counter material to carefully cut a rectangular opening. Aim for a size that fits a standard plastic planter liner.
- Purchase a rectangular plastic planter liner that is slightly smaller than your hole but has a lip to catch on the countertop edge.
- Drill several drainage holes in the bottom of the liner.
- Drop the liner into the hole. The lip should suspend it neatly within the counter.
- Fill with potting soil and your choice of herbs or a graphic plant like sansevieria.
17. Cozy Covered Patio with a TV Over the Stone Fireplace
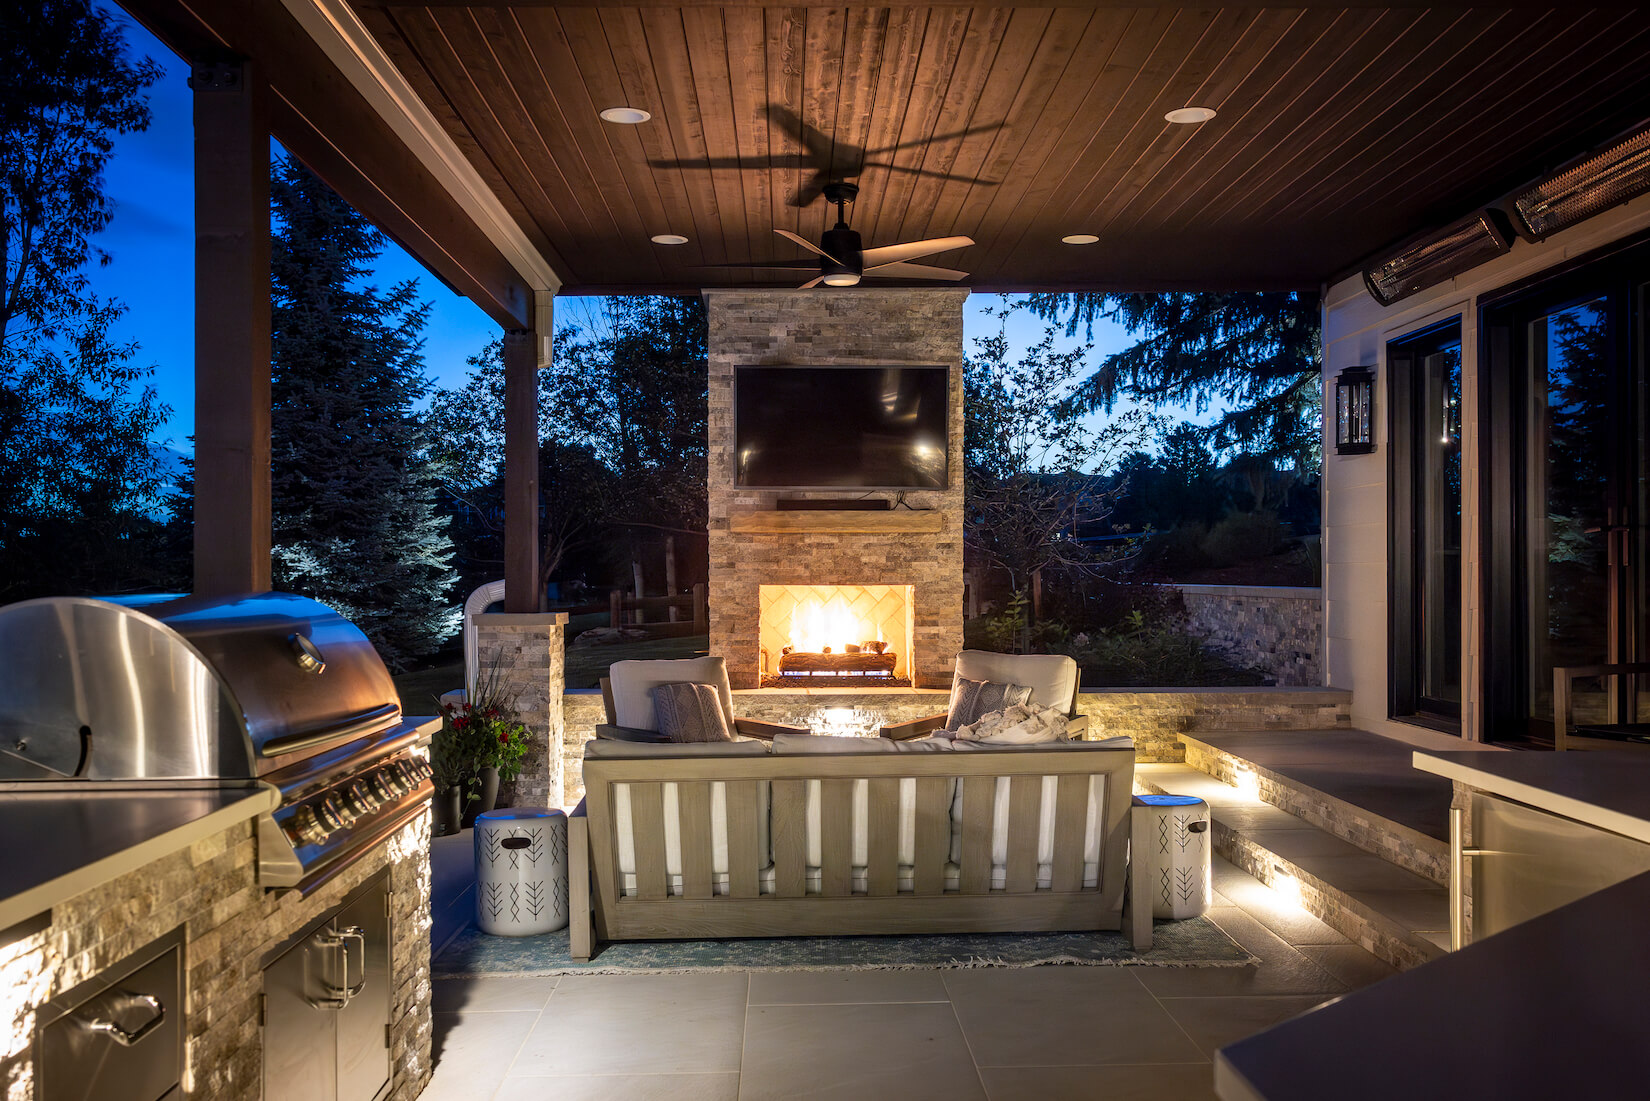
“A floor-to-ceiling stone fireplace is a major expense.”
To get this cozy vibe on a budget, frame the fireplace wall with standard lumber and use a cultured stone veneer instead of full-thickness stone. It’s lighter, cheaper, and easier to install. Opt for a high-quality electric fireplace insert ($500-$1,500) instead of a wood-burning or gas version to save on masonry and ventilation costs. For seating, look for acacia or eucalyptus wood sets from Wayfair or Walmart, which offer a similar slatted look to teak for a fraction of the price. The same feel as Idea #4 for half the cost!
This design creates the ultimate outdoor living room by centering everything around the hearth. The fireplace and TV combination provides a powerful focal point for both warmth and entertainment. The U-shaped seating arrangement with the slatted wood sofa and armchairs encourages conversation and lounging, directed toward the fire. Subtle but critical details like the recessed ceiling lights, ceiling fan, and integrated step lighting ensure the space is comfortable, safe, and usable day or night, in any weather.
18. Sheltered Outdoor Kitchen with a Wood Plank Ceiling and Heaters
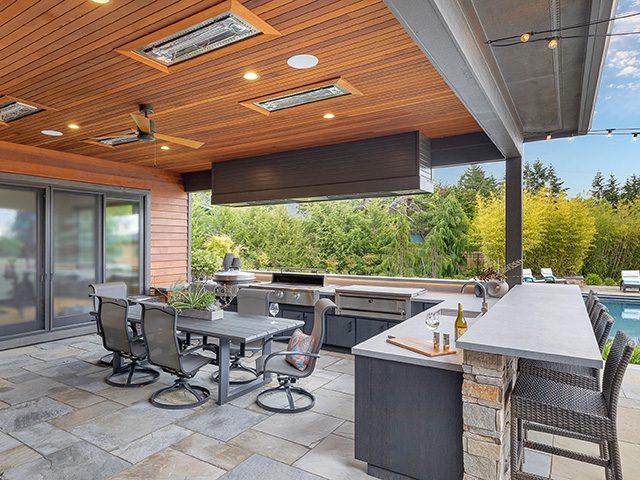
“If you’re investing in a covered patio, maximize its usability with integrated heaters.”
The recessed electric heaters in this wood plank ceiling are a game-changer, extending the patio season into chilly spring and fall evenings. When placing them, position them directly over the primary seating and standing areas—in this case, the dining table and the bar counter. This provides direct, efficient radiant heat right where people will be gathering, making the space dramatically more comfortable when temperatures drop.
A natural wood plank ceiling outdoors requires commitment. To keep it from weathering to a dull gray or being damaged by moisture, it will need to be re-sealed or re-stained every 2-4 years, depending on your climate. This is a labor-intensive job that involves working overhead. The stone tile flooring is a durable choice, but light-colored grout lines can become stained or discolored over time, especially in high-traffic areas. Plan on a deep clean and possibly re-sealing the grout annually to keep it looking fresh.
19. Polished Stone Countertop on a Stacked Stone Grill Island
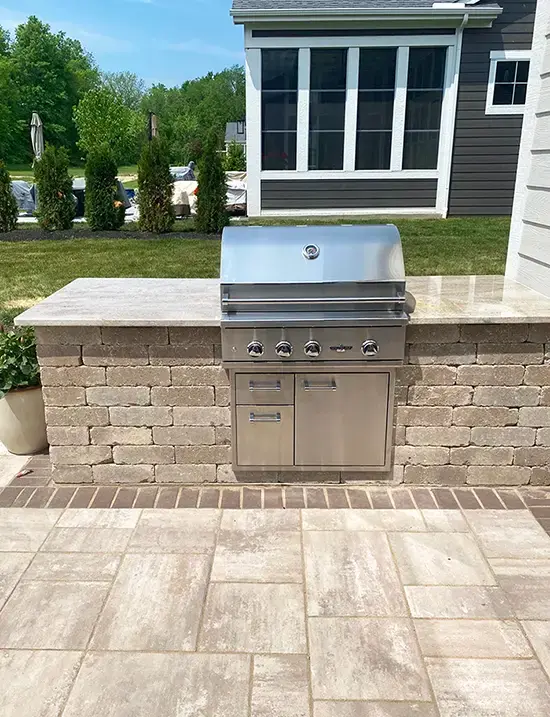
“This classic outdoor kitchen look relies on a simple, effective formula: 60% Rustic Texture (the stacked stone island base) + 30% Polished Finish (the smooth stone countertop) + 10% Modern Gleam (the stainless steel grill and doors).”
The contrast between the rough, irregular texture of the stacked stone and the smooth, polished surface of the countertop is what creates the visual interest. The clean lines of the stainless steel appliances cut through the natural materials, adding a contemporary edge that keeps the design feeling current.
The choice of patio pavers is just as important as the kitchen itself. Notice the large-format stone pavers used here. Smaller pavers or intricate patterns can look too busy next to the detailed texture of a stacked stone island. Using large, neutral-colored pavers provides a calm, stable visual foundation that allows the kitchen island to be the star. Also, ensure your pavers are properly sealed. Unsealed pavers are susceptible to grease stains from the grill, which can be nearly impossible to remove completely.
20. Night-Ready Outdoor Kitchen with Illuminated Grill Knobs
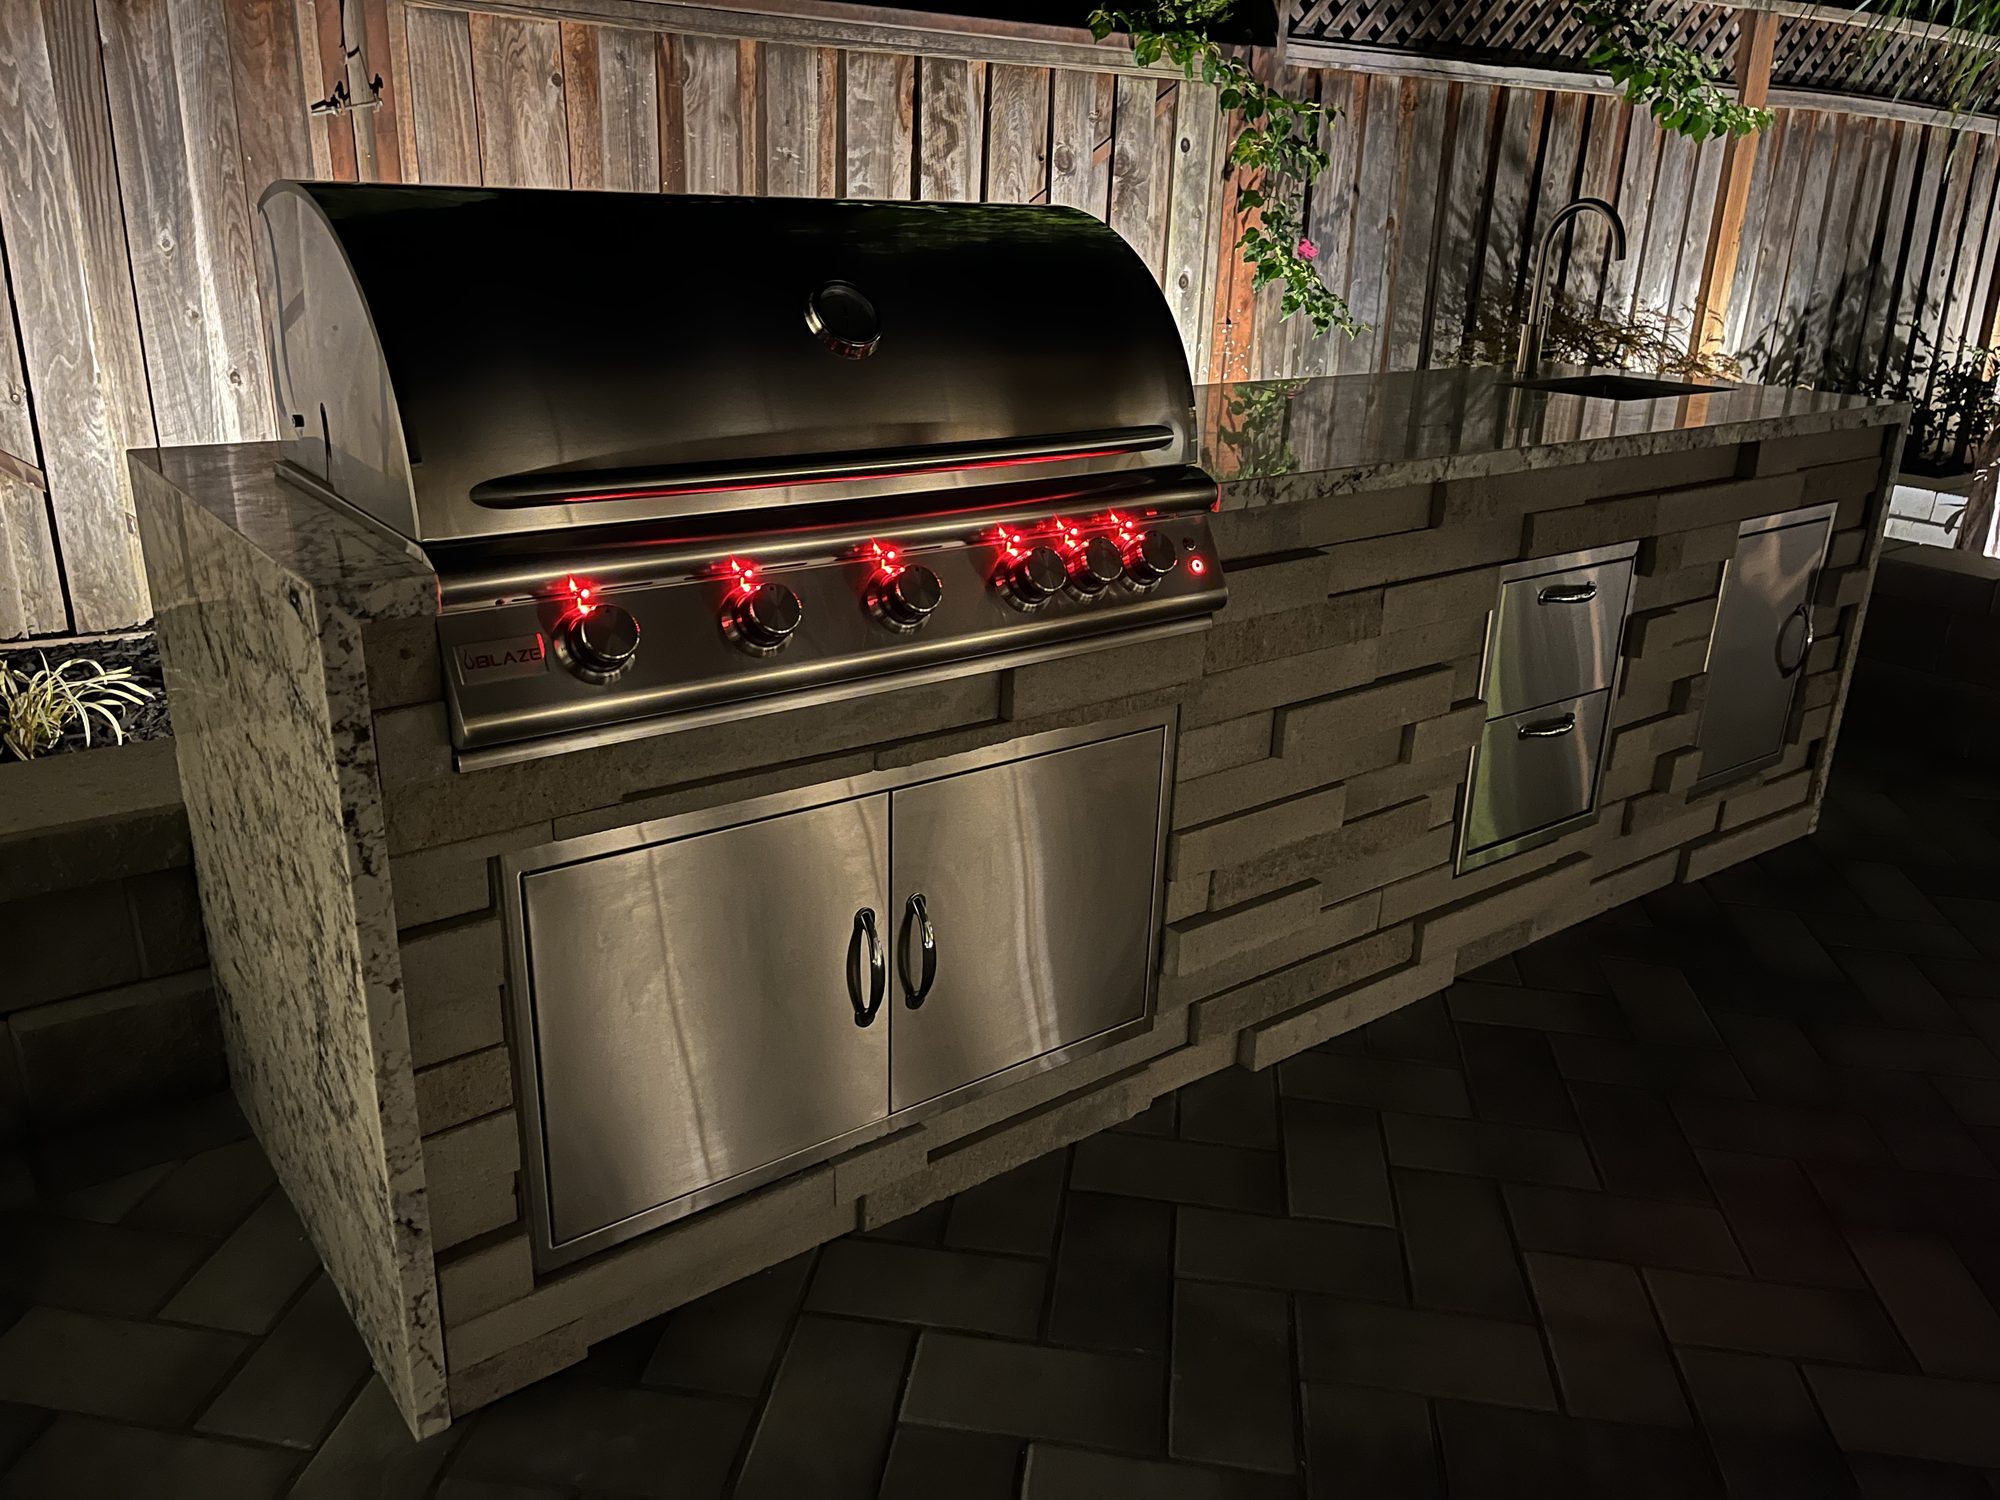
“The illuminated red control knobs on the grill are the defining detail of this nighttime scene.”
Functionally, they make it easy to see and adjust your settings in the dark. Aesthetically, they add a dramatic, high-tech pop of color that transforms the grill from a simple appliance into a cool, futuristic centerpiece. In a dark environment, these small points of light create a huge visual impact, drawing the eye and adding an unexpected layer of style and ambiance to the entire kitchen setup. It’s a small feature that makes a big statement.
Install DIY Under-Counter Lighting on a Stone Island. Time: 3 hours. Cost: $80-$200.
- First, ensure you have a GFCI-protected outdoor outlet nearby. Safety first!
- Purchase a waterproof outdoor LED strip light kit that includes a channel or mounting track. This helps diffuse the light and protects the strip.
- Clean the underside of your countertop overhang thoroughly so the adhesive or mounting clips will stick.
- Mount the channel to the underside of the counter lip, positioned so the light will shine down the face of the stone.
- Press the LED strip into the channel and attach the diffuser cover.
- Run the power cord discreetly along the inside of the island to your outlet. Use outdoor-rated cord clips to keep it tidy and secure.
21. Upscale Wooden Kitchen Island with Open Firewood Storage
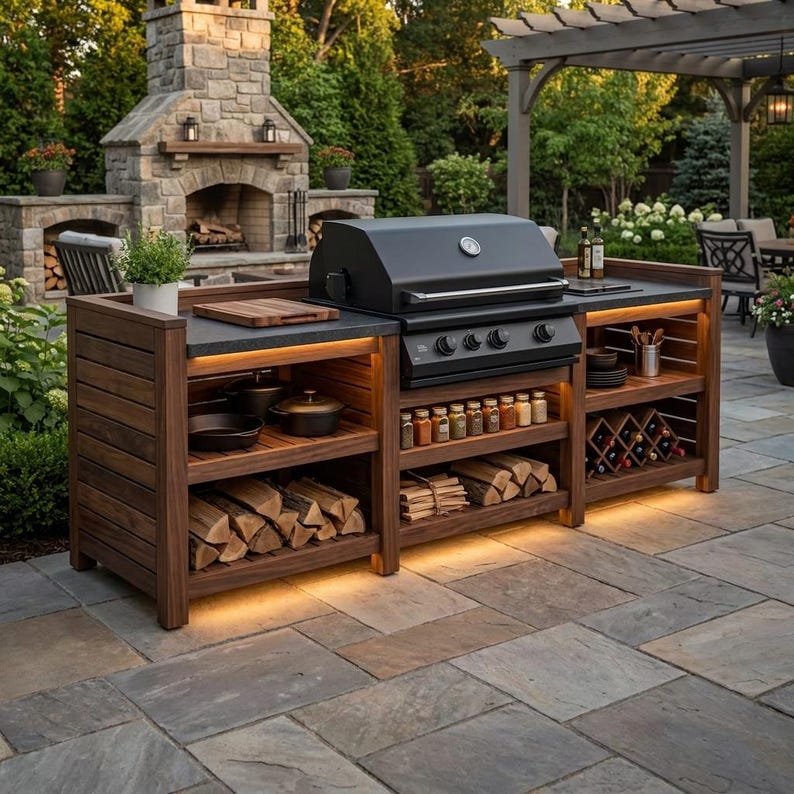
“This high-end, custom look involves premium materials and skilled carpentry.”
It’s a statement piece with a price tag to match.
- Custom Hardwood Island (Ipe or similar): $9,000 – $16,000
- High-End Grill & Appliances: $4,000 – $8,000
- Countertop (Dark Stone/Quartz): $3,000 – $6,000
- Lighting (Integrated LED): $500 – $1,500
- Labor & Installation: $3,000 – $5,000
- TOTAL: $19,500 – $36,500
Budget alternative: Build the frame from pressure-treated lumber and clad it with composite decking boards that mimic dark wood. Use a drop-in grill and source a countertop remnant. You could achieve a similar aesthetic for $6,000 – $10,000.
This design is successful because it masterfully combines form and function. The slatted dark wood island is visually stunning, especially with the warm glow of the under-counter lighting. But it’s also incredibly practical. The large open shelving provides the perfect, beautifully styled storage for firewood, linking the kitchen to the fireplace in the background. This thoughtful integration of storage turns a practical necessity—piles of wood—into a key decorative element, adding texture, warmth, and a rustic-yet-refined sensibility.
22. Pro-Style Outdoor Kitchen with Wood Slats and a Pizza Oven
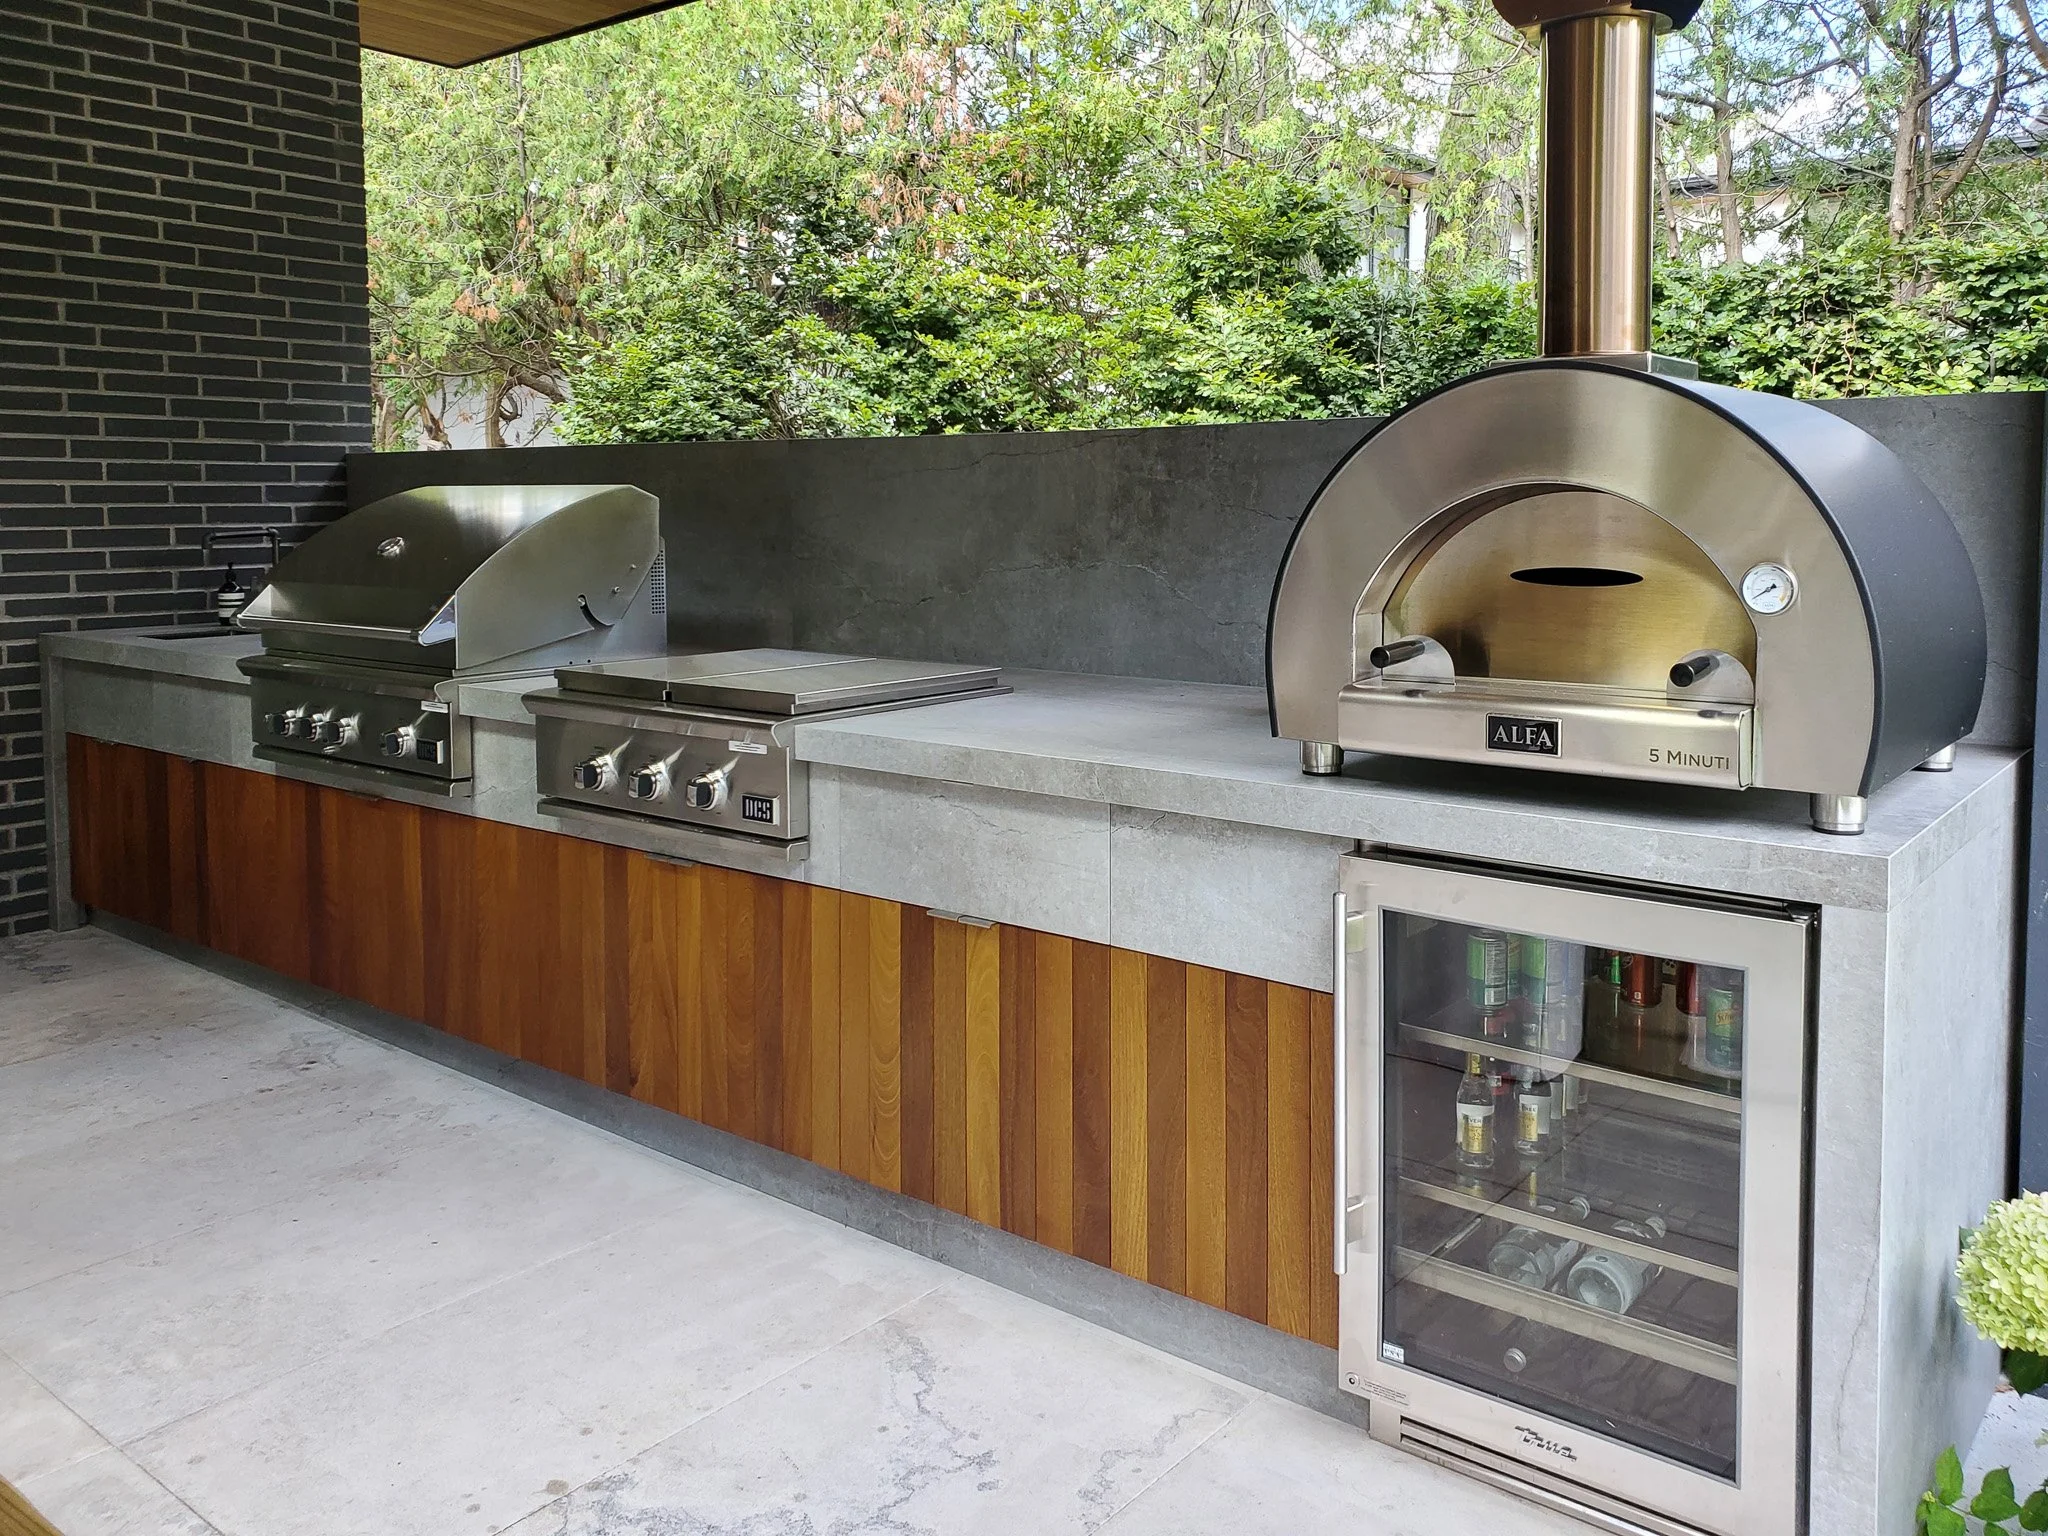
“We’re seeing a huge move towards professional-grade functionality in outdoor kitchens for 2026, and this setup is a prime example.”
It’s not just a grill anymore. The inclusion of a dedicated griddle (or flattop), a high-heat pizza oven, and a glass-front beverage fridge speaks to a desire to cook a wider variety of meals entirely outdoors. This mirrors the indoor kitchen trend of specialized appliances. Homeowners want the ability to host a pizza party one night and a hibachi-style dinner the next, all without stepping foot inside.
While the vertical wood slats are gorgeous, they can be a trap for dust, pollen, and cobwebs. Plan on giving them a good wipe-down or a gentle hose-off a few times a season. The concrete countertop is a durable, modern choice, but it must be sealed to prevent staining from grease spatters from the grill and griddle. The stainless steel appliances will also show fingerprints and water spots, so a good stainless steel cleaner and a microfiber cloth will be your best friends to keep this pro-look kitchen shining.
23. Intimate Brick Courtyard with a Grill Station and Plunge Pool
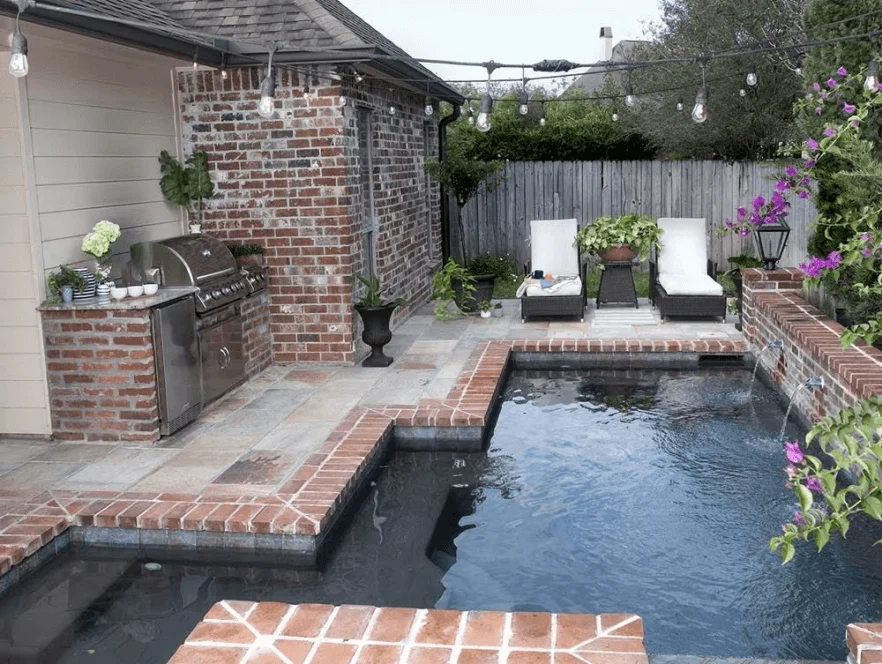
“This is a brilliant design for a smaller, enclosed backyard or courtyard, roughly 20×25 feet.”
The key is the ‘plunge pool’ or ‘spool’ (spa-pool), which offers the refreshment of a pool without dominating the entire space. A typical plunge pool is only about 8×15 feet. By keeping the grill island compact and linear against the house wall and using just two lounge chairs, the design preserves plenty of open patio space for circulation, making the yard feel cozy and intimate, not cramped. The overhead string lights also help define the area and make it feel like an outdoor room.
Repeating a single, dominant material is a powerful way to create harmony in a small space. Here, the red brick of the house wall is echoed in the grill island and the pool coping. This repetition makes the new additions feel intentional and integrated, as if they’ve always been there. If you have a dominant material on your home’s exterior (be it brick, stone, or a specific siding color), use it in your hardscaping to create a cohesive, custom-designed look, even on a smaller scale.
24. Luxury Outdoor Lounge with a Marble-Look Kitchen Island
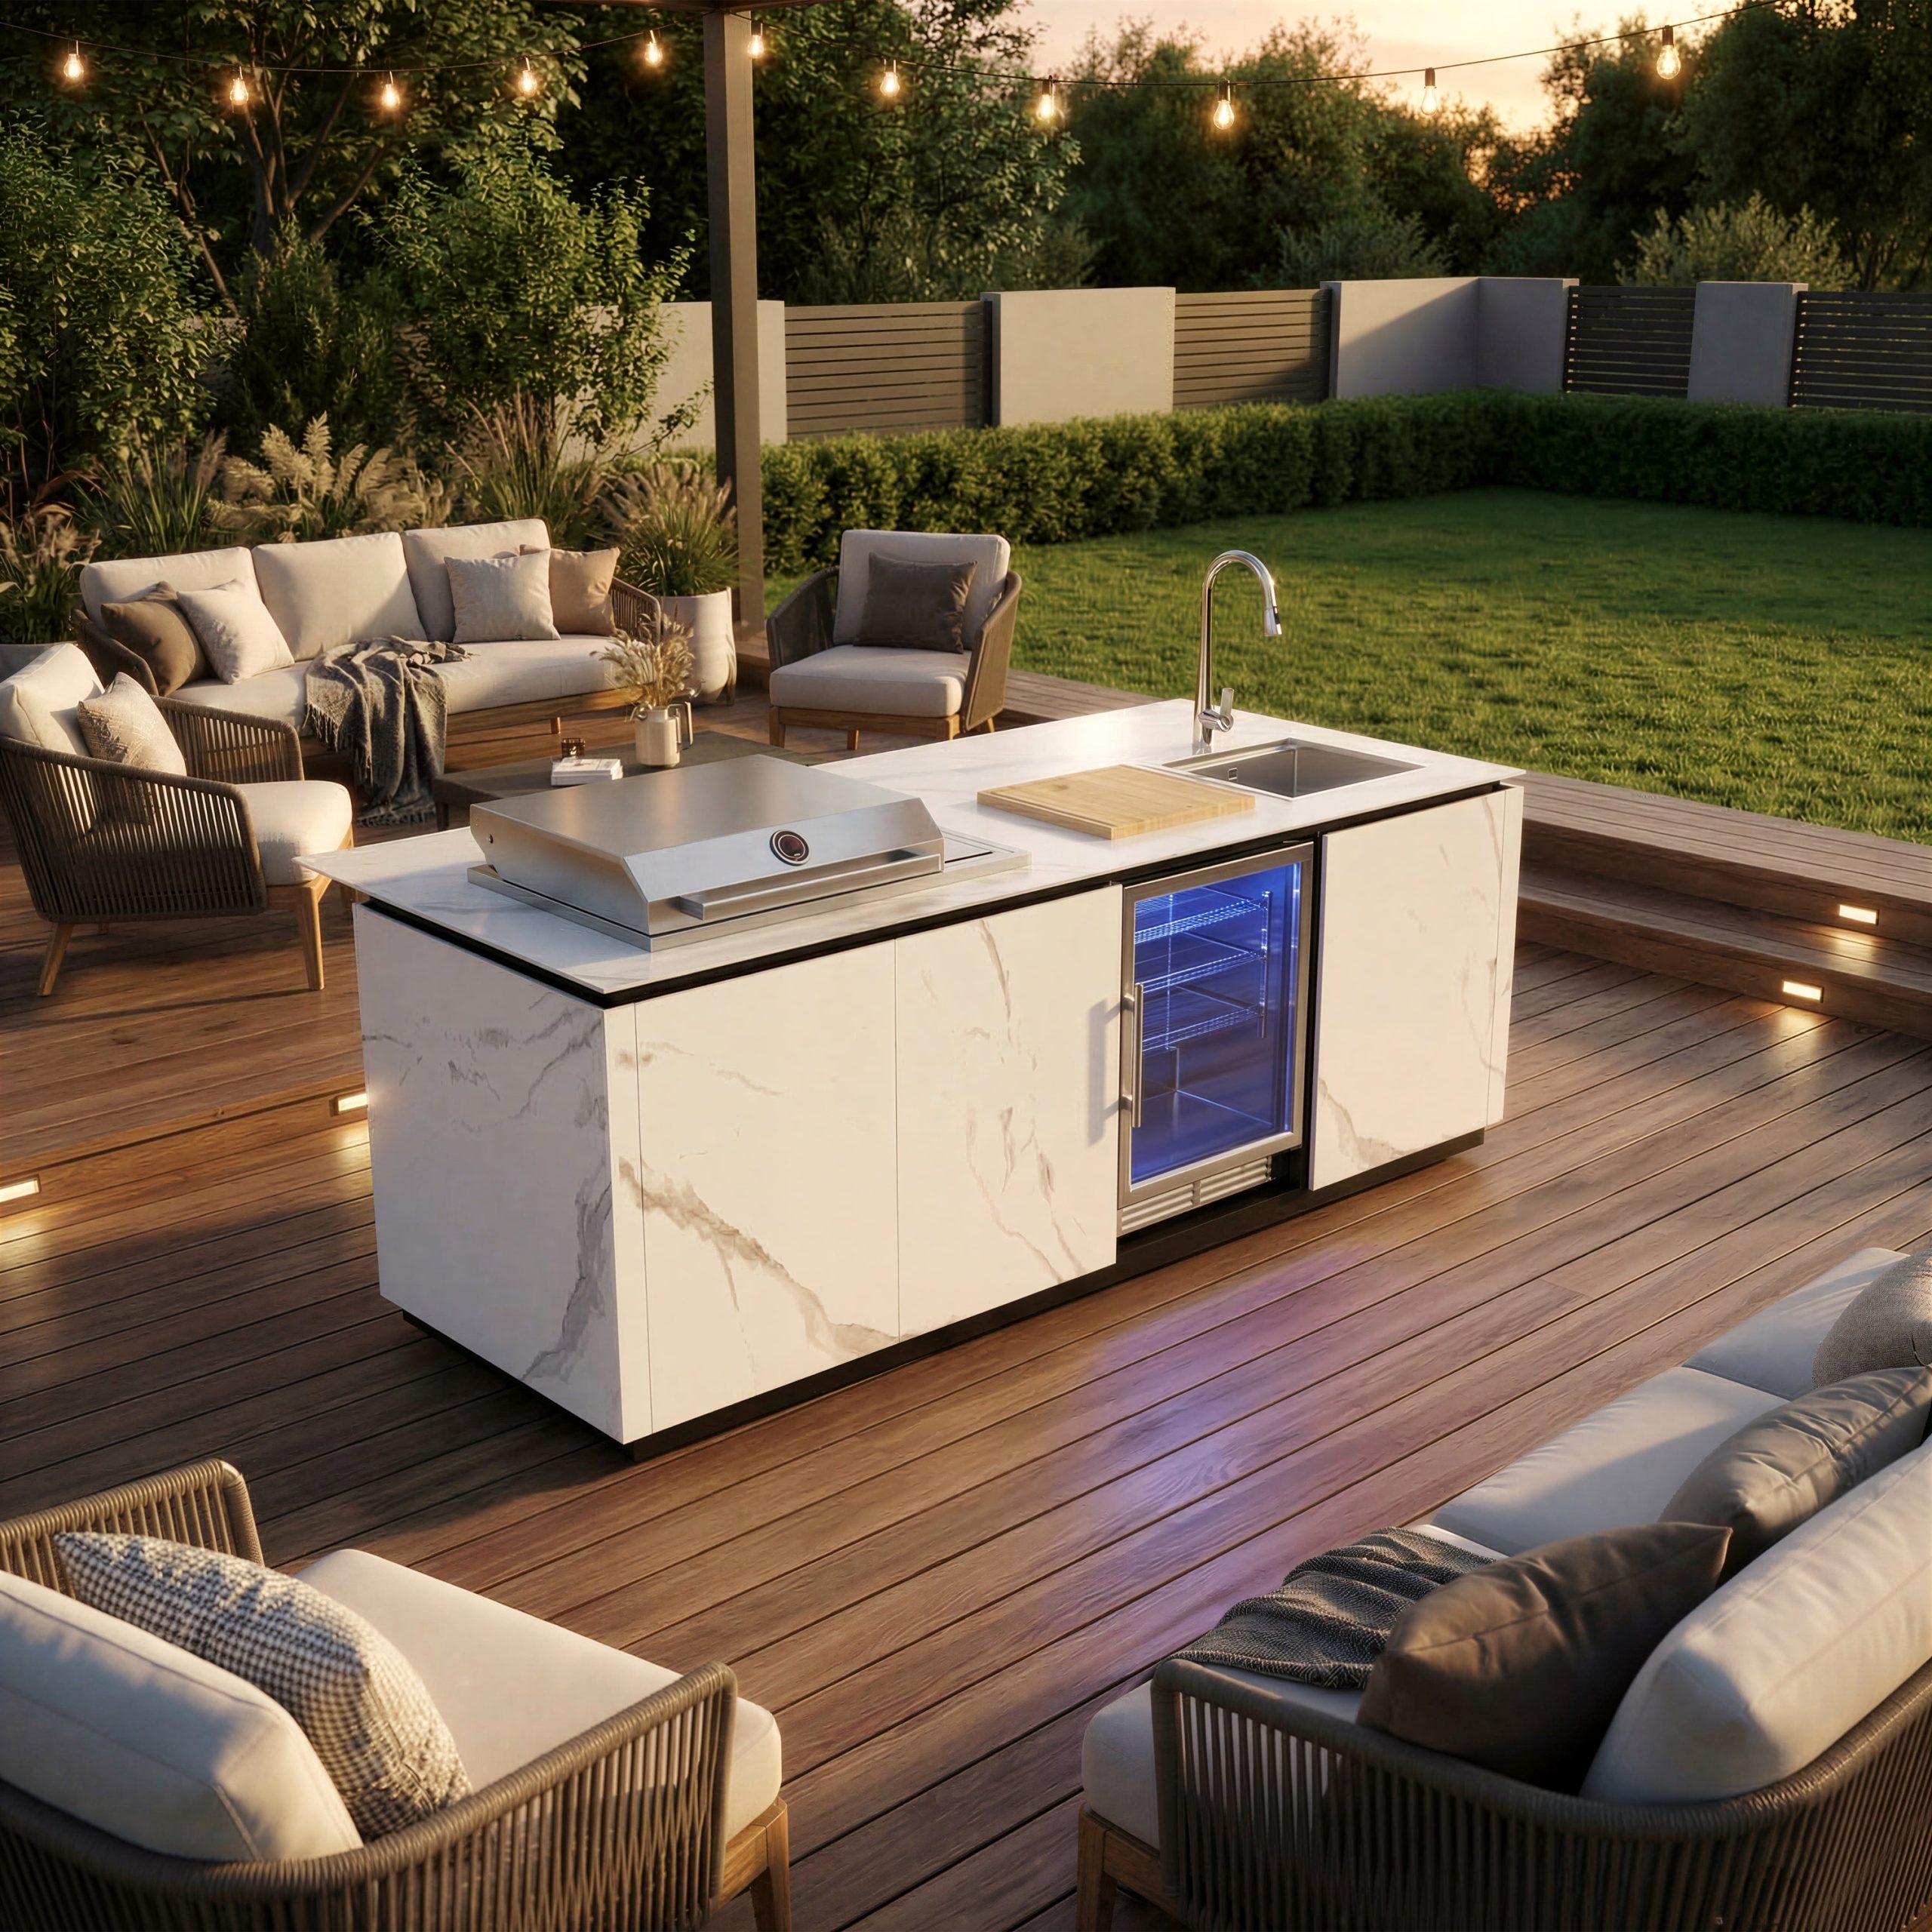
“A full marble-clad island is a luxury splurge.”
To get this opulent look for less, use large-format porcelain slabs or tiles with a realistic marble print. They are significantly cheaper, more durable, and less prone to staining than real marble. For the seating, skip the designer showroom and look for rope-woven or resin wicker conversation sets from brands like Article, Outer, or even Target’s higher-end collections. A similar set can often be found for $1,500-$2,500, a fraction of the designer price tag. The key is the silhouette, not the brand name.
This space feels incredibly luxurious because it treats the outdoor area exactly like a high-end interior living room. The kitchen island, with its dramatic marble-patterned base and waterfall countertop, acts as a sophisticated console table or bar. The choice of plush, comfortable lounge furniture—sofas and armchairs with thick cream cushions and throw pillows—invites guests to settle in and stay awhile. The layers of lighting, from the overhead string lights to the integrated deck lighting, create a warm, enveloping ambiance. It’s a complete outdoor room, not just a patio with a grill.
25. A Grand Outdoor Room with Stone Walls and Exposed Beams
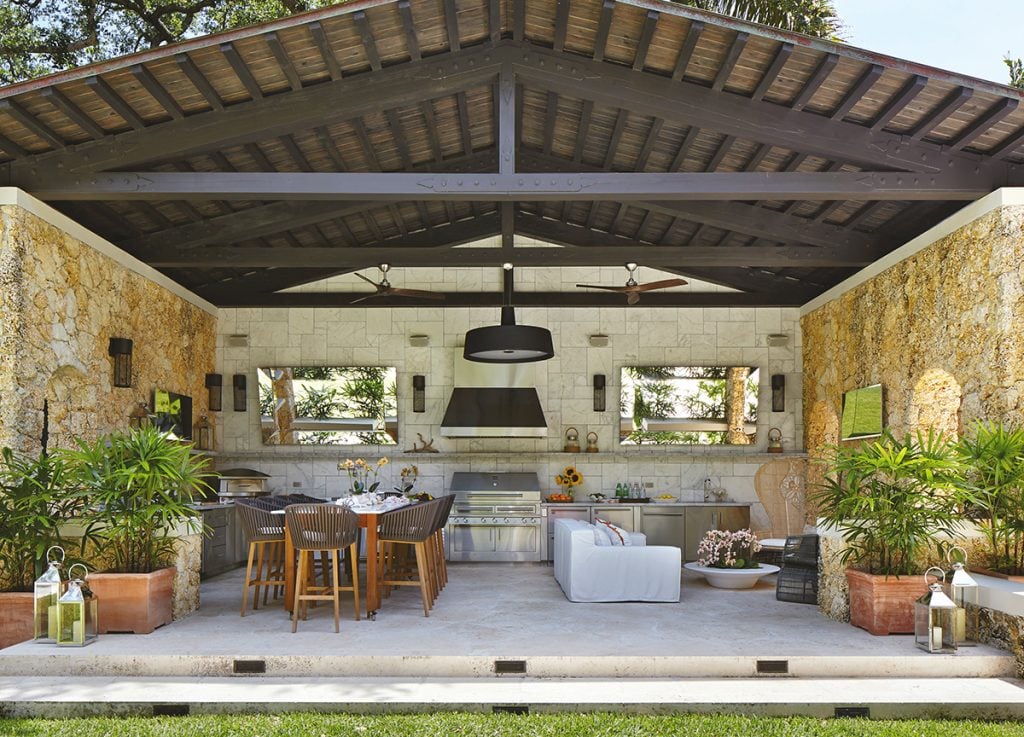
“The dark wood exposed-beam gable roof is the single most impactful element in this design.”
It’s what elevates the space from a simple covered patio to a grand outdoor room with architectural significance. The soaring height creates an incredible sense of volume and airiness, while the dark wood brings warmth and a touch of rustic elegance that contrasts beautifully with the rough-hewn stone walls. Without this dramatic ceiling structure, the space would lose its sense of grandeur and enclosure.
A structure of this magnitude demands a large, open space and a significant budget. The footprint is likely in the range of 20×30 feet or larger. To support a vaulted roof like this, the ceiling peak should reach at least 15-18 feet high. The substantial stone walls and exposed beams are heavy, requiring deep concrete footings and professional engineering. This is a true home extension, not a weekend DIY project. It’s best suited for a property with a large, flat backyard where it can stand as a destination pavilion without overwhelming the main house.
26. Sleek Louvered Pavilion for Outdoor Dining and Bar Hosting
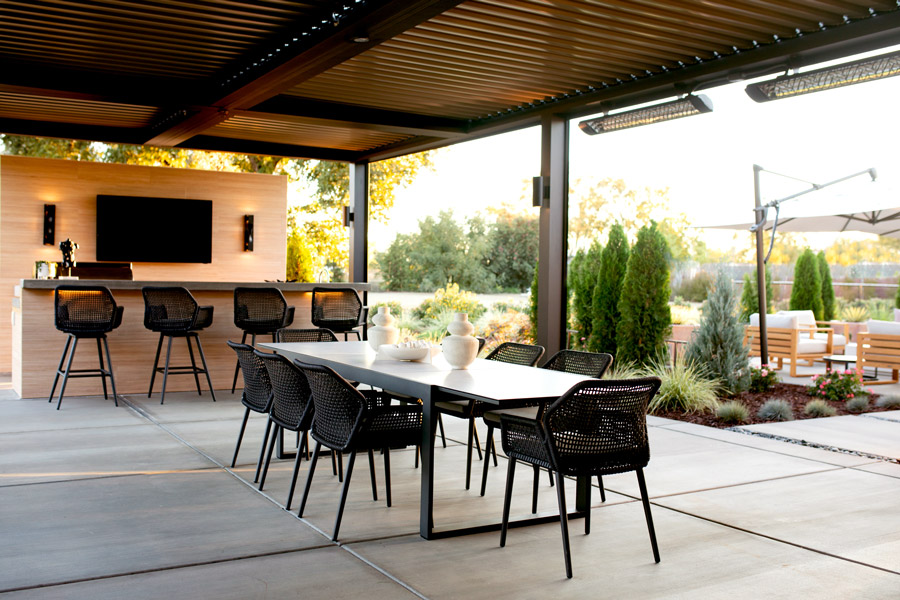
“This sophisticated space is a study in modern contrasts.”
The formula: 50% Dark, Sharp Structure (black metal louvered roof, chair frames) + 30% Warm Natural Tones (light wood accent wall, bar paneling) + 20% Soft Neutrals (gray flooring, white bar top, distant landscaping). The dark metal creates a bold, graphic frame, while the wood paneling provides a focal point and a necessary touch of organic warmth. The neutral flooring and furnishings provide a quiet backdrop, allowing the architecture and the view to take center stage.
A motorized louvered roof is an amazing, flexible solution for sun and rain protection, but they come with a high price tag—often starting at $15,000-$25,000 for a space this size, and going up from there. They also have moving parts, sensors, and motors that can require maintenance or repair over time. Be sure to choose a reputable manufacturer with a good warranty. Also, consider that while they block rain when closed, they aren’t fully insulated, so it won’t feel like a true four-season room in colder climates.
27. A Complete Stainless Steel Outdoor Kitchen Suite
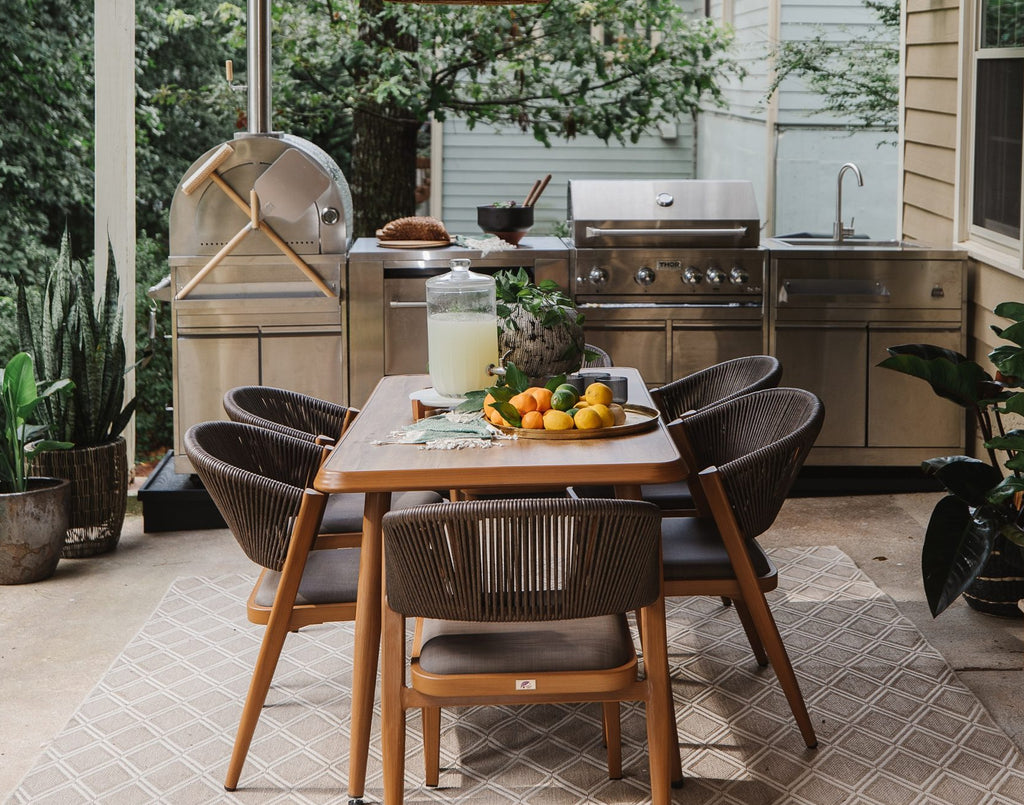
“A matching suite of stainless steel outdoor kitchen cabinets can be pricey.”
To get this clean, professional look on a tighter budget, focus on the essentials. Start with a good quality built-in grill. Then, instead of full cabinets, use stainless steel access doors and drawer sets installed into a more affordable base structure made of steel studs or concrete blocks covered in stucco. This gives you the gleaming stainless front without the cost of the full cabinet boxes. Add a standalone stainless steel prep cart for flexible workspace. For more ideas on budget-friendly materials, see our notes on common mistakes.
When working with a large amount of stainless steel, it’s crucial to add warmth and texture to prevent the space from looking like a commercial kitchen. This design does it perfectly. The warm wooden dining table, the soft texture of the upholstered chair seats, the patterned area rug, and the lush green potted plants all work together to balance the cool, hard metal. These organic and soft elements are what make the space feel like an inviting residential patio rather than a sterile laboratory.
28. Rugged Stacked Stone Kitchen with a Built-In Pizza Oven
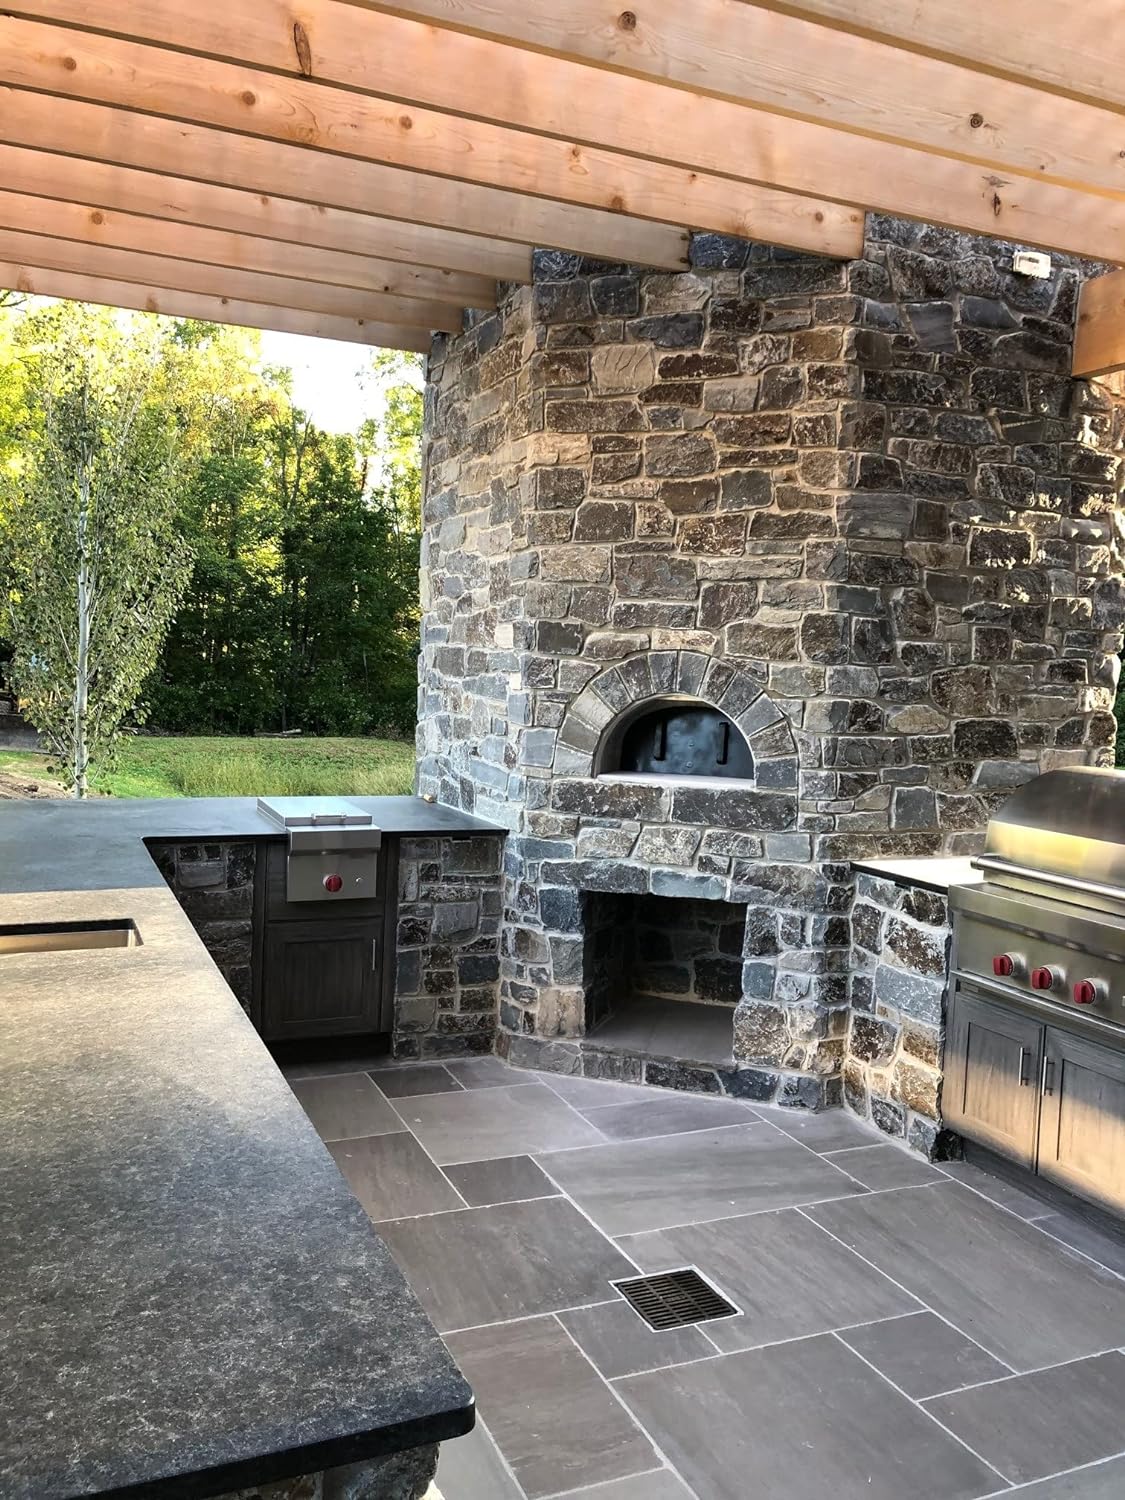
“This design is all about celebrating mass and material.”
The huge, stacked stone structure housing the pizza oven and grill isn’t just a kitchen; it’s a powerful architectural statement. The sheer scale and rugged texture of the stone give the space a timeless, earthy feel. This is balanced by the clean, modern lines of the dark stone countertops and the light wood pergola, which prevent it from feeling overwhelmingly heavy. The combination of rustic stone, sleek counters, and natural wood creates a sophisticated, layered look.
Get Your Pizza Oven Ready for a Party. Time: 1.5 – 2 hours. Cost: Wood/Fuel.
- Start Early: A masonry wood-fired oven needs time to heat up. Start your fire at least 90 minutes before you plan to cook.
- Build a Top-Down Fire: Place 3-4 large logs on the oven floor. Add smaller logs, then kindling, on top. This method creates less smoke and heats the dome effectively.
- Soak the Dome: Let the fire burn vigorously in the center of the oven until the interior dome, initially black with soot, burns white. This indicates the oven has reached cooking temperature (around 750-850°F for pizza).
- Move the Fire: Once the dome is white, use a long-handled brush to push the hot coals and fire to one side of the oven.
- Clean the Floor: Use a damp, natural-fiber mop or cloth to quickly wipe the cooking surface where your pizzas will go. Now you’re ready to bake!
29. Minimalist Black Textured Grill Station on a Flagstone Patio
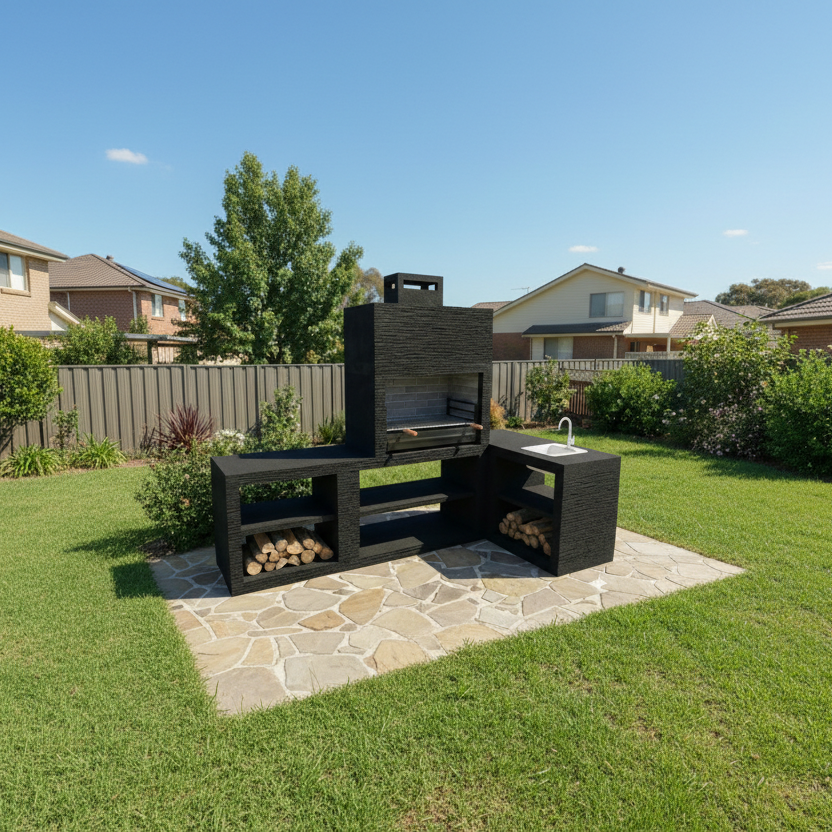
“The texture of the black finish is the crucial detail here.”
If this L-shaped station were smooth or glossy, it might look too severe or plasticky. But the subtle, rough texture gives it a more sophisticated, substantial feel, almost like cast iron or lava stone. This texture catches the light in interesting ways and helps the structure feel grounded and connected to the natural flagstone patio. It elevates the design from a simple black box to a piece of minimalist sculpture for the backyard.
This freestanding, minimalist design is incredibly versatile. Because it’s not a massive built-in, it can work in a wide range of backyard sizes. It’s perfect for a medium-sized yard where you want a designated cooking zone without the expense and permanence of a full built-in kitchen. The L-shape shown here probably occupies a footprint of about 8×6 feet. It needs to be placed on a level, non-combustible surface like this flagstone patio, and you should allow at least 3 feet of clear space around it for safe and easy movement.
30. Sleek Beige Island and Dining Set Under a Louvered Pergola
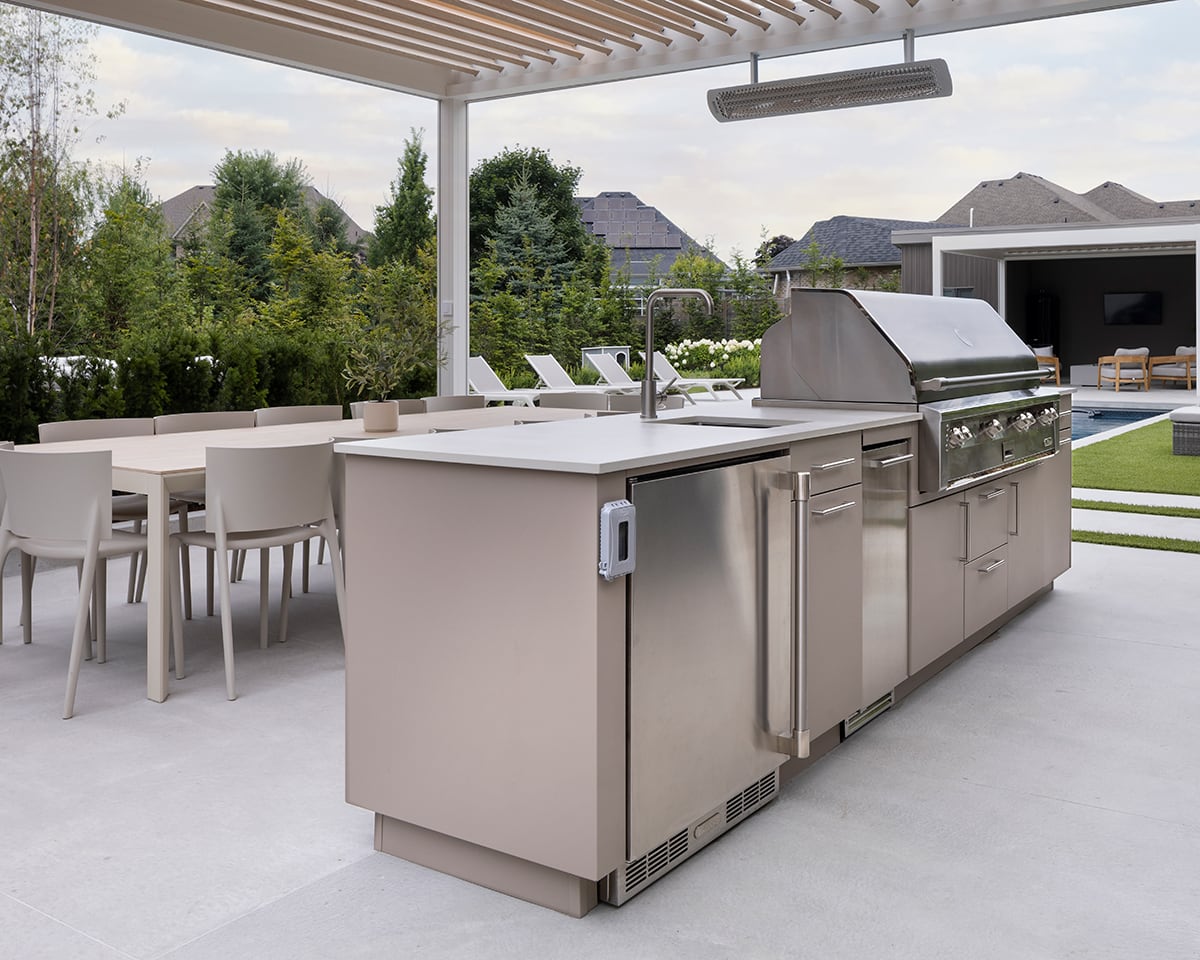
“This space is a masterclass in serene, modern neutrals.”
The formula is: 80% Muted Tones (beige island, light gray concrete floor, gray chairs) + 15% Sleek Metal (stainless steel appliances, dark pergola frame) + 5% Warm Accent (the overhead heater). By sticking almost entirely to a low-contrast palette of beige and gray, the design creates a calm, cohesive, and incredibly chic atmosphere. The sharp black lines of the pergola and the glint of stainless steel provide just enough definition to keep the space from feeling washed out. The result is pure, understated elegance.
A light, monochromatic color scheme like this is stunning, but it requires diligent cleaning to keep it looking sharp. The muted beige island will show every splash of grease and sauce. The light gray concrete floor will highlight every leaf, crumb, and dirty footprint. If you’re someone who enjoys a pristine space and doesn’t mind a quick daily sweep and regular wipe-downs, this is a beautiful option. If you prefer a more forgiving, low-maintenance setup, consider incorporating more pattern or a medium-toned color for your main surfaces.
31. Traditional Covered Kitchen with Concrete Counters and Stone Base
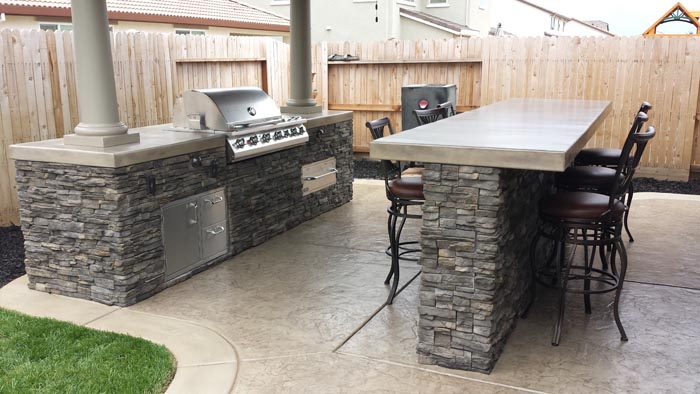
“Thick, poured concrete countertops like these are incredibly durable, but they are not stain-proof.”
They must be sealed properly upon installation and then re-sealed every 1-2 years to protect against oil, wine, and acidic spills. Without a good seal, stains can penetrate the porous surface and become permanent. The stacked stone base is also porous and can be a magnet for grease splatters from the grill. It’s a good idea to seal the stone as well, which will make it much easier to clean with a simple soap and water solution.
When creating a two-tiered bar and prep counter like this, getting the heights right is critical for comfort. The lower prep counter (where the grill is) should be at standard kitchen counter height, which is 36 inches. The upper bar counter should be between 40 and 42 inches high. This allows standard barstools (with a seat height of 28-30 inches) to tuck underneath comfortably and puts guests at a height where they can easily converse with the person who is cooking. This small difference in height is what separates a functional bar from an awkward one.
32. Casual Stone Grill Island Ready for a Summer Barbecue
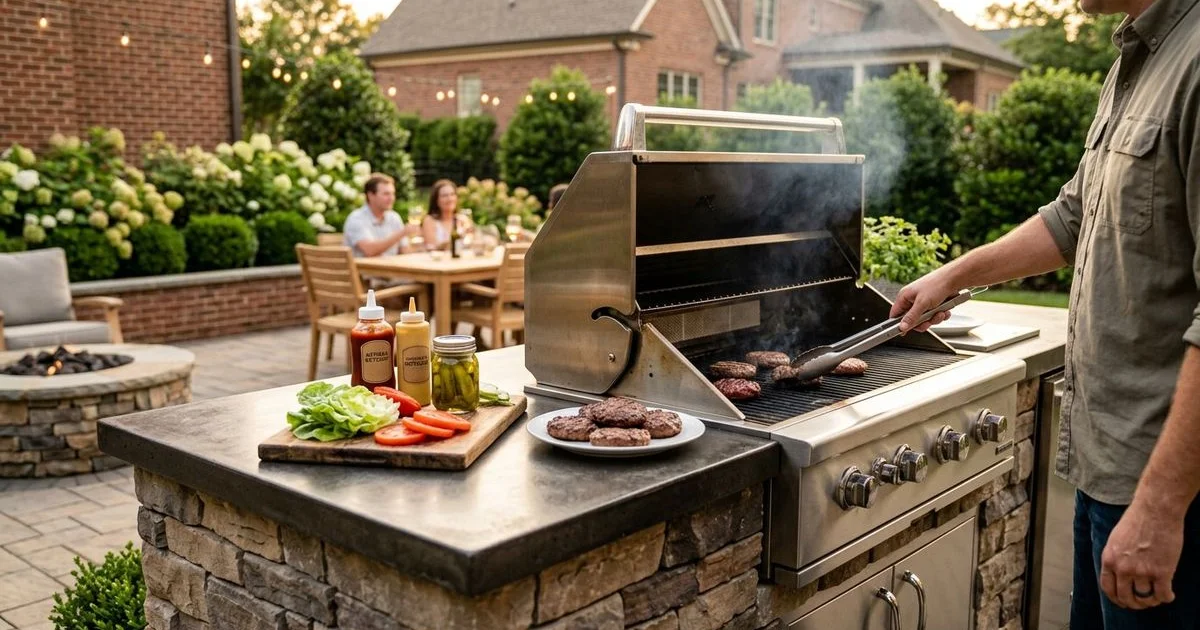
“This setup works because it’s approachable and perfectly suited for its purpose.”
It’s not trying to be a gourmet chef’s kitchen; it’s a fantastic, functional station for a classic backyard barbecue. The combination of the rustic stacked stone base and the simple, dark concrete countertop is durable and forgiving. The scale is just right—enough counter space for a cutting board and a platter, without taking up the whole patio. The lively scene with the food prep in action reinforces the friendly, casual, and inviting nature of the design.
This is one of the most budget-friendly built-in styles you can create. The island base can be built with inexpensive concrete blocks and then covered with a stone veneer, which is much more affordable than full-thickness stone. For the countertop, instead of a custom-poured concrete slab, you can achieve a similar look with large, dark gray porcelain or concrete pavers from a home improvement store. Paired with a mid-range drop-in grill, you can build a highly functional and handsome island like this for $2,500 – $4,500, especially if you can handle some of the labor yourself.
Your Alfresco Story Starts Now
Hopefully, these ideas have sparked some serious inspiration for your own backyard escape. Remember that the best outdoor kitchens blend seamlessly with your home and your lifestyle, whether it’s for quiet family dinners or big neighborhood parties. The perfect design is one that makes you want to get outside and start cooking.
Start a new board on Pinterest and begin saving the elements that feel right for you. Your perfect patio is closer than you think.