You know that feeling when you finally find the downspout landscaping idea that looks exactly right for your space, only to wonder… how do I actually *do* that? A boring downspout can feel like a necessary evil, but it’s really a design opportunity waiting to happen. After filtering through hundreds of options across Home Depot, Etsy, and Amazon, we narrowed it down to 29 ideas that actually deliver on both style and function. From natural rock waterfalls to modern rain chains and clever garden diversions, we’ve got you covered. In 2026, smart water management and major curb appeal are the ultimate power couple in home design, and these ideas are your starting point. And stay until the end — we break down the most common mistakes that can ruin these looks. 📌 Save this to Pinterest for later — you’ll want to revisit these ideas.
1. Create a Tiered Rock Waterfall for Natural Drainage
The magic here is in the blend of form and function. This design works because it mimics a natural stream, which our brains are hardwired to find calming. The use of large, dark, textured rocks creates a strong visual anchor and a sense of permanence, while the irregular flagstone path invites you to walk through the space. The key principle is ‘organized chaos’—the placement of rocks and plants feels random and organic, but it’s carefully planned to guide water flow and create visual interest from every angle. It’s a masterclass in turning a drainage problem into the garden’s main event.
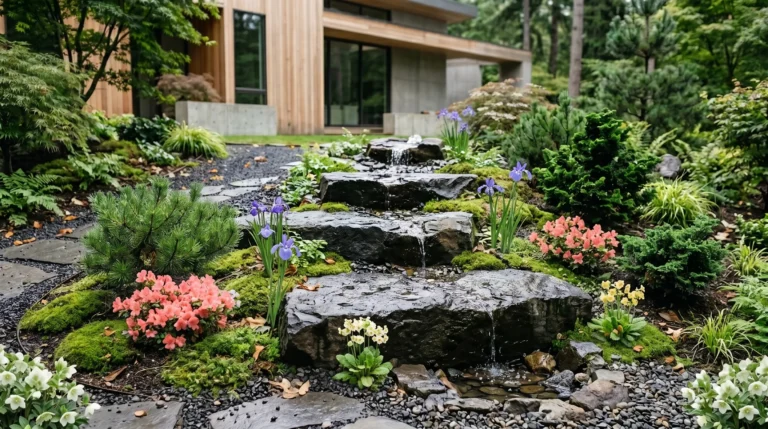
“When building a feature like this, the biggest amateur mistake is making it too flat.”
To get that beautiful cascading effect, you need significant changes in elevation. For every 3 feet of horizontal run, aim for at least a 12-inch drop in height. Use a mix of large ‘boulder’ rocks for structure, medium-sized rocks to fill gaps and direct water, and smaller pebbles for the base. This variation not only looks more natural but also creates a more pleasant, varied sound as the water moves through the feature. Don’t be afraid to dig down and build up to create the necessary drama.
2. Install a Copper Rain Chain with Tiered Metal Planters
that makes this setup truly special is the thoughtful transfer of water. It’s not just a rain chain; it’s a complete, multi-stage system. Removing the tiered metal planters would leave you with a pretty, but standard, rain chain dumping into a gravel pit. The two levels of planters, connected by small pipes, turn a simple runoff solution into a kinetic sculpture. It tells a story of water’s journey, making a mundane process visible and beautiful. The contrast between the warm copper chain and the cool grey of the planters is just the icing on the cake.
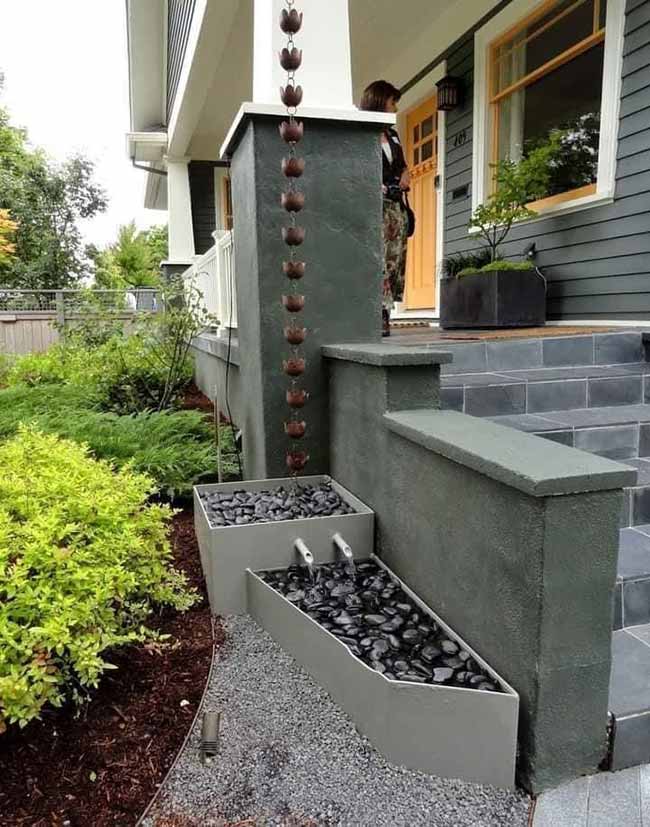
“Copper is a beautiful material, but it’s a living finish.”
That gorgeous, shiny copper color will not last forever when exposed to the elements, and that’s okay! It will naturally develop a patina, first turning a deep brown and eventually a classic verdigris green over several years. To keep it looking new, you can apply a specialized copper sealant once or twice a year. If you prefer the aged look, simply let nature take its course. The black river rocks will need a good rinse every spring to remove accumulated debris and keep them looking dark and polished.
3. Hang a Simple Black Rain Chain Above Potted Plants
This look proves you don’t need a huge budget or a complicated installation for a major upgrade. A basic black cup-style rain chain can be found online or at big-box stores for $40-$80. Instead of a fancy basin, a cluster of mismatched dark planters you already own (or can get from Target for $15-$30 each) does the job of catching splash. The key is arranging them in a tight group directly under the chain. A bag of mulch is about $5. You get the soothing sound and visual interest of a rain chain for under $150, a fraction of what a more elaborate system like Idea #1 would cost.
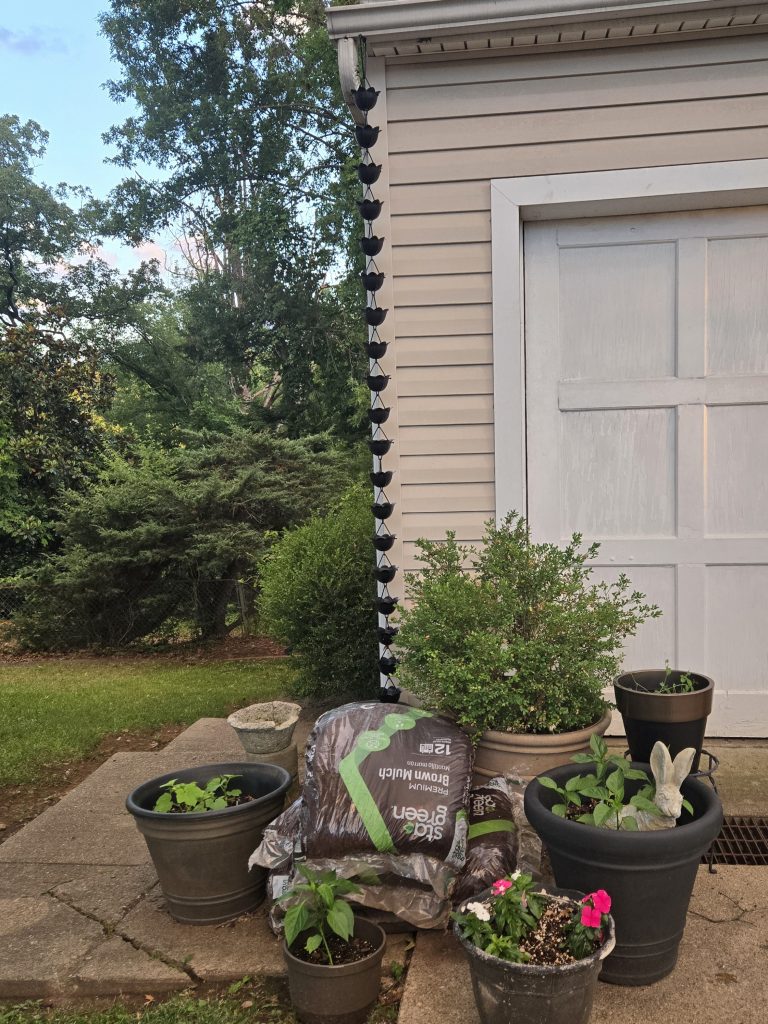
“Let’s be honest: this is a great-looking, budget-friendly solution, but it’s not a high-volume drainage system.”
In a light to moderate rain, it’s perfect. In a torrential downpour, that rain chain and those pots will be completely overwhelmed, and you’ll get significant splashing and overflow. This could be an issue if it’s right next to a basement window or a walkway. This setup is best for a corner of the house that can handle a little extra water and where perfect drainage isn’t mission-critical. It’s more about aesthetics than serious water management.
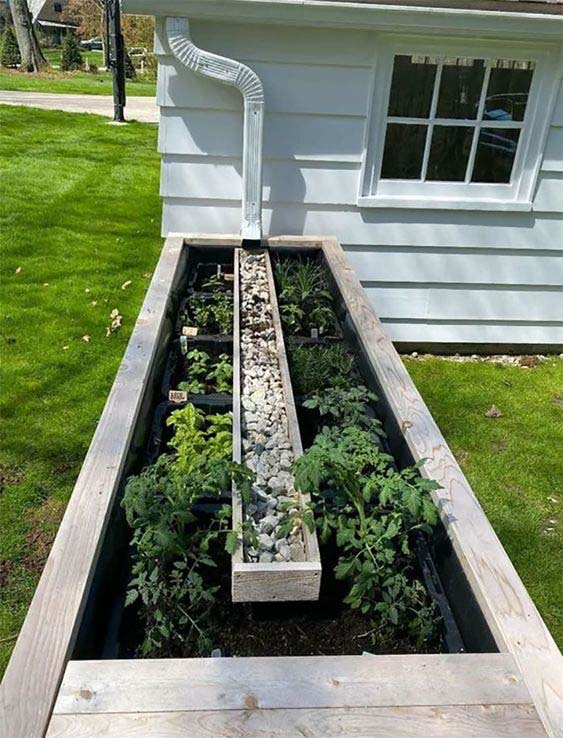
4. Channel a Downspout into a Raised Garden Bed Watering System
You can create this self-watering garden feature in a weekend. Here’s a quick guide to building the central stone channel:
- Build your raised bed frame and fill it with soil, leaving a 6-8 inch wide trench down the middle where you want the channel.
- Line the trench with a waterproof membrane (pond liner works well) to prevent water from immediately soaking into the soil below.
- Construct a simple wooden trough from cedar or pressure-treated planks to fit inside your trench. It doesn’t have to be perfectly waterproof.
- Place the trough in the trench and fill it with your chosen river stones or pebbles.
- Position the end of your downspout extension to empty directly into the head of the stone-filled channel. Now, rainwater will flow down the channel and gently seep out to water the plants on either side.
Total time: 3-4 hours. Material cost: $50-$100.
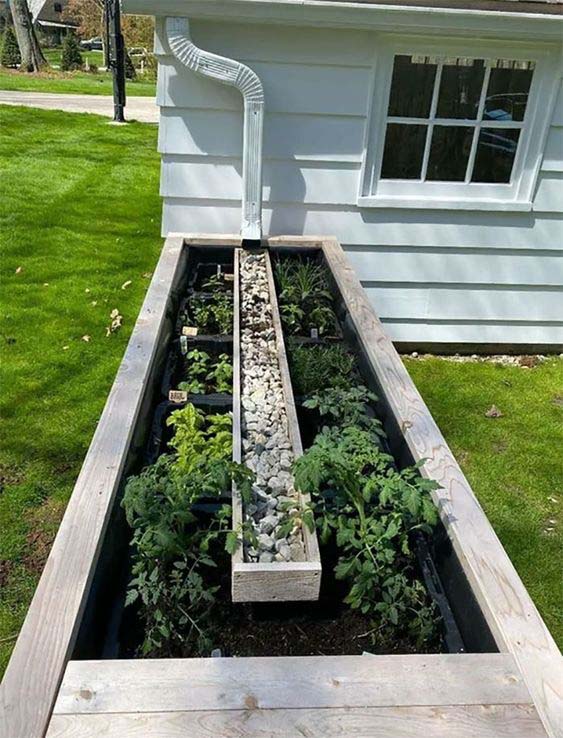
“Before you commit to this ingenious setup, run through this quick checklist:Measure Your Downspout: Do you have enough room to extend the downspout to the edge of the raised bed without creating an awkward trip hazard?Check the Grade: Does the ground where you plan to build the bed slope slightly *away* from your house’s foundation?”
You never want to encourage water to flow back toward your home.Sunlight Check: Is this location sunny enough for the leafy greens or vegetables you want to plant? A drainage solution is useless if the plants won’t grow there anyway.Water Volume: Is this a high-flow downspout from a large roof section? If so, you may need a wider channel or an overflow point at the far end of the bed to handle heavy rain.
5. Use a Trellis to Turn a Downspout into a Green Feature
The single element that elevates this entire corner is the black metal trellis. Without it, you just have a plain white downspout against a blue wall—functional, but forgotten. The trellis is a simple, inexpensive addition that completely changes the narrative. It gives the downspout a purpose beyond plumbing, transforming it into a structural support for a living, growing element. It’s a brilliant way to say, “I’m not hiding this downspout, I’m celebrating it.” The climbing vine softens the hard lines of the house and adds a touch of romantic, garden-y charm that the colorful pots alone couldn’t achieve.
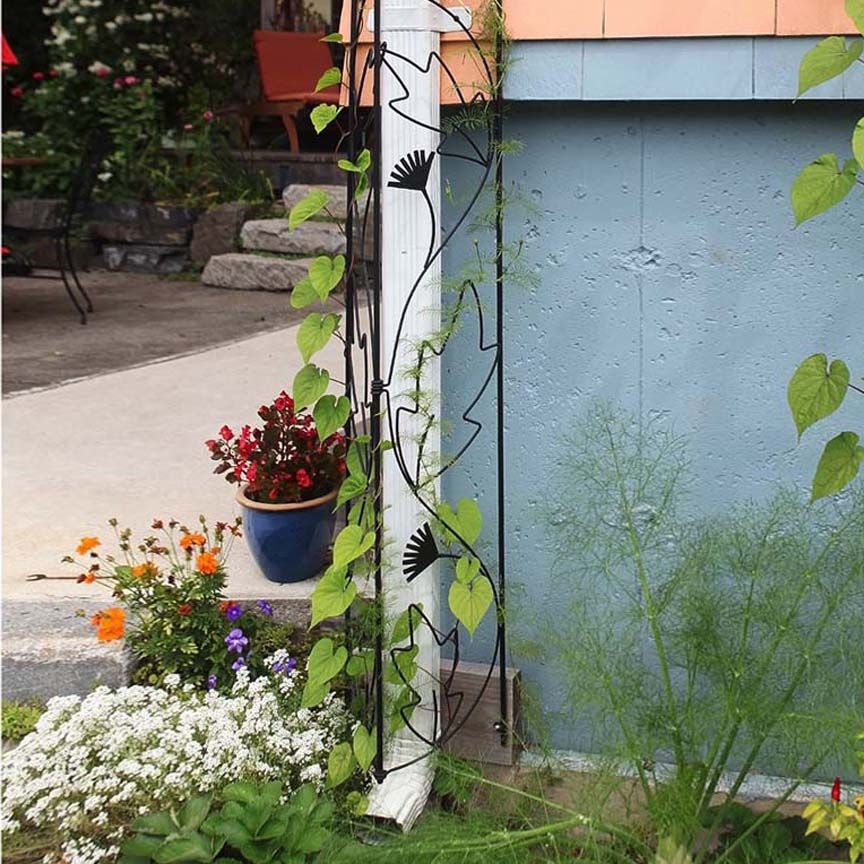
“This look follows a simple but effective formula: 50% functional hardware + 30% living greenery + 20% colorful accents.”
The downspout and trellis make up the foundational hardware. The climbing vine provides the lush, green element that softens the structure. The potted flowers at the base are the final punch of color and personality. You could easily swap the elements: trade the black trellis for a natural wood one, use a different climbing plant like clematis, or change the flower colors to a monochromatic scheme. As long as you keep that 50/30/20 ratio, the balanced and beautiful result will remain.
6. Hang a Decorative Rain Chain of Stones and Glass Beads
When hanging a decorative, lightweight rain chain like this, the biggest impact comes from its placement. Don’t just hang it from the most convenient gutter. Instead, treat it like a piece of art and consider the background. Position it where it will be framed by a contrasting texture, like the natural wood shingles here, or against a dark wall where the light-colored stones can pop. Also, consider what’s below it. Even a decorative chain needs a destination. Placing a simple ceramic bowl or a small patch of river stones beneath it completes the picture and acknowledges its function, even if it’s primarily for looks.
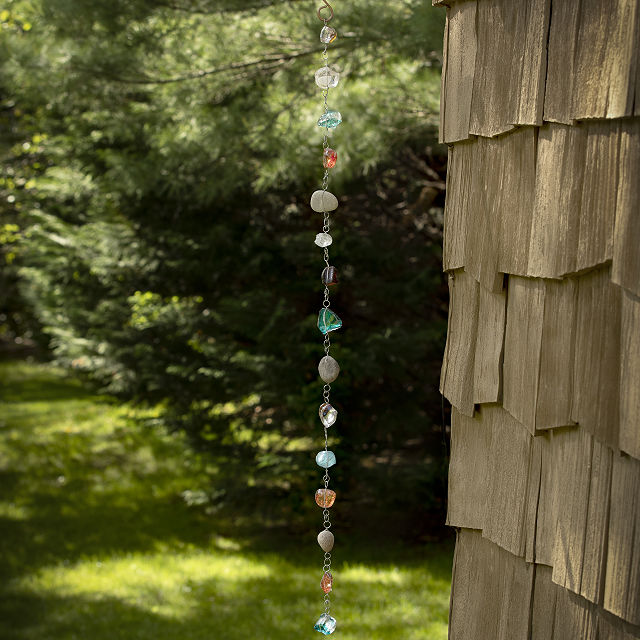
“There’s a growing movement in home design toward artisanal, unique pieces that tell a story, and this rain chain is a perfect example.”
We’re seeing a shift away from mass-produced, purely functional items and toward objects that feel personal and handcrafted. This trend, often called ‘Artisanal Functionalism,’ is all about finding beauty in everyday objects. A rain chain made of natural stones and glass beads feels more connected to the earth and less like a piece of plumbing, which resonates with our collective desire for more natural, calming home environments. It’s a small detail that makes a big statement about valuing craftsmanship.
7. Integrate Downspout Drainage into a Colorful Mulched Flower Bed
This design is successful because it embraces the downspout instead of trying to hide it. The black corrugated pipe isn’t an eyesore; it’s a deliberate, functional part of the landscape design. The deep color of the pipe visually connects to the dark soil peeking through the mulch, making it feel integrated. Furthermore, the use of a limited, high-impact color palette (yellow, orange, purple, red) against the neutral backdrop of the reddish-brown mulch creates a vibrant, professional-looking display. The gray gravel border provides a crisp, clean edge that makes the entire bed look polished and intentional.
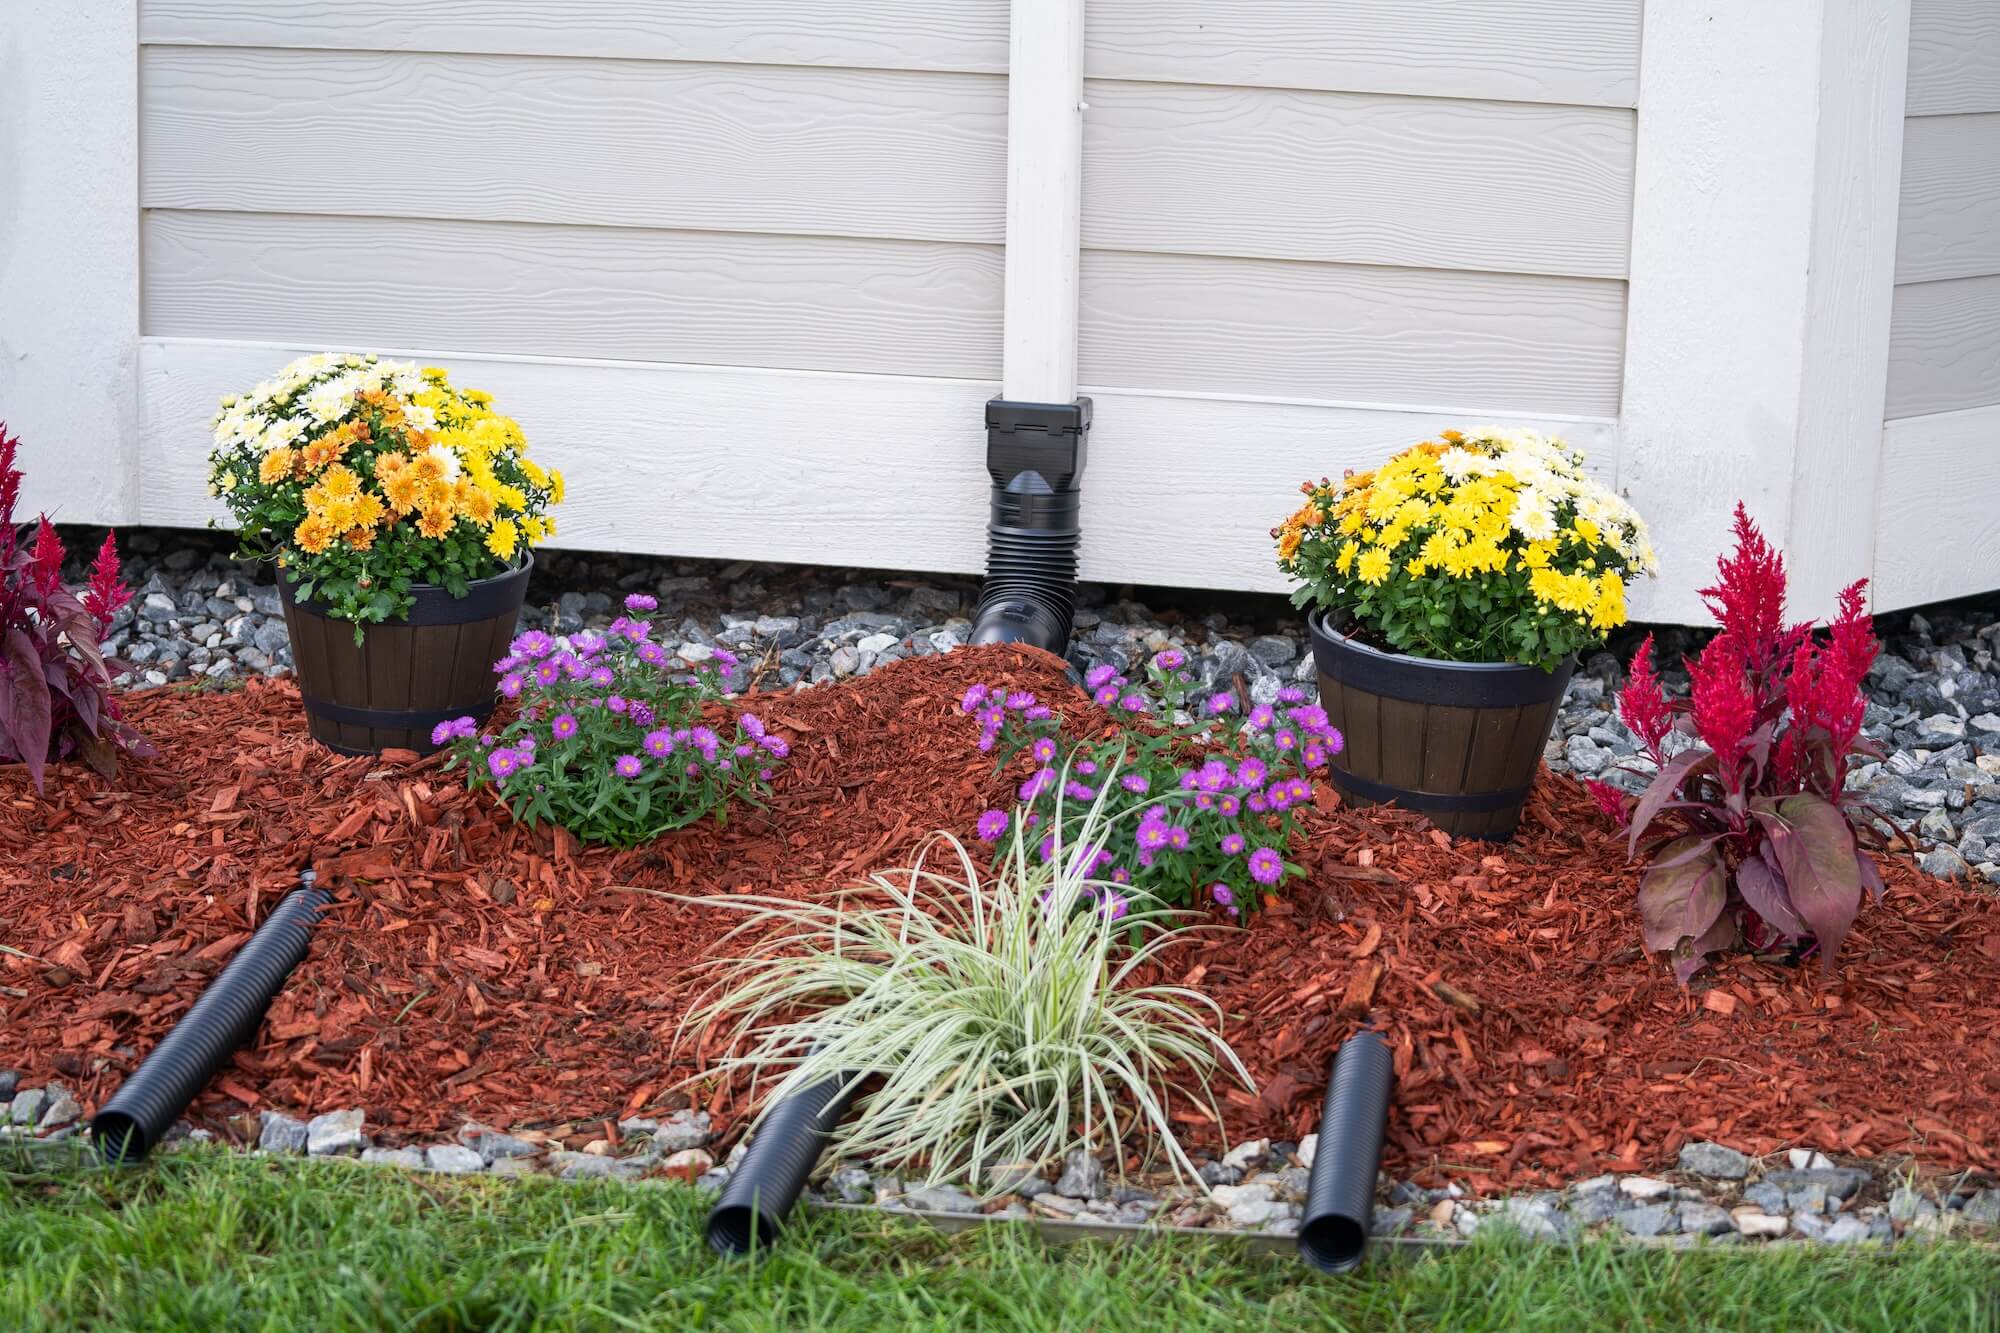
“This is an incredibly versatile idea that works well for small to medium-sized garden beds, typically in the range of 15 to 50 square feet.”
It’s perfect for those awkward corners of the yard or foundation plantings. The key is that the scale of the plants matches the scale of the space. Using a mix of potted plants (like the mums) and in-ground plantings allows you to create height and dimension even in a small footprint. For a much larger area, you would need to repeat the plant groupings to avoid the bed looking sparse. For a very tiny space, like a patio, you could adapt this using only containers, as seen in Idea #2.
8. Feature a Designer Glasswork Rain Chain in a Garden Setting
A high-end, artistic rain chain from a designer like Margaret Joplin is a stunning statement piece. But let’s be real: this is jewelry for your house, not a primary drainage solution for a 2,000-square-foot roof. These delicate, intricate designs are not engineered to handle the sheet of water coming off a roof in a major storm. They are best used on a smaller structure, like a garden shed, a gazebo, or a small porch roof, where the water volume is manageable. Placing it on your main gutter system without a traditional downspout nearby is asking for overflow and potential water damage to your foundation.
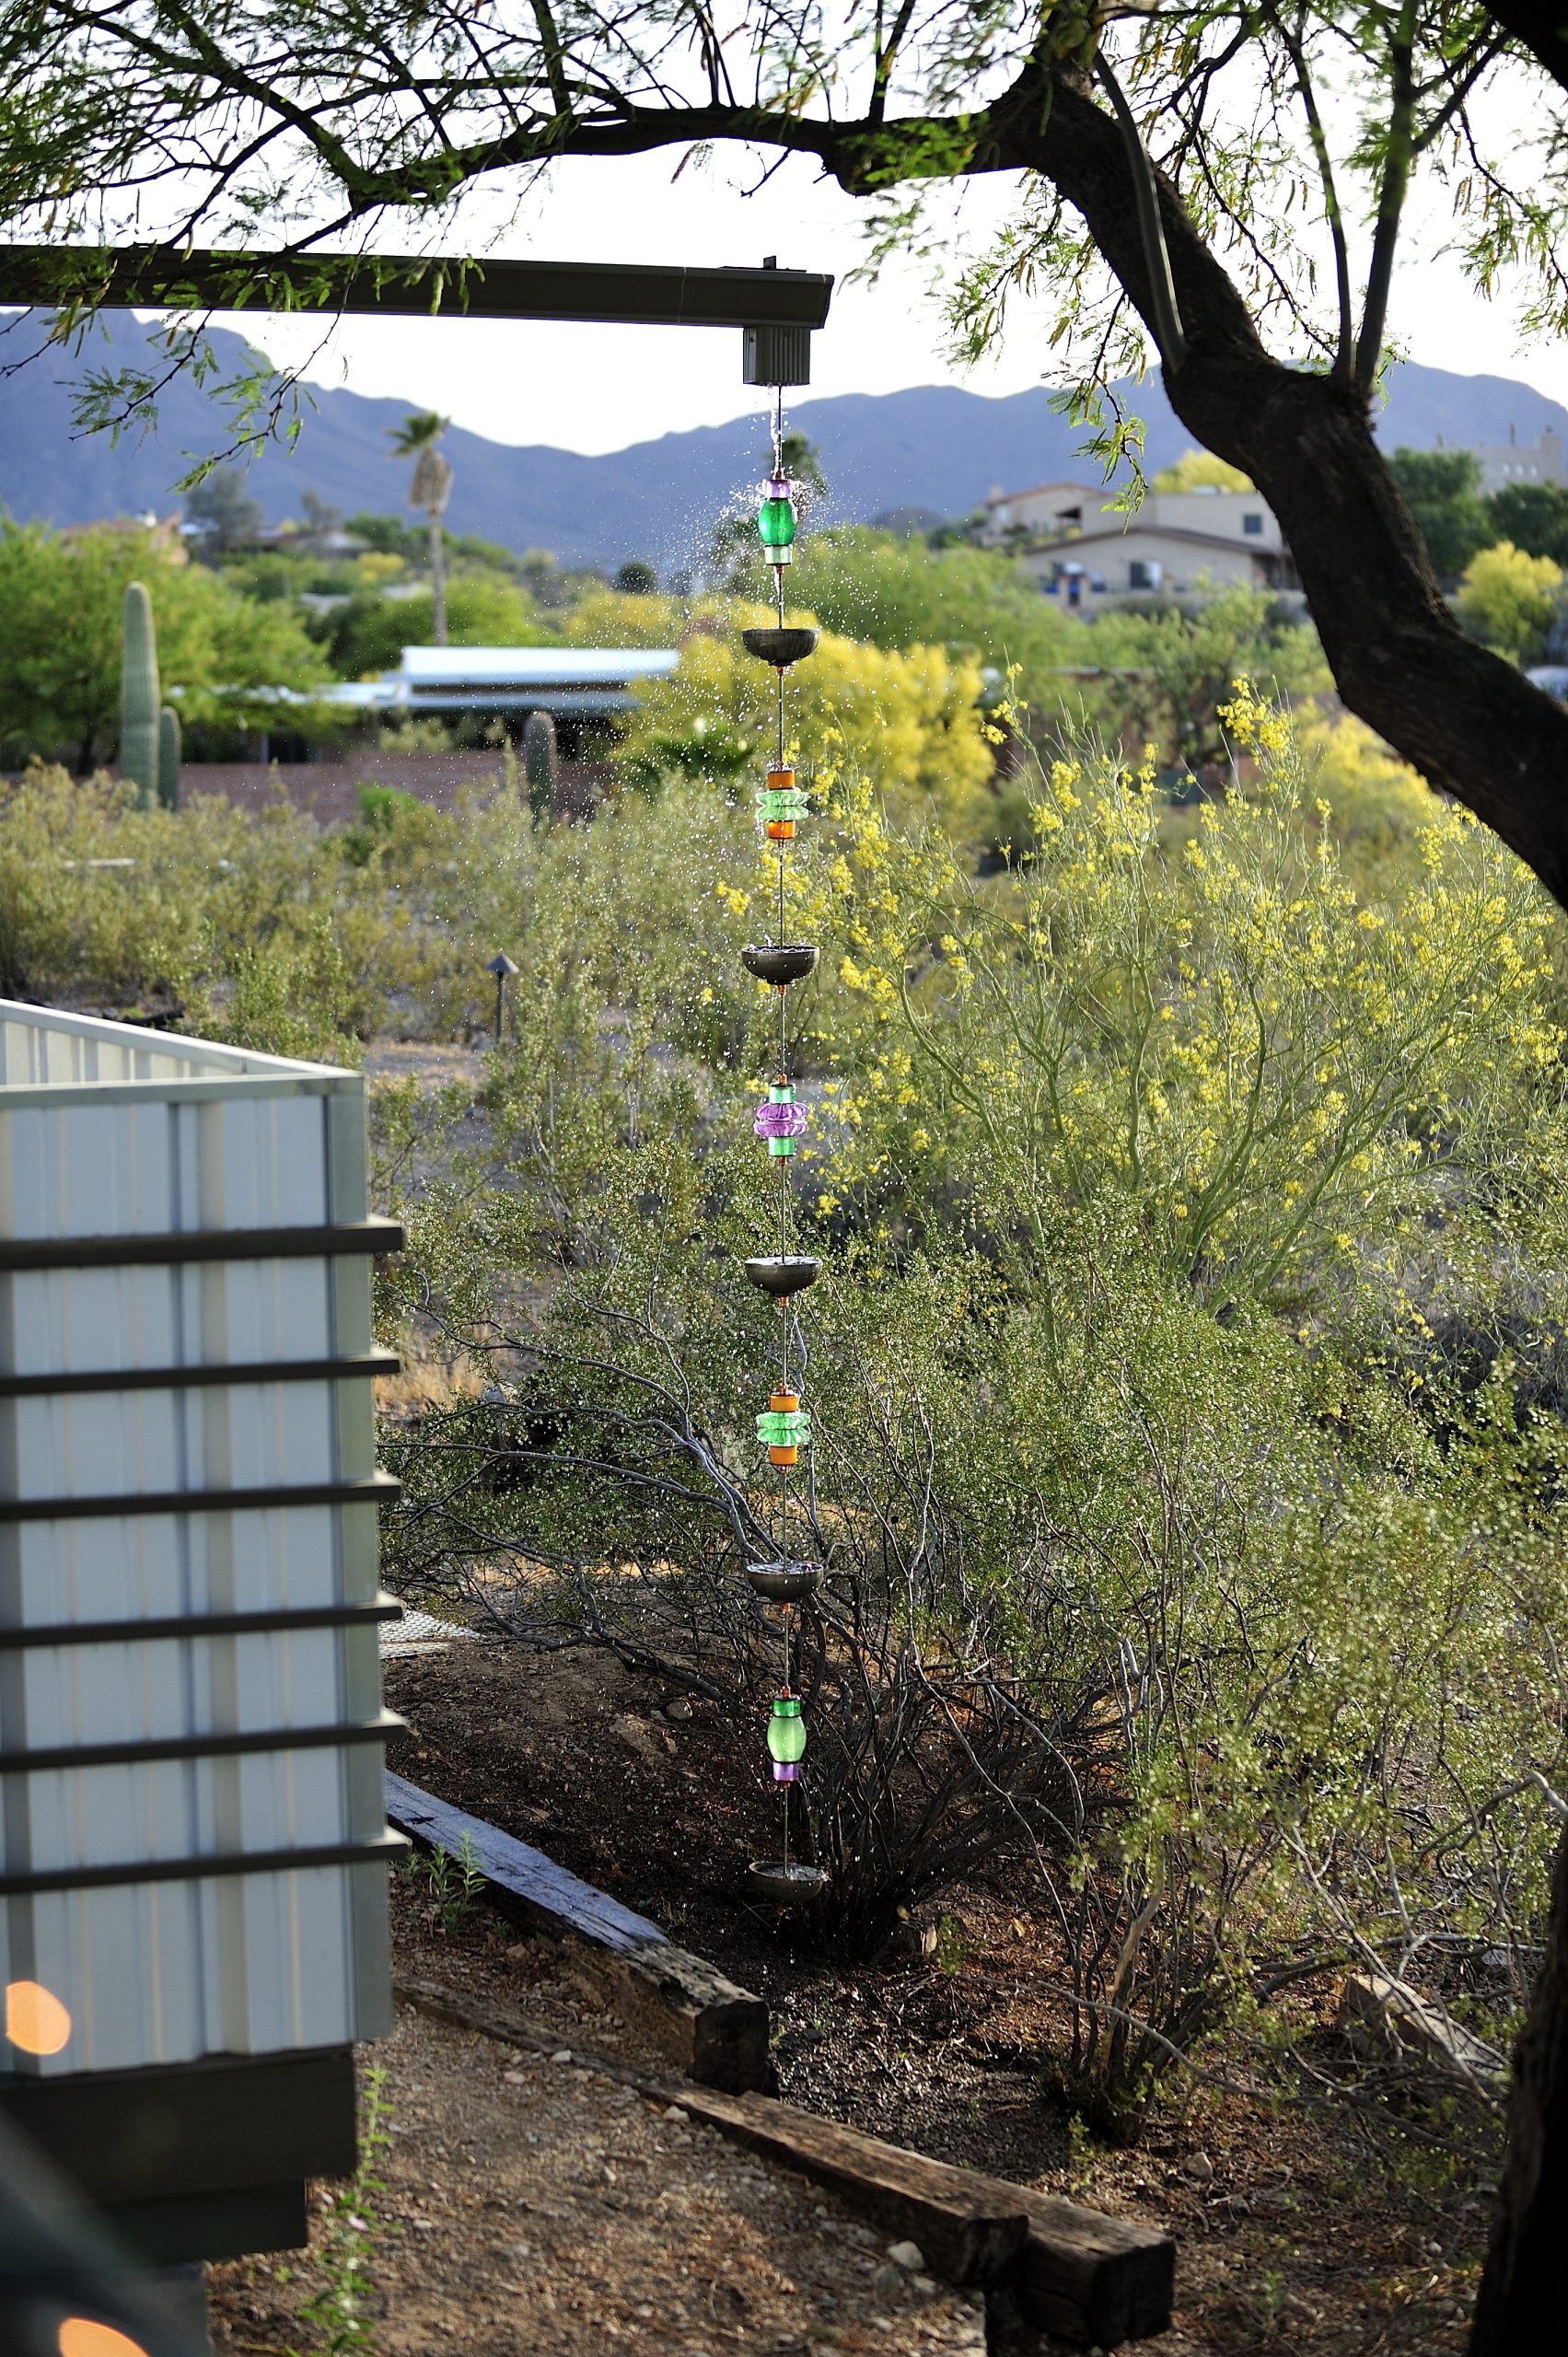
“Collaborations between artists and design firms are becoming a huge trend, as homeowners look for ways to personalize their spaces beyond what’s available at big-box stores.”
Featuring a piece from a specific artist like Margaret Joplin of Glass Works Rain Chains signals a move towards ‘slow design’—investing in unique, crafted pieces that have a story and will be cherished for years. This isn’t about just solving a drainage problem; it’s about curating your home’s exterior with the same care you’d give your interior art collection. It’s a splurge, but one that adds a layer of personality that mass-produced items can’t match.
9. Create a Structured Drainage Bed with a Raised Wooden Planter
This tidy look breaks down into a simple formula: 40% hardscaping + 40% organic material + 20% living plants. The wooden planter box and the white downspout form the hardscape structure. The river rocks and black mulch are your organic materials, providing texture and color contrast. The green strap-leaf plants are the final touch of life. You could easily change the recipe: swap the wood for a sleek metal planter, use black pebbles instead of tan river rock, or plant flowering perennials instead of leafy greens. As long as you maintain that balance of structure, texture, and life, you’ll get a similarly clean and organized result.
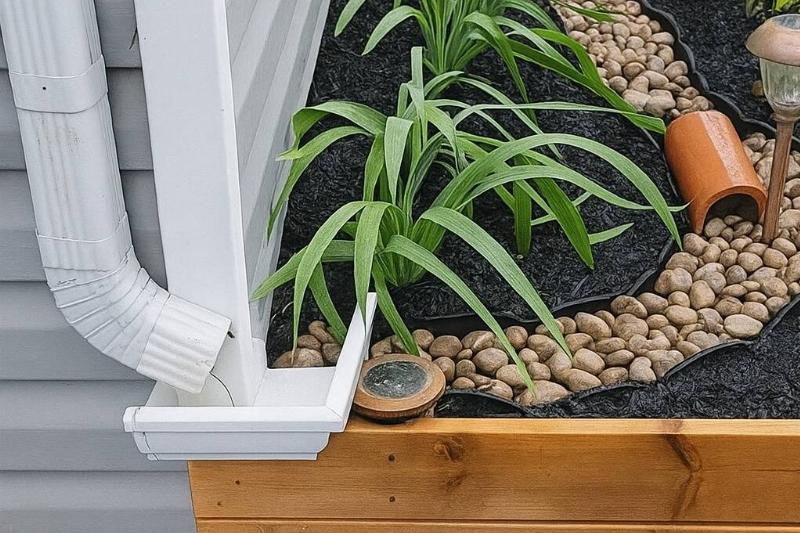
“The secret to keeping this look so crisp is the black plastic edging separating the rocks from the mulch.”
Don’t skip this step. Without that hard barrier, the mulch will inevitably wash into the rocks, and the rocks will get scattered into the mulch after the first heavy rain or leaf-blowing session. It’s an inexpensive detail (around $1 per foot) that saves you hours of tedious cleaning and keeps the lines of your design sharp. Make sure the top of the edging is flush with or slightly below the level of the mulch and rocks so it’s not visually obtrusive.
10. Use a Metallic Lotus Cup Rain Chain with Dense Greenery
Open-cup designs like these lotus shapes are beautiful but can be magnets for debris. Expect to clear out leaves, twigs, and seed pods from the cups, especially in the fall. A quick blast with a garden hose every month or two should do the trick. The tall grasses and shrubs below are great for disguising the splash point, but they will also need to be trimmed back occasionally to ensure they don’t grow into the chain itself. The white painted post shows wear and tear, which is a good reminder that any painted surface near a splash zone will require more frequent touch-ups to prevent peeling and wood rot.
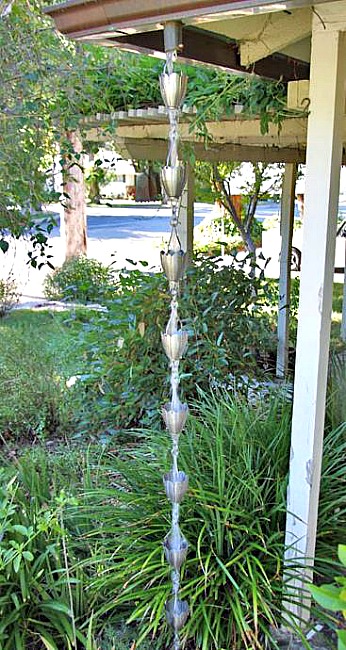
“This composition works because of the elegant contrast in form and texture.”
The rain chain provides a strong, repeating vertical element with its metallic, man-made lotus shapes. This is set against the soft, organic, and slightly chaotic backdrop of the tall grasses and leafy shrubs. The rigid geometry of the chain against the free-form growth of the plants creates a compelling visual tension. The aged white post adds a touch of rustic history, suggesting the garden is well-established and loved. It feels both functional and naturally integrated into its surroundings.
11. Craft a Whimsical Rain Chain from Blue Sea Glass and Driftwood
The single element that makes this piece so enchanting is the driftwood. You could have a chain of sea glass, and it would be pretty. But adding that gnarled, sun-bleached piece of driftwood at the top completely transforms it. It grounds the piece in nature, giving it an origin story and a sense of found treasure. It provides a beautiful, organic contrast to the polished glass and metal links, and its natural curve adds a graceful, sculptural quality. Without the driftwood, it’s a craft project; with it, it’s a piece of art that feels like it washed up on the shore just for you.
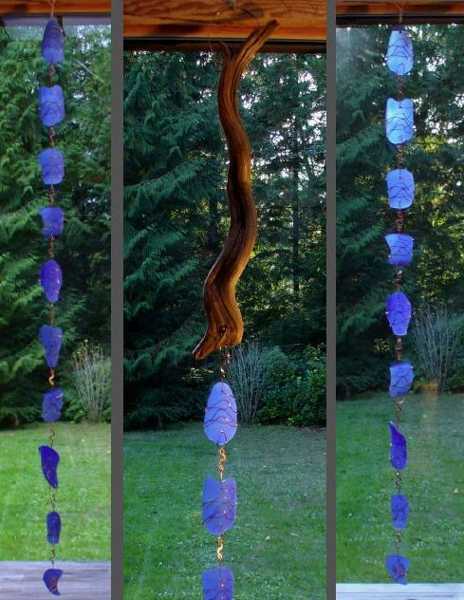
“This is a gorgeous, artistic piece, but let’s be clear: it is 100% decorative.”
This is not a functional downspout replacement. The irregular shapes of the sea glass mean it will shed and splash water everywhere rather than guiding it downwards. In a heavy rain, it will offer virtually no control over the water flow. Think of this as an outdoor mobile or a piece of garden sculpture that happens to interact with the rain. Hang it from a tree branch or a pergola where it can be enjoyed for its beauty, not from a gutter where it’s expected to do a job.
12. Install a Dark Metal Rain Chain with Spherical Cups
While a high-end, handcrafted rain chain can cost hundreds, you can get this sophisticated look for much less. Check out retailers like Amazon or Wayfair for ‘orb’ or ‘sphere’ style rain chains, which often retail for $70-$120 for a standard 8.5-foot length. The key is the dark metallic finish, which looks more expensive than shiny, cheap-looking silver. For the basin, you don’t need a custom copper bowl. A large, simple dark ceramic or resin planter bowl from a garden center ($30-$50) filled with black river rocks ($20/bag) will create the same elegant, water-collecting base for a fraction of the cost.
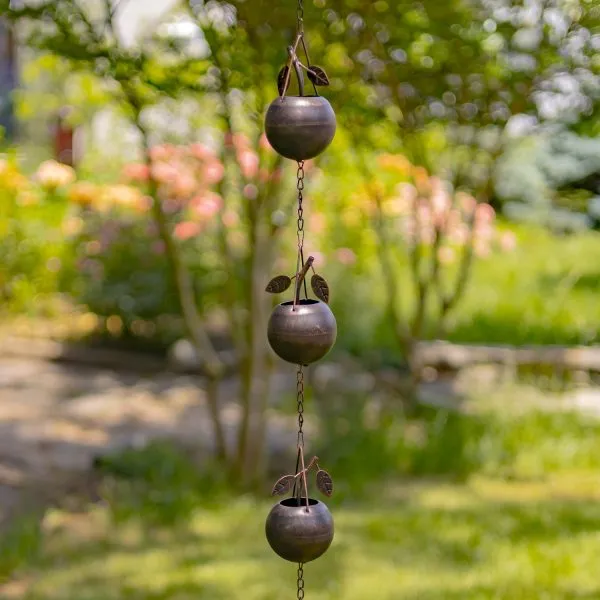
“For rain chains with a cup or sphere design, the sound is as important as the look.”
To get a pleasant, melodic dripping sound instead of a harsh splashing noise, you need to create a ‘landing pad’ for the water at the base. A simple anchor chain dropped into a basin of water is okay, but for a richer sound, fill the basin with 2-3 inches of smooth, varied-sized river stones. The water will then trickle over the stones, creating a more complex and soothing sound profile. This also helps reduce splash, keeping the surrounding area drier.
13. Watch Water Flow Through a Copper Lotus Rain Chain
The appeal here is pure sensory delight. It works because it makes an invisible process—rainwater flowing through a downspout—both visible and audible. The lotus cup shape is perfectly designed to catch water from the cup above, channel it briefly, and then release it in a gentle stream to the next, creating a mesmerizing, continuous waterfall effect. The warm glow of the copper against the cool, soft-focus greens of the foliage creates a beautiful color contrast that feels both rich and natural. It’s a dynamic sculpture that performs every time it rains.
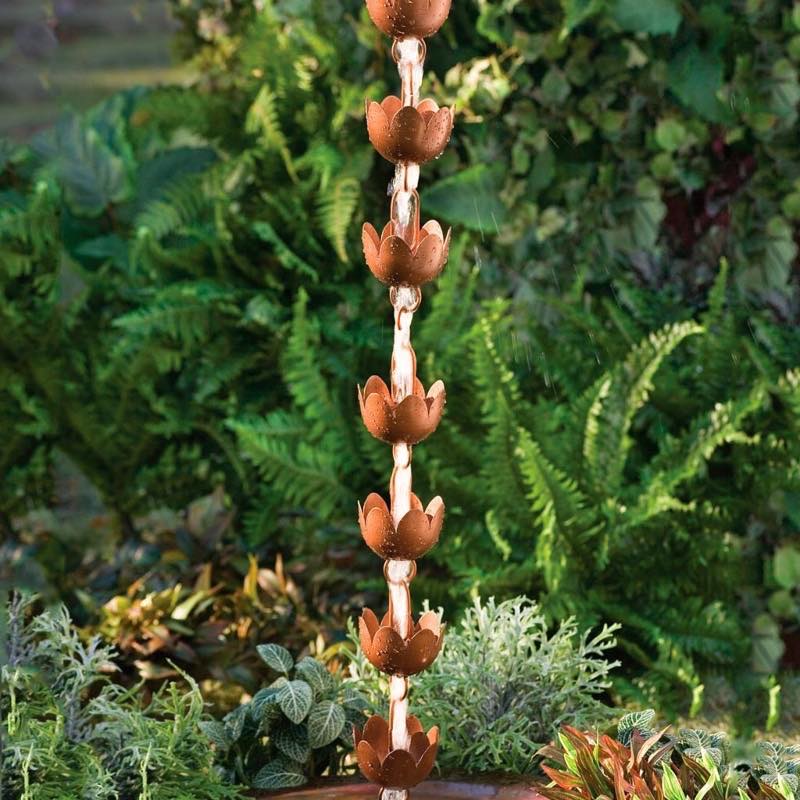
“An 8.5-foot rain chain (a standard length) is perfect for a single-story home or the lower roofline of a porch, gazebo, or shed.”
For a two-story home, you will need to buy two chains and connect them, or purchase a separate extension kit. Before buying, measure the distance from your gutter to the ground. You want the chain to terminate about 6-12 inches above the basin or splash block to prevent the bottom from sitting in standing water. Compare the scale here to Idea #17, which is designed for a much grander, multi-story building.
14. Create a Playful Watering Can Rain Chain with a Teacup Collector
The genius of this design is its commitment to the bit. The one thing that makes it unforgettable is the oversized blue teacup and saucer at the bottom. The watering can chain is clever, but the teacup is the punchline that elevates the entire concept from ‘repurposed items’ to a whimsical, story-driven piece of garden art. It completes the narrative: water is ‘poured’ from the cans and ‘collected’ for a giant’s tea party. It’s this playful, imaginative quality that makes you smile and transforms a drainage solution into a conversation starter.
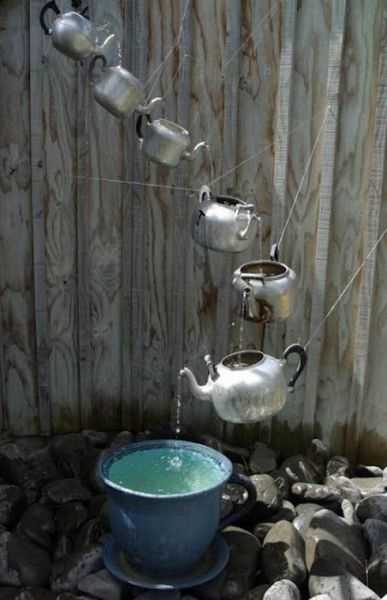
“Want to make your own teapot or watering can chain?”
Here’s the basic method: Source 6-8 small, lightweight metal teapots or watering cans (thrift stores are great for this).Using a drill with a metal bit, drill a small hole in the bottom of each pot. This is where water will drain out.Drill another small hole near the top of the handle and another at the tip of the spout.Use sturdy galvanized wire or small sections of chain to link them together, connecting the handle of one pot to the spout of the one above it.Create a stronger wire loop at the top for hanging. Aim for a 6-inch gap between the spout of one and the opening of the next. Total time: 2-3 hours. Cost: $30-$60.
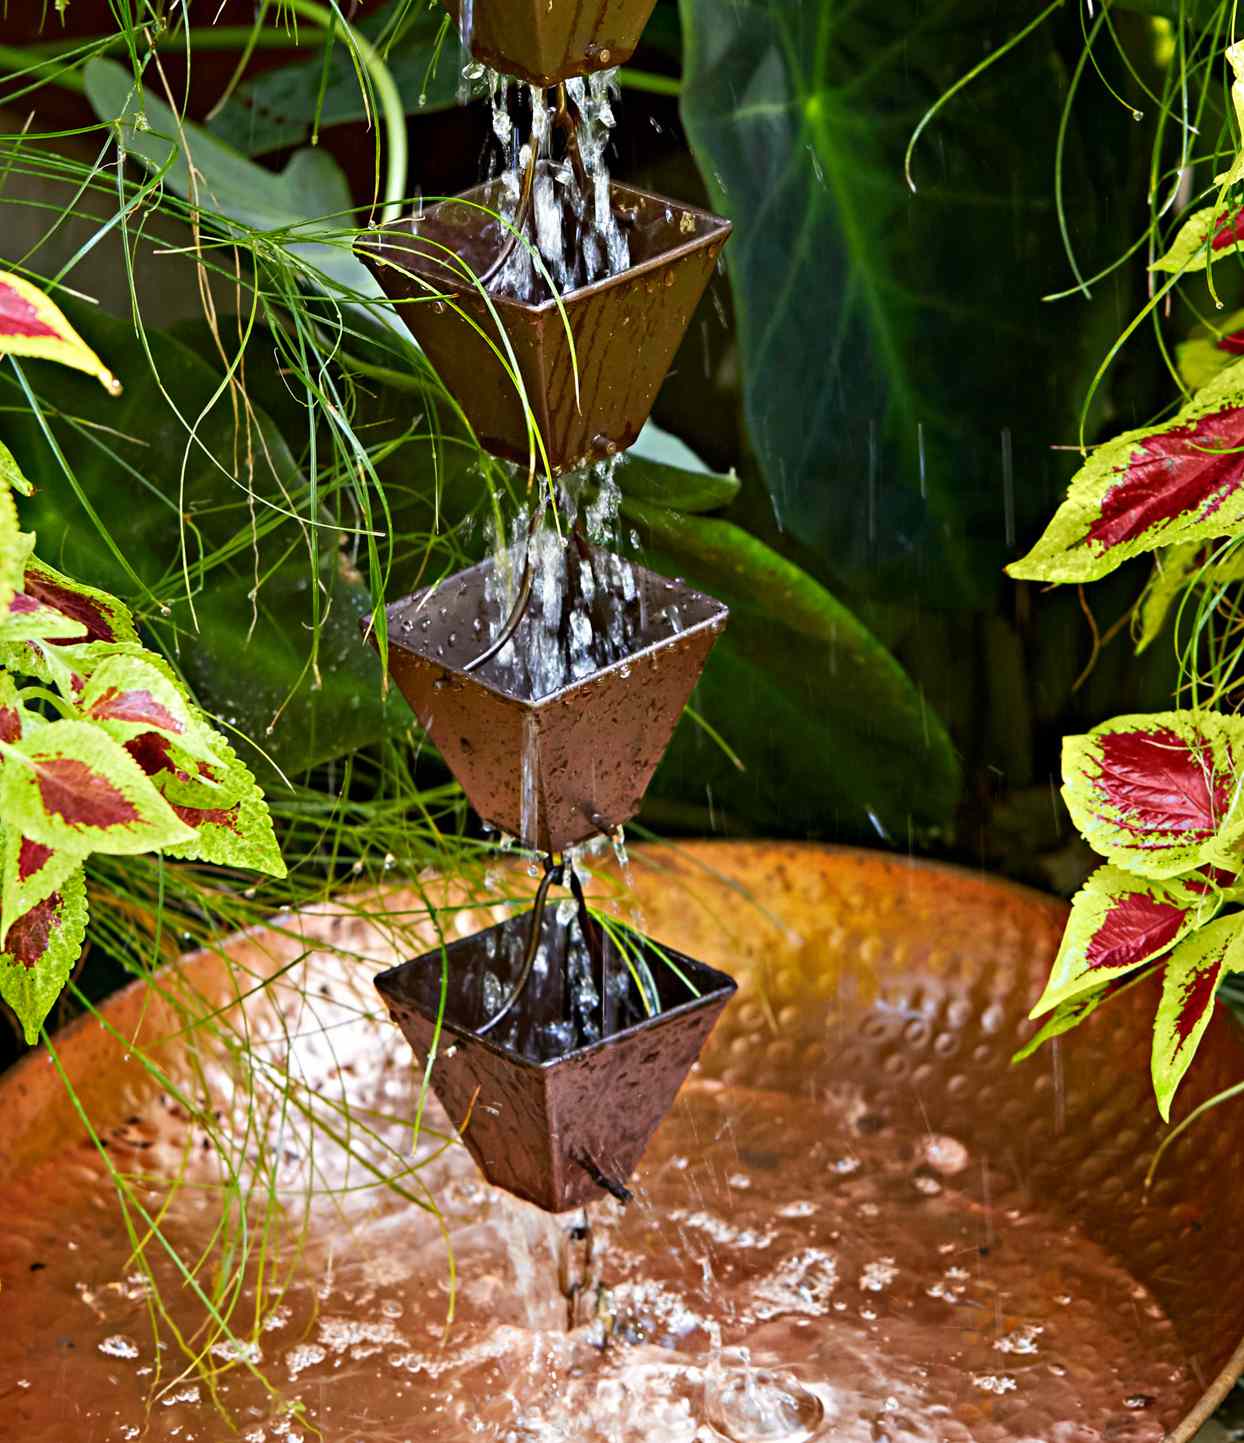
15. Pair a Cascading Rain Chain with a Hammered Copper Basin
Getting this lush, high-end look involves a few key investments. The copper elements are the star, and they carry the highest cost. Here’s a potential breakdown:
- Main Furniture (Basin & Chain): A high-quality copper rain chain ($150-$300) and a large hammered copper basin ($200-$500) are the main expense.
- Textiles (Plants): The lush, variegated foliage is crucial. Budget $100-$250 for a mix of mature perennials.
- Decor/Accessories (Rocks/Lighting): Optional, but add $50 for river rocks or accent lighting.
- TOTAL: $500 – $1,100
Budget alternative: Use a powder-coated aluminum chain in a bronze finish ($80) and a large ceramic or resin bowl ($60) to achieve a similar vibe for about 40% of the cost.
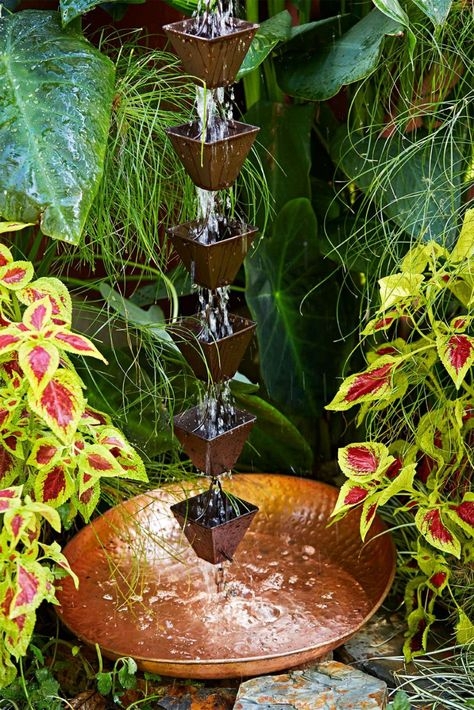
“The visual harmony of this scene is a study in complementary colors and textures.”
The formula is approximately 60% lush greenery + 30% warm metallics + 10% flowing water. The dominant element is the foliage, with its mix of greens, reds, and lime. The dark brown chain and hammered copper basin provide the warm, textural counterpoint. The final 10% is the motion and sparkle of the water itself, which brings the whole scene to life. You could change the plants to all-green ferns or use a different style of chain, but keeping that 60/30/10 ratio of plants to hardware to water is key to its success.
16. Combine a Silver Downspout with a Rustic Wooden Post
This is a purely functional, no-frills setup, and that’s its strength. But be aware of the materials. That sharp bend at the bottom of the corrugated downspout is a prime spot for clogs. Leaves and debris can easily get trapped there, leading to backups and overflow. It will require an annual check and clean-out, especially if you have large trees nearby. Also, placing untreated wood directly next to a drainage point is risky. Even with the downspout directing water away, splash-back will keep the base of that post consistently damp, accelerating rot and attracting insects. A concrete or stone base for the post would be a more durable choice.
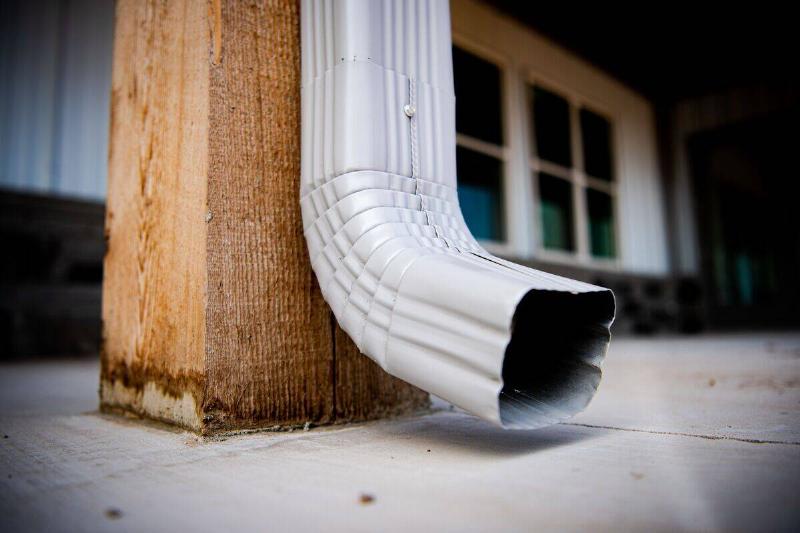
“This composition feels strong and grounded because of the powerful juxtaposition of materials.”
The cold, industrial, machine-made texture of the silver corrugated downspout is placed directly against the warm, organic, and weathered texture of the rough-hewn wooden post. One is smooth and reflective, the other is rough and matte. This high level of contrast creates visual interest and makes both materials appear more distinct and true to their nature. The plain concrete ground serves as a neutral stage, allowing the two main elements to take center focus. It’s an honest, utilitarian aesthetic.
17. Integrate a Sculptural Downspout with a Carved Stone Face
The undeniable star of this show is the carved stone grotesque. Everything else—the ornate metal hopper, the substantial downspout, the massive stone wall—is there to support it. If you removed the face, you would still have a very handsome, historic-looking drainage system. But you would lose all the whimsy, personality, and storytelling. The face transforms the entire facade from merely ‘old’ to ‘enchanted.’ It implies history, mythology, and a sense of humor, making you wonder who carved it and why. It’s a masterstroke of architectural detail that elevates a functional object into a piece of art.

“This is not an idea for your average suburban home.”
This kind of grand, integrated architectural element is designed for a building with significant scale and a specific historical or revivalist style (like Gothic, Tudor, or Chateauesque). The stone blocks of the wall themselves are massive, suggesting high ceilings and thick walls. The downspout and collector box are oversized to match. To attempt this on a smaller home with vinyl siding would look completely out of place and cartoonish. This is a look that requires a minimum facade height of 20-30 feet and a commitment to authentic, substantial materials. Compare this to the much more adaptable Galvanized Bucket Chain.
18. Hang a Galvanized Bucket Rain Chain on Yellow Siding
This is the perfect example of achieving a high-impact, custom look on a shoestring budget. You can find pre-made galvanized bucket rain chains online for $30-$60. But for an even cheaper and more creative option, you can make it yourself. Source a dozen miniature galvanized pails from a craft store or Amazon for about $15. Buy a few feet of simple metal chain ($10) and a bag of S-hooks ($5) from the hardware store. Drill a small hole in the bottom of each bucket, and use the S-hooks to attach them to the chain. You’ve just created a charming, functional piece of garden art for under $30.
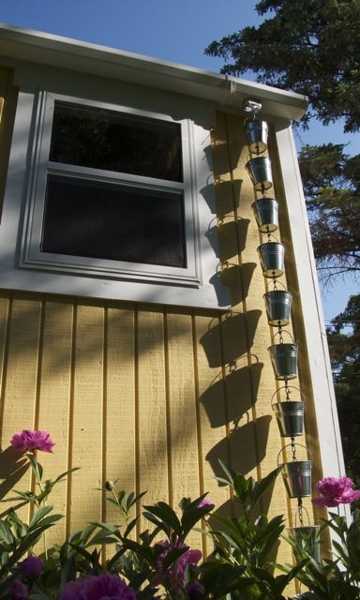
“The ‘Modern Farmhouse’ trend has been huge for years, but people are getting tired of the same old black, white, and gray palette.”
This look points to what’s next: ‘Colorful Farmhouse’ or ‘Dopamine Decor.’ It takes the same rustic, unpretentious elements (like galvanized metal and vertical siding) but injects a dose of personality with cheerful, unexpected color. The bright yellow siding paired with the quaint buckets and vibrant pink peonies feels joyful and personal. It’s a move away from cookie-cutter trends and toward creating homes that genuinely make us happy.
19. Design a Modern Drainage Bed with Black Downspout and River Stones
The formula for this sleek, modern look is all about minimalism and clean lines: 70% neutral hardscape + 30% natural texture. The black downspout, gray gravel, and dark landscape edging create a strong, neutral foundation. The smooth, multi-toned river stones provide the 30% of natural texture, breaking up the monochromatic scheme without adding overwhelming color. There are no plants, no ornaments—the beauty comes from the simplicity and the interplay between the smooth stones and the fine gravel. To adapt this, you could swap the black downspout for a galvanized steel one, but you’d need to keep the material palette limited and uncluttered to maintain the modern feel.
“This looks incredibly low-maintenance, and for the most part, it is.”
However, that pristine bed of rocks is a magnet for leaves, pine needles, and dust. To keep it looking sharp, you will need to use a leaf blower on a low setting every few weeks to clear debris. About once a year, you may need to rake the rocks aside, clean the fabric underneath, and refresh any gravel that has washed away. The biggest challenge is weeds; even with landscape fabric underneath, determined weeds will find a way. Pulling them by hand as soon as they appear is the best strategy.
20. Construct a Modern Wooden Rain Chain Catchment Screen
This design is a masterclass in layering materials and functions. It works because it’s not just a rain chain; it’s a complete ‘water moment’ that engages multiple senses. The metal rain chain guides the water, creating sound. The sculptural wooden trough catches and redirects it, adding a second layer of sound and motion. The horizontal slat screen provides a warm, textured backdrop that makes the whole installation pop against the cool gray wall. Finally, the lush green foliage at the base grounds the entire piece and softens the modern lines. Each element has a distinct role, but they work together to create a rich, cohesive vignette.
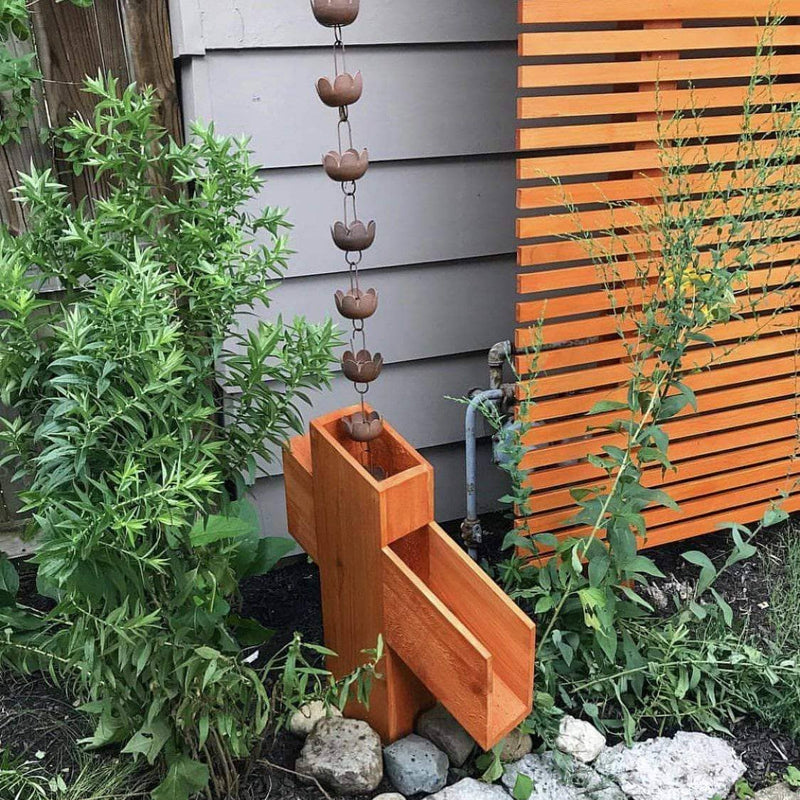
“When working with wood for an outdoor water feature, material choice is everything.”
To ensure your beautiful structure doesn’t rot away in two seasons, you must use a species known for its natural water and insect resistance. Teak, Ipe, and Cedar are top-tier choices. They are more expensive upfront, but they will last for decades. A less expensive but still effective option is to use pressure-treated pine and then apply a high-quality exterior stain and water sealant every 1-2 years. Do not use untreated pine, fir, or poplar – it will fail quickly.
21. Showcase an Ornate Copper Fish Rain Chain
that makes this piece so captivating is the sense of dynamic motion, even when it’s not raining. The sculptural form of the fish, with its open mouth and curved body, is designed to look like it’s perpetually swimming and spouting water. The detailed scales and fins add a layer of realism and craftsmanship that draws you in for a closer look. While any rain chain is functional, this one transcends its purpose to become a true piece of kinetic art. It’s the artistry and implied movement that set it apart from a simple series of cups or links.
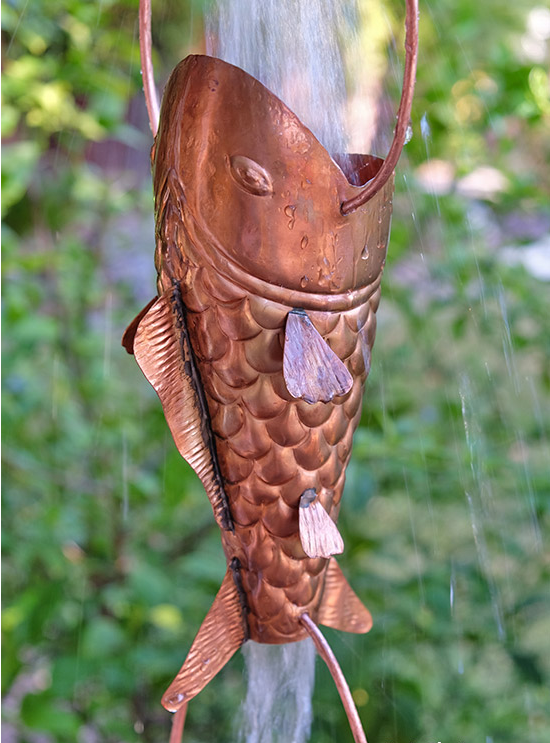
“An intricate, sculptural rain chain like this requires more maintenance than a simple cup or link style.”
The detailed crevices of the scales and fins are perfect spots for algae, pollen, and debris to collect. To keep it looking its best and functioning properly, you’ll need to take it down at least once a year and give it a gentle scrub with a soft brush and some soapy water. It’s a small price to pay for such a unique piece, but it’s a task you should anticipate. This is not a ‘set it and forget it’ accessory. Also, be aware that genuine copper pieces like this are a target for theft in some areas.
22. Install an Artistic Copper and Patina Water Feature
This works because it feels like a discovery—a hidden gem in the garden. The combination of polished copper and green verdigris patina gives it an immediate sense of age and history, as if it’s been part of the landscape for centuries. Setting this intricate, man-made sculpture against the rough, natural texture of the stone wall creates a stunning contrast. The sound and motion of the streaming water add a fourth dimension, transforming it from a static object into a living feature. It’s a perfect fusion of art, architecture, and nature.
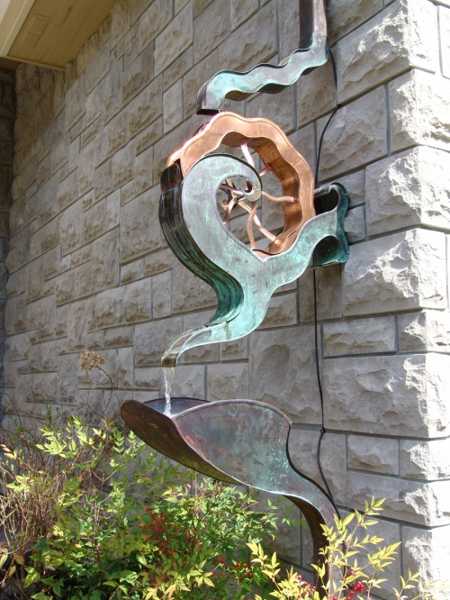
“This is a high-end, custom look that commands a significant budget.”
It’s less of a downspout accessory and more of a commissioned art piece with plumbing.Main Furniture (Sculpture): A custom-designed and fabricated copper water feature of this complexity would likely start at $2,000 and could easily reach $5,000 or more, depending on the artist and size.Lighting: Professional uplighting to showcase it at night would add $300-$600.Installation: This requires a plumber and possibly a mason. Budget $500-$1,500 for installation.TOTAL: $2,800 – $7,100+Budget alternative: A much simpler, off-the-shelf tiered copper rain chain feeding into a patina-finish basin can give a hint of this style for under $500. Compare with Idea #15.
23. Use a Whimsical Stone Cat and Turtle Splash Block
What makes this so utterly charming? It’s the element of surprise. At a glance, it looks like a simple, rustic stone splash block. But as you get closer, you notice the little turtle peeking out from the water channel and the cat sleeping peacefully on top. It’s these small, narrative details that transform a purely utilitarian object into a source of delight. They give the piece a personality and a sense of humor, turning a boring corner of the foundation into a tiny, whimsical scene. It’s a reminder that even the most practical items in our home can be playful.
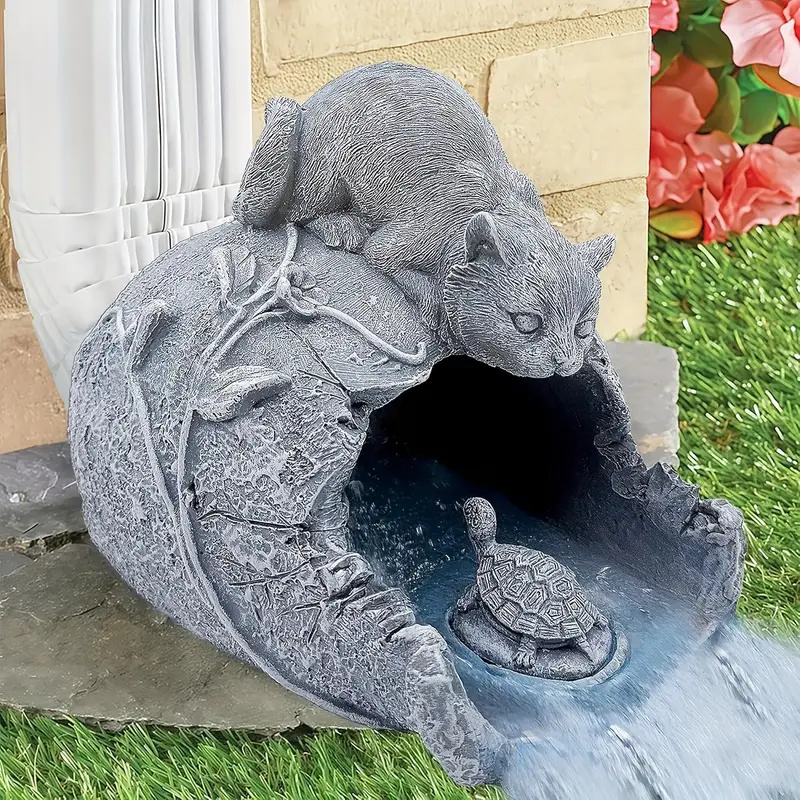
“You don’t need a custom-carved stone sculpture to add a touch of whimsy to your downspout.”
This playful look is easily achievable on a budget. Big-box home improvement stores and online garden retailers sell a huge variety of decorative resin splash blocks for $20-$40. You can find frogs, turtles, fish, gnomes, and all sorts of other critters. While this example is stone, a resin version will give you the same playful vibe for a fraction of the cost and weight, making it easy to move for mowing. It’s a simple, inexpensive swap that instantly boosts your garden’s personality score.
24. Add a Decorative Frog Splash Block to a White Downspout
A decorative splash block like this is a fun, inexpensive way to add personality, but it has its limits. These resin pieces are very lightweight. In a heavy downpour, the force of the water coming out of the downspout can easily push the splash block out of position, sending water gushing towards your foundation—the very thing you’re trying to avoid. To make it effective, you should secure it in place. Driving a landscape spike or a long tent stake through the back of the splash block and into the ground will keep it from wandering off during the next storm.
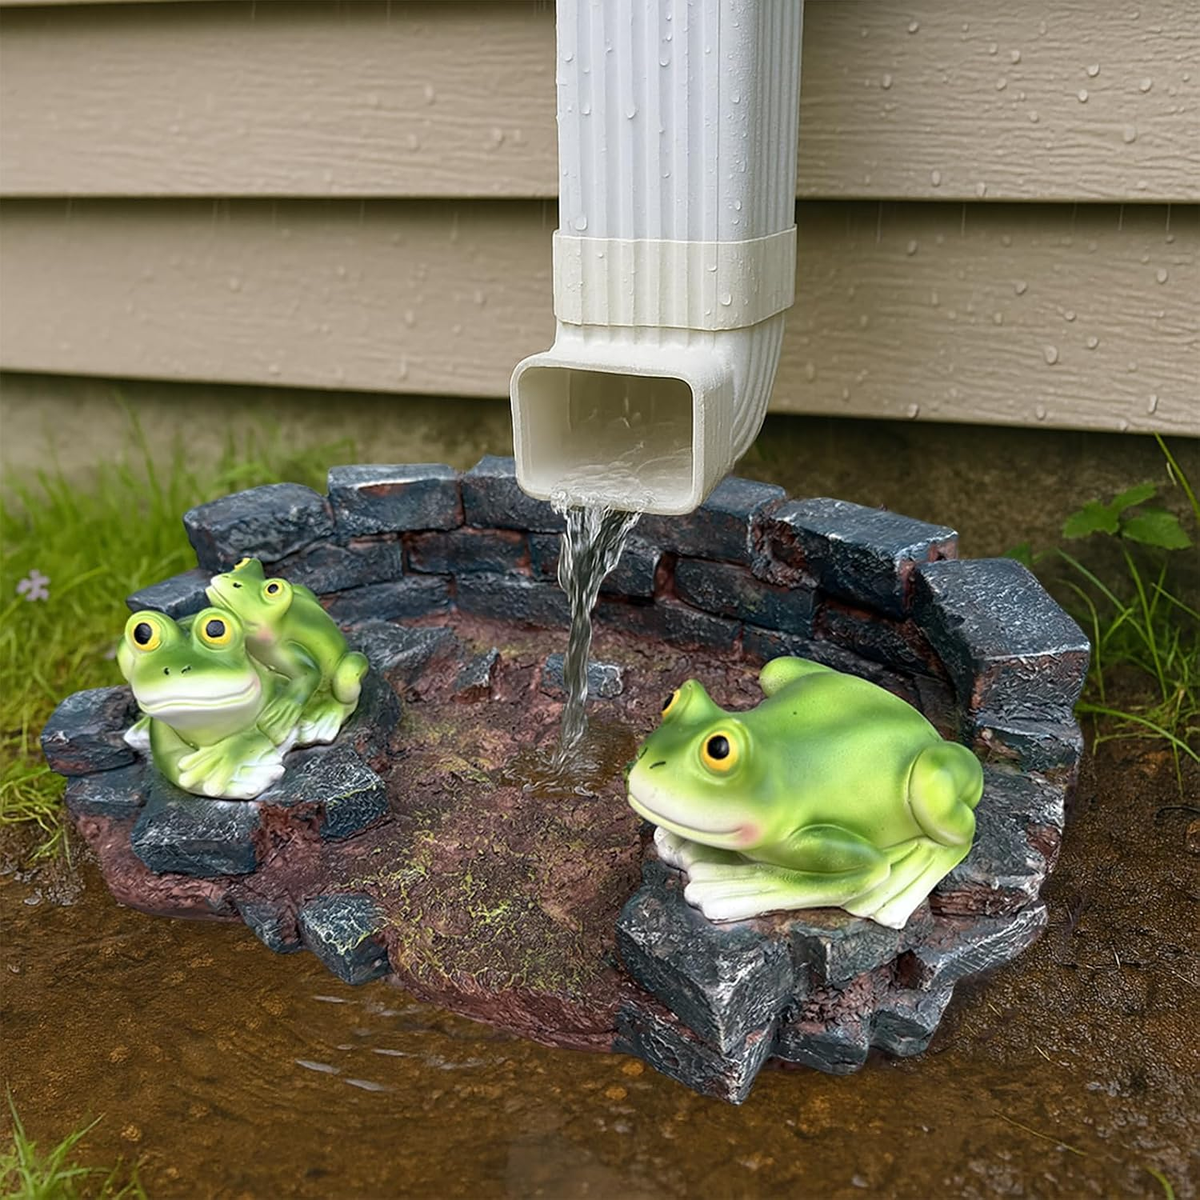
“This little scene is effective because it uses the principles of repetition and color pop.”
The three green frogs are a classic design trick—an odd number of items arranged together is always more visually appealing than an even number. Their bright, almost cartoonish green color stands in sharp contrast to the neutral tan siding and charcoal-colored splash block, immediately drawing your eye. It’s a small detail, but the shot of vibrant color makes the entire corner feel more lively and cheerful. A simpler design can be seen in Idea #28.
25. Install a Dark Metal Rain Chain with Bird-Shaped Cups
When choosing a themed or figural rain chain like this one with birds, the key to keeping it chic and not kitschy is subtraction. Because the chain itself is so decorative and detailed, everything around it should be simple. Don’t pair it with a wildly ornate planter or a bed of multi-colored flowers. Instead, let the chain be the star. The best pairing is a simple, dark-colored basin and a backdrop of uniform green foliage, as seen here. This allows the unique shape of the bird cups to stand out and be appreciated as a sculptural element.
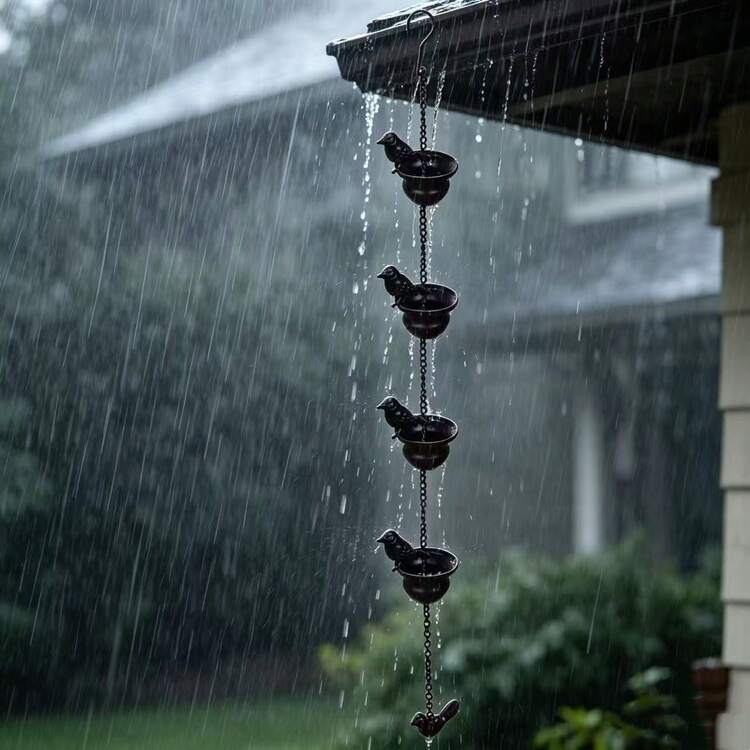
“This style of rain chain is wonderfully adaptable to different scales.”
For a small porch or shed, a single 8.5-foot chain is perfect. For a taller, two-story house, you have two options. You can connect two chains for a dramatic, full-length drop. Or, for a more subtle approach, use one chain on the upper story that drains onto a lower roof, and a second, separate chain that drains the lower roof to the ground. This breaks up the vertical line and creates two distinct ‘water events,’ which can be more interesting than one long drop.
26. Accent a Craftsman Home with Copper Rain Chains and a Stone Basin
Achieving this established, high-end look requires some upfront planning. Before you install multiple rain chains, consider this checklist:
- Gutter Health: Are your gutters clean, properly sloped, and securely attached? Rain chains concentrate water flow, which can expose existing gutter problems.
- Ground Preparation: Do you have a plan for the water at the base? This look uses a dedicated basin and river stones, but a French drain or a dry creek bed are also good options. Simply letting water pool on the grass will create a muddy mess.
- Style Cohesion: Does the warmth of copper and the rustic look of a rain chain fit the architectural style of your home? It’s a perfect match for Craftsman, Rustic, and Japanese-inspired homes, but might look out of place on a Colonial or modern minimalist facade.

“We’re seeing a huge trend toward ‘Japandi’ design—a hybrid of Japanese minimalism and Scandinavian functionalism.”
This downspout solution is a perfect example of that ethos in the garden. Rain chains, or ‘kusari-doi,’ have been used in Japan for centuries, valued for their beauty and the serene sound they make. Paired with the clean lines of the Craftsman architecture and the simple, natural materials like stone and wood, the result is a space that feels calm, intentional, and deeply connected to nature. It’s about finding tranquility in a functional element.
27. Place a Coppertone Rain Chain in a Lush Garden Setting
The magic of this scene lies in its romantic, almost painterly quality. It works because the man-made element—the rain chain—is completely enveloped and softened by nature. The lush ferns and blooming flowers crowd around the base, blurring the line between the hardware and the garden. The stone retaining wall adds another layer of texture and a sense of timelessness. The gentle rain adds atmosphere, making the metallic surface of the chain gleam. It’s a perfect harmony of manufactured geometry and organic abundance, creating a look that feels both curated and effortlessly natural.
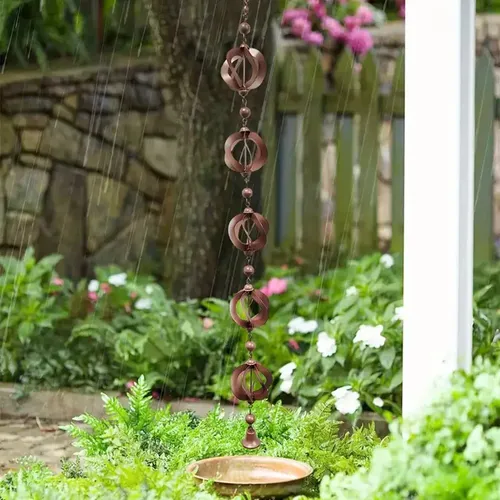
“This lush, cottage-garden look is beautiful, but it requires active gardening.”
The ferns and flowers will need regular watering (even with the rain chain), occasional fertilizing, and seasonal trimming to keep them from completely overrunning the basin and chain. The shallow metal basin will collect leaves and petals, requiring weekly clearing to prevent it from turning into a swampy mess. The stone retaining wall may also need to be cleared of weeds or moss periodically. This isn’t a ‘plant it and forget it’ landscape; it’s a gardener’s delight that requires consistent, loving attention to maintain its romantic charm.
28. Use a Standard White Downspout with a Black Plastic Splash Block
Here it is: the most common, utilitarian, and frankly, uninspired downspout solution in America. This is pure function over form. While there’s nothing technically wrong with a plastic splash block, it doesn’t do your home’s curb appeal any favors. It screams ‘builder-grade’ and ‘afterthought.’ The dark brown mulch is often kicked out by the force of the water, and the plastic can become brittle and crack over time. It does the basic job of moving water away from the foundation, but it offers zero aesthetic value. It’s the baseline from which all other ideas in this article are an improvement.
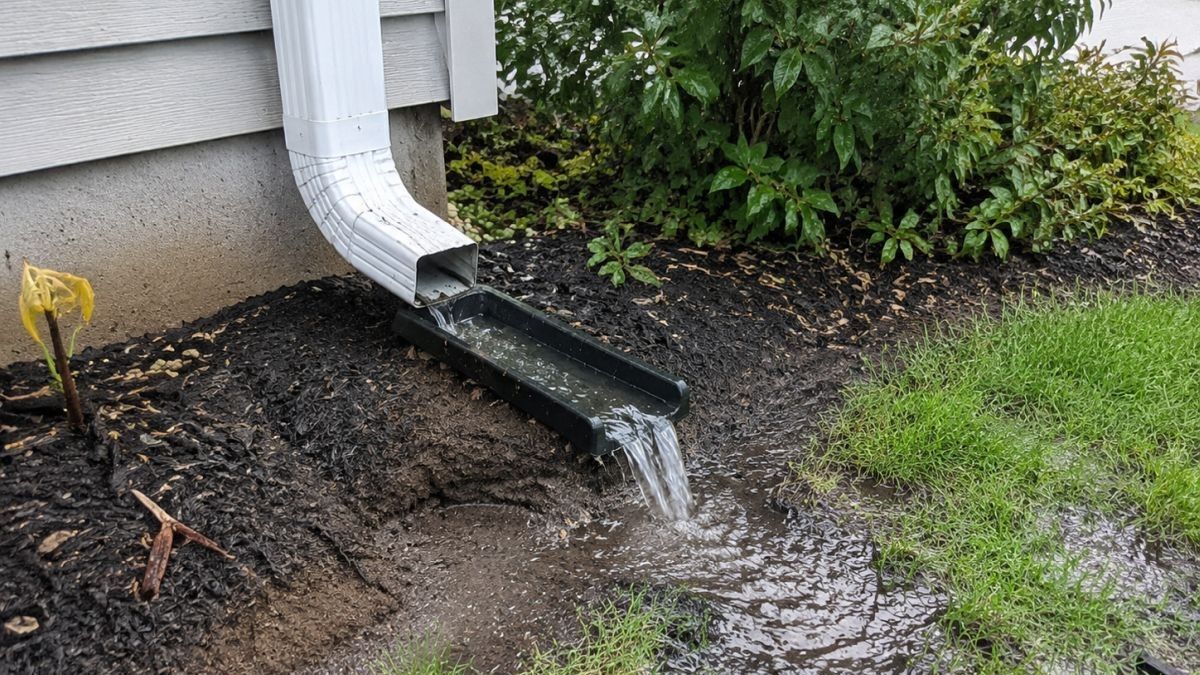
“Even with a basic setup, you can optimize it for better performance in under 15 minutes.”
First, ensure the ground beneath the splash block slopes away from your house. If it doesn’t, spend 10 minutes building up the soil so there’s a gentle grade.Position the splash block so the downspout empties into the very back of it.To prevent the splash block from moving during heavy rain, drive a 12-inch landscape stake or a long tent peg through the front end of the block into the soil.Finally, dig a shallow, 1-inch deep depression in the mulch where the water exits the block to help contain the flow and prevent mulch washout. This won’t make it prettier, but it will make it work better.
29. Create a Clean Drainage Trench with Pebbles and Black Mulch
The secret to a professional-looking pebble trench, or dry creek bed, is variation. Don’t just use one size of rock. This design works so well because it uses a mix of smooth, rounded river stones in various sizes and colors (browns and grays). This creates a much more natural, visually interesting texture than a uniform bed of pea gravel would. For a 4-inch deep trench, use larger stones (3-5 inches) as a base, then fill in with smaller pebbles (1-2 inches). This mix not only looks better but also helps to slow down water flow more effectively.
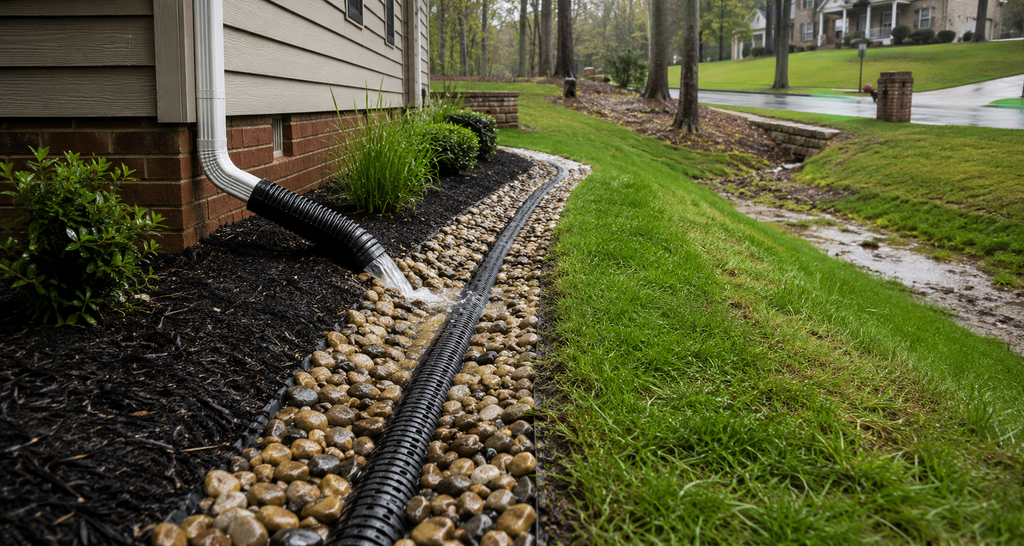
“This clean, effective design follows a simple landscape formula: 50% lawn + 30% mulch bed + 20% drainage feature.”
The green lawn provides the broad, soft canvas. The black mulch bed carves out a defined area for planting and creates a dark, contrasting backdrop. The curved pebble trench is the functional and decorative element that draws the eye. The plastic edging is the invisible ‘grammar’ that holds it all together. By keeping these proportions, the feature feels balanced and integrated, not like a random ditch dug in the yard.
Let Your Garden’s Style Flow
That sad little downspout doesn’t have to be an eyesore. As you’ve seen, it can be the starting point for a stunning water feature, a clever garden solution, or a whimsical piece of art. The key is to see it not as a problem to hide, but an opportunity to create something beautiful and functional. Now go turn that runoff into a main event! Don’t forget to save your favorite ideas to your Pinterest board for when you’re ready to make a splash.